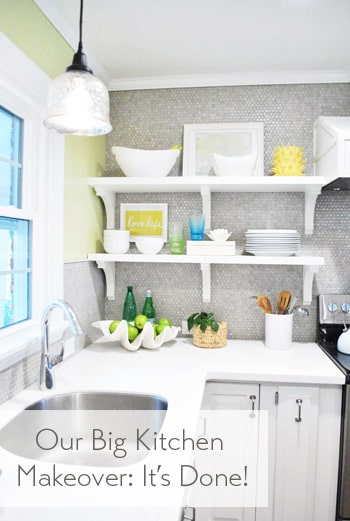
Ok, we’re calling it. The kitchen is officially done!
Of course that’s a lie and we still have a bunch of little things to complete, like:
- adding decorative molding to the back of the peninsula
- adding a message center/chalk board to the side of the pantry
- adding the last of the transitions/reducers to finish the floors (and that rectangle of fireplace tile)
- replacing the broken light in the fireplace area – most likely with a spotlight that washes down the fireplace wall
- adding some sort of window treatment (colorful roman shade?) over the sink
And of course we dream of refinishing the surrounding oak floors to match the dark mocha cork in the kitchen so our whole house is more seamless (more on that here) but that’s a down-the-line thing. Thankfully all of the big stuff and most of the small stuff in the kitchen is checked off the list and we’re so excited to see how this room has transformed in the last five months. Can you believe we’ve been slowly chipping away at this renovation since October?! Things have definitely come a long way…
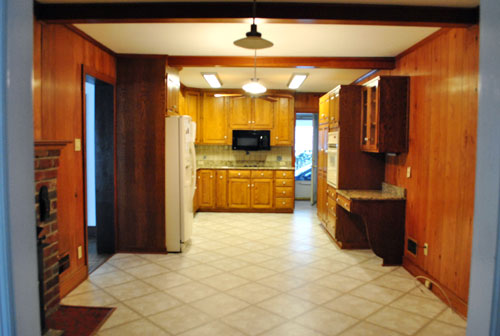
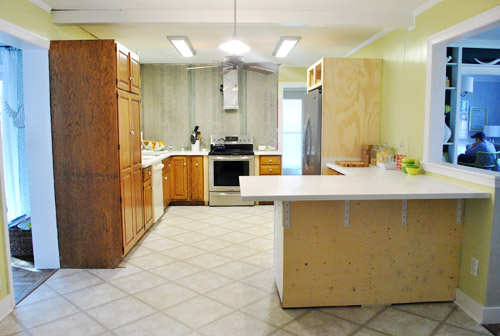


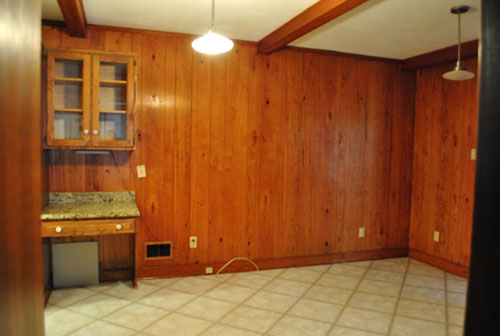
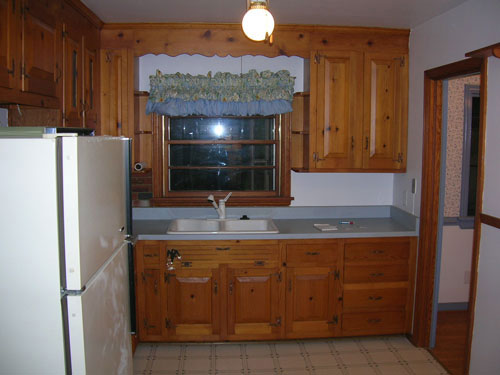
Just to save you from scrolling back, here’s the before again for comparison’s sake.
It really doesn’t even feel like the same room anymore. We can hardly remember the dark paneled kitchen that we lived with for almost a year while we planned our remodel and saved our pennies.
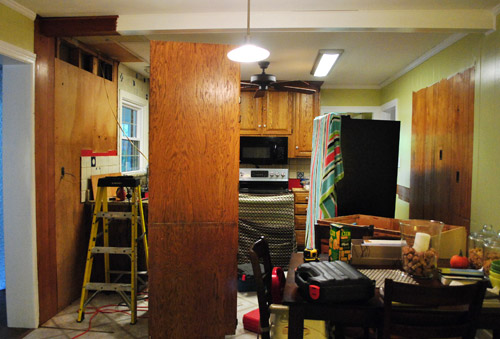
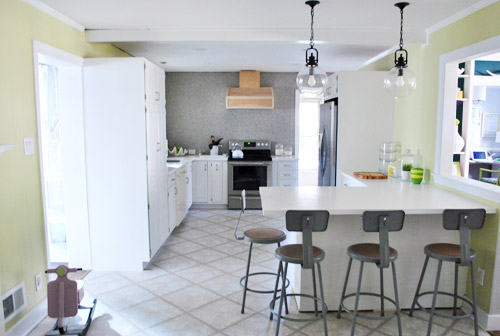
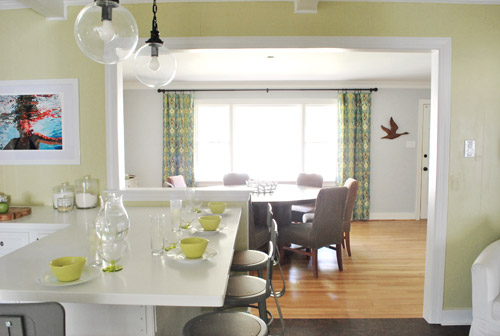
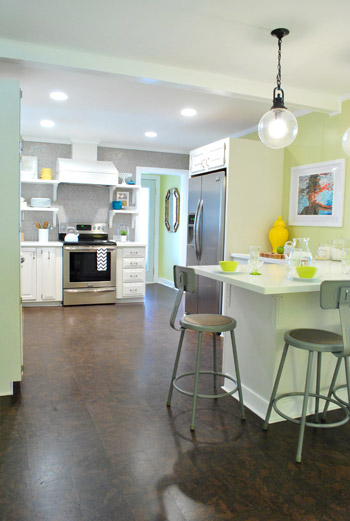
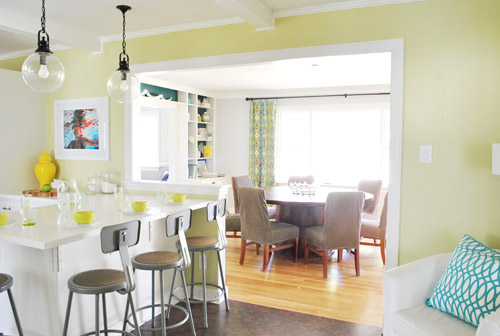
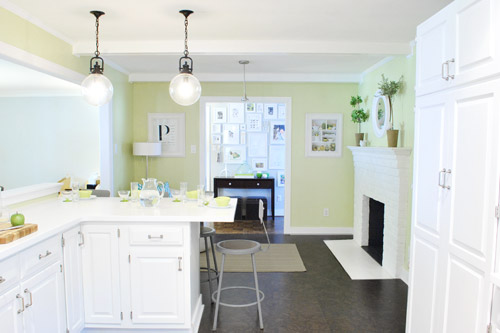
Here’s the makeover from the other side of the room:
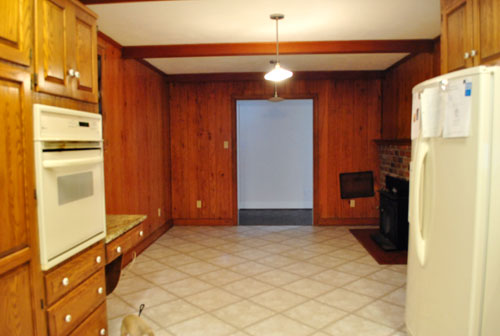
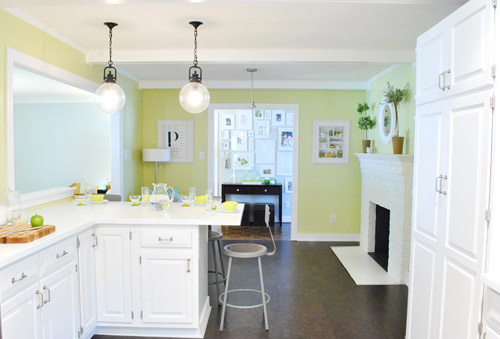
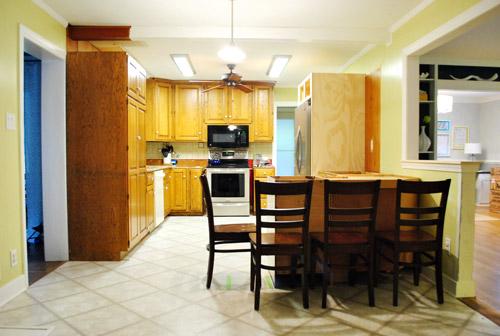
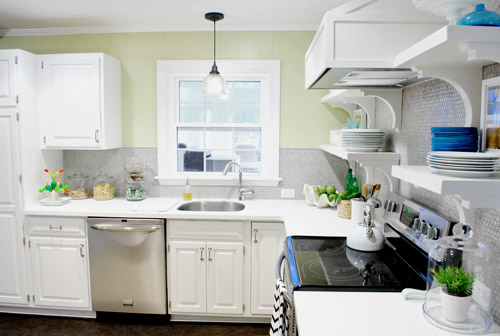
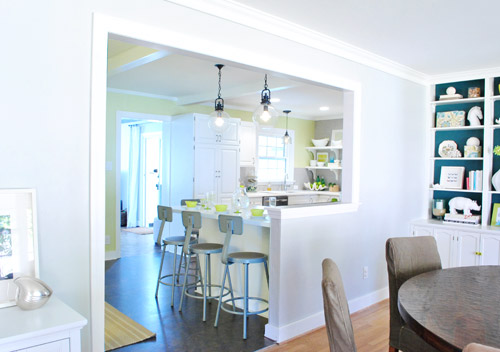
And here’s a before and after shot from a similar angle where we opened up the wall to create a nice big doorway between the kitchen and the dining room:
Oh and here’s another fun before and after comparison (from the doorway of the office that leads into the kitchen):
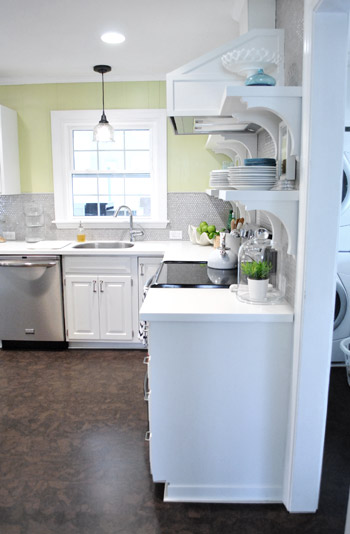
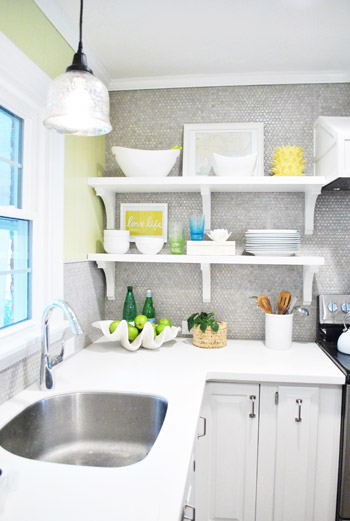
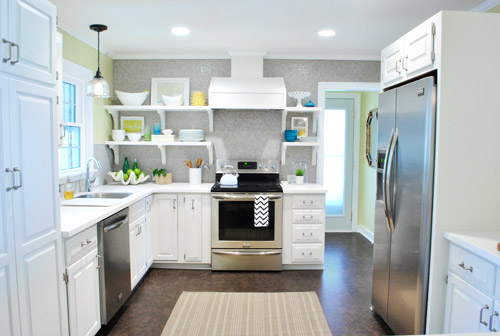
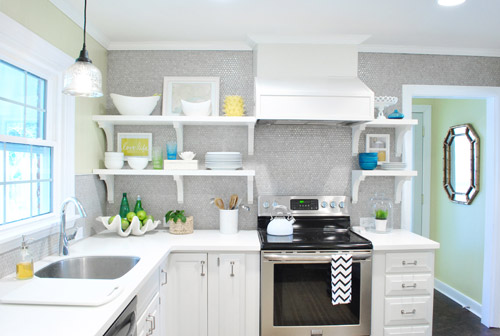
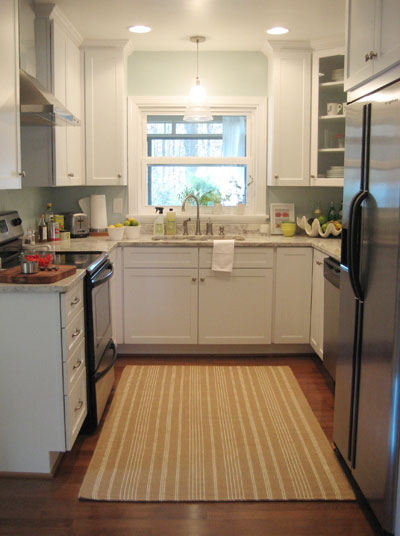
Here are a few more POVs of the room as it looks now:
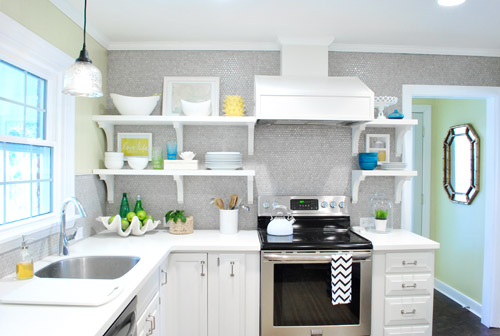

Lots of things are still in flux (items on the counters and shelves will definitely rotate in and out, which is fun for a kook like me). And these two 4 x 6′ rugs from our first house’s kitchen and third bedroom aren’t permanent…
… we just tossed them down for a few shots, but we envision getting something new to help define those areas (they’re old and stained and not as soft underfoot as a few other options, so we’ll keep you posted).
Oh and when it comes to the bar stools that we debated spray painting anything from a bright color to oil-rubbed bronze, now that the floor is so dark the silver color ties into the stainless appliances and looks nice and balanced in person. So we might live with them a while before we decide to defile them with spray paint or anything. Of course we’ll keep you posted.
And we actually have one more tweak that we’re seriously thinking about ever since a reader sent us a photoshopped picture of our hood with the top as wide as the bottom part (thanks Brooke!). She actually sent the pic on the 15th of February, but we decided to wait to finish up the kitchen (add the flooring, etc) before making any rash decisions…
The good news is that we’re still smitten with the idea, so all signs point to beefing up the neck of the range hood someday! Of course we’ll keep you posted on that too.
But back to the overview of our big kitchen makeover. We definitely got really hands-on with this transformation (especially when compared to our first kitchen reno, which we managed but mostly outsourced, my how things change). It just goes to show you that over time you can learn as you go and five years later you might be way more comfortable doing a lot more than you did the first time around. Here are some of the things we did in our current kitchen to save money:
- doing all of the drywalling and trim on our wall opening into the dining room
- relocating things like our fridge, pantry, and stove to make a better work triangle by ourselves
- refinishing our original cabinets and reusing our faucet and sink
- getting additional base cabinets from the Habitat For Humanity ReStore to create a peninsula
- reselling things on Craigslist (our old granite, dishwasher, over the range microwave, wall oven, dining table, and fireplace insert)
- going with Corian over pricier granite or marble
- buying on-sale appliances over a tax-free weekend with Energy Star discounts stacked on top of that
- building our own cabinet around the fridge
- scoring our $350 range hood for just $60 on craigslist
- doing all of our own tile installation with on-sale penny tile
- building our own range hood cover and shelves
- buying inexpensive metal lab stools from a school supply website
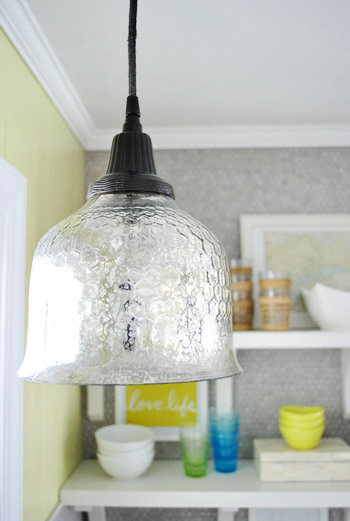
- getting pendant lamps for over the peninsula on the cheap from a local outlet
- spray painting an old $29 Pottery Barn outlet pendant to match the others for over the sink
- getting clearanced-out cork for the floors that we laid ourselves
And here’s an actual budget breakdown:
- New cork floor + underlayment from Lumber Liquidators (including the cork in the laundry room too): $848
- All new stainless appliances (originally priced at $3,776): $2,129 (we originally spent $2,384, but later switched the microwave)
- Opening the doorway into the dining room, which was done by a local contractor and then finished by us: $790 (which includes $90 of materials that we bought to drywall and trim it out)
- Additional base cabinets from the Habitat For Humanity ReStore to create peninsula: $88 (they would have been $500+ new)
- New pendants over island and sink: $149 ($60 for each globe pendant and $29 for the one over the sink)
- The cabinet we built around the fridge so it looks built-in: $90
- All electrical work (done by local pros over three visits): $711
- Wood filler, primer, and paint for refinishing the cabinets: $69
- JennAir range hood scored on craigslist (worth $350): $60
- Wood and brackets to hang/frame out hood: $115
- Wood & brackets & all hanging materials to make shelves: $141
- Corian counters in Glacier White from Home Depot ($33 a square foot): $1,700
- All new cabinet hardware and hinges: $173
- Backsplash (penny tile from The Tile Shop): $280
- Four industrial lab stools (from a school supply store): $168 (they were just $33 each plus shipping)
- Miscellaneous (screws, nails, glue, little cords/connectors for appliances, flooring & tiling supplies like grout and sealer, shoe molding, etc): $194
- Items we sold on craigslist to get money back to put into our reno: old black microwave: +$90, old fireplace insert: +$60, old dining table and chairs: +$120, old bisque dishwasher: +$90, old granite: +$350, old bisque wall oven: +$40 (total back: +$750)
- TOTAL SPENT: $6,955
Not bad since a large kitchen renovation of this scale (our room is 24′ x 12′), if outsourced would probably be around 30K (for a giant new doorway that leads to the dining room, an accent wall of penny tile to the ceiling, all new cork floors, all new appliances, refacing oak cabinets and adding a peninsula to match the original cabinets, all new Corian counters including a giant 3 x 5′ slab for the peninsula, an entirely new lighting plan, a built-in hood with custom built shelves, a relocated pantry, stove, and built-in fridge, etc). We originally budgeted 10K for the job, so we’re really happy to come in under!
By contrast, our first kitchen renovation (from back when we both made bank working in advertising, haha) involved pricey granite, a lot more professional help, and all new cabinets.
It actually came to $20,500 (including the purchase of a fridge and stove that weren’t included in this breakdown since we bought them a year prior). And that room was only 13′ x 10′!
So although this second kitchen reno took us tons of time (we started this project back in October, and have probably put 5-10 hours a week into it since then – for a total of around 155 hours) it was definitely something that we loved doing – mostly on nights and during weekend Clara-naps. We almost never worked on it during the day on weekdays (when the blog is active and the bean’s awake one of us is a stay at home parent and one of us is on blog duty) so that might help those of you with a day job who wonder if you can pull off a major kitchen remodel like this on nights and weekends.
You can! It might just span across five months or so, but as long as you take things one small project at a time (it’s waaaay less intimidating than thinking of it as one big project when you break things down into bite-sized chunks) you’ll most likely live to tell the tale. And all the love and sweat that you put into your “new” kitchen will be totally worth it in the end.
Who’s excited to call this turkey done? Is anyone else out there about to start a big kitchen reno? What have you guys done when it comes to being hands on and saving some money by doing things yourself? We’d love for everyone to share tips about how they renovated their kitchen on a budget so this post can become an awesome resource for anyone out there who is thinking about getting started and would love to peruse a bunch of what-worked-for-me tips! And now we just owe Clara and Burger a big thank you: for sleeping through all the hammering and drilling and just generally being such great little DIY enthusiasts (Clara still loves to measure the cabinets with her tape measure since she remembers us doing it months ago).
A five month long kitchen reno can definitely “interrupt” daily life, but our little ones are such troopers, so we’re sending them both a big virtual kiss for their patience and excitement throughout the loooong and not-always-easy process! Our tip is to try to maintain as many working appliances as possible (which is easier when you’re working with your existing cabinets, but nearly impossible when it’s a full gut job). We only had a few days without most of them, if that, which was no sweat! In fact it totally paled in comparison to the 113 days that we were without our first house’s kitchen during that reno. Thank goodness for extension cords to keep the fridge running and the fact that moving our stove across the room didn’t mean losing the function of it!
Psst- To check out virtually every post about our kitchen renovation, click here, here, here, here, and here (hooray for monthly breakdown posts that have 20+ links in one place!).

Holly says
That’s amazing! Very inspiring that you did it all on that budget. Looks great!
Brittany says
Love it! It looks totally rad! Now my only suggestion! Always amazed by how you have kept the price down! The bar stools get painted turquoise! That would be soo cool! And flow into the dining room since the back wall is painted the same color! how perfect would that be!!!
Lulu says
Good job Kiddos! I can say that cause I’m like a whole ten years older than you :P Fabulous budget and YES – absolutely expand the top of the hood (just my opinion). You guys are inspiring. I wish I had a partner with that much energy and ambition for such an intense renovation. After so much excitement — what’s next?
YoungHouseLove says
We have lots on the docket- some bathroom upgrades, landscaping stuff, and we want to build a big deck this spring for some outdoor dining!
xo,
s
K says
I think the kitchen looks much more open with the hood the way you have it right now!!
Jen says
the giant hanging bulbs over the island/peninsula are awesome. your kitchen transformation is awesome too!! glad to see you guys do another awesome transformation! you guys are crazy in an awesome way. i diy, but not on that kind of scale haha.
jen
http://www.fauxtreschic.blogspot.com
Jen says
I really like the beefed-up range hood. To my eye, it appears to better balance out the stove. Whatever you end up doing, I really appreciate how open you guys are to tweaking. One of the things that’s always held me back from DIYing is the feeling that if I don’t get things right the first time it means I really wasn’t capable or am bad at DIYing. I have to admit that it was a relief to me to see that sometimes you mis-hang your gallery wall frames and need to correct, or have to run to the store multiple times during a project for forgotten/unanticipated supplies. Not that I’m rooting for mishaps or anything! But it is reassuring to know that mishaps or adjustments can be a totally normal part of getting a DIY project right. In other (shorter) words, I appreciate that you keep it real!
Oh, and I love the stools just as they are. I think they coordinate well with the other elements/textures in the room without being too matchy-matchy.
partyofsix says
Here ya go! There are two views on this board: http://pinterest.com/pin/224898575111871806/, again my apologies for my lack of photoshop skills. Truly have enjoyed seeing all the progress you’ve made on your kitchen–you’ve done such an impressive job! I really like your industrial stools, so I was wondering what they’d look like in blue for my kitchen, so I thought I’d play around with the blue for yours since it was easier to visualize. Then while I was at it, I thought I’d tackle the white bit in front of the fireplace. See what you think. Having done this, I like them in the bluegreen, but left as is, they still look great. Looking forward to your next project! Best, K.
YoungHouseLove says
Looks awesome! That’s so much fun!
xo,
s
Colene says
Congrats, you guys did such an amazing job! I’ve loved following along week after week and seeing it slowly change. Is it strange to say that I’m a bit sad it’s done? hehe. On to the next!
Emma says
Looks beautiful. Have you thought about staining the ‘wooden’ portion of the stools a dark brown to match the cork flooring?
YoungHouseLove says
Yes, that has been one of our “that would be really easy” things we’ve chatted about! We’ll definitely keep you posted!
xo,
s
Sam C says
Heeey! that photo of the opening looking into the dining room, the one right before “Lots of things are still in flux…”, right before you mention the rugs… is that a more true to life version of your wall color? It is very cute! and much warmer than I thought, it does not look as green as it normally does from other POVs. It is sunny and happy and bright!
YoungHouseLove says
Yes, that’s pretty close. It’s a really soft warm color in real life- just hard to photograph (someone told us all forms of grellow seem to be hardest to capture – even the brighter grellow in our site design apparently looks different on every monitor- so weird!).
xo,
s
Sona Jacob says
Looks great! Have been following your adventures for a long time now and this has been one of the best before-afters!! And the budget breakdown was awesome!
You’ve got some great blue and green accents. Maybe you could make the seats of those stools blue or green or blue-y green! Congratulations again!
Jen F says
Amazing! We did a mini kitchen remodel a couple of years ago….new countertops, painted cabinets, new backsplash, new color on the walls and new appliances. I think it came in around $4K…and made a HUGE difference. Thankfully we had nice tile floors and good quality cabinets to start with!
Rob says
It’s amazing how much bigger the space looks now. White is definitely right ;-)
Fiona says
Looks Awesome! Fantastic job with the budget!
Jen T. says
Nice job! I absolutely LOVE the pendant over the sink with the pitted glass. That would match my home beautifully. You mention you got it at a local outlet. Do you remember the name?
Thanks!
YoungHouseLove says
It’s called the Decorating Outlet and it’s an outlet of Shades of Light.
-John
Dugi says
Things I don’t like: cupboard handles look dated and cheap (sorry), cork floor also look dated (reminds me of my grandparents house in the 80s), rangehood cover box thing that you built doesn’t look great with the cute shelves
Things I love: the breakfast bar and new door way (brilliant!!!), the whole colour palette (just makes the whole kitchen look bigger and brighter), wall tiles (very cute!)
well done! the budget is great and all that hard work is just inspirational!
Crystal says
To be honest, I have not been loving the makeover because of the wall colour; it always looked so green to me on my laptop monitor! Today I just happened to be reading on my phone today and the walls come up a soft buttery colour, and I sighed with relief – its not you, it’s been me all along. It DOES look fantastic – great job guys!
Diana @ Boy + Girl says
Wow! What an amazing transformation. I’ve enjoyed following along! I can’t believe how little you spent and what an expensive and professional look you achieved! Hope you’re enjoying all of your hard work!
Erin @ How to Nest for Less says
WOW. That is one impressive makeover!! I can’t believe you did it all for less than $7000. Just blows my mind :) GREAT JOB. Dang, I think I need to start on my kitchen now!!
Hollie says
I am totally crushing on your kitchen! It looks so fresh and inviting. Kinda makes you want to exhale, pour yourself a frosty beverage and perch on one of those stools (which I adore in their current state–a nice, industrial contrast with the clean, modern features of the room). Also, that large yellow jar on your counter. Homegoods? I have the same one. I’m in the midst of a serious love affair with yellow, and I really like how you have little pops of it throughout your house.
YoungHouseLove says
Yes! HomeGoods! Too funny that you have the same one!
xo,
s
Addie Klein says
Wow, wow, wow. So inspiring, you two! I don’t know if I’m more impressed by the final product, the stick-to-it-ness or by the pricetag. Way to go!
Marian says
Careful guys. That kitchen looks so great, people are gonna start making you big ticket offers to do theirs. You guys may end up being one of those HGTV shows you like watching. I for one, wouldn’t be surprised if you’ve already gotten that offer, and are just hoarding it with all the other little surprises in your playroom. Great work. It really does look fabulous.
YoungHouseLove says
Haha, we actually have been approached a few times but we’re 100% sure we’re not TV people. Haha. We don’t mind being on Nate Berkus as a guest, but a show of our own makes us want to break out in hives. We’re so much happier hiding behind our laptops and sticking to our first love: blogging!
xo,
s
Laura says
Looks like a 30K kitchen. I’ve really enjoyed watching the progress. Well done.
YoungHouseLove says
Aw thanks so much Laura!
xo,
s
Karen F says
Hi, sorry to comment again, but I just saw this post on Little Green Notebook about a DIY chevron rug and thought of your kitchen, since someone else commented about a chevron rug:
http://littlegreennotebook.blogspot.com/2010/06/diy-chevron-rug.html
YoungHouseLove says
Such a cool project!
xo,
s
K says
Okay, I am sure you have mentioned this, but what does the window over your sink look out over? I can’t figure it out.
Looks great – love that you reduced the number of shelf brackets. Looks much lighter!
YoungHouseLove says
That’s actually the sunroom! I just posted a house tour video that clears the layout up a lot since you can see me walking from room to room. Hope it helps!
xo,
s
Kim BirUm says
Love the new bright fresh space. You guys are amazing. We just wanted to replace our 24″ oven with a new one that worked and spent more than your budget on the new cabinet and 3 appliances. Kitchens are so expensive.
Amy says
It’s amazing how light and airy you’ve made everything! I love the views into the hallway and dining room.
NJ Kitchen Contractor says
Job well done! Bravo! I just found your web site and I have to say that this kitchen renovation is spectacular! I love the pendant lights. This site is filled with sooooo much information. Congrats!
Rebecca says
love, love, LOVE it all. Every last detail is perfect and that budget is awesome!
Kim says
This is absolutely stunning!! I enjoy reading about all your projects, and have borrowed your penny-tile concept for my next project – our new kitchen when we move. :D I’ll probably borrow more than that idea. Hahaha
thanks for sharing your home w/us!!
-Kim
Rebecca says
Kitchen looks beautiful! I just found a super cool resource for those of us trying to fix up our kitchens on a little bit of a budget http://www.mymove.com/tips-advice/home-improvement/remodeling/10-tips-for-affordable-kitchen-makeovers
Although I am just a little bit tempted to just copy yours
YoungHouseLove says
Thanks for the link! So helpful!
xo,
s
Ashley says
Do you have a link for your cork flooring with Lumber Liquidators? Thanks!! Love the kitchen!!
YoungHouseLove says
We don’t believe they carry it anymore, but it’s the Porto color of their Lisbon Cork if that helps!
xo,
s
Jill says
Praise the Lawd!!!! Congratulations on finishing the kitchen, yall! I am soooo glad you’ve decided to beef up da hood, yo. That will complete it for me. :) Now… let’s talk about those dining room chairs. They just don’t seem to be special enough to be situated next to that stellar kitchen!!!! hehehehe Don’t you want to kick me now?
YoungHouseLove says
Haha, well we have to agree. They work for now though, and since the cheapest we’ve seen eight chairs is $800, we have to wait (thrift stores and yard sales just don’t have sets of eight for us to get on the cheap)!
xo,
s
Jill says
I agree… they can wait! :) I’ll be on the lookout for some awesomer ones but you might have to drive to Raleigh to come get them and meet me for lunch…. and help me redo my bedroom.. ha ha jk im no stalker!
YoungHouseLove says
Haha, I’m on the way!
xo,
s
Jenia says
You two just blow my mind.
Ever since I introduced my husband to your blog, we’ve been eying this house for sale ($19,000!!) and wondering what we’d have to do to restore it to some level of glory :) In our 4 years of marriage, this is the first time we seriously considered buying a house, all thanks to you.
YoungHouseLove says
Wow- that’s an amazing deal! I would love to hear what you do to it (and see pics) if you go for it! Good luck!
xo,
s
Katie @ Katie Without Restrictions says
WOW!!! This is absolutely amazing.
Amanda says
Everything turned out fantastic!! You have inspired me to start a “painting our kitchen cabinets adventure” with a little one running around as well :)
P.s. I love the wider hood cover with the crown molding around it… Great idea!
YoungHouseLove says
Good luck Amanda!
xo,
s
Nicholin says
Good on you! Your re-do looks fabulous.
I will someday tackle my outdated kitchen, and your blog gives me hope and inspiration.
Stephanie says
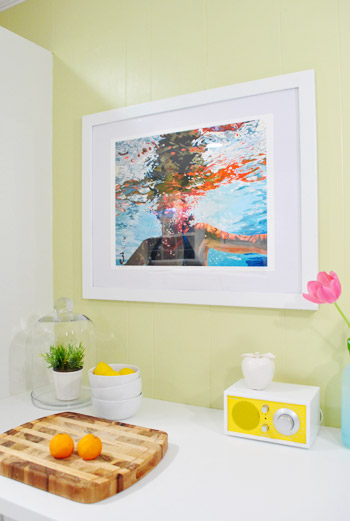
I love it all – except I’m not so sure about the picture next the the refrigerator that looks as if that woman got a bloody nose jumping off the diving board into the pool. Sorry!! It’s pretty, but ever since you first introduced it, that’s what I see. The colors are great though.
Rachel S says
I was eyeing your gorgeous cabinets and thinking how I wanted to paint ours… until I realized it took you 15 days to paint yours. Yeah, not happening! Oh well!
YoungHouseLove says
Yeah, it takes some time! But if you don’t happen to have a toddler it can be substantially faster (we could only work in chunks of 2-3 hours most times, instead of devoting a while night or weekend to it).
xo,
s
ashley says
wow– this is amazing. so inspiring!!!
Lindsey says
Beef it! Beef it!
I love everything about your kitchen with the tiny exception of the vent hood. I have thought it looked a bit wimpy with the rest of the bold statements in there, so I vote you go with the beefing it up!
Congrats on a huge job well done. Of course I was so exhausted by your efforts that I have permanently put off my own kitchen remodel, but that’s okay! :)
Amanda says
I’ve been following along through the whole kitchen process and just have to say…Way to go! It looks awesome! And the {low} cost was inspiring!
Bobbinoggin says
Do you guys use a microwave? If so, where is it hidden?
YoungHouseLove says
It’s in the cabinet to the left of the sink! More on that here: https://www.younghouselove.com/2011/12/goodbye-microwave-hello-microwave-cabinet/
xo,
s
Melissa says
I am truly in awe. I have faith in you guys, but even I did not think this was not a “pro” kitchen if I had just seen the photos and didn’t know of your blog. Absolutely gorgeous! Well done! I’m so inspired to try to slowly tackle my monstrosity of a kitchen now. My favorite part is the new view of the opening! That peninsula ended up being greater than I imagined.
YoungHouseLove says
Thanks so much Melissa!
xo,
s
Bobbinoggin says
Oh! I found the post. Sorry!
YoungHouseLove says
No worries!
xo,
s
Chantal says
Love your Blog!! So many wonderful ideas! We are currently in the midst of reno-ing our kitchen. Actually very simialar to yours. Orignal cabinets oak, painting them white. We also have the same hinges as you and just wondering if when you put the new ones on if you have any recommendations/tips on how to do it? Our old hinges have 2 screws to screw into the door and now our new hinges have 3 screws. So we will have to drill new holes which is simple but making sure they’ll all line up is what I’m concerned about. Also, love your penny tile – it is currently back ordered:( I can’t even get a sample… I want to confirm the color since it states moss but I want grey. Love your style and any feedback would be helpful! Thanks.
YoungHouseLove says
That’s crazy about the penny tile! Who knew? As for the hinges, I would just take it slow and measure/check things out a bunch of times before drilling. If you mark your drill spots with a pen and measure them all to make sure they line up you should be good to go! Good luck!
xo,
s
Christina @ The Frugal Homemaker says
I read every post you guys write (even the sponsor ones:) and can’t wait to meet you both at Haven! :)
I have waited anxiously sometimes to see the afters on some of your kitchen projects – the cabinets, the tile, the shelves :)
Everything is gorgeous!! It is so bright and cheerful and just beautiful! And to think you did almost all of it yourself too. :) Inspiring! I am hoping to do a “minor kitchen makeover” this year and you make me want to run to Home Depot and order new countertops :) Hubby is actually talking about us building 2 window paneled doors ourself so we shall see :)
Love it! Great job!
As I was reading, I was thinking, I wonder if the previous owners are reading/seeing this and what they think or could they envision their kitchen looking like that :)
YoungHouseLove says
Aw thanks so much Christina! We do hear from the old owners from time to time and they’re so sweet! Apparently they read along and love seeing what we’re up to. In their words, they like seeing us do all the work. Haha.
xo,
s
Katie gibson says
Hi! In was the girl that ran up to you in Maui with my daughter Violet! Glad to know you enjoyed your vacation. Your kitchen is amazing. The before and after pictures are incredible, crazy to even think it’s the same kitchen! Quite impressed and it’s very inspiring!!!
YoungHouseLove says
Aw thanks, Katie! It was so much fun to run into you with sweet Violet!
xo,
s
Sarah R. says
Can I come live in your house? I hate my kitchen now.
YoungHouseLove says
Aw, I’m sure it’ll be awesome someday! In the meantime, come on over!
xo,
s
Monica Gurry says
What school supply store did you get the kitchen stools from? I love them and couldn’t believe the price you got them for, I am in need of a few stools in our kitchen, although shipping to Alaska might be a dealbreaker. I love your blog and cant wait to see you convert your carport into a garage and add a deck since those are two projects we will be embarking on soon too. I just hope you guys do it first so I can steal any good ideas/advice you may have!
YoungHouseLove says
It was a place called schooloutfitters.com. Here’s that post: https://www.younghouselove.com/2011/12/stool-boom/ Hope it helps!
xo,
s