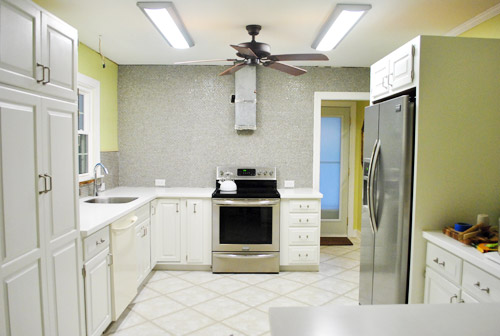
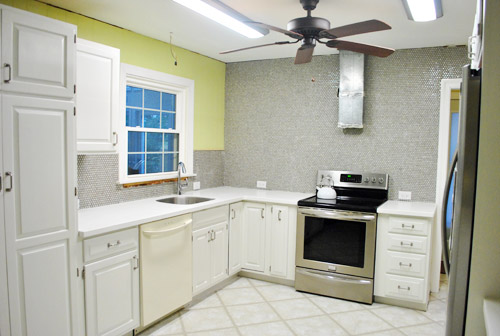
We did it. We tiled the entire back wall of our kitchen in a counter-to-ceiling backsplash move that we like to call Project Crazy, and we lived to tell the tale.
We still have to grout, add a big ol’ industrial range hood and chunky open shelves (those will just be screwed right through the tile with a special drill bit) but when we squint we can almost picture it…
As for the top seam where the tile meets the ceiling, there’s crown molding that runs around the entire room (although we removed some of it on the window wall) so we’ll be adding that back around the whole room so the top of the tile will look nice and finished once we get to that step.

The black box next to the range hood is an outlet for our range hood, so that’ll be hidden once we install ours. We tiled a few inches behind the range hood duct, but didn’t remove it since once we install our industrial hood that area won’t be visible.
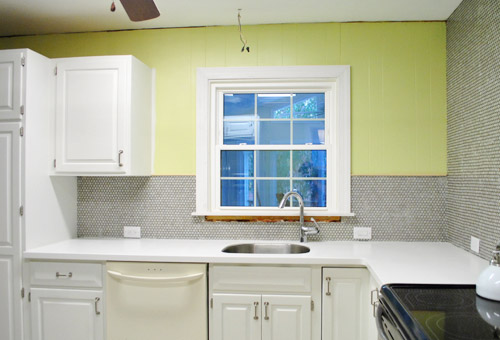
Once we add our floating shelves (which will be 12″ deep) along the oven wall, the space on either side of the window will be 14″ – so it’ll finally look balanced again! I mention this in every kitchen post because I. Can’t. Wait. For. That. Moment.
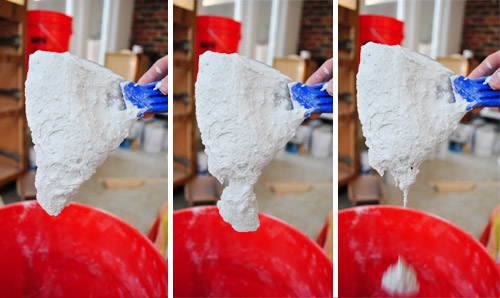
This entire backsplash process took us around 14 hours total. We tackled it mostly in 2-3 hour chunks in the evening after Clara went to bed or on weekends while she napped (so it’s a good indication of what anyone with a day job might be able to follow). That includes a few hours of figuring out how to cut the tile, which we summarized in this video for you (read a lot more on that process here).
We also shared an in-progress post about prepping the room for tiling, mixing and spreading thinset, and placing the penny tiles here. So that might come in handy if you’re at that stage of the project and could use some reassuring.
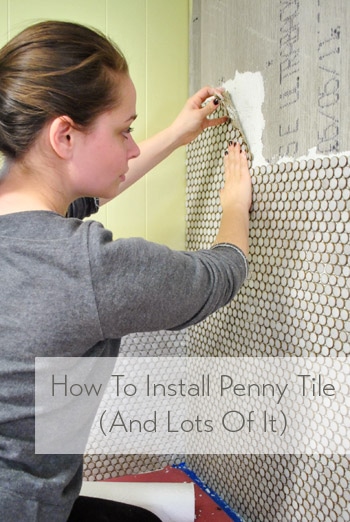
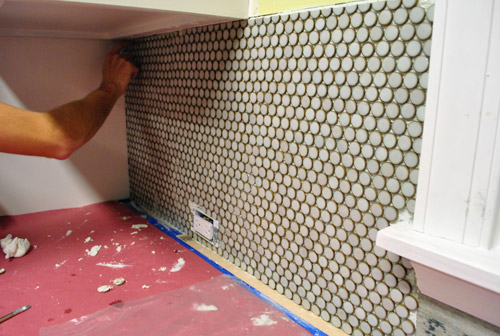
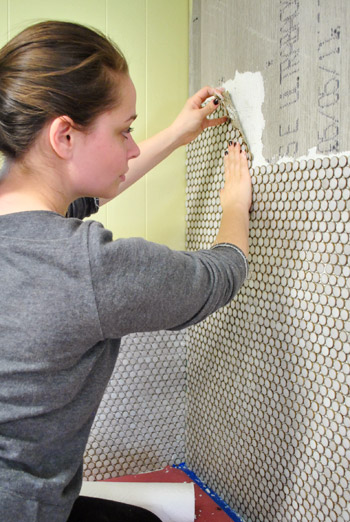
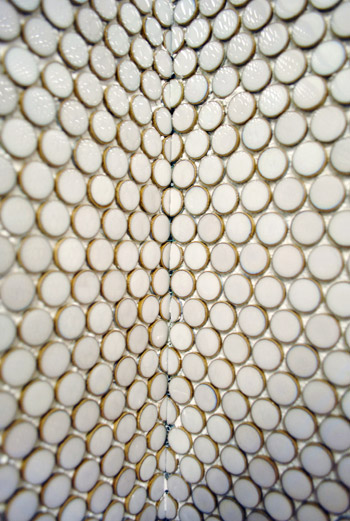
It’s really important to place penny tiles in a way that makes the line where each sheet meets less obvious, so we found that a staggered pattern was the best method for us to achieve a seamless result:

That way your eye doesn’t catch one seam and follow it all the way across the room (more on that here). We also played around with each sheet of tile after squishing them into the thinset, scooching them a bit to the left or the right or higher (since they were on a sheet of mesh it was pretty easy to manipulate them) until they looked evenly placed so the seams weren’t obvious.
Just wanted to recap that stuff for a second so anyone looking for an exhaustive post about installing penny tile would have those pics and links all in one place. Anyway, when we last left you, we were just beginning the back wall, which we knew would be tedious (but hoped wouldn’t make us rue the day that we picked penny tile). The good news: it didn’t. We made it all the way across that wall, baby! Without wanting to poke our eyes out with penny tile once (well, maybe once…).
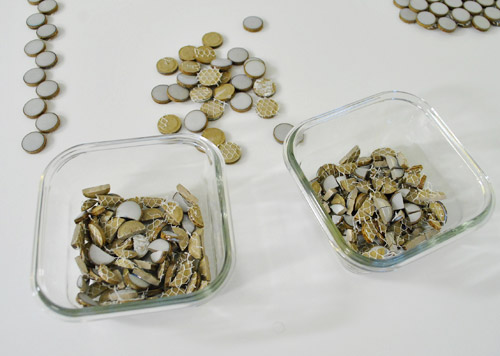
Thankfully, there weren’t many cuts since we could slap a ton of full sheets up in that giant expanse of wall, so although we took our time placing them to keep seams from showing up, we did move faster than having to cut a bunch of tiles. It probably took us three days of 2-3 hour sessions each time. We found it helpful to use little glass dishes to divide full tiles, half tiles, more than half tiles, and less than half tiles. That way if we needed to quickly back-fill an area, like the edge of the wall, with half-tiles or slivers or almost full tiles we already had a little dish of them separated out that we could dig into quickly.
Here’s a video about spreading the thinset and placing the tiles, complete with how to back-fill any tiles that you need to add and how we slid them around and adjusted them to look more seamless. Oh and in the video when I describe it as a brick-layers pattern, I create a horizontal one with my hands, but it’s really a vertical one (two tiles on top of each other and one staggered in the middle of that next to it). Oops. Hope that makes sense when you see it!
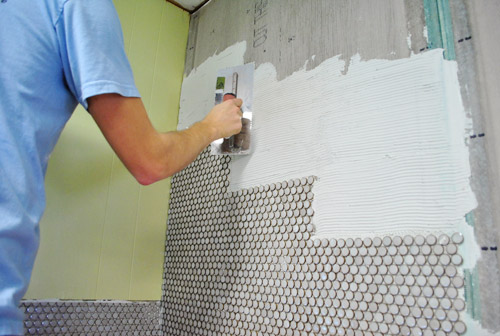
And here are some pics of us making our way across the wall. John applied the thinset with a putty knife (and sometimes a trowel). We mixed enough thinset to set about four to six tiles at a time (so it didn’t dry out before we could set the tile). You can see John applying the thinset in the video above.
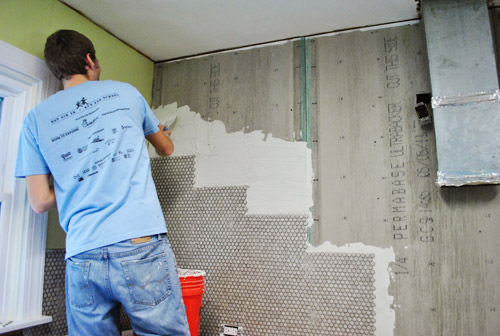
Then John scraped it with his trowel to make little ridges to help the thinset grab the tile and stick for good. Our trowel was a 3/16th notched trowel since penny tile is small, so we heard that smaller ridges were recommended (you can also see this in the video above).
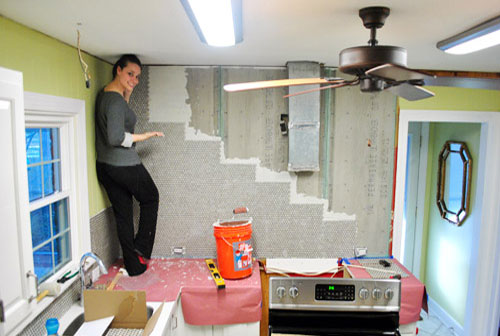
Here I am placing the top tile on the left side of the wall. John got a kick out of the fact that I could comfortably stand on the counter without having to crouch (oh the perks of Team 5’2″). You can see how we worked from the bottom left corner and went up and out to create a staggered staircase effect. This allowed us to build things slowly without having much of a problem with keeping things level since each tile interlocked down the staircase on two ends to keep it from skewing.
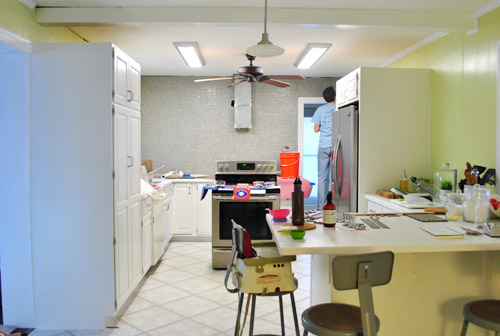
Day by day, we inched our way across…
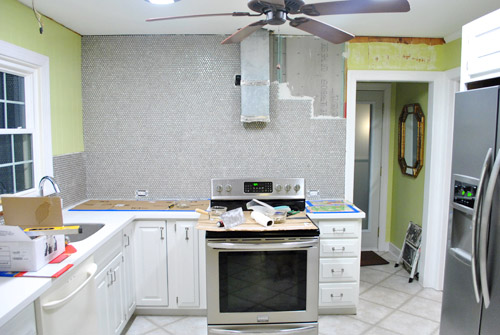
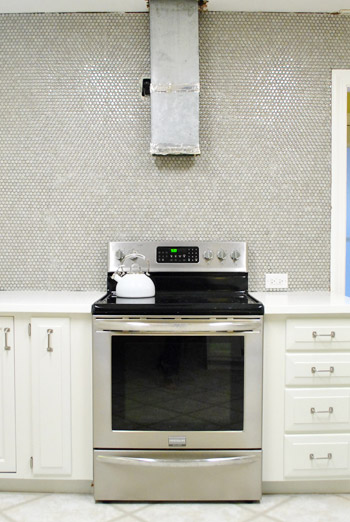
Here we are in the very last corner, finishing things up. You can see that we scooted the oven out while we were working (to gain more access to the wall and keep from getting thinset on it).
Since a few of you have asked for a shot of the corner to see how the tile meets, here ya go:
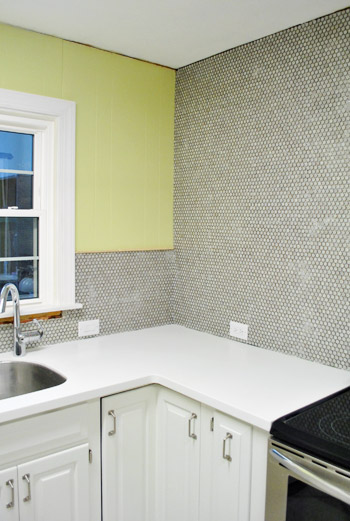
Let’s get a little closer…
Basically whatever would be placed next to the last tile on the wall where the wall ends just wraps around and gets placed on the new wall. It’s not 100% perfect but once it’s caulked/grouted we think it’ll look pretty darn good (we’ll snap another pic for you then).
Oh and some other folks asked how we’d be “capping” the 14″ of tile that will be exposed on each side of the window wall, so here’s a detail shot for ya:
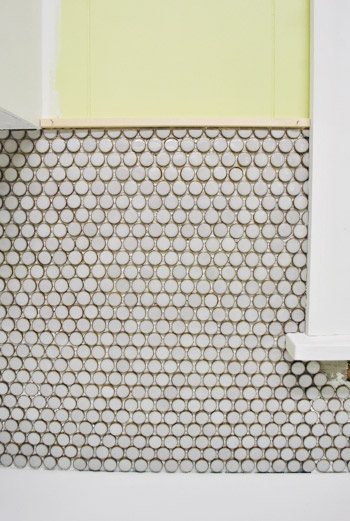
We actually got some thin glass tiles that we thought we’d like, but they just looked too brown and sort of competed with the penny tile, so we decided some thin thin thin pieces of craft wood will make great simple and clean little borders that don’t compete for attention. They’re not hammered in completely yet, since we’ll be pulling them out and painting them white like the rest of the trim in the room after grouting (just to avoid getting paint on the grout).
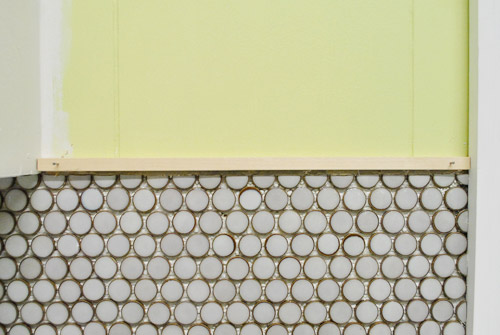
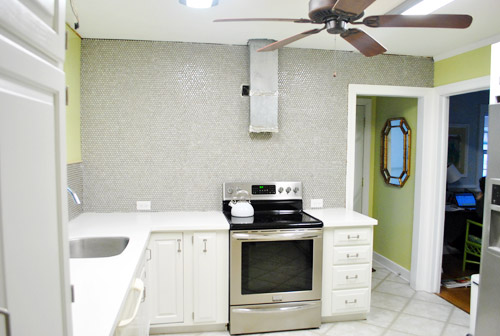
Grellow note: the picture above is probably the most true to life shot of our wall color (in some of the far shots it looks darker/greener/brighter than it is). In real life it’s a soft avocado color (although it can read quite differently on different computer monitors). Here’s a link to it on BM’s site if that helps, since the bad lighting in our kitchen hardly does it any favors. We think once we tackle the new lighting and add the open shelving and some pretty colorful accessories up there (and on the counter) it’ll all tie together really sweetly. You know we’ll share those pics as we go!
Obviously we still have to spread all that grout, but we’re giving our arms a day of rest before picking up the trowel again (well, I guess in this case it’ll be the grout float). As for the specifics, we picked a soft creamy-gray grout that’s a smidge lighter than the tile. You can see it in this sample shot snapped at the store back when we chose our tile (more on that here):
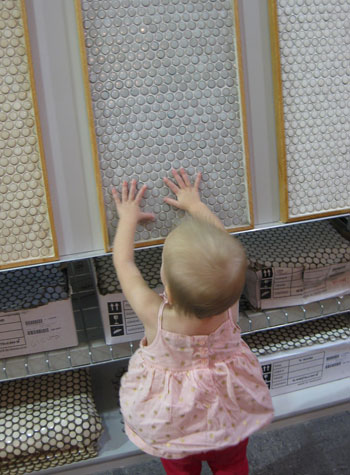
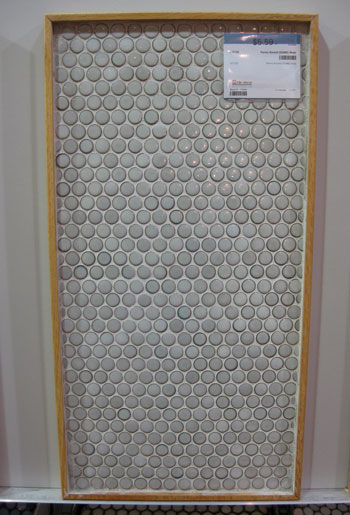
Oh and see how you can kind of see the seam in the picture above (there’s a horizontal line of grout in the middle of the photo that seems a bit thicker/bolder). That’s why scooching things around and stepping back to see how it all looks before moving onto the next tile is so important! We were sticklers about it, but we’re so glad we took the time to keep everything as evenly placed as possible.
Now we just need to grout, get new lighting (and kill that haven’t-used-it-in-13-months fan), add crown molding and some sort of decorative treatment and baseboard to the back of the peninsula, lay our cork floors, install our new dishwasher, and add shoe molding around the room. And probably some other stuff that our tile-drunk minds are forgetting. So we’ll be back with grouting progress in the next few days or so- probably on Wednesday. We’re hoping we can knock it out pretty quickly, but you never know until you’re knee deep in grout… we’ll keep you posted!
What did you guys do this weekend? Do you all have off today in honor of MLK?
Psst- Oh yes there is a Clara vs. Santa wrestling match going on over on Young House Life…

Kelly Gross says
You guys are awesome! This looks beautiful! I want to put penny tiles all over my house now.
Kate says
That turned out so beautiful! Can’t wait to see it with the rest of the kitchen finished :)
Ainhoa says
The tile looks great! Can’t wait to see the range hood you choose.
Jordan@the2seasons says
Wow that looks good all of the hard work is paying off. I want to thank you so much for your tutorial on painting kitchen cabinets. I have started with the project and your blog has been my resource during the whole process. From the steps, to the brand of paint. So thank you thank you! Have a great Monday!
YoungHouseLove says
So glad! Good luck with everything!
xo,
s
Wendy - Old Town Home says
Just my two cents, I absolutely LOVE the penny round tile. :-) Fabulous job! Can’t wait to see how it looks grouted. It looks like you did a fantastic job spacing out the tile sheets.
We spent the weekend tackling closet clutter to ring in the New Year, and in celebration of our 9 year anniversary in our home, we’re reminiscing about our first project – the budget makeover of our kitchen. http://www.oldtownhome.com/2012/1/16/Inexpensive-Kitchen-Makeover—-Transforming-Cabinets-with-Paint/index.aspx
Luckily we have today off, so we plan on installing new window treatments in our sun porch. Never a dull moment, or a “day off”! :-)
YoungHouseLove says
Aw love it! Happy 9 year anniversary in your home!
xo,
s
Laurel says
Huzzah!! Way to go you two! The hardest part of the reno is over! And it looks ahhh-mazing!! You never cease to leave me inspired. :)
Rachel says
It looks amazing!!
Ashleigh says
LOVED IT! I have been waiting all weekend for this post! Great job.
Jeannine says
Oh, Youngsters, it looks so great. Congratulations!
Ashley @ sunnysideshlee.com says
Lookin great guys!! Love it!
India says
Love it! What does Clara think? Does she like petting it like you guys? Haha.
India xx
YoungHouseLove says
She’s so unfazed by all of our hard work. We wake her up and show her things and she looks at them for a second and then runs off saying “my kitchen!” or “let’s color!”
xo,
s
Heather says
Oh it’s looking sooooo awesome! Makes me want to put penny tiles somewhere lol…
Sarah B says
It looks beautiful!!
Janet Gaupp says
I didn’t even READ it yet……OMG you tiled over the door, just like I asked you too ;-). Really though it looks GREAT! I was completely obsessed with the over the door tile if you remember my comment from back a ways. (which I’m sure you don’t ;-)
Anyhoo I’ll return back to my normal senses now and stop obsessing every time you post a pic of that wall. I’m proud I only kept it to one comment publicly! Go me! and GO YOU!
YoungHouseLove says
Haha- I do remember your comment! The funny thing is that we kept going back and forth. I think I promised you we’d keep considering it though- and we did! In the end we really wanted the range hood to look centered so doing the entire wall was the way to go!
xo,
s
Lindsay says
It looks SO fantastic!
Did you have to put up more cement board above the door to put the tile up, or were you able to just put it up over the paneling?
YoungHouseLove says
Thankfully we were just able to sand the heck out of it (since it was painted we wanted to rough it up) and tile that. Since it was such a small area (without much weight from the tile) it worked! And thankfully the paneling was completely flush with the cement board so there’s no seam where it transitions. Whew.
xo,
s
Heather S. says
I was surprised to see the tile over the door since you didn’t replace the paneling with cement board. I keep going back and forth over whether I like it but I do love the rest of the wall. Can’t wait to see the new range hood!
YoungHouseLove says
We just thought the range hood would look off-centered if the area above the door was untiled! It makes more sense in the middle of the wall now – well it will when we eventually hang it there. Haha.
xo,
s
Kim says
Wow, I admire your patience! Looks wonderful.
Candice Matthews says
shes a beaut!
Ang says
Looks fantastic! I LOVE it!
This week I did some minor rearranging and covered a new lamp shade with some old cloth I had used on our dining chairs, and yesterday we laid new laminate flooring in our entry way. You guys motivate me to do things one step at a time. Now that I have those things out of the way, I’m going to start working on my bathroom. Finally! New master bath here I come!
YoungHouseLove says
Wow- you were busy!
xo,
s
Lindsey @ arkadian belle woods says
Seriously amazing! That penny tile is to die for! I love love love the look! Getting soooo close YHL!
Katie @ Lovebird Productions says
The kitchen looks amazing! I cannot wait to see the finished product. Has anyone told y’all how brilliant y’all are?
I still cannot get enough the progress of the kitchen. It makes me proud! Ha :)
Tiffany T. says
Ok you guys are my heroes. Seriously! It’s like every time you guys complete something I’m excited FOR you. Thank you! I could never afford to have someone do these things for me so you all breaking it down for the rest of us, makes having a truly nice home within reach!
YoungHouseLove says
Aw you guys are so sweet! So glad you like it!
xo,
s
Betsy says
That looks really great…..I love your blog…I love how you take the time to think everything out, I have had to completely redo my house after flooding twice, and It seems I am so rushed to get it done and moved back in, I dont have the time to do all that planning, plus it was before I discovered blogs! I have to say you havereally inspired me for the next time…and living in south Louisiana, there will probably be a next time.
Amanda @ Our Humble A{Bowe}d says
I don’t know if my other comment went through, but the tile is gorgeous! I’m so happy you’re done with it, for your sake. It will look even better when grouted, but I really love the shot with the stove. So sleek and chic.
Jessica from The Paper Plume says
That looks so great. Congrats on another job well done. I so appreciate that you did it over after bedtime and during naptime! Cant wait to see the finished product.
Allyn says
Holy cow it’s gorgeous! Way to go guys!
If only I did have MLK off… sigh. Back to the old grindstone.
Kate says
You go, Petersiks!!! I am inspired! My husband and I decided doing our kitchen backsplash would be our Valentine’s gift to each other. Romantic, huh? And, thanks for the tutorial, we will be taking full advantage!
YoungHouseLove says
Haha- it does sound romantic to a weirdo like me! Have fun!!!
xo,
s
Raina@ Mamacita Spins The Globe says
You must feel SO good having that big part of the job behind you! Congrats! It looks great :)
TheChangingHouse says
Wow! I can’t believe how great it looks!
LaTonya says
This looks even more amazing than I thought. I love how the tile kind of sparkles in the light. I am also really excited about you removing the fan and florescent fixtures. New lighting will really bring your updates to life. Great job you guys!
Did you cut the penny tile at the ceiling as well? You said that you are going to cover the seam at the ceiling with crown molding, so I was wondering if you thought it was worth it to make that seam straight. It’s hard to tell in the pictures.
YoungHouseLove says
Nah, we just left full tiles up there, which pretty much fit right to the ceiling, so it worked out to be a really easy seam for us!
xo,
s
Michele Daggar says
Oh guys it’s fantastic! Congratulations. There’ll be penny tiles all over blogland now!
I hope you find time to sit on your new counter stools and stare at your hard work for awhile. I really envy your DIY dedication. Love, love, love it!
YoungHouseLove says
Haha, we were just saying how much we use the peninsula now! For everything. Cooking, eating, projects, blogging- it’s like our home base now! Especially since Clara likes playing on the rug in front of the fireplace.
xo,
s
Chrystal says
Wow, it looks amazing!! You make me want to redo our kitchen, that we redid last year. Way to go!
Jen Migonis says
Sherry! I can’t even handle how fabulous looks. What a difference! I wasn’t spending hours installing tile this weekend but did refinish this dresser: http://www.migonishome.com/2012/01/makeover-monday-navy-dresser.html
Keep up the good work!
YoungHouseLove says
Beautiful job! I love it!
xo,
s
Janice says
I’m so glad you did over the door too. I had commented on that way back, after you changed your mind. So glad you went back to the original plan. I cringed everytime I saw the pics with the green wallboaed up there. Yeah on a big tiling job!!!!!!!!
YoungHouseLove says
Haha, that’s so funny because we heard from someone else saying the same thing! We kept flip-flopping but decided that the hood would look the most centered that way. So glad!
xo,
s
Mona Alicia says
This looks amazing! I love the subtle texture and color it adds to the room while still being light and airy. I’m also loving the piece by piece reveal of your new kitchen. It really shows how much work goes into a room makeover and it makes me so excited to see the finished product.
Carrie @DreamGreenDIY says
Way to go!!! Looks gorgeous…We have been super inspired by your kitchen redo and decided to paint our kitchen cabinets (FINALLY) – Thanks for giving such fabulous how-to’s!
http://ow.ly/8uWug
YoungHouseLove says
Wahoo! You’re moving right along! Can’t wait for the Wednesday reveal!
xo,
s
Carly says
This looks amazing! So impressed. It’s making your kitchen look extremely high-quality and, dare I say it, C-L-A-S-S-Y! :) Your kitchen makeover is probably the most drastic before-to-after of your home so far, don’tcha think?
-Carly @ Createlive
YoungHouseLove says
Haha- classy is my favorite adjective so that makes me giggle. We definitely think our kitchen is going to be our most dramatic change to date once it’s done! Oh man, can’t wait!
xo,
s
Robin @ Our Semi Organic Life says
Love this! Looks so fresh!
tara says
O.M.G. !!!!! It looks so amazing! I just cannot wait to see dark flooring go in! Your kitchen will be pinned a million times over when it’s finished:)
Cara L. says
First of all – WOW! you guys are seriously DIY superstars! that job looked like quite the undertaking, and I don’t know if I’d have the patience.
After seeing the gray penny tiles all finished, up against the lemon-lime wall color, are you still happy with your original paint choice? Or do you think you might decide toswitch it up to something different? (I do admire your love for a pop of color!)
YoungHouseLove says
Oh yes, in person we love the combo although it tends to look odd on people’s monitors. It’s not lemon lime in real life, it’s actually a soft avocado color!
xo,
s
Ellen says
I spent the weekend nursing the almost 2 week old baby, while my husband was ripping up nasty carpet and sanding the gorgeous hardwood floors in the nursery to be. (yes, we’re not done yet with the nursery… this is what happens when a baby comes 3 weeks early!!)
Coming up… stain and poly! I’m so excited for how this room will turn out.
YoungHouseLove says
Aw congrats on the new bundle!
xo,
s
MissCaron says
AMAZING. Y’all are a great team!
Krystle @ ColorTansformedFamily says
I applaud your hard work. There is no doubt it would have taken me a lot longer. Clara probably thinks houses are magical… That they transform themselves while she is asleep! I can’t wait to see the rest of the kitchen.
Krystal says
The tile looks uber fantastic! All your hard word definitely paid off.
As for me, I may or may not have finally taken down my Christmas decorations this weekend (which may or may not still be sitting in boxes in my dining room…one step at a time!) Other than that, I have today off but have to go into the drawing studio and work on a piece that’s due Wednesday. I wish I could say it’ll be fun.
YoungHouseLove says
Haha- we still have two red reindeer sitting on our dining table!
xo,
s
Janice says
My tree’s still up! My plan was to take it down yesterday while I worked at home, but didn’t get to it. Hopefully today!
Julie says
Beautiful, I’m really loving how it’s turning out! can’t wait to see the open shelves.
Jessica says
That looks so amazing. Great job and thanks for all the tutorials!
sarah @ sarah learns says
wow – it looks amazing! you guys did such a good job & it makes the room look so much more finished. :) love it!
Diana @ Boy + Girl says
I don’t know if my previous comment was submitted. Technical issues over here. Anyway, how many square feet did you cover? It’s gorgeous by the way. You guys did an amazing job! It looks better than some of the installations I’ve seen done by professionals – I work in the tile and granite industry so I’ve seen a lot of tile jobs and the seams in this are less visible than the ones that were on display in a showroom I worked in! Well done!
YoungHouseLove says
Hmm, the back wall was about 40 square feet and the other wall was about 8 square feet. Wow – almost 50 square feet!
xo,
s
Devon @ Green House, Good Life says
I agree that you guys did a better job than a lot of professionals would have. I read a blog a while back where someone had hired tilers to do either penny tile or hex tile, and they obviously had no idea what they were doing. They didn’t bother with half tiles, the lines weren’t straight, etc. There’s a lot to be said for “hiring” someone who is going to see it every day and who has a stake in taking the time to make it look awesome!
Adrianne says
I’m probably just missing this – but are you putting any trim/capping, etc, when the tile meets the counters? Can you just grout right up to the Corian? Caulking??
(It’s like my brain exploded, sorry.)
YoungHouseLove says
Oh yes, there will be a line of caulk there. It’s recommended that you grout all the internal areas and just run a bead of caulk along where the counter/tile meet!
xo,
s
Gaidig says
It’s looking great, but I’m glad to hear you mention caulking the edge. You definitely shouldn’t grout the tile directly to wood wither, or anything else that has a different expansion rate from the tile, because when summertime comes around, you’re likely to get cracks. You can caulk at those edges, too, or another cap solution is to use the aluminum edges (such as Fry Reglet) you can pick up at the hardware store.
YoungHouseLove says
Smart! Thanks for the tip!
xo,
s
Gaidig says
Oops! Typo. That should say “wood, either”.
Susan (Between Naps on the Porch) says
Sherry and John, it’s looking so great! What a professional looking job you’ve done! I know you’re glad that part is done and it was worth the time and patience…just beautiful! Can’t wait to see the next part…getting more and more exciting as you take each step toward finishing!
Susan
Jen says
I have to admit that when I first saw the penny tile, I wasn’t sure I liked it much, but now that it’s up, I love the texture it gives to the wall. It looks fantastic.
Marissa says
WOW!!! Great work you guys!!