Let’s see… when we last left off on Monday, our open shelves had been primed in preparation for their big hanging debut.
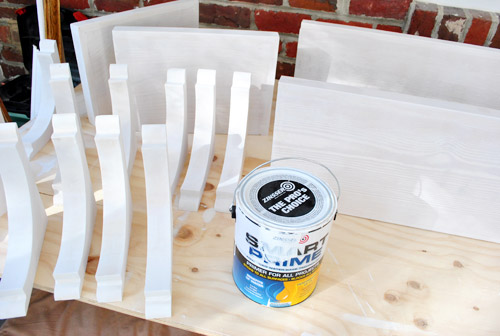
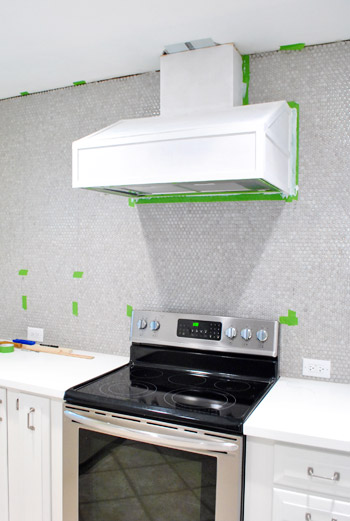
While we had the primer out we went ahead and slapped a coat on the hood cover too (using a 2″ angled brush in the cracks followed by a small foam roller to smooth everything out). Things were instantly looking less wood-sy on that wall.
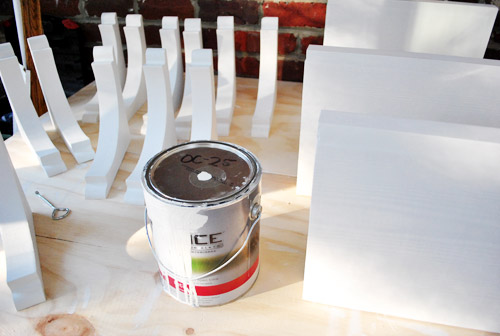
Once the primer dried on both – we used Zinsser Smart Prime which is low-VOC and was recommended by a few pro cabinet painters that we know – out came the same high-durability paint that we used on our cabinets (yes, there’s still plenty left!) and we gave the brackets, shelves, and the hood a couple of coats. Two thin and even ones over one coat of primer did the trick. We also applied those with a 2″ angled brush followed by a small foam roller to keep things smooth and even. Oh and the paint is Benjamin Moore Advance paint in Cloud Cover, bee-tee-dubs (which many pros use to paint the inside of their clients’ cabinets along with the outside, so it should stand up really well to everyday use once it’s nice an cured up).
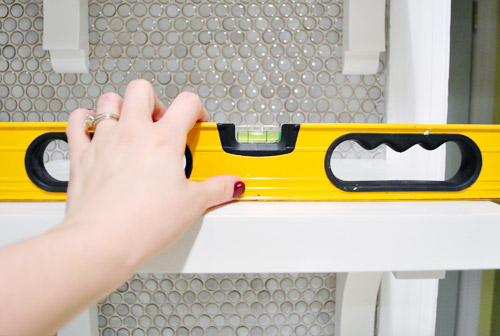
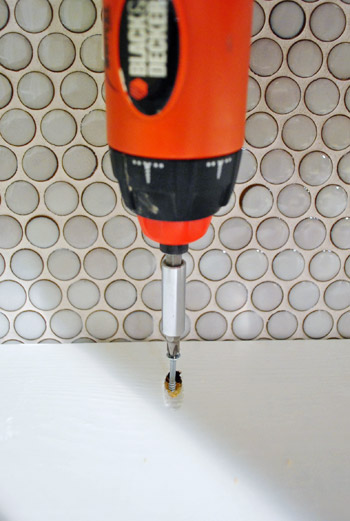
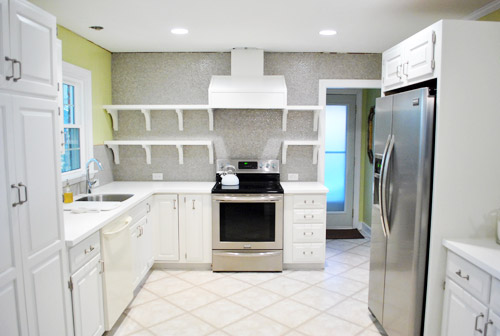
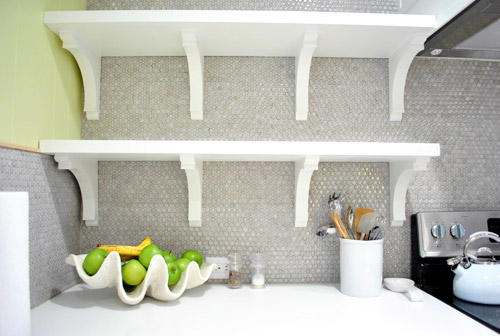
But the exciting stuff really started to happen when we finally got to the point of ACTUALLY PUTTING STUFF ON THE WALL. Yowza. Sorry for the caps. I said we were excited, right? Excited might be an understatement actually. Luckily, since we had already drilled all of our screws into the wall, the hanging step was pretty easy. Up went the brackets on the short side…
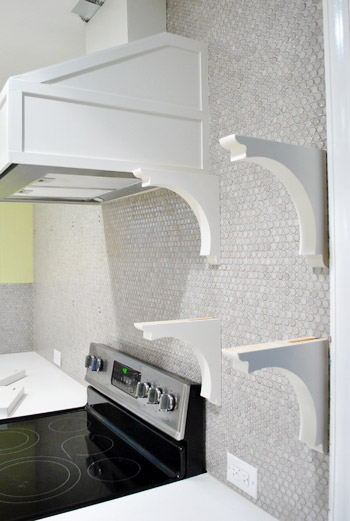
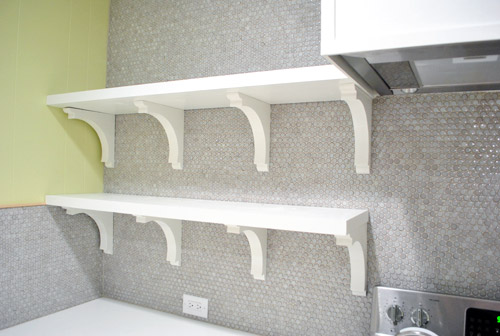
…followed moments later by the shelves themselves. Can I get an “Ooooh”? How about and “Ahhhhh”?

Don’t worry, we weren’t gonna just let them sit there unsecured. We just had some other things to do first – like making sure everything was still level. It was. Phew.
So then we put everything up on the long side of the wall.
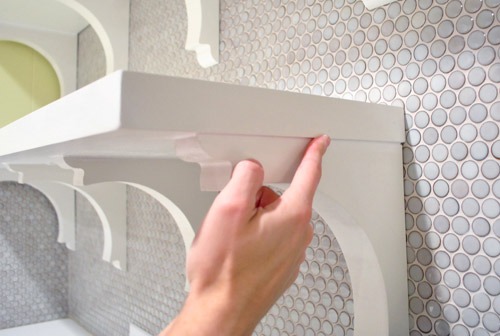
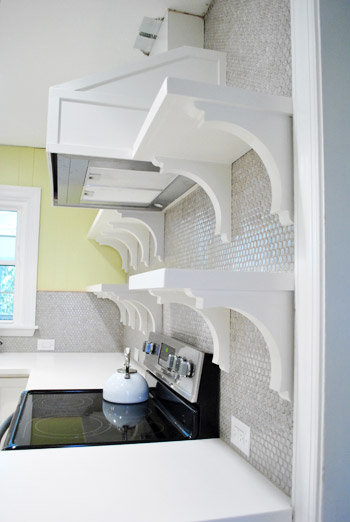
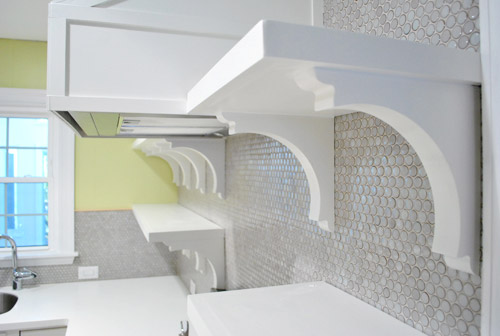
We had mentioned in the previous post that we had originally planned to screw the shelves into the wall (we even made some pocket holes in preparation for this step). Well, after feeling how solid the brackets felt (more on that here) and not really wanting to put 12 more cringe-inducing holes in our tile – we opted to just use those pocket holes as a spot to screw the shelves firmly into the brackets (so the screw actually went straight down, not at the angle of the pocket hole). In hindsight, we definitely could’ve skipped the pocket hole step, but at least now the screw will be hidden in a spot that we can easily caulk over.
Speaking of caulk, that was our next step after everything was drilled together. Since there were some dark seams where the shelves met the brackets, we just ran a thin bead of white paintable caulk along the top of each bracket and smoothed it with our finger to make the shelves and brackets look more like one unit. Tedious? A smidge. Worth it? Totally. Then of course we painted over it so everything matched.
And with that folks, we were done! Except for more waiting. Booooo.
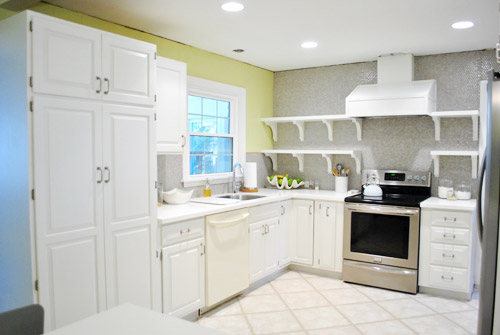
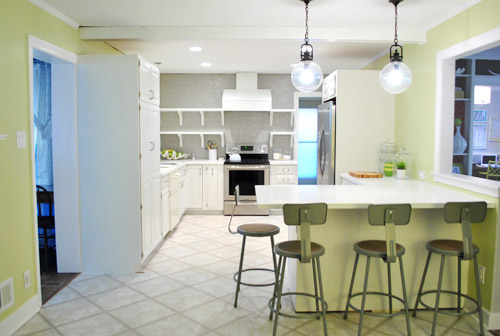
As eager as we are to immediately fill them with plates and bowls and cups, we resisted that urge in order to let all of the paint cure a little bit longer – just because we caulked those screw holes and around the edges which called for some touch up paint. We definitely don’t want to jump the “fully cured” gun (which could result in a bunch of dents and dings in our shelves during their first few days of use). So for now we’ll just have to enjoy these empty “after” shots thanks to following the full curing time on the paint can’s directions. But tomorrow – oh baby, it’s on. Sherry’s even planning to shoot a little time lapse video of the process of loading them up.
Oh and of course we still have to add crown molding to the ceiling to finish things off and make the top of the hood a lot more seamless. But slowly it’s all feeling a lot closer to “done” than “just started” – especially now that the hood is painted too (never mind the fact that we still have some patch work to do on the ceiling along with that aforementioned crown molding).
We’re really happy with how the brackets turned out, so we haven’t thought twice about our decision not to do true floating shelves. We think these are really charming – and they’re super stable so Sherry could probably hang off of them if she wanted. Instead she wants to fill them with ceramic animals. Same difference.
It’s nice that there’s still plenty of room to load them up and make them really functional, even with the brackets (no, they will not actually end up full of ceramic animals- not on my watch). Our shelves are deep enough for our 12″ dinner plates and the brackets are 15″ apart so we should have lots o’ room to put everyday stuff up there – which we hear from other open-shelf-having folks works really well, since it’s used often enough not to get dusty).
And even though it was a bit weird at first to see our wall of penny tile suddenly broken up by these bright white lines, it’s cool to see the thing we’ve always envisioned come that much closer to being a reality.
So we should have pics (and a video) of the shelves all filled for you tomorrow. Until then, we’ll leave you with this slightly-closer-to-after shot of the room. We’re definitely getting there. And we’re counting down the seconds to Operation Cork My Floor (along with adding that crown molding, patching the ceiling, adding a pendant over the sink, covering the base of the peninsula with some decorative wood planks, hanging some art to the right of the fridge, do something to the side of the pantry, etc).
We feel especially giddy when we look at old photos of the room back when it looked like this:
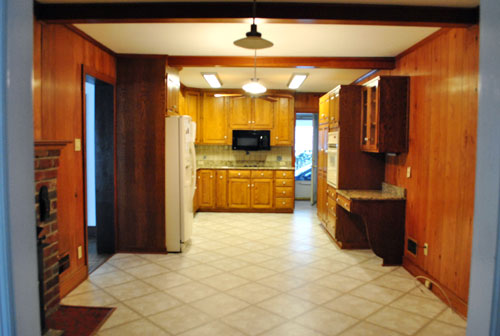
We can hardly picture that old room anymore. Isn’t it funny how quickly your brain replaces things? It’s so crazy that we lived with the room just like that for over six months before even painting the paneling. But once we finally got the ball rolling… well, it’s still rolling. Haha. Is anyone else in the home stretch of one of their home projects? Though I probably should knock on wood when I say that, since it sounds like a sure way to jinx myself into some last-minute wrench in the plan (he says as he gets up to literally go knock on wood while crossing his fingers and eyes).
If you’re interested in more ideas for adding shelving or vertical storage, this post has a bunch of DIY shelving projects and ideas for you.

Kathryn says
Yup…that totally completes the wall. When you “stage” it, I will be officially drooling.
gayla says
looks amazing! I cant wait to see some dishes and accessories on those shelves!!
Bria says
It’s all coming together so nicely! :)
abode love says
I squealed with delight when I saw that there was a kitchen update! I ADORE those shelves, ya’ll did a great job. I think the brackets really finish it off beautifully and create a lot of charm in your kitchen!
abodelove.com
Stephanie says
I feel silly writing this, but I have been so excited waiting for these pictures. Can’t wait to see the final product!
jamie says
looking awesome over there! waiting for paint to dry is like staring at a big, juicy ice cream cone. can’t wait to see the junk on the trunk or uhhh… shelves :)
stephanie says
wow! what a transformation. i anxiously await the final before and after photos…great job :)
Melanie @ Mailbox Journey says
Absolutely gorgeous! I can’t wait to see them loaded up with stuff!
Lori says
Ahh! It looks amaaaazing! Better than I pictured! Sherry, can you reach the top shelf without standing on a stool? It looks pretty high in the pictures? Seriously can’t believe it’s the same kitchen… :-)
YoungHouseLove says
Yes! I can reach it! Yay. You’ll get to see me loading them up on video soon!
xo,
s
Bethany says
LOVE IT!!!!
Hesper says
It looks fantastic. We also just hung open shelves in our kitchen just last week! I looove them and I am so happy to be a little closer to actually liking my kitchen! Next up is painting the awful yellow pine cabinets and then replacing the gross floor! Woot!
Andrea says
FANTASTIC!!!!!!! =)
MidloMel says
GORGEOUS! And I mean really, really gorgeous! I just love it. Great job.
I wish I had room for some open shelving in my kitchen!
Leslie says
It looks WONDERFUL. Well done guys. You must be so proud of all that hard work. :)
Tracy says
Amazing. Can’t wait to see it with the new floor!
Captain Micah says
Good gravy. It looks AMAZING!
claire says
You guys have done such a fabulous job. Love love the shelves!
Syreena says
can’t wait to see the shelves all filled. You guys are pretty awesome. I think I am too much of a chicken to have open shelving, my cabinets and drawers are my secret place :)
Kim S says
Love it! I think the step I’m most excited for now is the cork flooring. I liked that idea as soon as you told us about it, and I’m glad it’s coming soon!
Marianne says
Me too- I can’t wait to see that Cork floor! I think it will totally complete the room!!!
Missy says
Yes. I too, can’t wait to see the cork go down. I’ve thought about cork in some of our house projects, but haven’t pulled the trigger.
Erin @ One Project at a Time says
Do you all still have some tweaks in mind for the chairs? I can’t wait to see what you do there!
YoungHouseLove says
We’re waiting for the cork floors to go in before deciding since they’re such a game changer!
xo,
s
Aida says
I was thinking the same thing. They are starting to look out of place in that awesomesauce kitchen. I’m thinking glossy pop of color!!
Mary says
I agree . . . the chairs don’t compliment what else is a fabulous kitchen.
Amber V. says
I stand firmly on team “LEAVE THE STOOLS ALONE!” I think the cool gray color acts as a bookend to the room that compliments the gray penny tile. Im sure the color you bring in with accessories will be plenty… but that’s my two pennies (ba dum bum).
Ultimately, I’m certain the room will be a stunner. Great job!
TheChangingHouse says
The transformations are unreal!
This kitchen looks fantastic!
Brandi @His Shabby Her Chic says
Oooooooh…aaaaahhhhh… Looks great!!
Jordan@the2seasons says
Love them! They look amazing!
Dana says
Looks absolutely stunning!! Can’t wait until tomorrow’s post! Have fun filling them up today!
Natalia says
I was sure there would be a picture with dishes and stuff on top! I guess I’ll just have to wait till tomorrow!! Can’t wait to see that :)
Kate says
Looks beautiful – I love it!
Alison says
Nice work! I can’t wait to see them filled. What a transformation!!
Angle says
I can’t wait to see them with stuff on them. Sometimes I have a hard time visualizing things, so right now all I notice is the brackets lol. Can’t wait for some plates and ceramic animals to make me go “ahhhh, NOW I see it!”:) very happy for you!
Emily R. says
I was thinking the same thing. Even when I don’t immediately see your version it always comes together. The perfect example of this is the living room. You always pull everything together.
Jennie D says
The kitchen is looking amazing!! You guys are so inspirational. Can’t believe those before and after shots!
Rhiana says
Looks so great guys! I can’t wait to see it all done!
reb y. says
now now, when did that white kettle suddenly appear?? and how did I miss it before!
YoungHouseLove says
Haha- that’s been here a while! Got it from HomeGoods on sale a few months back. It’s by Kitchenaid if that helps!
xo,
s
annabelvita says
Looking awesome! I can’t wait to see how you style them.
We just signed on a brand new flat (sneaky picture here http://annabelvita.com/on-the-right-track). I’m so excited since it’s UNFURNISHED. You can bet I’ve already bought some furniture to refinish before we can move in on March 5.
YoungHouseLove says
Exciting! Good luck with everything!
xo,
s
Melissa says
What a difference you guys have made in there! I honestly thought you two had lost your minds buying that house when I saw the kitchen. I couldn’t see past that wood-riddled eyesore to see anything salvageable. You are rock stars!
Question – what happened with Clara’s booster on one of the counter stools? Was there an issue with it not being secure after all?
YoungHouseLove says
Oh no I just pop it off for after pics since it’s so crazy looking (bright maroon) – haha. It’s so easy to snap on and off for the pics, thankfully!
xo,
s
Ashley@AttemptsAtDomestication says
Love the shelves! They look fab! Can’t wait to see them loaded up! And now that everything is painted I totally see why you needed a darker floor, it looks like the room is floating. I’m sure the floors, stuff on the shelves and some art will ground everything together though!
Janette@The2Seasons says
It looks really great. My daughter/blog partner and I repainted her kitchen cabinets per your instructions, and they turned out great. Thanks for such good tutorials.
Melissa says
I can’t even believe it’s the same kitchen. Looks absolutely amazing! I knew the old kitchen was dark, but you really don’t realize how dark until you see the before and after. Congrats!
Julia @ Chris loves Julia says
So pretty! I am anxiously looking forward to:
1. Tomorrow seeing everything in place and the video! Eee!
2. Seeing the cork flooring go down. It’s gonna add so much warmth.
3. Understanding what you mean by “decorative planks” on the peninsula.
4. Hearing what else isn’t gonna happen on John’s watch. Hahaha!!
YoungHouseLove says
Haha, nice rundown.
xo,
s
Amy L. says
Do you think you’ll keep the wall color? For some reason it reads as a construction color rather than the actual final color, so I keep waiting for something else. I think a dark floor will certainly change the feel, but wasn’t sure if you were thinking of changing it.
YoungHouseLove says
Oh yes, we love the color and think the dark cork floor will be awesome in the mix. But wall color is definitely one of the most subjective things out there in the universe!
xo,
s
allison bolton says
I love your Kitchen!! You have inspired me so much, I want to do copy your backslash and counters. I need to repaint all my white cabinets in my laundry room, bathrooms! Thanks for inspiring me with your beautiful Kitchen!
Deanna Divino says
AMAZING! I love it! I have a question. I am on the hunt for lights over our peninsula… I love the glass ones and have found tons I love, but I am worried about staring into the light… sound scary! ;) Are you guys bothered at all by it? I go to the store, look at them and my eyes are terribly unfocused…but I guess once they are in your home it’s different? You don’t stare at them all day, do you?
I love the shelving, we did open shelving too and I love it and it’s 20 times “easier” to live with than the millions that warned against it!
You guys are amazing!
YoungHouseLove says
Thankfully they’re just great! We put them on a dimmer just in case, but we’re always putting them all the way up, so it’s not too bright or anything!
xo,
s
Alisya H says
Way to go, you two! The before and after photos were awe inspiring! Although I’ve been following the kitchen renovation since it started, it’s still very startling to see the improvements! x
Reenie says
WOW–WEEEE!!! What a diff seeing the last 2 photos of the before and after. The floor doesn’t even look half bad with the “almost done new look.” I can only imagine how the cabinets, tile, and everything else will stand out once you get the new floor in.
Lookin’ good :)
Ginny @ Goofy Monkeys says
The shelves look so great!
Amanda @ Our Humble A{Bowe}d says
The shelves look awesome! I’m surprised you were able to resist putting stuff up there.
WE’re almost done with our kitchen, too. We installed our cabinet doors last week: http://ourhumbleabowed.wordpress.com/2012/02/02/cabinet-doors-done/ I’ve got some painting to do today and a few more little projects, then we’re done!
YoungHouseLove says
Looks awesome!
xo,
s
kristin says
wow, you guys, this is looking fantastic! getting those shelves up really transforms the space, and i can’t wait to see those puppies all loaded up with brightly colored goodness (and of course some white-ceramic-animal goodness too, let’s be honest). nice work! :)
bridget b. says
cool! can’t wait to see them loaded up!
Ashley says
Beautiful! You guys are rockin it!!
Question for you…. How well do the shelves wipe off? I had some open shelving put in my bathroom when it was remodeled and it seems to eat the sponge when I try to wipe it down. I love the look and and want to add some to my new chicken coop and paint it a fun bright color (well the storage area in the front of my coop) but am afraid of not being able to clean them. Im in the midst of a kitchen remodel and have some open shelving but I ordered it from the cabinet maker (for a pretty penny!!) but obviously I don’t have that kind of budget for a dirty ole chicken coop:)!!
YoungHouseLove says
Oh yes, just like factory sprayed cabinet doors and interiors, it wipes down. Benjamin Moore Advance is the best!
xo,
s
Seriously Sassy Mama says
Ever think about painting that beam a different color? I saw it and immediately thought about your TV room.
YoungHouseLove says
Since they run in the opposite direction and can be seen in the same glance (since the living room is right next to the kitchen) we think it’ll be too busy – like a criss-cross ceiling if we paint them dark. But the addition of the dark cork on the floor should be some awesome contrast!
xo,
s
Mary Lou says
Looks so amazing!! Im just starting the process of redoing my office/craft area, and that grellow + white shelving is calling my name.
Kristina says
It really looks great. It looks like there might even be enough room for your rooster up on the top shelf.