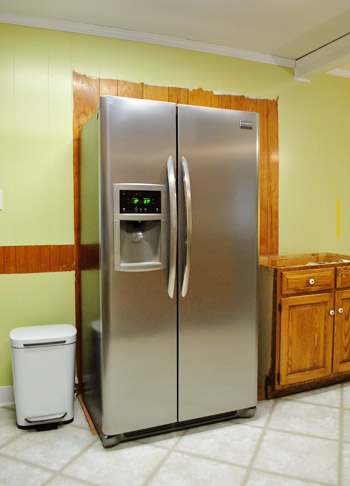
We learned with our first kitchen that building in your fridge is a huge help in making a kitchen look fancy schmancy. And at the moment our floating fridge was looking pretty much the exact opposite.
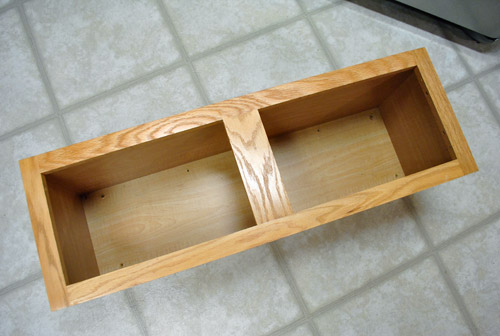
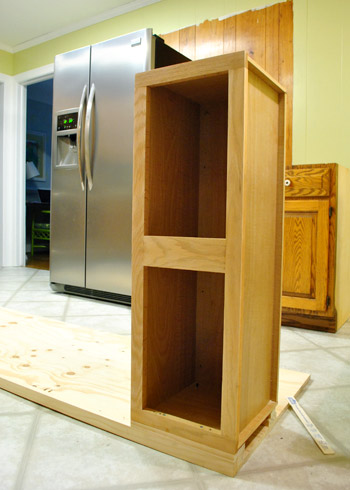
That’s where an also less than schmancy $19 cabinet from the Habitat For Humanity ReStore (mentioned yesterday) came in handy. It’s 12″ tall and 36″ wide, the exact width of our fridge. And when you take off the don’t-match doors (we’re hoping to retrofit extra existing doors to make it seamlessly match the other cabinets later), it starts to look more like a workable piece of cabinetry to sit atop our refrigerator.
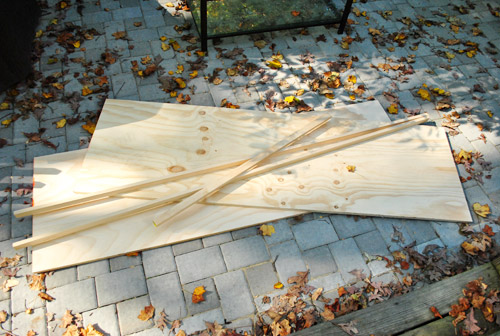
For the sides of our built-in fridge, I picked up two 4′ x 8′ pieces of plywood that the Lowe’s guy recommended for cabinet work (he said it’s the same stuff they sell folks who get theirs built-in by pros as part of their kitchen installation process). They even cut it to size for me right in the wood cutting area, which was a huge help. The planks were still too big for our Altima so I rented the $19 Lowe’s truck to get it home. The truck rental, fridge planks, plus a few 1 x 2″ pieces of pine trim brought my grand total to about $90. Good thing that ReStore cabinet was cheap ($19).
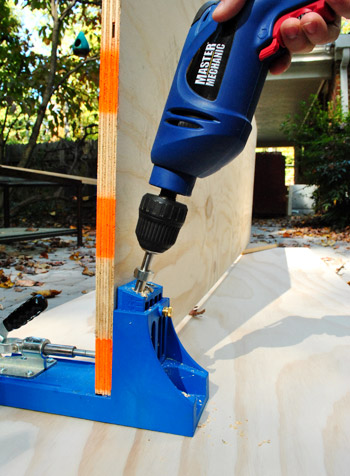
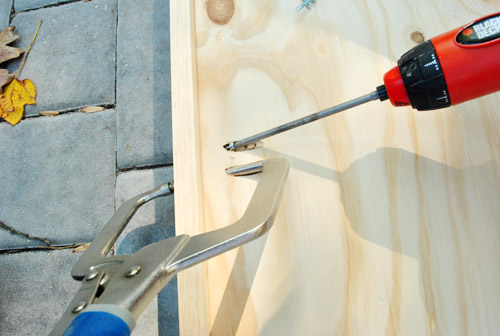
The point of the trim pine was to make the front edge look more finished and a bit more substantial looking. So I broke out my trusty Kreg jig and drilled a bunch of holes down one edge of both plywood pieces.
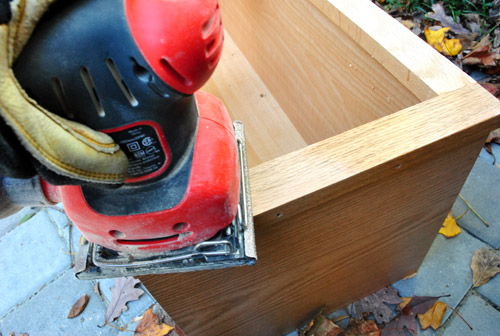
With my holes drilled, I sanded both sides of the plywood to make sure they were smooth. And while I was at it I sanded the finish off the front of the cabinet so it’s primer/paint ready (we’ll tackle it when we tackle the rest of our existing cabinets after the counters get installed so nothing gets chipped or scratched off during that stage).
Then I carefully clamped and screwed the pine trim to the plywood piece so that the edges were flush. Having been around block with my Kreg by now, I’ve learned that it’s sometimes helpful to drill a second hole just to put the special Kreg clamp into. This is me trying to think ahead.
Eventually (note that I didn’t say “soon” – this part took me about an hour) I had the trim attached just the way I wanted on both pieces of plywood.
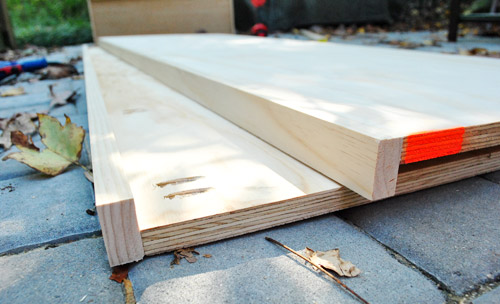
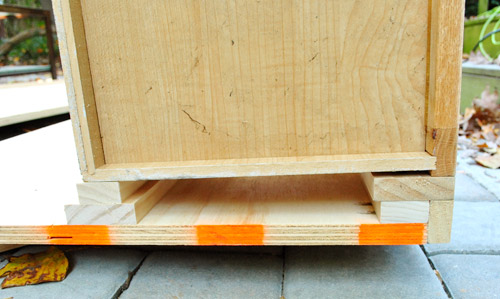
Attaching the cabinet took some thinking ahead too. Since we wanted the cabinet to sit flush with the trim (not behind it) and needed the opening to be slightly wider than our fridge (which was the same width as the cabinet) – I had to add some filler pieces (aka, leftover scraps). One stack of scrap wood went up at the front of the cabinet and the other was located at the back (neither of which would be seen at all once it was all installed).
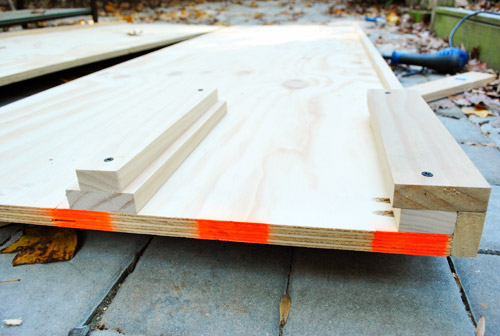
Here’s the same view with the cabinet sitting on it, to give you a better idea of why the filler was needed (I ended up adding a wooden shim to make sure the cabinet sat 100% straight).
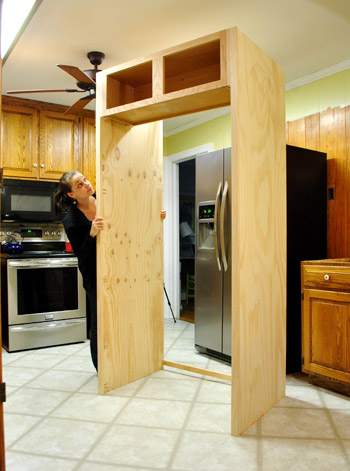
We didn’t actually attach the cabinet until we got everything back inside, since I wasn’t about to try to maneuver this whole thing from my patio-workspace through a few doors and into the kitchen. So here we are in the kitchen, with the cabinet screwed to one of the plywood sides. Here’s where Sherry put Clara down for a nap and came in to help.
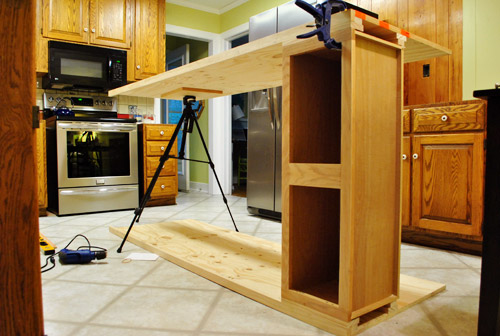
We brought in the second side and used our camera tripod as makeshift jack to hold it in place while we screwed it all together, checking and double checking that everything was square and level.
Before standing it up we added a spare board across the back to help keep everything straight and supported from front to back. It’s also the board we later drilled through to screw the whole thing into the wall (didn’t want it falling over on anyone!). We also put a similar plank of wood across the bottom (again to keep things square and to allow us to screw the whole piece into the wall).
Then we heave-ho’d it up to a nice standing position…
… and slid it into place (after temporarily removing the bottom support slat so we could slide it over the fridge like a slipcover).
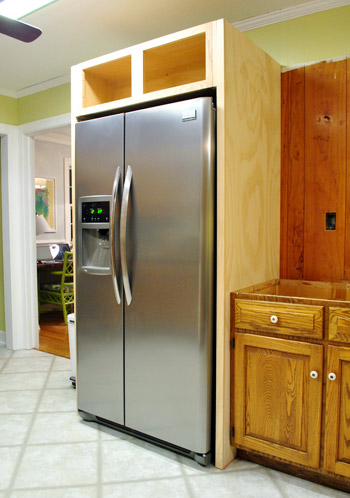
We’re not saying “ta-da!” quite yet, since there’s still lots to be done to it. Like priming and painting it, priming and painting the paneling behind it, adding matching doors, adding molding around the top, adding trim around the bottom, etc. But for now, we’re enjoying one pretty noticeable step towards making the kitchen look a lot more pulled together.

It’s definitely an upgrade from the un-built-in version, right?
Oh and if you scroll back up to the built-in pic above this one, you’ll notice that the fridge sticks out just a smidge from the wooden sides. That’s just a functional thing (it can slide a bit farther in, but the doors wouldn’t open as wide as we needed them to in order to access certain slide-out fridge drawers without hitting the wood frame). But it’s nice because the new built-in sides block all of the black coloring on both sides of the fridge – so all that’s visible is the stainless front (and a smidge of the sides of the doors – which are still stainless). It’s definitely going to be a huge upgrade to have a custom looking fridge setup along with the flush front cabinet up top (our old above-fridge cabinet was set about 6″ back, so it was a lot harder to access).
So that’s the latest slow but steady kitchen progress. Next on the agenda is attempting to finalize the placement of the peninsula (we still need one more cabinet to complete that area) by the end of this week so that we can finalize the placement of the giant eight foot doorway to the dining room that we’ll be adding with the help of a pro (which we hope to begin sometime next week!). Is it next week yet? Should be interesting/scary/exciting/dusty. As always, we’ll keep you posted!
Psst- We’re over on BabyCenter sharing an update on how we organize and store Clara’s outgrown clothes. And we’d love to hear your storage secrets on the subject.

Regan @ RenovatingRothenbergers says
I love how you used your camera tripod as a jack! Gotta be resourceful! :)
Amanda @ Our Humble A{Bowe}d says
Awesome! Your kitchen is going to look fabulous when you’re done. I feel your excitement on the small steps because we just got our kitchen sink back: http://ourhumbleabowed.wordpress.com/2011/10/31/everything-including-the-kitchen-sink/ Luckily we didn’t have to live without it for very long, but I’m happy to be in the rebuilding stages of our kitchen renovation. Can’t wait to see more of yours. :)
Stephanie Phillips says
Do you have any idea how many people come clicking over here at 10:00am on the dot for a kitchen update?? I don’t either, but I know I am here every morning!
That tripod-as-jack is pretty funny. You take the “work with what ya got” to a whole new level.
Can’t wait for next week!
Miranda @boucksy says
Stephanie, I’m with you! I’m in the Central time zone and come over here ASAP around 9am just to see if there’s my first-blog-of-the-morning post. Then, I’m right back here about 1:30 to see if the afternoon post is up! Favorite blog, EVER!
YoungHouseLove says
Aw shucks you guys are sweet.
xo,
s
Donita says
I do the same thing girls, only I’m pacific time zone, so it it 7:00 for me. :-) LOVE this blog too!!!! I can’t wait for next week and the peninsula and wall opening.
YoungHouseLove says
Aw, love you guys. Really do.
xo,
s
Lindsay says
I was so excited when I was working out of town in AZ for a couple weeks, and I got to read the post first thing when I got to work at 7:30 since I normally have to wait til 10 on East Coast time. LOVE YHL!
YoungHouseLove says
Aw schmanks Lindsay.
xo,
s
Harinee says
Let me add my bit – I’m on the opposite side of the world so I start checking every evening at 7:00 pm… and sometimes am up late till 12 ish to catch the next one too!
Nessa@{CasaBraaflat} says
wow what a difference! bravo!
CandiL says
Lookin’ good! When you all are done…wanna come redo my kitchen for me?!? Pretty pretty please! I’ll even throw a cherry on top!! ;)
YoungHouseLove says
Haha, sure. Be right over!
xo,
s
Suni says
Your new built in looks very nice, even though it’s not finished! You two always are so good at giving great ideas to update our own houses, I appreciate it!
Melanie @ Mailbox Journey says
looking good!
marci lambert says
i’m loving the progress. but a quick question — is there a reason you aren’t painting the wall behind the fridge before you add the cabinets? will you just wait until you are done and paint only the visible areas? just curious.
YoungHouseLove says
Since the whole cabinet and fridge can be pulled out, we just thought it would be smarter to do touch up painting after the wall is opened to create the door to the living room. That way we just have to get the primer and paint out once instead of a few times in a row!
xo,
s
Krysta @ Domestic for Dummies says
You guys are so gosh darn handy! It looks better already. On a side note I am dying to see what your pinterest project is…hurry up Wednesday!
YoungHouseLove says
Wahoo it’s tomorrow! Still finishing things off and getting ready to photograph everything for tomorrow!
xo,
s
Lindsey @ arkadian belle woods says
I second that Krysta! I can’t wait to see all of the great projects tomorrow!
Meagan says
So are you sure John doesn’t have a younger (single) brother?? Because dang Sherry…you are one lucky girl…is there anything John can’t build? haha.
YoungHouseLove says
Haha, he does have a younger sister- but she has a boyfriend and can’t build as much. Haha. I truly am a lucky gal!
xo,
s
Ashley says
Hey guys! Long-time reader and LOVE your blog, but I have to comment on something that bugs the grammar nazi in me very often.
Farther should be used instead of further when referring to a distance.
Your fridge looks awesome with the built-in stuff around it. It *almost* makes me motivated enough to do the same in my kitchen. :)
Keep up the good work.
YoungHouseLove says
Thanks for the tip! The proofreader in me knows that but somehow I always miss it!
xo,
s
heather says
Bwahaha the title of this reminded me of Kris Kross – Jump.
“Build it up, build it in, let me begin.” Who’s rad? <— this little lady right here.
heather says
Holy crap. I mean House of Pain. Wrong Jump song. Whatever. Both amazing.
YoungHouseLove says
Haha.
xo,
s
Meredith says
I was totally doing the same thing. You are not alone! Hooray for House of Pain!
Julia @ Chris loves Julia says
It has me singing the Glade Plug in commercials. “Plug it in. Plug it in.”
Lindsey @ arkadian belle woods says
HAHA! Julia – I totally did that too! In my head I was listening to that Glad Jingle!
Adrienne says
Thank goodness I wasn’t the only one singing “Plug it in, plug it in” after I saw the title!
heather says
@Meredith *high five*. The fact that someone else thought of House of Pain is proof that YHL readers are the shiz.
Cindy says
Random kitchen question: Do your cereal jars have the rubber ring around the lid for an air tight seal? I bought one at Walmart, but it didn’t have the seal. Does your cereal go stale in the jars?
YoungHouseLove says
Nope, no ring, but we eat cereal every day so it doesn’t have a chance to go stale!
xo,
s
Reenie says
Lookin’ good :)
John@Our Home From Scratch says
Man, you guys got some serious carpentry skillz. Looks perfect.
Anne says
Looks great! Y’all are making great progress!
Just as a heads up, usually you need to leave 2″ between the fridge and cabinet above it to allow for circulation (you know, so the coils in back don’t overheat or anything!). Just wanted to let you know before you filled in the trim all the way!
Good luck on the rest of the kitchen!!
YoungHouseLove says
Thanks for the tip Anne! Our last fridge looked a bit more flush (the installer/kitchen designer built it that way) so maybe we’re just used to that look. Good tip about the coils though! We’ll be sure to check into that before adding any more trim around that opening!
xo,
s
Jenn(ifer) @ heim-elich says
I just read a whole kitchen building book to be better prepared for my kitchen decisions and from all I read you should be fine with all the ventilation from the open top behind the new restore cabinet.
Jess @ Little House. Big Heart. says
Wow, that really does make a big difference! We have a free-floating fridge stuck on one wall of our kitchen. Maybe we need to build it in!
Kim says
We have pull out drawers over our fridge, which make that space totally accessible. I wonder if you guys could do some slide outs or at least baskets in that space.
Molly says
Really great. I had to go back and read the part about the cabinet being flush with the front of the trim a couple times, but I’m not a carpenter. Great work. I am so excited to see how the opening looks. I’m dying for some natural light in there!
Lisa P. says
So exciting!! I love seeing the progress/process. We are hoping to start our kitchen reno this winter/early spring. I will definitely be using your tutorial for the built in fridge. :)
Shanny says
I’m thinking I need a Kreg jig, no? John seems to use it nonstop, and his stuff comes out looking a lot less wonky than what I schlep together.
Thanks for living in kitchen mess! I love watching this process!
YoungHouseLove says
Yeah, I pretty much rely on mine to not feel like I’m gonna totally screw up anything I build. I think I saw them for sale at Lowe’s or Home Depot the other day too, in case you wanna check it out in store.
-John
Crystal says
That looks great! I love seeing your kitchen coming together piece by piece. It’s got me eye-balling my kitchen wondering what could be done to solve it’s many issues.
Samma says
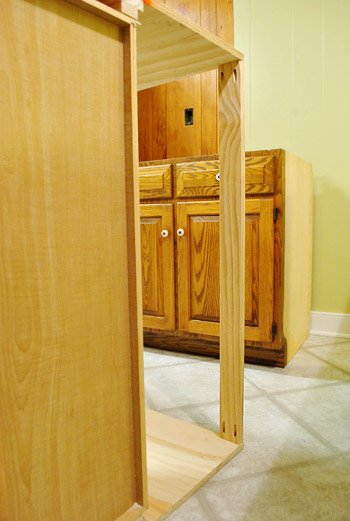
HaHa! “Eye-balling” is all I can think of whenever S&J post pics of their cabinet knobs — especially the one in this post where the cabinet is peaking around at the built in laying on it’s side.
YoungHouseLove says
Seriously! We be gettin’ stared at.
xo,
s
Lauryn says
that looks great!! really cleans everything up! I also love the picture with Sherry peeking out from behind it, too funny!
Kristina says
Between you two and Ana White, I feel like I could design or build almost anything I want. Thanks for the inspiration and motivation.
Em says
Question…if you guys are using some of your current cabinets, building some and getting some from ReStore, how are you going to make them look cohesive? Are you putting all new doors on them so that they’ll match? Just wondering!
YoungHouseLove says
We’re hoping to cut down and retrofit some of the doors from the upper cabinets that we’ll be removing to make way for open shelving. If that doesn’t work we might hire a local woodworker since our doors are kind of complicated to replicate (they half-sink, which means they have a lip that sinks into the cabinet opening, so doors that don’t sink would stick out too far and look off by comparison). We’ll keep ya posted!
xo,
s
Em says
Maybe you should consider replacing all of the doors…seems like the ones you have now might not be as streamlined and modern as the look you’re going for? I’m sure you guys have thought of that already of course – but just thought I’d throw the idea out just in case. I bet John could even build doors that you guys design!
YoungHouseLove says
Yup, we looked into that but it was around 2K to order new doors – which is almost as much as replacing all of the cabinetry so we’re a little gunshy about shelling out that much money when we have perfectly serviceable solid oak doors. We have thought about DIYing them, but due to the sheer number of them it might take us a year! And John’s nervous about things turning out wonky (we want our new kitchen to feel new and not budget). Not sure where we’ll end up but we’ll keep you posted!
xo,
s
Carrie says
What if you were to reface all your doors like this http://manhattan-nest.com/2010/10/13/conquer-your-vanity/.
It would be really time consuming though.
YoungHouseLove says
Love that! Not sure it would work on larger areas (like our two 5′ pantry doors) but it’s always another possibility!
xo,
s
Miranda @boucksy says
You guys are seriously my heros. My husband and I are going to attempt our own DIY kitchen when the time comes (1950 ranch, small 8×10 room square with awkward door placements) and I wanted a built-in fridge but didn’t want to pay the price for it.
THANK YOU! & It looks FABULOUS! Way to go, guys! Hope you’re able to find that last cabinet soon!
El says
Coming along very nicely! Great finds on the cabinets and the kitchen is looking more an more finished.
I was going to ask are you planning to check with the contractor about moving the beam in the kitchen up in to the attic. Not sure how much it costs so it may be a budget buster. Or maybe you’re planning on adding a few more to make it look intentional.
YoungHouseLove says
We have a few other beams in the room so they look good when ya pan out! So we’re keeping the beams since we like the added architecture (it’s a 25′ long room, so the beams break it up and keep it from looking like a bowling alley!).
xo,
s
Maureen @ This (Kinda) Old House says
Looks great already! I have one of those annoying above fridge cabinets that is set back about a foot from the front of the fridge! It’s ridiculous! I have NOTHING in there. i would love to this built in. I also need one of those Kreg Jig things. :)
Quick question, do you guys put a clear coat over your cabinets after painting them? We have a dog that scratches everything, and was thinking maybe I should put a protective coat on. Just wondering if you, or anyone else on here has done this and if it helps.
Can’t wait to see more!
YoungHouseLove says
We have painted cabinets before and just use the primer + paint method (sealers can yellow over time and cause drying issues/drips – so the standard method is actually not to use any). But there are kits called Rustoelum Cabinet Transformations that are sold now and I think they might have a sealer included. Hope it helps!
xo,
s
Maureen @ This (Kinda) Old House says
Thanks guys! That makes sense about the yellowing. I would rather have some scratches.
emma says
I made the mistake of saying–ooh i want really glossy cabinets after i had finished painting mine white. the guy at home depot recommended a certain polyurethane…next day they were yellow. womp womp.
reminded me to reference 3 blogs before making a home depot purchase.
YoungHouseLove says
Oh man- that stinks! So so so sorry! What a bummer.
xo,
s
heather s. says
Looks great so far! I noticed in the patio pics that the sand didn’t hold up in the cracks – I sadly, had the same experience with polymeric sand each time I’ve used it.
YoungHouseLove says
Yeah, we think it’s our fault (we were supposed to do a lot more layers of applications than we did- and we think the loose sand under the polymeric sand might have jammed things up since that’s not the best foundation). We’re planning to do another few applications in the spring since we still have a huge bucket of polymeric sand leftover. Here’s hoping it works better! We’ll keep you posted.
bridget b. says
it never would have occurred to me to create my own built-in for a fridge. you guys are full of great ideas. i can’t wait to see how the rest of the process goes.
how would the process of attaching the wood pieces together have been different if you did not have the kreg jig?
YoungHouseLove says
I think we just would have screwed through stuff to attach it and used counter-sinking screws so they could be puttied and painted to look as flush as possible (it would be hard to attach the trim pieces from behind). The jig usually makes it possible to hide all the areas where you join things and helps things join super tightly so the seam is nearly invisible. Hope it helps!
xo,
s
rebeca says
Sherry,
You could paint one of the sides of the built in with magnet paint. Double function!!!!
YoungHouseLove says
Totally thinking about it! We even thought we could frame something out and create a big pinboard or blackboard too! We’ll keep you posted once we decide!
xo,
s
Brittany says
so excited to see the final kitchen redo!! Can’t wait!
Ashley@AttemptsAtDomestication says
It looks great! I love how the cabinets on top line up with the front of the fridge because they are too hard to get to if they are set back. Mine are empty right now because it was too much of a pain to try to get stuff out of them!
Mariah says
You guys are so inspiring! I love to read about all of your renovating/decorating adventures. :-) I have a random question for you – I’m pretty sure we have the same refrigerator….Have you had any trouble with the freezer temperature deciding that it wants to be reeeally cold? Like -13 degrees? Ours is driving us nuts! We have to re-set the temperature every single day.
YoungHouseLove says
Oh no! So sorry about that! Ours has been right on 0 since we got it (and the fridge stays on 37). Maybe call the manufacturer and get it looked at since it’s hopefully still under warranty?
xo,
s
Mariah says
Well shoot – thanks for letting me know! We actually did call the manufacturer and the woman we spoke to told us it is designed to have something to do with the temperature differential between what we have the freezer set to (0) and the temperature in the house (60 – 70 since we let the temp go way lower while we sleep), but this just sounds wonky to me! We’ll just have to keep trying to figure it out, I guess!
Keep up the awesome work with your house! It makes my day to read all about it. :-)
Mariah
YoungHouseLove says
Aw man, so sorry you’re having issues Mariah! Hope it all works out!
xo,
s
Jen @ The Decor Scene says
Love it!!! Also love the use of the tripod…awesome use!!! I wish our frig was more built in like yours. Well if we ever redo our kitchen, I’m asking for the frig to be built in. You two are so handy. WOW the kitchen is really coming together and how exciting that you are opening the DR wall soon…can’t wait to see it happen! :)
Margaret says
There is some crazy perspective wackiness going on in that first picture of it standing up with Sherry. It looks like it’s 2ft taller than the fridge! Makes my brain hurt!
YoungHouseLove says
Haha- it’s true! And it looks like the built-ins are about a foot higher than the fridge in that shot!
xo,
s
ashlee@238windsor.com says
i would be saying TA DA if it were me! this is great! question – are you planning to keep the green colour scheme? question again – will you be using oil primer on the cabinets? i recently had a horrendous experience with priming cabinets.
YoungHouseLove says
Yup, so far we’re planning to keep the artichoke walls (they look great with the backsplash tile and the dark wood floors) but can always repaint down the line if we change our minds. As for how we’ll paint the cabinets, we think we’ll follow the same steps we took to paint the office cabs (Kilz no-VOC primer + Benjamin Moore Advance aklyd paint).
xo,
s
ashlee@238windsor.com says
i cannot wait to see the end result! it’s like christmas.
melody says
No Way! You guys are amazing! It makes such a difference!
Ashley @ A {Blonde's} DIY Life says
I can’t believe how amazing easy you made that look! It is seriously going to look fabulous when everything is completed! I can’t wait to see it!
Monica says
Looking great! If you have issues finding doors that match, you could always build in a wine bottle rack. I’m sure you could also think of another neat function as well. I’m loving your kitchen remodel.
Samantha says
Love the built in! It turned out great. Your whole kitchen renovation is super exciting! Cant wait to see more :)
Anna Scherling says
Just curious if you’re going to do anything about the open space behind the cabinet (between the back and the wall) since it’s open to the top of the fridge and the (awesome) built in isn’t conducive to frequent cleaning of the top of the fridge. Although with the sweet vent hood, I’m guessing you won’t have to deal with the nasty grease dust getting down in there. :)
YoungHouseLove says
We’re planning to lay something thin over it (like a flat piece of wood veneer) – just so it doesn’t get crazy dusty back there and things don’t end up falling behind it.
xo,
s
Lindsey says
Squeeee! It’s happening so fast! (to me, anyway, haha)
Your kitchen project is making my fingers itch to start on my own kitchen. We have been slowwwwwly trying to figure out what our kitchen style is, and agonizingly realized that the dark mahogany I painstakingly stained the cabinets 4 years ago is so.not.us. I breathed the words “white painted…” and hubby almost fell dead on the floor. So for the moment, I’m living vicariously through y’all.
So, thanks for that! :)
Cortney says
This is so EXCITING! It is so fun to see all of these steps DIYed. I obviously have seen this in custom kitchens but I would not have ever thought of looking for secondhand cabinets and building this myself.
I’m really excited we are finally getting a Habitat for Humanity Restore soon here on the Cape! Its prob. gonna be teeny like our goodwill but hey it’s something!
I can’t believe how fast you guys are moving through this! Good Luck its looking good so far!
Ashley @ Lewis in Love says
Looks awesome as usual!
kathy says
Looks great – good thinking about opening the doors as well as it sitting flush with the fridge. Our fridge is built in but squeezed in between the counter on the right (which houses the dishwasher) and the wall on the left so we can’t get out our ice box from the freezer if it gets jammed or stuck. Our cabinet also is back a few inches from the top of the fridge and I have to stand on my tip toes to get anything out of there (and I’m 5’8″!)
tina says
I can’t let my husband see the tripod “jack” or I’ll never be able to find my tripod again !!!
Emily says
I’m sure you’ve answered this question already, but I can’t find it in all the comments. Why aren’t you doing the flooring first? Won’t you have to pull out all of the cabinets and appliances again to install the new flooring in the kitchen? Can’t wait to see more pictures as it comes together!
YoungHouseLove says
When you’re using existing cabinetry like we are, you do floors afterwards since you won’t be tearing out all the cabinets and doing it from scratch. It’s usually one of the last things done actually, that way the floors don’t get dinged up when doorway demo is done and counters are installed. Then you slide out the appliances, do the flooring around the existing cabinets and the new ones (so everything stays the same level) and slide the appliances back in. Hope it helps!
xo,
s
Lisa says
I also have a question about the floor. I know you will be removing the old vinyl tile before laying the new floor. It looks like the new fridge cabinet is partially sitting on the existing tile, and partially on subfloor. Will you be removing the fridge cabinet in order to get that part of the old floor up? Why didn’t you do that small area before installing the cabinet? And is the cabinet unlevel right now because of the floor? Sorry, it’s buggin’ me!
YoungHouseLove says
We learned that we have asbestos liner under our tile so per regulations we won’t be touching the vinyl anymore (no more ripping it out) so we’ll just fill in any cracks and build things up to make them level and then snap the floating cork over that!
xo,
s
Lisa says
Oh, bummer about the asbestos – don’t want to mess with that! Hope the increased height doesn’t cause issues with fitting the dishwasher under the counter, but I guess the cork isn’t very thick so hopefully it will be fine! I’m sure you’ve already checked that out. Love watching your progress and SO excited to see the wall come down next week!
YoungHouseLove says
Yes, the one thing we’re scared about is the dishwasher (hence all this waiting before we install it). We got extra thin underlayment and the cork itself isn’t too thick plus our dishwasher has legs that can be toggled up a bit to make it shorter so we hope it’ll work. We’re also removing the granite eventually so we might be able to shim up the cabinets if things get dire.
xo,
s
Eilene says
I was having younghouselove inspired fantasies about doing over my kitchen while getting ready for work this morning! I’m on the edge of my seat with every entry! You guys rule :-)
Harmony says
Can i just say… WOW. I am impressed. The look of the semi finished product is worlds ahead of what it was before, and i really appreciate how much re-use you are doing. I am hoping to do something similar in our new house and its nice to see a kitchen that isnt “gut/destroy/NEW” happy and instead looks at how we can improve, reuse, modify, and adjust. looking forward to more!
Kristen says
I totally agree! It’s the original way to be “green”… my father-in-law always says he’s been green longer than “any of those hippies out there driving a Prius.” (he’s from Mississippi, can ya tell?) ha! I just have to shake my head and laugh- because hey its true! Reuse what you have – better for the landfills, better for your wallet!