So, remember that microwave that we got a great deal on a couple of months ago? Yeah. Well. We returned it.
A few of you questioned why we needed “such a big microwave” when we originally posted about it, which did get us thinking that we don’t do all that much microwaving. A bowl of soup here. A bit of reheating/defrosting there. And when we took down the kitchen’s original black over-the-range microwave (which was just as wide as our oven – 30 whole inches)…

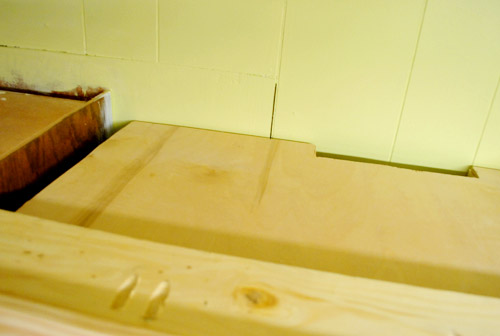
… we realized just how hulking the new 30″ one would look in its new home next to our pantry. See, we had originally planned to build it in there like the one in our first kitchen, but that meant that it would butt up right against the side of the window:
So two weeks ago (after seeing how nice and open the kitchen felt without a lot of those heavy, overbearing upper cabinets)…
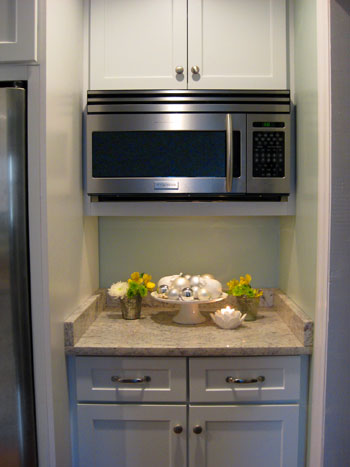
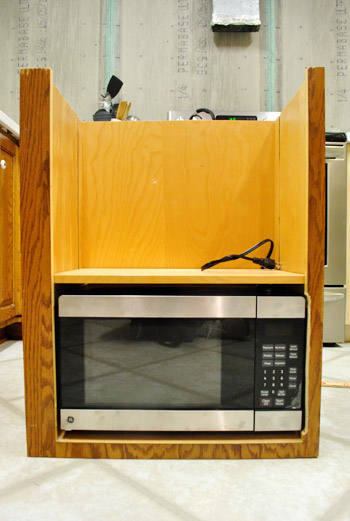
… we returned it and bought this much smaller countertop one instead for $84 (it’s 18″ wide). He’s nice and “modestly sized” as Sherry likes to say. I even tossed a tea mug in there for scale:
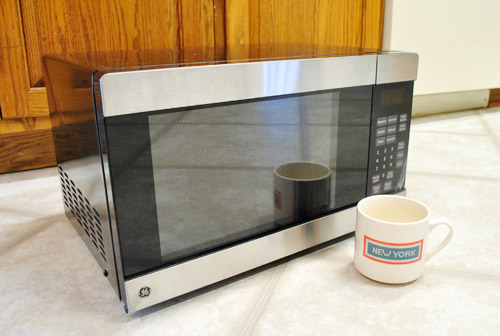
But much like the big original microwave that we got, we never planned for it to live on the countertop. Oh no, we got planz yo. This guy is getting built in…
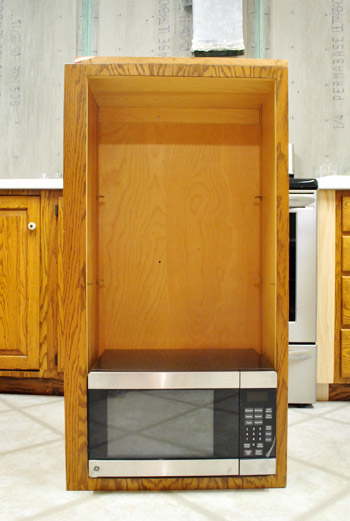
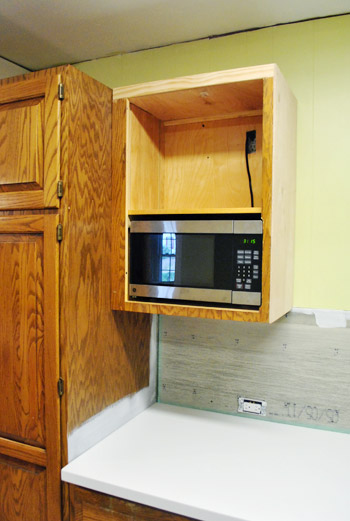
This is one of our old upper cabinets (it hung to the left of our old microwave when it lived above the cooktop) and it just happens to fit the microwave almost perfectly. It’s actually a bit snug around the frame, but the frame is built in around the front edge of the cabinet if that makes sense. So on the inside of the cabinet there’s about two inches of extra space on either side.
The only problem was that:
- the cabinet itself was too tall for its new home next to our pantry (it would hang oddly low as-is)
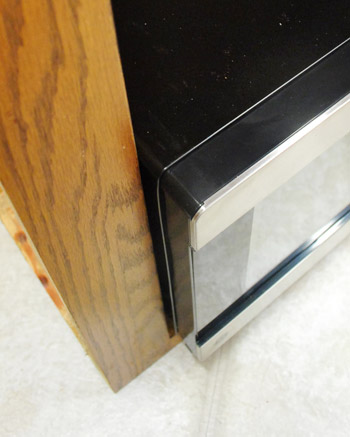
- it wasn’t deep enough for the microwave to sink back into it and look flush (with extra ventilation room for safety reasons)
So we had some work to do. We had to adjust the height and depth of the cabinet, then hang it next to the pantry with a new door. That way the infrequently used microwave can be hidden away most of the time and when it’s needed we can open the door and zap our food while allowing the appliance to vent (more on that in a moment). Oh and we already had an electrician add an outlet where the cabinet will hang, so the microwave will have power.
Many custom kitchens actually have built-in microwaves, like this one from here, and this one, from here. So we knew it could look great and actually be really functional (warning: read the paperwork on your microwave to see what type of ventilation it needs – some don’t need any except for the ready-made space under the little legs while some have a vent on the side or back that needs room for aeration, which is something we took into consideration as we went)
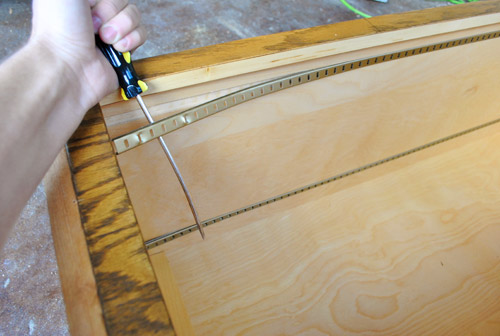
But back to the whole cabinet being too tall issue. First up was chopping that baby down to size. I started by prying out the metal shelf rails. Luckily they came out with almost no effort.
Then I measured, marked, measured again, leveled, measured again, double-checked my marks and leveled one last time…
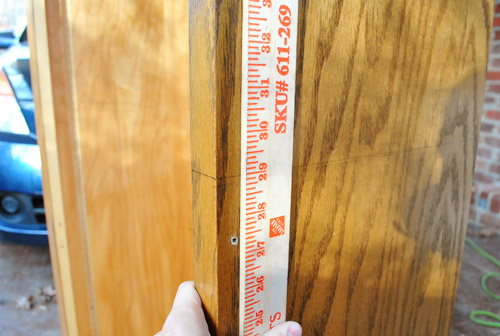
…before taking my jigsaw carefully along the lines I had drawn on each of the three sides.
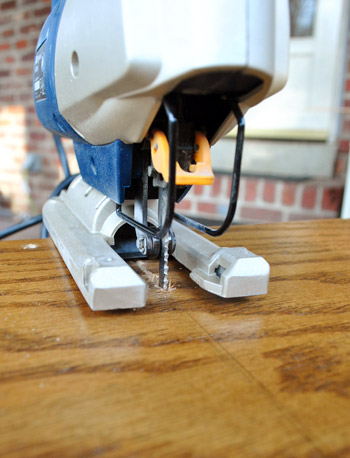
What I was left with looked like a bad magic act. All that was missing was a lovely assistant chopped into two lovely pieces.
Are you nervous yet? I was. Although I felt a bit better because this was my second time doing this (I tested this method on another spare cabinet that we weren’t reusing first).
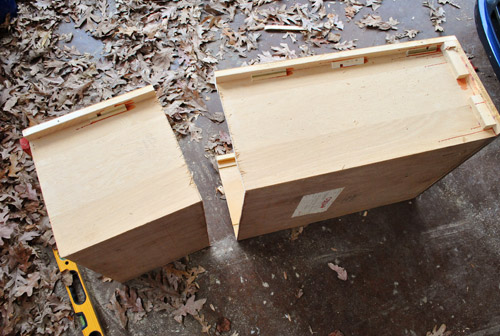
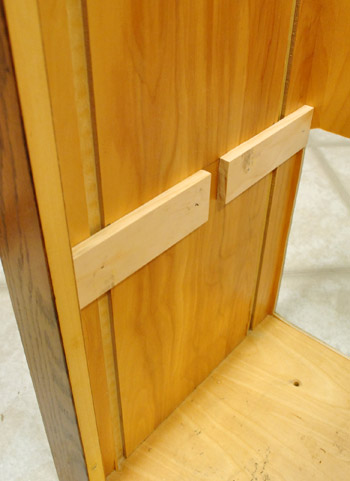
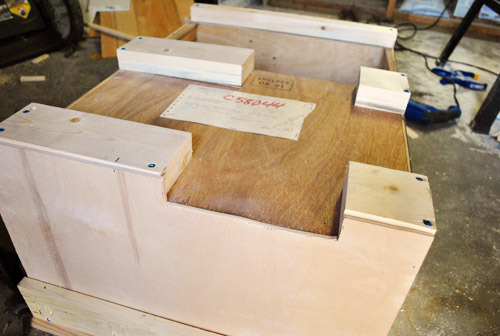
So that big cut started getting me to a better height, but I also had to cut a hole in the back to help with the depth/ventilation plan. Oh, and I had to put a slight notch in the bottom right side of the frame so that the microwave door could swing open more easily (this way we can shimmy the microwave over to the right in the cabinet, which gives the hinges on the left more room to swing so the door can open freely). Not to worry – it will later be concealed by a door.
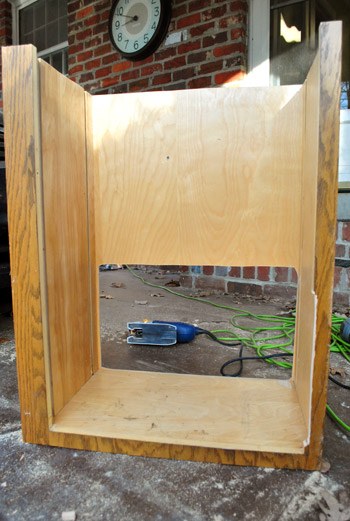
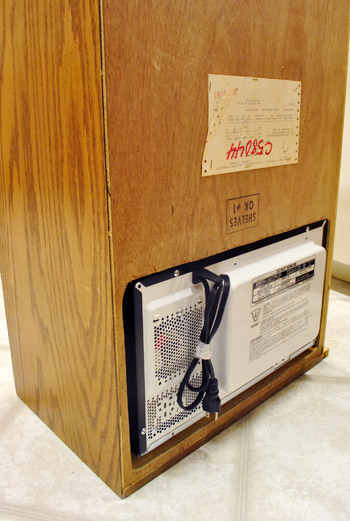
Here’s a shot to show how the microwave stick outs the back – which also helps it vent since there will be a column of “free space” behind the cabinet for aeration all the way up and out the top of the cabinet (more on that a bit later).
Enough looking at its backside. Let’s look at the front. Is this starting to make more sense? Remember once we add a door that small notched out area for the microwave will be concealed.
Oh, and I added that shelf above the microwave by nailing in some fixed ledges for the shelf (which we already had) to sit on.
Obviously the cabinet was far from being ready to hang. It needed a top, for one. And it needed some extra support on the back if it was gonna sit away from the wall enough to let the microwave vent out the back.
So we devised a plan, I made a sketch (which I don’t expect anyone other than me to understand) and hit up the hardware store to grab some wood.
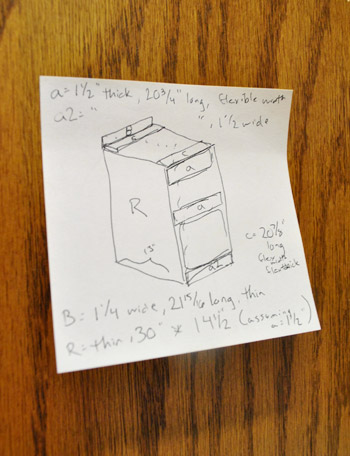
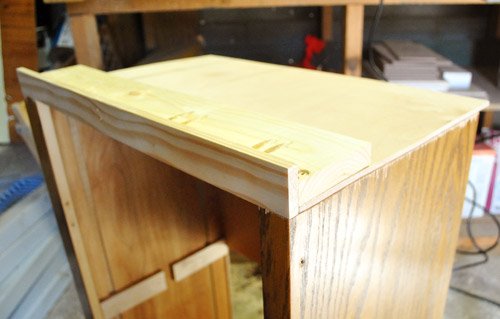
The new top was basically three pieces. A thin piece of plywood as a new top, a thin piece of pine on the front and a scrap piece of 2×4 to hold it all in place. It’s looking a bit rough at the moment, but bear with me…
Along the back I screwed in a few blocks of 1 x 4″s doubled-up. This way the cabinet will sit away from the wall a couple of inches and I still have solid wood to screw into when we go to hang the cabinet. Oh, and we cut a wide channel in a couple of the blocks to (broken record alert) help the microwave vent up the back.
Last but not least was the side. For this I used another thin piece of plywood that I clamped on tight, cut to size, and then nailed in place.

After all that “fun” stuff, it was looking more like this:
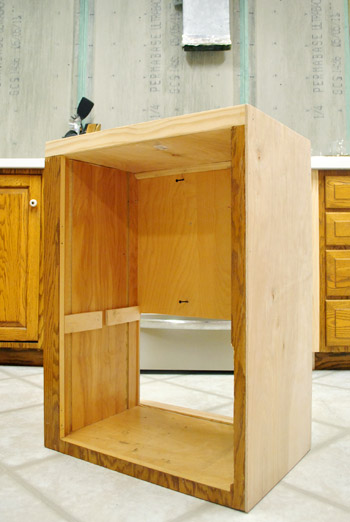
Significantly more cabinet-like if I do say so myself. Especially once it all gets painted the same color with a door in the front and some shiny new hardware.
Then with the help of my lovely assistant (nope, not the one I pretended to cut in half earlier in this post) we hung this Frankstein’d cabinet in place.
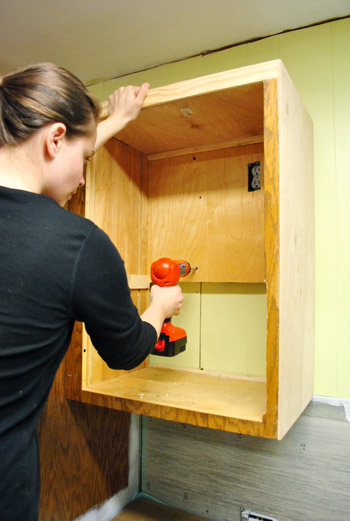
Here’s a view of the top so you get a sense of the venting on both the back and side. I drilled some holes in the left side of the cabinet to take advantage of the gap between it and the pantry (the gap exists because the cabinet frame was wider on that side).
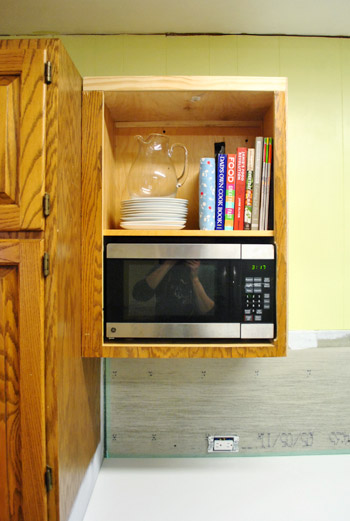
So with cabinet hung, we put the microwave in place and plugged it into the outlet that our electrician put in when he was here about a month ago (more on that here).
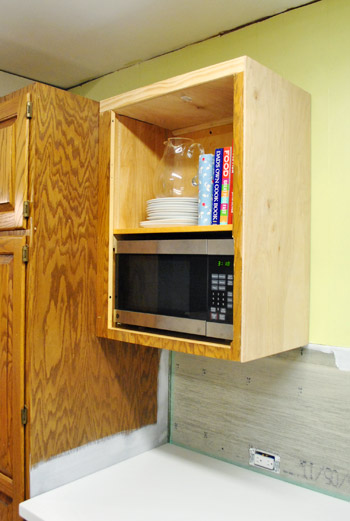
Of course it’ll look better once it has a door on it (and when it’s all painted) but even with the addition of some cookbooks and plates it’s starting to look more presentable. Even if just a little bit.
Update: as for that little routed out area that will only be visible with the door open, many of our cabinets are less than gorgeous when they’re open (picture them stacked high with cookware, blenders, tupperware, and all sorts of other stuff!) so we’re of the “what happens in the cabinets, stays in the cabinets” mindset. If the doors are closed and the kitchen looks good, we’re happy!
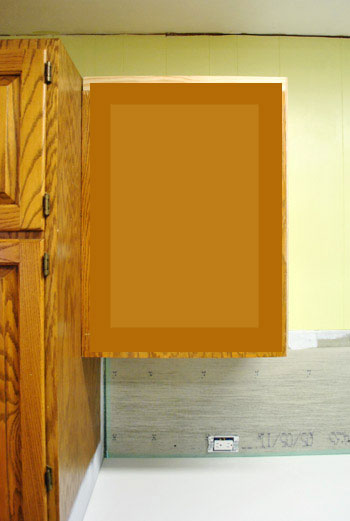
This makes us all the more excited to take care of the door situation – which we’ll hopefully be posting about later this week. Until then, allow this terrible photoshopped rendering to demonstrate how the added door will hide the little routed our area for the microwave when it’s closed (it’ll be open whenever the microwave is in use, of course).
Oh and with this cabinet now hung next to the pantry it leaves us 14″ to the right of it (between the side of the cabinet and the window over the sink). And once the new 12″ deep floating shelves get hung on the oven wall of the kitchen there will also be exactly 14″ between the front of those floating shelves and the right of that window over the sink). So it won’t look crowded, and will actually be nice and balanced. Whew.
Getting the whole cut-down microwave cabinet thing done also makes us excited about our shrinking budget. Not only did we get $255 back for returning the jumbo microwave, we also sold our old over-the-range one on craigslist for $90 (which adds up to $345 back in the ol’ kitchen piggy bank). Plus, we craigslisted our old kitchen table & chairs for $120 and actually sold our old granite counters for $350! If my math is right, that’s $815 back in our pockets… well, it’s actually $731 after we take out $84 for the cost of the new microwave. Still, over seven hundred beans is definitely a welcome “kitchen refund” as we get to that hard “middle part” of the makeover that has us eager to reach some of the bigger changes that we’re slowly but surely inching towards.
No one wants those cabinets painted and the new backsplash hung more than we do, but we’re trying to be realistic about the timeline in here (we originally estimated that we’d be done sometime in January, which we still hope to accomplish). We don’t know how much we’ll have done for the holidays, but at the very least we’ll have our microwave concealed by the time company arrives (oh man, I first typed that as “by the time cabinets arrive” – clearly I’ve been spending too much time in the kitchen). And just to lay it out for anyone wondering what our next steps are, they’re a little unglamorous for a bit longer – and then they should get a lot more exciting:
- cut down all the doors for the cabinets that we added
- add window trim and build a window sill (we had to strip the window over the sink down here)
- add toe kick around all the cabinet bases to make things like the peninsula unified with the rest of the kitchen (we’ll hold off on adding shoe molding until after we do the cork floors later)
- remove all the cabinet doors (after making sure they hang straight and are fitted correctly) and wood putty and sand any gaps/cracks/old hardware holes, etc
- prime everything
- and then we get to paint – yeee haw! (we’re still torn between white and a soft tone like gray-beige, but we’ll share as soon as we’re sure!)
Continuing the list after that step gets us all clammy and overwhelmed, but a new lighting plan, cork floors, and backsplash tile with floating shelves and a built-in range hood are all on the agenda. One cabinet day at a time. What have you guys been doing in the kitchen? Demo? Holiday cooking? Painting? Microwaving?

Heather says
The kitchen updates are so exciting!!!! :-D Thank you!
Meg@Keeping up with the Jenks' says
Brilliant! Absolutely Brilliant. Can I just say that John’s woodworking skills are becoming, dare I say, experienced/professional? I’m super impressed (and jealous).
YoungHouseLove says
I know right? So proud of my hubby! It’s amazing to think that before Clara was born he hadn’t built anything- but her arrival spurred him to make some floating shelves for her room and the rest, as they say, is history.
xo,
s
annabelvita says
$84 is much nicer than $255 and it looks better too! Good work.
Abigail says
Such a good idea! I’d love to build my microwave in, just not sure where I’d put it in the tiny kitchen… But everything is coming together great!
Amanda @ Our Humble A{Bowe}d says
You know, we had similar plans to build in a microwave. But, we built the cabinet BEFORE we had a microwave (or the counters in) so we didn’t know how wide we could make it. Alas, it’s about an inch too narrow to put even a .7 cubic foot microwave in. Boo. So, now we’re trying to figure out a different plan, but we have only three upper cabinets. I think your solution is great, though.
And, we’ve been doing much of the same stuff to our kitchen that you have. Here’s everything so far: http://ourhumbleabowed.wordpress.com/category/our-house/our-kitchen/kitchen-renovation/
emily says
I love the idea of concealing the microwave, and your build looks incredible, John.
Thanks for keeping us all up-to-date with your kitchen progress. I know we’re all eager to see the finished product!
Rebecca @This Nest is Best says
That is such a fabulous idea to have a smaller microwave and hid it in a nice little cabinet! They are never all that wonderful to look at in the first place :)
heather says
I’m a fan of the smaller & built in microwave myself – and of appliances not sitting around on counters. I can’t wait to hide a few myself. We’re actually doing a hidden microwave like the photos above, with a sliding face. Ours currently is absolutely massive and sits on top of our fridge. The bohemith has got to go. Just about the only thing I’m okay with staying on the counter for good down the line is our stainless steel kitchenaid mixer. Everything else will have specific spots built in for them.
Kristen @ Popcorn on the Stove says
That’s such a great fix! I think that this looks much better than the original microwave you guys had chosen. I also like that you’ll be hiding it behind a door. I’ve also seen people hide them in islands which at first I thought was weird but I actually kind of like now.
Anyway, great job on the progress! I’m always so amazed at what you guys are able to come up with and DIY!
Audrey says
I still can’t believe you guys are doing this all yourselves. Very impressive! Can’t wait to see the next steps!
Elisa @ The Self Life says
A hidden microwave! Ingenious! Wish I had a picture but we currently have all the doors removed on the bottom half of our kitchen (it’s a big kitchen – not complaining but we’re doing bottom first, then top) and they are prepped for painting. Current feelings = -097*&%*^#*#()!!!
YoungHouseLove says
Haha, I can totally relate to those feelings! You can do it though- it’ll be so worth it when you’re done!
xo,
s
Elisa @ The Self Life says
I bet you can! I’ve run a marathon before and it is TOTALLY similar. Mind over matter and you want to get it done just so you can tell people you’ve DONE it!
TheChangingHouse says
I also have a hidden microwave, except I have failed to show it on my blog! (I’ll post that soon!) Ours is below the counter, though, so nobody sees it, but us!
Great idea… I’m glad you returned the big one!
Melissa says
Please, pretty please paint those cabinets and finish your backsplash. I realize these things take time, but I’m living vicariously through your renovations and right now, I really need to see some painting progress! Everything looks absolutely fabulous. Thanks for sharing!
YoungHouseLove says
Haha, we’d love to jump on that as soon as we’re able! Obviously still have to cut down and fit all the doors and add all the toe kicks before we can paint, but we can’t wait!
xo,
s
Anya says
Thanks for the project update.. your kitchen looks great, and I love the concealed microwave.
I’m moving into a new apartment just after the holidays so I’ve been busy figuring out paint swatches, since our awesome landlord will have it painted for us before we move in to the colors we want. Although it makes it super hard to really know what colors to choose, since we don’t get time to live in the space and have our stuff in there.. So we’re sticking to neutrals. Thanks for all your painting posts, and about minimizing the color changes in a home.
YoungHouseLove says
Wow- what a nice landlord! Have fun and good luck with the big move!
xo,
s
Anya says
Thanks! I’m just so happy not to have WHITE walls, but I don’t want to go crazy with painting all the colors of the rainbow.
Lindsey @ arkadian belle woods says
Awesome! I think this is a much better choice! Now you have room to breathe!
Rebecca @ the lil house that could says
I’m glad to see my husband isn’t the only one that ends sentences with yo when writing posts :)
YoungHouseLove says
Haha, he’s in good company!
xo,
s
Katy says
Ohhh, pretty! No demolition here, just peppermint bark and pulling out the spanx for all the holiday food! http://thefirstapartment.blogspot.com/2011/12/peppermint-bark.html
~Katy
YoungHouseLove says
Haha, love it!
xo,
s
Staci says
Spanx. Wore some to my husband’s work party–the party that went ON and ON and ON. Thought I was going to pass out!
YoungHouseLove says
Hahaahahahah- I’ve totally had those experiences too. Felt like a sausage all night long!
xo,
s
Jess says
Maybe I’ll showcase myself as a newbie, but how did you secure the cabinet into the wall? That’s always my greatest fear when hanging things is that the wall won’g be strong enough or my screws won’t be deep enough. What did you guys do to make sure it will hold the weight?
YoungHouseLove says
We use heavy duty 3″ cabinet screws. They were actually the same screws that hung all of our original cabinets, so we knew they would hold their weight (and just saved them during the process of rebuilding the cabinet so we could reuse them). Hope it helps!
xo,
s
Julia @ Chris loves Julia says
Wow. John, you typed that so nonchalantly as if you hadn’t performed a miracle! I am SUPER impressed with your skills. We aren’t doing much in our kitchen right now–besides making sure the candy dish is stocked with red and greed peanut butter m&ms–important stuff. After we finished our basement a week ago ( http://chrislovesjulia.blogspot.com/2011/12/guest-roomoffice-reveal-its-here.html ) we have taken a break from the power tools and paintbrushes and are FINALLY getting our Christmas shopping/making done. :)
YoungHouseLove says
Ohemgeee, hilarious story. As I read this comment I called out to John who was in the other room and said “People think you’re woodworker of the year!” and he said “What? People think I’m handsomer in a beard?”
Bwahahahahha. True story. Still giggling. And congrats on finishing the basement!
xo,
s
Lindsay says
hahahaha that IS hilarious!
Julia @ Chris loves Julia says
Hahahahha! We’d have to see John in a beard first before deciding if he is handsomer. Hahaha.
P.s. *red and greeN, not red and greeD. Although peanut butter m&ms do make me kinda greedy. ;)
heather says
bwahahahaha. I think John should grow out a beard until the kitchen is finished.
Heidi P. says
Beard beard beard beard! DO IT!
As for the microwave/cabinet – awesome.
Soulmaz says
I would say some tone of gray cabinets, since the counter top is white, although walls are yellow/greenish & white might be better, decision decision :)
karen says
looking good! you guys are really good!
just send those cabs to a painter and have them quickly spray them! if you were in toronto you could go to my father in law for a cheap price!!
YoungHouseLove says
Aw that would be nice! We actually just have to get to the point where they’re ready to be painted (build some missing doors, add toe kicks, etc). Then we should be good to go since we primed and painted our last kitchen’s cabinets too!
xo,
s
Haley Hill says
Are you putting in the same door as in your inspiration pictures to cover the microwave? The kind that opens from the top and slides back? Or just a regular cabinet door that hinges on the left? If you did a regular door, it seems that it might hit the cabinet next to it, but I’m sure you have already thought of that! I love waiting to see what you will do next!
YoungHouseLove says
We’re just doing a regular door that swings. There used to be a cabinet hanging there with a door that swung that way so it worked just fine (lots of cabinets seem to swing open next to each other and still work, thankfully)! Here’s hoping…
xo,
s
Jenn(ifer) @ heim-elich says
Oh, I had that problem too – with the one cabinet being counter deep and the other one an upper cabinet. It all depends on the handles you have, their position on the door and the with of the frame… So I would suggest testing that before you paint (so you don’t have to get three sets of doors like I did…)
http://heim-elich.blogspot.com/2011/08/neue-locher.html
(at the bottom of the post) and
http://heim-elich.blogspot.com/2011/08/wasserhahne-dekorleisten-griffe.html
I know everyone can’t wait for you to get done, I can’t either, but I also love that you can’t make it happen overnight, because it is so much more real that way and makes me feel better about needing time to finish projects as well :)
YoungHouseLove says
Thanks Jenn! We definitely are of the test-at-least-three-times mindset! Haha.
xo,
s
Jen A says
Sweeeeet. At the end of this adventure, will you be summarizing your total $$ spent?
YoungHouseLove says
But of course- a full budget breakdown (and happy dance for being done) is on the agenda!
xo,
s
Shannon @ Bungalow960 says
It’s really starting to come along! What a wonderful idea for the microwave. It has me thinking…. do I really NEED my giant hood microwave? Wouldn’t it look so much nicer without it? Look what you’ve done!! Haha
Chrissie says
Haha I’m doing the same – thinking that our next microwave can probably be smaller, since we mostly use it for defrosting (the amount it gets used for that is inversely proportional to how organised we are – right now it’s used a lot!) and reheating things.
Maureen @ This (Kinda) Old House says
I have really been wanting to do this also. I hate how big my microwave it and would love a smaller, built in one. all in due time. We are sorely lacking in countertop space, so to get the microwave off of it would be a huge deal for us. I have done nothing in my house in weeks, so at least I can live vicariously through you guys. :)
Mari says
In your Christmas tree post yesterday, you include one picture in which you can see through to your kitchen. It would appear in that photo that the microwave cabinet already has a door. Is that right?
YoungHouseLove says
Yes, it was semi-fitted (leaning up there, but not completed/hinged) – still working on that! Details as soon as we can snap some photos and write up all the details of the process for you guys!
xo,
s
Margaret says
omg, who has eyes that freakin good? I’m always impressed that everyone notices these things, I don’t ever. Maybe it says something that I never finished those Highlights “find 10 things that are different about these two pictures” things.
YoungHouseLove says
Haha, you guys are good!
xo,
s
Erin @ One Project at a Time says
I would love to hide my microwave… I’m off to draw up some plans. In the mean time this totally reminded me of my little cupboard Houdini project, when I split my ‘L’ cupboard in half. Not nearly as scary as I imagined it would be… http://oneprojectatatime.blogspot.com/2011/06/171-flying-solo.html
YoungHouseLove says
Awesome job!!! I love that open look!
xo,
s
Julia says
This is such a cool DIY. I kind of like the cabinet sans door, but by now I trust that ya’ll will have an end result that is better than what I can visualize. Great work John! (And great work watching Clara, Sherry. You two amaze me. Kid watching and working is NOT easy without a nanny. Which I don’t have. Just saying.)
Rebecca Armtage says
My husband and I are closing on our first house the 22nd (not really sure what we were thinking when we picked a date TWO DAYS before Christmas – yikes) We have to completely redo our kitchen. The room is 10′ x 20′ but the actual “kitchen” part was only 6′ x 5’6″!!!! WHAT!!! So needless to say we needed to rectify that haha.
So we’ve got carpet to rip up – yup, carpet in the kitchen, BLEGH – electrical needing to be moved and added, plumbing to be redone, gas lines added, stucco ceiling sanded down, wallpaper removed, cabinets, walls, counters, ACK! Definitely a lot to be done…hopefully we don’t get too sick of microwave/crock pot cooking haha.
YoungHouseLove says
Good luck with everything! I bet it’ll feel like a whole new place when you’re done!
xo,
s
Krissy says
@Rebecca: I close on my first house tomorrow, with tenants remaining in the house until xmas eve. This means my first official day in the new house is xmas day. I’m pretty sure I AM crazy. :-/
That said, I’m not getting the u-haul truck until mid January, as I have my current rental house until the end of January. But, still.
Best of luck on your move/projects!
YoungHouseLove says
Good luck Krissy! And have fun!
xo
s
Rebecca Armtage says
Oh wow Krissy, that should be fun! Haha we are also lucky that we don’t have to be out of our apartment right away…we’re moving most things Christmas Eve day…good thing we both have huge (both in physical size & numbers) families to help hehe.
Good luck with your move!
Chrissie says
We got the keys to our house on December 23 as well (almost three years ago now – where did that time go?). We were too poor for a moving truck (as under-25s the hire rate went up drastically) so we used an assortment of cars, trailers and vans, and ended up finishing the move on Christmas day!
It was crazy, and the most expensive Christmas present either of us has ever bought, but it was so worth it :-)
YoungHouseLove says
Wow- that’s amazing! What a memory!
xo,
s
amandita says
As I was reading this post I was shocked..I just assumed that during the kitchen redo you would be eating a lot of take out and reheating everything in the microwave. I would love to hear a post on your survival cooking methods throughout this process.
Can’t wait to see the penny tile up! You are doing an amazing job!
YoungHouseLove says
Oh no, we have a working stove and fridge and dishwasher (we made sure to do things on phases so we always had access to those things). Now we even have a sink again and a working microwave back up (and counters again!) so we’re cooking just like normal. Although we have heard that a crockpot can be amazing for times without a kitchen! In our last house we ate things like Hot Pockets and ate out all the time and felt sooooo sick of that life by the time the kitchen was back (it took 113 days!). That was crazy, so this time is definitely a lot easier to deal with!
xo,
s
Melanie @ Mailbox Journey says
Very nice. My boyfriend is currently obsessed with this microwave that is bigger than me and I hate it. I’m soon going to swab it out for a much smaller one and hide the big honker one. It will probably take him a month to notice anyway.
Mandi says
Will you be bumping out the outlet fixture and putting a faceplate on it, or otherwise trimming the outlet? (I can’t imagine you wouldn’t, lol!) My own thinking was that you planned to run the cord all the way up the backside of the bumped out cabinet – in the “vent” spacing. You could even get a 90-degree adapter so the plug goes in vertically, and need not be in the cabinet space at all. If it’s a matter of allowing for the cord to turn and plug in, could the cabinet be bumped out a bit further?
(And I so don’t mean to be that Picky Reader, but I know you value the posts as future tutorials . . . do you mean that the strips on the backside are 1×4’s? They appear shallow to be 2×4’s.)
I’m really enjoying watching your progress, I can’t imagine being in the thick of it over such a busy season – I’m taking notes about the sensible way you’ve done this to keep some workability in there (vs. a full tearout.)
YoungHouseLove says
Yes, we have since trimmed out the outlet and put a faceplate on! As for 1 x 4s, you’re right – all fixed!
xo,
s
Lindsay says
That’s usin’ your noodle!
YoungHouseLove says
Haha, that cracked us up. Both of our dads say that all the time.
xo,
s
Penny says
Noodle…use your noodle…noodle…do the noodle dance! Anyone else remember that from PB&J Otter? Nope?
YoungHouseLove says
I can honestly say I don’t remember that. Haha. But it sounds fun!
xo,
s
Penny says
Haha, showing my age I guess! It used to be on Playhouse Disney back in the day (early 2000s).
YoungHouseLove says
Too funny.
xo,
s
Jennifer (iffles) says
I’m always impressed with the vision you guys have – and the ability to turn that vision into reality. It looks great! Can we see a wider shot that shows it from afar more? I’m having trouble envisioning it in the space… even though I’m sure it looks fantastic.
YoungHouseLove says
We’ll have to snap a ton of wider shots for our next kitchen post about the door cutting down process! Soon hopefully!
xo,
s
katalina says
boy I wish John had a twin brother who lived next store…
I have seen kitchens (including my sisters) where she picked a lighter white color –for upper cabinets and a darker color for the base cabinets.
Please share the cabinet steps and colors –because I have been wanting to paint my builders fake oak for awhile and if I had your clear instructions, I might actually do it!
Tamar says
Another great DIY project! As far as cabinet color I think white is the way to go. In several of the apartment buildings I’ve lived in they’ve gone for that beigy-color and the paint seems to look rattier faster (granted, I doubt they’re being nearly as meticulous as you are when it comes to the initial paint job!). White just seems to be, counterintuitively, easier to maintain and always looks poppin’ fresh!
Happy holidays!
Lizzy says
yay for steps towards the finished product – and for savings!
oh, and the link to the property in CT that you provided has me so depressed that i can’t ask for a 5.2 million dollar xmas gift. insanely gorgeous house!
YoungHouseLove says
Isn’t that crazy? It just came up when I searched “hidden microwave” – so amazing!
xo,
s
Keely says
I keep hoping you guys will put up a post saying “Look! The cabinets are all shiny and white!” LOL Guess I’m not the only one! :) And for me, it’s just gratuitous internet reading. I bet you guys are dying to have it at that point.
The little microwave cabinet is delightful. I wouldn’t have thought to space it out from the wall for extra ventilation, but it seems like a really good idea.
Jen @ Domesticated Nomad says
Oh, my gosh, I was so confused when I started reading this because I thought the microwave was going in the bottom cabinets. Took me a minute to realize what was going on. :) Need more coffee, I think, so I can focus. But I do love the inspiration pictures of closing it in. That’s going to be awesome!
And, I love the opening! I knew I would, but seriously, every time you show a picture of it, it just looks right, you know?
Try not to get too worn out/frustrated with the length of time it takes to do this kind of remodel. It’s going to be so worth it in the end (which you know already, but I just want to encourage you.). :)
YoungHouseLove says
Aw thanks Jen! We’re definitely in that middle period where there’s still lots to do but you’re inching along wondering if you’ll ever be done! Although we know we will be someday- just can’t wait for that moment. Thanks for the encouragement!
xo,
s
Emily says
I’m so happy you went this route! I just couldn’t ever wrap my head around an almost 300 dollar appliance to heat up water! My folks have their microwave concealed in the pantry closet, and it makes the whole kitchen look sharper.
Hoorah! Looks great.
mp says
John, if you get tired of blogging, you could have a fine career as a carpenter! Well done.
Nikki says
When you guys said you had to cut down a cabinet I was thinking that the project was no easy task but John nailed it as usual! I can’t wait to see the woodworking skills for the cabinet doors. You guys are quickly turning into pros!
manyhatz! says
What a clean look! I do have a small uestion, though. I know y’all are enviornmentally friendly, and that plays a role on how you live/redo your home. Beyond that, what else do you take into consideration (besides price/uality)? ie would you NOT purchase a certain brand due to company policies?
YoungHouseLove says
We definitely just strive for balance. We reuse as much as we can and we recycle, compost, have a rain barrel, cloth diaper, only have one car, etc. But we don’t eat all organic or only buy organic furniture and clothing because it’s just not feasible or affordable for our family. It’s all just a balancing act. We try to buy local and support small businesses along with shopping at some big box stores when they have what we need at the right price (assuming they don’t have company policies that frustrate or upset us – there are definitely some stores that we like more than others, so we prefer to give our patronage to them). Hope it helps!
xo,
s
Julie says
You guys think of everything! I am anxious to see it done, but I am glad you are taking your time to blog about the small details too. They tend to be the ones people don’t consider and yet they make a huge difference in the end. I am learning tons! Thanks!
Lindsay says
I spent Saturday in the kitchen making some holiday goodies.
http://truebluecurlytop.blogspot.com/2011/12/weekend-stuff.html
YoungHouseLove says
Mmm, love them!
xo,
s
Amy @ Lovely Nest says
It looks great! We actually don’t own a microwave at all. We’ve come to find that we really don’t need it and have a way to heat everything we would’ve used a microwave for. My best revelation is that popcorn tastes way better when it’s cooked on the stove. Anyway, I like the idea of concealing it and I’m sure if we ever decided to get one, I would want to do something like this! Can’t wait to see it all come together, but I’ll wait patiently!! :)
E says
So it appears from the pictures that the cabinet is notched on the right, but the microwave opens on the left? Am I missing something? I can’t figure out how that microwave will open…. I’m sure it works but it is just hard to tell.
Looks great, though, love a hidden mirowave. Also love a microwave drawer….
YoungHouseLove says
Yup, it’s notched to the right so we can shimmy the microwave over to the right in the cabinet, which gives the hinges on the left more room to swing so the door can open freely. Hope it helps!
xo,
s
Karen @ Aurelia Interiors says
Looking good! Are you guys going to trim out the tops of the cabinets too? Also, I seriously cannot wait for that wall of penny round tile to go up! I will be curious to see how you drill holes for shelf support.
YoungHouseLove says
We’re currently on the fence about adding crown molding to the cabinets. We originally planned to do that but now sort of like the clean boxy lines and the modern feel so we’re not sure if crown is in the cards for us. Will keep ya posted!
xo,
s
Sarah @ Redhead in Ruffled Flats says
Just to clarify – you notched out the right side of the cabinet so the microwave could be moved over to the right a little more, therefore allowing more vent room and more room for the door to swing without hitting the left side of the cabiinet, right? I got confused when you wrote that the notch on the right side made the door open easier – but I think I figured it out right. Is that what you meant?
I think you made a wise decision scaling down the microwave, especially since you already had a cabinet to fit it! This is all genius, by the way. I can’t wait to get a house and use your renovating posts as inspiration to work on our own!
YoungHouseLove says
Yes, that’s exactly what we meant! Should clarify that better in the post, thanks!
xo,
s
Rachel Tatem says
You guys are WAY more adventuresome then I was… building your own cabinets!