We downsized to this 1,400 square foot house in Northwest Florida on May of 2020 after a fast, furious, and long-distance three-month renovation. You can read more about how we found ourselves craving a pared-down lifestyle for our family here and here (that last one is a really good synopsis of what led us to this exact spot). But onward to the before & after pictures!
NOTE: We created this Shop Our House page to help you hunt down any furniture/accessories that you see in our house, along with our paint colors.
The Exterior
We kept all of the same cedar siding, black metal windows, exterior doors, and metal roofing…
… but updated the decking, railings, front steps, and gave everything a fresh coat of white paint! You can see this post for more photos & details on the exterior renovation. And this post all about adding pathways and parking spots.
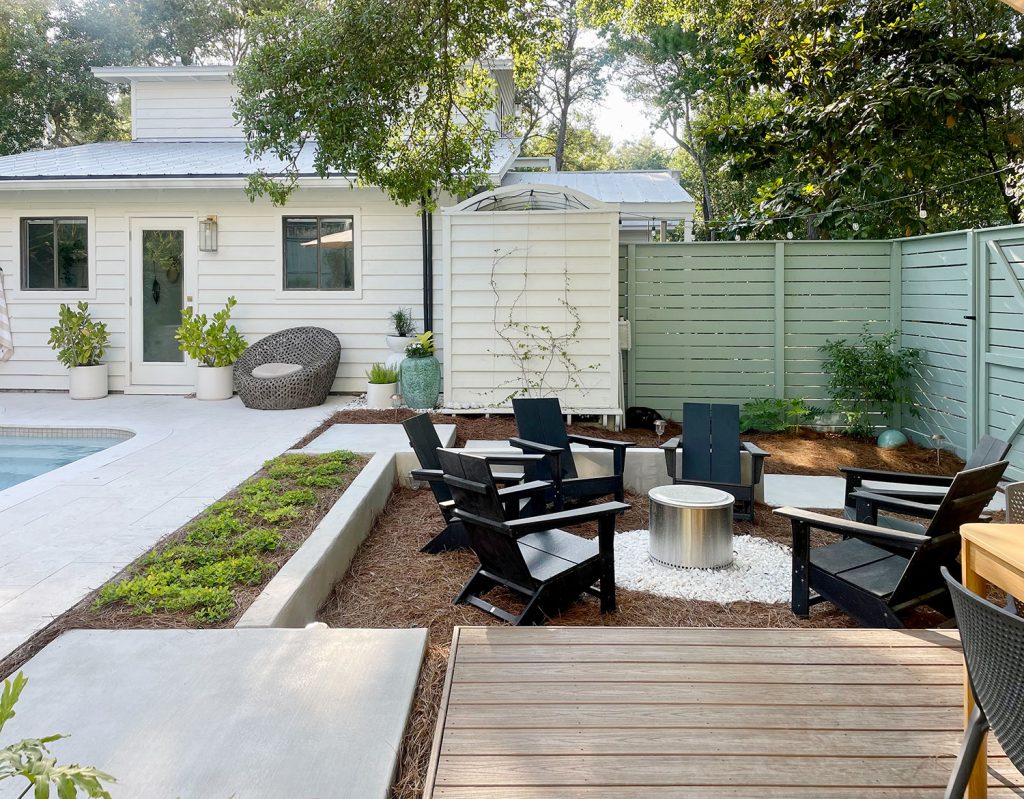
We also added things like a few rainchains & some gray-green fencing to define certain outdoor zones (like our firepit and pool).
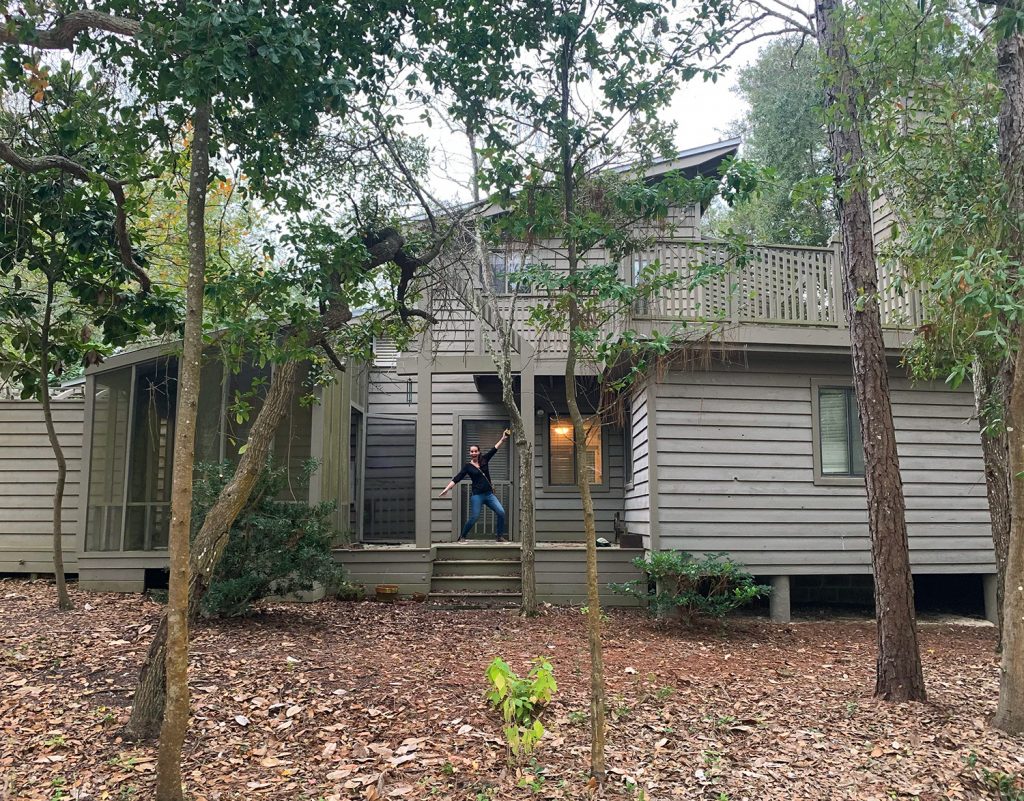
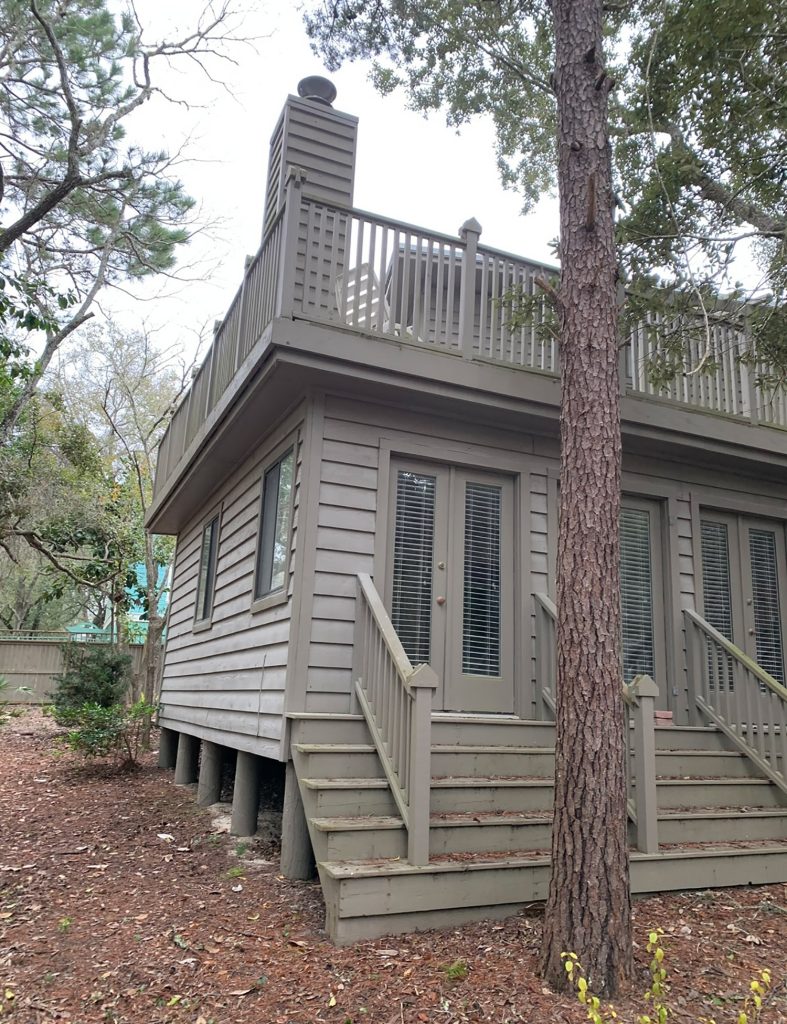
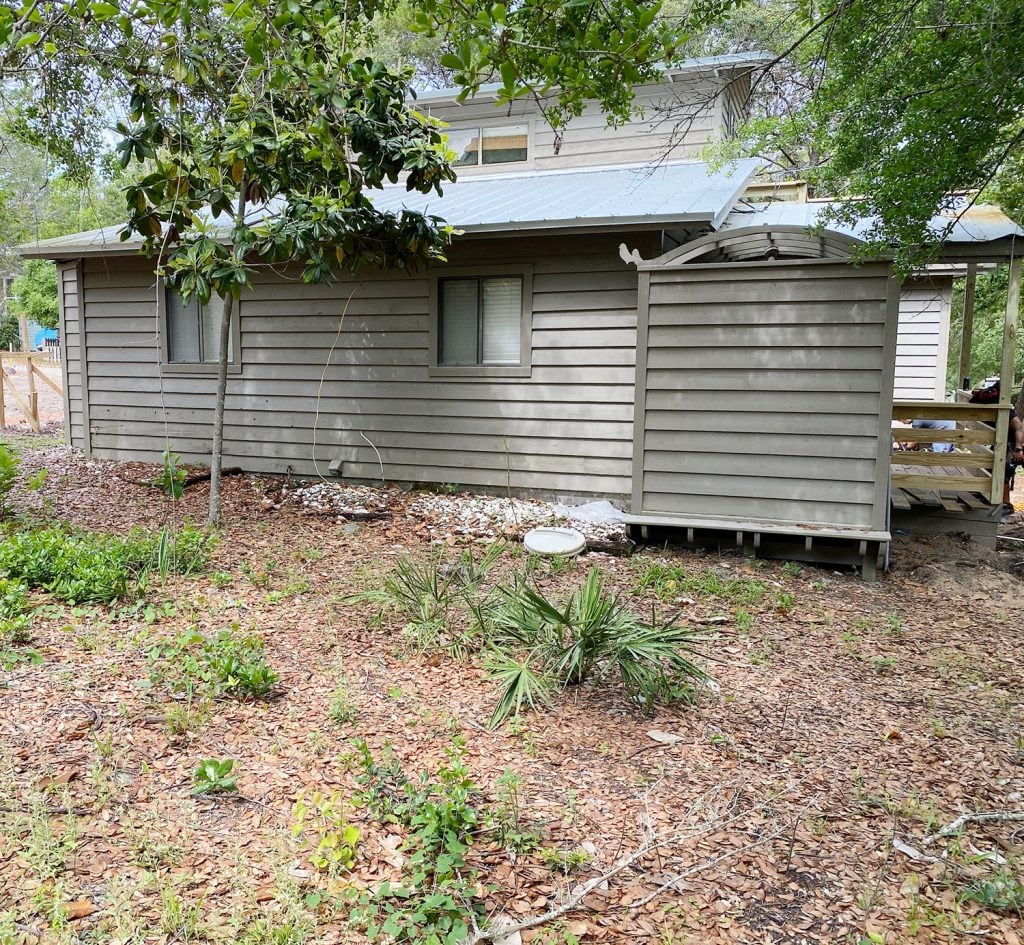
Here’s the side of the house as it looked when we bought it back in Feb of 2020:
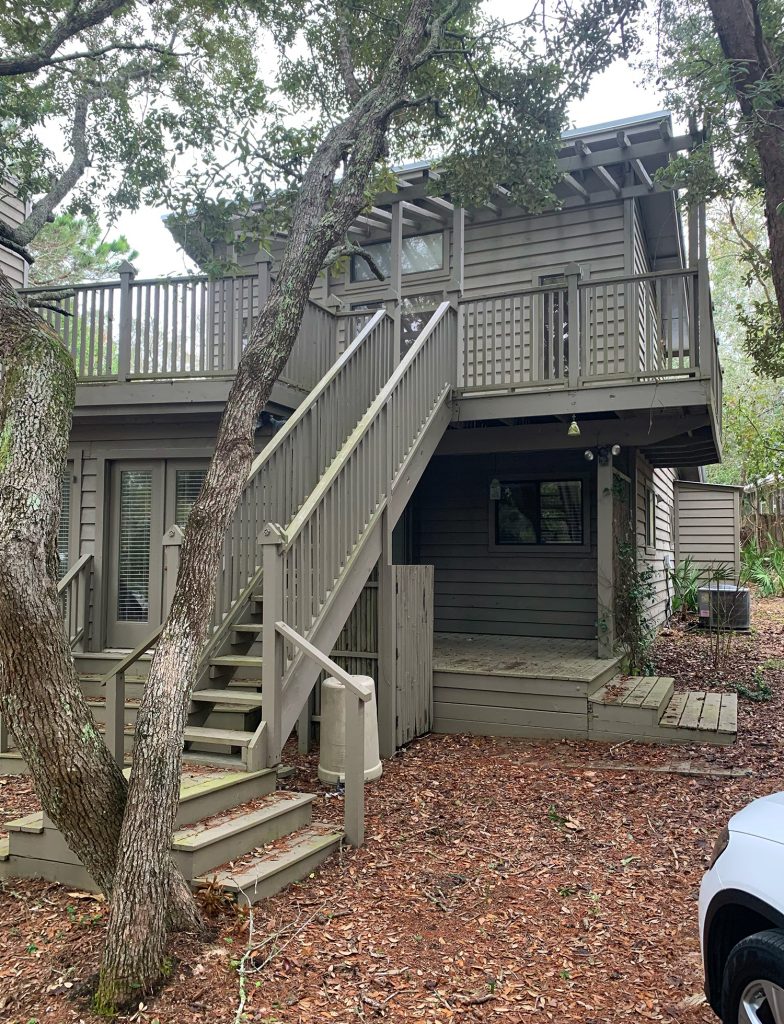
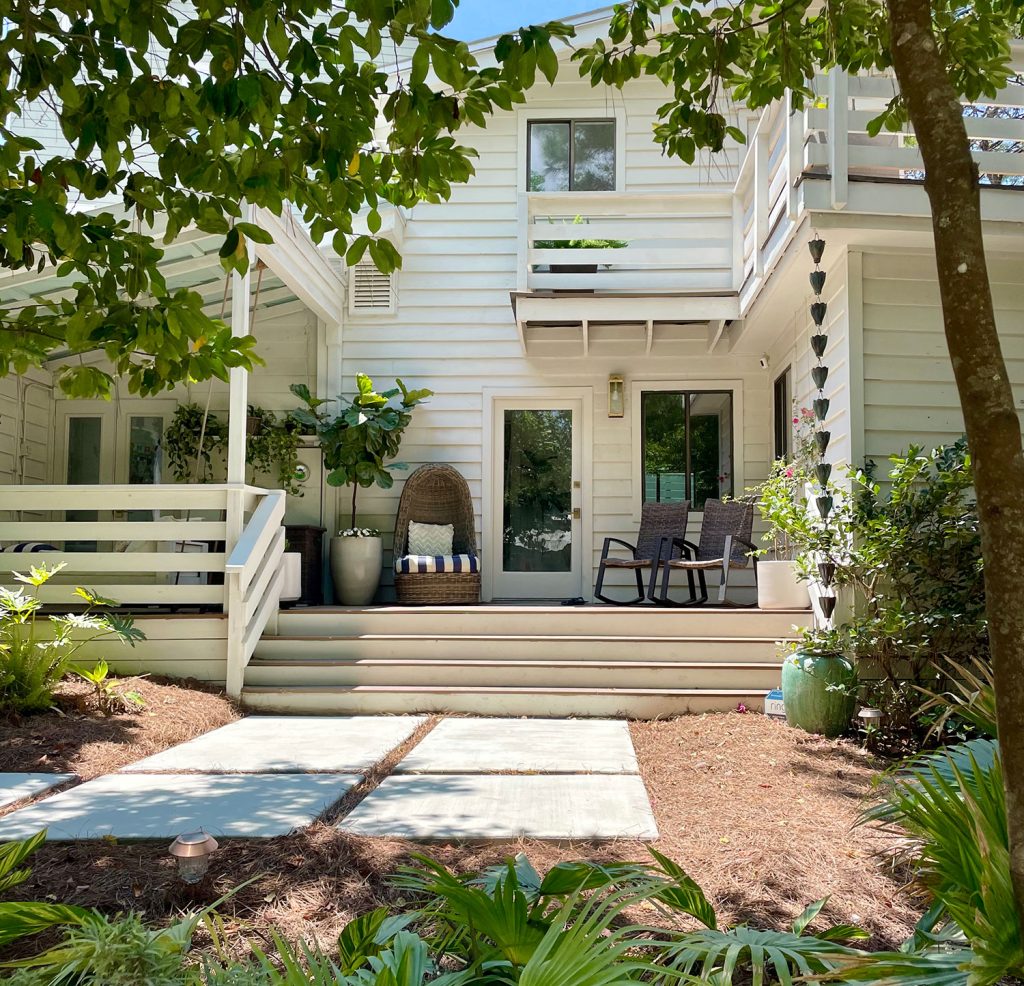
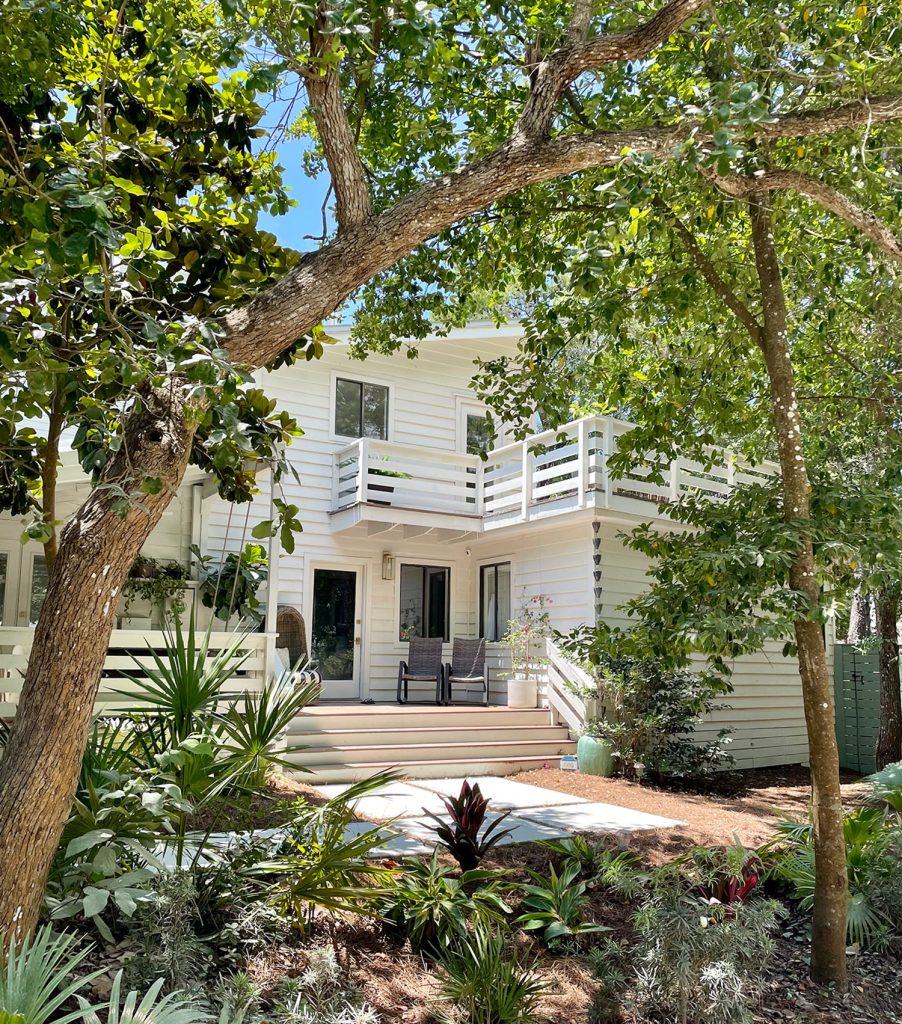
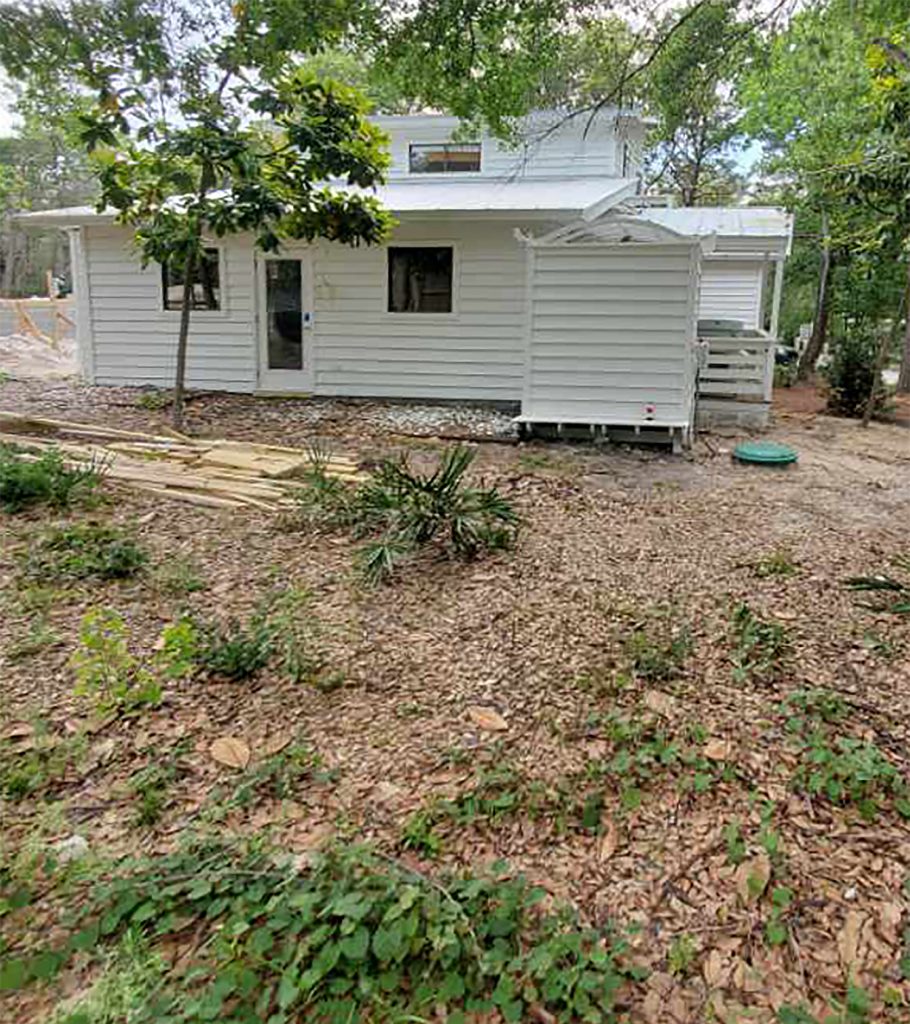
And here it is all painted, with new horizontal railings on that second-floor deck. Removing the steeply pitched steps to the upper deck instantly made us feel safer (someone outside being able to access our second-floor windows & doors just felt off). And replacing all the older wood decking with low-maintenance Trex makes the entire thing feel so much fresher. We also added those steps to the front of that porch, which now has a door that leads to our kitchen, but more on that a little later.
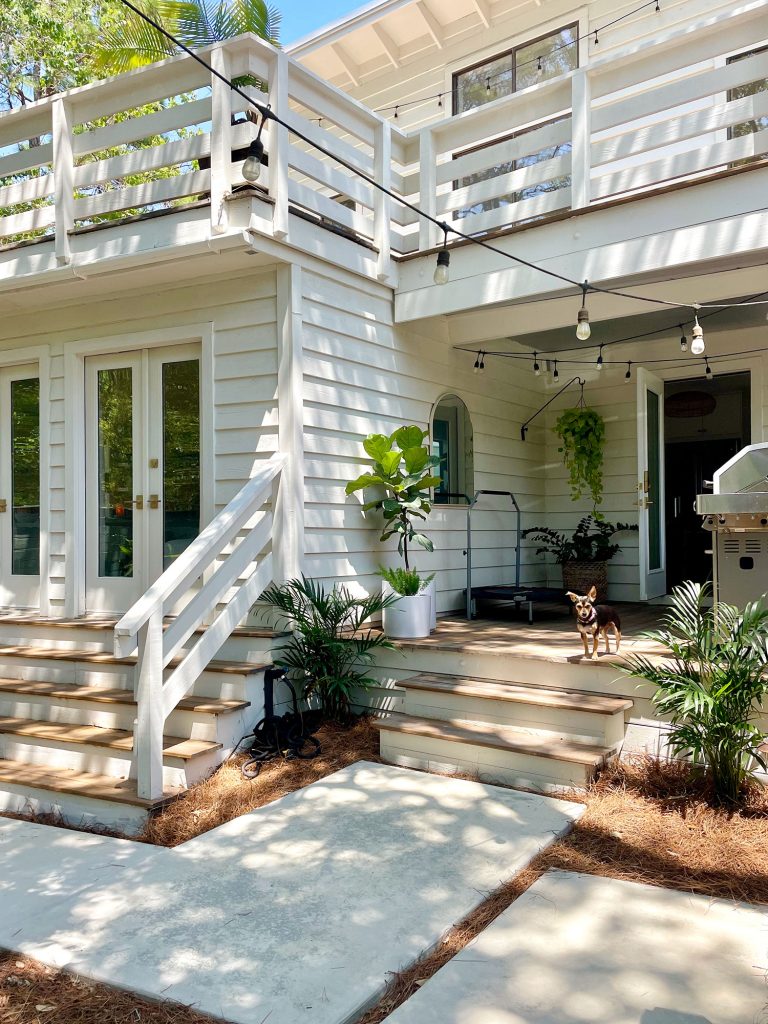
There’s more that we did to this side yard of our house (fences, plants galore, and a hammock – oh my!) but let’s pop inside for a second and head back outside again later on in the tour.
The Kitchen
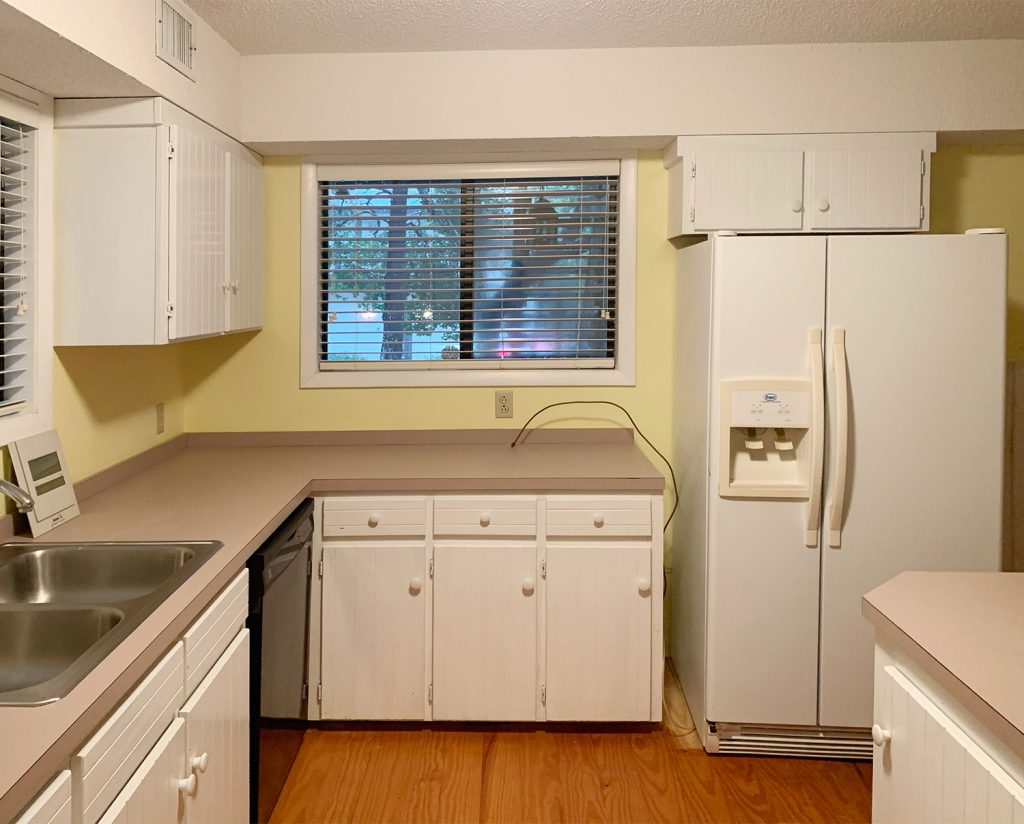
The kitchen involved some large renovations and some small projects to get it to its current state. This is what we started with:
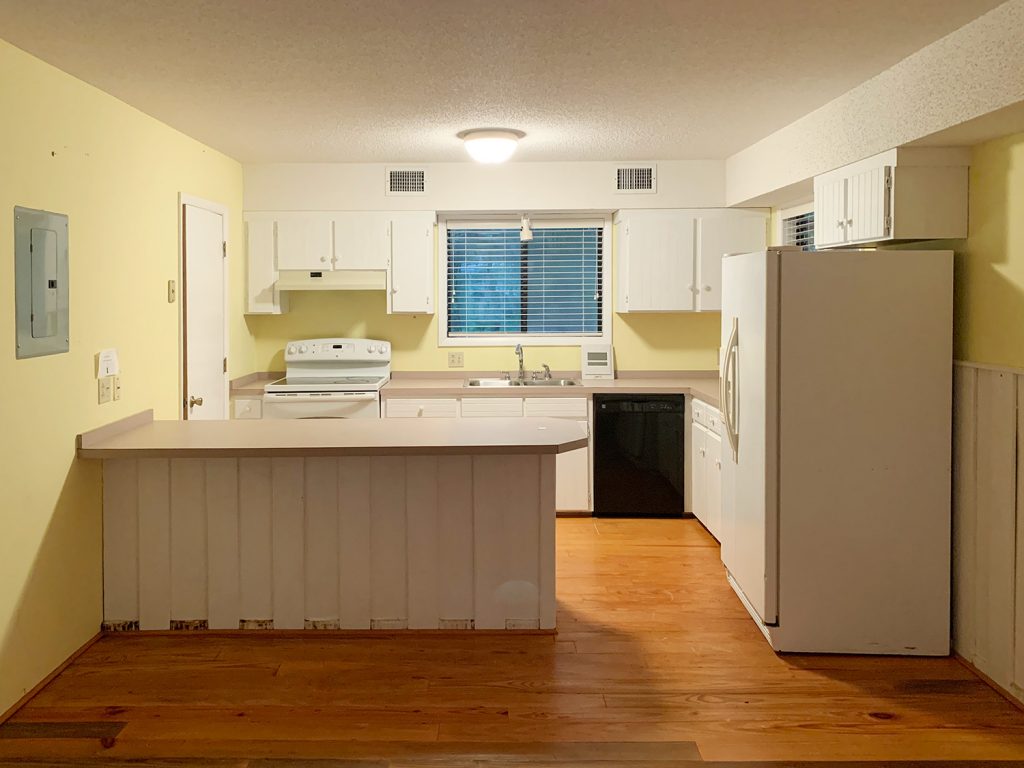
We repaired the floors, removed the soffit, added additional lighting, and replaced the drywall (goodbye popcorn ceiling!). You can read more about those projects in this post and this post.
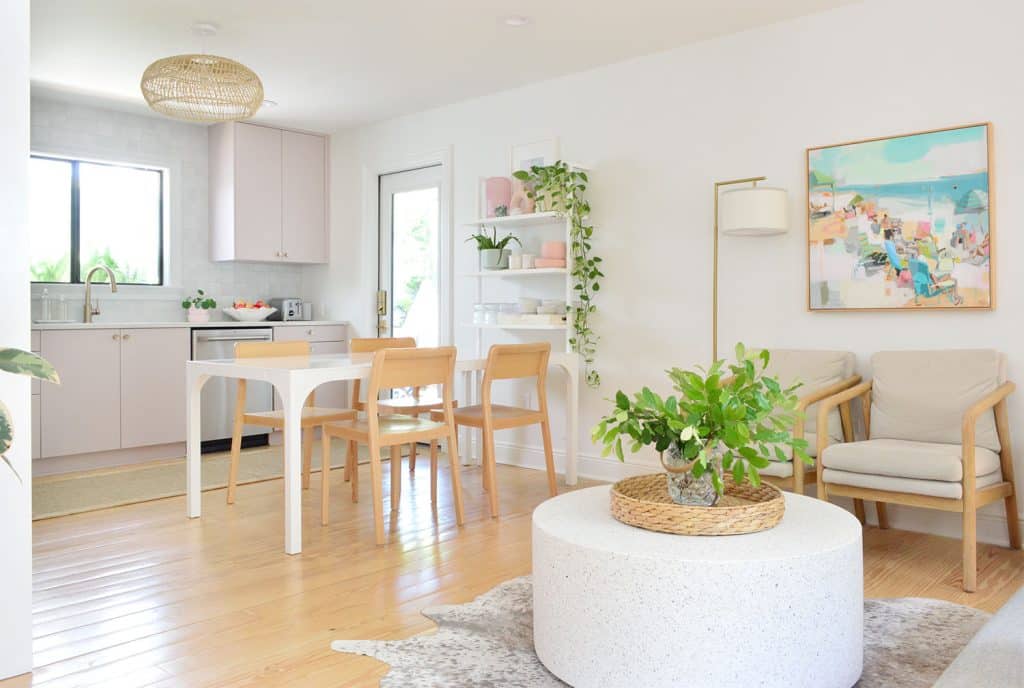
We gradually updated the room in a few affordable ways, like hanging new lighting & DIY shelves and painting the cabinets (you can also see a full tour of how our kitchen is organized). Then we scored an awesome deal on secondhand appliances & tweaked the room’s layout and later added an Ikea pantry that we built in around the fridge, which we moved to the opposite wall. Finally, we updated the cabinets, got new counters & upper cabinets, and added a shiny pearlescent backsplash (more on that final phase here).
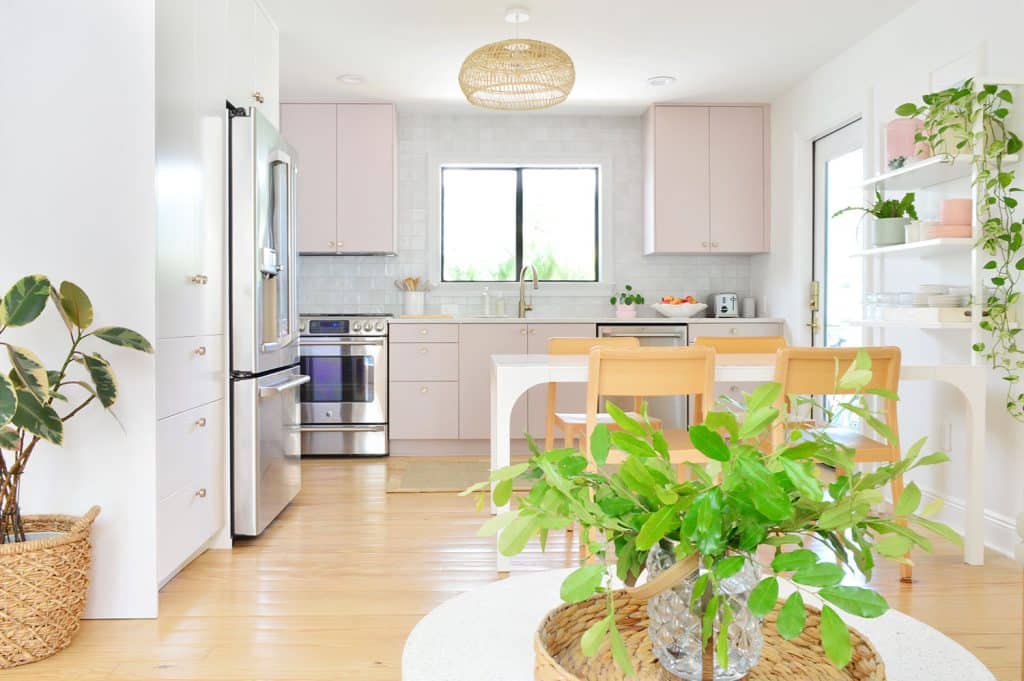
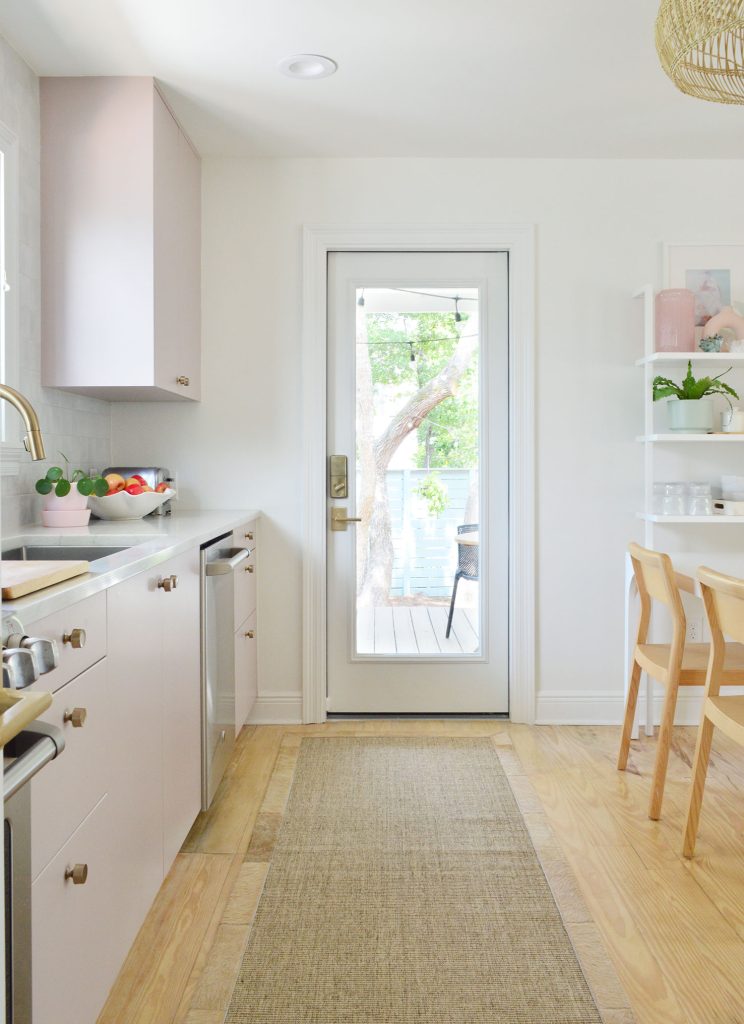
By shifting the fridge to the other side of the room, you can actually see that side of the room now – and extra light flows in thanks to trading the old window that used to be there for a full glass door. That former window used to be almost entirely blocked from this vantage point by the fridge (scroll back up a few photos to see what I mean). Plus we gained an entire pantry full of storage around our newly relocated fridge (more on that here). Win-win!
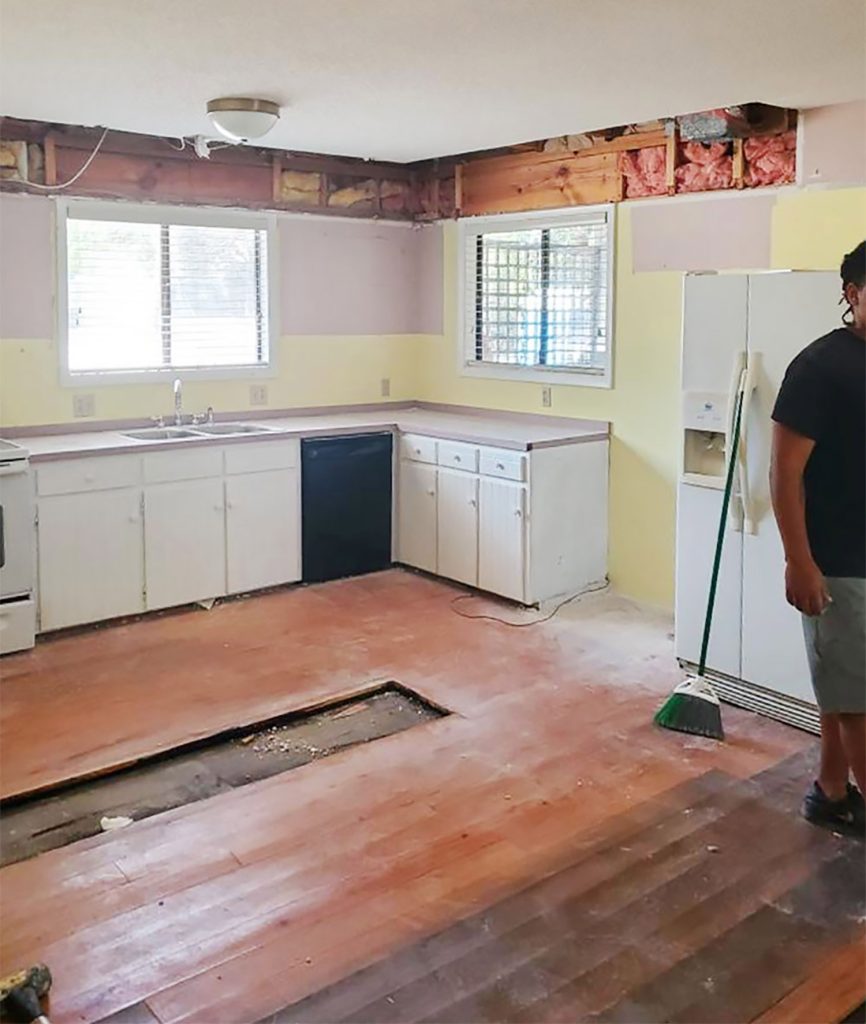
Here’s a photo that was taken during the initial renovation, so you can see how the walls were mauve to match the counters. Pretty funny to see, since we brought that exact color into the cabinets to make them fit with the original counters (they stand out a lot less, and the whole look is pretty fun).
Here’s the same angle now, from a bit further back:
This is one more before shot of that side window that was mostly blocked from view when you entered the room thanks to the fridge being right next to it.
And here’s that wall now, after switching out the window for a full glass door. Light just streams in, and best of all, we gained access to an amazing outdoor porch that was already there – so now it’s just a few steps from the kitchen counter to grill up burgers or shrimp or anything else on the bbq. We also have a table that seats 4-5 more people, so when we have friends over, the kids often eat inside and the grown-ups dine alfresco.
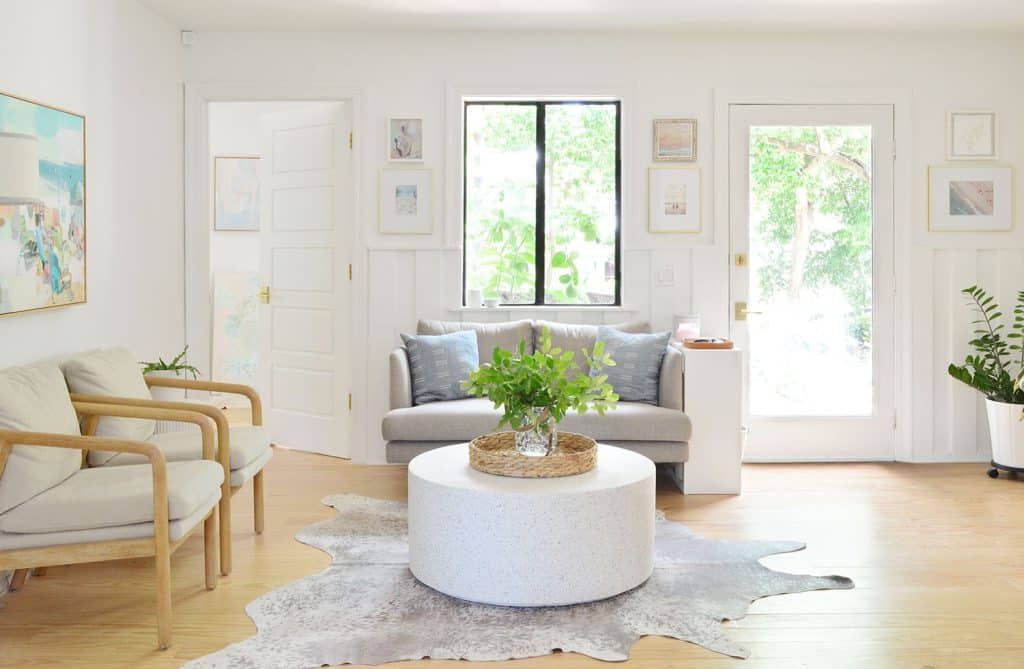
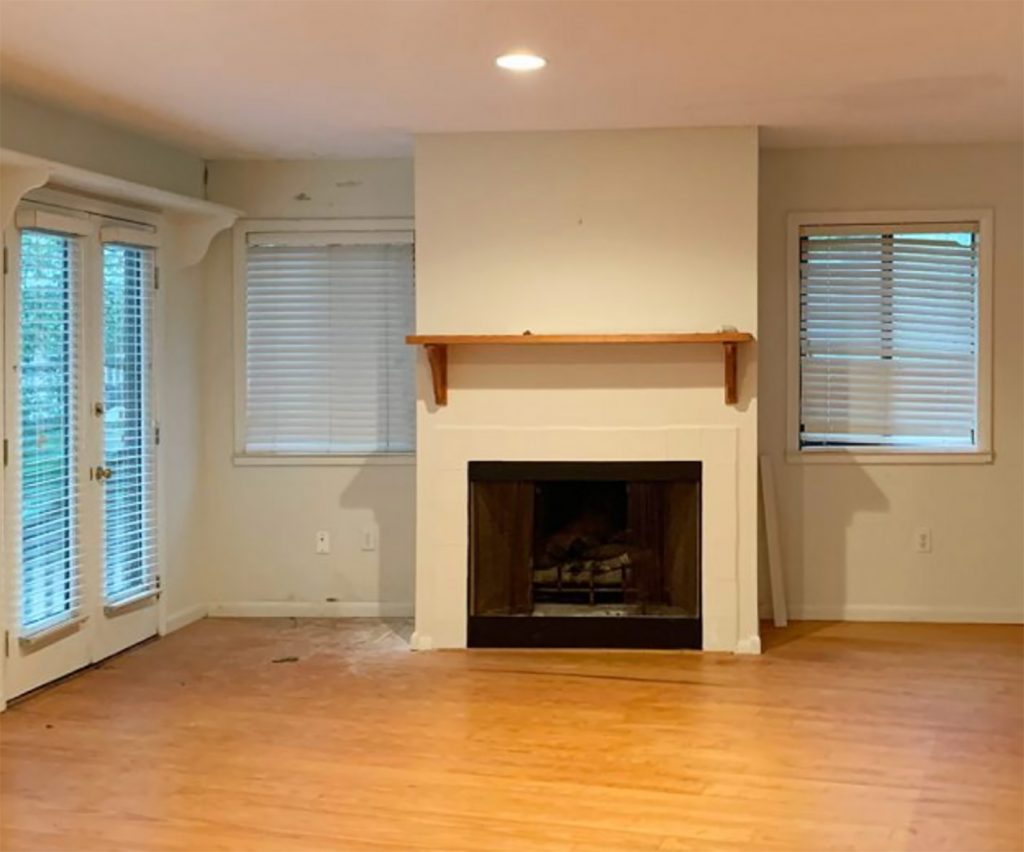
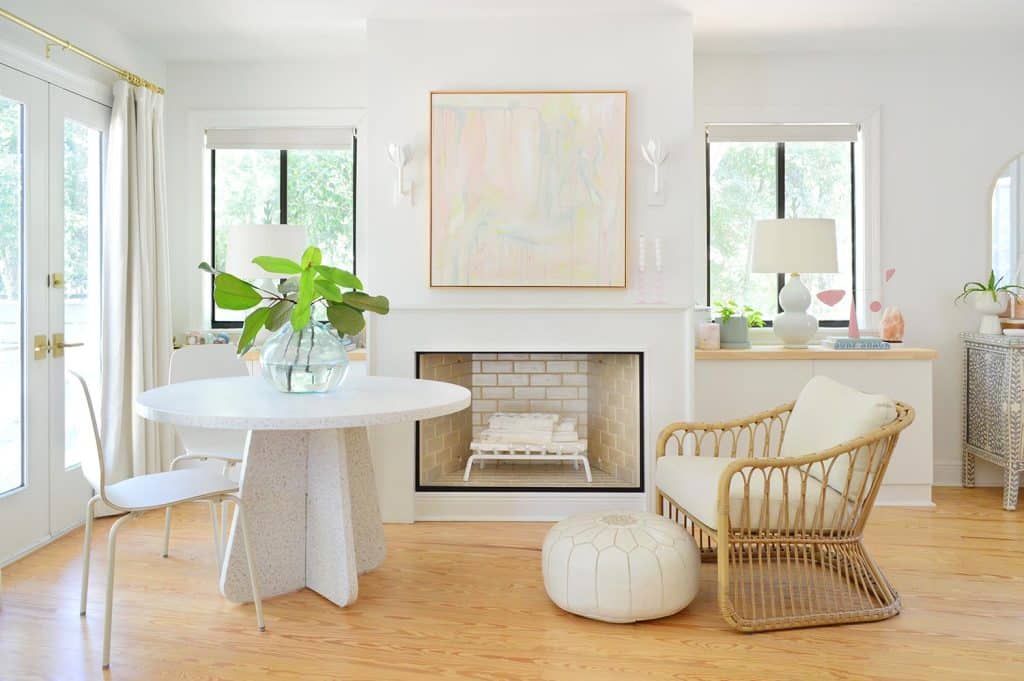
In order to enjoy a comfy little sitting area on this side of the room, we closed off that wide doorway that you see below. You can still enter that room via the door next to the loveseat in the next photo (it’s our bedroom – so that extra-wide doorway wasn’t necessary). You can read more about the sitting area & how our whole kitchen has evolved here and here.
This room is deceptively large, so along with having room for an eat-in kitchen table, we love that we gained this casual bonus hangout spot (since our big family room with the TV is upstairs, we tend to gather in here when someone’s cooking or when friends drop in for a coffee or a drink). It’s also great to have when someone wants to hang out or read without hearing the TV upstairs).
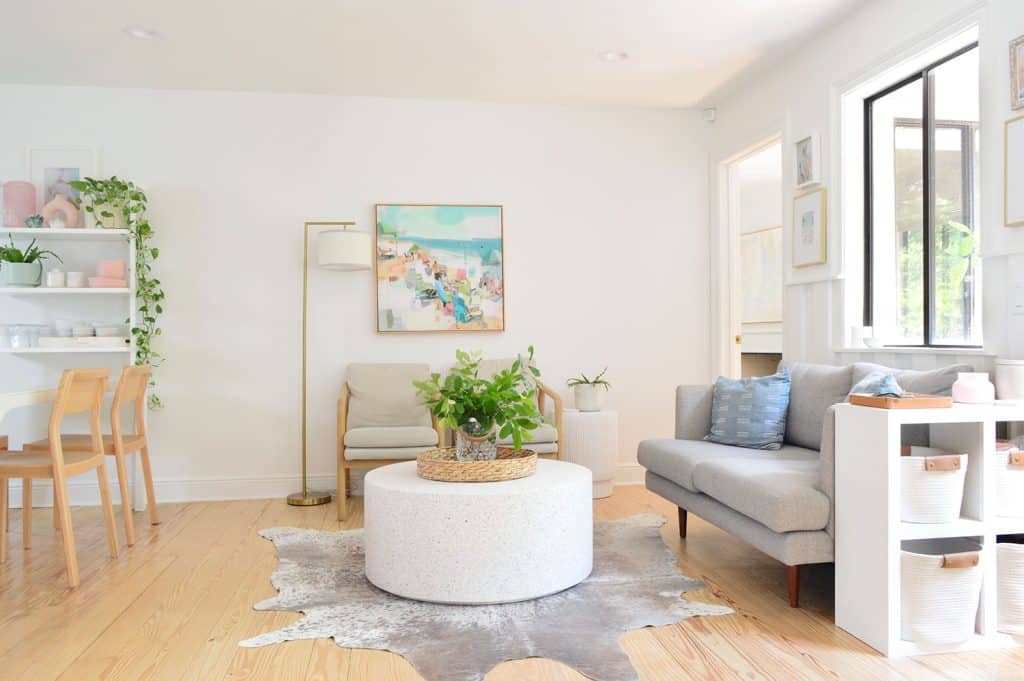
Having two common areas in the house that aren’t open to each other (meaning that the sound doesn’t travel between them very much and one kid can do homework while the other watches cartoons or does a big part project) is key to feeling like we’re living large in a smaller footprint. If we had one larger adjoined space as our only shared area in the house, we’d feel a lot more cramped & on top of each other, I think!
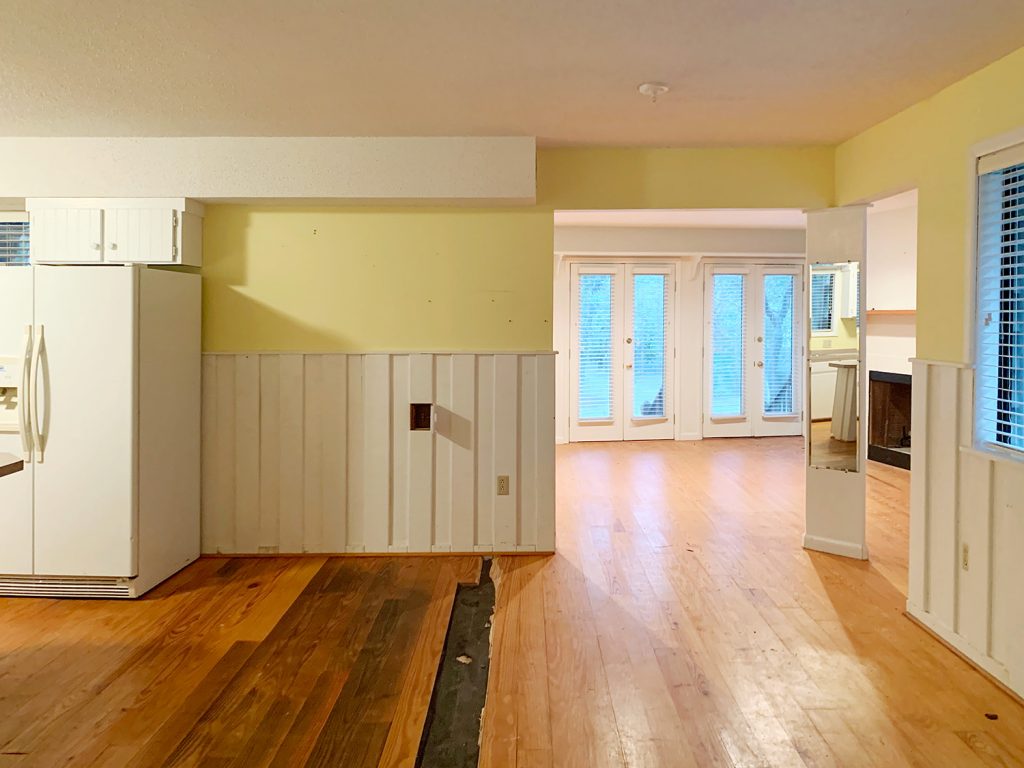
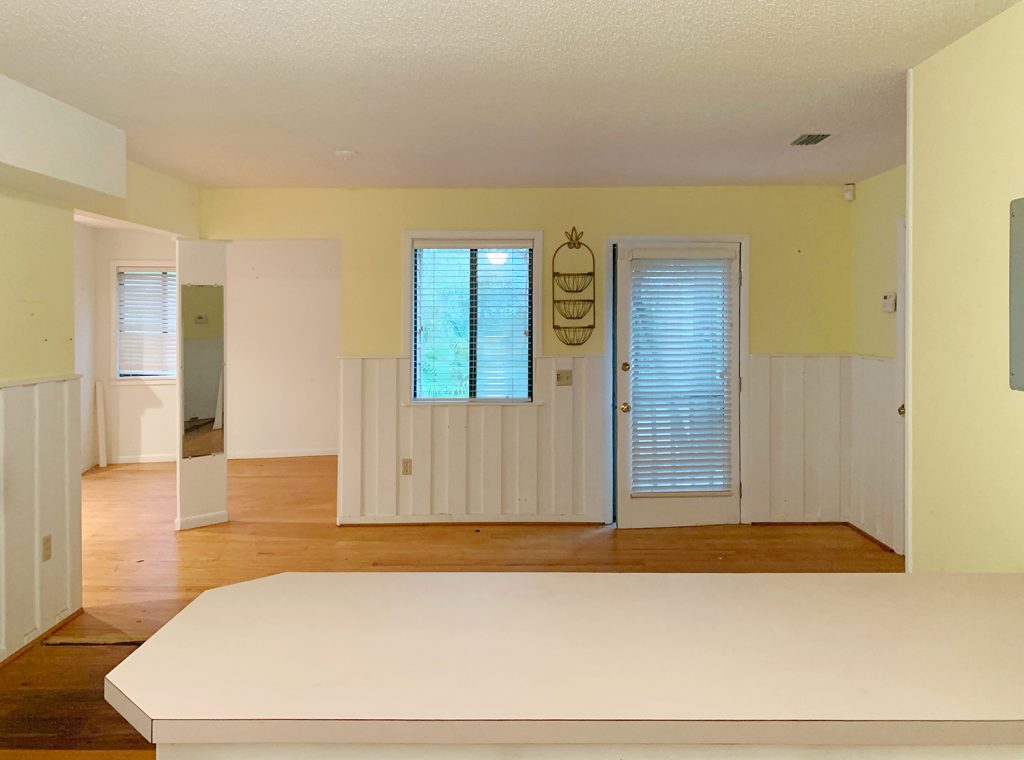
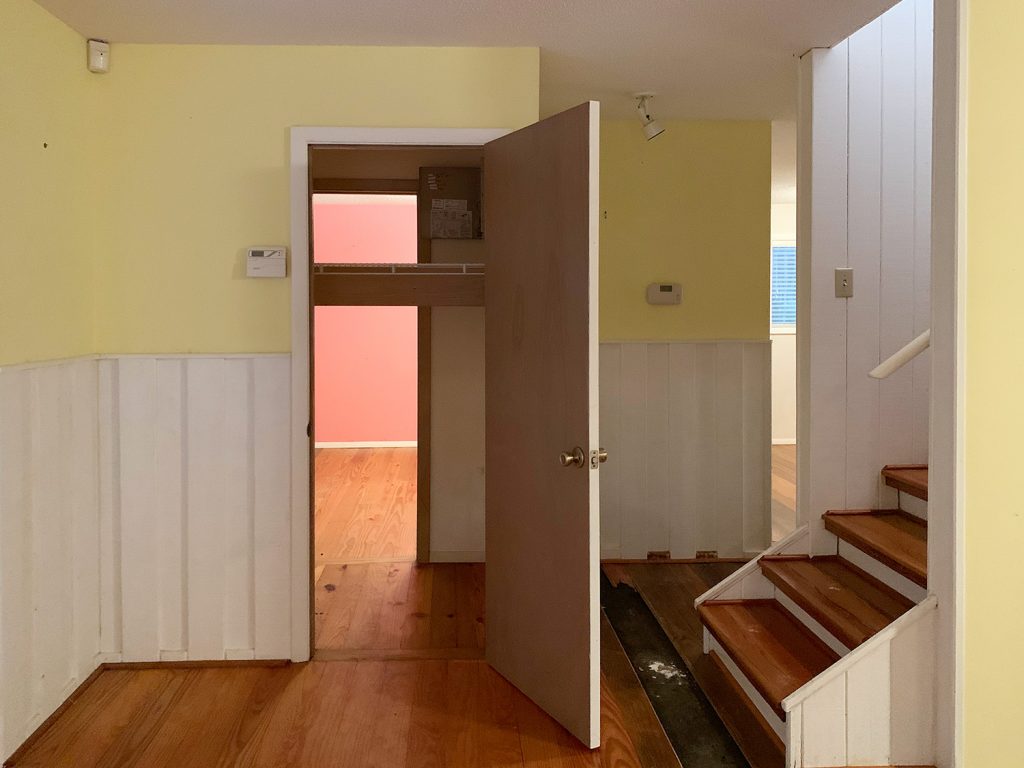
If you spin around to face the front entry door, this is the before shot from that angle:
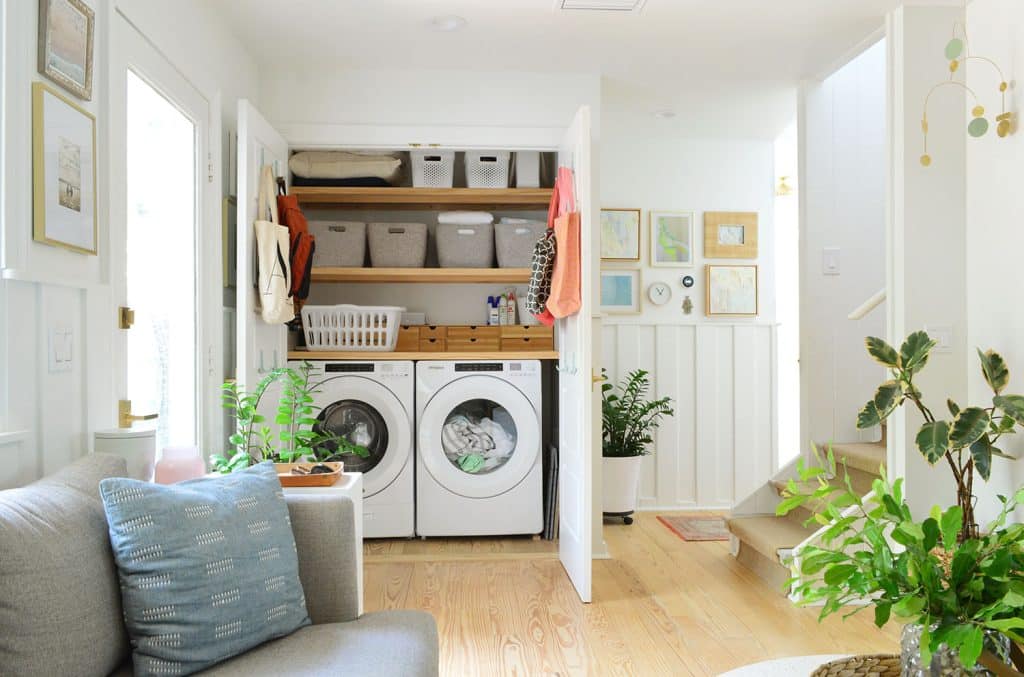
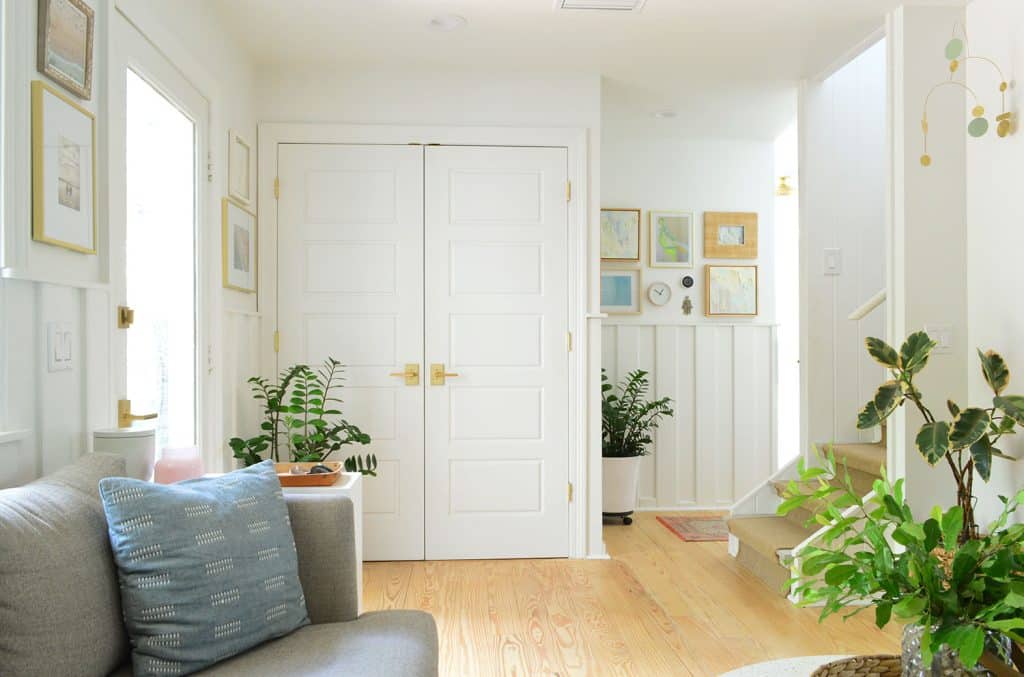
And here’s the same angle as it looks today (you can read more about how this space evolved here and here).
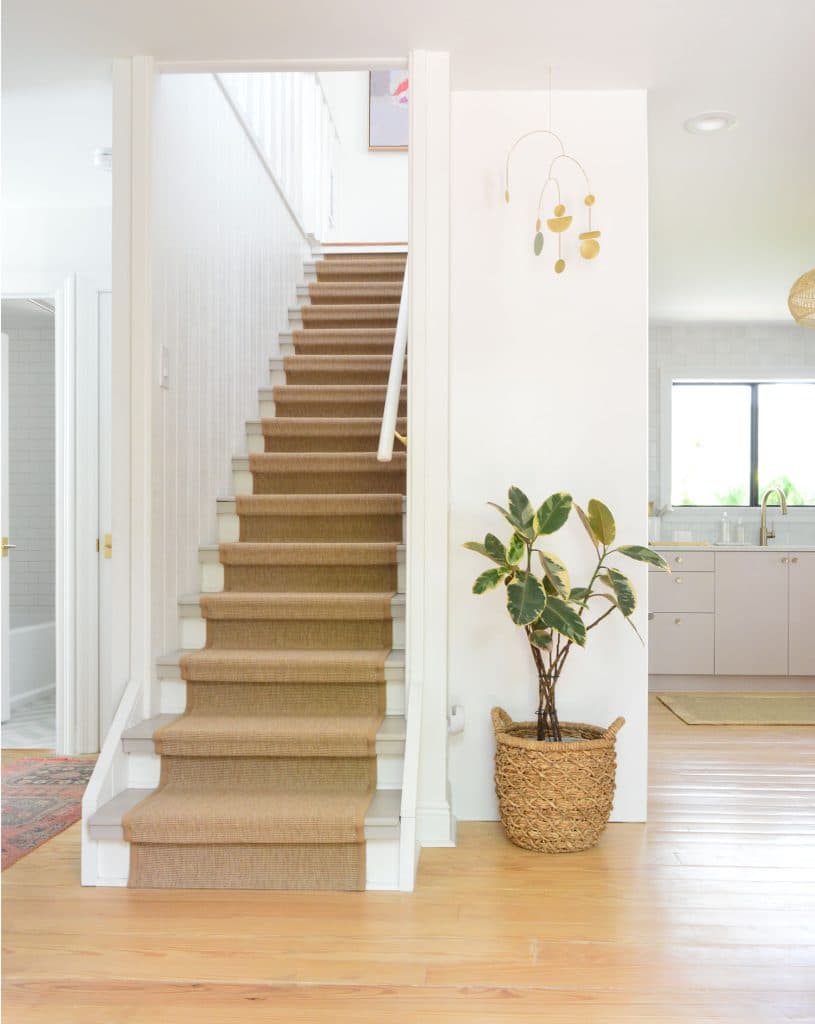
The Stairs
The stairs that lead to our upstairs family room and second-floor deck had cool vertical planking and got lots of natural light thanks to a window above them in the family room. But the wood treads had some finish issues after we had them redone, and it didn’t match our wood floors downstairs (more on that here).
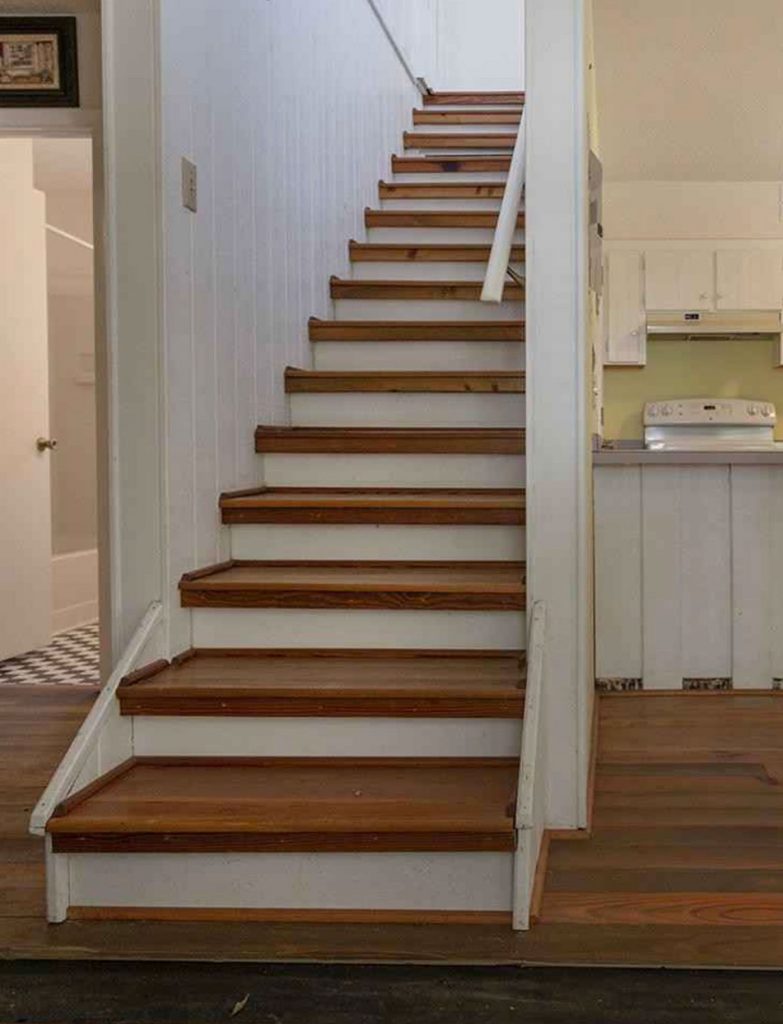
We ended up adding a really nice textured runner (and painting the treads to solve the finish issue), which gives our dog some much-needed traction. It’s an indoor/outdoor rug, so it’s super durable (more on that here).
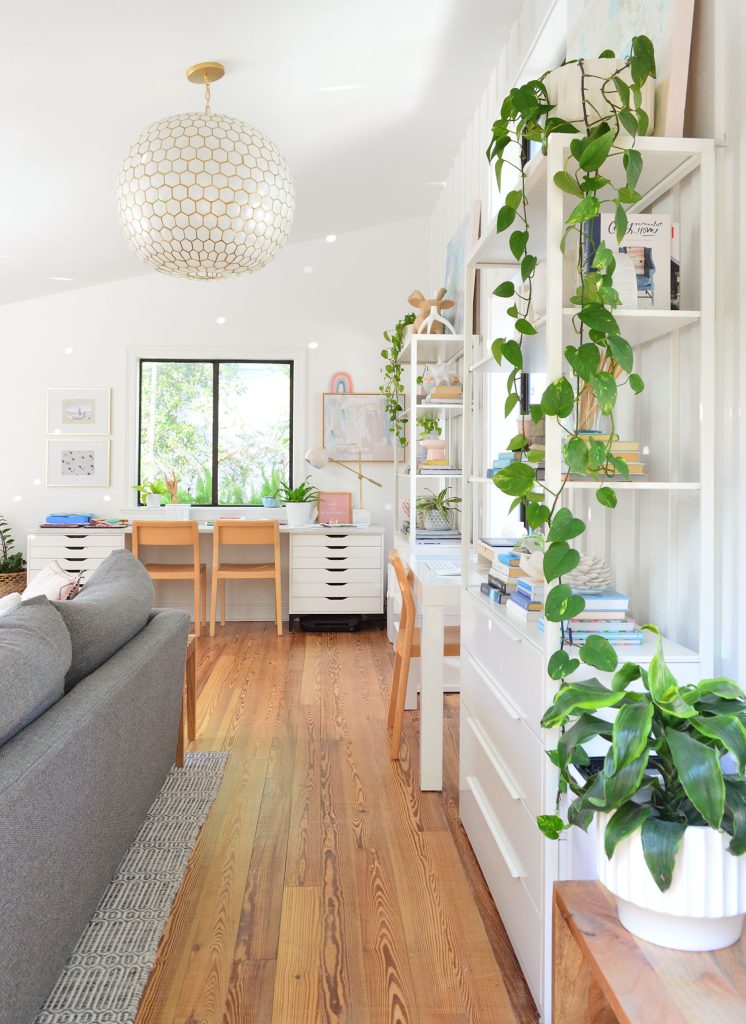
The Family Room
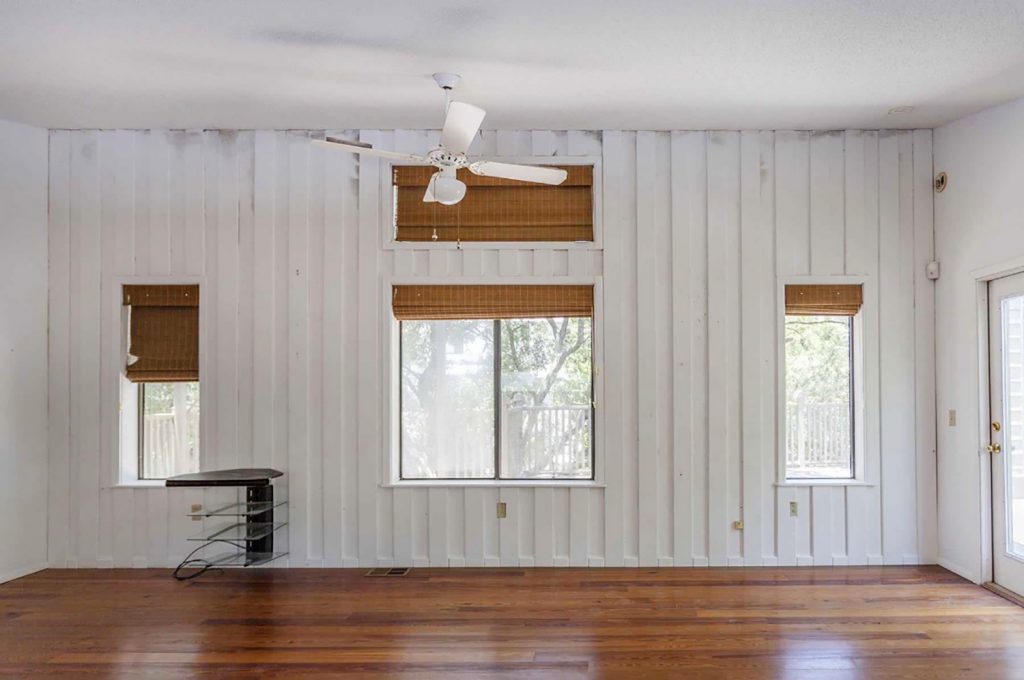
The only room upstairs is this large multi-purpose room that we use as a TV/movie room, home office, and kids’ crafting area (thanks to the pandemic it was a virtual-learning spot too). It’s by far the largest room in our house (two 8 x 10 rugs can fit in here without touching!) so it’s awesome to all get to enjoy it – and for it to perform so many functions for our family. Here’s how it looked when we bought the house. Note that scummy mildew along the top of the ceiling…
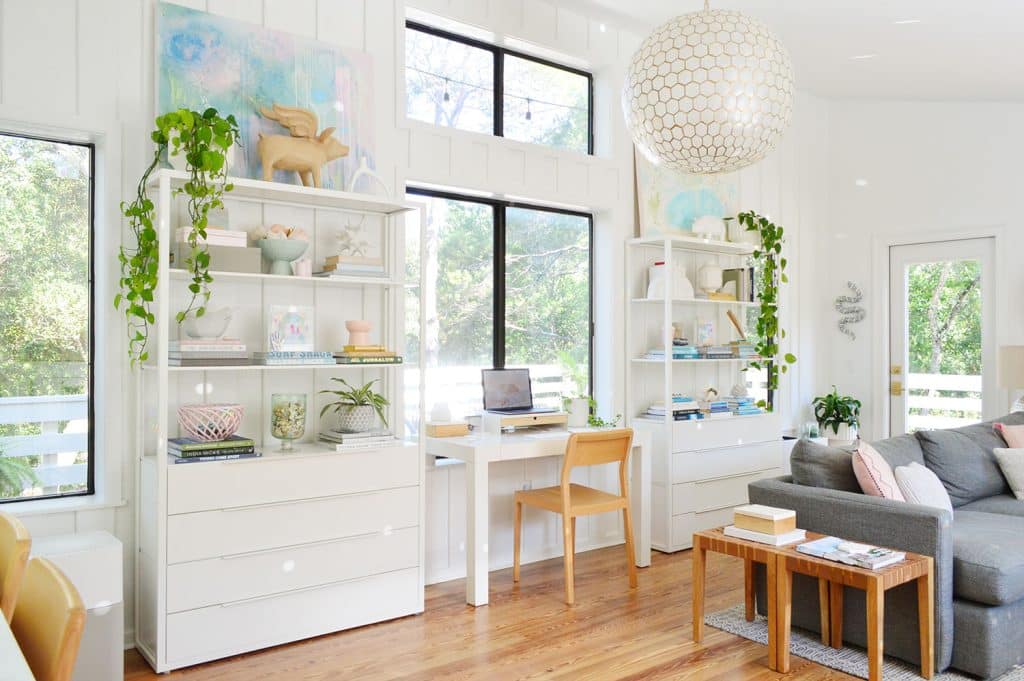
And here it is more recently after some simple floor refinishing and a fresh coat of paint (those big windows and cool paneling were already there!). You can see more of this room in this post – and see a few updates we later added in this post. We’ve also made some other changes up there, so we’ll have to take more photos and a video for an updated post.
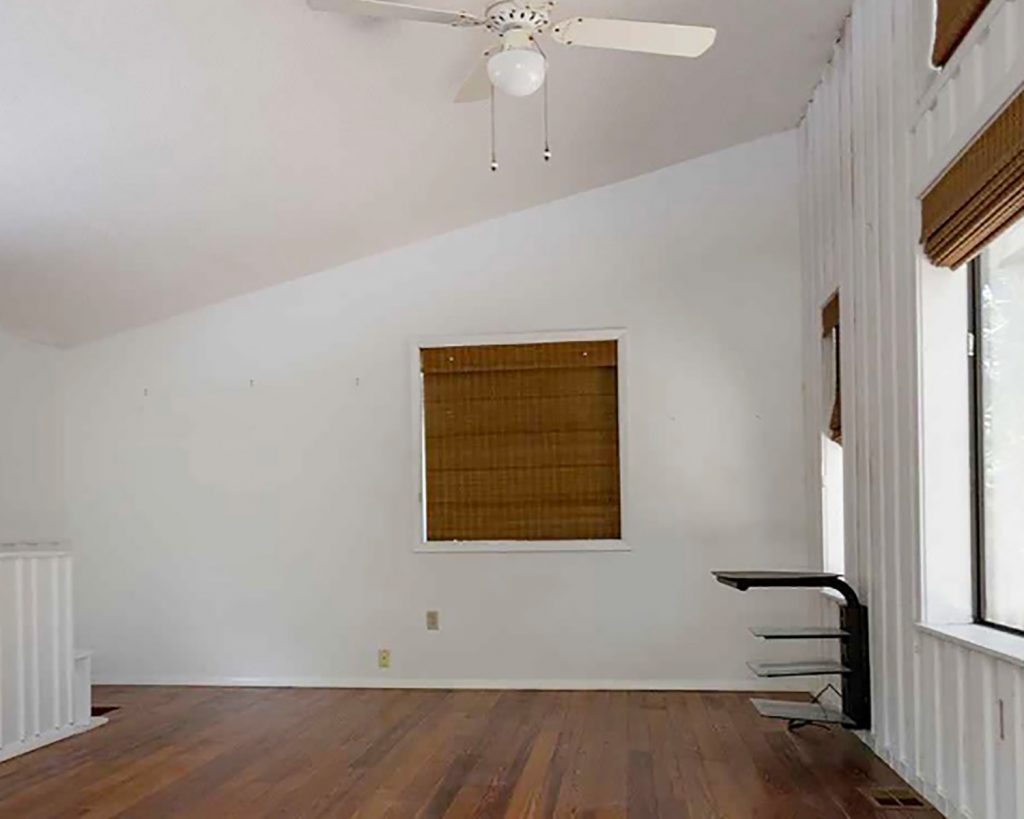
Here’s the other half of the room as it looked when we bought the house. It was pouring rain when we took this picture, hence it being so dark (and those foggy windows):
Here it is more recently from the same angle. This is such a good demonstration of how adding furniture can help so much with capturing a room’s scale! Doesn’t the room look half as wide in the before shot above? And it appears to only have a sliver of space between the windows on the right-hand wall when there’s really over 70″ for a wide bookshelf with four spacious drawers. It’s wild!
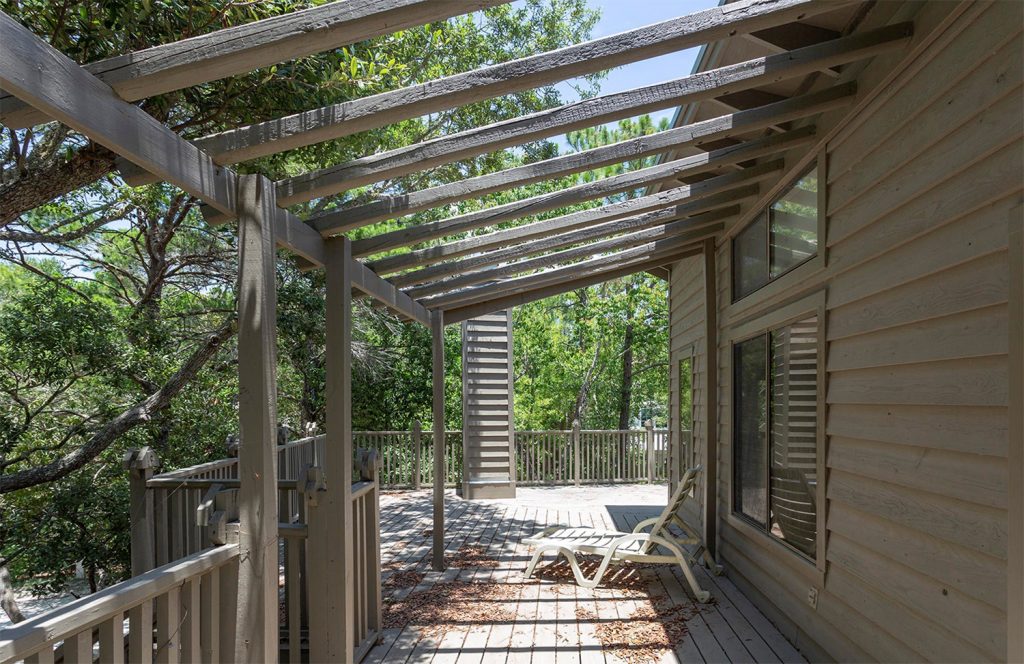
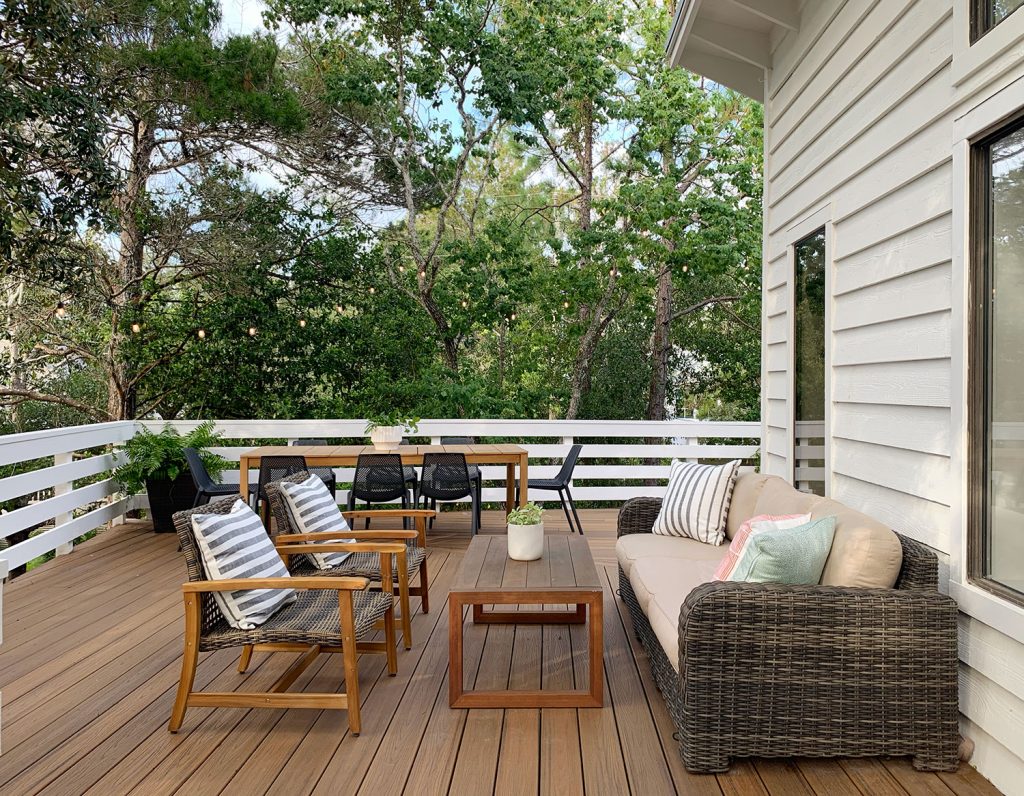
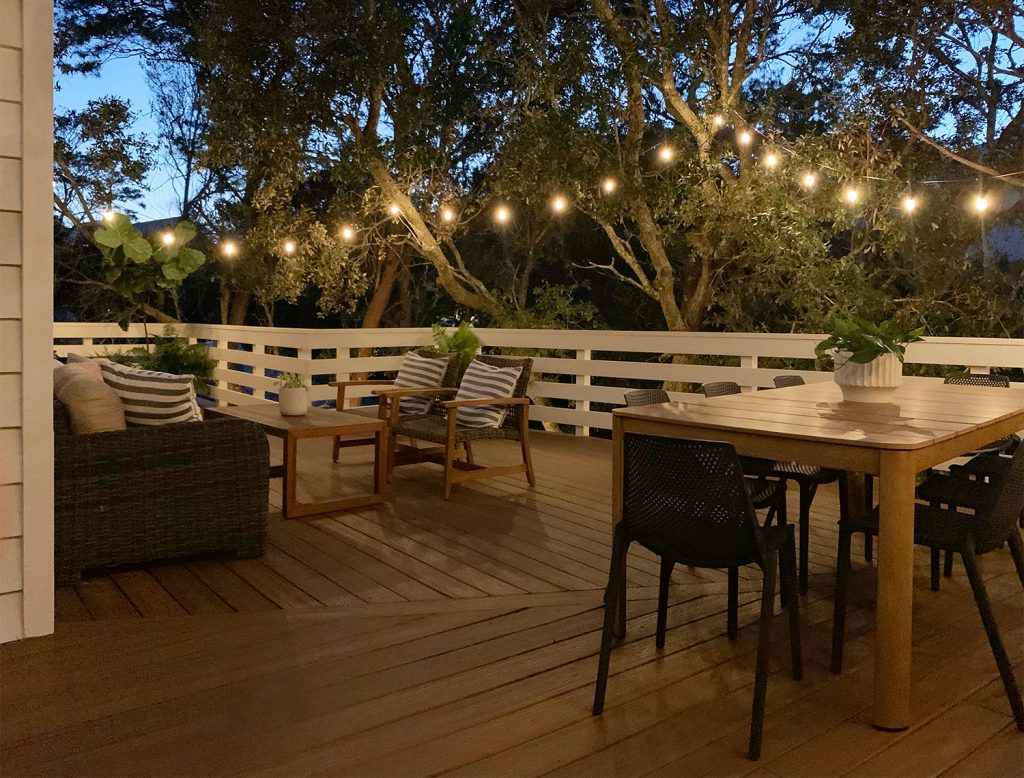
The Upper Deck
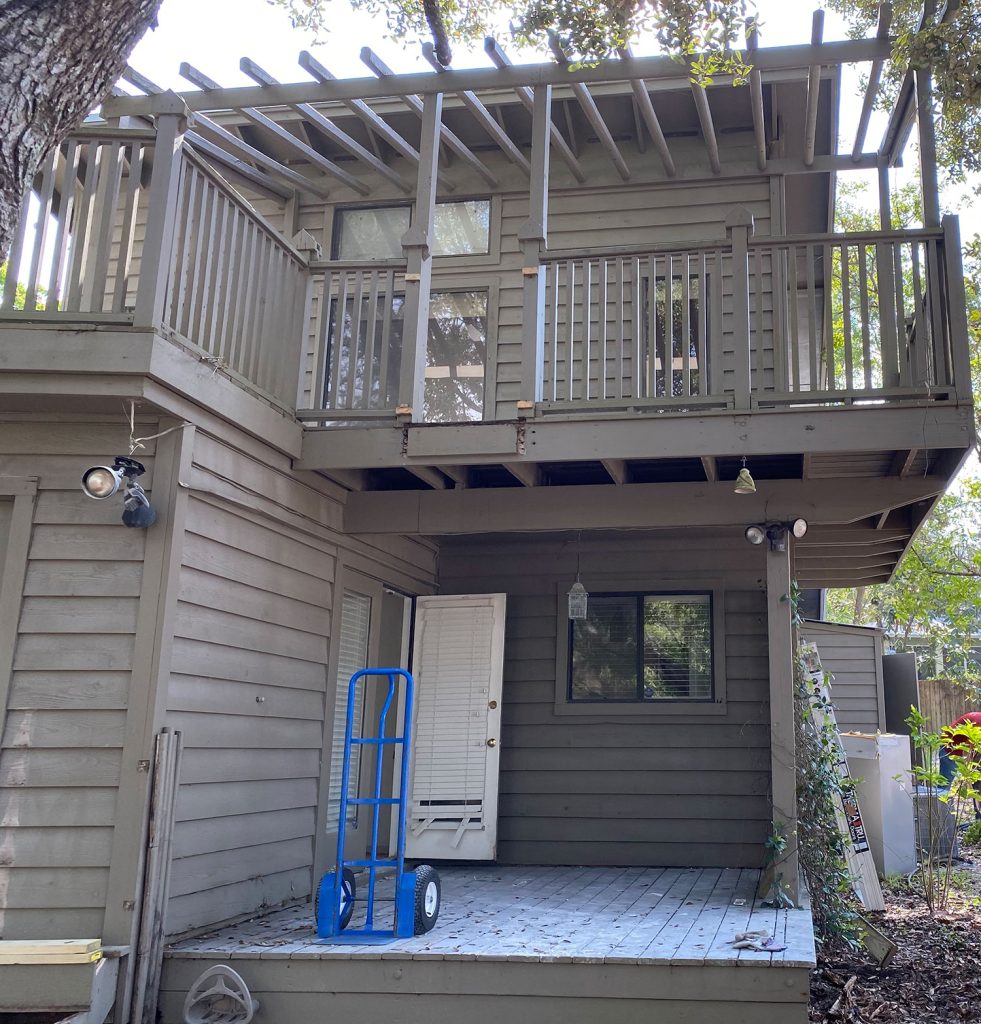
Right outside the living room is a large upstairs deck that we all use as an extension of our living area. It was hugely improved by replacing the rotting deck, railings, and rickety pergola.
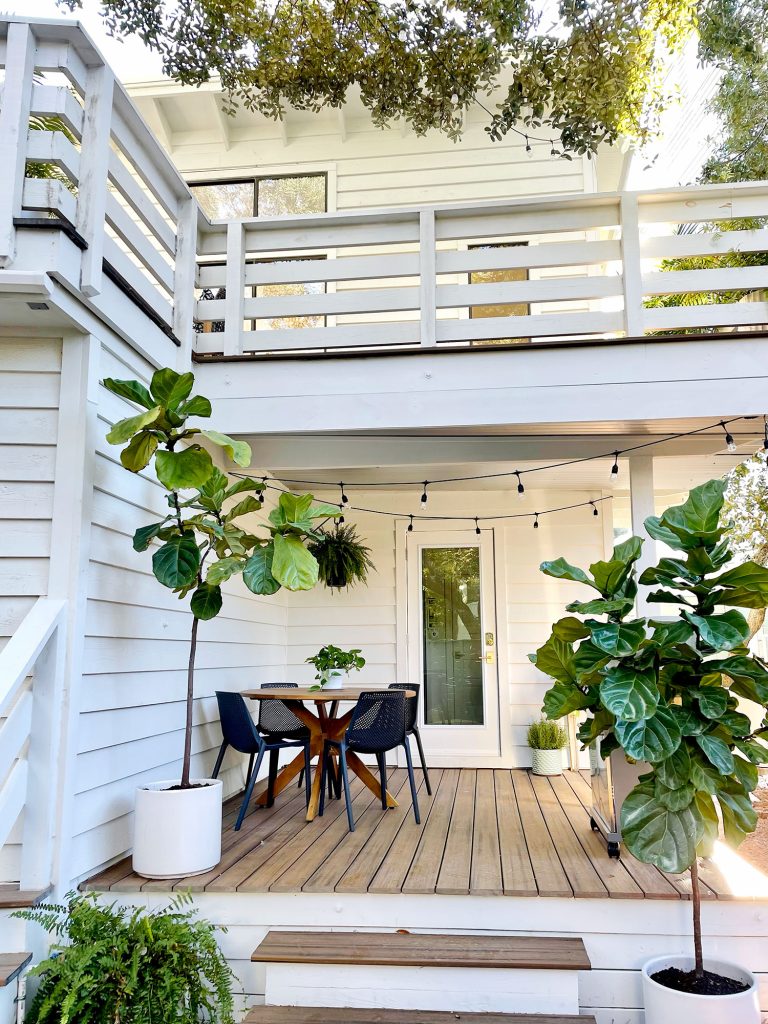
This is what the deck looks like now, thanks to the magic of new decking, railings, nixing that chimney that popped up in the middle of where our big 8-person table now lives, and a whole lot of white paint. We’ve also added some more seating, a dining area, and some string lights to make this one of our favorite hangout spots! You can read all about the details of this space right here.
Another fun before & after shot of this upstairs deck is this one. I can’t tell you how much better it is without that huge chimney jutting through the deck (when we bought the house it was majorly leaking down into the bedroom below).
And here’s the after shot from that vantage point now. This is one of our favorite spaces in the whole house – for sharing pizza with friends or having a family game night up in the trees. It’s really cozy and makes our house feel so much bigger thanks to this huge outdoor room.
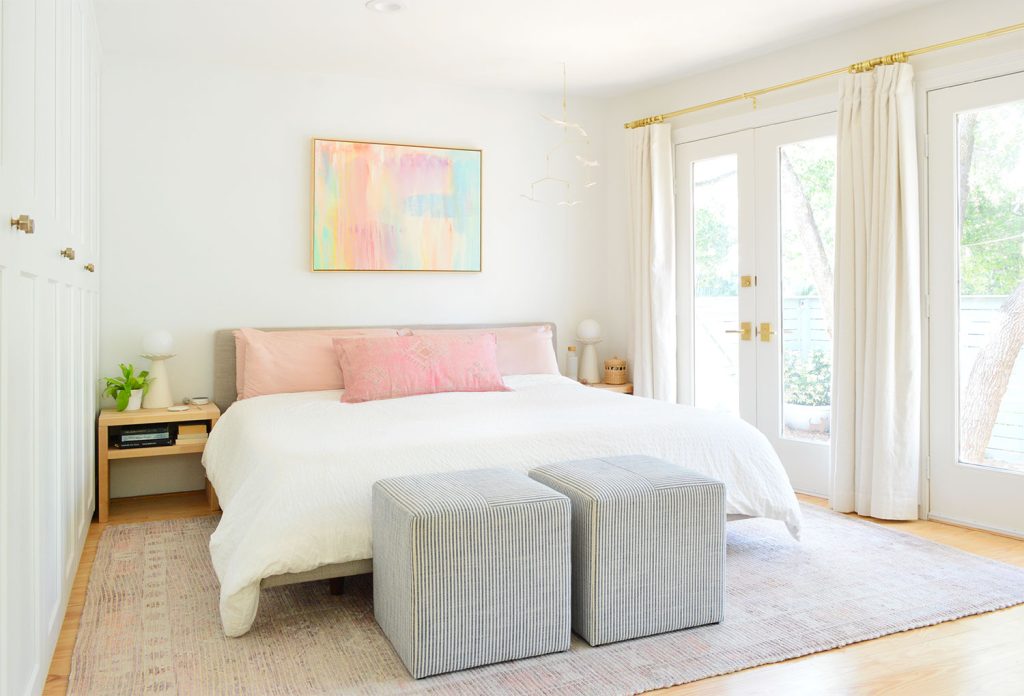
Our Bedroom
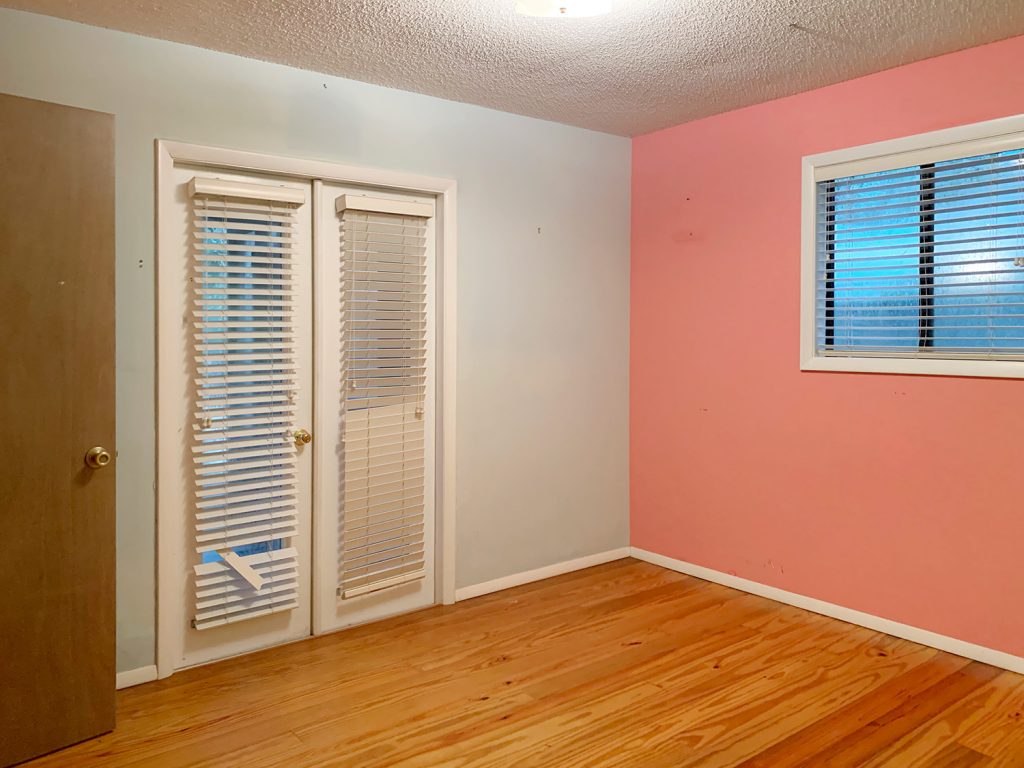
Here is our bedroom as it looked when we bought the house. This house only had one bedroom with an actual door that you could close when we bought it (it was originally listed as a one bedroom, one bathroom!), so we converted this beautiful light-filled space into our bedroom by closing a large extra doorway that led to the kitchen.
We refinished the floors, gave it some fresh paint, and then it just took some comfortable things like curtains, furniture, and a cozy rug to make this feel like a welcoming retreat. You can find more bedroom details here.

Here’s a before and after view of the bed wall, since it’s hard to see in the photo above…
We added a lot more storage to the room and rearranged things and closed off 2 of the 8 exterior doors (yes we really had that many doors in here, which is why the two on the bed wall in the before picture above are now gone – but the room is still flooded with light). We also added a closet (storage, glorious storage!) which you can read about here. And then upgraded to a king bed.
We have possible someday plans to create an attached bathroom in an existing underutilized corner of the room (but only if we end up wanting one – so far we’re surprisingly fine with one bathroom).
Here’s another before shot of our bedroom back when we bought the house:
Here’s the same angle now. It really is a life hack to have a puzzle table by the fireplace if there’s randomly room in your bedroom. It keeps the kitchen table clear for food – and provides a fun spot to sit and decompress whenever the mood strikes (John can be found here a lot more than I ever expected. He has become a true puzzle lover).
Speaking of the fireplace, we updated ours and shared those details in this post and this post. It’s such a cozy feature to have in a bedroom.
*And now for a long-winded bedroom-related side note, because the most common question we get about our house is if we ever considered making the large upstairs family room into our bedroom. The short answer is that we did, but ended up nixing it for a number of reasons:
- 1) we all prefer to sleep on the same floor
- 2) that room upstairs is nearly twice as big (it’s the single biggest room in our house!), and we’d much rather share it than take it all for ourselves
- 3) entertaining a bunch of people on the huge upstairs deck would mean everyone would have to walk through our bedroom to access it
- 4) there’s no plumbing upstairs, so adding an ensuite bathroom would be much pricier than the one we have planned for downstairs
- 5) we already mentioned this, but it bears repeating for anyone who is looking to downsize & worries they’ll feel too cramped. We’ve learned that it’s SO HELPFUL in a smaller home if there are two common areas that aren’t right next to each other (someone can watch a movie upstairs or do a zoom call for work while someone else is downstairs at the kitchen table working undisturbed or reading in the sitting area). We’ve also found that when our friends & their kids drop in, the kids all run upstairs to play & we sit downstairs in the sitting area and chat & have drinks or a snack.
You can find more layout tips for a small house (& other general downsizing info) right here in this post. Ok, but on with the tour!
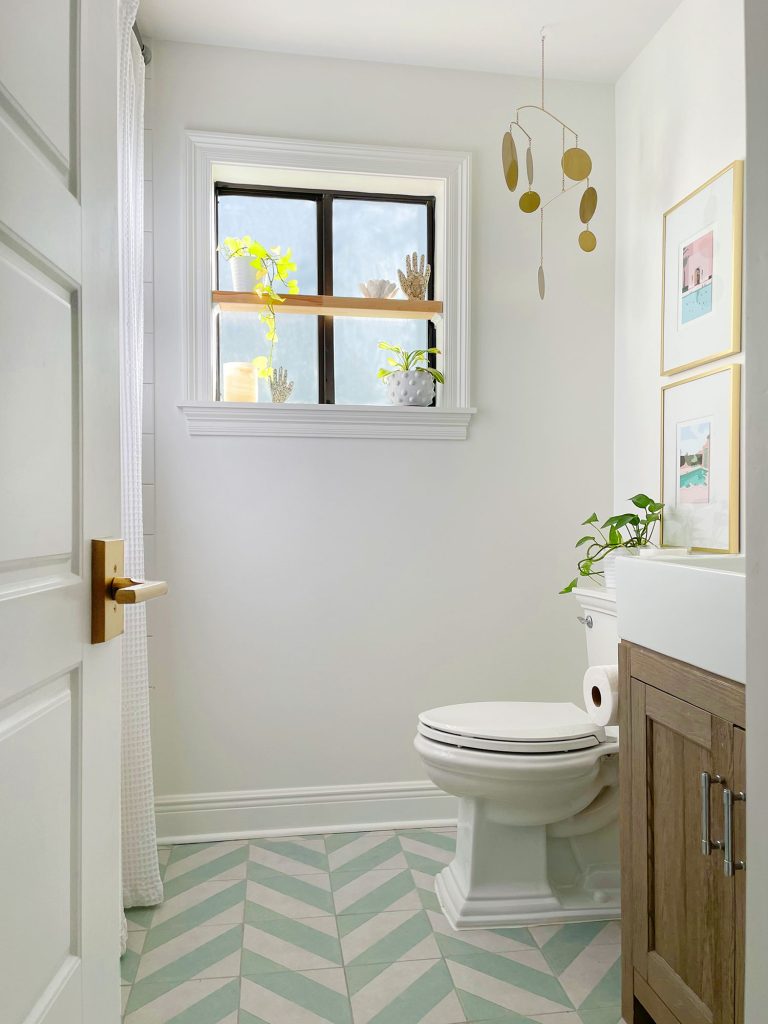
The Bathroom
Our house only has one bathroom – and it didn’t even function when we bought it! The sink and vanity had been torn out, there were leaks festering in the walls behind the drywall and the tile, and the toilet couldn’t even be flushed due to the absence of a sewer line. Here’s what it looked like back then:
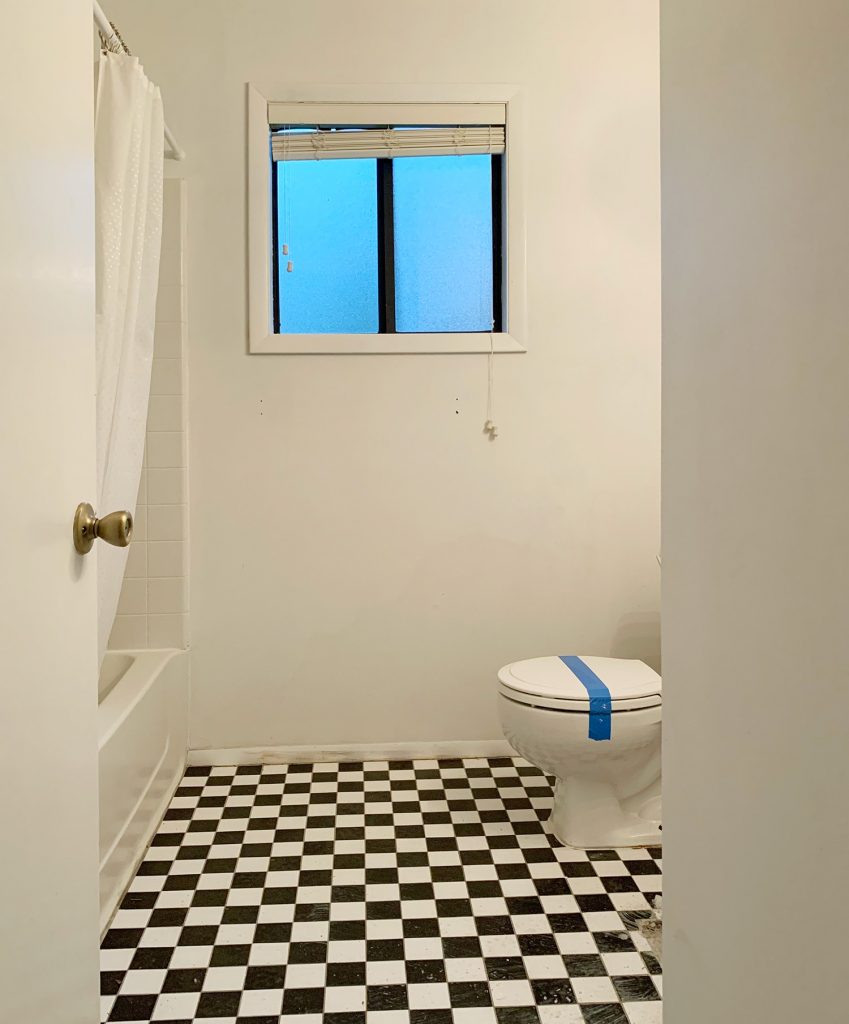
Before we moved in, we had basically everything replaced (except for the window!) to make this space functional. I gotta say, as much as we like the fun floor tile, and the cheerful accessories, a toilet that flushes really is the best part of any bathroom. You can see more of the room in this post and this post.
The Laundry Closet
We converted a (weirdly double-sided) closet right off the front door into a laundry closet, which actually reminds us a lot of the laundry nook that we had in our very first house.
In addition to the new appliances, we built some nice deep shelves and added lots of hooks to make it extra hardworking.
And here’s what it looks like when it’s closed and all tucked away. So unassuming, yet filled with function.
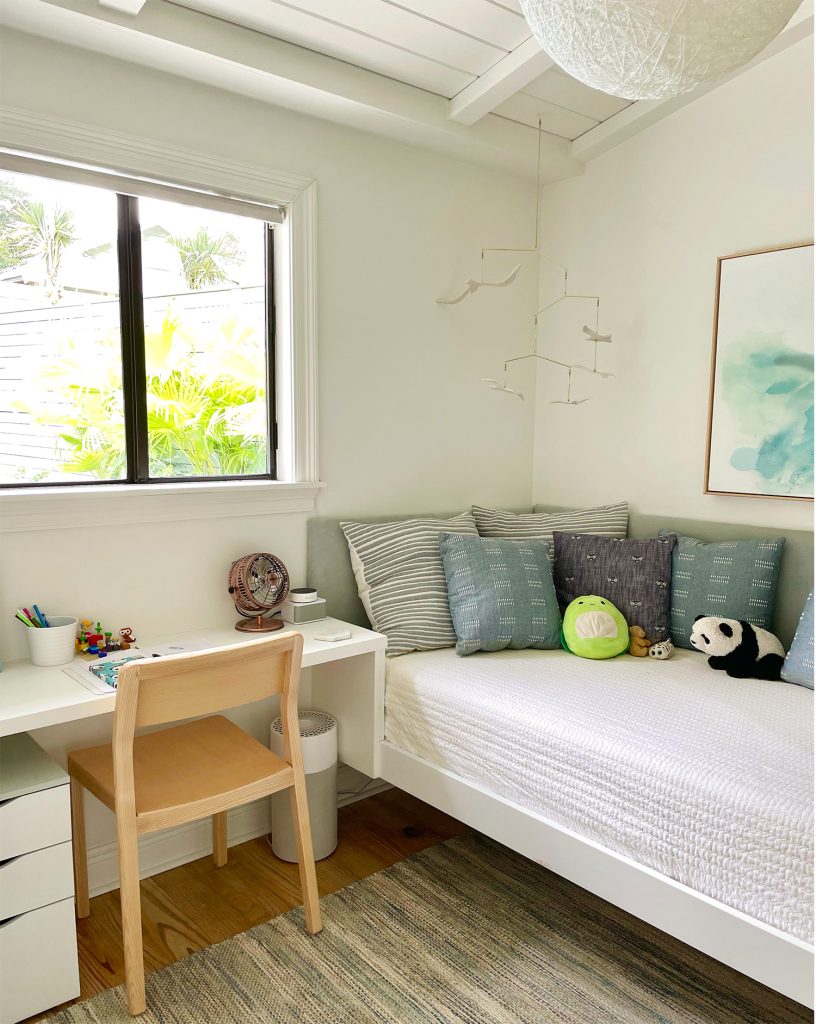
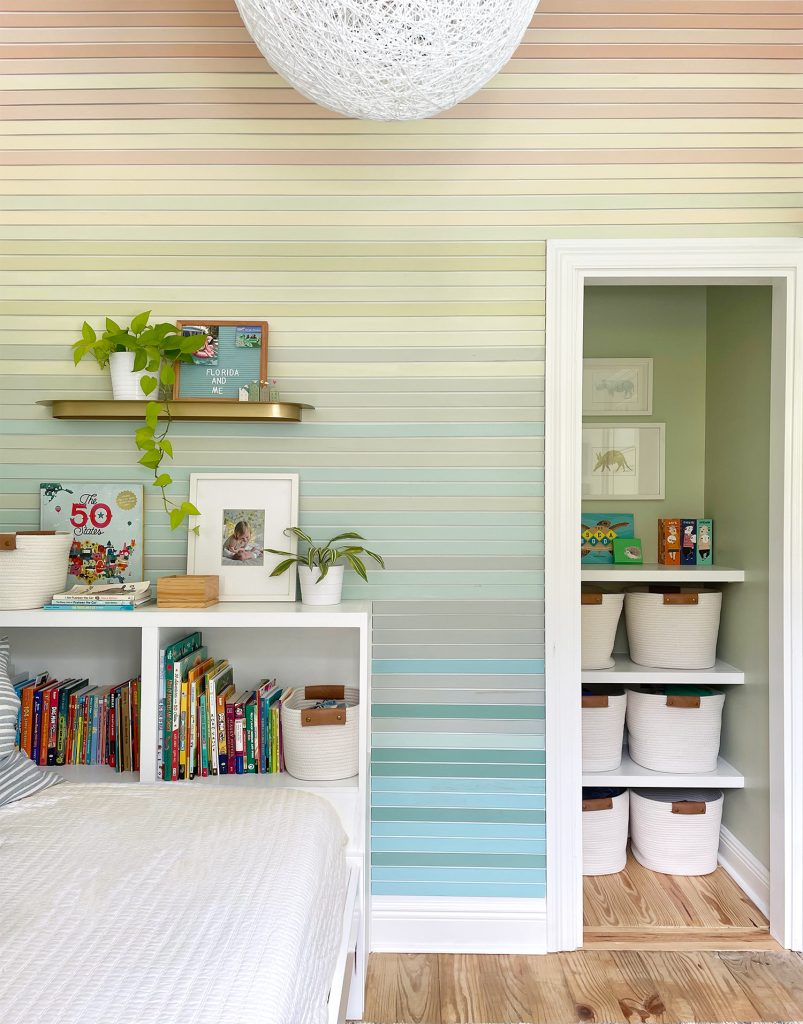
Our Daughter’s Bedroom
Some of our favorite transformations in this house are our kids’ bedrooms, since we were able to vault the ceilings in both rooms – making these spaces feel so much bigger and brighter than they used to feel.
Yup, this is the same room, from the same angle. Crazy the difference that ceiling change made, right? It wasn’t structural (the roof already had that slope, so we essentially removed a drop drywall ceiling, added insulation, and just followed the slope of the roof with the planked ceiling). You can click here to see more photos (and get a DIY channel headboard tutorial). We have since changed up the side tables, added a larger rug, and brought in a desk so we’ll have to share a post with all of those updates soon.
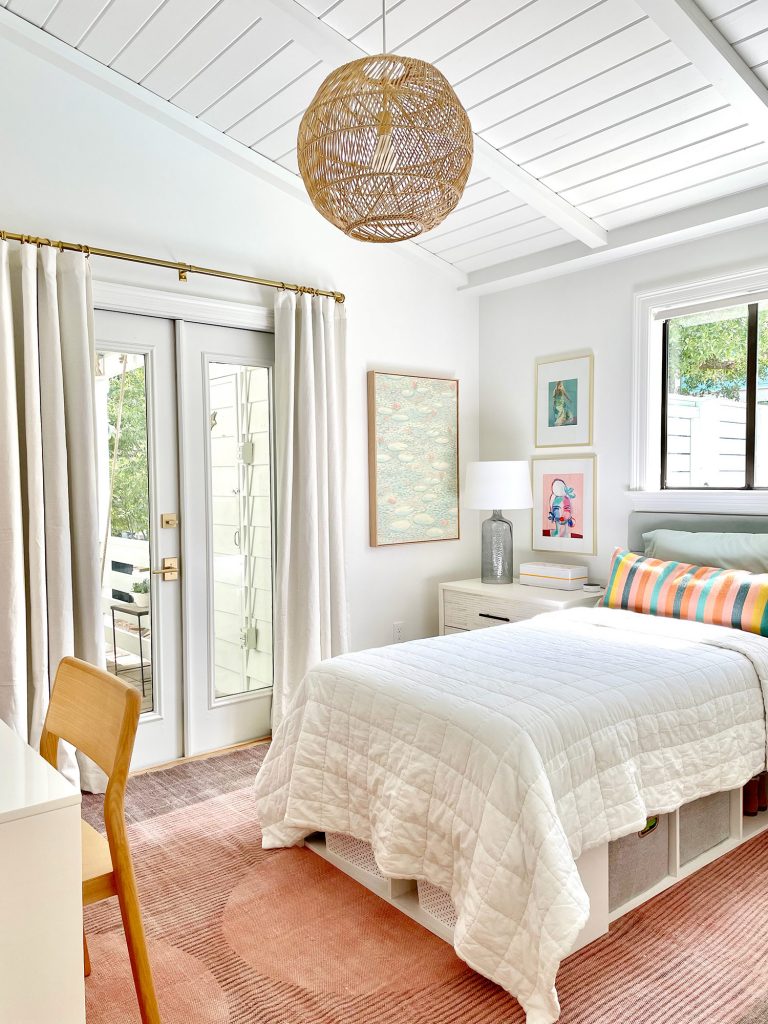
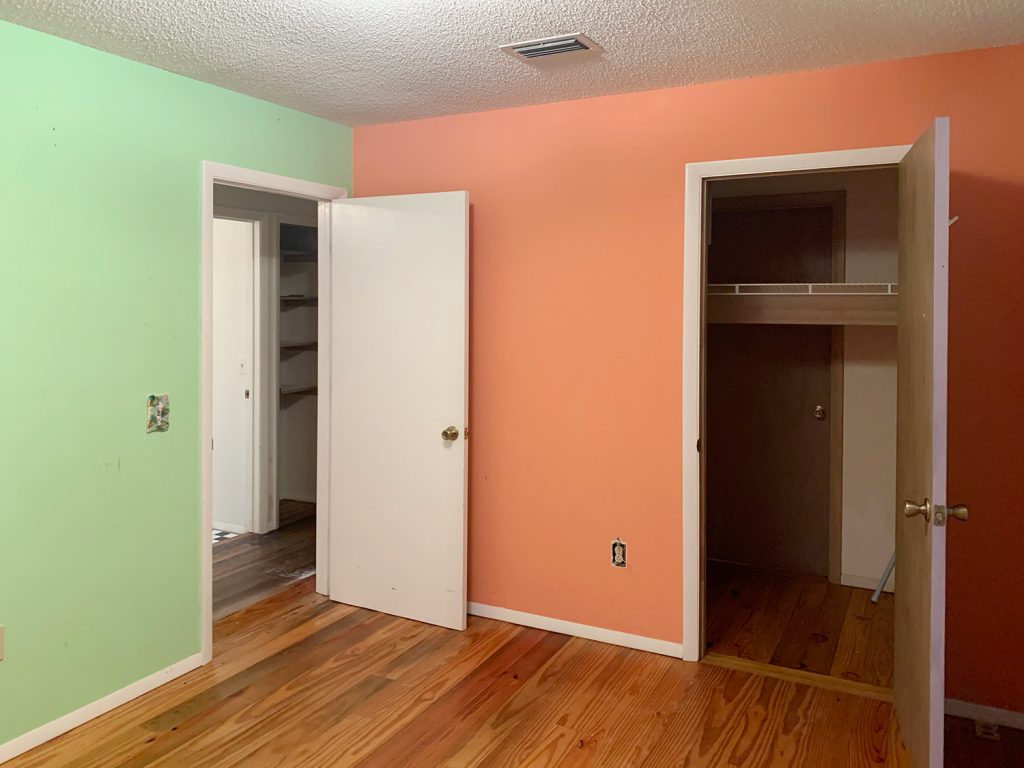
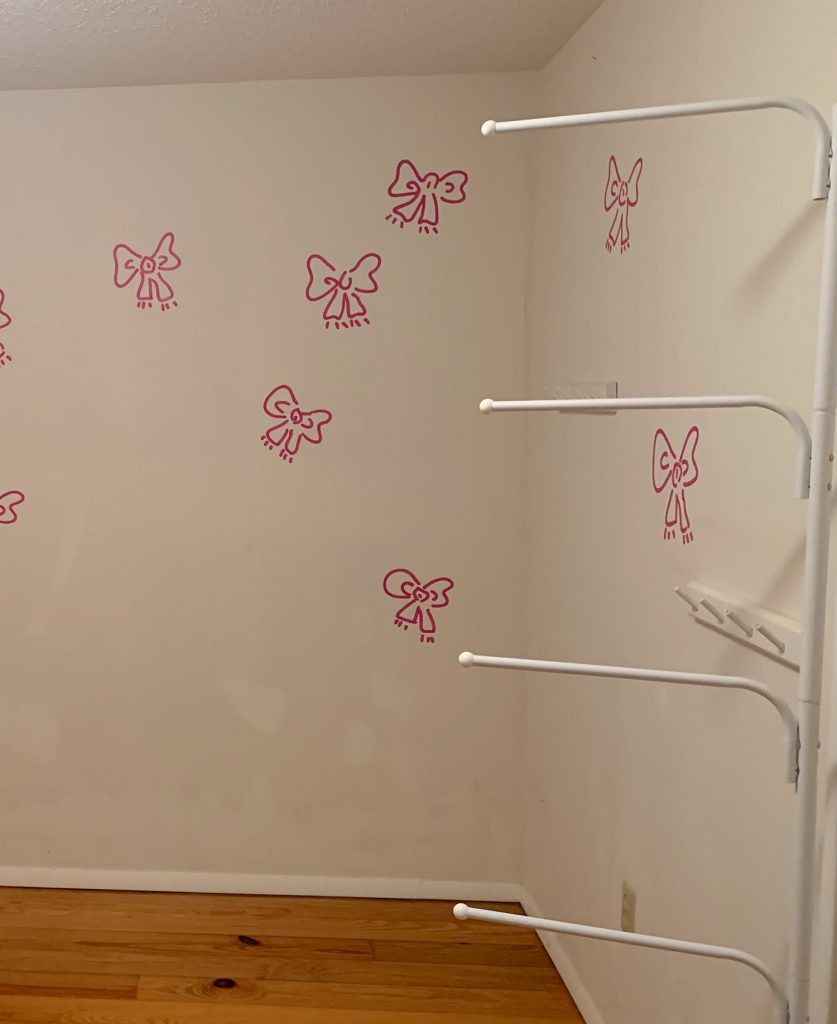
You can also see this room in particular had a very colorful past…
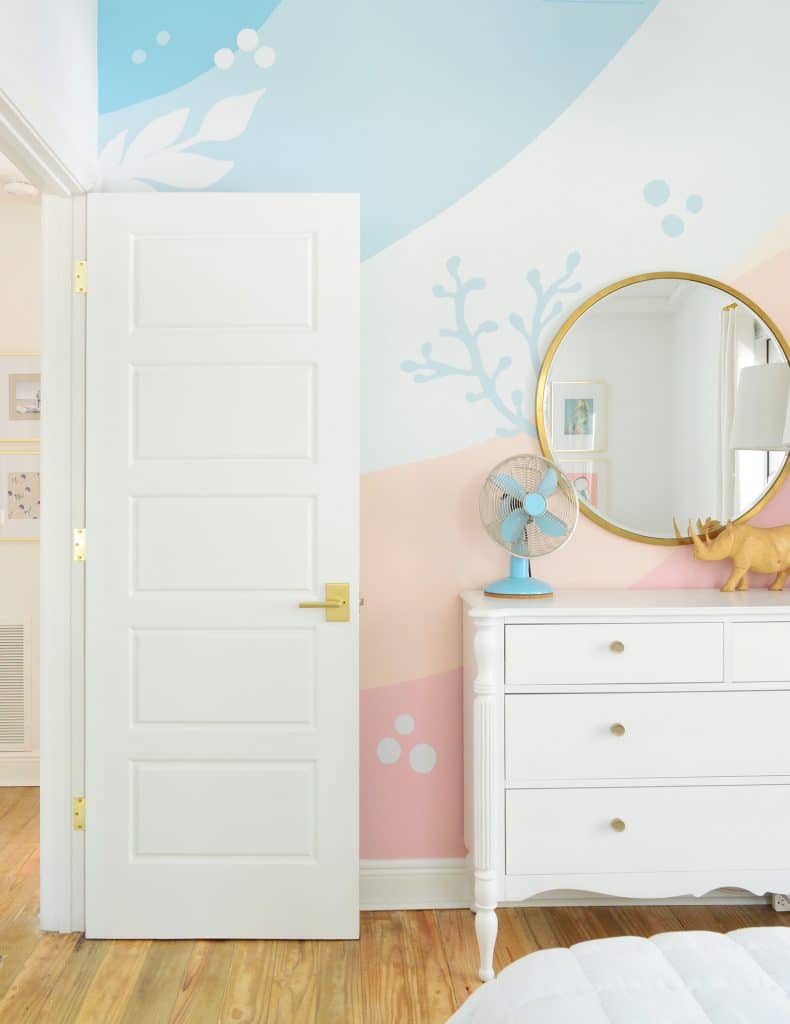
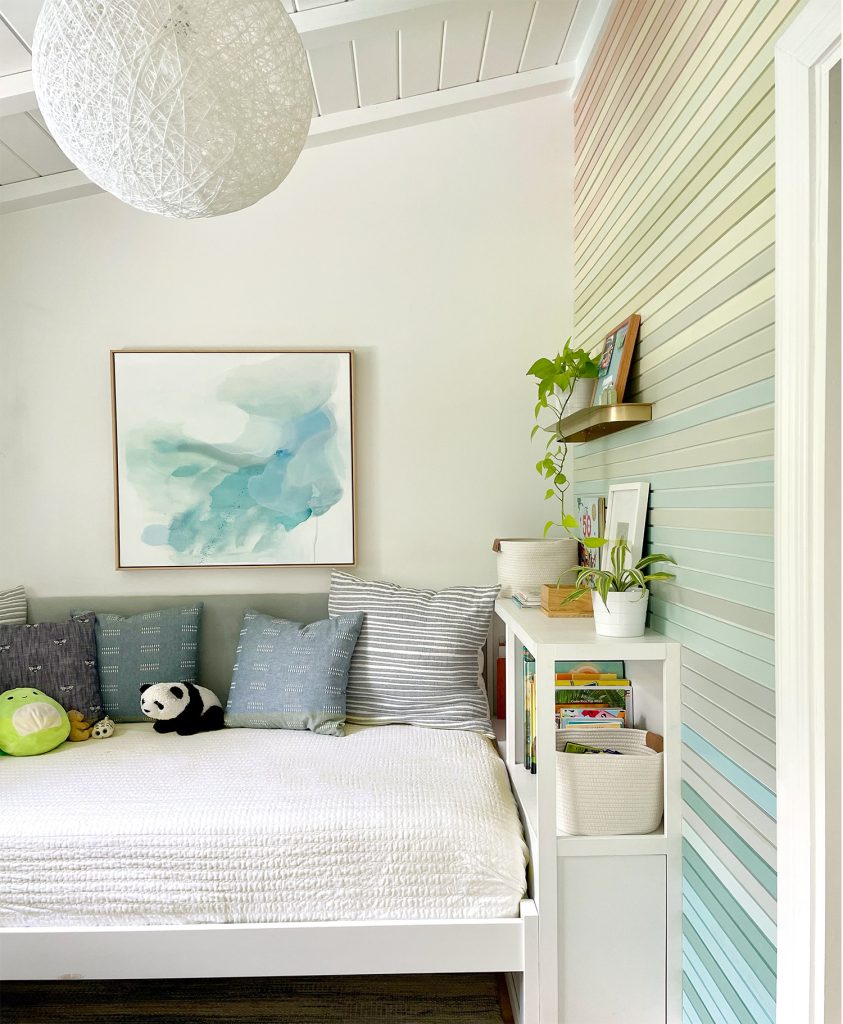
… which we embraced by hand-painting a large mural on the newly vaulted wall across from our daughter’s bed.
Our Son’s Room
We were also able to vault the ceilings in our son’s room to follow the slope of the roof, as well as adding more planking and beams to the ceiling, which adds character and some nice dimension. Here’s the before:
And here’s what it looks like these days:
This super cozy room is one of our kids’ favorite spots to hang out together (ever since the beach house bunk room they’ve loved quiet time together in a small space). We built in the bed by creating a simple DIY wraparound headboard, which they hang out on kind of like a daybed. And we later added a built-in desk that doubles as a nightstand.
Here’s another before shot that was taken with the camera swung more towards the right wall of the room:
And here’s the same angle of the room as it looks now:
Every inch matters in smaller spaces like this, so the built-in bookshelf we made is really functional too. That foot or so of floor space along that wall works so much harder for us now! You can also see that we added some colorful painted horizontal planking along that side wall.
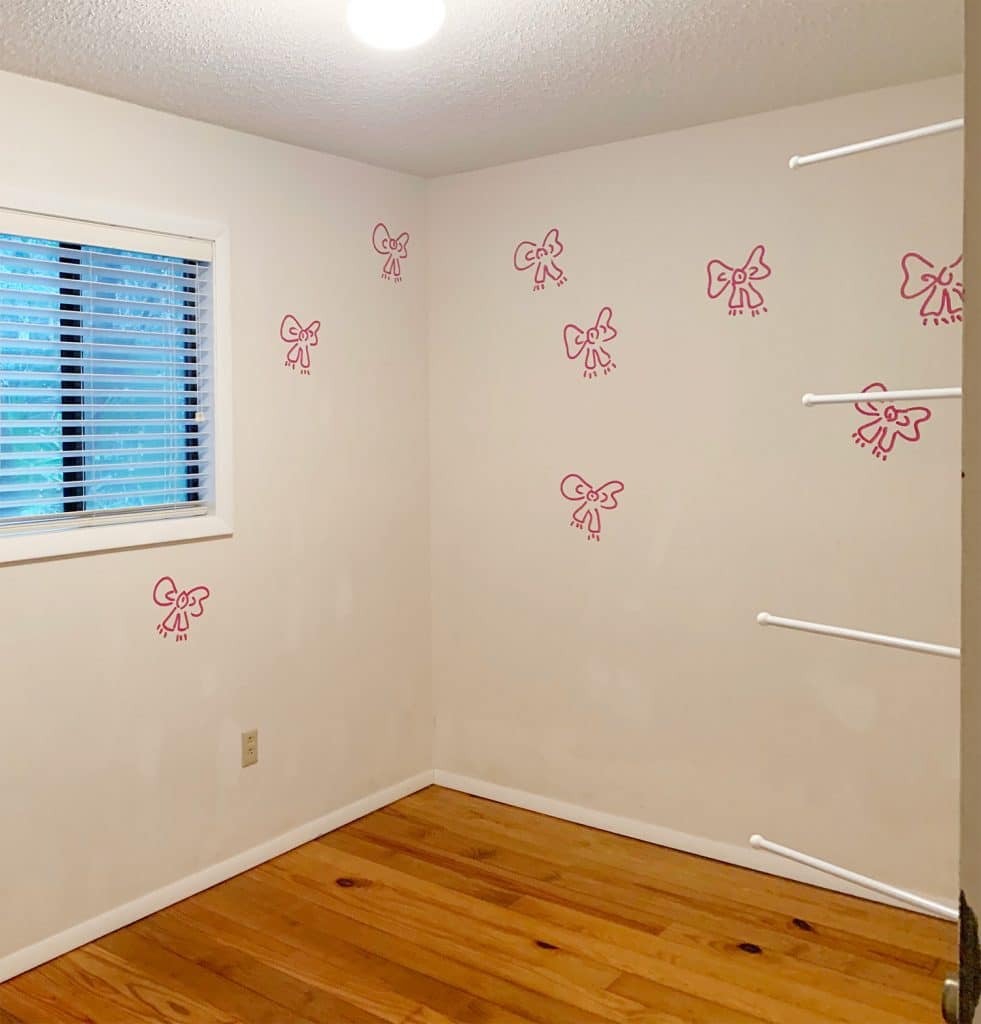
This before shot shows the small closet that was already in this room…
… which we filled with custom shelves, for some easy clothing storage (more on that project here).
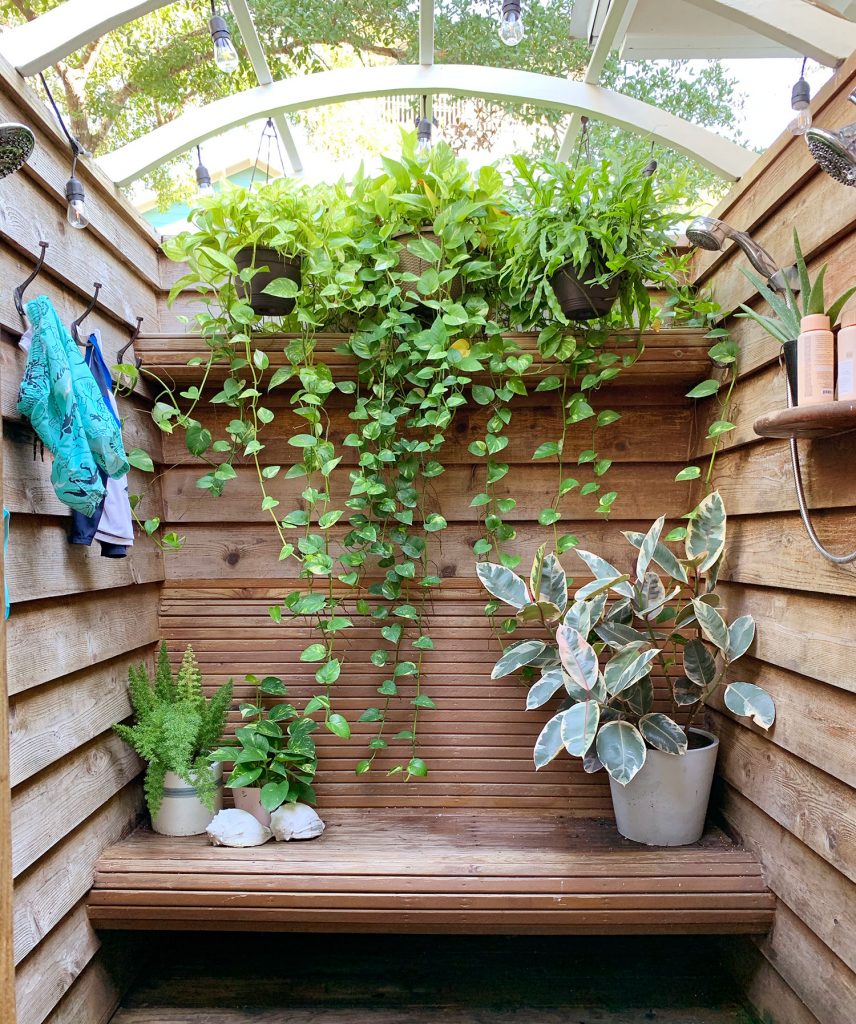
The Outdoor Shower
We weren’t quite sure what to make of this space when we bought the house because it felt pretty grody with so much grime going on…
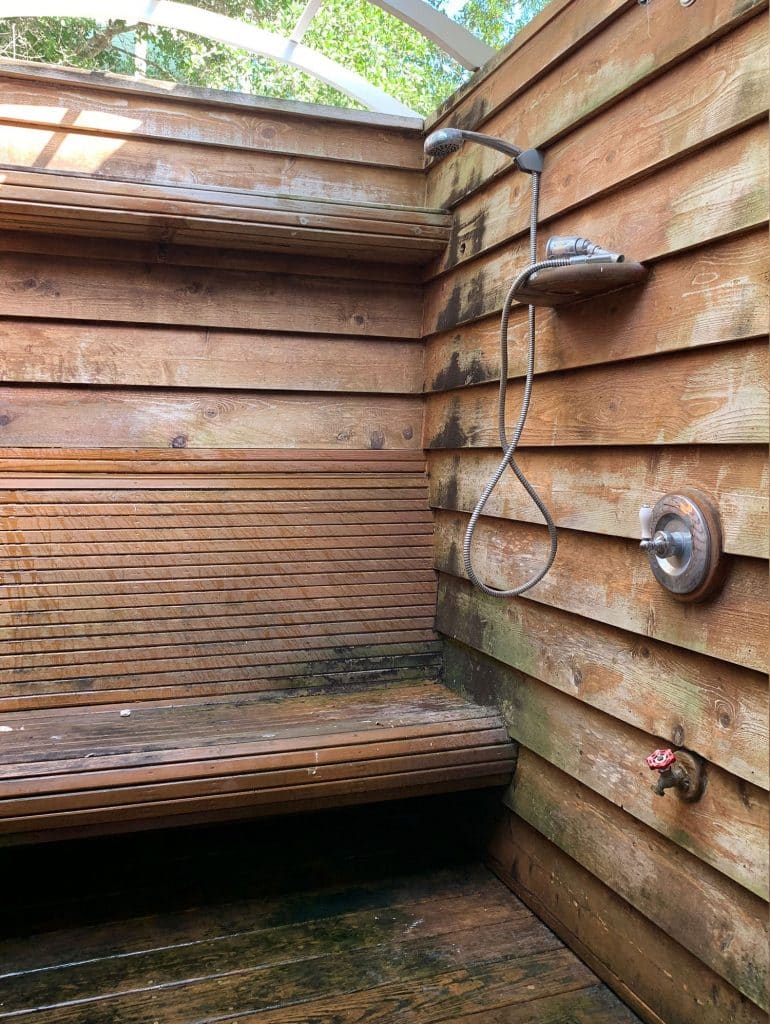
… but after some pressure washing, resealing the cedar with teak oil, and adding lights, plants, and new shower fixtures, it has actually turned into one of our favorite spaces. The whole family prefers this shower to our indoor one! You can see more of it in this post and we just kept adding more plants from there (so you’ll see that it’s a lot more lush in this updated photo below):
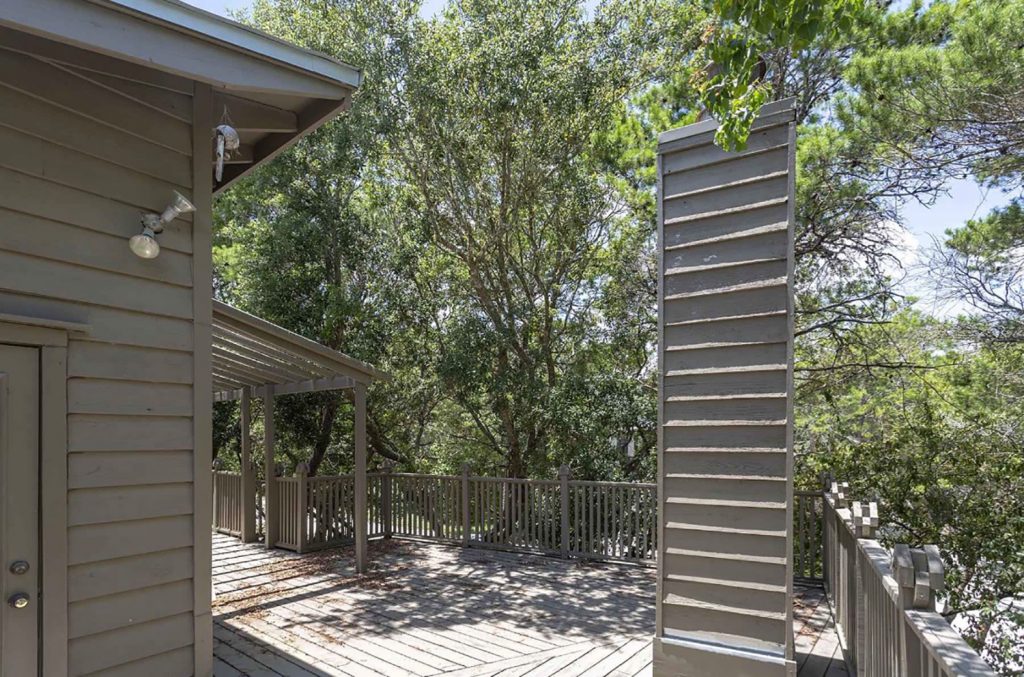
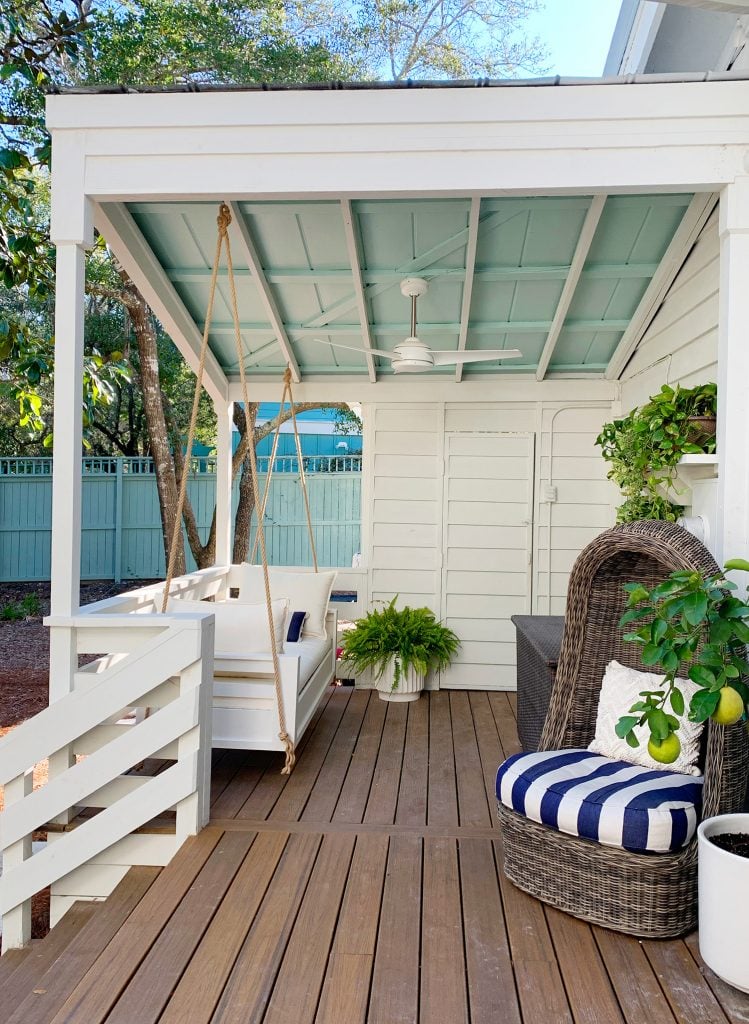
While we’re talking about the outdoor shower, the area that leads to it is kind of like a covered side porch, and this is what it started out looking like.
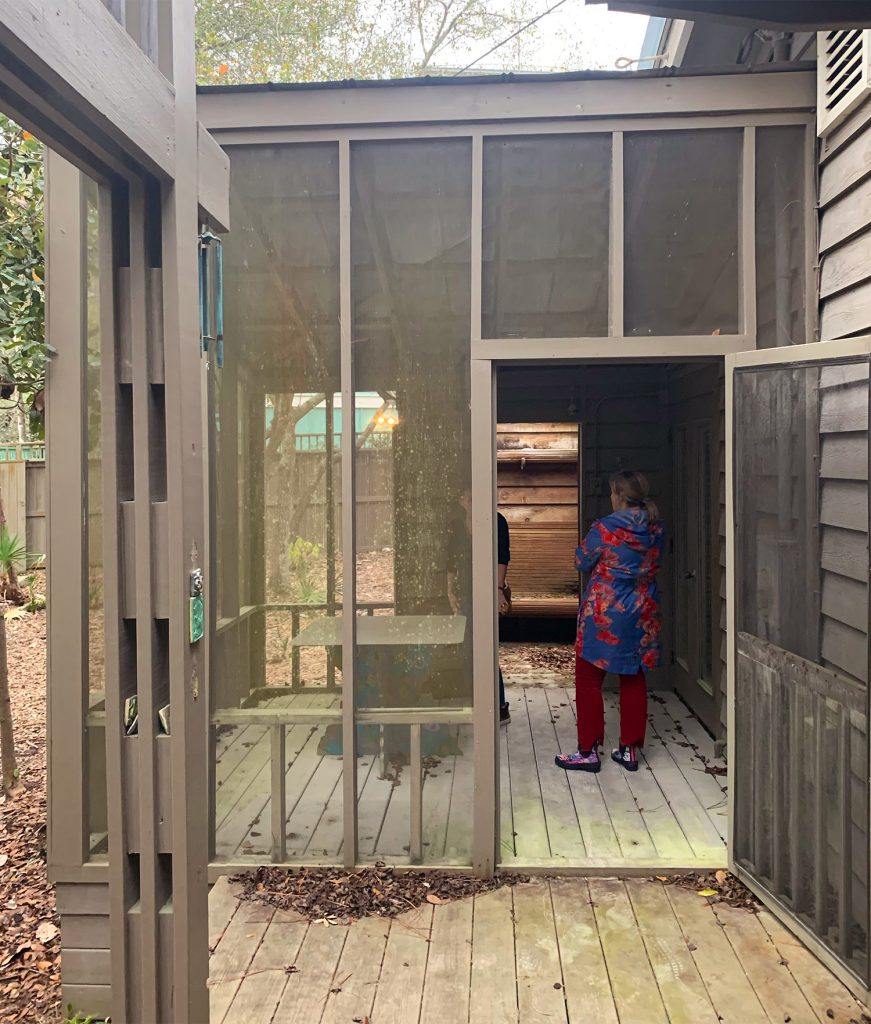
It has come a LONG WAY, thanks to removing the mildewed screening around it, replacing the rotten floor, rebuilding the railing with a modern horizontal design (like the one we added up on the second floor deck) and a whole lot of paint. And for anyone wondering what our secret is to avoiding mosquitoes without screens – it’s that ceiling fan we added! They hate flying into moving air, so when we’re out there we flip it on and they don’t bother us. You can read more about our side porch update and how we built the hanging daybed.
Now to revisit this porch area on the side of our house that we said we’d come back to. Shortly after we bought the house it was looking like this (the old railings were just about to come down, and the big steps that cut through this area had already been removed).
Now looks like this, and we call it the kitchen porch, thanks to adding a door to connect it to our kitchen (that’s the door you see on the back wall of the porch below). We closed off the doorway on the left of the porch above that led to our bedroom. Our room still has 6 (!!!) exterior doors and we gained the perfect wall to place our bed (plus a nice big closet – more on that here). This porch has been great for grilling dinner just steps from the kitchen, and carrying groceries directly into the kitchen is much easier. You can read more about this space here.
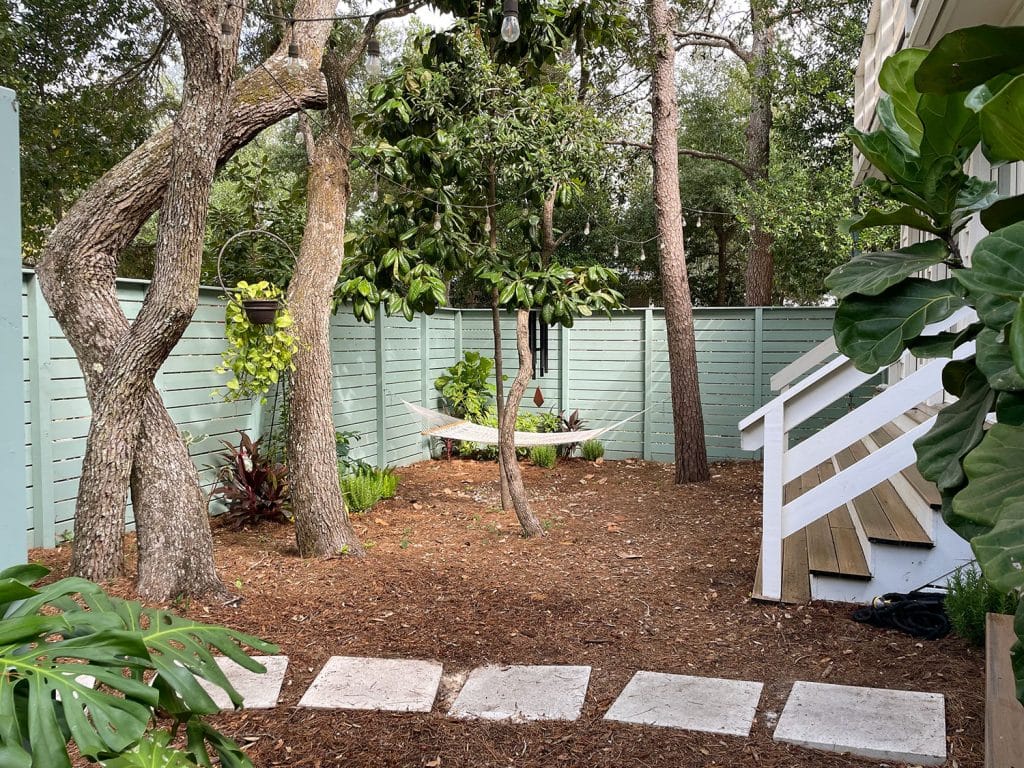
We added a fence around this entire side yard to create more of a private courtyard and made a cozy little firepit zone from a formerly unused area that felt exposed to the street. This is the before:
And this is a slightly different angle (the camera was further back and aimed more towards the right) but here’s what it looks like now that there’s a fence to define that area and make a nice little private courtyard. That hammock is prime real estate for us on lazy weekend afternoons.
It’s hard to explain how much of a difference some fresh paint on the house & the addition of that fence made, but here’s a before shot that gives you more of an idea. This was taken when we saw the house for the first time:
And here’s how it looks today, with the new upper deck railings, new door hardware, fewer railings for those steps that lead to the hammock (there used to be four sets of them!) and the fence truly made the area feel so much more defined and useful. It used to just be an area where we never spent any time, and now we’re out there a ton.

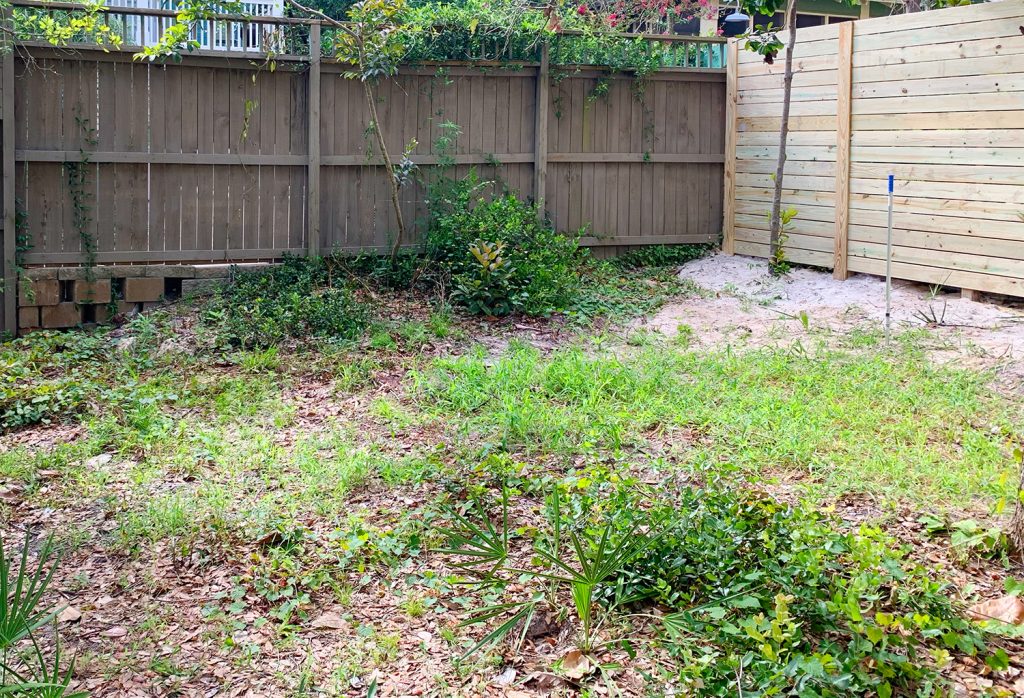
And in one of our longest-running updates to date (it took about a year from when we applied for the permit to completion!), we also added a pool to this formerly weed-riddled part of our yard. Here’s the best before picture I can find, which was taken right after we added that fence on the right, but before we painted anything:
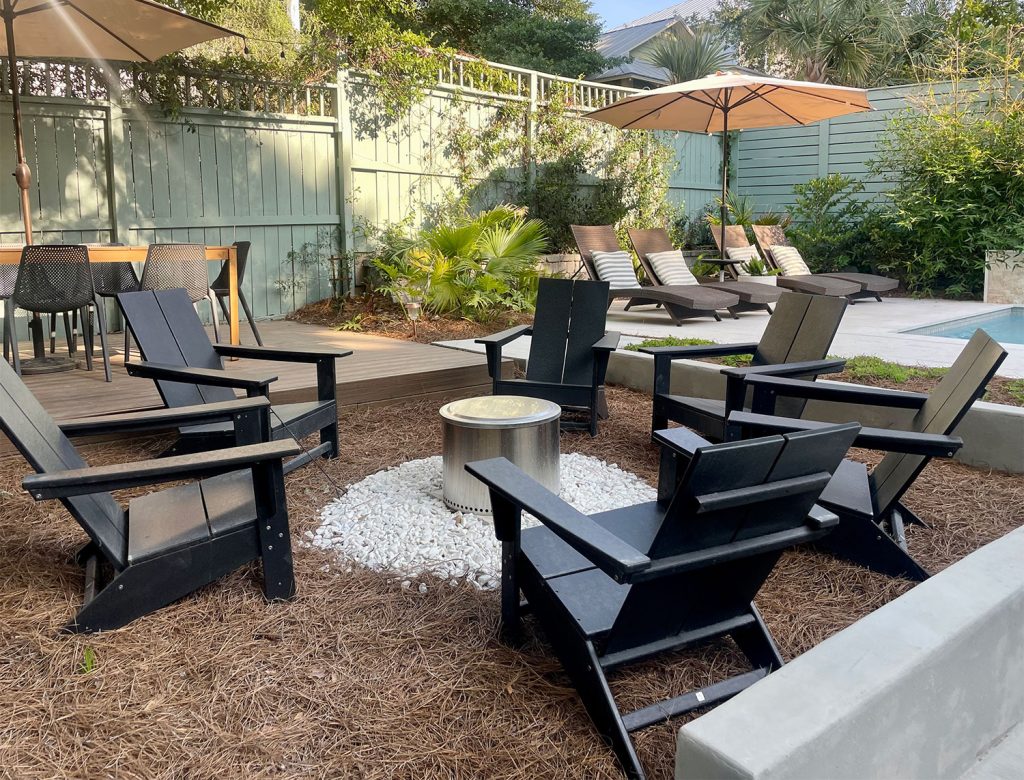
And here’s what it looks like now that we painted all the fences to match and added a pool with a retaining wall and three fountains that sound better than any white noise machine we’ve ever had (it’s so soothing – you can see more photos and read about the whole process here!).
We also added a pool deck, a hardyplank deck for a large table that seats 8 (great for game nights and entertaining) with some other spots to lounge (like around the pool or the firepit). So much room for activities.
From the other side, facing the house, here’s a before shot:
And here’s what it looks like now.

Here’s one more before shot from right after we moved in (so the house had been painted, but not much else had happened on this side):
And here’s the after from almost the same angle. Wild, huh?! It’s one of our favorite before & afters of all.
You can read all about adding those paths, steps, and retaining walls right here. And again, you can read about the entire pool process (how much it cost, how long it took, etc) – and see even more before & after photos right here. And here’s an updated post about how we doubled the size of our pool yard and added two more zones to it!
So that’s our progress so far on this house since we moved here in May of 2020. We can’t wait to take some updated photos and share the other ways that this house evolves for our family over time. In the meantime, you can check out these related pages for even more info, details, project tutorials, etc:
- If you’re wondering what paint color we’ve used or where we got a certain item of furniture (or a specific curtain or planter pot, etc), please check out the Shop Our House page for all of that info.
- To read about how we feel about so majorly downsizing, and what it has taught us, here’s a post full of details.
- To see our house all decorated for the holidays, here’s a post with lots of photos.
- And to see before & afters of our last house, here’s a page full of those. You can also see our beach house’s before & after page, as well as one that we made for the duplex that we renovated.
P.S. And to see the entire makeover of our house in chronological order, this category has you covered!