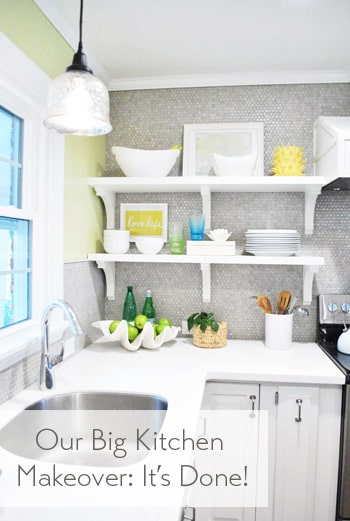
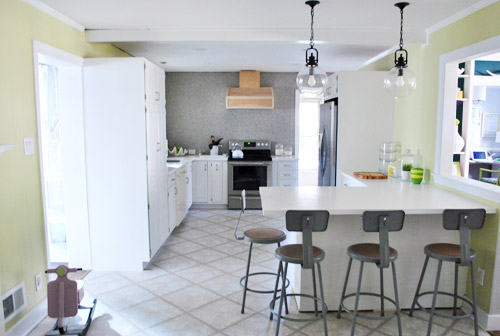
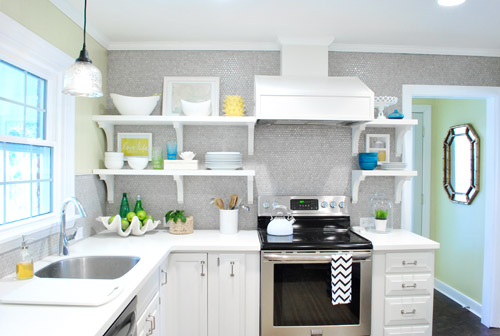
Ok, we’re calling it. The kitchen is officially done!
Of course that’s a lie and we still have a bunch of little things to complete, like:
- adding decorative molding to the back of the peninsula
- adding a message center/chalk board to the side of the pantry
- adding the last of the transitions/reducers to finish the floors (and that rectangle of fireplace tile)
- replacing the broken light in the fireplace area – most likely with a spotlight that washes down the fireplace wall
- adding some sort of window treatment (colorful roman shade?) over the sink
And of course we dream of refinishing the surrounding oak floors to match the dark mocha cork in the kitchen so our whole house is more seamless (more on that here) but that’s a down-the-line thing. Thankfully all of the big stuff and most of the small stuff in the kitchen is checked off the list and we’re so excited to see how this room has transformed in the last five months. Can you believe we’ve been slowly chipping away at this renovation since October?! Things have definitely come a long way…
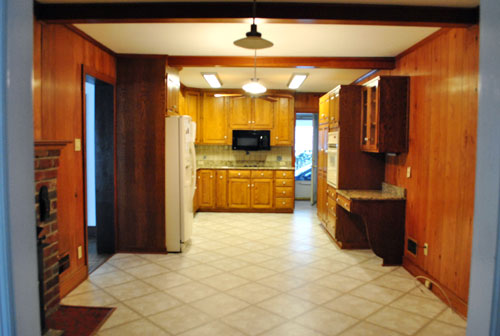
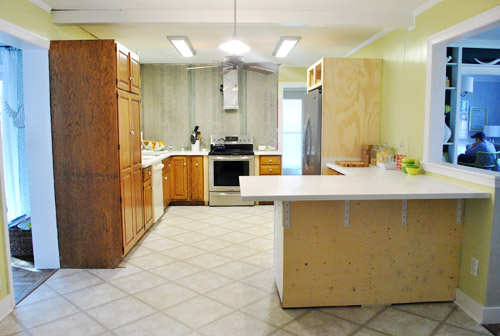


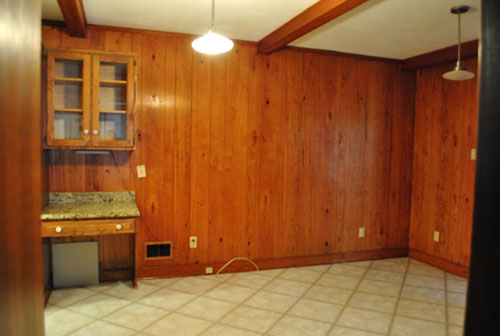
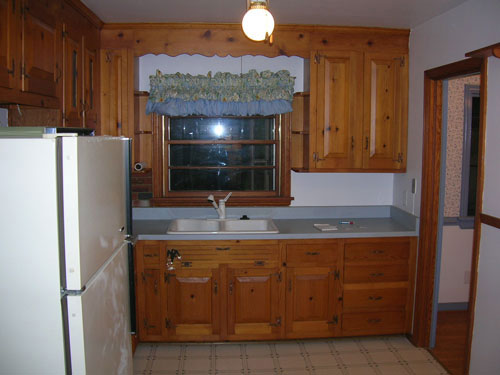
Just to save you from scrolling back, here’s the before again for comparison’s sake.
It really doesn’t even feel like the same room anymore. We can hardly remember the dark paneled kitchen that we lived with for almost a year while we planned our remodel and saved our pennies.
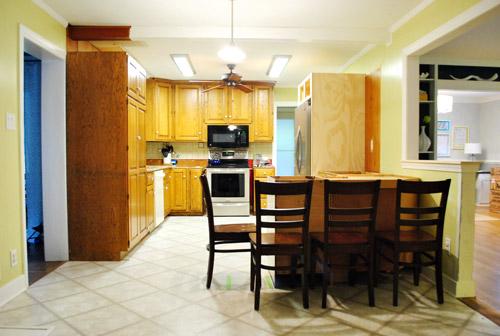
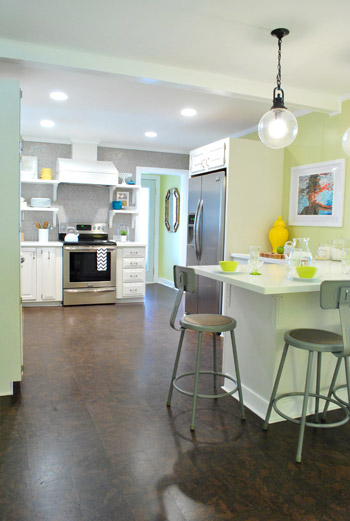
Here’s the makeover from the other side of the room:
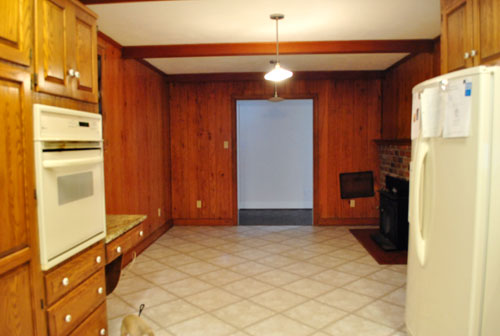
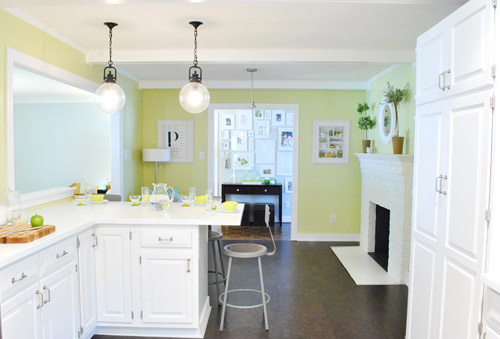
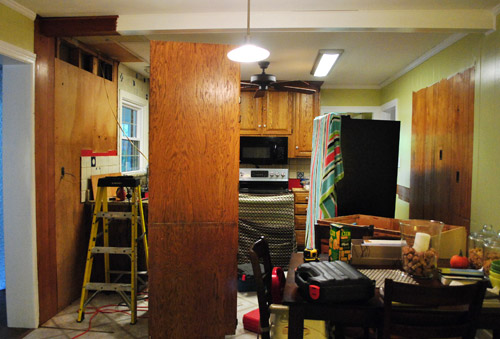
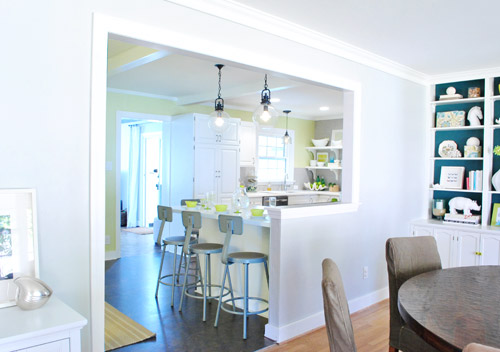
And here’s a before and after shot from a similar angle where we opened up the wall to create a nice big doorway between the kitchen and the dining room:
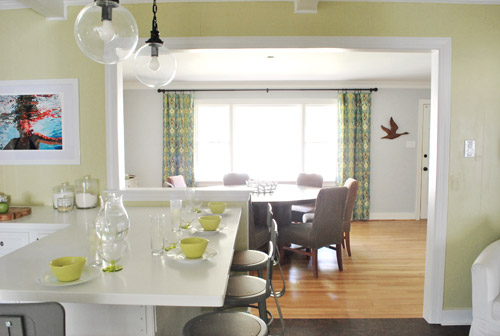
Oh and here’s another fun before and after comparison (from the doorway of the office that leads into the kitchen):
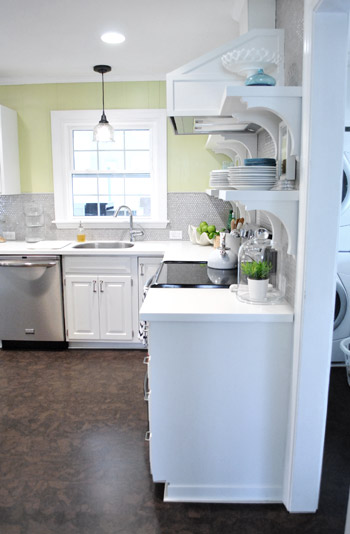
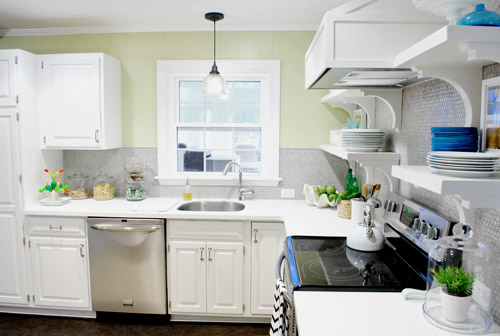
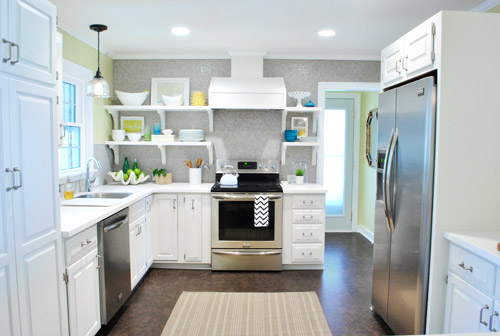
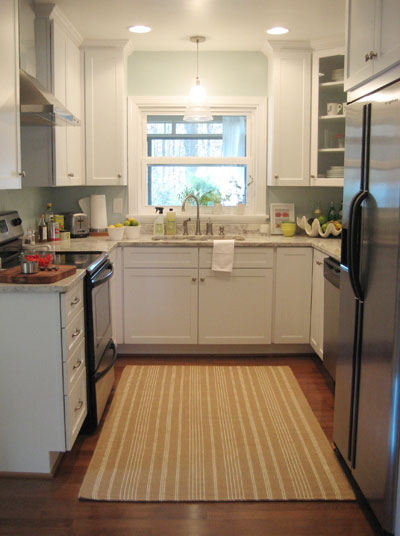
Here are a few more POVs of the room as it looks now:

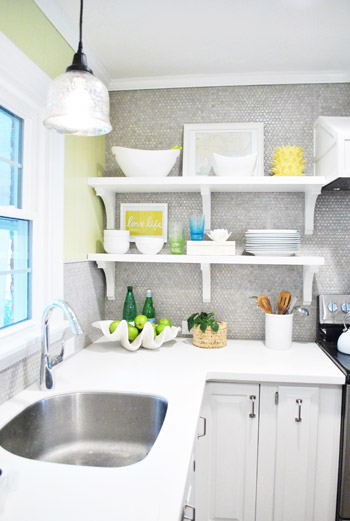
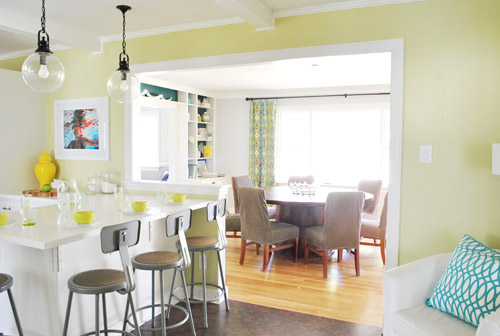
Lots of things are still in flux (items on the counters and shelves will definitely rotate in and out, which is fun for a kook like me). And these two 4 x 6′ rugs from our first house’s kitchen and third bedroom aren’t permanent…
… we just tossed them down for a few shots, but we envision getting something new to help define those areas (they’re old and stained and not as soft underfoot as a few other options, so we’ll keep you posted).
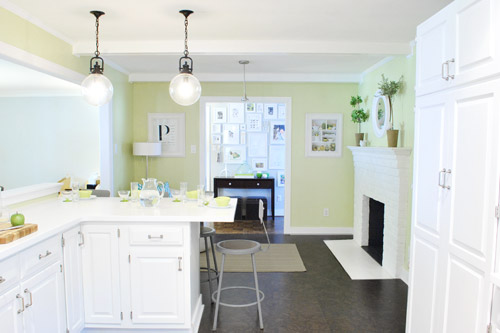
Oh and when it comes to the bar stools that we debated spray painting anything from a bright color to oil-rubbed bronze, now that the floor is so dark the silver color ties into the stainless appliances and looks nice and balanced in person. So we might live with them a while before we decide to defile them with spray paint or anything. Of course we’ll keep you posted.
And we actually have one more tweak that we’re seriously thinking about ever since a reader sent us a photoshopped picture of our hood with the top as wide as the bottom part (thanks Brooke!). She actually sent the pic on the 15th of February, but we decided to wait to finish up the kitchen (add the flooring, etc) before making any rash decisions…
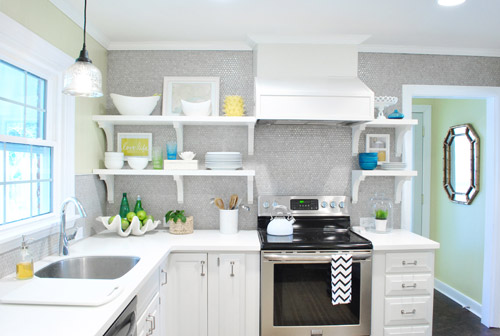
The good news is that we’re still smitten with the idea, so all signs point to beefing up the neck of the range hood someday! Of course we’ll keep you posted on that too.
But back to the overview of our big kitchen makeover. We definitely got really hands-on with this transformation (especially when compared to our first kitchen reno, which we managed but mostly outsourced, my how things change). It just goes to show you that over time you can learn as you go and five years later you might be way more comfortable doing a lot more than you did the first time around. Here are some of the things we did in our current kitchen to save money:
- doing all of the drywalling and trim on our wall opening into the dining room
- relocating things like our fridge, pantry, and stove to make a better work triangle by ourselves
- refinishing our original cabinets and reusing our faucet and sink
- getting additional base cabinets from the Habitat For Humanity ReStore to create a peninsula
- reselling things on Craigslist (our old granite, dishwasher, over the range microwave, wall oven, dining table, and fireplace insert)
- going with Corian over pricier granite or marble
- buying on-sale appliances over a tax-free weekend with Energy Star discounts stacked on top of that
- building our own cabinet around the fridge
- scoring our $350 range hood for just $60 on craigslist
- doing all of our own tile installation with on-sale penny tile
- building our own range hood cover and shelves
- buying inexpensive metal lab stools from a school supply website
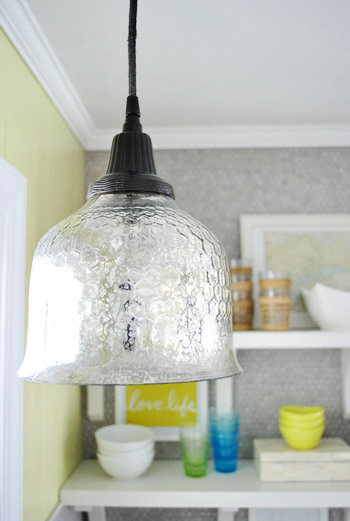
- getting pendant lamps for over the peninsula on the cheap from a local outlet
- spray painting an old $29 Pottery Barn outlet pendant to match the others for over the sink
- getting clearanced-out cork for the floors that we laid ourselves
And here’s an actual budget breakdown:
- New cork floor + underlayment from Lumber Liquidators (including the cork in the laundry room too): $848
- All new stainless appliances (originally priced at $3,776): $2,129 (we originally spent $2,384, but later switched the microwave)
- Opening the doorway into the dining room, which was done by a local contractor and then finished by us: $790 (which includes $90 of materials that we bought to drywall and trim it out)
- Additional base cabinets from the Habitat For Humanity ReStore to create peninsula: $88 (they would have been $500+ new)
- New pendants over island and sink: $149 ($60 for each globe pendant and $29 for the one over the sink)
- The cabinet we built around the fridge so it looks built-in: $90
- All electrical work (done by local pros over three visits): $711
- Wood filler, primer, and paint for refinishing the cabinets: $69
- JennAir range hood scored on craigslist (worth $350): $60
- Wood and brackets to hang/frame out hood: $115
- Wood & brackets & all hanging materials to make shelves: $141
- Corian counters in Glacier White from Home Depot ($33 a square foot): $1,700
- All new cabinet hardware and hinges: $173
- Backsplash (penny tile from The Tile Shop): $280
- Four industrial lab stools (from a school supply store): $168 (they were just $33 each plus shipping)
- Miscellaneous (screws, nails, glue, little cords/connectors for appliances, flooring & tiling supplies like grout and sealer, shoe molding, etc): $194
- Items we sold on craigslist to get money back to put into our reno: old black microwave: +$90, old fireplace insert: +$60, old dining table and chairs: +$120, old bisque dishwasher: +$90, old granite: +$350, old bisque wall oven: +$40 (total back: +$750)
- TOTAL SPENT: $6,955
Not bad since a large kitchen renovation of this scale (our room is 24′ x 12′), if outsourced would probably be around 30K (for a giant new doorway that leads to the dining room, an accent wall of penny tile to the ceiling, all new cork floors, all new appliances, refacing oak cabinets and adding a peninsula to match the original cabinets, all new Corian counters including a giant 3 x 5′ slab for the peninsula, an entirely new lighting plan, a built-in hood with custom built shelves, a relocated pantry, stove, and built-in fridge, etc). We originally budgeted 10K for the job, so we’re really happy to come in under!
By contrast, our first kitchen renovation (from back when we both made bank working in advertising, haha) involved pricey granite, a lot more professional help, and all new cabinets.
It actually came to $20,500 (including the purchase of a fridge and stove that weren’t included in this breakdown since we bought them a year prior). And that room was only 13′ x 10′!
So although this second kitchen reno took us tons of time (we started this project back in October, and have probably put 5-10 hours a week into it since then – for a total of around 155 hours) it was definitely something that we loved doing – mostly on nights and during weekend Clara-naps. We almost never worked on it during the day on weekdays (when the blog is active and the bean’s awake one of us is a stay at home parent and one of us is on blog duty) so that might help those of you with a day job who wonder if you can pull off a major kitchen remodel like this on nights and weekends.
You can! It might just span across five months or so, but as long as you take things one small project at a time (it’s waaaay less intimidating than thinking of it as one big project when you break things down into bite-sized chunks) you’ll most likely live to tell the tale. And all the love and sweat that you put into your “new” kitchen will be totally worth it in the end.
Who’s excited to call this turkey done? Is anyone else out there about to start a big kitchen reno? What have you guys done when it comes to being hands on and saving some money by doing things yourself? We’d love for everyone to share tips about how they renovated their kitchen on a budget so this post can become an awesome resource for anyone out there who is thinking about getting started and would love to peruse a bunch of what-worked-for-me tips! And now we just owe Clara and Burger a big thank you: for sleeping through all the hammering and drilling and just generally being such great little DIY enthusiasts (Clara still loves to measure the cabinets with her tape measure since she remembers us doing it months ago).
A five month long kitchen reno can definitely “interrupt” daily life, but our little ones are such troopers, so we’re sending them both a big virtual kiss for their patience and excitement throughout the loooong and not-always-easy process! Our tip is to try to maintain as many working appliances as possible (which is easier when you’re working with your existing cabinets, but nearly impossible when it’s a full gut job). We only had a few days without most of them, if that, which was no sweat! In fact it totally paled in comparison to the 113 days that we were without our first house’s kitchen during that reno. Thank goodness for extension cords to keep the fridge running and the fact that moving our stove across the room didn’t mean losing the function of it!
Psst- To check out virtually every post about our kitchen renovation, click here, here, here, here, and here (hooray for monthly breakdown posts that have 20+ links in one place!).

tiffaney says
The difference is incredible. I personally can’t stand a dark kitchen. You guys did exactly what I would have done in brightening it up. Its so fresh and clean andhappy. Amazing job, for real!
Im not wild about the floor though, but thats just me of course. I dont like the brown with the black and stainless appliances, however I do love that its cork. What a great choice.
And Im so jealous that you have a fireplace in yoir kitchen! Thats high on my list of wants in our first house, but it seems to be rare these days!
Kath says
You guys are rockstars. Seriously. $7K for the whole beautiful thing!!
Beth says
It’s STUNNING! Both the price and the kitchen!
You really are an inspiration, thanks for (over) sharing :)
Kim says
looks fantastic! what a transformation – so exciting!!!!!!!!
Jasanna says
I love it! It’s fantastic to see the transformation! Did you know everything that you would do in advance or did you come up with some of it along the way? I don’t know that I could envision it beforehand so well! Great job! :)
http://munchtalk.blogspot.com/
YoungHouseLove says
We tried to take it one step at a time to avoid getting overwhelmed, so we tried to tackle the big tasks first (picking the tile, the floor, the paint color for the walls, and the layout) and then it was just little baby steps to get from the selecting everything process to the putting it all together completion!
xo,
s
chris says
I am excited for you guys that you get to call this turkey done, but I have loved watching to redo every step of the way! It’s beautiful! I think the board on the side of the pantry with be Pièce de résistance! All on a beat the band budget. Great job!
What’s next???
YoungHouseLove says
We’re doing a bunch of things at once- haha. Bathroom updates, landscaping stuff, and we’re planning a big deck build too!
xo,
s
Jacqueline says
Congrats guys! Those niggly little finishing tasks are always the worst huh! (not hard, but just hard to get motivation to do them!)
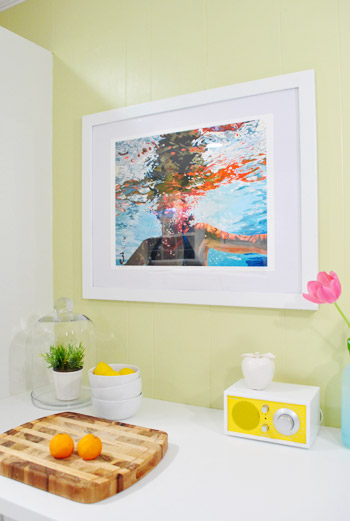
I totally always see goldfish when I see that “lady swimming” picture… just like Clara! :-)
Lindsey says
This is absolutely stunning! This has given me new inspiration to finally stop avoiding my own kitchen dilemma!
My fiancé and I are getting ready to move into our first house, and I have a huge dilemma when it comes to the kitchen. When we initially saw the house, I fell in love with the bright red kitchen immediately. It was one of the main reasons I wanted to buy the house. It is fairly new, and all of the stainless steel appliances are less than 5 years old (the only thing missing was the fridge). Once we bought the house I realized, that despite the kitchen being new, the off-white cabinets are not working with the white trim. I love the red with white trim, but am not sure if we should paint the cabinets. I guess my problem is I like all the different aspects of the kitchen – just not together!
Thanks for the great and inspiring post!
YoungHouseLove says
Aw thanks Lindsey! We have seen lots of gorgeous kitchens with cabinets and trim in the exact same color (like bright white) and they always look fresh. You’re right how off-white cabinets can sometimes look off with white trim! Hope it helps!
xo,
s
JoDi says
Everything looks great, and bravo to Brooke for sending a pic so you could visualize what a difference the wider hood would make! Ever since that hood went up, I’ve felt like the sides of the bottom either needed to angle in to meet the narrower vent or the vent needed to be wider. I could never pinpoint exactly why, but it just looked awkward the way it is now.
molly says
I love it when hard work pays off. You guys created something absolutely beautiful. Good job, team! And thanks for sharing it with us.
YoungHouseLove says
Aw thanks Molly!
xo,
s
HeidiY says
Wow, beautiful job!! Thanks for sharing! I’ll be looking at your other changes through your links. I’d like to know where you got your dining table. Love round tables – been eyeing some ;) And congrats on all the ‘savings’ you did, too!
YoungHouseLove says
We got it from a local furniture outlet. Here’s that post for ya: https://www.younghouselove.com/2011/02/table-talk/
xo,
s
diane says
An amazing job as always, from you guys. I would add a faux panel, some molding or even chalk board paint to the side of that giant white cabinet to finish it off but nice job! Can you come do mine?
YoungHouseLove says
Sure, we’ll be right over! Oh and we do have plans to do something to the side of the pantry cabinet (probably a framed our message center of some kind) so that should be fun!
xo,
s
Jennifer says
I am so impressed and intimidated, honestly! I have some details from my kitchen remodel that are STILL not finished, 4 years later. SO embarrassing. The work you’ve done on this is spectacular and you’ve made what was a dungeon into a bright and airy space. Bravo!
Penny Smith says
I don’t see the paint color listed… It could be attention-of-a-gnat issues… but could you email that to me? Thanks!! We are moving from a 3 year old house we built to a 1970’s traditional that needs some cosmetic work. :) Masacist. I know. :)
YoungHouseLove says
Aw, good luck with everything Penny! It’s Benjamin Moore’s Sesame. Hope it helps!
xo,
s
Erica says
I love the teal pillow – is that new?
YoungHouseLove says
It’s from ZGallerie!
xo,
s
Furpants says
Your blog is great and the kitchen turned out fantastic. I never comment here because, well, while I really appreciate the helpful way you break down your projects, I just don’t share your taste (although I can appreciate you do what you like very well). So, bearing that in mind, the one thing about your kitchen I would have done different is the fridge. If you had done an under counter fridge and freezer and left the space above open, the sightline for your kitchen would have opened up through that doorway and it would make the kitchen seem so much bigger and more relaxing.
YoungHouseLove says
Oh yes, that definitely would have been another way to go! We love being able to stand up with our toddler on our hip and grab her a snack at eye level from the fridge, but under counter is always another option!
xo,
s
Marie says
Sorry if this has already been answered, but who makes the green/yellow paint you guys picked for the walls? I’m absolutely in love with it!
Marie says
I just found the link where you guys listed all your paint colors! Oops!! I feel silly now but congratulations on your kitchen it’s gorgeous and I love the site!
erin says
So amazing! You guys are so inspiring!
Jackie Toye says
To the tune of Beyonce’s “Party” … Your Kitchen is driving me crazy. I can’t explain the way I feel, so in love … I love to see it everyday … We like your Kitchen, yeah, yeah …
haha, I know, a bit much, but I love this kitchen.
YoungHouseLove says
Hahaha, aw thanks Jackie!
xo,
s
Penny Smith says
wait… maybe you mentioned this. But you don’t have a microwave at ALL now? Where is it? Seriously-gnat attention span issues. I just don’t see it (in the picture, OR living without one!)
YoungHouseLove says
Haha, we hid it in the cabinet to the left of the sink. Here’s that post for ya: https://www.younghouselove.com/2011/12/goodbye-microwave-hello-microwave-cabinet/
xo,
s
Brandie Seedorf says
I cant wait to see how this turns out since I have foot problems and I hear that cork is easier on the feet. I have a couple questions for you. 1st, I noticed in your lovely pinterest photos that there is no place for the microwave. It’s such an odd appliance but so necessary for my life. I dont like when they put it below the counter because its hard to see what’s going on and push the buttons (i can only imagine, i dont know this for sure). 2nd I have laminate wood-like flooring from Lowes that we installed a couple years ago (hired some handyman to do it) and i dropped a 10 pound iron key on the floor (in two places) and now i have to take up these sections and replace them. How the heck do you do that?!
YoungHouseLove says
We actually have a microwave that we hid in a cabinet (the one to the left of the sink!). Here’s a post about that for ya: https://www.younghouselove.com/2011/12/goodbye-microwave-hello-microwave-cabinet/
xo,
s
allison says
Yee-haw!! Beautiful and inspiring. Congrats! Do you have any posts on how you tackled the wood paneled walls? We have a similar situation and aren’t sure on whether to paint them or rip them out. Any links to what you two did? Thanks and enjoy that gorgeous kitchen!
Ashley says
I love it! I have been loving penny tile for a while now and was so excited when y’all posted that you were going to use it! I recently bought a house and actually decided to copy you and get the same stuff – the price and color were both right, too. I ordered it to put in my bathroom, but now that it’s arrived I decided I would like an accent strip, and need a little more. I was actually curious to see if y’all had any extra sheets that you were wanting to get off your hands… I live in TX and shipping to get it out here is ridiculous! Let me know! Thanks!
YoungHouseLove says
So sorry! We only have a few extra sheets that we’re saving just in case something crazy happens to any of our tile and we need it for replacements. I hope they get it back in stock soon so you can get your hands on more!
xo,
s
Cathy says
Just wondering how you’re feeling about the white counters. We’ve got white laminate and I HATE them. Not because of how they look, but because everything shows on them. If I open a can and the bottom of the can rubs on the counter I end up with little silver scuffs on the countertop. Barkeeper’s Friend is my new best friend, but I hate that I’m constantly wiping up the counters. Does the Corian do that?
YoungHouseLove says
We love them! We always wiped down our old counters every night before bed anyway, and they were veiny granite so nothing showed – which was a problem! We’d find a glob of peanut butter from three nights ago on the counter that we somehow missed. So gross! It’s nice to see everything and just swipe it all down and wake up to a sparkly white room! Perhaps Corian is easier to wipe down though? It’s smooth so stuff seems to slide off.
xo,
s
Cathy says
Sorry–have to leave another comment. It probably doesn’t matter, but the photo is not me. It’s my parents. I didn’t even think about that it might show up since you use WordPress for your blog. I set up a blog for my parents when they took a fabulous cruise (72 days!) around South America and last logged in as them to help them fix some hinky stuff. Anyway–the kitchen looks great. We’re thinking of replacing our counters and I’d love to know if you have the same issues with the Corian. If not, I might consider going with that–although Formica and WilsonArt have a new edge feature (Formica’s is called IdealEdge http://www.formica.com/home/ideal-edge/new-laminate-countertop-edges/) and it looks pretty spectacular (at least in the photos–I haven’t seen it in person) and is supposed to run only $15-$20 a square ft.
Rachael S says
You guys use white cabinetry a lot and I love the look and was thinking of doing it in our kitchen as well, but my husband thinks they are going to look dirty after a while. How do you keep yours looking amazing?
YoungHouseLove says
It’s wipeable cabinet paint so it’s easy to wipe down if you get a splatter of something. They generally just look really clean because white is a color that looks nice and bright without much work. Haha. It’s not like white fabric (which can be stained) since paint can be wiped down!
xo,
s
Lynn says
We are in the middle of a kitchen remodel, and your blog has helped me cope in so many ways. I now know I want to donate our old sink and cooktop to Habitat ReStore, or sell them on Craigslist. I also am reassured with my decision to to with Corian countertops. I just love the way it looks. I hope I have what it takes to tile the backsplash!
YoungHouseLove says
You can do it Lynn! We’re rooting for you! Good luck with everything.
xo,
s
Jenn says
I love your kitchen. It really opened up with the changes you all put in. Would you mind sharing what color the walls are?
YoungHouseLove says
Yep, they’re “Sesame” by Benjamin Moore.
-john
Caitlin says
Love the color of the walls…can you tell me the name of it? I want to paint every room in the house gray but I know I need more color and I stumbled across your kitchen! Gorgeous!
YoungHouseLove says
It’s Sesame by Benjamin Moore. Hope it helps!
xo,
s
Erin says
Quick question – I noticed there wasn’t any evidence of coffee drinking in your new kitchen? Did you hide it or is it just not your thing? If it’s not your thing, maybe you could show what you would do if you WERE coffee drinkers, like a coffee station or what not? I’m setting up a little coffee corner in our kitchen and trying to find ideas for storing mugs, sugar, etc. You could even call it a “Hot Chocolate/Tea station” if that was more your deal. Just an idea for a post :)
Thanks, love your style/colors/insights by the way!
Erin H.
YoungHouseLove says
Yup, we’re coffee drinkers but I’m a tea fiend (hence the tea kettle). I think a coffee station on the counter could be cute. You could try to invest in a cute coffee maker (do they come in stainless steel?) so it looks nice on the counter. And adding a pretty lacquered tray for the cups and a little cream and sugar container could be cute.
xo,
s
haverwench says
When it comes to remodeling, I remember the rule my friend the computer programmer told me about developing code: out of Fast, Cheap, and Good, you can only get two out of three. Buy pricey materials and outsource the work, and you can get a Good job done Fast (but pay through the nose); buy el cheapo materials and slap it all together and you can do it Fast and Cheap (but don’t expect it to look good); take the time to hunt for bargains and do the work yourselves with precision, and you’ve got Good and Cheap. That’s an end result that makes it worth living with a ripped-up room for a few months.
YoungHouseLove says
That’s a fun concept! I heard a wedding planner use that same equation.
xo,
s
Kysa says
What color penny tile did you use? I thought you mentioned Moss, but it certainly doesn’t look greenish. Very curious!!
YoungHouseLove says
Yup, it’s moss. No idea what it’s called that, it’s completely gray.
xo
s
Jan Thompson says
So I am looking at painting my own cabinets after getting bids from 2400-4200. I have two young kiddos (one 9 month old breastfeeder) and I really don’t want the house to be that stinky for them. I noticed what you used and wondered how stinky it was for you guys. And how long it took for everything to off gas? Was it pretty easy to use?
Would you still recommend that brand of paint? Also how many cans did you need to buy? Sorry for the 20 questions.
YoungHouseLove says
We used all low-voc products, so it was a lot more kid friendly. We hear that essentially once the paint is dry it’s not off-gassing much anymore when it’s so low-VOC, so if you could send the kiddos off with someone while you’re actually applying the paint and then have them come back home once things are dry (you can also run fans and crack windows since as much ventilation as possible is best) you should be all good! Hope it helps!
xo
s
Jan Thompson says
That is great! Thanks so much for your help!! You house looks amazing so if my kitchen can turn out as well then I will be one happy camper!
Sherry says
I am curious what kind of potlights you put in? Are they halogen? We have a terrible old flourescent light in our kitchen (looks like it belongs in a workshop) and cannot decide what would work better.
YoungHouseLove says
Ours are regular standard cans, but the bulbs we use are halogena (that’s the brand I think, but yes they’re halogen).
xo
s
Food Fanatic says
Wow now that was an overhaul that would make any home chef jealous. Incredible job guys!
Rachel Yates says
I love everything you all have done in the kitchen :)
Thought: Have you thought about adding wainscoting/crown molding to the sides of your cabinets and all around your island? I think it would look amazing!
YoungHouseLove says
Yes, we initially planned to do that and then held some up and it looked weird – just didn’t go with the modern shape of our shelves, hood, etc – but maybe it was the wrong trim and we just have to keep working on it! Will keep you posted!
xo
s
Kristin says
We are thinking of doing white Corian as well. I noticed you priced it at Lowe’s but got it at Home Depot. Did they honor that price? Or did you find it on sale?
Thanks!
YoungHouseLove says
Yup, they price matched and even did some things cheaper (sink cutout was cheaper I think).
xo
s
Maria says
Hi, You did a wonderful job on your kitchen. Now that you’ve been living in it a while can you tell me how the cork floor is doing with the barstools on it? I would like to use cork but was told by someone that it indents where bar stools or heavy objects are placed.
Thanks so much!
YoungHouseLove says
It’s great! We have little felt pads on the feet so they haven’t been an issue!
xo
s
audra says
where is your microwave? I love that you took it out from on top….but i can’t seem to find it! We’re looking at a classy richmond rancher (with original 1967 green carpet) with a similar kitchen. Super exciting!
YoungHouseLove says
It’s hidden in a ventilated cabinet. Here’s a post that explains it! https://www.younghouselove.com/2011/12/goodbye-microwave-hello-microwave-cabinet/
xo
s
Jessie says
We are currently in the process of buying all the materials for our bathroom renovation! (So excited!!) We’ve been shopping for penny tiles (for the floor) and LOVE the tiles you used for the backsplash. When we went to check it out at the Tile Shop, the “Moss” color looks a lot more green than gray…should we be worried or is the image just off?
YoungHouseLove says
It’s definitely just the picture. We saw it the other day in person again at their store and it’s definitely still the same muddy gray color we installed in our kitchen.
-John
Barb Ward says
I read about your site in the latest “Real Simple” magazine. Wish I’d found you (much,much) earlier. I’ve always been a huge do it yourselfer. I learned how to put up a ceiling fan while watching TV when on a treadmill at the gym (wow, over 20 yrs ago). I learned how to reupholster (sp?) when I watched a wonderful old show on cable “The Furniture Guys”. I did my couch with inexpensive white canvas that I dyed with tea then laid it in the yard, hosed it down and threw paint at it. The paint cost me more than my $2/yd fabric. It’s time to do something to the couch again, but I think I’ll just cover it and add some firm foam over the current cushions. So much to do so little time. Glad to meet you. I’ll be back.
YoungHouseLove says
Aw thanks Barb! So glad you found us. Thanks for stopping in :)
xo
s
Meredith says
Where did you get the globe pendant lights from? I am looking for ones just like them for my own kitchen!
YoungHouseLove says
We got them at a local Shades of Light outlet called The Decorating Outlet, but they’re still available through Shades of Light.
-John
Sarah says
*sigh*
Your kitchen looks SO “HAPPY” . l.o.v.e.
Don’t think its possible to feel sad in your house its so cheery n’ i love it!
YoungHouseLove says
Aw thanks Sarah! You’re so sweet!
xo
s
Ashley says
Okay, love love love the kitchen! I have a very small kitchen and need all the counter space possible, but there is no built in for my microwave so it has to sit on the counter… Where is your microwave and where would you suggest me trying to “hide” ours :) ?
YoungHouseLove says
We actually made a vented cabinet to safely hide ours. Here’s that post for ya: https://www.younghouselove.com/2011/12/goodbye-microwave-hello-microwave-cabinet/
xo
s
Kim H says
A big thanks for your tutorials (fridge framing here I come) as we are working on our kitchen remodel on a budget (building an island with microwave built in and was wondering how to vent it- thanks!). My question is: how do you keep yourself from going full steam ahead on a project like this, especially when it is the hub of the family. I appreciate that you teach patience to make your house a home but construction is so hard to live in!
YoungHouseLove says
I honestly think we’ve just done this long enough (we’ve been blogging 5.5 years now) to know that we’re just never done. So we have learned to enjoy the journey since it took us 4.5 years to finish our first house and we’re on year 3 of our second house – it’s all about having fun along the way and less about the destination :)
xo
s
Will says
Wow – the transformation is unbelievable! I am in the process of remodeling my kitchen and this has sparked my inspiration! Just wanted to note that I’ve been using this measurement guide: https://www.cabinetstogo.com/measuring-guide.html. It has helped a TON when installing kitchen cabinets. Hope it can be of use to someone!
Sophonia says
I give thanks to the universe that I found your blog. Bought a “fixer upper” home a little over 2 years ago and am completing the bathroom renovation. It took more months than I thought to get to “almost complete” and I’m still cutting crown moulding and painting but I absolutely love my home. Had buyer’s remorse the first week after moving in and cried for about 30 days after moving in. Over that now and taking it one room at a time! It’s my palace.
Sophonia a.k.a. “Sassy”
Chelsea says
Hi guys! Your kitchen is unbelievably beautiful! I’m in the middle of deciding on a kitchen renovation project and am gravitating toward the white cabinets/white countertops. My only concern is the stain factor. The little display at Lowe’s said Corian stains easily. I’m curious how yours has held up now that it’s been awhile? Thanks so much!
YoungHouseLove says
Weird! They said it stains easily? It’s non-porous so in our experience it was impossible to stain (didn’t happen once in over a year of everyday use). I hear some colors show scratches but white is one of the better choices (ours didn’t). You can also get it buffed and it looks like new (I think it would even be good for a rental because of that – sort of like how you can refinish floors, it’s cool that you can refinish Corian too!)
xo
s