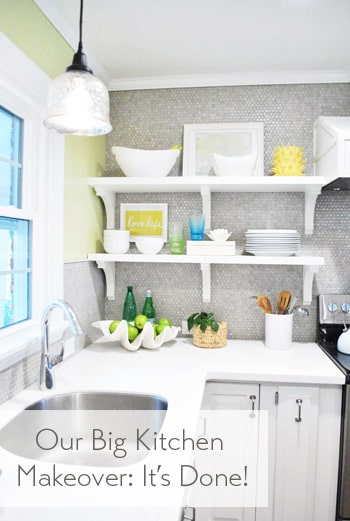
Ok, we’re calling it. The kitchen is officially done!
Of course that’s a lie and we still have a bunch of little things to complete, like:
- adding decorative molding to the back of the peninsula
- adding a message center/chalk board to the side of the pantry
- adding the last of the transitions/reducers to finish the floors (and that rectangle of fireplace tile)
- replacing the broken light in the fireplace area – most likely with a spotlight that washes down the fireplace wall
- adding some sort of window treatment (colorful roman shade?) over the sink
And of course we dream of refinishing the surrounding oak floors to match the dark mocha cork in the kitchen so our whole house is more seamless (more on that here) but that’s a down-the-line thing. Thankfully all of the big stuff and most of the small stuff in the kitchen is checked off the list and we’re so excited to see how this room has transformed in the last five months. Can you believe we’ve been slowly chipping away at this renovation since October?! Things have definitely come a long way…
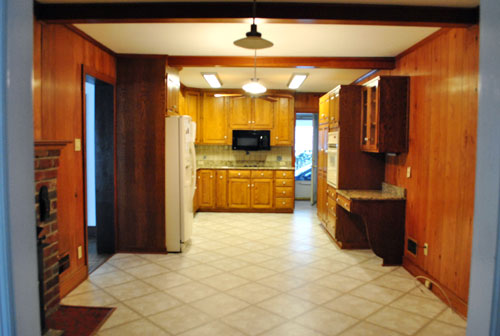
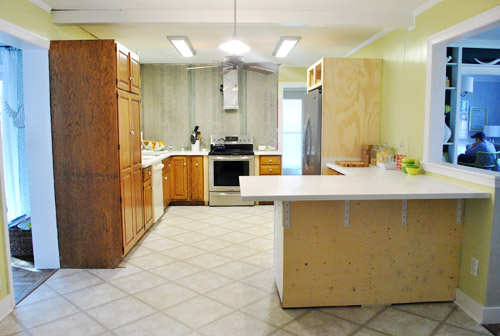


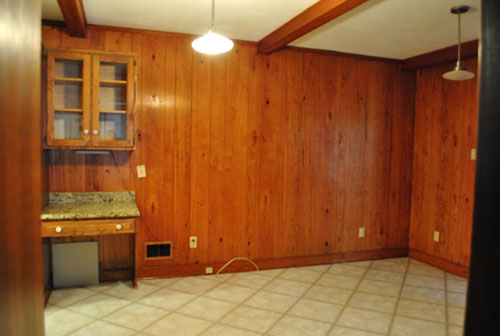
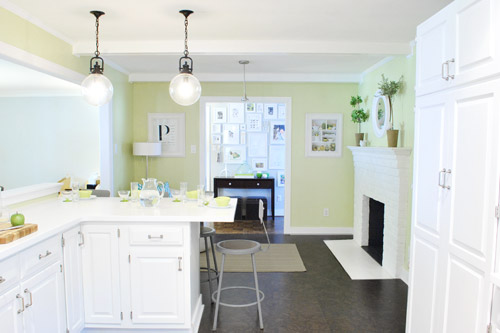
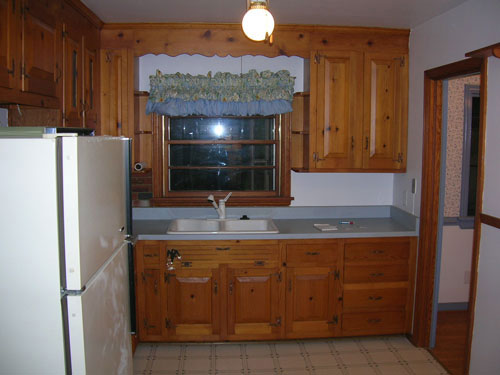
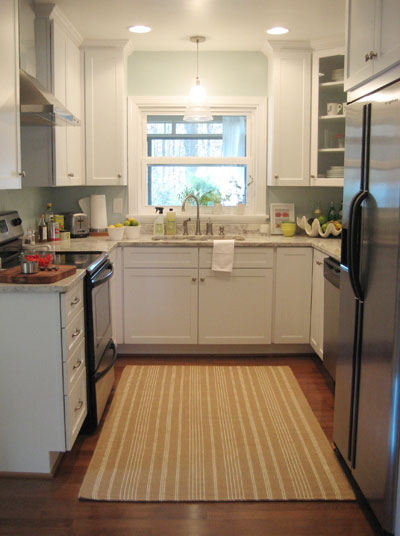
Just to save you from scrolling back, here’s the before again for comparison’s sake.
It really doesn’t even feel like the same room anymore. We can hardly remember the dark paneled kitchen that we lived with for almost a year while we planned our remodel and saved our pennies.
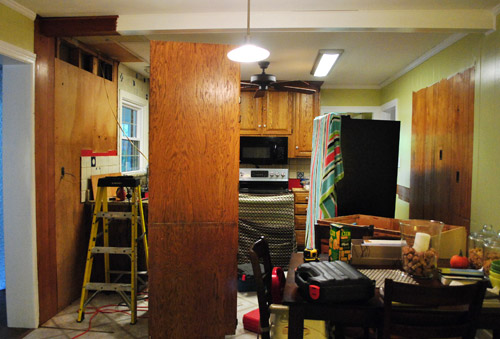
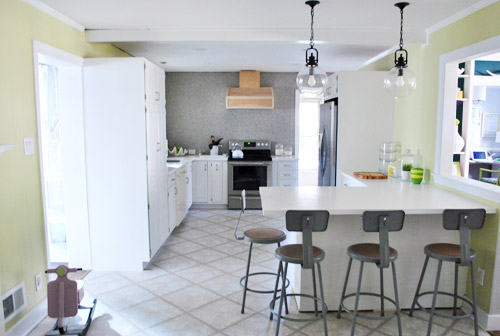
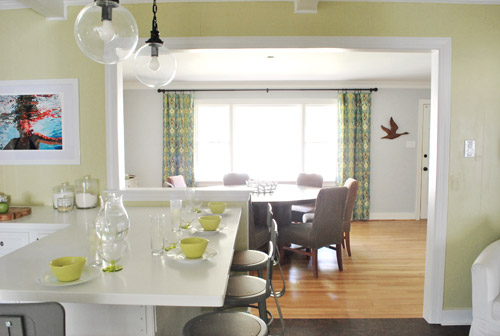
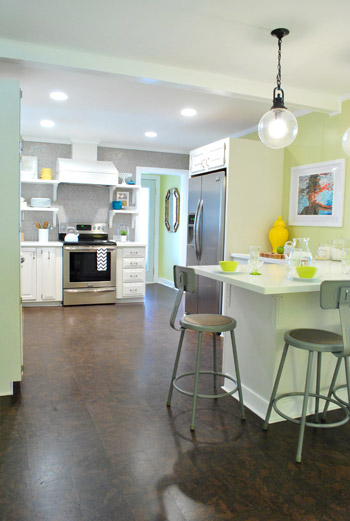
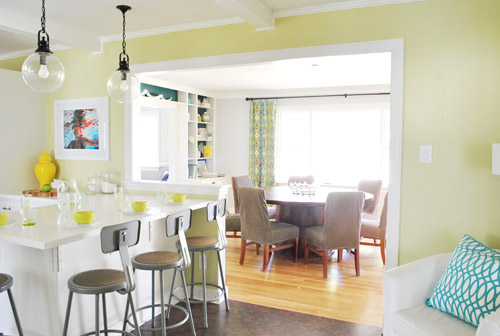
Here’s the makeover from the other side of the room:
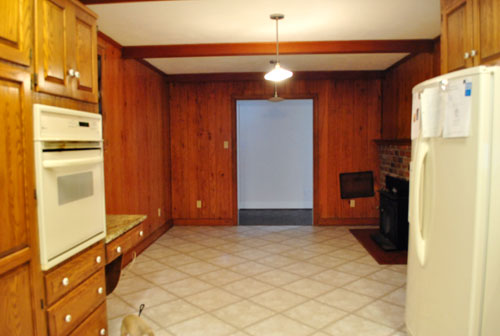
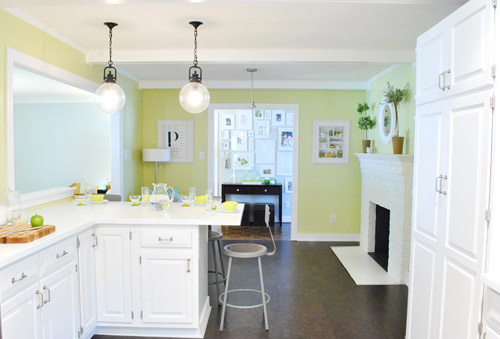
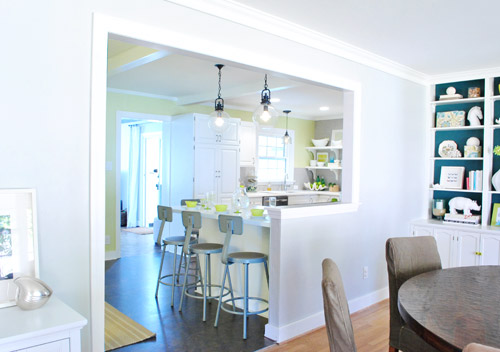
And here’s a before and after shot from a similar angle where we opened up the wall to create a nice big doorway between the kitchen and the dining room:
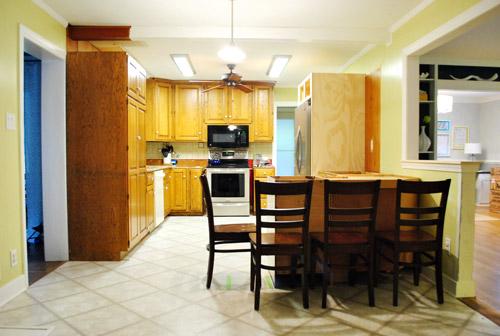
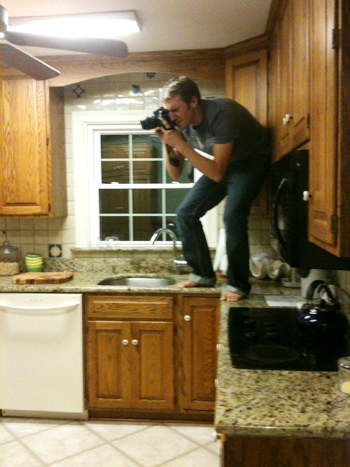
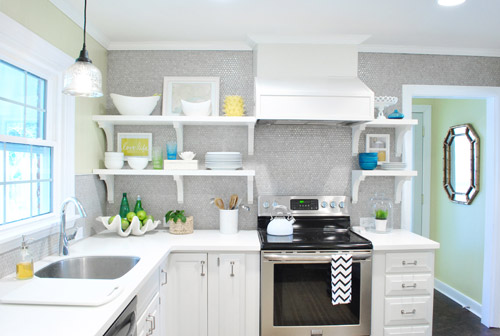
Oh and here’s another fun before and after comparison (from the doorway of the office that leads into the kitchen):
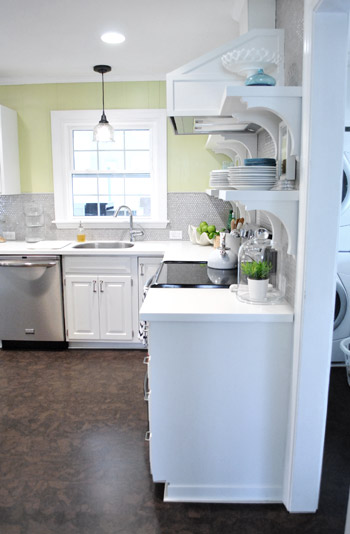
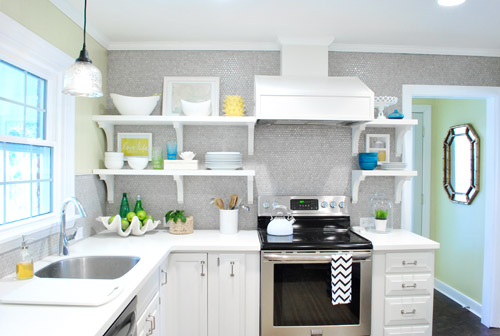
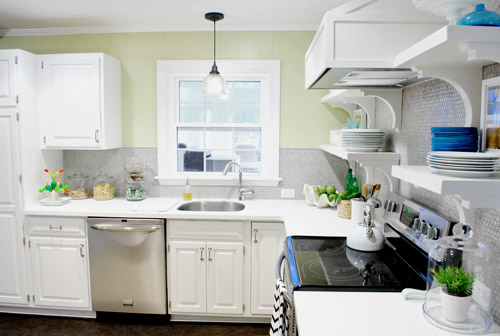
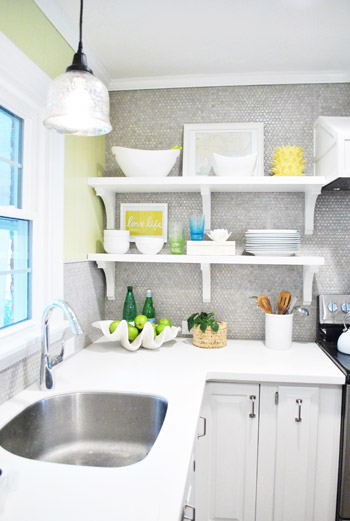
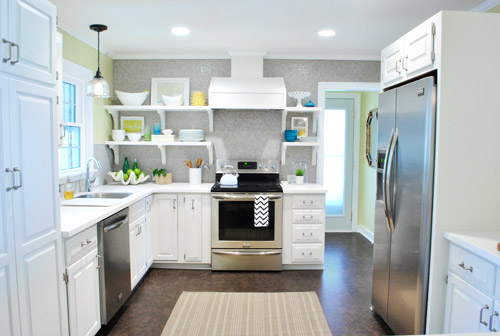
Here are a few more POVs of the room as it looks now:

Lots of things are still in flux (items on the counters and shelves will definitely rotate in and out, which is fun for a kook like me). And these two 4 x 6′ rugs from our first house’s kitchen and third bedroom aren’t permanent…
… we just tossed them down for a few shots, but we envision getting something new to help define those areas (they’re old and stained and not as soft underfoot as a few other options, so we’ll keep you posted).
Oh and when it comes to the bar stools that we debated spray painting anything from a bright color to oil-rubbed bronze, now that the floor is so dark the silver color ties into the stainless appliances and looks nice and balanced in person. So we might live with them a while before we decide to defile them with spray paint or anything. Of course we’ll keep you posted.
And we actually have one more tweak that we’re seriously thinking about ever since a reader sent us a photoshopped picture of our hood with the top as wide as the bottom part (thanks Brooke!). She actually sent the pic on the 15th of February, but we decided to wait to finish up the kitchen (add the flooring, etc) before making any rash decisions…
The good news is that we’re still smitten with the idea, so all signs point to beefing up the neck of the range hood someday! Of course we’ll keep you posted on that too.
But back to the overview of our big kitchen makeover. We definitely got really hands-on with this transformation (especially when compared to our first kitchen reno, which we managed but mostly outsourced, my how things change). It just goes to show you that over time you can learn as you go and five years later you might be way more comfortable doing a lot more than you did the first time around. Here are some of the things we did in our current kitchen to save money:
- doing all of the drywalling and trim on our wall opening into the dining room
- relocating things like our fridge, pantry, and stove to make a better work triangle by ourselves
- refinishing our original cabinets and reusing our faucet and sink
- getting additional base cabinets from the Habitat For Humanity ReStore to create a peninsula
- reselling things on Craigslist (our old granite, dishwasher, over the range microwave, wall oven, dining table, and fireplace insert)
- going with Corian over pricier granite or marble
- buying on-sale appliances over a tax-free weekend with Energy Star discounts stacked on top of that
- building our own cabinet around the fridge
- scoring our $350 range hood for just $60 on craigslist
- doing all of our own tile installation with on-sale penny tile
- building our own range hood cover and shelves
- buying inexpensive metal lab stools from a school supply website
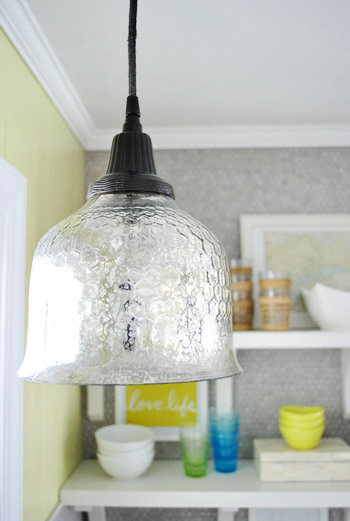
- getting pendant lamps for over the peninsula on the cheap from a local outlet
- spray painting an old $29 Pottery Barn outlet pendant to match the others for over the sink
- getting clearanced-out cork for the floors that we laid ourselves
And here’s an actual budget breakdown:
- New cork floor + underlayment from Lumber Liquidators (including the cork in the laundry room too): $848
- All new stainless appliances (originally priced at $3,776): $2,129 (we originally spent $2,384, but later switched the microwave)
- Opening the doorway into the dining room, which was done by a local contractor and then finished by us: $790 (which includes $90 of materials that we bought to drywall and trim it out)
- Additional base cabinets from the Habitat For Humanity ReStore to create peninsula: $88 (they would have been $500+ new)
- New pendants over island and sink: $149 ($60 for each globe pendant and $29 for the one over the sink)
- The cabinet we built around the fridge so it looks built-in: $90
- All electrical work (done by local pros over three visits): $711
- Wood filler, primer, and paint for refinishing the cabinets: $69
- JennAir range hood scored on craigslist (worth $350): $60
- Wood and brackets to hang/frame out hood: $115
- Wood & brackets & all hanging materials to make shelves: $141
- Corian counters in Glacier White from Home Depot ($33 a square foot): $1,700
- All new cabinet hardware and hinges: $173
- Backsplash (penny tile from The Tile Shop): $280
- Four industrial lab stools (from a school supply store): $168 (they were just $33 each plus shipping)
- Miscellaneous (screws, nails, glue, little cords/connectors for appliances, flooring & tiling supplies like grout and sealer, shoe molding, etc): $194
- Items we sold on craigslist to get money back to put into our reno: old black microwave: +$90, old fireplace insert: +$60, old dining table and chairs: +$120, old bisque dishwasher: +$90, old granite: +$350, old bisque wall oven: +$40 (total back: +$750)
- TOTAL SPENT: $6,955
Not bad since a large kitchen renovation of this scale (our room is 24′ x 12′), if outsourced would probably be around 30K (for a giant new doorway that leads to the dining room, an accent wall of penny tile to the ceiling, all new cork floors, all new appliances, refacing oak cabinets and adding a peninsula to match the original cabinets, all new Corian counters including a giant 3 x 5′ slab for the peninsula, an entirely new lighting plan, a built-in hood with custom built shelves, a relocated pantry, stove, and built-in fridge, etc). We originally budgeted 10K for the job, so we’re really happy to come in under!
By contrast, our first kitchen renovation (from back when we both made bank working in advertising, haha) involved pricey granite, a lot more professional help, and all new cabinets.
It actually came to $20,500 (including the purchase of a fridge and stove that weren’t included in this breakdown since we bought them a year prior). And that room was only 13′ x 10′!
So although this second kitchen reno took us tons of time (we started this project back in October, and have probably put 5-10 hours a week into it since then – for a total of around 155 hours) it was definitely something that we loved doing – mostly on nights and during weekend Clara-naps. We almost never worked on it during the day on weekdays (when the blog is active and the bean’s awake one of us is a stay at home parent and one of us is on blog duty) so that might help those of you with a day job who wonder if you can pull off a major kitchen remodel like this on nights and weekends.
You can! It might just span across five months or so, but as long as you take things one small project at a time (it’s waaaay less intimidating than thinking of it as one big project when you break things down into bite-sized chunks) you’ll most likely live to tell the tale. And all the love and sweat that you put into your “new” kitchen will be totally worth it in the end.
Who’s excited to call this turkey done? Is anyone else out there about to start a big kitchen reno? What have you guys done when it comes to being hands on and saving some money by doing things yourself? We’d love for everyone to share tips about how they renovated their kitchen on a budget so this post can become an awesome resource for anyone out there who is thinking about getting started and would love to peruse a bunch of what-worked-for-me tips! And now we just owe Clara and Burger a big thank you: for sleeping through all the hammering and drilling and just generally being such great little DIY enthusiasts (Clara still loves to measure the cabinets with her tape measure since she remembers us doing it months ago).
A five month long kitchen reno can definitely “interrupt” daily life, but our little ones are such troopers, so we’re sending them both a big virtual kiss for their patience and excitement throughout the loooong and not-always-easy process! Our tip is to try to maintain as many working appliances as possible (which is easier when you’re working with your existing cabinets, but nearly impossible when it’s a full gut job). We only had a few days without most of them, if that, which was no sweat! In fact it totally paled in comparison to the 113 days that we were without our first house’s kitchen during that reno. Thank goodness for extension cords to keep the fridge running and the fact that moving our stove across the room didn’t mean losing the function of it!
Psst- To check out virtually every post about our kitchen renovation, click here, here, here, here, and here (hooray for monthly breakdown posts that have 20+ links in one place!).

Seriously Sassy Mama says
Love love love the view from the dining room.
Nikole says
Y’alls ability to change a room is a-mazing!
I love everything about it, from the colors to the openess!
Great job
Thais Bessa says
Well done, guys, such a massive accomplishment in so many levels!
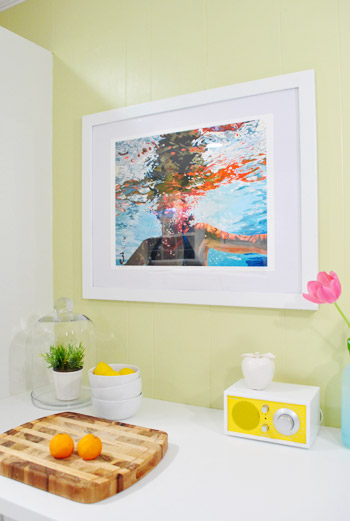
I have 2 questions: 1) what is that wall art near the fireplace (right side of the wall opening that goes to the hallway)? It seems lovely. 2) Is it the photos or the floor seems a bit high near the fireplace? Are you going to make a transition like with the floors from the dining room, etc?
YoungHouseLove says
Oh yes, we still have to add the transitions around there (they were on order, so we just got them in today), and the art near the fireplace is an old poster from allposters.com that we got years ago (it used to hang in our dining corner of our first house). It’s shelves with kitchen stuff like lemons and olives on them.
xo,
s
Elisabeth says
Hi Sherry and John!
Your kitchen looks “wunderbar”! I love all the
work you did. You really did an amazing job!
Bravo!!!! So what´s next? Maybe Claras 22 month
photo project?
Elisabeth
YoungHouseLove says
Haha, we’re so overdue on that! We’re hoping to have it up today! As for what’s next at our house, a bunch of folks have asked that so just scroll back for that info!
xo,
s
Elisabeth says
Clara is such a big,happy,lovely girl in her
22 month photo and her haircut has style!
Thank you for posting only 1 hour after I asked
you! You are amazing nice people over in
Richmond!
Sending you warm springtime greetings
from the Black Forest in Germany !
Elisabeth
YoungHouseLove says
Haha- so glad to finally get that up!
xo,
s
susan says
Love the kitchen, love the price, love the way you staged it. Great job and very inspirational……….
Morgan says
Everything looks just wonderful! Glad you guys finally get to enjoy your beautiful new kitchen!
Sarah C. says
So when I glanced at the ‘done’ photo I initially thought you painted the back and side of the peninsula the grellow wall color and I thought it looked cool. Alas my brain was playing tricks and was just the naturally light reflecting off the half wall. But if you ever did paint it to match my mind’s tricky thoughts, I wouldn’t be opposed :)
Anyhoo, I noticed you guys didn’t sell your fridge which I felt was odd since it would have brought your costs down even more. Is it secretly hanging out in the playroom waiting to be transformed during a ‘dude get on that already’ challenge? I have no idea what you could turn a fridge into but I’m sure y’all would find a way to make it awesome.
The transformation looks beautiful! I vote your next project should be renovating my tiny 5′ x 7′ kitchen which is in desperate need of a makeover ;)
YoungHouseLove says
Haha- we actually donated our old fridge to a local church! It felt great to pay that forward since they really needed one!
xo,
s
Allison says
How did you know that your floors had an asbestos liner? I’m curious before we start our kitchen floor :)
Great job! It’s so impressive!
YoungHouseLove says
We heard that black paper under vinyl tile that looks sort of like matte fly paper in a house of our age is almost always riddled with asbestos and shouldn’t be ripped or removed, so when we saw the telltale black paper when we moved our fridge and pantry around we knew we were doing floating floors to keep things safe!
xo,
s
Jess @ Life happily ever after says
Wow. I am so impressed! I think it looks awesome and I can’t wait to buy a house and make it my own. You guys are so inspiring!
kathy says
Beautiful and bright! I agree 100% with the range hood re-do. I actually think leaving the hood stainless would have added a bit more contrast to the kitchen, and I couldn’t figure out why I wasn’t loving that wall with the open shelves. And then I figured out it was the range hood that was off-kilter for me after you posted the reader pic. Range hood looks much better without that skinny neck. Otherwise, amazing new kitchen!
Amanda McCann says
Wow, wow, wow! What an incredibly beautiful transformation! I have loved reading and watching from the start! I am surprised you completed it as fast as you did. Of course, I’m a DIY newbie (hopefully gonna have somewhere to get started soon, lol), so maybe it just seemed fast to me! Congratulations on being “finished!!!!”
Christine says
Your kitchen is beautiful! You guys did an amazing job! We are buying a house that needs a major kitchen update among many other things. Thank you for all the inspiration! I feel much more encouraged about turning my future ugly kitchen into something hopefully as nice as yours!
becca says
congrats! it looks wonderful, and its unbelievable you could do it for that little! (I vote leave the range hood as-is though!)
our kitchen had the color scheme of a dead banana – brown and yellow floors, brown and yellow wallpaper, dingy dirty looking muddy tan trim and ceiling. so far, we pulled down the wallpaper, painted and replaced the floor (with vinyl tile that fools everyone into thinking its the real thing). oh oh oh and the dishwasher had fake plastic “wood finish” molding on it to match the cabinets. gross. replaced that too (hand-me-downs from my husbands parents = free).
but just yesterday I finished touching up the last bit of trim upstairs – we pulled down a bunch of dark ugly wood paneling only to discover the original plaster walls were nasty beyond repair so we drywalled over top (every bedroom all at once, what a mess!), pulled up some ugly cheap carpet and completely redid our windows with custom hand made trim (to match the downstairs). we started in sept and just finished now! so relieved. funniest part of that project: finding hopalong cassidy cowboy wallpaper under the paneling in one of the bedrooms!
YoungHouseLove says
Haha, what an awesome discovery! Hope you took lots of pictures. Sounds like you guys are making tons of progress! And I love describing the color scheme as dead-banana-ish! Haha.
xo,
s
Jess says
Really great work!! I’ve loved following your progress! And just my two little cents: I think you made the right choice with not painting the stools. I think they look really vintagey and cool as is and they’re a nice contrast to all the shiny & new goodies. Hooray, new kitchen!!
JessiBee says
Congratulations! It looks so great and I have loved watching it come together. You guys are so inspirational and I love the break downs…under $7,000! Crazy awesome!
Don’t know if you are open to suggestion on the stools but I vote spray them white and stain the seat dark to match the floors. They will really pop if you decide to go with color underneath the island!
YoungHouseLove says
Always a possibility down the line! We have no idea where we’ll end up!
xo,
s
Jenna says
Looks great! I am jealous of your countertops. We have been renovating our kitchen right along with you! Last October, while my husband was out, I ripped out this huge ugly cabinet that was seperating our kitchen from the dining room. I thought it would be a quick job…some new paint, change the hardware, update the countertops. Well, three days later I found out I was pregnant and then spent four months with my head in the toilet (TMI?). Anway, this weekend we FINALLY got around to putting in the new flooring and as my husband was struggling to take out the dishwasher I rememebered John’s awesome tutorial. So, as he was laying on the floor, I would say “Now John says too…”. The steps worked like a charm and the dishwasher was out in no time..only to discover that the old home owners had left carpet under the dishwasher, and there was a slow leak into the subfloor…but that is another story!
YoungHouseLove says
Oh Jenna, I remember it well! I got sick 100 days in a row with Clara. And yes, I counted. Haha. So glad you’re feeling better and congrats on the bean on the way! Good luck with the kitchen!
xo,
s
Ashleigh says
I can’t believe the difference, knocking down the wall makes the room. I have loved watching the transformation since I stumbled upon your blog towards the end of last year. Our kitchen was the first thing we tackled when we moved into our flat as the oven didn’t work and the cupboards were falling down.
http://madeinmorningside.blogspot.co.uk/2012/01/kitchen-before-and-after.html
We did the demo-ing ourselves but were too scared to do the installation. What saved us the most money was taking the old kitchen to the dump, as our builders get charged a fortune by the city for taking it.
YoungHouseLove says
Such a gorgeous makeover! I love it!
xo,
s
Jen says
It looks soooo great you guys! It’s fresh, airy.. I can picture enjoying a couple cups of coffee on a Sunday morning in this kitchen!
Amy says
Congrats you guys! Looks amazing. And your budget is unbelievable! Can’t wait to see what you do next :)
Krystle @ ColorTansformedFamily says
Your kitchen is just beautiful. It belongs in a magazine. Sherry, I love all the pops of yellow thou have added. I would love to have a kitchen this large. Five months of renovating has definitely paid off.
Alyssa says
Really, really awesome job! It looks beautiful…and so inspiring! I have a kitchen that is begging to be redone & would love to see the look on my husband’s face if I said “They did it, honey! We can too!” Many happy days & nights enjoying your new space :)
Robin @ Our Semi Organic Life says
All I can say is Wow. Hope you rest up for whatever’s next!
Urban Wife says
You guys are amazing! Thank your for the daily inspiration (I don’t always comment but still read every day…) and I’m forwarding this post to my parents. They’ve been living in their house for 9 years now and have been wanting to redo their kitchen forever but always seem to say that “it’s too expensive” or “we don’t have time”. If reading this post doesn’t spark their kitchen remodel fire, then I just guess they really don’t wanna do it themselves. ;)
Monica W says
Y’all inspire me so much! We have a 1970’s small kitchen that I would love to revamp on our own and your budget will hopefully inspire my husband to agree! I think y’all should definitely celebrate finishing that under budget!!
LIZ says
Looks amazing – really really great job!
One question… that you might have talked about at some point… but did you ever consider extending the cabinets all the way to the ceiling (similar look to your old kitchen)? Does it bother you having that dust-collecting-space above the cabinets, at all? Just curious…
YoungHouseLove says
We actually thought about it a lot but we’d have to lose the ceiling beams to do that (and we love that they add architecture and break up a super loooooong room). We also only have two tall cabinets, and the rest of the kitchen is pretty low-profile, so having those few things get even taller might have felt like giant skyscrapers in the room.
xo,
s
becky says
i’m so glad we’re not the only ones who are crazy about how cheap we were able to pull off the kitchen. and we had to tear out walls and ceiling and replace wiring and plumbing (thank you california) as we went…but living with the headache was soooo worth it. plus, and you’ll appreciate this as she gets older, your daughter is learning so much from seeing you guys work hard…and trust me she’ll be in there in a year or two swinging a hammer (when we had to tear out walls, we let the kids go to town on the old drywall when they were only 3 and 5)…i love the “finished” room and can’t wait to see all the little tweaks that you do over time as you settle in, especially the hood – now i’m curious. anyhoo – congrats. it looks amazing.
YoungHouseLove says
Aw thanks Becky! I can’t wait for Clara to actually join us! Right now she “helps” but that’s in quotes since it’s usually fake-measuring something with her tape measure…
xo,
s
Kate says
Haha I definitely read message center as “massage center” – you guys should get one of those, too.
YoungHouseLove says
Hahah, I need one of those right about now!
xo,
s
Anne says
AMAZING! What a transformation. Congratulations on reaching the finish line!
Christie says
Brooke is a genius! There was something that seemed a little off about the range hood but I never commented on it. Brooke’s photoshopped version of a more beefed up range hood is exactly what is needed for that space (in my humble opinion).
The kitchen looks absolutely lovely. Congrats for doing it way under budget! :-)
Karin T says
Love the finished product!! You guys did an amazing job! I don’t know if I could do half of what you did, I’m not so handy with a saw, but the painting of cabinets and the new floor is definitely do-able!
Mckae @ kaescornerdesign says
You guys are amazing! I cannot believe you did all that for under 7k. It’s looks gorgeous!
Meghan says
Congratulations! Kitchen renovations seriously change lives :) What a transformation! I am currently searching my house to use that awesome penny tile! Loved following the process with you guys!
Jen Kline says
We have been working on our kitchen remodel since the end of September. Your blog has been such an inspriration to us. We aren’t quite ready for our big reveal, but we are getting there. Here’s a link to our progress so far.
Kitchen Remodel
YoungHouseLove says
That tile is amazing! It looks great!
xo,
s
Staci @ My Friend Staci says
It look so fantastic! Give yourselves a big ole high five! It must be such a relief to have this fresh, new space in the center of the house!
Can’t wait to see what you come up with next!
Staci @ My Friend Staci says
Gah, one more note–Where’s the rooster??! I think a punch of purple would look great in there! I have been keeping my eyes peeled for a cool ceramic animal to spray paint. ALMOST snagged a pheasant-vase (yes!) at an estate auction last weekend!
YoungHouseLove says
Poor rooster has been living in our bedroom for a while. The house is sort of upside down in most rooms (except for the kitchen – haha) so we can’t wait to get things back out where they belong. Soon I hope!
xo,
s
Jamie@VTMamateurs.com says
WOW! So wonderful to see everything pulled together, and what a sense of accomplishment you must have! I hope you are planning a big dinner party to celebrate!
Julie says
Could I borrow your brains please? How you took that original kitchen, moved EVERYTHING around and created THAT space is simply unbelievable. You guys should be DIY blog superstars or something… oh wait ;) Congrats on a job well done!
YoungHouseLove says
Haha, thanks Julie! You’re so sweet. Feel free to borrow our brains anytime. Although most days they’re just thinking “where did I last leave Clara’s sippy cup?” or “ack, need to hurry up and file our taxes” – haha.
xo,
s
Lindsey says
Love the kitchen. Quick question: In the pics it look likes you can see the unfinished side of the cork flooring around the bottom of the fireplace. What do you plan to do to finish that edge, if anything? Thanks!
YoungHouseLove says
Oh yes, see the bullets at the top of the post – that’s all the things we still need to get to! Will post all about it when we add some wood trim to get that looking more normal!
xo,
s
Lindsay says
Love, love, love it! I’m going to be painting my kitchen cabinets soon as a surprise for my husband (hopefully when he’s out of town on business).
Joanne says
Yea!!! You guys must be so happy! It looks AMAZING. You’ve totally inspired me to finally start our kitchen reno. Now I just need to inspire my husband :-)
Tina says
Its beautiful! You guys are amazing! I thought doing mine for $15K was good, but you guys put me to shame! :)
YoungHouseLove says
Nah, our first one was tiny and it was 20K so maybe your next one will put us to shame! Haha.
xo,
s
Jennifer says
Kitchen’s looking GOOD! I also like the beefier hood option…
Stephanie says
Wow. Just… wow. I didn’t even hide that I was reading this blog at work I was so stunned by the reveal. What an incredible kitchen. You guys are an inspiration.
Donna says
Awesome job you guys! Just curious if the previous owners know about your blog and wow would they be amazed!
YoungHouseLove says
Yes, they actually read along! They’re such good sports about everything and say they love watching us do all the work! Haha.
xo,
s
Amanda says
LOVE the kitchen. We’re getting ready to move into a house that has a very traditional kitchen with wood cabinets and a formica countertop that someone painted black (Which concerns me a bit… btw. How long will the paint stick?) It’s got deep red walls and a dark, glass-tile backsplash… which WILL be coming down as soon as I can get moved in and get a plan for tearing it down and re-tiling.
Anyway… I’d love to do something bright and cheery in that room someday (once we get all moved in and get some scary paint colors taken care of in other rooms). But, I’m not certain I want to paint the cabinetry… I know we’ll definitely want to live with it for awhile before we know what we want to do. Do you happen to know if there’s a way to achieve this same “feeling” in a kitchen when there’s so much woodgrain about?
I’m a country-girl, but I don’t like to go all-out country in design (ugh!)… and I’m not fond of all-out Scandinavian style either… I need my touches of country charm thrown in around the room! It’ll be an interesting challenge to mix the two styles! Especially in a house that’s fairly new in construction. It just doesn’t have the same charm that an older house does! We plan to add plenty of detailing over the years so we can “fake” the look and feel of an older home. I’m thinking built ins… molding… etc. Can you point me in the direction of good research for what I’m wanting to do?
YoungHouseLove says
Hmm, I would head over to a site like google images or pinterest or houzz.com and just search for a kitchen or two that you love with wood cabinets! There are so many of them! One idea might be to go white with the walls and then keep the wood cabinets and add pops of color in curtains, accessories, rugs, art, etc. Hope it helps!
xo,
s
Courtney says
That looks amazing!! I love it! I hope you haven’t answered this question before but where did you get the turquoise and white pillow that is on the white chair facing the bar stools? I love it – turquoise is my favorite color!
YoungHouseLove says
That’s from ZGallerie!
xo,
s
Sarah says
It looks great! As soon as you reduced the brackets, I fell in love with your kitchen-it’s so cheery and fun!
We’re in the middle of our own little kitchen reno. Can I just tell you that I have been to four-yes FOUR stores that sell BM paint, and not one of them sell the Advance line-grrrr. I’ve been making calls all morning to find it and *think* I’ve finally found it.
What’s making this reno a little easier for us is the fact that we actually have a second kitchen. What a luxury, right? Our house was originally set up to run as two small little apartments, but we’ve been slllooooowwwwly converting it to one normal size single family home. The second kitchen-complete with everything except a dishwasher (if you don’t count me!) is located in our family room and pretty convenient. The second thing is that I am taking my time (for the first time ever!) researching every process/product and then doing every step. I’ve given myelf a pass on finishing this project any time soon. Yeah, that second kitchen really does make that pass easier.
YoungHouseLove says
No way- that’s so convenient to have a second kitchen! Amazing! So sorry that the Advance paint has been so hard to track down, but it’s totally worth it! Happy cabinet painting!
xo,
s
Amber Wallace says
Funny but it seemed to go fast for me. Probably because you made such good progress each week. You did an amazing job. And the amount you spent is amazing too. Talk about inspiring. It gives me motivation to do my kitchen rearranging sooner than later. I am planning to do your same counter tops for sure. Great, great job!!!
Sara says
It looks amazing! Such a huge transformation, so light and airy and stylish. Good job!
I am in the middle of a kitchen reno. I gutted it last February and lived with it like that for almost a year (it was better gutted then the way it looked previously!). Started the wall work recently, building a “parisian” balcony and switching large window for french doors to balcony … its coming along.
You guys have great luck with craigslist – both for buying and selling. IT must be regional. I’ll be giving away my old things!
YoungHouseLove says
Wow- that sounds so gorgeous! Good luck with your kitchen reno!
xo,
s
Jessica says
woo wow wow! the floors make such a difference! and I am still in love with the nerdy chic bar chairs!
xx
Mary says
Looks so beautiful, John and Sherry!!!
As for Brooke’s suggested tweak–I admit to liking the wider range hood. It balances the heaviness of the stove below (at least in the pictures). A more substantial range hood would be a great complement to the lightness of the open shelving. With no upper cabinets on that wall, the eye is a little overwhelmed by the penny tile and the room looks “bottom heavy” (if that makes any sense..).
Nevertheless, this totally could be just a matter of personal preference. If you guys love it as-is, then rock on! :)
YoungHouseLove says
I think we agree Mary! We’re definitely leaning towards making the tweak!
xo,
s