With the addition of a light fixture and shoe storage this past week (and deciding to nix a window covering for now and just frost the window when we convert the carport into a garage), we just had one last item on our tig ol’ bist (which is how I would imagine Missy Elliott would say “big ol’ list”):
Frost the side door for privacy<– seen here
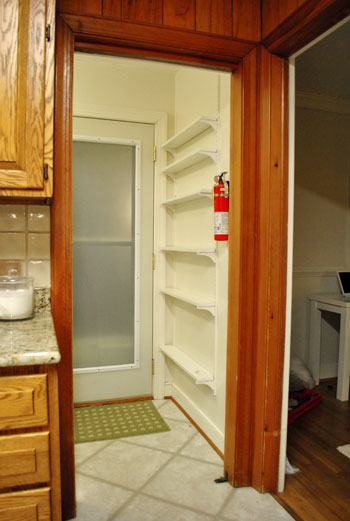
Remove the narrow shelving that gets blocked by the open door<– seen hereRemove the old shutters that block much-needed light<– seen hereCraigslist the old un-energy efficient stacked top loaders and snag a killer deal on new Energy Star front loaders<– seen hereCaulk a big ol’ crack in the ceiling<– seen herePaint the odd brown quarter round near the baseboards glossy white<– seen here
Redo all the dinged up trim (also in semi-gloss white)<– seen here
Paint the walls<– seen here
Replace our dryer hose with a safer all-metal one<– seen here
Add adjustable built-in shelving in that nook next to the stacked washer & dryer<– seen here
Prime & paint the upper cabinetry<– seen here
Replace the hinges and knobs on those upper cabinets<– seen here
Hang the ironing board to obscure the giant metal fuse box<– seen hereAdd other functional storage near the door for shoes<–seen here
Make a new light fixture<– seen here
Add a window treatment (maybe a homemade one?)<— will just frost it when we convert the carport to a garage
- Hang some art to keep it cheerful (and add storage for Burger’s leash)
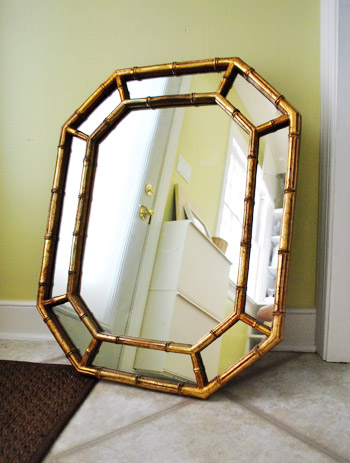
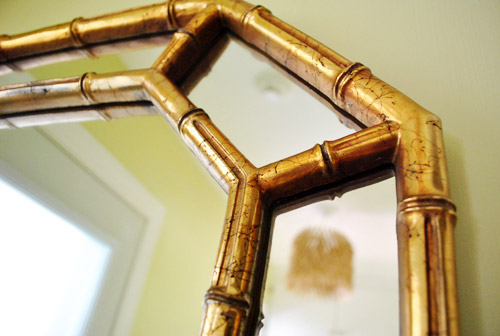
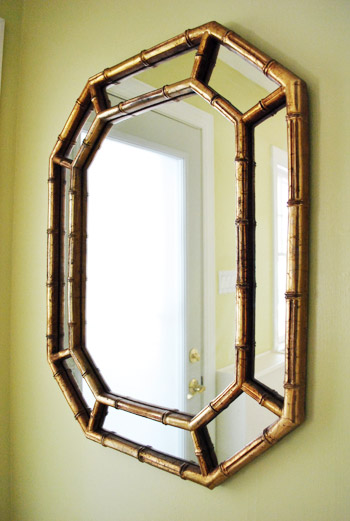
When it came to what to put on the wall besides the hanging ironing board, Sherry and I bounced around a lot of ideas throughout the whole laundry room process. And ultimately we decided we need something else bouncing around in there: light. Lucky for us, we snagged this awesome $10 mirror at a neighborhood yard sale a few weeks ago. Coincidentally, it was the same one where we got our twig & berry art – so imagine us walking home carrying two big frames and a heavy mirror while pushing a stroller and walking a chihuahua. Yeah, that’s how we roll.
We decided it was perfect for that big blank wall next to the door, since whatever went there had to be relatively flat or risk getting slammed by the door (which is why the narrow open shelving left by the previous owners made us nervous so we removed it and frosted that side door for privacy).
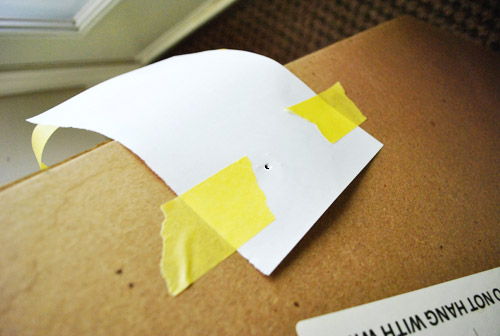
Anyway, the mirror was perfect. Except that hanging it was going to require some planning because my screws in the wall would have to be perfectly placed thanks to this “do not hang with wire” warning (complete with accompanying illustration):
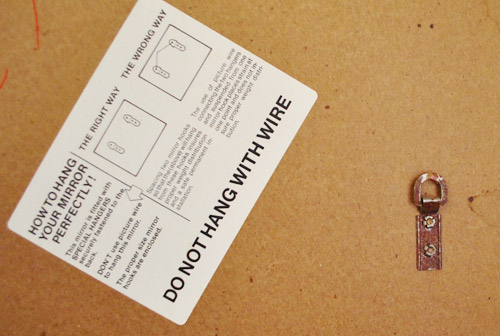
So I tore a piece of printer paper in half, and taped each piece partially over each hook (with that tape facing the mirror) and partially hanging out the sides (with that tape facing away from the mirror). Basically, I gave the mirror dinky paper wings.
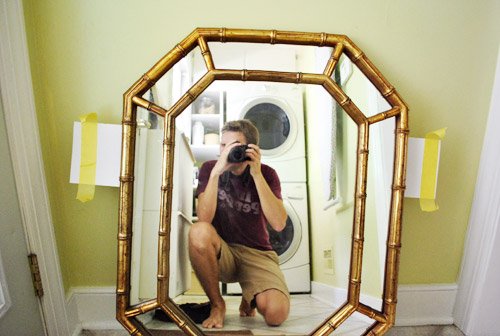
And yes, my Dr. Pepper shirt is campaigning to become The Official Shirt Of Doing Projects With (Or In Front Of) Mirrors. That or I just wear it a lot.
Back to the winged mirror. First I poked a hole right through where my screw would need to go:
That way when we held up the mirror in place (making sure it was centered and level) we could slap the exposed pieces of tape against the wall and have an instant guide for where the screws needed to get a-screwed:
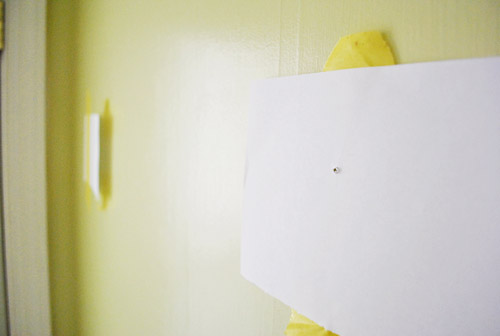
I definitely recommend two people for this method. One to hold it up (me) and one to step back and make sure it’s placed well/not wonky (Sherry). After that step it was also Sherry’s job to hold down the taped wings as I pulled the mirror away from the wall to ensure that they successfully separated and remained in the right spots (as opposed to shifting or unsticking as the mirror was pulled away).
After quickly drilling through my guide holes to make small pilot holes, those paper wings that we had taped to the wall came down and a heavy duty anchor and screw soon took their place on each side:
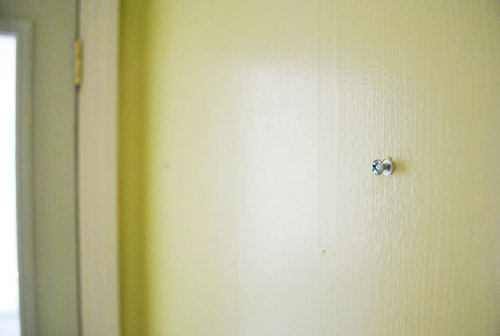
Just as I had hoped (but didn’t expect), it worked and the mirror was hanging in no time. Total shocker. Quick tip: never expect that something like this will work on the first try because you’re practically ensuring that it won’t and you’ll be pissed. I went into this expecting it to take a fortnight (which resulted in “pleasantly surprised John”).
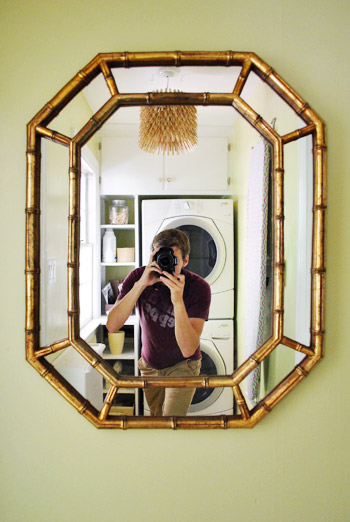
Sherry and I are still a bit undecided about the finish on the mirror. Our usual instinct was to paint it white (or ORB, or even the same deep teal from the built-ins), but lately we find ourselves appreciating a mix of finishes more and more. And letting “old pieces” add to the collected feel of a room without always slapping paint on them right away. I know, another shocker. So, for now, we’re living with this crackled gold dealio. Although down the line when we get stainless appliances in the adjoined kitchen it might look clashy and call for a paint job. We’ll keep you posted.
So far our random $10 yard sale mirror is turning out to be an AWESOME addition to the room. Not only does it allow for that last look at ourselves before heading out the door, it also reflects a lot of additional light into our windowless kitchen. Heck, it even makes the laundry room look bigger too thanks to “visually doubling” the space when you stand in front of the dryer (now the room seems to go on and on).
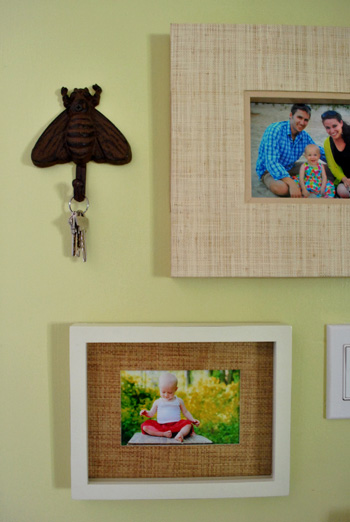
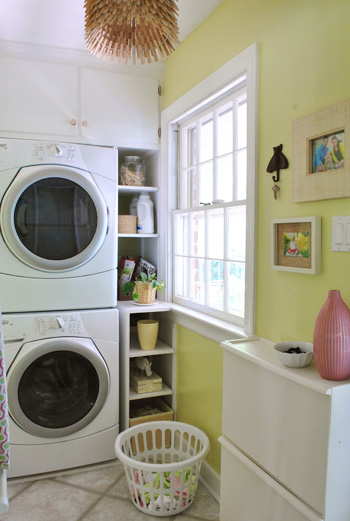
But that’s not our only addition to the laundry room walls. We also hung two textured frames (from the Pottery Barn Outlet a few years back – they used to live in our old office slash guest room). And we decided to use them to proudly display some of our favorite family pictures above our new shoe cabinet. As for Burger’s leash, we just tucked it into a white bowl from the kitchen. Oh and we got that pink vase on sale at Target for $7. I actually found it myself and recommended it to the wife since it reminded me of the colors in our ironing board cover. Who knew I had that in me? The laundry room is evidently helping me branch out in ways that I never imagined.
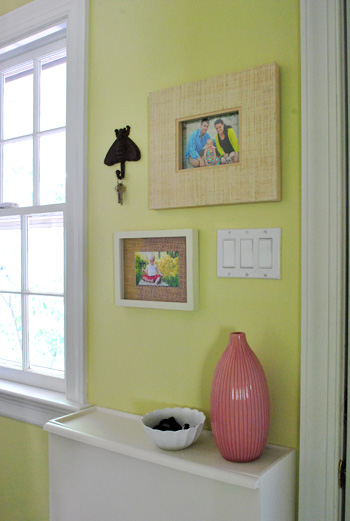
But back to the art. I actually owe my mom for inspiring the framed family pics. She always had a collage of family photos tacked up in our laundry room growing up and I loved looking at it. Functional spaces like laundry rooms can so quickly become just that – functional – so it’s easy to overlook bringing something personal in. Wow – how lame was that last sentence? To put it in less “TV decorating host” terms: it doesn’t hurt to look at a cute baby while, well, washing diapers for said cute baby. And the rest of the fam doesn’t hurt my eyes either.

The top pic is a family portrait (Burger included!) from our Outer Banks trip last month. And the bottom is one Katie Bower snapped the last time we visited her in GA. Lucky for us, the yellows in each pic accidentally work nicely with the room’s colors scheme (although we’d probably hang them up even if they clashed because they’re favs). Oh, and next to the top frame is a little iron bee (you know we love us some bees) that we got a while ago while thrifting in Delaware. And once again, we opted to leave it as is (even though we mentioned painting it white in the thrifting post). That, my friends, is our form of rebellion. Yup, we’re bad. Bad to the bone.
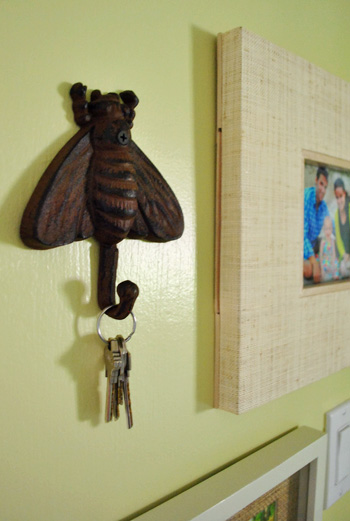
Wow, just realized that wall comes from a lot of states. Pictures taken in NC and GA, frames purchased in SC, and a hook found in DE. Though the miscellaneous keys are for things like local PO Boxes and family members’ homes – so that kinda ruins the streak. Oh well.
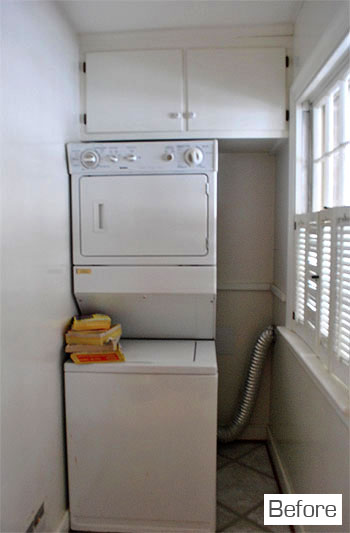
And with that fine ladies and gentlemen, we are calling the laundry room COMPLETE… for now at least. So let’s take one more look back at how we got from before…
…to done (for now):
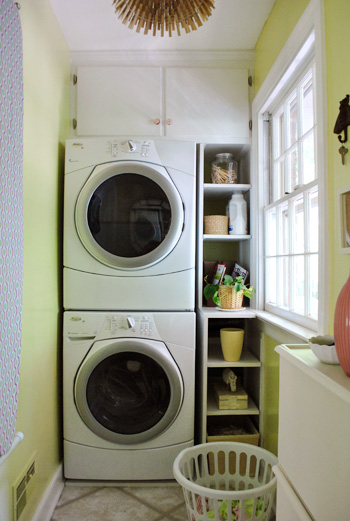


It’s actually the first room we’ve made this much progress on. Quite possibly because it was only about the size of a bathroom stall. Oh well, you know we’re all about taking the whole house makeover thing one tiny project at a time.
And for all you number crunchers out there, here’s the whole budget breakdown of all of the updates we’ve made in the past few weeks:
- New Energy Star front loading washer/dryer: $388 (well, really $638 but we craigslisted the old set for $250)
- Frosting film (Home Depot): $18
- Paint and caulk: $0 (already owned)
- Built-in shelves (supplies from Lowe’s & Home Depot): $74
- Ironing board cover (Etsy): $24
- Ironing board hooks (Lowe’s): $12
- Cabinet knobs (Hobby Lobby): $8
- Shoe cabinets (Ikea): $38
- Clothespin light fixture (homemade here): $34
- Mirror (yard sale): $10
- Family photos (CVS): $1
- Frames (Pottery Barn Outlet): $0 (already owned)
- Iron fly hook (thrift store): $0 (already owned)
- Laundry basket (Target): $0 (already owned)
- Pink vase (Target): $7
- Other accessories like bowls & baskets: $0 (already owned)
- TOTAL: $624*
* which is pretty thrilling considering our new front loading washer & dryer alone were originally $1198!
Oh and we don’t factor in the cost of things that we have leftover from previous projects or already own since they’re usually already “counted” in other budget breakdowns (ex: the wall paint we used was already counted in the kitchen painting breakdown, so using the remaining paint for this project and saying “$20 again” would be double-counting). But a few folks commented to say that it might be helpful to mention the cost of those already-owned items in case someone at home was planning to do the same thing (but had to buy everything from scratch) so adding about $25 for some caulk & a quart of paint, $25 for frames & accessories, $3 for the plastic laundry basket, and $5 for the iron bee hook that we found thrifting should do it (for a grand total of $682).
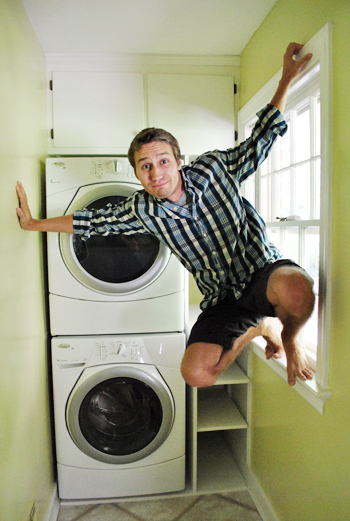
Thee cheers for appliance deals and DIY built-ins and ironing-board-covers-as-art and thrift store hooks and clothespin chandeliers and all the other odd calls that we made for our tiny laundry room. And now I’ll toss in this awkward monkey-toed picture, lest you forget just how narrow this space really is:
And so ends the laundry room makeover. We’re currently enjoying diaper-washing-day a little too much. And my mom and dad saw our clothespin light in person and proclaimed it “the coolest thing we’ve ever made besides Clara.” Which got us all awkward and blushy. Have you guys done any laundry room revamps lately? Or made any cute babies? Or done some owling on a windowsill? Apparently owling is the new planking.

Rocky Mountain Mama says
It looks fantastic! :)
Paula M. says
Great job on the laundry room!
Impressive list of things that you did to it, too!
It just shows what a difference someone’s vision and hard work can achieve, because, frankly, the Before photo is really offputting — kind of depressing and downright creepy.
By contrast, the After photo shows so much personality and functionality. An amazing difference. You’ve both really wrought the maximum potential out of it, I think. It also proves how even a very small space can be thoroughly transformed.
Pretty incredible.
Paige W says
I absolutely love how it turned out!!! All the art gives it a layered feel which is so personal and homey. Great job!!!
Amy @ this DIY life says
I went back and looked at your frosted door post thinking of your window. We used the frosted paint on a window in our half bathroom (http://thisdiylife.wordpress.com/2011/03/30/happy-wife-happy-life/). I was told that it can come off fairly easily if I need to. I wasn’t concerned about it because the window will need to be replaced anyway within the next year-ish. But my question is if there is a reason that ya’ll use the film rather than the frosted paint. Have you had a bad experience with the paint? We have another window that we were thinking about using this paint on, so I’m looking for any input I can get :)
YoungHouseLove says
We have just had a few good experiences with the film (and it’s a no-VOC option as opposed to the fumey spray) so that’s why we thought it was the way to go. But we’ve heard awesome things about the spray (other than some folks saying it’s pretty stinky). Hope it helps!
xo,
s
ShellyP says
I continue to be inspired by the likes of you two. The laundry room is so lovely and functional given the limitations of that particular space. You turned it into a fab-U laundry room. I am completely ripping off your ideas for my own laundry room — as I do for many of your projects. I’ve written this before, but your web site is the first thing I hit in the morning, even before checking my own email. I look forward to reading your book when it arrives next year.
Brianne says
I love your laundry room! I just wanted to tell you that I saw you at the Art Walk on Friday. I was next to you at a little booth where you bought an adorable little drawing…and I can’t wait to see where you put it! I didn’t want to stalk you, er, I mean, randomly talk to you while you were enjoying an evening out with your beautiful family, but it totally made my night! Thanks for a great site!
YoungHouseLove says
Oh we would have love to meet you! I’m sure we’ll see you again! Still trying to figure out where to hang that cute print in Clara’s room!
xo,
s
Heather says
So the first time I glanced at your picture of the back of the mirror I read “Do no thang with wire”, so I thought $herdog must have been in charge of picking it out……. then I reread it. :p
YoungHouseLove says
Haha- too funny.
xo,
s
PatC says
Love the mirror and faux bamboo frame. Though I do have an idea for you…
I have a lovely vineyard picture – it had a black frame with lots of gold smudges. The frame lines were nice, but it had a little ‘too much gold’ for me. One evening I took some acrylic black paint and quickly toned it down. There are still touches of gold – but it’s very muted now.
Makes me love the picture even more than when I purchased it 5 years ago.
But I must say, that I like your mirror just the way it is – which surprises me since the mirror frame is very gold. It just seems to go nicely with the yellow-green walls. Anyway, good luck with whatever you decide.
Sandra says
I love the transformation. It is nice to be remininded that you don’t have to do an entire room at once, running around like a crazy person hgtv style, and still have it look classy.
Nicky at Not My Mother says
The thing with the paper and the holes and the tape to hang the mirror? GENIUS. I would never have thought of that and now I want to go hang all my awkward picture frames using that method!
Kiran @ KiranTarun.com says
I love that mirror! Overall, an awesome DIY project with realistic and doable targets! I hope I can find a similar mirror with pricetag (or lesser!) soon ;)
Rina says
Love the laundry!! Very inspiring! Might just have to look at “bringing in something personal” to my own laundry!
Kristin says
Ha . . . I just got an email from Joss & Main (which I joined after you guys mentioned them recently . . . snagged a cool light fixture for our kitchen to replace the UGLY one that came with the house)… . . and what do I see but the “curatorial talent of John and Sherry Petersik”. I’m looking forward to your collection. :-)
YoungHouseLove says
Isn’t that so crazy?! We can’t wait to start looking for ceramic animals! Haha.
xo,
s
orchidlanedecor.com says
Lol @ “the rest of the family doesn’t hurt my eyes either” … has my husband been teaching you how to give compliments!? Room looks great … lots of texture, which I love, and the pink vase is gorgeous. I like that you’ve left the mirror the way you found it, for now, anyway.
Suzy xxx
MelissaG says
It looks so great! I love the bee and how cute that you picked the pink vase out yourself….you have quite the eye for these things!
Lauren says
I bought the exact same mirror at a local resale shop. I just finished painting it with a pale gold metallic paint since, I too, was not crazy about the black in the original finish. Two coats covered the black for the most part, but I decided I didn’t mind it showing through slightly here and there :)
Jennifer B. says
I’m not going to lie. I’m kind of in love with the mirror as is. I feel like it helps to bring the grellow color out. I say keep the color!
Lena says
Love the Missy Elliot reference.. so random! Haven’t heard her name in a while, just funny she shows up here. <3
Belinda says
So I’ve been stalking your blog every day for like a year and never comment…I’m full of lame! Anyhow, I saw this post this morning, went to my local goodwill and found the SAME EXACT mirror for $2.99. What the what?! Love it :)
YoungHouseLove says
Wahoo! That’s amazing. Congrats!
xo,
s
Shannon Hoving says
Love that mirror. What a deal! I like to have a mirror hanging near the door,too, so I can do a last-minute check. (I’ve been known to leave the house looking like I combed my hair with an egg-beater.)
Leslie says
I have been reading your blog for quite a while now…. and this is my first post… so here it goes… first off ‘ Hello!’ and thank you for sharing your experiences of making a house into a home with us all! You are both amazing!
Well done on the laundry room… what an amazing transformation. I just LOVE the close-pin chandler! I also appreciated your step by step instructions in regards to hanging that mirror – the wing technique is duly noted.
To paint or not to paint …. well…. I just love the mirror and bee the way they are! I think they are lovely without a coat of white paint. Don’t get me wrong, I LOVE your hallway of frames that are white…. Just beautiful…. it is on my ‘Pinterest’ page as project for my future home…. but…. keep the bee and the frame as is…
Thanks for the amazing posts and ongoing inspiration!
– Leslie – Toronto – Canada
Rachel H. says
So, this is totally unrelated to this post, but I feel the need to share this with you. Every time I see this commercial, I think of John because the apple guy looks a lot like him. Have you seen this before? Such a resemblance!
YoungHouseLove says
Hahahahahha, I can kind of see it! Of course I think John’s the cute version. Haha. And he doesn’t see it at all (he never does).
xo,
s
Lindsay says
what an awesome tip about hanging a large item on the wall! where do you guys come up with this stuff! you’re so smart!!!! thanks for the tip! I wish you could come make over my house! Let me know if you ever go into THAT business! :)
Sarah says
Congrats, guys! Your blog makes me want to redecorate my (mom’s) whole house right now!
I love the pink vase, and also I noticed that the laundry in the basket matches the color scheme. ;)
YoungHouseLove says
How funny is that? Those are Clara’s actual dirty clothes. I think her colorful outfits subconsciously inspire us to use those colors in our house!
xo,
s
Carmel @ our fifth house says
I hope you leave the mirror gold. Let’s call her Goldie or Goldmember- since you all like to name stuff ;) Your laundry room would make me want to actually do some laundry which is saying a whole lot!
Mary V. says
I love your blog – I have been stitch witchery-ing curtains, tablecloths, etc. since I started reading! :) I am especially interested in your laundry room reno because we are trying to add on to our house, which would include a small laundry room. Any chance you would share the measurements? At least width-wise?
Thanks so much!
YoungHouseLove says
Sure! From the back wall behind the appliances to the mirror wall it’s 11′ and the width is 3.5′ – hope it helps!
xo,
s
AP says
I found the same exact mirror at a flea market and have been trying to find a spot for it. Too bad my laundry room has too many doors (4) and not enough wall space.
Virginia says
ummm don’t know if y’all know how much of a deal you got but….
http://cgi.ebay.com/BEAUTIFUL-CHINESE-CHIPPENDALE-BAMBOO-SALMON-MIRROR-/310315451803?pt=Mirrors&hash=item48403e059b#ht_500wt_665
$599.99 for the exact same mirror! You three are yard sale champs
p.s. leave it gold and leave the bee brown: very charming
YoungHouseLove says
Woah! That’s so expensive! The funny thing is that others have mentioned finding similar deals for similar mirrors at places like Goodwill- so there must be a pretty wide range of prices. Haha.
xo,
s
justme says
That room looks so welcoming and cheery. And I love the mirror in antiqued crackling gold. It plays off well against the clothespin shade (want! totally want! btw, parents were so right, but one round of blushing is enough).
So, now that I’ve oohed and ahhed, a harrumphing question for you both: how does the floor grout read in person? is it white? off-white? gray? and do you guys like it the way it is/does it fit in nicely with the room in person?
tile grout is my new pet peeve at home, and my to-do list involves painting all of it white – oy! – so of course, grout grouch that I am these days, I wanted to ask! thanks for always keeping it fun and inspiring!
YoungHouseLove says
That’s actually vinyl flooring, so it’s faux grout. Haha. Down the line we have dreams of ripping those floors up and hopefully finding hardwood floors that we think might run under them (and also under a thick layer of plywood). That’s definitely a down the line thing since it would necessitate removing the base cabinets in the kitchen to get to it!
xo,
s
nk says
Family photos in the laundry. What a great happy idea. I think I’ve just found a little weekend project for me.
nora says
I usually find the best stuff at yard sales when I’m the solo adult out for a walk with the double stroller and our big black lab.
YoungHouseLove says
Haha- it’s so true! The less space/capacity to carry things you have, the more you find!
xo,
s
Bec says
For the love of God please stop spray painting everything white (or ORB which seems to be your new addiction). You are absolutely right – a mix of textures and an appreciation of the history of some of your things will eventually make for a much more personal, eclectic style and I love this mirror just as it is. I love you guys and most of the things you do but I really don’t understand your obsession with spray paint and white.
YoungHouseLove says
Haha, we said the same thing. In a shocking turn of events we put down the spray paint and left the mirror alone. And we love it! So assuming it doesn’t majorly clash with the stainless appliances that will be visible on the same wall when we redo the kitchen, the mirror’s golden. Haha. Although we’ll probably always work in orb & white spray paint when something’s original finish doesn’t work for us (that’s just what floats our boat).
xo,
s
emily says
Hi! When i was looking around for some cheap easy wall art i thought ‘gift wrap!’ and when i saw THIS gift wrap i immediately thought of your ironing board cover, and how awesome this paper would look framed in your laundry room/nook (plus it’s made from recycled paper and sustainably printed which i know is right up your street) so i thought i’d share it with you, but then i come on to your blog and you’ve just sorted out your art for the space! damn, just out of time! but anyway… i might as well share it with you still ‘eh:
http://smockpaper.com/everyday/gift-wrap/R9D01/
YoungHouseLove says
Oh my gosh it’s so cute! Maybe I can use it in there someday!
xo,
s
threadbndr says
I vote for wrapping the family photo’s frame in that paper! The color on that one kind of fades into the wall color – at least on my monitor. I like the idea of pulling more pink and pattern onto that wall.
I was kind of thinking finding more of the fabric from the ironing board cover as a fun, flirty valance over the window, but then I saw that you are just going to be doing a plain frosted glass in that one.
YoungHouseLove says
It’s always a possibility down the line!
xo,
s
Jen says
Love the idea for hanging the mirror, I have several things that require two screws and never know how to best measure for them. I’ll definitely be trying this technique after our next move. Thanks
Laura says
Love it! Unfortunately our “laundry room” is in our unfinished basement. :( Sadness.
Can we get a picture with the light on at night? I would love to get a better feel for the way light filters… you know so I can convince my SO that we NEED a clothes pin light fixture. :)
YoungHouseLove says
We’ll have to remember to grab a night shot soon!
xo,
s
Dani says
The room look fabulous! And that mirror hanging trick is genius. Congrats on a great room!
Andrea @ DwellRepurposed says
PUH-lease don’t paint the mirror! I’m going through a texture/color mixture thing and all of the gold tacky frames I bought, planning to paint white or black, are staying gold and I like the contrast of colors.
YoungHouseLove says
As long as it doesn’t clash with the stainless appliances we’ll bring into the kitchen it’ll stay gold for sure! We love how it looks with the clothespins and the grellow walls!
xo,
s
Katie Lee says
Love it! My husband and I our estate sale hounds as well. We feel so awesome deciding where to put our finds and constantly reminding ourselves of how inexpensive they were.
Chesley says
I love the mirror, and I love the finish as it is. I agree that mixing of finishes makes for a great room. Nice work!! I envy your energy and determination.
Heather @ REOlisticRenovation.com says
So in love with that chandelier and all that you did to give your laundry room a little spunk! SO CUTE!
Juliann says
Um, is it just me, or does that mirror remind anyone else of a pretzel?
YoungHouseLove says
Mmmm. Salty snacks are my favorite.
xo,
s
Kim says
Ok, your laundry room looks more polished and done than the rest of my house! You guys are awesome and whenever I get into a funk about my house not being ‘done’, I read your blog and get inspired again, so thanks! And your tip on hanging the mirror (plus the ideas your readers gave – brilliant! Thanks for those ideas :)
Olivia S. says
Nicely done!! I think the whole room looks fantastic.
Tricia says
More of a safety comment. And maybe you did think this through since you didn’t have car keys hanging… But once upon a time a very mean man broke into my house (in clear daylight while I was at work). We lived in a very nice neighborhood too. My roommate at the time left her spare keys to her brand new GT Mustang on a key hook, like yours, that was close to a door. Sure enough, that jerk grabbed them on his way out… Along with every other valuable we owned. So while key hooks are handy (and really cute in your case), it’s always good to keep important and obvious keys (like expensive-to-replace car kays) in weird places where a jerk burglar may not look rather than their typical spots.
YoungHouseLove says
Thanks for the tip! We just keep random unmarked keys for PO Boxes and relatives’ homes (not our house keys or car keys) on that hook. Safety first!
xo,
s
Jaime A. says
What a method for that mirror! lol… I take painters tape – stretch it along the bank of the mirror, mark where the hangy things are, then take the tape off, put the tape on the wall where I want it to hang, use my trust level to get it straight and then drill the holes (or hammer in the nail) right where I marked on the tape. Easy Peasy! ;)
Very lovely laundry room!!
Morgan says
What a great find!! And I love the gold.
Cortney says
Hey I was just at the nester and saw something really cool for the window. I dont know if it would be too busy but instead of frosting it she had a link to a post where someone stenciled on the window. Thought it might be a fun idea??
YoungHouseLove says
That could definitely be fun!
xo,
s
K (barking baby mama) says
Just looking through this new-to-me design blog emilyaclark.blogspot.com and noticed that she had your same garage sale mirror in her home!!
http://4.bp.blogspot.com/-_gcOxPQly3w/TaboSCASZDI/AAAAAAAAEIQ/1MH5N8SuY3s/s1600/IMG_6098.JPG
YoungHouseLove says
That’s so funny! I looove her blog!
xo,
s
Emily says
I got this exact mirror at a thrift store about a month ago. Mine’s a dingy off-white, so it needs to be re-painted. What method would you recommend? Spray paint? Brush?
Thanks!
YoungHouseLove says
I’d tape it off and spray it with spray primer followed by spray paint I think. Hope it helps!
xo,
s
Kati says
Are you going to hang up a blind in the window! I think one from your old laundry room would look really good in here!
YoungHouseLove says
For now we’re happy to keep it un-blinded since the blind would basically touch/crowd the cabinetry up top, but you never know where we’ll end up down the line!
xo,
s