With the addition of a light fixture and shoe storage this past week (and deciding to nix a window covering for now and just frost the window when we convert the carport into a garage), we just had one last item on our tig ol’ bist (which is how I would imagine Missy Elliott would say “big ol’ list”):
Frost the side door for privacy<– seen here
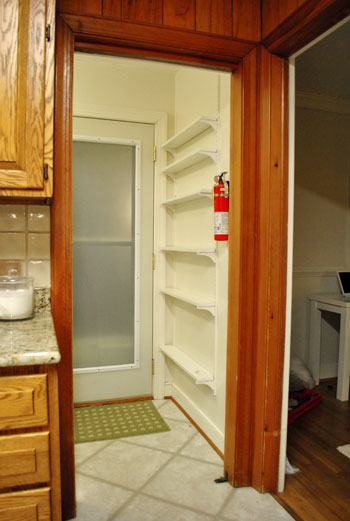
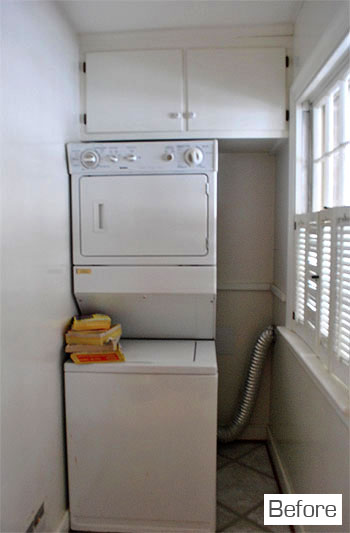
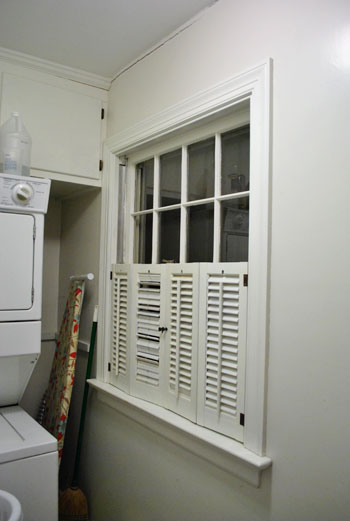
Remove the narrow shelving that gets blocked by the open door<– seen hereRemove the old shutters that block much-needed light<– seen hereCraigslist the old un-energy efficient stacked top loaders and snag a killer deal on new Energy Star front loaders<– seen hereCaulk a big ol’ crack in the ceiling<– seen herePaint the odd brown quarter round near the baseboards glossy white<– seen here
Redo all the dinged up trim (also in semi-gloss white)<– seen here
Paint the walls<– seen here
Replace our dryer hose with a safer all-metal one<– seen here
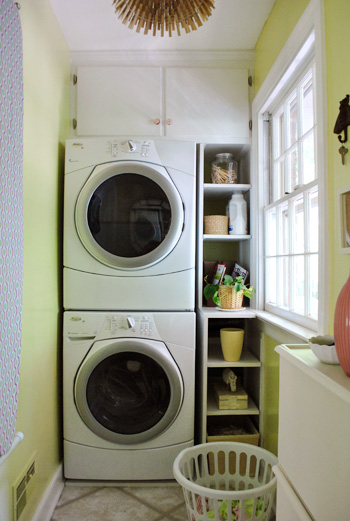
Add adjustable built-in shelving in that nook next to the stacked washer & dryer<– seen here
Prime & paint the upper cabinetry<– seen here
Replace the hinges and knobs on those upper cabinets<– seen here
Hang the ironing board to obscure the giant metal fuse box<– seen hereAdd other functional storage near the door for shoes<–seen here
Make a new light fixture<– seen here
Add a window treatment (maybe a homemade one?)<— will just frost it when we convert the carport to a garage
- Hang some art to keep it cheerful (and add storage for Burger’s leash)
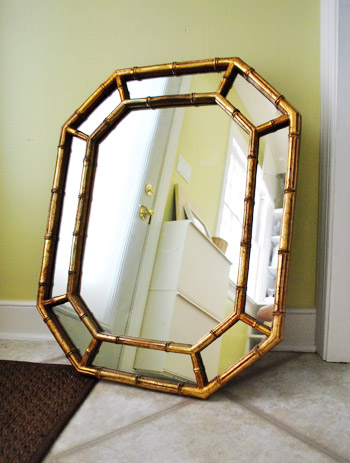
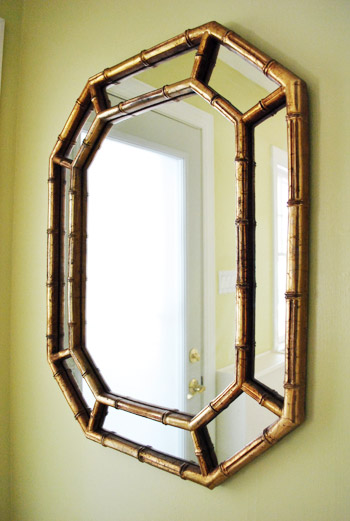
When it came to what to put on the wall besides the hanging ironing board, Sherry and I bounced around a lot of ideas throughout the whole laundry room process. And ultimately we decided we need something else bouncing around in there: light. Lucky for us, we snagged this awesome $10 mirror at a neighborhood yard sale a few weeks ago. Coincidentally, it was the same one where we got our twig & berry art – so imagine us walking home carrying two big frames and a heavy mirror while pushing a stroller and walking a chihuahua. Yeah, that’s how we roll.
We decided it was perfect for that big blank wall next to the door, since whatever went there had to be relatively flat or risk getting slammed by the door (which is why the narrow open shelving left by the previous owners made us nervous so we removed it and frosted that side door for privacy).
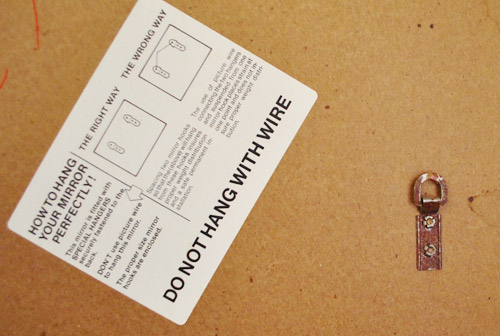
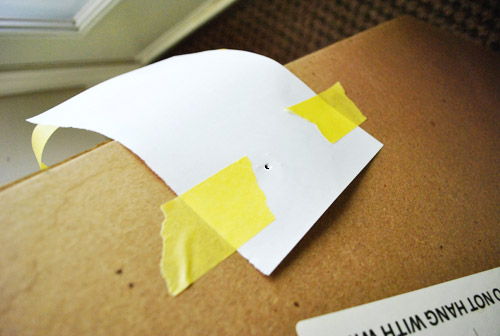
Anyway, the mirror was perfect. Except that hanging it was going to require some planning because my screws in the wall would have to be perfectly placed thanks to this “do not hang with wire” warning (complete with accompanying illustration):
So I tore a piece of printer paper in half, and taped each piece partially over each hook (with that tape facing the mirror) and partially hanging out the sides (with that tape facing away from the mirror). Basically, I gave the mirror dinky paper wings.
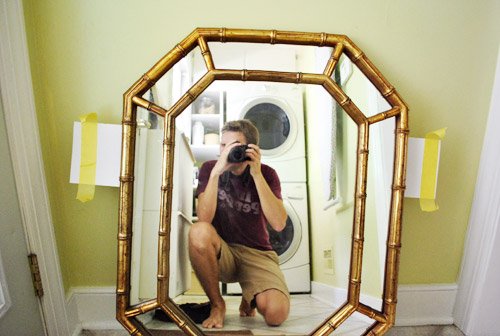
And yes, my Dr. Pepper shirt is campaigning to become The Official Shirt Of Doing Projects With (Or In Front Of) Mirrors. That or I just wear it a lot.
Back to the winged mirror. First I poked a hole right through where my screw would need to go:
That way when we held up the mirror in place (making sure it was centered and level) we could slap the exposed pieces of tape against the wall and have an instant guide for where the screws needed to get a-screwed:
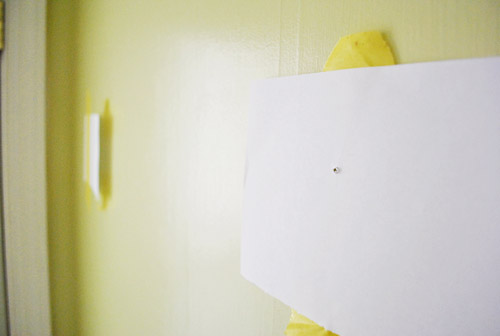
I definitely recommend two people for this method. One to hold it up (me) and one to step back and make sure it’s placed well/not wonky (Sherry). After that step it was also Sherry’s job to hold down the taped wings as I pulled the mirror away from the wall to ensure that they successfully separated and remained in the right spots (as opposed to shifting or unsticking as the mirror was pulled away).
After quickly drilling through my guide holes to make small pilot holes, those paper wings that we had taped to the wall came down and a heavy duty anchor and screw soon took their place on each side:
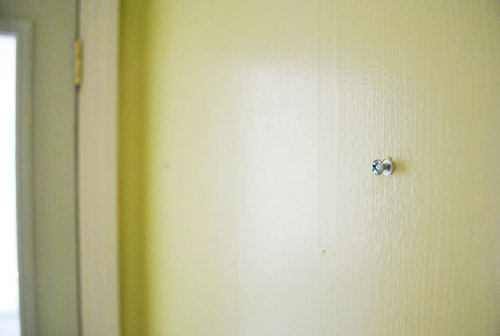
Just as I had hoped (but didn’t expect), it worked and the mirror was hanging in no time. Total shocker. Quick tip: never expect that something like this will work on the first try because you’re practically ensuring that it won’t and you’ll be pissed. I went into this expecting it to take a fortnight (which resulted in “pleasantly surprised John”).
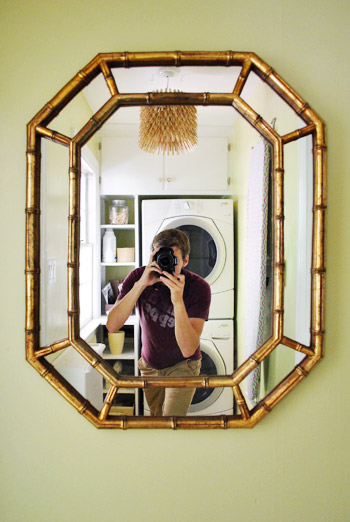
Sherry and I are still a bit undecided about the finish on the mirror. Our usual instinct was to paint it white (or ORB, or even the same deep teal from the built-ins), but lately we find ourselves appreciating a mix of finishes more and more. And letting “old pieces” add to the collected feel of a room without always slapping paint on them right away. I know, another shocker. So, for now, we’re living with this crackled gold dealio. Although down the line when we get stainless appliances in the adjoined kitchen it might look clashy and call for a paint job. We’ll keep you posted.
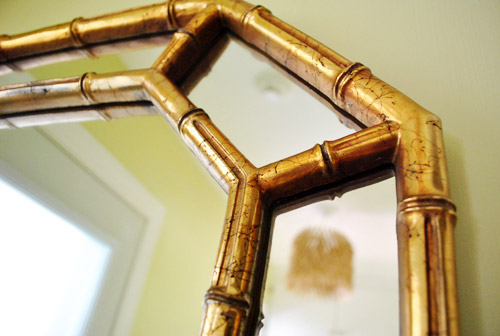
So far our random $10 yard sale mirror is turning out to be an AWESOME addition to the room. Not only does it allow for that last look at ourselves before heading out the door, it also reflects a lot of additional light into our windowless kitchen. Heck, it even makes the laundry room look bigger too thanks to “visually doubling” the space when you stand in front of the dryer (now the room seems to go on and on).
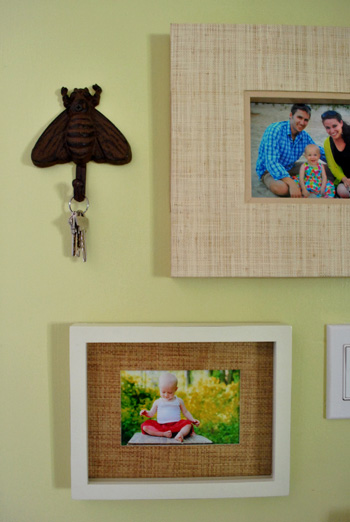
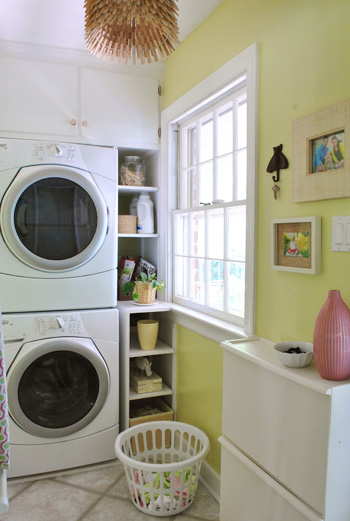
But that’s not our only addition to the laundry room walls. We also hung two textured frames (from the Pottery Barn Outlet a few years back – they used to live in our old office slash guest room). And we decided to use them to proudly display some of our favorite family pictures above our new shoe cabinet. As for Burger’s leash, we just tucked it into a white bowl from the kitchen. Oh and we got that pink vase on sale at Target for $7. I actually found it myself and recommended it to the wife since it reminded me of the colors in our ironing board cover. Who knew I had that in me? The laundry room is evidently helping me branch out in ways that I never imagined.
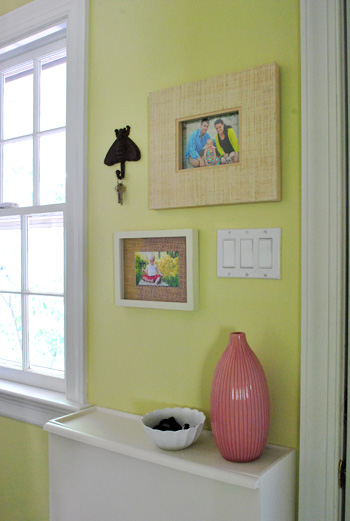
But back to the art. I actually owe my mom for inspiring the framed family pics. She always had a collage of family photos tacked up in our laundry room growing up and I loved looking at it. Functional spaces like laundry rooms can so quickly become just that – functional – so it’s easy to overlook bringing something personal in. Wow – how lame was that last sentence? To put it in less “TV decorating host” terms: it doesn’t hurt to look at a cute baby while, well, washing diapers for said cute baby. And the rest of the fam doesn’t hurt my eyes either.

The top pic is a family portrait (Burger included!) from our Outer Banks trip last month. And the bottom is one Katie Bower snapped the last time we visited her in GA. Lucky for us, the yellows in each pic accidentally work nicely with the room’s colors scheme (although we’d probably hang them up even if they clashed because they’re favs). Oh, and next to the top frame is a little iron bee (you know we love us some bees) that we got a while ago while thrifting in Delaware. And once again, we opted to leave it as is (even though we mentioned painting it white in the thrifting post). That, my friends, is our form of rebellion. Yup, we’re bad. Bad to the bone.
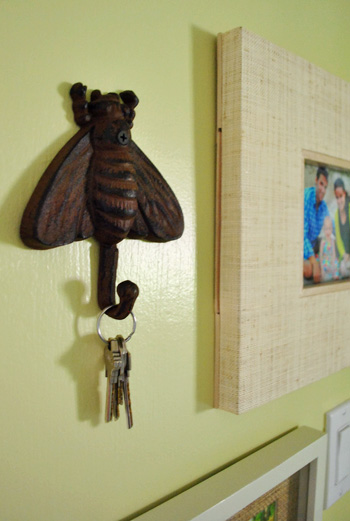
Wow, just realized that wall comes from a lot of states. Pictures taken in NC and GA, frames purchased in SC, and a hook found in DE. Though the miscellaneous keys are for things like local PO Boxes and family members’ homes – so that kinda ruins the streak. Oh well.
And with that fine ladies and gentlemen, we are calling the laundry room COMPLETE… for now at least. So let’s take one more look back at how we got from before…
…to done (for now):


It’s actually the first room we’ve made this much progress on. Quite possibly because it was only about the size of a bathroom stall. Oh well, you know we’re all about taking the whole house makeover thing one tiny project at a time.
And for all you number crunchers out there, here’s the whole budget breakdown of all of the updates we’ve made in the past few weeks:
- New Energy Star front loading washer/dryer: $388 (well, really $638 but we craigslisted the old set for $250)
- Frosting film (Home Depot): $18
- Paint and caulk: $0 (already owned)
- Built-in shelves (supplies from Lowe’s & Home Depot): $74
- Ironing board cover (Etsy): $24
- Ironing board hooks (Lowe’s): $12
- Cabinet knobs (Hobby Lobby): $8
- Shoe cabinets (Ikea): $38
- Clothespin light fixture (homemade here): $34
- Mirror (yard sale): $10
- Family photos (CVS): $1
- Frames (Pottery Barn Outlet): $0 (already owned)
- Iron fly hook (thrift store): $0 (already owned)
- Laundry basket (Target): $0 (already owned)
- Pink vase (Target): $7
- Other accessories like bowls & baskets: $0 (already owned)
- TOTAL: $624*
* which is pretty thrilling considering our new front loading washer & dryer alone were originally $1198!
Oh and we don’t factor in the cost of things that we have leftover from previous projects or already own since they’re usually already “counted” in other budget breakdowns (ex: the wall paint we used was already counted in the kitchen painting breakdown, so using the remaining paint for this project and saying “$20 again” would be double-counting). But a few folks commented to say that it might be helpful to mention the cost of those already-owned items in case someone at home was planning to do the same thing (but had to buy everything from scratch) so adding about $25 for some caulk & a quart of paint, $25 for frames & accessories, $3 for the plastic laundry basket, and $5 for the iron bee hook that we found thrifting should do it (for a grand total of $682).
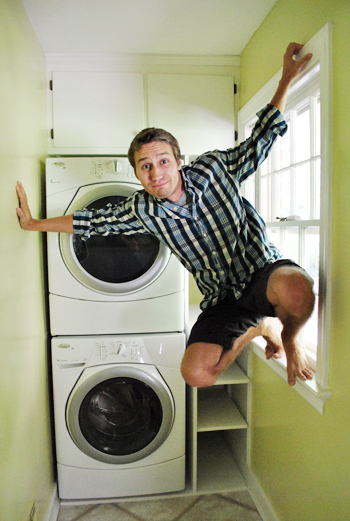
Thee cheers for appliance deals and DIY built-ins and ironing-board-covers-as-art and thrift store hooks and clothespin chandeliers and all the other odd calls that we made for our tiny laundry room. And now I’ll toss in this awkward monkey-toed picture, lest you forget just how narrow this space really is:
And so ends the laundry room makeover. We’re currently enjoying diaper-washing-day a little too much. And my mom and dad saw our clothespin light in person and proclaimed it “the coolest thing we’ve ever made besides Clara.” Which got us all awkward and blushy. Have you guys done any laundry room revamps lately? Or made any cute babies? Or done some owling on a windowsill? Apparently owling is the new planking.

Angela says
I love it!
Amy says
I love the finished project! Bravo!!
I posted today about my trip to the laundromat and linked to your post…because whomever decorated my laundromat needs to consult with YHL! :)
Once again, great job!
Cheryl D. says
I’m not sure I understand. Is that a cheap plastic container you’re using for your shoe storage? Aren’t you worried about bacteria? The mirror is nice, but the location very questionable. Mirrors should only be placed where they reflect something that enhances the energy and flow of a room. Reflecting unattractive stacked appliances and being able to now see them from your kitchen and eating space was not a very thoughtful choice.
YoungHouseLove says
Yup, they’re made by Ikea and sold for that. Lots of other folks commented that they use the same ones and love them. They’re opened all the time for ventilation and easy enough to wipe down (they’re also meant for storing recycling cans and bottles)! As for the reflection in the mirror, from the kitchen we see the frosted door (not the appliances, you only see those when standing right in front of the mirror in the laundry room). We love all the light it adds to our window-less kitchen!
xo,
s
Marla says
harsh-sounding comment. Oh, well, Sherry, you’re always keeping it classy :) Times like this that I admire you and your work even more!
Heather W says
Ditto that Marla!
Chelsea says
Wow!!! It all came together SO perfectly. I admit I was skeptical when I first saw the paint color, but you made it work and I love it now! Way to go!
MJB says
Like others have mentioned, I am inspired… and a little jealous of your warmer weather location. Here in MN, we would need much more space for outdoor gear. The coats alone… sigh.
Maybe some happy paint will help me deal?
Reenie says
Very cute and cheerful.
April says
I love the way the laundry room turned out! And I was thrilled when I saw your mirror – I bought the exact same one at a Goodwill a few months back! I did end up painting mine… If you want to, you can read about it here:
http://akitchentablefortwo.blogspot.com/2011/06/pillows-and-lamps-and-puppies-oh-my.html
But I have yet to hang it up, since I’m not totally sold on the silver color I chose. I can tell you I don’t regret painting it, though. The gold looks great in your laundry room, but it looked not-as-great in my house. Congrats on the finished room!!
YoungHouseLove says
I love it painted too! And your spray paint hand. Haha.
xo,
s
Katie says
That mirror hanging trick is BRILLIANT! I’m going to totally use that the next time we hang anything on our walls.
cassy says
Looks amazing! Love it love it.
Kristin says
love this room! i think this is your best turn-a-round yet! it’s amazing how you guys can turn a shabby, small room into an amazing laundry room! seriously, absolutely love it!
Bob says
John,
Could you possibly make hanging a simple mirror any more complicated? Sheesh, man, measure/mark/drill. It really doesn’t have to be all that hard!!
YoungHouseLove says
Try owling while doing it! That might take it up a difficulty level or two! Haha. We just don’t like to measure up from floors or down from ceilings since our house is old slash wonky and nothing is level! Eying it with a level and then marking the drill spots with paper templates floats the ol’ boat. But there are lots of other hanging tips going on here in the comments too!
-John
Bob says
Not sure what the levelness of the floor or ceiling has to do with anything, but I guess this is one of those topics to just let go. Sherry wants me to embrace the love so I will bite my tongue about your wonky mirror hanging technique. :)
Betty says
I knew we’d see that mirror eventually! It looks great in your well thought out laundy room. My husband and I met you while you were yard sale shopping the day you found it.
Which begs an aside – when we recognized you, I didn’t feel that we should interrupt your personal time, my husband, on the other hand felt that you would be happy to say hello to a fan. He, being the bold one, said hi. You all were, of course, gracious and lovely. How are you handling your celebrity these days? Is it weird when strangers “know” you?
Anyway — thanks for sharing your writing and decorating talent with all of us!
YoungHouseLove says
Oh yeah! It was so great bumping into you! I don’t know if we had picked up our two big frames at that point, had we? Too funny. As for bumping into readers, we’re always geeky and awkward but so flattered to “meet” people who drop in on us everyday! It’s so much fun to put faces to names when we’re not being completely lame and “ruining the illusion that we’re not total weirdos” – haha.
xo,
s
Robin O says
Gorgeous! Very inspiring!
Jennifer says
Your mom and dads comment: HILARIOUS! Totally blush worthy! My parents used to have that exact mirror. Im pretty sure my dad bought it at a yard sale in Winston Salem before he moved to the Outer Banks in the early 70s. It was in our house until it was sold in 99. Pretty sure it hit the thrift store as it was never a fave of my moms (or mine). But I would love to have one now, funny how things come back!!
Great job on the laundry room completion!
Rachel says
lol,is the ironing board John’s way because he wrote the post?
i love the room! i can’t wait to have a laundry room again so i can do something like this.
YoungHouseLove says
Haha- yup. We go back and forth when the other person isn’t looking. It’s more fun than it should be.
xo
s
Tamrah Ryan says
Really nice! I love how all of this came together… you guys sure are talented!
karen says
looks awesome guys!! but i loved those half window shutters…so charming!
Molly says
1)I love it! I wish any part of my house would come together like that!!
2)I was distracted by the word fortnight. I love that word. I kind of scanned the rest of the post in a fortnight induced stupor.
YoungHouseLove says
Fortnight induced stupor = hilaious.
-John
Lindsay says
Congratulations! Isn’t this your first complete room?
YoungHouseLove says
It is! Wooot! Maybe because it’s only the size of a bathroom stall. Haha.
xo,
s
Gina @ Running to the Kitchen says
It must feel great to have one whole room done! It looks great! The mirror was the perfect finishing touch.
Katherine O says
My vote is to not paint the mirror – it adds a bit of glam amongst all that lovely white and bright. What a snag, that mirror!
kelsey says
i am always so jealous that you can have things on table tops – like the cute vase on the top of the shoe storage. i was looking around the house yesterday and it is so pathetic. my kids destroy anything i put out so i have no cute groupings anymore. i am just living vicariously through your blog. love the mirror, it looks so good in the space. i love laundry rooms and other random rooms, they are so fun to decorate!
YoungHouseLove says
Someone posted a tip that she uses 3M adhesive strips to keep things like tabletop vases safe from her kiddos! Maybe that helps?
xpo,
s
kelsey says
ooh good idea.. i might have to give that a try!
you guys are the best!
carolinaheartstrings says
That room came together nicely!!! I love a list all checked off. Okay, what’s next?
YoungHouseLove says
We’re in the process of doing rocks, paper, scissors to decide on the next things we should tackle! You know we’ll keep you posted though!
xo,
s
Shannon says
I love the idea of using paper and tape as a guide to hang your mirror! So simple yet I never thought of something like that. Now I can hang up the artwork that has been sitting on my floor for a few months with less stress!
heather s. says
Looks great! The only thing I’m not a huge fan of is the placement of the pink vase – love the vase but I know I’d bump into it in such a small space and have it come crashing to the ground. I do like a couple people’s suggestion about using command strips to fasten it to the shoe storage since that may help.
I agree – don’t paint the mirror since it looks great as-is.
Connie says
Have you considered a skylight or sun tunnel for your dark kitchen? We’ve just added sun tunnels to our stairs and an east-facing office that became dark enough to need lights in the afternoon. What a difference—both places are bright all day.
YoungHouseLove says
Yup- we’d love to add a skylight down the line for sure!
xo,
s
Erin @ One Project at a Time says
You guys are making me feel totally jealous. Our laundry was literally the first room we tackled, but when Bath Crashers came through to remodel our Master Bath, they put a laundry shoot in and we’re not super big fans of the way it turned out. Top that off with a back order on Ikea wood countertops, and the room just looks like one big project. You’ve totally given me the inspiration to get back to work on it!
http://oneprojectatatime.blogspot.com/2011/07/just-wasting-time.html
YoungHouseLove says
It’s looking good already! Good luck!
xo,
s
Erika says
It looks so inviting! Love the finish details and the colors.
I have just completed a vintage-style makeover to my laundry space. At least one side of the room has gotten the treatment. The other side has just been cleaned up and organized for now. I am still toying with how to transform the cupboards, counter and backsplash.
http://www.kitschdesigns.com/post/DIY–The-Laundry-Room.aspx#comment
Question: Have you guys ever used or known someone who used that countertop coating that is supposed to make laminate look more like stone? I was thinking about trying it in my laundry space just for fun.
YoungHouseLove says
We’ve heard other bloggers have used it and loved it! Maybe google around to read their reviews of it? I think Mrs. Limestone used it at her shore house!
xo,
s
bhh says
Wonderful results! An earlier commenter suggested a rug. Along those lines, how about a painted floor cloth? I am not particularly “crafty” but this summer I made a 3 x 5 floor cloth in a chevron design using painter’s floor canvas for our beach house. It was easy, inexpensive, gets tons of compliments, and can be cleaned easily with a damp mop/sponge. Doesn’t that sound like a laundry room DIY for you guys?
YoungHouseLove says
That sounds really sweet! We might just have to try that as a little p.s. to the room someday!
xo,
s
Miranda says
I have to know–did you coordinate the laundry in the basket with the room for the “after” photo shoot??? Or was it just a crazy coincidence? Do tell! :)
Great work, this room looks fabulous.
YoungHouseLove says
Haha, you’re the second person to ask! Those are actually real Clara outfits that were actually dirty. The greeny dress on top was a total coincidence – but we’ll take it! Haha.
xo,
s
Erin says
What an awesome transformation of the laundry room! You’ve inspired me to put some thought into what can be done in our laundry room. And the owling v. planking article was great :).
April says
I love the mirror! What a neat find. I love the completed laundry room! It is cute and practical! I would love to have such a cheery place to do my laundry in instead of my dark and dank basement. :)
Laura says
What a cheerful room to do laundry in- I love it! I think on the bottom picture of Clara, it would be great to have this mini clothes pins that they have in craft stores glued to the mat to clip pictures on. :)
Meaghan says
This is so sweet and cheery. It’s great that it’s the last room you see before leaving and first room you see when arriving!
vettyv says
You all have done it again!! Luv everything abou this quaint lil space…that mirror really does add the finishing touch…love the finish…it works well to reflect light as does the mirror…kind of a lil bonus! Keep up the great work…Thanks for the ideas!!
Lux says
I love how it all turned out. The idea of a clothespin chandelier in a laundry room is brilliant! I say leave the chinese chippendale mirror gold. I’m loving gold lately. I just got some awesome owl bookends at a thrift store and after considering white I decided to paint them gold.
Meg says
It all looks so fresh and so much better than when you first moved in.
Just wanted to let you all know about hanging your keys/having them in a bowl anywhere near a window. An intruder can easily break the window, snatch the keys, and quickly be able to get into the house. This happened to my husband’s aunt when she was younger. She ended up being raped, but did survive, because of him getting in the house that way. Just wanted to send out an awareness in case those are house keys you keep there.
Meg
YoungHouseLove says
Thanks for the tip Meg! And so sorry to hear about your husband’s aunt’s terrifying story! We actually don’t store house keys on that hook (they’re unmarked keys to random PO Boxes and relatives homes) just to be safe!
xo,
s
Rachel Wester says
We had that exact same mirror in our house growing up. My mom decided to get rid of it so I took it, thinking it could be cute spraypainted white. I sold it for $3 in a garage sale in March because my husband wasn’t a fan. Now I am crying to myself because it looks sooo cute in your laundry room (just as I thought it would in my house). MAJOR REGRETS! I’m glad it lives on in a way in the YHL casa.
YoungHouseLove says
So sorry Rachel! A few folks have commented that they found the exact same ones at Goodwill so maybe you’ll find one someday!
xo,
s
Meredith says
So lovely, petite, yet functional! Have you seen the hanging trick on Pinterest that has you mark the hanger spot on the back of hte frame (or mirror) with tooth paste and then place it against the wall where you want it, having it leave a mark for your screws? Such a duh moment when I saw that!
YoungHouseLove says
Love that tip! So smart.
xo,
s
Lesley says
I am LOVING the mirror! Maybe it’s because I bought the exact same one for about the same price at a local antique mall a few years ago. ;-) I painted mine ivory & it hung in my guest bathroom until we sold our house in April. So normally, I would be all for painting it, BUT I actually think the distressed gold is really working in that room! It ties in tonally with the baskets & clothespin chandy. You guys have imbued that tiny room with so much more function, character & personality than it had originally. Well done!
Kacie says
You made it into such a light, lovely space. I’m completely impressed and inspired.
Kacie
http://www.acollectionofpassions.blogspot.com/
ashlee says
hi sherry,
your new laundry room looks absolutely charming. what a pretty, feminine space! i’d totally love doing laundry if my area looked so light and airy :)
i have a question for you. a serious, adult, real world type of question. :)
you guys seem to be very budget-conscious.
i was wondering if i could ask you how you do it.
my husband and i are currently in the midst of saving a couple of thousand dollars just for emergencies. in addition, however, we have student loan debt.
yet, at the same time, i want to have fun with my home and bring some character and charm to it by fixing it up.
but i don’t really know how to find an even balance between work (being ultra responsible with money) and play (having fun creating our spaces).
do you guys follow a general guideline, like, for example, choose a room per month and set a firm budget to stick with? or do you go shopping regularly and pick up small, cheap items as you see them?
i’m not sure how to go about home renovating/home decor without breaking the bank.
i’ve recently started living on cash (meaning DO NOT TOUCH THE CREDIT CARD AT ALL COSTS). it’s working very well – i’m not accumulating even more debt.
any advice would be so greatly appreciated regarding how to properly budget home repairs/home FUN decorating.
YoungHouseLove says
Aw, thanks for the kind words! We have a bunch of posts about money on our Projects page (in the “money-saving ideas” section) but our general philosophy is not to buy anything unless we can afford it right then and there (ex: pay for it in full) which usually results in doing things in small inexpensive steps (like saving up for the washer & dryer, waiting a bunch of months to revisit the laundry room, building our own shelves and light fixture to save money, using art and paint we have, etc). We generally approach every single project with the mindset of: how can we do this for as little as possible without “settling” (because if we settle we end up replacing something down the line which ends up costing more). So we like to hold out until we can get/make what we really want and just take our time so we don’t go broke or get overwhelmed. This post on the subject might help too: https://www.younghouselove.com/2010/03/email-answer-money-management/
xo,
s
ashlee says
thanks so much sherry. i am going to start the ‘jar’ system, where i set aside designated amounts of money for home improvements, decor, etc.
one of my biggest problems (and reason why i end up overspending) is that i haven’t actually decided WHAT i want to do with ANY space in my home. so..i go into a store and stand there and say…well. here i am. what am i buying today? NO IDEA. my house is literally a GIANT blank canvas with absolutely no ideas as to what to do with it. my kids’ rooms are decorated. that’s it. & they are half assed decorated. not done well by no means.
i need a to-do list. a big one. i wouldn’t be so overwhelmed if i saw it all on paper. & i would get a sense of accomplishment each time i ‘met a goal’.
ps. i started a new blog of my own – inspired by you!
here is the link. when you are bored (IF you are ever bored)…feel free to sit back and laugh at my massive decorating failures :)
http://238windsor.blogspot.com/
YoungHouseLove says
Love it! Already dropped in on you! Can’t wait to see what you do with house number two! Happy blogging…
xo,
s
Ann Lusas says
So jealous, that mirror is such a find. I’ve been looking for something similar for our bedroom on e-bay, CL, etsy and local thrift stores / flea markets for about 4 months, but haven’t found anything even close. If you ever decide you aren’t in need of it anymore, I assure you I could give it a loving home in NJ. :)
YoungHouseLove says
There were actually two at the yard sale! So there might be another one out there (that may have gotten donated if no one got it by the end of the sale)! Virginia road trip!
xo,
s
ashlee says
ps. i absolutely love how you bring such personal touches into your home. the family pictures are gorgeous, and make it feel so welcoming.
Lesley says
I painted our laundry room and hung a picture on the wall. It’s amazing the difference it made in my laundry-doing attitude!
Question (you may have mentioned this but I get ADD and don’t always read, just look at the pictures!) – but where do you sort and fold your laundry? Unless there is a little fold out table hidden in there somewhere, I imagine you have to stuff it in a basket and take it to another location. Just curious!
YoungHouseLove says
Yup, the room’s too narrow for a workable fold-down shelf or anything, so we just carry it into the living room or the bedroom and fold stuff on the bed or sofa.
xo,
s
Deb says
Hey guys! The laundry room looks awesome! John, great idea for hanging the mirror. The hubs and I recently found something called the “Hang and Level Picture Hanging Tool” on a recent trip to the hardware store.I have to tell you, I used to be the WORST picture hanger and this actually does work. I recently used it to hang a mirror (all by myself hah) that had the same issue “do not hang by a wire” and it worked! Just thought I’d suggest it, since I can vouch for it :). Sorry if this almost sounds like a commercial lol
YoungHouseLove says
Thanks so much for the tip Deb! We’ll have to check it out.
xo,
s
Alice says
I am loving the new mirror, gold color and all! I agree you should keep it it as is colorwise. However, seeing the photos of your kitchen also in this post has me confused as I didn’t realize there was a doorway from the kitchen to your office (the previous homeowner’s dining room), so I went looking for the layout of your home and couldn’t find it. Help!!
YoungHouseLove says
Here ya go: https://www.younghouselove.com/2010/11/the-floor-plan-stan/
xo,
s
Laura says
You guys, the laundry room looks AMAZING! Great job!
Beatrice says
Yea for finishing stuff! It’s the best. I have now finished 3 projects I found on your Pinterest Challenge! I am giddy! Oh wait…I mean Fortnight induced stupor …
rachel @ Just a Touch of Gray says
Fantastic job! Love everything about it! So bright and cheery now!