It’s no secret that the real improvement we need to make to our new laundry area is in the upgrading to energy efficient appliances arena along with adding some nice built-in storage to maximize that tiny room. But as we save up and plan for those upgrades, we took a few hours after Clara’s bedtime a few days ago to tackle some smaller items on our laundry list. Pun intended.
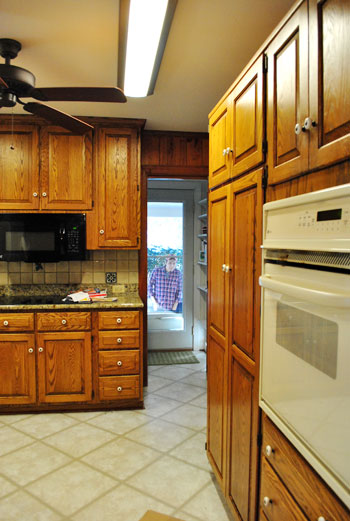
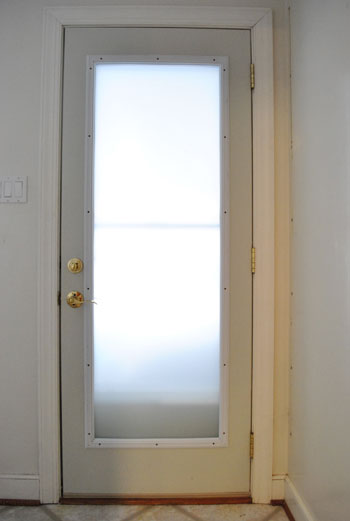
First we went to work on the glass side door. You know, the one that gave everyone a straight shot from our carport, through the laundry area and into our kitchen (here I am being creepy and demonstrating the problem, which you can read more about here).
Since we were eager to get rid of this bi-fold door that was currently acting as a privacy solution in the interim…
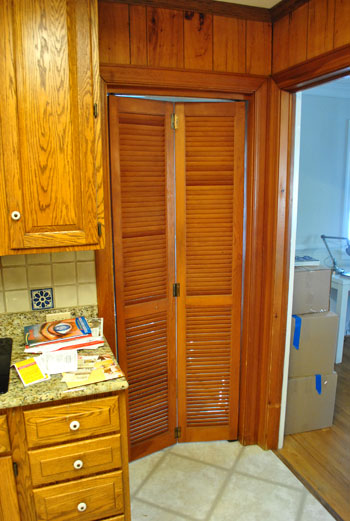
… at first we figured we’d throw up a cheap wooden blind over the glass side door, remove the dark pocket door, and consider our problem solved. Well, after buying a bamboo rolling shade from Home Depot, we realized how much light it blocked and after learning that our kitchen is a black hole in the mornings (it’s the only room with no windows to the outside world- the window above the sink looks out into the sunroom) we didn’t want anything that would block too much light.
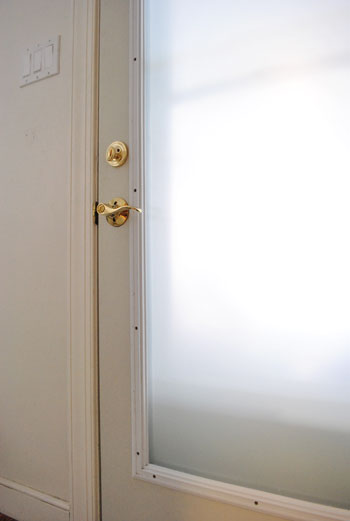
That’s when we opted to go the frosting film route. We used the same materials / techniques that we employed in our basement a while ago, so you can read that step-by-step guide here (and see what film we chose). The only issue we ran into this time was bubbles.
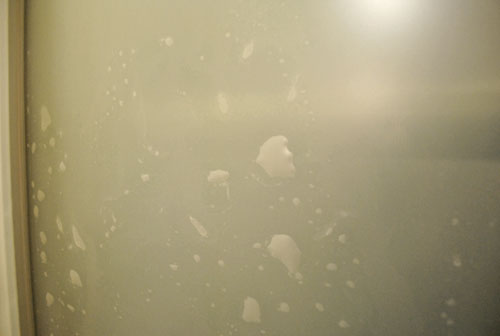
Some serious, annoying, won’t-go-away bubbles. You always have these at some point of this process, but it usually just takes a few squeegees to get them out. But these bubbles weren’t bursting, no matter how hard Sherry squeegeed. And it totally burst our bubble (too corny- had to cross it out).
We hoped it was just an issue with not having applied enough applicator spray to each surface, but we feared it was a problem with the temperature of the side door (instructions said not to apply it in under 40 degree weather, which it definitely was on the other side of that glass). We crossed our fingers, peeled off the permanently bubbled film, scraped some residual glue off of the window, and readied ourselves to try again (fortunately our leftover scrap of film was perfectly sized for a second attempt). And this time we used a boatload more of the applicator solution to keep things nice and slippery so no bubbles could take permanent hold.
And it worked. Phew.
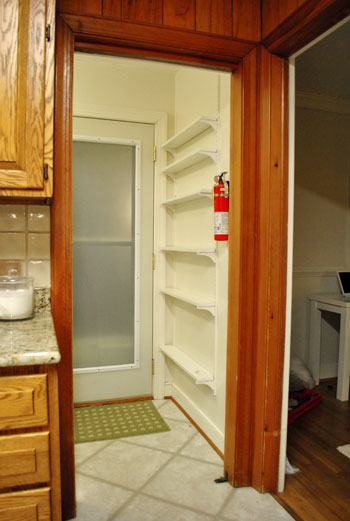
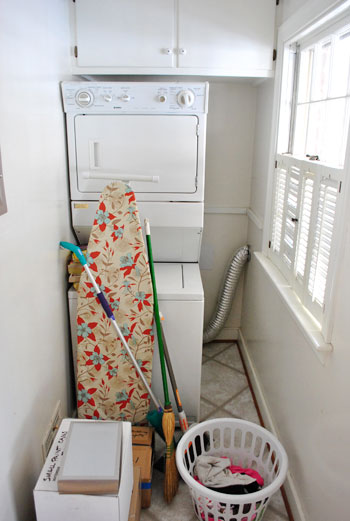
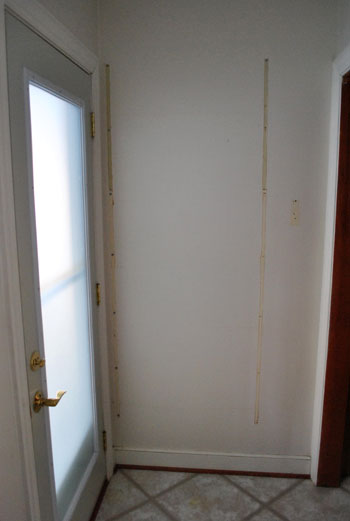
Our next little project was the removal of those shelves next to the door. We love bonus storage just as much as the next blogger, but we couldn’t figure out exactly what we’d want there since it’s not concealed- and we learned that coming through the door with our hands full meant that we routinely bumped into whatever was on those shelves anyway. So we decided to take them down and instead turn it into a place to hang art or a frame collage someday. Every laundry room needs a little space for the eye to rest and art always makes it feel a bit more welcoming and less utilitarian. At least that’s what the wife says. She’s more of the decorating brains. And I’m the take-those-shelves-down brawn. Although Sherry does get down with the power tools when the mood strikes.
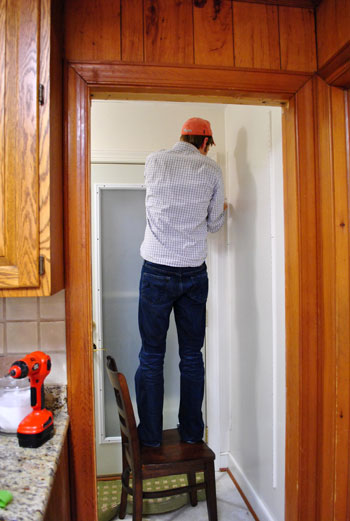
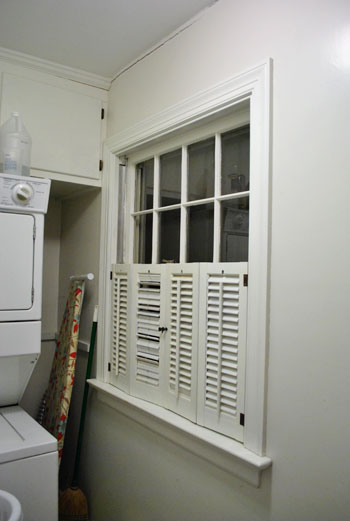
While I was in the midst of unscrewing things (despite it being about 10:30pm) we thought we’d keep the momentum going and get rid of the shutters on the laundry room window too (to make room for an eventual set of blinds/roman shade/curtain).
So by morning, our laundry area was looking more like this:
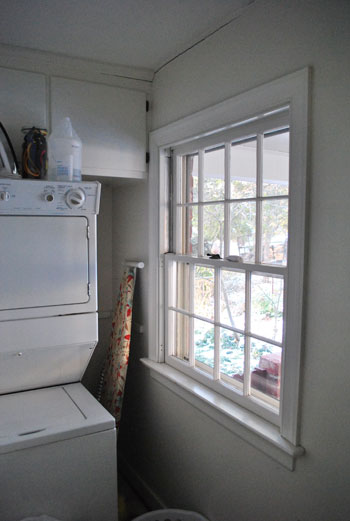
No shutters, no shelves, but a bit of touch up painting to be done.
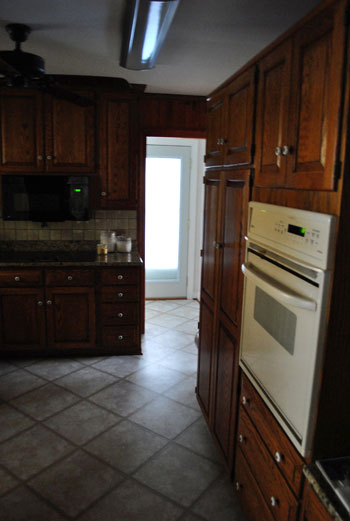
And we’re still getting a nice stream of morning light coming into the otherwise pitch black kitchen in the early morning. Frosting film was definitely the (nice cheap) way to go.
Have you guys frosted windows with the same film stuff from Home Depot? Have you ever encountered the not-coming-out-no-matter-how-hard-you-squeegee-bubble problem? Was it due to temperature or lack of applicator spray? Or something else entirely?
Psst- We announced this week’s giveaway winners back on the original post. Click here to see if it’s you.

Sara says
I am very impressed at how motivated you guys are after the little bean is asleep. WoW! Everything looks great.
Amanda says
Am already imagining a lighter, brighter kitchen. Way to go, guys!
Emily says
Looks great!
I did the same thing in my laundry room immediately after moving in last fall – except to a window. Neighbors and people walking down the street could see right in while I was working so after seeing you do the basement, I tried it. Love it – so thank you!!
ALittleBite says
I tried to frost the glass doors of our kitchen cabinets with Ikea’s film… but couldn’t get rid of the bubbles, and it looked horrible! It’s staying as it is for now. But since we use those cabinets as the “pantry”, it looks a bit messy (even though it’s pretty organized) and we’d really like to frost them. Maybe I’ll try again using more spray like you suggested!
Christina Marie says
Won’t you lose the light once you upgrade the carport to a garage?
YoungHouseLove says
We’re planning to add some windows to the side and back of the garage (and the garage door) so hopefully it won’t get too dark and cave-like in there.
xo,
s
rboyd says
I have a window above the back door in my house that was giving me grief, and I considered the frosted film…but I was too lazy to measure it so I used frosted spray paint! Same look, less work…hahaha!
Anne says
Right after we moved into our house in April of 2009, I attempted to apply the same frost film to the french doors leading to our bathroom. Since I am modest, I was not exactly thrilled with having a glass shower door and glass doors leading to the bathroom. Anyone coming up the stairs could see the person showering in all their glory.
I believe this was my first project in our new house. Yeah. I failed. The window dividers weren’t removable so I had about 16 rectangles to do. On the first on I used the edge trimmer tool included in the kit and it left a huge (ok maybe just 1/4 inch) gap between the film and the trim. Not the look I was going for. I ditched the tool for the next one. That one actually went fine so I continued but each one kept getting worse and worse. Bubbles and more bubbles. The cuts weren’t looking right. Then the section where the film was bent in the box wouldn’t come out. The bent part stuck out causing one long skinny bubble. Maybe I needed more solution. I was doing this by myself and after about 5 rectangles I quit.
Those 5 rectangles still have the film on them. The rest are clear glass.
However, we rarely close the bathroom doors anyway so it doesn’t really matter. Might be a different story when we have teenagers.
Sorry for the long story. Thanks for this post. Now that I know a lack of solution might have been my problem, maybe I will try it again.
Love the new house btw!
Carmen @ Life with Sprinkles on Top says
Yes, you have to keep the light coming in. I like the frosted window. Great idea! The laundry room looks so small. Will you be able to fit a non-stackable washer and dryer in there? And the shelves by the door definitely were NOT practical. I would have removed them too. :)
YoungHouseLove says
Hey Carmen,
Nope, there’s only room for stacklable ones- but upgrading to energy efficient front loaders would be nice down the line.
xo,
s
Blog is the New Black says
Great idea!!!
ashleyD says
our front door had some see through glass so we used the “frosted glass” spray paint. we did have to take the glass panel out to make sure we didn’t over spray and get paint on the door itself!
Leanne (For Health's Sake) says
We frosted a side panel near our front door (because I didn’t want to have to custom order a tiny blind or curtain) and the frosting has a really nice pattern in it. I absolutely love it because it completely gives us privacy while still looking very stylish. The best part of all is that it was FREE because my best friend had extra from doing her window at her house :)
Heather says
I work for a screen printing company that deals with decals/window clings all the time- I have customers calling me when it’s 20 degrees outside and trying to put a static cling on a freezing cold window. It doesn’t work. Science! When they tell you application temperature is 40, it usually will work if it’s above 30, but no colder than that. Extra water/windex/whatever you’re using to apply it will help, but ultimately, the temperature of the window makes a HUGE difference.
Love what you’re doing with the house!
Mommy G {Forty Weeks} says
I just love your diy projects! I hope I have the time to do mine too. :)
Your frosted glass project reminded me of putting an invisible shield on my phone. Very easy…I had a husband to do it for me. Hahaha!
Monica says
I’ve never frosted a window/door before, but now that I know how easy it is, I just may very well tackle it!
It looks great, and I’m in agreement with the shelves by that door needing to go. As great as the extra storage space would have been, the bumping hazard seemed to outweigh that!
I love that you guys are tackling the “little things” first but they’re already making a HUGE difference in the new place!
Melissa says
I used a spray that frosts glass (found in the spray paint section). I was worried it wouldn’t be even, but it worked like a charm. It comes off with acetone so it was great for an apartment I lived in.
Beth says
Just found your blog a couple of weeks ago. Love it. In regards to the film, I used film that I bought at either Home Depot or Lowe’s for my bathroom window. Unfortunately, I cut it too small so I had to cut a teeny tiny piece for the bottom. It actually looked great, though I, too, had the “bubble issue”. They eventually went away so I don’t know if it was the humidity that created the bubbles. I will say that the teeny tiney piece for the bottom has fallen off a bit and you can now see outside (or inside if you really really want to). I have a very shear curtain covering the window, and used the film to keep the light in what could be a pretty dark bathroom.
Brandi says
You guys have accomplished a lot in a short time, way to go! We worked on doing things around our house for a month before we moved in since we still had our apartment. I was so glad just to knock out the basic things (remove popcorn ceiling, paint every single thing, and change out most light fixtures) without furniture getting in the way.
Diana says
Looks good,we used the same stuff in our bathroom window (that was located inside the shower!).
Just a thought- what are you going to do about light in the kitchen when you build the garage? That will probably kill any light that is coming in now, will you have a window/ skylight in there?
YoungHouseLove says
Hey Diana,
We’re planning to add some windows to the side and back of the garage (and the garage door) so hopefully it won’t get too dark and cave-like in there.
xo,
s
Beth@Just{Heart}It says
Wow, that looks so-o-o much better with the film on and the shelves and blinds gone. Are you thinking of putting in a tube light or skylight down the line? Although I’m sure once there’s a doorway into the dining room that will also change the lighting in there.
YoungHouseLove says
Hey Beth,
We might consider that down the line to let in more light, but we’re hoping we won’t need to go that route since keeping things light with paint and other cheap-o cosmetic updates is always nice and easy.
xo,
s
Julie says
I actually like the spray frost. It seems so much easier (I guess I don’t have the patience to cut nicely and get out all of those ugle bubbles). Love that you get some privacy while keeping all of that natural light!
MS says
We used that frosty film stuff before and actually moved the leftover roll and kit. I have the perfect door to do in our garage next.
I was wondering what you were thinking about doing about the lack of light in your kitchen. We had the identical problem, but in our living room. What a depressing room to have so little sunlight!
After a year of living with it, I saw these tubular skylights being installed on Holmes on Homes on tv. I guess they look like a can light on the ceiling, but let in tons of natural light. I have 2 companies coming to give me quotes this week and next…but I’d love to hear if you have an alternate plan for that little “problem.”
YoungHouseLove says
Hey MS,
We think painting all the dark paneling, trim, and cabinets will really lighten things up!
xo,
s
MDAsay says
Just got the most awesome “light” put in our dark (read: no window) laundry room. It’s called a “solatube” that utilizes some shiny aluminum tubing (I think it’s aluminum) to bounce sunny rays into the room. Even on an overcast day the room is bright enough not to have to turn on the light (which we still have for nighttime laundry duties). Best of all it qualified for a 30% tax credit. This could be a great solution for your kitchen. We are having one installed in our kitchen too, as even with windows, it’s in the northeast corner of our home and is dark in the afternoons.
As for the frosted window panes, we installed some frosty film to our master bath and haven’t regretted it once. Nice light and privacy to go around. We even painted the master in your famous “gentle tide” color and it is beautiful!
Holla!
Andra says
I have a potential bubble-bursting query: Though you have an open carport now, I seem to recall that plans are in the works to turn said carport into a closed garage – Won’t that eliminate all of that natural light into the kitchen? I am with you on preferring a closed garage to a carport, but if it’s going to close off all natural light to the kitchen that’s a bummer! I cannot remember if the door comes straight from the carport or if there is a gap and the carport is not immediately attached to the house, but if so that is something to think about!
YoungHouseLove says
Hey Andra,
We’re planning to add some windows to the side and back of the garage (and the garage door) so hopefully it won’t get too dark and cave-like in there.
xo,
s
Amanda says
Any tips on putting up the frosting?? I tried it on our bathroom window and used a whole roll…and still have nothing on the window. Plus I have two sidelights I’d like to do. I can’t seem to get the measurements right and it just looked awful! I really need to put it up in our bathroom!
YoungHouseLove says
Hey Amanda,
Just follow the link in the post to our older post full of tips for application. Hope it helps!
xo,
s
Robin says
Wow that does look good! I always thought that frosted glass was for greenhouses, pimped cars and meth houses! Yours looks surprisingly great!
Abby says
We have a 100 year old house full of quirks including a tiny, odd window in our walk-in closet with a straight eye shot to our neighbors. Not ideal for getting dressed. We used some of that frosting film (free from a friend who had a small scrap left) and it worked great. We had some trouble because it’s an original, leaded glass window and it’s not exactly smooth or straight but it turned out fine. Great, cheap fix!
Nancy says
My neighbor as I was growing up was constantly redecorating her house. She was in her 70’s then, and is still going strong 20 years later. One of her many projects was frosting her windows. I asked her how she did it and she said she sprayed beer on them. I know she wasn’t making that up, but I don’t really know how she managed her desired results other than putting a beer in a spray botttle.
I’ll have to ask her the next time I visit my parents. :)
Tami says
Yes! Yes! A million times YES! Frosted window film has become my new BFF since buying our home in the city. We have a bottom floor condo unit and we had two types of window situations to combat: 1) people walking by our windows and turning their head to look DIRECTLY into our living & dining room and 2) some really high, weird-o windows atop a sliding glass door in the bedroom.
Window film was our super hero and here’s the links to see how it turned out (click on the photos to see larger views). Oh, and I didn’t have any issues with bubbles so perhaps you are right that it was a temperature thing bc. we’re in CA and it was about 75 and sunny [as it always is] when I installed it.
http://tami-licious-life.blogspot.com/2010/10/masterful-windows.html
http://tami-licious-life.blogspot.com/2010/11/peek-boo-pt-2.html
P.S. We’re going at a snails pace for sprucing up our beach pad fixer-upper so please be gentle on the rest of the place :)
Kate says
We used a patterned frosted film (purchased on eBay) on our french doors that lead to a basement bedroom. There are two huge windows in there as well as one in main basement room and we wanted light to flow freely while still providing privacy. It worked great!
Malissa says
We have windows in every room of our house except for the laundry room and our hall bath, both of which get pretty gloomy. I’m considering putting in light tubes, have you guys ever considered or looked into using those? Basically they are a smaller, less roof/ceiling invasive sky light.
YoungHouseLove says
Hey Malissa,
We might consider that down the line to let in more light, but we’re hoping we won’t need to go that route since keeping things light with paint and other cheap-o cosmetic updates is always nice and easy.
xo,
s
Snickrsnack Katie says
Glad you are going to move to some energy efficient front loading stackables. Love the new frosted door!!
Anne Lee says
Hi J&S, I’ve been following your posts close to a month now while I was searching for some moving-house tips. You guys have been an inspiration and we (me & hubby) are excited to put much of your ideas into our new place soon (though it’s rented).
We used frosting film on a glass window before…and yes those bubbles will appear. What we did was cut a small slit on the bigger bubbles using a thin blade or cutter and press (more like knead) the air out. Once done you’ll hardly notice the lines!
Nichole@40daysof says
I think the frosted glass is a great solution.
As for the solar tubes mentioned above, my parents used them in their kitchen remodel last year and they really do let in a ton of light.
http://40daysof.wordpress.com/2010/12/29/how-to-look-like-a-space-alien-with/
heartartz says
Looks brighter, lighter. Wow…Great work so far.
That washer/dryer looks small. You talked about appliance upgrades. Any plans for lager sized washer and dryer like you had at old house? How would they fit in the small space laundry room?
Loved seeing your “list” Can’t wait to see things crossed off the list.
YoungHouseLove says
Hey Heartartz,
Our old washer & dryer were actually a “Whirlpool Sport” set, which is the smaller models, so the existing washer and dryer in this house don’t feel very small since we’re used to modestly sized laundry appliances already. But we will definitely see what’s on sale when we upgrade and go for the best size/deal!
xo,
s
Blair says
This is a totally random question, but it does have *something* to do with laundry, so I’m counting it. I know that ages ago you all stopped using dryer sheets (as have I). Do you notice that you have problems with static cling in your laundry, especially in these drier months?
YoungHouseLove says
Hey Blair,
We do have occasional static but nothing too intolerable. Usually by the time we put stuff away and get it out to wear it the static is gone.
xo,
s
Hollie says
Thank you so much for posting this today! The timing couldn’t be more perfect! I have those narrow windows on each side of my front door. I love the light that it lets in, but I don’t like that anyone who steps on my front porch can see inside. Yesterday some weird lady stopped by selling meat out of the back of her truck. Strange. I normally hide, but she spotted me! Definitely frosting the windows TODAY!
Janell Beals says
Looking around your house are you simply gleeful at the good couple of years of projects ahead of you?!? It will be fun to watch! All the best for 2011!
Janell
Christi says
Have you thought about a garage with a loft or bonus room above? Your “alley” of a laundry room would be perfect for a stair case?
Just thinking – I love the new house!
YoungHouseLove says
Hey Cristi,
That would be super fun down the line but right now we have lots of space to grow. We also have a nice new roof (just installed in the spring by the previous owners) so we would hate to rip it up to create a loft just yet. Love the creative idea though!
xo,
s
Ami @ beyondpeasandcarrots says
looks so much better already!! That frosting film is amazing stuff. I used it on a bathroom window in my old city apartment (which conveniently gave the creepy man across the parking lot a birds eye view to me showering :s).
amy good house says
I was wondering if you guys are considering relocating the washer/dryer to a whole different area and knocking down the wall between the laundry/kitchen area?
I’m talking way, way down the line!
YoungHouseLove says
Maybe waaaay down the line but since we want to keep the existing cabinets and configuration of our kitchen, knocking everything out just to move it back a few feet seems like a lot of work!
xo,
s
Becky says
Yay for your motivation! You guys amaze me with how fast you are already making changes/improvements!
Dawn says
I love the new house and I’m currently living vicariously thru you two since I can’t do anything to my rental…(bummer)…but when I get my own house…LOOK OUT!
And yes, it was the temperature that was causing your bubble issues. My fiance does tinting along with his auto paint business and that is always an issue when someone comes to have it done in the shop. We don’t have a heated shop and the paintbooth usually has a drying car in it…so tint waits until the temperature is right.
Sometimes, you can overcome the temps with more spray, but more than likely those bubbles will pop up again before it’s done drying. Looks like that door gets some sunlight though, so it should dry flat if you got the bubbles out with more spray.
WendyMI says
I have one of those long, invasive windows next to my front door. I bought one of those printed vinyl clings at Home Depot with a purple/green orchid pattern on it. Still lets some light in but definitely gives me privacy. The only thing that I don’t quite like is that I cannot always identify who is at the front door, but that’s a very rare occasion. =)
Loving the updates so far.
Laura says
I used the frosted film from Home Depot on my living room windows, which face the sidewalk and parking lot for my 4-plex. The first application was full of bubbles, and I could NOT get them to smooth out. The second application I made sure the film was dripping wet & the window was dripping wet, and it adhered smoothly. I still need to remove the flawed initial sheet of film & re-do that window, but at least we have privacy+light in our previously cave-like room!
Ana Silva says
I have used that privacy film before. We had this second story bathroom and this tiny window so we used the film to get privacy and keep the light. It worked wonders. I liked that we didn’t have to use any kind of curtain/blinds, etc.
Steph says
I work in a sign shop and do lots of frosted vinyl applications on windows/doors. A few tips:
1. Temp is very important. Vinyl does not like cold, and anything under 40 degrees annoys the vinyl. To get around this in cold weather use a hair dryer to warm up the glass/surface as well as the vinyl a bit. Makes application much smoother.
2. Liberal application of the solution will obviously help the problem as it works as a lubricant to help the trapped air. At the shop we use old windex bottles filled with warm/hot water with less than a teaspoon of dish detergent (we use Dawn). Instant homemade vinyl applicator fluid.
3. I’ve used that particular film before, and it’s a lot different than what we have in the shop. If you have problems with bubbles close to the edges it’s usually best to walk away for about a half hour and let the majority of the moisture dry, but come back before it’s completely dry and immovable.
Hope this helps anyone looking to do this in the future!
YoungHouseLove says
Wow- thanks for sharing all the tips Steph!
xo,
s
Barbara says
Well, it looks like everyone said the same thing I was going to say except that I used a bigger squeegee than Ikea gave me and it helps. Lots of fluid, warm windows and a big squeegee.
Paula says
All the changes you made in the mudroom/laundry room are great!! I recently watched a show on HGTV where they did a similar process on a door, but the designer left about an inch or two around the outer edge. It was a nice look.
I’ve gone back and read all your archived posts, and noticed the use of “Eh?” a lot. It caught my attention because I’m from the UP(upper Peninsula)of Michigan and we get teased for using that slang all the time. People think we’re Canadian! Just thought it was funny!
I also love Burger, he reminds me so much of our own “child” dog, Macie. She is a 5 year old very spoiled Cockapoo!
Keep up the great blog and work!!
Jessica says
Do you guys (or anyone else) have tips on frosting glass that is not totally flat? Our front door has thin vertical panes of glass that have like some sort of metal framing around the inside (it drives me crazy because every time you shut the door it kind of vibrates). This might be hard to picture but basically this metal framing is on top of the glass therefore you cannot get a smooth finish if you apply frosting film to it. I have always wanted to frost the glass for privacy reasons but short of replacing the entire door I don’t know what else to do. I don’t have any experience with the spray frosting method (if there is such a thing…).
YoungHouseLove says
Hey Jessica,
A few commenters have said they’ve had luck with the spray frosting stuff so maybe try that?! Good luck!
xo,
s
Robin says
I like how you propped up the ironing board to block the view of the dryer vent hose. It appears to be a cute fabric on the ironing board, too. LIttle things like that make such a difference, don’t they? Anyhow, everything is really looking great. Love your energy!!