Laundry room update? Don’t mind if I do. To jog your memory, so far we’ve replaced the washer/dryer, taken down window shutters & cluttered shelves along with frosting the door (all here), filled some ceiling cracks, and painted the room the same color (Benjamin Moore’s Sesame) as the kitchen. And voila, we’re all up to speed.
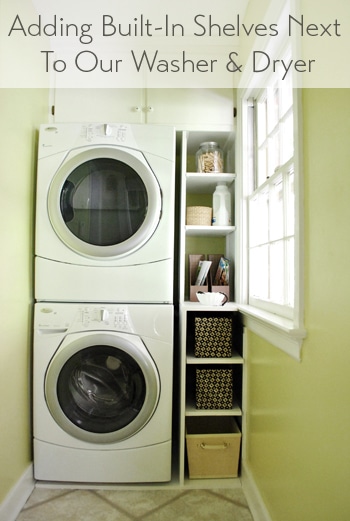
Well, if you really want to be up to speed, now it looks like this:
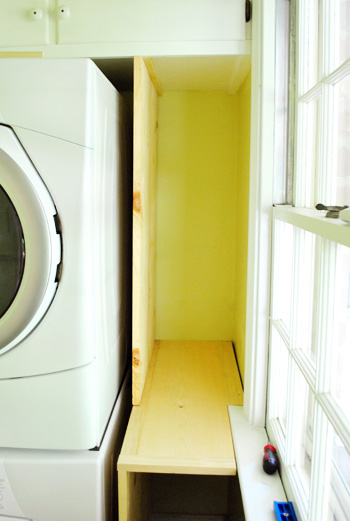
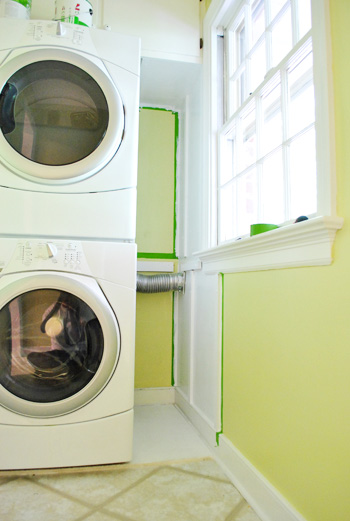
But let’s back up so I can blather on about how those shelves came to be. Even during our initial walk-through of this house we decided to maximize that sliver of space with some built-ins to add a lot more function.
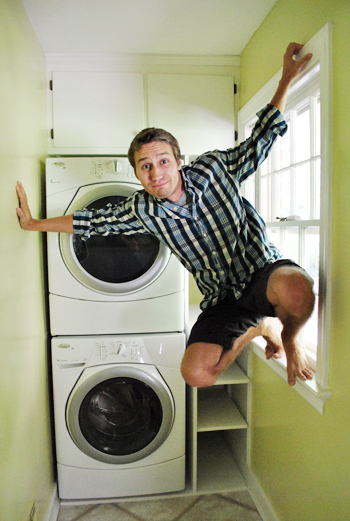
Did we mention the room is just 3.5′ wide? That means the washer and dryer doors wouldn’t even open if they were placed on the other wall under the window or fuse box. So if anyone’s still having trouble getting how narrow this space is, I broke out my spider monkey skills (and crazy toes) to demonstrate. Don’t try this at home, kids.
Since the room is so skinny, we knew adding that vertical storage next to the washer would be key (we can’t really go “out” for fear of bashing into fold-out shelving or counters or drying racks – so we might as well go “up” instead!). Speaking of up, since the built-in cabinets above the dryer are completely out of Sherry’s reach (poor thing, but at least she can reach the dryer buttons), more accessible storage was just the thing. And since no ready-made bookshelf skinny enough to fit into that 14.5″ gap won us over (they were all too shallow to allow us to take full advantage of the nook), we opted to build something instead. It certainly couldn’t be harder than the behemoth console that we built, right?
Wrong.
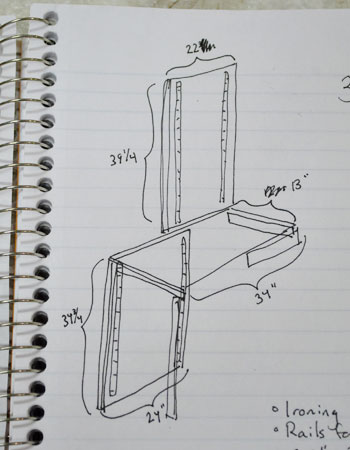
Just kidding. It definitely was easier. So here’s a quick-ish recap of how it went down. First I measured the space and marked up a little sketch that I did with a few measurements. I’ll pause while you marvel at my technical drawing skills.
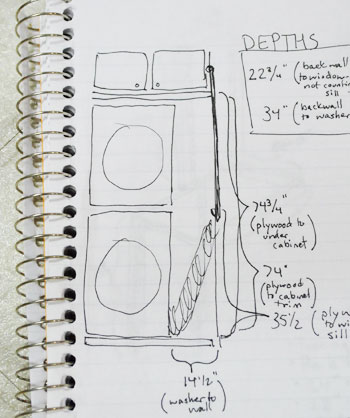
After much consideration, we opted to use the right wall (with the window on it) as side #1 of the bookshelf and to build a vertical divider of sorts to be side #2. We wanted the whole thing to be as deep as the appliances, but then it would partially cover the window. So instead we’re decided to split it. The bottom half would be washer-depth and the top-half (above the window sill) would be window-depth. Confusing, I know. And I’m sure this drawing below (which helped me determined wood cuts) doesn’t help. But here it is anyways. Enjoy!
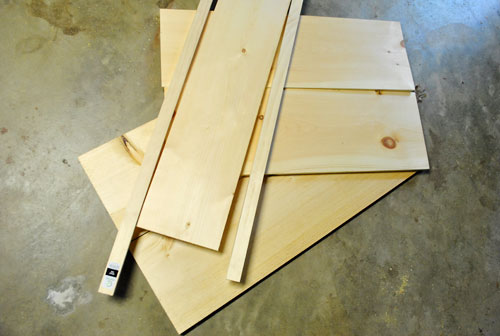
I got the guys at Home Depot to make most of my cuts, so here’s the bulk of my wood pile by the time I got home. We used whitewood with 1 x 2″ poplar boards mixed in (since they don’t sell whitewood planks that thin) just like the console. Also like the console, I’d be screwing two 1 x 12″ boards side-by-side to get a wider board for the bottom and top portions of my vertical divider. And then a 1 x 10″ trimmed with 1 x 2″s for the middle shelf that would connect the two divider halves. Not pictured, nor sketched above, are some more 1 x 12″ boards for my shelves and some miscellaneous 1 x 2″s for trim.
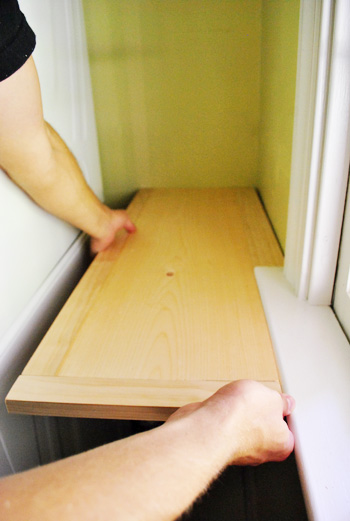
The middle shelf would sit flush with the window sill, so I cut and attached the 1 x 2″ trim pieces so it’d leave a sill-sized notch. Here I am testing the placement, which fortunately worked out really well.
Then I screwed bottom half of the divider directly into the “floor “(which is actually a piece of plywood that runs under the appliances for extra stability – more on that here) and into the middle shelf using my Kreg jig. It hung over the plywood a bit (I forgot to calculate the added trim on the middle shelf when cutting my board) but I solved that later with another piece of 1 x 2″ trim on the floor to finish things off.
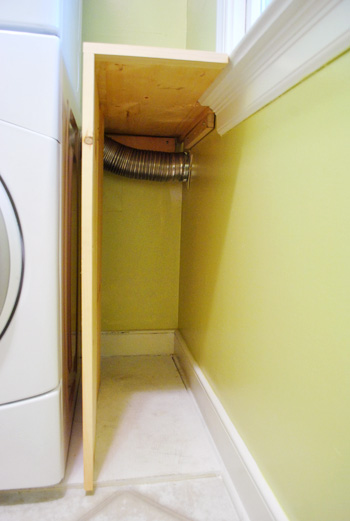
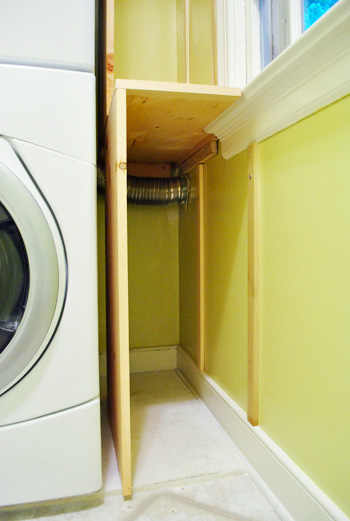
You can see above that I screwed in a couple of pieces of wood on the back and side walls for the middle shelf to rest on. That’s because the vertical divider doesn’t go all the way back to the wall (to leave some access to the washer and the dryer duct).
Speaking of which, I updated our old aluminum-foil-ish dryer duct to a safer rigid all-aluminum version from Lowe’s (since we hear they’re less of a fire hazard). It was an easy switch (remove the other guy, clamp new new one in place with metal clamps and metal wall piece, that’s it).
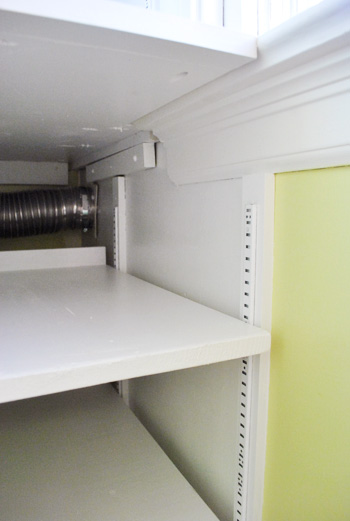
Here’s the top divider now attached, just like the bottom guy. Notice how he’s set back to be even with the window? Is this making more sense now? It’s sort of a two-tiered profile so it uses all of the depth that we can use without oddly overlapping the window.
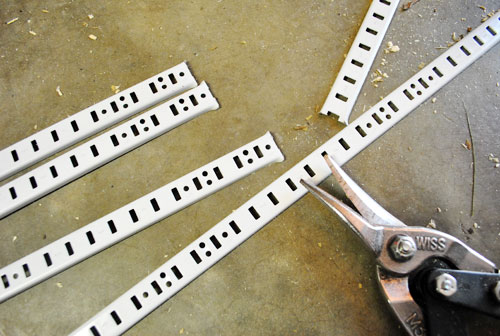
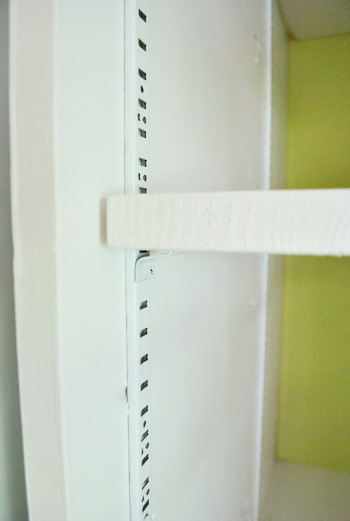
As for the rest of the shelves, we wanted them to be adjustable and removable. Adjustable because, well, sometimes you want to adjust your shelves dagnabbit. Removable because it’ll help us gain access to the back of the washer/dryer if need be. So I purchased four 6ft lengths of metal shelf tracks at Home Depot (the same kind that we have in our built-ins and master closet) and snipped them with metal cutters to the right lengths.
The space between the divider and the wall was shaping up to be a smidge wider than my 1 x 12″ shelf pieces, so I added some additional 1 x 2s to bridge the gap. In the long run, I think this actually make the metal tracks more secure (since otherwise they’d just be nailed into drywall). So maybe a happy accident?
A not so happy accident? Realizing at this point that it’d be very difficult to paint all of the wood in place. So out it all came so we could access everything more easily. The good news is that it was pretty quick and easy to take out, which will be appreciated if ever it has to come out for some serious appliance maintenance.
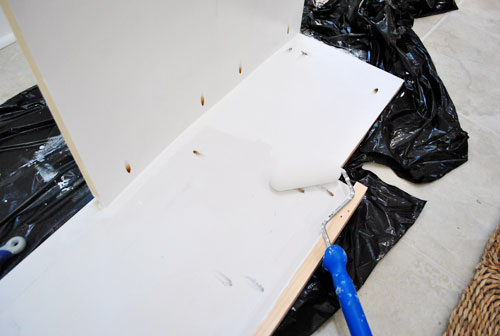
In the sunroom (the laundry room is waaay too small to attempt to paint these big pieces) we applied two quick coats of primer (Kilz No-VOC) followed by two coats of white paint (Olympic Premium No-VOC semi-gloss off-the-shelf white paint) on all of the framing for the built-ins to make sure we were getting our whitest white without any wood bleed going on. But after lazily painting the shelves with just two coats of paint the next day (no primer) we realized we probably would’ve been fine without primer on the framing too. Oh well. It certainly didn’t hurt.
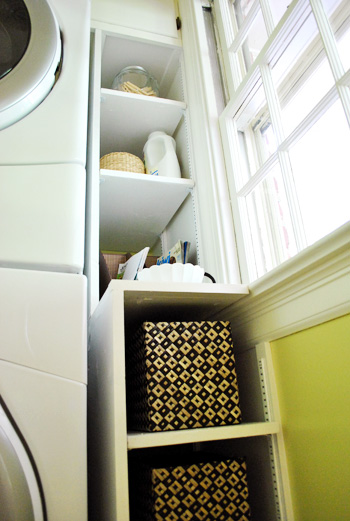
Oh, and we also painted that side wall on the right white (to make it look more like it was part of the bookshelf). But we left the back alone for a shot of color that would be seen through the shelves.
Then I reinstalled everything, nailed in my metal shelf tracks, added the clips, and took them for a spin.
On the bottom half I also added a little lip at the back of the shelf since, unlike the top, they don’t go all the way to the wall. This will hopefully prevent things from sliding off and getting lost back in there. But if something does sneak back there over the lip somehow, we can still easily retrieve it thanks to the shelves being removable.
But enough “how we built it” mumbo jumbo. Let’s check out the finished product:
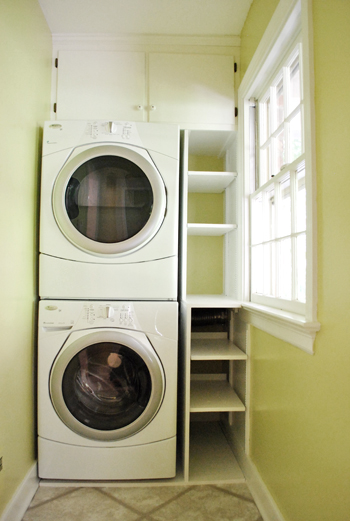
That 2″ gap between the appliances and the shelf was intentional so that when the washer starts a-rockin’ things on the shelves don’t start a-knockin’ (if you know what I mean). Actually, that’s literally what I mean. It’s not a euphemism.
Admittedly she’s not the prettiest thing in the world when she’s empty (I think I would’ve preferred the look of fixed all-the-same-size shelves). But the function of adjustable shelving made a lot more sense, and we can now store something small and something tall without worrying that things won’t fit.
And there’s no denying that we’ve gained a lot of usable storage space when it comes to the max-depth that we worked hard to obtain. We haven’t quite figured out all that we’ll put here (besides the obvious detergent, iron, etc – maybe a basket that can be used for winter gloves & scarves and a larger one for flip flops and sandals). Just for fun Sherry went ahead and fancied it up a bit with some – you guessed it – baskets.
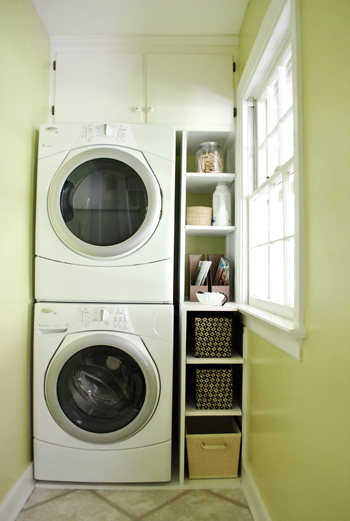
Along with a few other things we already had (magazine files, a scalloped bowl, a jar full of clothespins, etc).
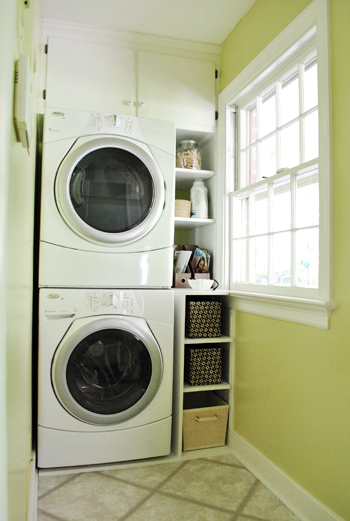
We’re toying with the idea of this becoming our new drop spot for mail, coupons, and other miscellany. So maybe it’ll look like this in the long run?

As for the cost on this one, it definitely was more than if we’d gone with a not-quite-right existing solution (like this narrower, shallower version from Ikea). But we totally think it was worth getting something that looks more seamless and really makes the most of the space (so we can use the full width and depth and adjust the shelves to customize it even further whenever need be). Here’s the ol’ budget breakdown:
- Wood (from Home Depot & Lowe’s): $59
- Metal shelf tracks & shelf clips (from Home Depot): $15
- Primer & paint (Kilz No-VOC primer & Olympic No-VOC paint): already owned
- Baskets, magazine files, the bowl, etc: already owned
- TOTAL: $74
Oh, and the aluminum dryer transition duct was $10 from Lowe’s.
If you’re searching around for more ideas for making shelves yourself or adding vertical storage, this post is full of 16 ideas for adding shelving.
As for our laundry room to-do list, these days it’s looking more like this:
Paint the odd brown quarter round near the baseboards glossy white
Redo all the dinged up trim (also in semi-gloss white)Paint the wallsReplace our dryer hose with a safer all-metal oneAdd adjustable built-in shelving in that nook next to the stacked washer & dryer- Replace the hinges and knobs on the upper cabinetry
- Get a new light fixture <- DIY something? maybe a small chandelier?
- Add a window treatment (maybe a homemade one?)
- Add other functional storage near the door for shoes, Burger’s leash, etc
- Hang some art to keep it cheerful and obscure the giant metal fuse box
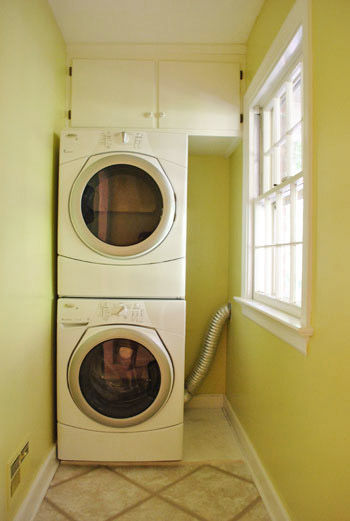
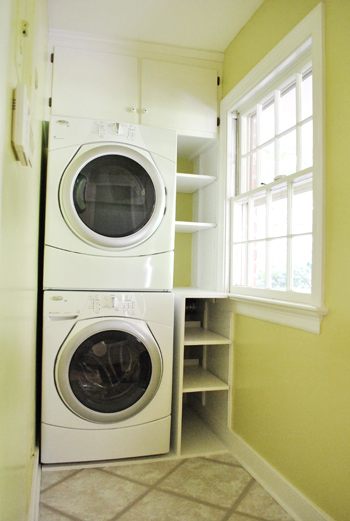
Even though we’re only about halfway through, we’re feeling pretty good that in the past few weeks, this space has already gone from this…
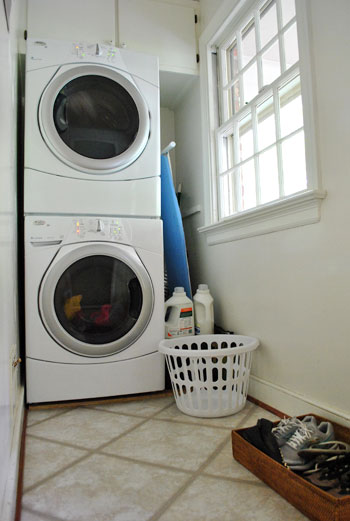
…to this:
As for where we’ll store the ironing board- we have a plan for that. More details to come after we tackle it (we wanna make sure it works first, haha). In the meantime we’d love to hear what storage solution you’re loving (or lusting after) in your laundry space. Got some sweet cabinets or drawers? A cool collapsible drying rack or ironing board? Your very own laundry sink? We know there are some pimped out laundry rooms out there, so let’s hear it.

Kristen @ Popcorn on the Stove says
Ah! This looks awesome! The shelves make the room look so much nicer. You cal also add a runner to help make the room feel cozy (I just like having rugs under my toes at all times, especially when it’s cold out).
YoungHouseLove says
Oh yeah that’s an idea! We just have to find something thin enough not to get all jammed up when the side door opens.
xo,
s
Amanda says
Check out FLOR. I know you’re familiar with it as you used it in your old home’s basement, so this is just a friendly reminder sent your way :)
YoungHouseLove says
Oh yeah- that stuff does lie pretty close to the ground! Great idea!
xo,
s
Ashley @ DesignBuildLove.co says
Totally diggin’ the runner idea!!!! They totally warm up the space and give the toesies all kinds of love! :) The shelves are a perfect addition to the space and now you guys totally have the proper space for the oh-so-important Burger’s leash!!! :)
Nicely done guys!!!
And I saw the alarm panel in the side of two of the pics and had to do a double-take to make sure that you guys didn’t sneak in some art work to cover the breaker panel!!! Can’t wait to see the laundry room “decor!”
Denise says
Looks great & perfectly organized…as usual!
Krysta @ Domestic for Dummies says
Love it so so much! Great job guys!
Erin says
Looks great! It’s so neat how the color of the walls changes that much day-to-day! It’s like a fun little surprise each morning.
Naomi says
This is probably my favortie project reveal so far! I LOVE IT! That shelf is the coolest. I wish I had a skinny laundry room now!
ALittleBite says
It looks great! I love that you didn’t paint the back of the shelves white!
marianne says
LOVE IT! Where does the ironing board live now?
YoungHouseLove says
We’ve got a plan for that. More details as we tackle it!
xo,
s
Mjb says
Where did you put the ironing board and laundry baskets?
YoungHouseLove says
We’ve got a plan for those! More details as we get to those projects!
xo,
s
heather s. says
That was my first thought as well. Since the laundry room doesn’t look large enough to even iron in I’d put the ironing board in the master bedroom closet since that’s where I’d likely iron. I am definitely curious to see where the basket goes – my guess is you got a collapsible basket or something similar. ;)
annabelvita says
Oh man it looks amazing. Right now, I live in a teeny flat. I’m lucky that we have a washing machine, but…. it’s in our living room (we have a kitchen-sitting-room-dining-room-office where we spend all our time when we’re not sleeping or bathing and the spin cycle is NOISY, plus then we have to drape everything over ropey old clothes horses to dry it and… argh. You get the picture, I’d love a laundry room. Ha.
Those shelves are really smart too, shows how building your own furniture isn’t just about saving money, it’s also about getting something totally perfect for the space. Good work!
annabelvita says
Also, I spent ages looking for the “a scalloped bow” (sounded pretty!) before working out you meant that cute scalloped bowl :)
YoungHouseLove says
Oh man- sorry about that. Fixed!
xo,
s
Shary says
Everything looks great! Where do you put your ironing board now?
YoungHouseLove says
We’ve got a plan for that! More details as we get to it!
xo,
s
Rebecca says
Have you seen what Sarah Richardson did to hide the fuse box on season 1 of Sarah’s House? She attached a piano hinge to the side of a frame and hung the artwork over the fuse box but the fuse box was still easily accessible.
http://pinterest.com/pin/42337331/
YoungHouseLove says
Yes- she’s brilliant!
xo,
s
Melissa says
Looks GREAT! I love the laundry built-ins. I’ve toyed with doing some in our laundry room – cabinets above and open storage below. Here’s ours now – http://houseography.blogspot.com/2011/05/putting-some-spin-on-laundry-room.html
We also have the wall mounted ironing board but behind the door in our master. It’s awesome. We iron our clothes so much more often now. I love it in the master since I never iron immediately after washing – just before wearing! http://houseography.blogspot.com/2010/09/making-dreaded-chore-soooo-much-easier.html
Kristen says
Pretty!!! Love the ironing board solution!
Lani @ Diapers and Divas says
$74 bucks still ain’t bad for something that’s totally custom and fits your needs entirely! I love it! It looks great!
Kelly says
Looks awesome! This is exactly what I need to do in a similarly narrow space in our kitchen, but I’m intimidated by removing the nonworking radiator and working with plaster walls.
bridget b. says
does your dryer have two positions for the duct? in the first picture, it looks like the duct comes from the bottom of the dryer up to the wall. but in the later pictures, it appears to go horizontally from near the top of the dryer to the wall?
i would like to rearrange my duct because it’s in the way of some storage bins in my laundry room, but i was nervous about crimping it too much.
YoungHouseLove says
It just has one position, but the old vent was long and floppy (and apparently a fire hazard) so we switched it out for an all aluminum one which was more rigid (and not at all floppy) so it didn’t swoop all the way down to the floor like the old one did. Hope it helps!
xo,
s
Ashley J says
You guys! This is ah-maziiiing! Our laundry room is an weirdly angled (a geometry lovers dream), robin’s egg blue mess with wires and pipes a’plenty and zero storage or organizational space. Oh, and a fab 80’s forest green gym floor. Man, I would just be satisfied with some Ikea bookshelves to put my laundry soap on. Sigh. To dream. :)
Tammy says
Ah this looks incredible! So warm and cheery… I’m inspired to “soften up” our laundry room now :)
Thanks for sharing
Ana says
My laundry closet is one of my upcoming projects. Once I find a pair of reasonably priced compact stackables, I’m going to build shelving to serve as a pantry as well as a storage area for pet supplies and laundry paraphernalia. I’m thinking of painting it either aqua or the same yellow as my Staub tea kettle.
Melanie says
Turned out great, and those adjustable shelves are going to make you love them in the long run.
My laundry room came with it’s very own little in-wall ironing board and sleever, all made out of wood and from the 50s. Um, love it. It’s so much nicer just having a cute little door in the wall than a big clunky ironing board hanging there. Usually, I use the big round iron (aka dryer), but when I do need to actually iron, it’s a nice perk.
Julia @ Chris loves Julia says
So cheery! It’s looking awesome. And, looks like you got your Christmas card photo, too (ahem John-the-monkey-man). Win. win. win.
YoungHouseLove says
Haha- if only Clara and Burger were in there hanging around too.
xo,
s
Amanda says
Looks fabulous as usual! I’m interested to see what you will do for a window treatment since the left side doesn’t leave much room for a hanging curtain – looking forward to the big reveal!
Crystal says
Love your custom shelves. They make the room look more finished. What did you do with your ironing board? I bought one of these cheap little ironing board/iron wall hangers and a pretty ironing board cover from etsy for my laundry room: http://theweekendhomemaker.com/wp-content/uploads/2011/07/ironingboard.jpg
YoungHouseLove says
We have a plan for ours- more details when we do it (wanna make sure it works out- haha).
xo,
s
Elizabeth says
Looks awesome!
Petra says
Looks wonderful! What are you planning to use the top shelves for, especially if you (Sherry) can’t reach to it?
YoungHouseLove says
Right now they’re where we house paint that we use all the time (ex: white semi-gloss trim paint) and things like bungees for the car- stuff I just ask John to get occasionally instead of everyday stuff.
xo,
s
Gina @ Running to the Kitchen says
Love the shelves. They make the room look much more “complete” and quite practical!
Kristina says
I just love how you guys take the time and effort to make every corner of your house fun and decorative…even a laundry room!
Alisa says
You guys just saved my sanity with this one! Our laundry room is bizarre. One side is the laundry, the other side is a “pantry” and there is only one wall shelf so the rest is just open floor. Nope, you’re not missing where it all starts to make sense-it just doesn’t. I was thinking about getting a bookcase and trying to make it match the one that’s already built in but I think this is actually a far better solution to our problem. Thank you!!!!!
Sara K says
wow John you got mad skills… it turned out ah-mazing.
Charles says
Agreed –
The “Kung-foo” is impressive here!
hannah says
nice. my laundry room used to be hideous- eighties wallpaper, nasty shelving and disgusting floor, painted plastic tile… is now a beautiful white beadboard with blue on the walls with grey laminate floors and grey ikea curtains (would link to pictures but I’m at work). the plastic tiles on the wall- when our daughter was a baby we put her baby tub in the sink there, worked out nice height wise, but all her pictures look like she’s bathing in some soviet era 1970’s bathroom…(so sorry to any soviets out there, only way i can think to describe it!) so nice to have a pretty place… now if I could only have the five foot long tub and five sheets of cement board moved out soon so I could maneuver my way around nicely (currently storage for the upstairs bathroom gut!) one project at a time :)
Jenni says
I love it!! I’m so jealous – our laundry room is in our unfinished basement and it’s nasty. Some day, maybe I’ll have one this pretty :)
Lynn says
Laundry is looking great! I have been neglecting my laundry room. IT’s 1/2 done. I have an awesome space with cabinets counter and kitchen sink on the left. BUT I did not have cabinets installed over the washer/dryer…the window on the adjoining wall would not allow SO….I’ve opted for opens shelves…to let the light in.
Any suggestions on what to use? My cabinets are white washed Birch.
YoungHouseLove says
Ikea has some awesomely affordable floating shelves. Hope it helps!
xo,
s
Monica says
You made a laundry room interesting! Bravo! Looks great…
Melissa says
No offense John, but in that photo you remind me of Chris Kattan’s Mr. Peepers from SNL! Sorry! :-)
YoungHouseLove says
I choose to take that as a compliment.
-John
Devon @ Green House, Good Life says
Yes!
Heather W says
Great use of space. What is hanging on the left side of the wall? Do you add a picture to the room. I noticed in a couple of the pics it is there and in some it isn’t. Is this decorative or a future reveal.
YoungHouseLove says
That’s actually one of our alarm keypads. Nothing decorative about it! Haha. But hopefully we’ll add some beauty to those walls soon!
xo,
s
Vanessa says
Looks great.
The laundry room solution I am hoping for is that (A)nothing ever gets dirty so I don’t have to do laundry or (B)that somehow these clothes figure out how to clean themselves.
Alas with a 4 year old, 10-month old and messy husband option A is not possible. Fingers crossed that somehow clothes can get themselves washed.
Ahhh…a girl can dream.
Angela says
Looks great! I am dying to make over our laundry/utility room, which doubles as the back side of a built-in bar. Currently, the heater and hot water heater are fully visible in all their hideous glory and some storage comes in the form of transplanted 60-year-old former kitchen cabinets. It’s all visible to anyone who has to walk through to get to our powder room. Because it’s so visible, I want to make it flow/coordinate with our Phillies theme in the family room. I may have to tap your genius for ideas when we’re ready to get cracking on it. ;)
DebInNYC says
The room looks great. I was thinking that you could use this idea to create a picture that turns into an ironing board. In the example on this site the picture hangs on the wall, but opens to a little dining table. Perhaps you could use your mad engineering skills to create the ironing board instead of the table! Seriously, how cool is that? :)
http://www.1designperday.com/2009/12/24/picture-frame-turns-into/
Best,
Deb
YoungHouseLove says
Holy cow that’s fancy! Unfortunately our room isn’t wide enough to accommodate a fold down ironing board. But it’s such a fun concept!
xo,
s
Melissa says
The one we have actually rotates about 45 degrees so it might actually work for you too.
YoungHouseLove says
Even fancier!
xo,
s
Emily says
I love that you’re tackling the laundry room! It’s been on our list for a while, as the appliances currently live in the garage. Here’s the weird thing, there’s an EMPTY mudroom that you have to go through to get to the garage. Pretty darn good place for a washer & dryer, huh? We cannot figure out what the room was used for by the previous owners. There are no shelves, no washer/dryer connections, nothing. It’s just a big empty blank box of a room.
The craziest thing of all, in my opinion, is that the washer & dryer connection are on the OTHER side of the wall, in the garage! Moving them shouldn’t be a problem for my handy hubby. (Disclaimer: my husband is experienced in these things, it’s a part of his job.)
You’ll definitely be getting reader redesign before & afters from us!
The shelves are FAB by the way. LOVE :) Is it bad that I suspected when I saw the first pic that Sherry had staged it? :-p
YoungHouseLove says
Ooh we’d love to see how that turns out! After pics for sure!
xo,
s
Lindsay says
I have a big blank room between my landing inside the house (where most would keep jackets and shoes) and my garage. It is about 8ft by 8ft. Right now, a big empty useless room. It has four doors on four walls (one to the house, one to the garage, one to the front yard, one to the back yard) and two windows (right next to the front yard door and back yard door). I can’t keep shoes and coats in there because it attracts quite a few critters. I have always been curious, what DID the previous owners use this room for?!?!? I have NO wall to put a washer and dryer on (and no hook-ups). It is just so random!!!
Jenn says
Haha. You’re not in Arizona are you? I have relatives there who had the builder put the laundry hookups in the garage so they could use the laundry room as a craft room instead. I’m pretty sure they sold the place…
Rachel Tatem says
That’s great! When my husband and I redid our kitchen we too our old cabinets and put them in our wash room for storage. I love having a place to put everything!
Ruth says
uhhh, if you guys didn’t already *have* a blog alias, I would definitely have suggested “something small and something tall.” you wouldn’t have to tell people it derived from a description of laundry room shelving functionality!
YoungHouseLove says
Haha, I always thought High & Wide had a nice ring to it. Or Paint It White. Haha.
xo,
s
Jessica says
Looks great! I can’t help but wonder — where is it you all do your folding? Is there space to put some sort of folding station?
I also wanted to show you something I am pretty proud of. I bought that Richmond Typographic Map you two showed here back around the holidays — and FINALLY got around to framing it. I know, terrible picture (I shouldn’t have done it at 9pm ast night), but you get the gist. Did you all ever get yours up?
Pic here:
https://fbcdn-sphotos-a.akamaihd.net/hphotos-ak-ash4/269485_10100150781150416_25501805_45012746_5421964_n.jpg
Jessica from the Fan
YoungHouseLove says
Since moving here we’ve done folding on the bed or the sofa, so I think now that we’re in the habit we’ll keep to that (just because the room is so small that some fold down counter would cramp things so much and make us feel even more boxed in).
As for your art- amazing! Looks so goooood! We still have to frame ours. The shame.
xo,
s
Blair says
I love it when you can find the perfect solution to those awkward spaces. That certainly is a tight fit but I like how you staggered the wood to make it fit better. I had the same conundrum with my couch, it awkwardly bumps into the breakfast nook and I need a way to separate the two without taking up too much space, I ended up stacking some crates which was just enough of a barrier. Here’s how mine turned out: http://thefirstapartment.blogspot.com/2011/05/50-dollar-fix-side-bookshelf.html
Can’t wait to see your light fixture ideas, I’ve been drooling over some on pinterest!
~Blair
Tanya from Dans le Townhouse says
Looks great! So convenient for you to have some more storage space. Love the baskets!!
Reenie says
WOW….Looks great :)
Heather Adams says
“So maybe it’ll look like this in the long rung?” Nice, haha. Shelf humor.
Lovely project and lovely post, as always. :)
YoungHouseLove says
Oh man- how many typos can we squeeze in today? Haha. Glad this one applied though.
xo,
s
Amy says
Looks So great already, can’t wait to see what you do next.
You could always put the ironing board on the wall and have it fold down when needed.
Jennifer B. says
I was so confused about the scalloped “bow” that Sherry put there. I had to look at the picture to realize you meant “bowl”. haha!
Jennifer B.
YoungHouseLove says
So sorry! Fixed now.
xo,
s
Jessicah says
Laundry room looks awesome, I’m really liking the ‘grellow’ more and more! Also, I’m happy to know I’m not the only person in the world with monkey toes…and five points for an excellent use of dagnabbit. :)
Traci says
I’m faced with a similar “narrow space” configuration with my new home. The previous owners had side-by-side washer/dryers, but they encroached upon the entry into the bath, and while I love the idea of a stackable unit, I would hate to lose any of the beautiful bright daylight that pours through the similarly placed window. Seeing your shelving unit built around the window frame gives me a few ideas I may be able to use on my own home. :-)
Aya M says
Hey! This is looking great. Loving the colors and shelving. Hoping to tackle something similar myself this weekend.
On a different note…On behalf of a friend who’s looking into buying an older home, did you guys test for led-paint or asbestos yourselves, or was that something your inspector did for you? I know you can buy a test kit for radon gas or for led-paint on your furniture(I have those links to send them). But, I just wanted to know if you have any tips.
Thanks!
YoungHouseLove says
We know that buying an older house means there is likely some lead paint on the first layer of wall paint, but we also know that it’s only a risk if the paint is flaking or peeling and hasn’t been painted over and sealed (most homes have been painted over five times since lead paint was used so it’s all sealed and ok, whch was the case at both of our old homes). Of course at inspection we have the inspector note if he sees any flaking or peeling paint so we know what we’re dealing with (both this house and the last house had “none found”) and we get Clara tested for lead since we live in an older home (so far nothing has been found in her results- whew! – but we always want to check just to be on the safe side). As for asbestos, we had a questionable drop ceiling in the last house that we had tested (none found) but in this house everything is hardwood or tile or plaster or drywall- so we don’t really have anything to test if that makes sense. Hope it helps!
xo,
s