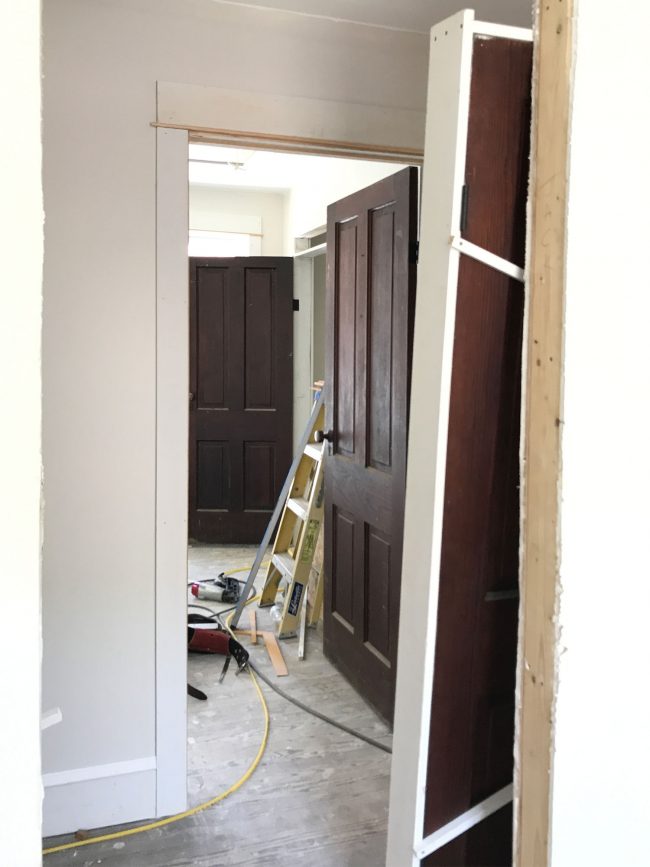
Compared to the last nine months of gradual progress on our beach house, it feels like things are moving at breakneck speed lately. So this post is one big smorgasbord of updates (but the good kind of smorgasbord, with exotic cheeses and chocolate fondue). Just like I consider this picture of the house’s foyer to be the good kind of messy.
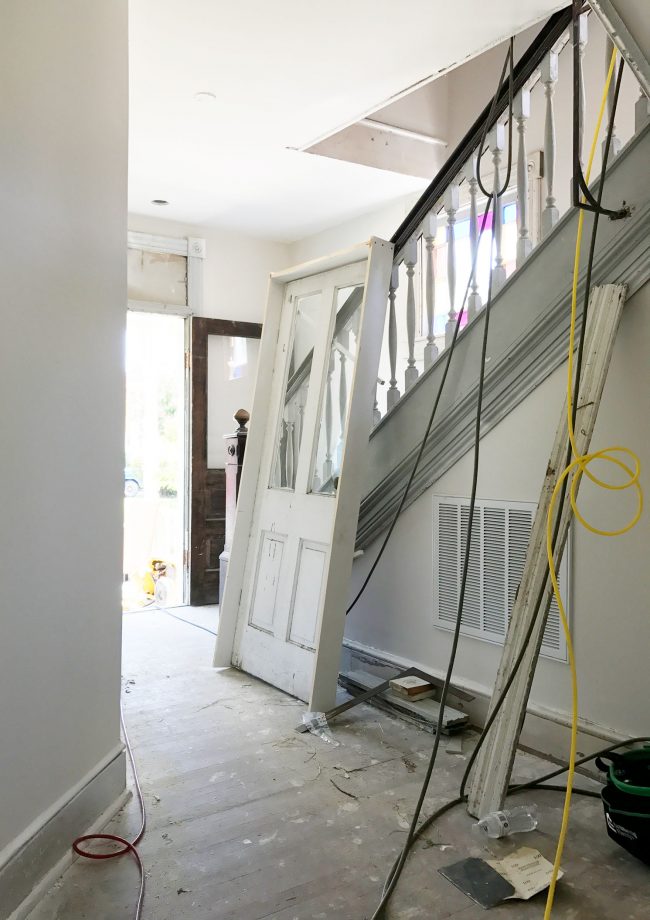
I guess practically anything is a good kind of mess compared to the actual mess we had at the start of this project. Memmm-ries….
I know, I know, those two photos don’t look all that different, but what you can’t see is the repaired not-collapsing foundation, the new not-leaking roof, the fresh not-rotting siding, all of the updated plumbing and electrical, an HVAC system that we can’t wait to fire up, and fresh drywall without any mold or cracks. It’s the little things.
The most comprehensive way to get caught up on everything is actually this video that Sherry shot last week. It’ll get you up to speed in no time. Well, not no time, but if you’ve spent as many hours tiling as we have lately, ten minutes should feel like a blink.
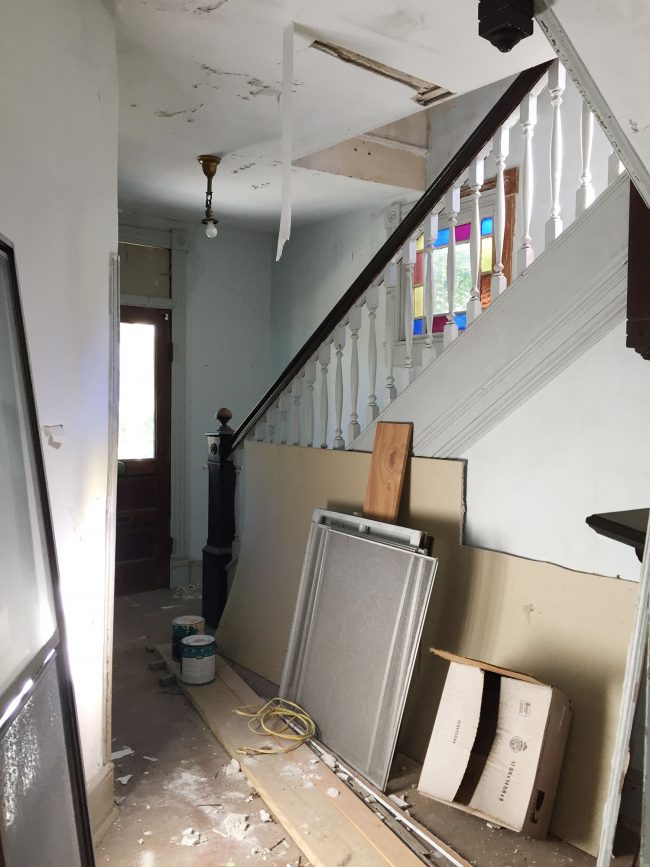
Something that has made a surprisingly big difference is the addition of trim and doors. Our contractor was actively installing them while we were there tiling, so it’s not complete in these pics, but you can already start to see how much more FINISHED the house is feeling with them.
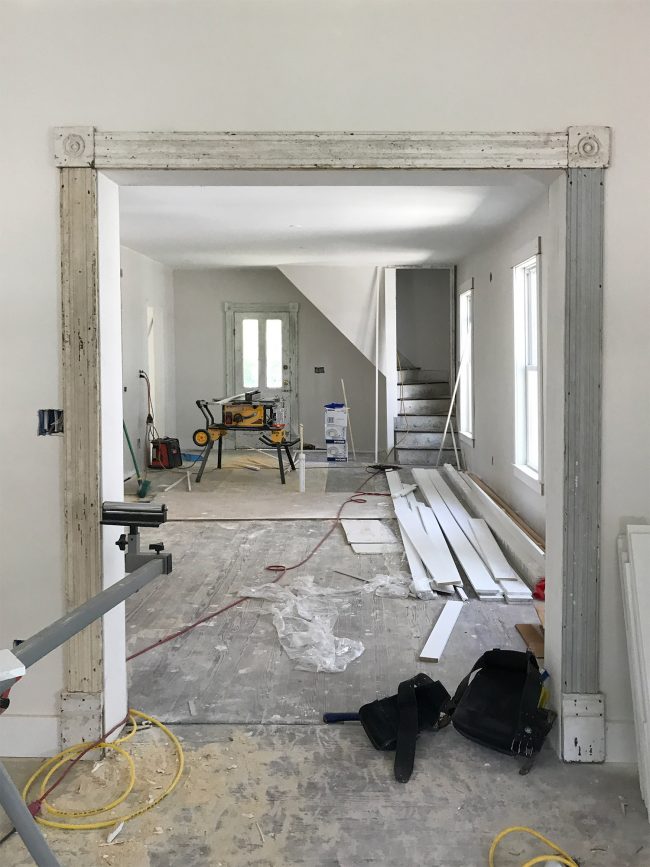
We saved as much of the original trim as possible during demo, but a fair amount of it was too rotten to use, so we couldn’t come close to outfitting the entire house with it. So we made some strategic choices to get the most impact – meaning we did the entire foyer and all of the doorways downstairs (along with the stained glass windows leading up the stairs) with original trim. Everything else got a simple, chunky trim treatment similar to what we’ve seen in other restored houses around town.
When we shared a sneak peek of the trim going up on Instagram, we got some questions about why it wasn’t primed and painted before it was hung – the answer is that our contractor preferred to hang things first and then paint afterwards since they have to caulk it all after it’s hung anyway and they weren’t sure which reclaimed trim pieces would be useful and which ones wouldn’t work/fit, so they didn’t want to paint all the possible pieces and then caulk and paint again – they’d rather hang them and then caulk and paint only the “winners” that made it onto the walls.
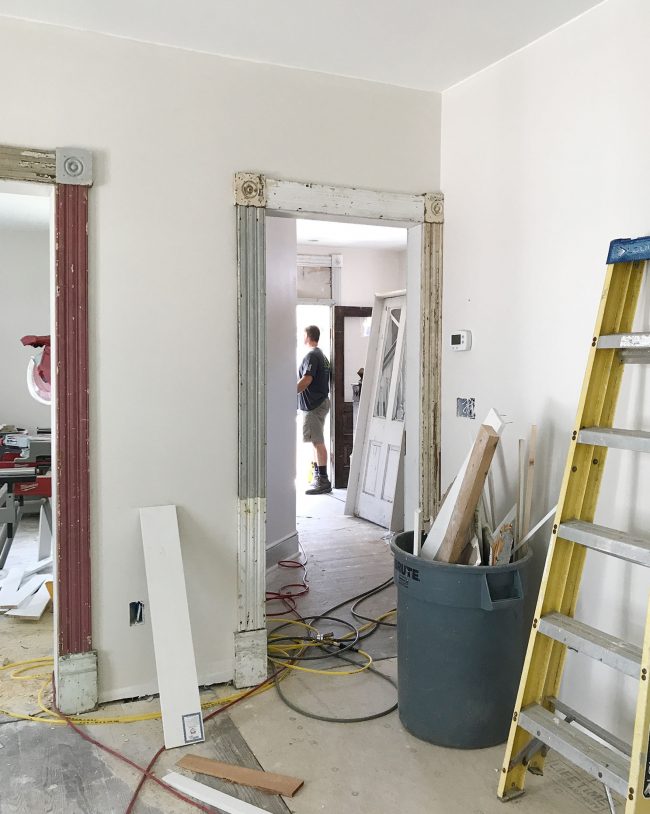
Also, it’s actually really fortuitous that they didn’t prime and paint everything white before it went back up, because seeing some of these muted colors on the trim – specifically the soft gray color on the front stairs and the pale blue-gray color around the doorway in the above photo made us second guess our original instinct to paint all of the trim white. I know, you’re shocked because our middle names could be “Bright White Trim” but it’s true. You can hear more about what we’re thinking in Sherry’s video, but we’re toying with color matching those two tones and using them in some spots around the house.
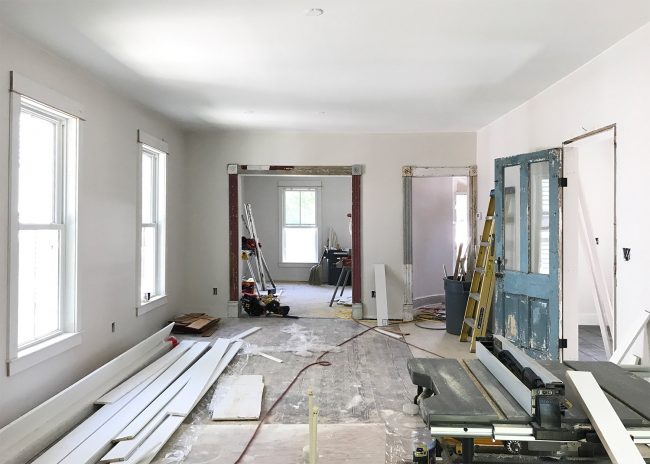
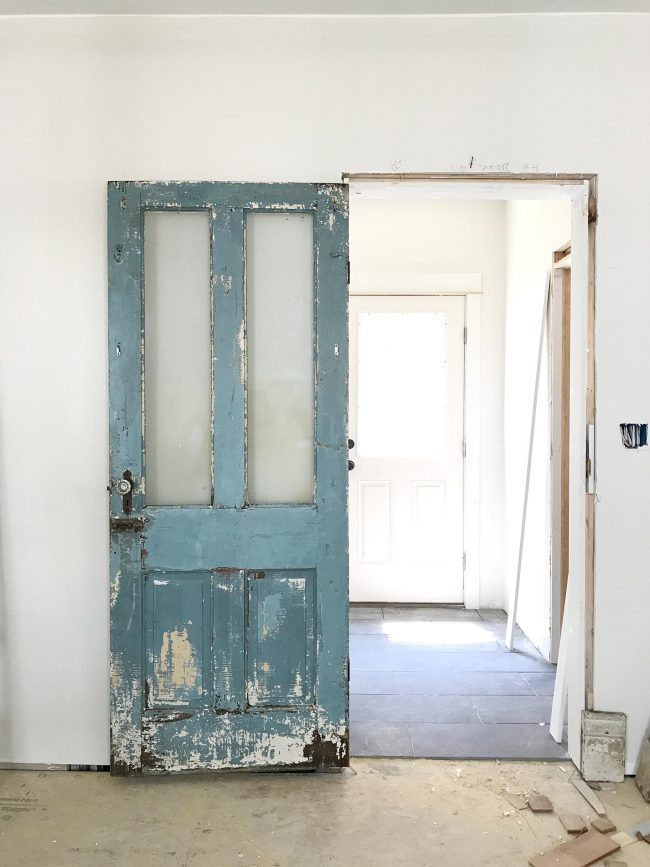
We also saved all of the original doors so they could be rehung. Even though it saved us the cost of new doors, it ended up being more expensive overall because our contractor had to build new jambs for each one (whereas new doors come pre-hung and can be slid into place faster). But it was well worth the expense for all of the original character they add. Our favorite is this chippy blue fellow that separates the mudroom and the kitchen/dining room. It’ll remain open most of the time (except for maybe when laundry is running in the mudroom) and we plan to just clean it up and clear coat it so that we can retain the worn, aged look without worrying about old paint chipping off.
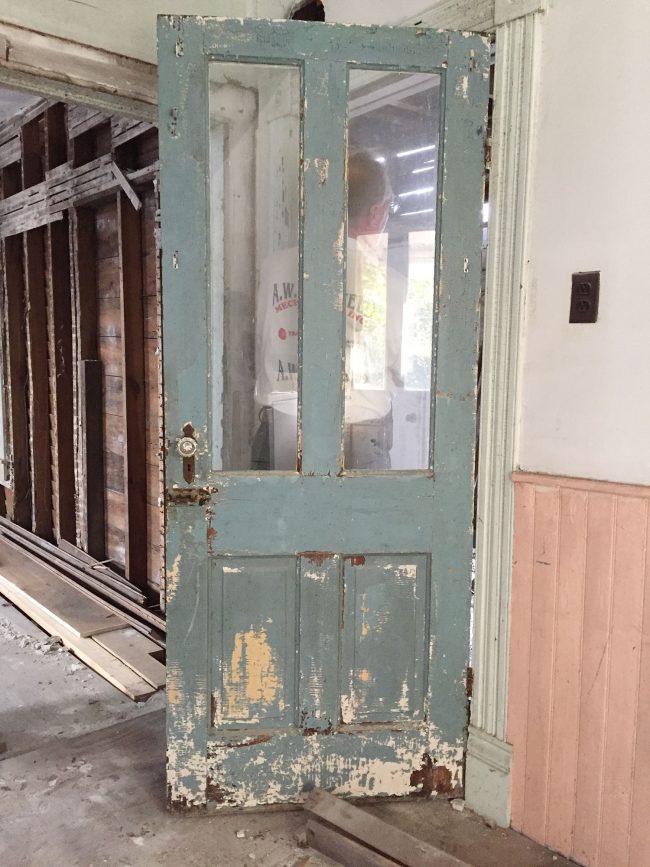
For reference, here it was in one of our “before” photos shortly after we bought the house. And it wasn’t until I uploaded this photo that I realized our HVAC guy was standing behind the glass. It’s from way back in the fall when we had him out to get a quote, ha!
Upstairs got all of the original wood doors that had hung up there before. This is the front bedroom, where we discovered that cool brick chimney behind the walls, which we also left exposed in the living room below it. Still gotta fix that hole, though.
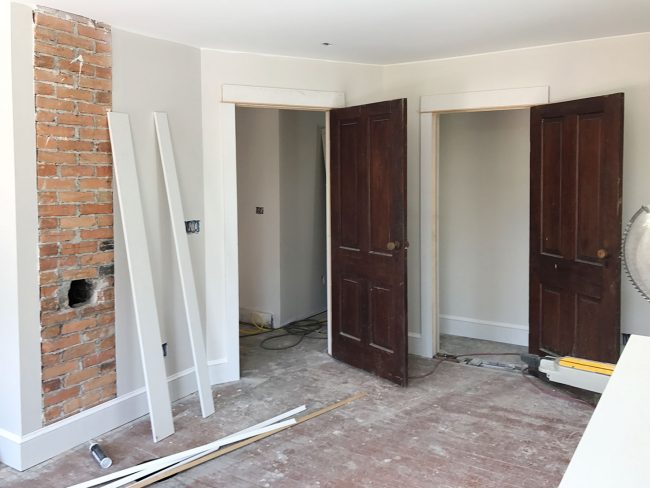
As Sherry says in the video, we’re having mixed feelings about the wood doors. We were very excited to hang them as-is, but they’re darker and more scratched than we remembered. And not in a cool weathered/old way, more of in an Edward-Scissorhands-was-trying-to-open-each-door kind of way. You can’t really see that in the pics, but the video above gives you a better view.
And since all of these dark doors will pretty much exist in the same windowless hallway, we’re starting to worry that they’ll feel gloomier than we intended (this photo below gives you a sense of what it might feel like). In an ideal world where money and time are no object, we’d sand each door down by hand and clear seal them to get them closer in color to the heart pine floors – but we might be working on that until we’re 92, so we have also tossed around ideas like painting them the same soft gray color as the foyer’s stairway trim. It could look really cool (all of the downstairs doors and some of the upstairs bathroom ones are already painted anyway), but we’re gonna let things come together more before making a final decision.
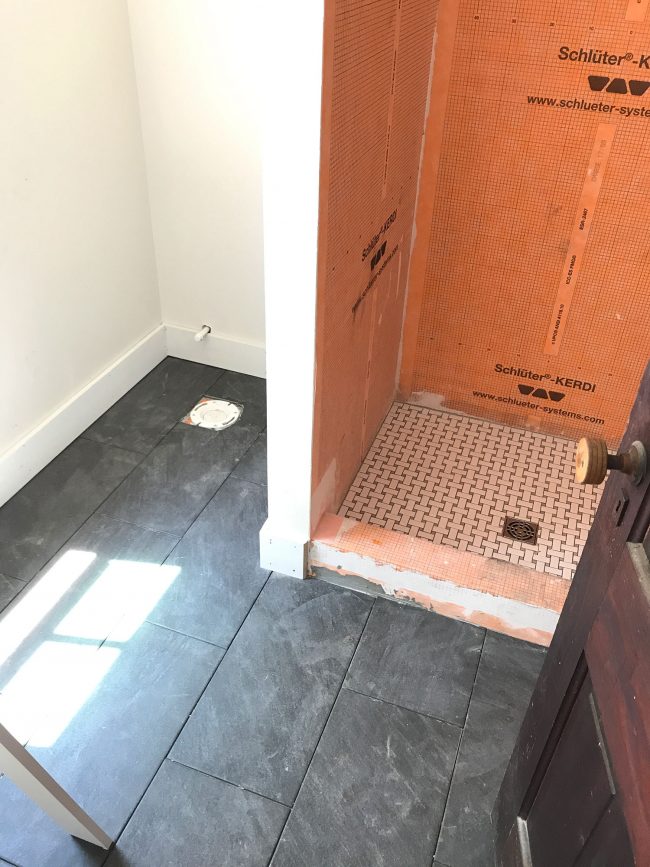
And lest you think the contractors are the only ones having all the fun, let’s get into what we’ve been up to. As you probably heard on Instagram, Facebook, and/or our podcast, we’ve been making some trips out there lately to lay tile. First we spent 19 solid hours across two days tiling four floors (three bathrooms and one attached mudroom) and we went again last week to tile all three shower pans. We still have three shower walls to tile and then we have to grout everything, but it definitely feels good to slowly chip away at one of our bigger line items (we’re saving over $12K by doing the tiling ourselves).
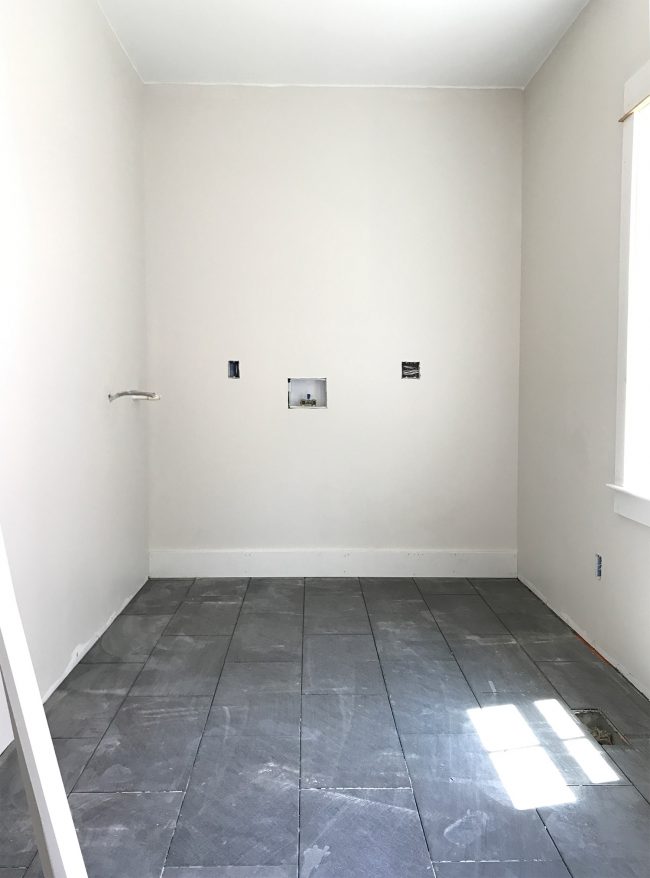
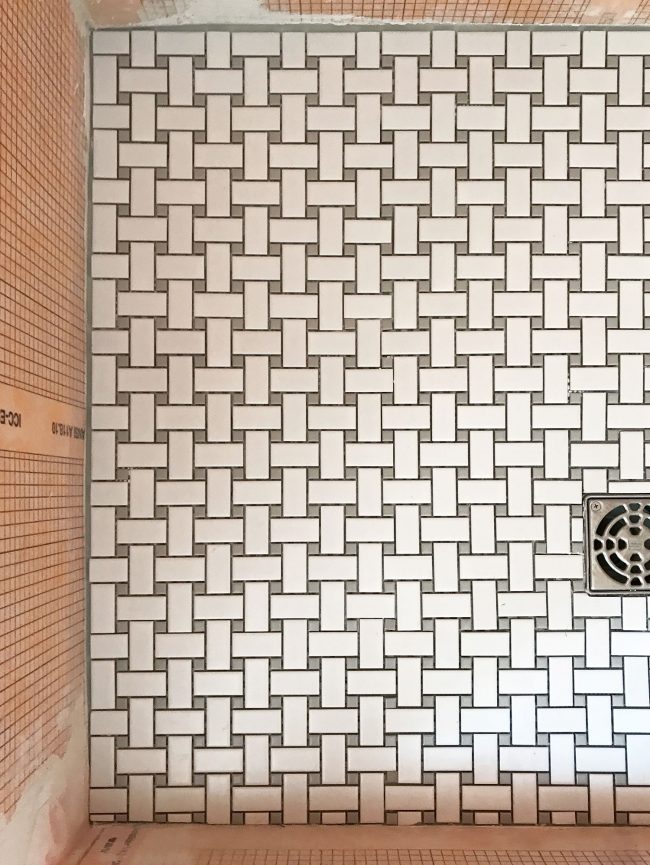
The shot above is the mudroom (nothing’s grouted and everything’s still VERY dusty) which extends into the downstairs full bath (seen below). We chose an affordable and durable slate-looking 12 x 24″ porcelain tile for the floor (this one from Lowe’s) and did the shower pan with a basketweave that we picked up at Floor & Decor (this one). The shower walls are just going to get an extra long white subway-ish tile that we also found at Lowe’s (this one).
We’re trying to keep the tile choices on the classic side, so they feel appropriate for an old house, but we’re still having some fun with them (like the blue asterisk/star/flower tiles we added in the master bathroom – more on that in a sec).
The upstairs hall bath is nearly identical in layout to the downstairs bath below it, but since it doesn’t get quite as much light, we wanted to avoid a super dark floor. This is another durable 12 x 24″ porcelain tile that almost has a concrete feeling. It’s a nice warm gray color, and once it’s grouted with a similarly toned grout it won’t have the high contrast lines that you see below. We kept the shower pan simple with white hex tile, since this is where our slightly “out there” patterned blue tile is going as an accent wall in the shower (you can see the inspiration pic of it in use that sold us on it here). That’s next on our install list and we’re so excited to see it go up!
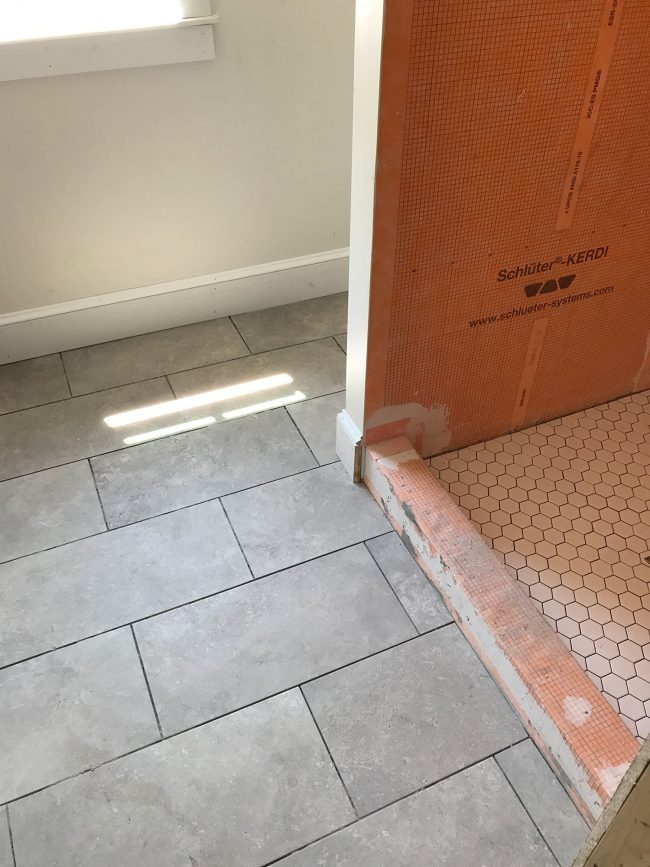
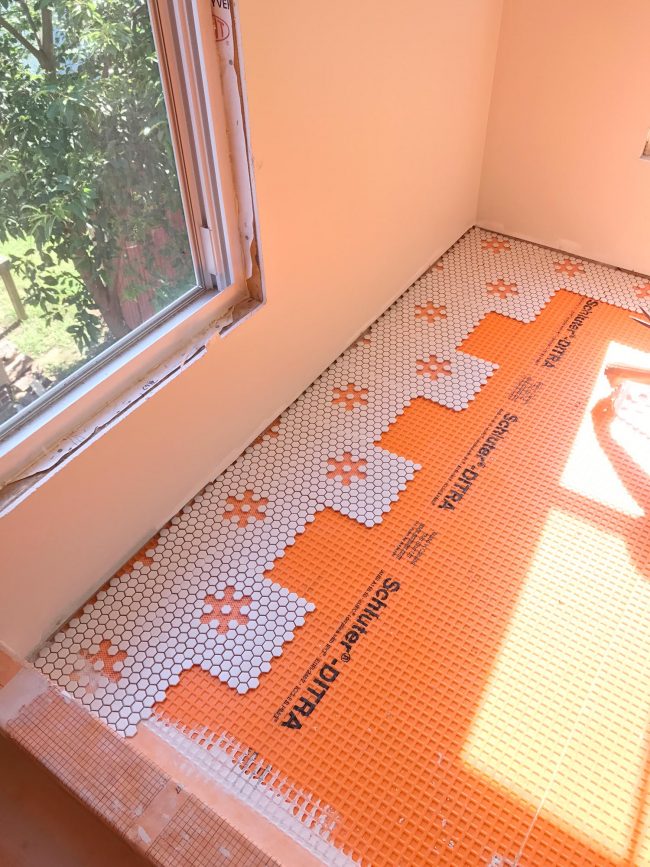
We were in such a time crunch to install all of this tile that we didn’t really stop to take a ton of process photos, but we’ve documented plenty of tiling projects before (floors, backsplashes, fireplace surrounds, shower walls). The main difference this time is the orange Schlueter system our contractor recommended in lieu of cement board (he swears by it, so we were game to give it a try), and we also used the new-to-us LASH system for spacing and leveling.
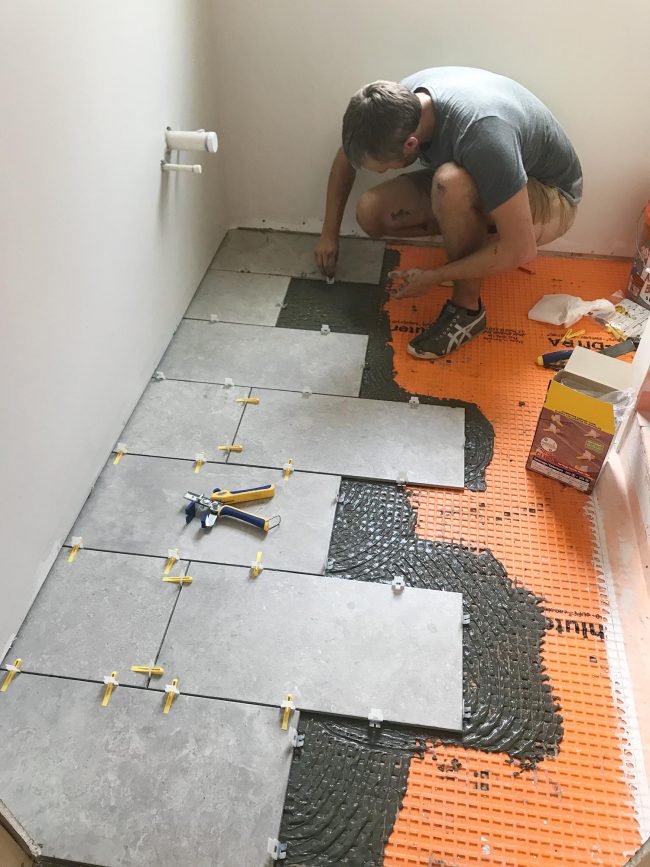
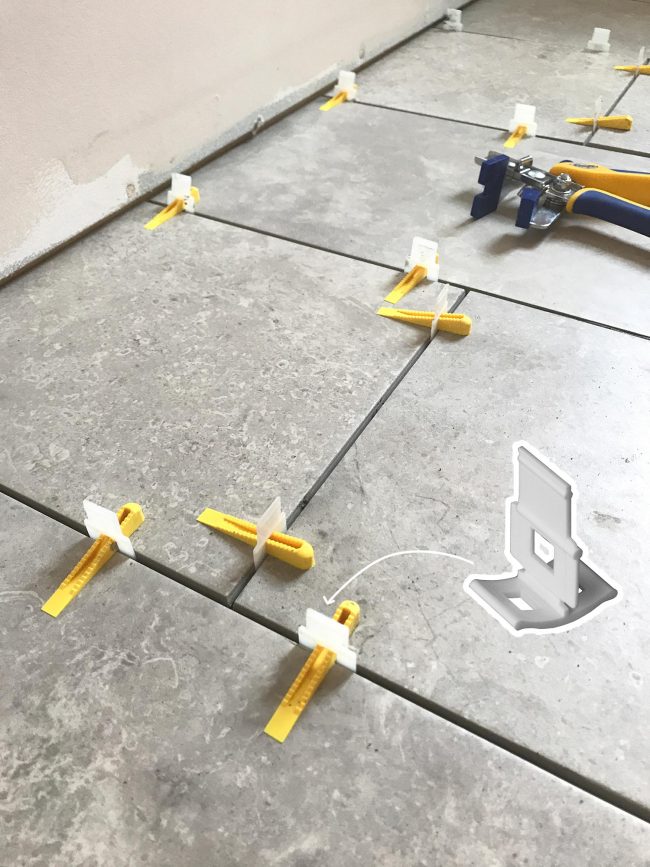
One of the hardest parts of installing the large format tiles in our sunroom was avoiding “lippage,” aka when adjacent tiles aren’t level and you get a visible (or toe-stubbable) lip. Adjusting tiles to be level burned up a lot of time on that sunroom project, so I was attracted to the LASH system as a way to eliminate that worry. The white plastic clips act as spacers between the tiles, but also go under the edge of each tile. Once the tiles are placed on each side of the clip, you shove the yellow wedge through the hole in the clip and it pushes the tiles to the exact same height. I highly recommend spending the $20 on the special pliers (seen in the background below) which spare your thumbs when tightening the wedges.
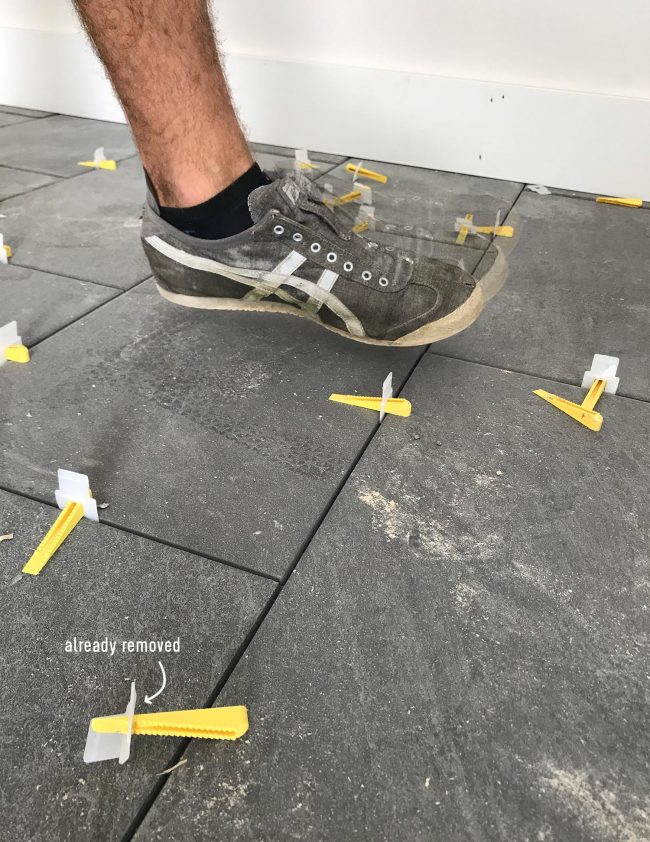
Once everything has set and dried (we did this at least 24 hours later), you just have to kick the clips with your foot swiftly and they snap off below the tile, so you’d never know they were ever there. It was actually really, really easy.
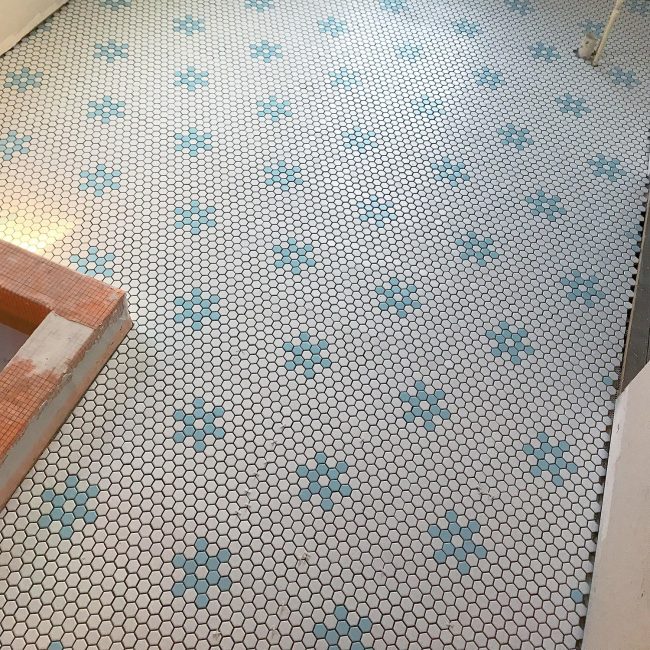
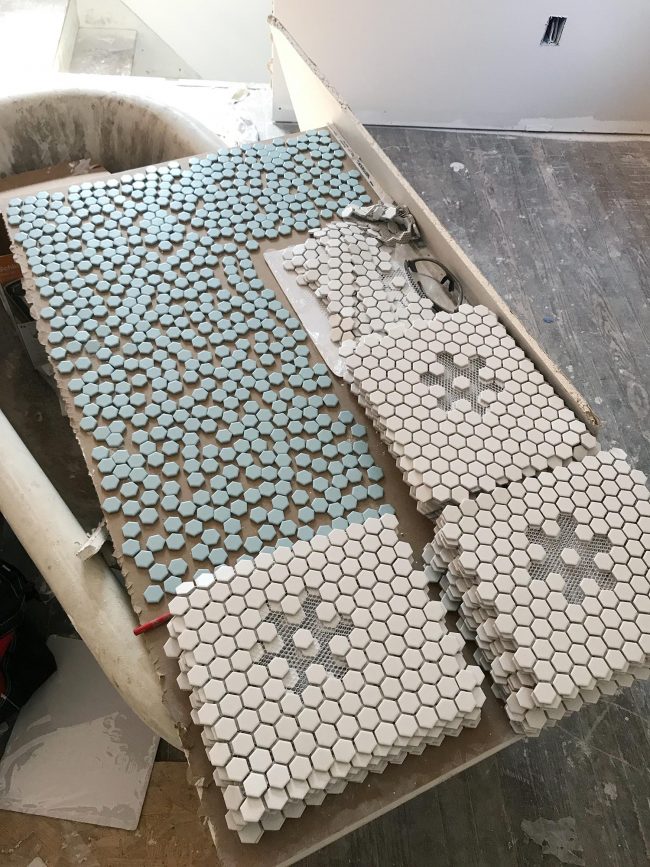
The most time-consuming part of our tiling to-do list was the upstairs master bathroom, where we went classic with a bit of a twist by laying these retro black & white hex sheets, but replacing the black flowers (or asterisks or stars or snowflakes, depending on who you ask) with these blue tiles.
Here’s a peek at our “prep table” – which is really just a clawfoot tub with a piece of drywall over it where Sherry systematically peeled off the black tiles from each sheet, and broke up the blue sheets into individual tiles for a quicker installation process.
Like with any tiling project, first we like to “dry fit” our layout so we can be certain that we like the spacing of everything before it’s stuck down. It was during this test that we realized we liked this staggered/offset pattern more than having the flowers in a perfect grid.
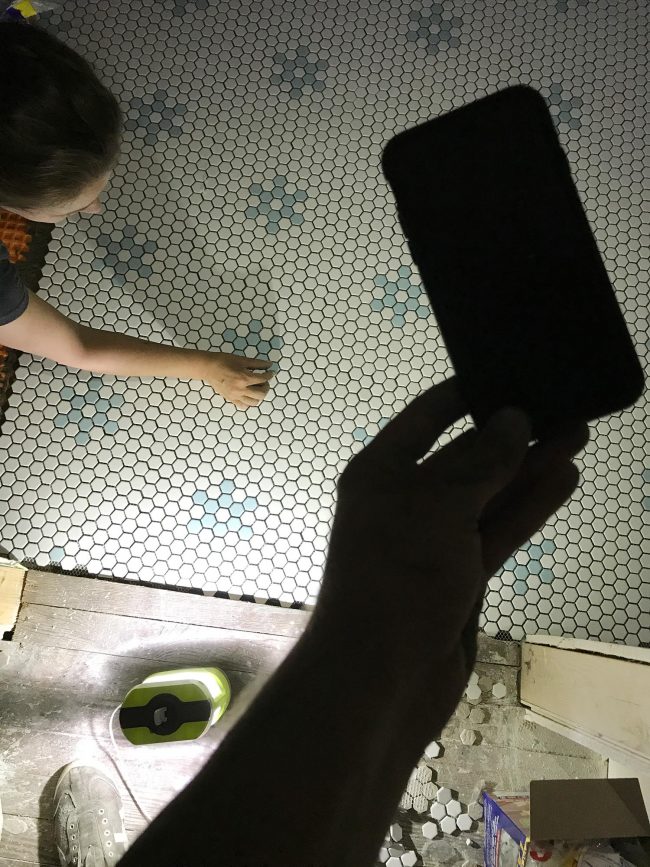
It took us much longer than we expected, hence us tiling until the sun set (with no power turned on in the house yet). So we resorted to this battery powered work-light and our iphone’s flashlights to double-check our spacing one last time before calling it a night and picking up where we left off the next morning.
And on our trip back last week, we continued the pattern into the shower pan as well. Since this shower will have a glass wall on one side, we thought it made sense to continue the pattern we had already laid on the rest of the floor (rather than have a random square in one corner with something that looked different or didn’t line up).
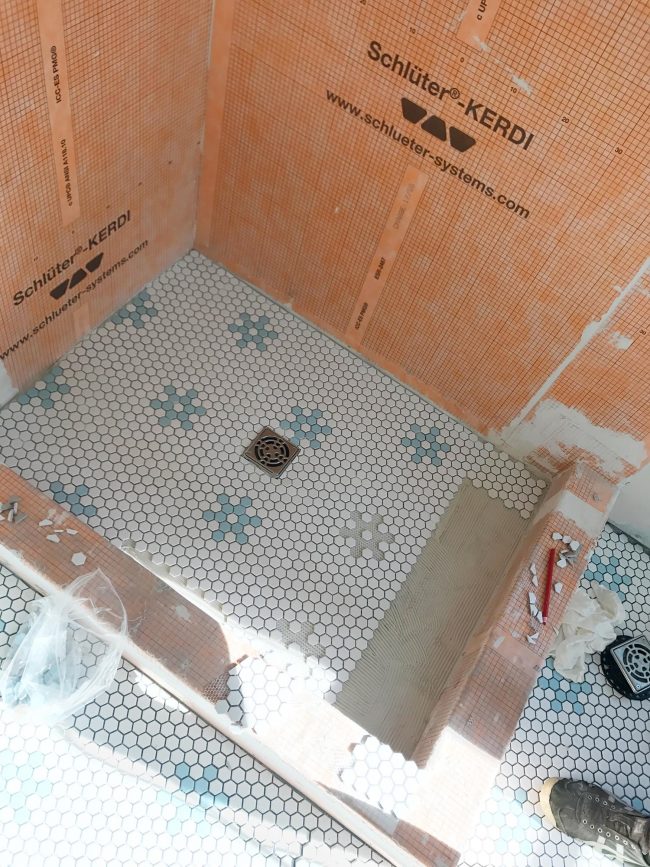
It was a bit of a headache to line the pattern up, but it all worked out nicely in the end. Once this is all grouted it’ll look even more finished. And once we tile the shower of course. Details!
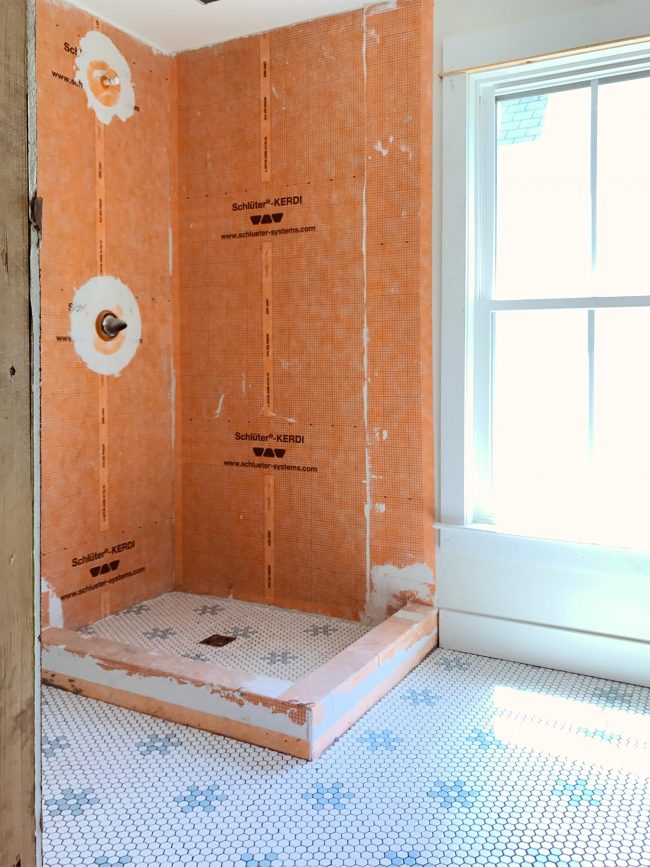
We’re hoping to head back sometime this week to start those shower walls (the master is getting the same long white subway-ish tile as downstairs) but at the pace things are going, who knows when we’ll complete them.
The last time we were there Sherry also squeezed in some “reconnaissance cleaning” of the original clawfoot tub. We didn’t have any cleaning supplies with us, but even with just some water and a sponge it revealed that everything seems to just be a surface stain – like some mineral deposits and lots of dust/dirt. Even that rust stain started to come off to reveal white cast iron goodness underneath it when she scrubbed.
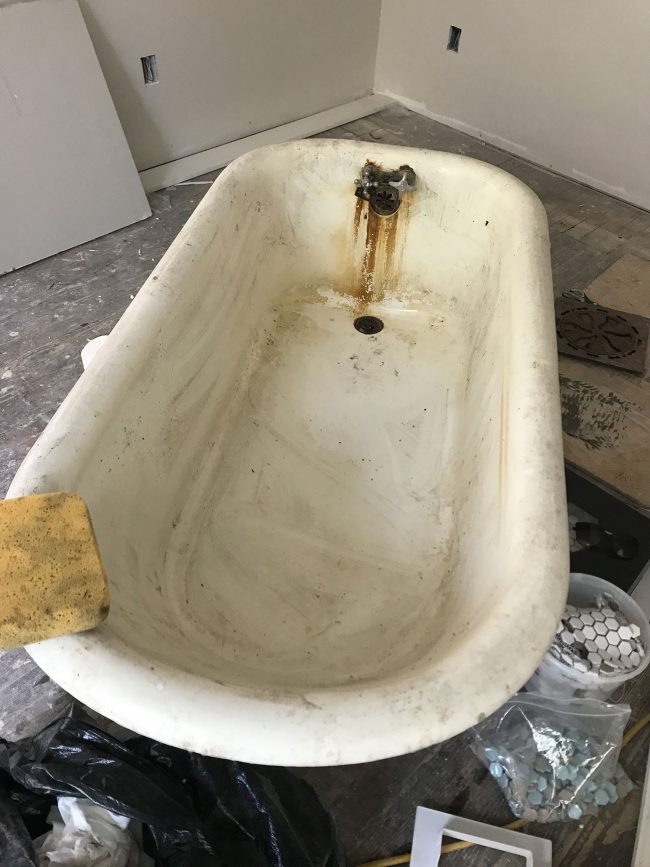
So we’re hoping that with a bit more elbow grease, we’ll be able to reuse this baby without having to have it reglazed (that is a coating that’s pretty durable but can scrape off over time – so restoring the original basin without needing to paint/glaze over it would be awesome). And as for the outside of the tub, you can just prime and paint it. Like this or this. Sherry can barely wait for that step.
And while we were there, the HVAC guy came and installed the A/C units outside so we’re just days away from being able to cool the house. Oh how we wish we had them a few weeks ago when we were tiling on a 90-degree day! But it’s feeling pretty awesome to have one more giant house to-do almost completely checked off the list.

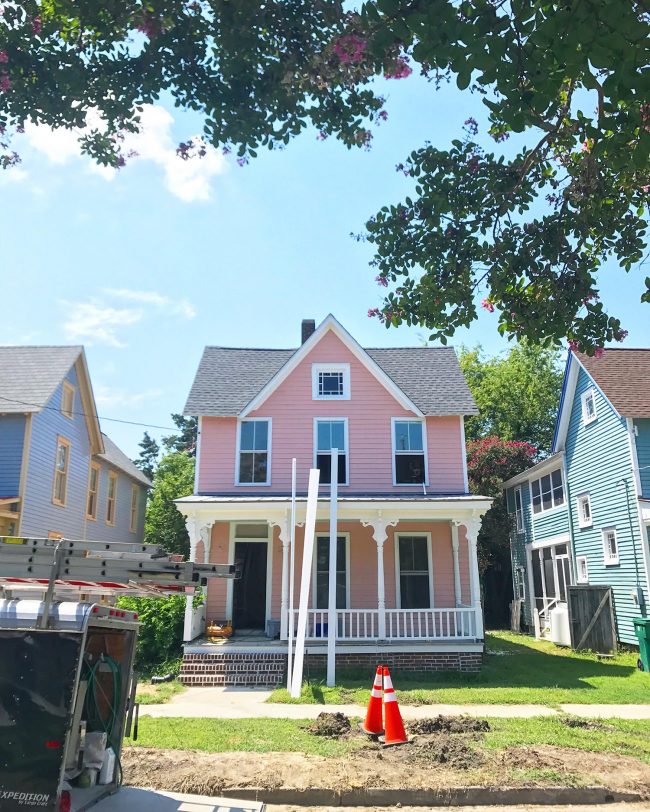
Another thing that we got to check off? RUNNING WATER! The town installed our long-lost water meter last week and our plumber is working on getting us hooked up to it this week. If you caught last week’s podcast, you heard the saga of how a few decades ago our house’s water meter was mysteriously placed many houses away (on another street even!), which meant that old leaky line ran under a bunch of neighbors’ yards, including a shed and several fences.
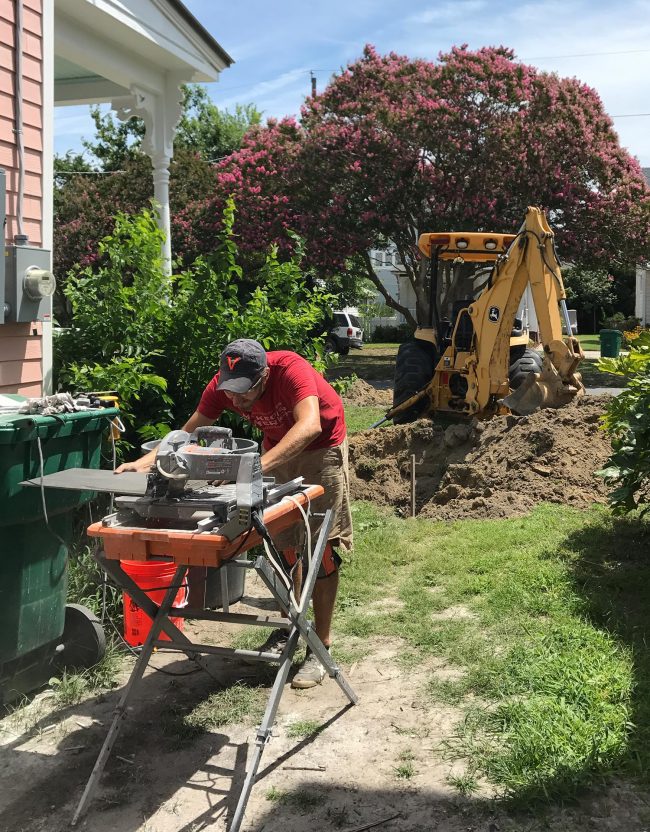
At first, we were told we’d have to dig up two roads and pay $15K to connect a new/safe line in front of our house, but then the city found an old diagram that indicated we might already have a verrrry old line out front – we just needed to find it. So after a whole lot of digging and metal-detecting and more digging, the town’s big yellow excavator found evidence of that very old line in front of our house, and they agreed to repair that line so we’d have a water meter in front of our house like everyone else on the street. Whew!
So yeah, definitely the good kind of mess. :)
If you want to catch up on all of the other beach h0use updates we’ve shared, here ya go:
- Drywall is up, and it’s glorious!
- Finding a vintage pink stove
- Stuff Sherry bought (way too early)
- The outside’s almost done & the inside’s getting good
- That time our beach house photobombed HGTV
- Walls up, walls down, and a new floor plan
- How we picked the exterior color
- Gathering beach house style inspiration
- Beach house “before” video & floor planning
- Holy seashells, we bought a beach house!
*This post contains affiliate links
