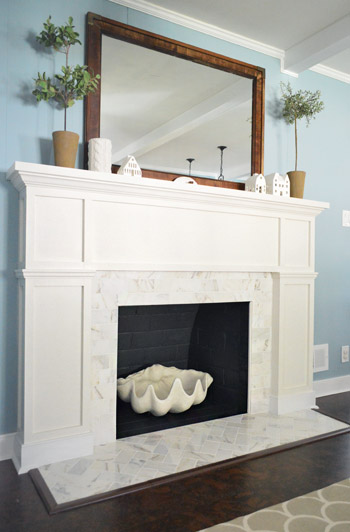
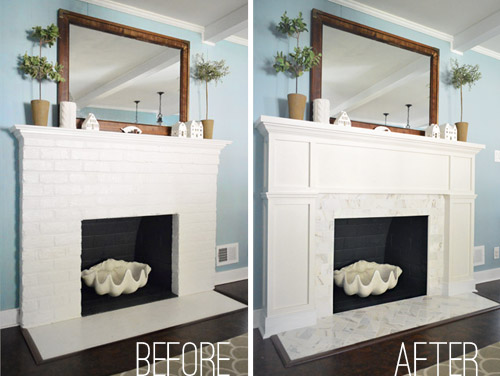
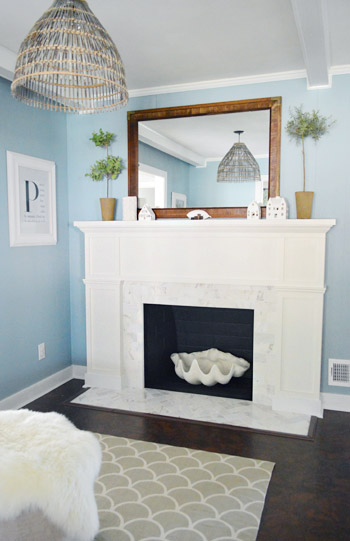
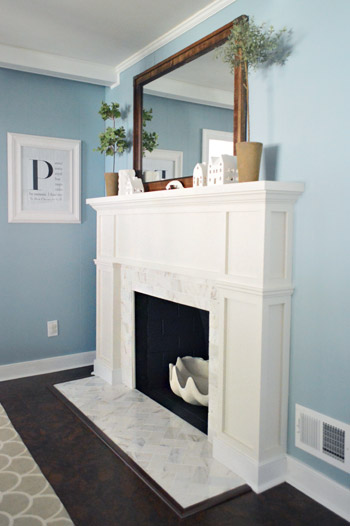
We can officially stick a fork in it, guys. Well, Sherry actually stuck an oversized fauz clam shell in it, but that’s doesn’t roll off the tongue quite as well. Either way, the fireplace makeover is complete.
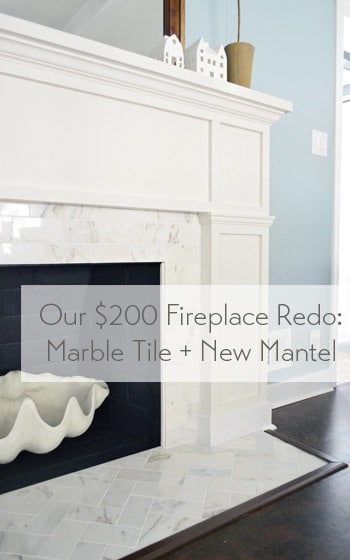
To back up a smidge, you saw us devise a plan for this little refacing makeover, add some marble subway tile and then build out around it. Reminder: fireplace code is different in every area (and requirements vary if it’s wood burning or if it has a gas insert, etc) so it’s a good idea to check that before going nuts on your fireplace.
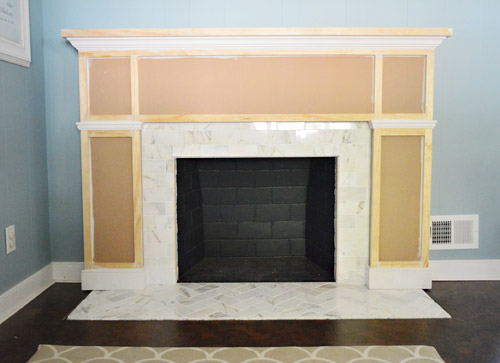
Our fireplace is non-working (we’d love to add a gas insert and even double-side it down the road) but for this phase of the process all that was left was to add some primer and paint.
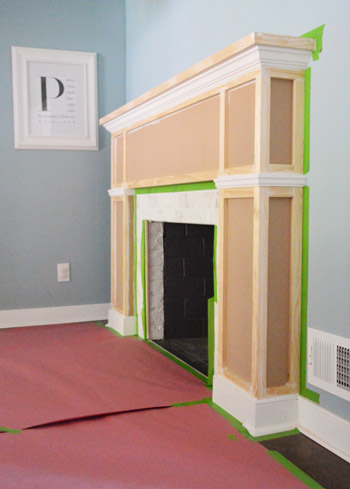
I’ll spare you the play-by-play of the painting process because it wasn’t all that exciting. First we primed (using what we already had on hand) then painted the whole thing with Benjamin Moore’s Cloud Cover since it’s what’s on the nearby cabinets (and because we had some leftover). After that we did some touch-ups, like giving the firebox itself a fresh coat of its original color (Benjamin Moore’s Temptation) Note: use fireplace-approved high heat paint if you have a working fireplace.
And after giving it a couple of days to “cure” we put everything back so that we could call this puppy complete. And it’s a puppy that I kind of want to curl up with (yes, Sherry pets it).
Update: A few folks are asking if we considered widening the tiled heath to match the width of the built-out sides of the fireplace – we did, but since it’s just a bit of shoe molding (which also extends around all of our cabinets) it didn’t bother us enough to rip up cork to make it happen. Perhaps down the line we’ll paint the brown floor trim white to make it appear wider if it bothers us :)
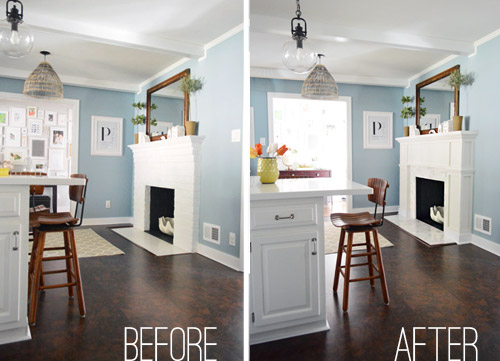
Here’s an obligatory before and after for ya:
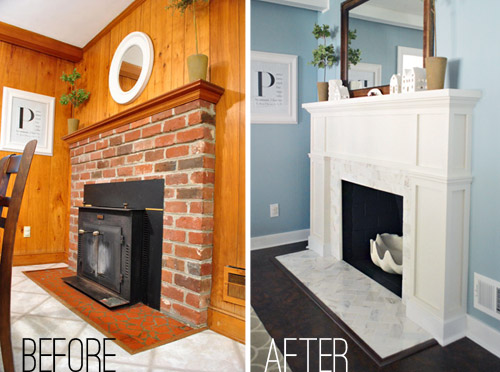
But I much prefer this one, which shows what the fireplace looked like when we bought our house back in 2010…
Since the painting step didn’t cost us any extra money (we used supplies that we already owned), the total cost for the project is just the addition of the two budgets we’ve already shared (tiling was $99 and building out was $98.75) but here’s the full breakdown:
- Cement board (2 sheets): $16
- Masonry screws: already owned
- Liquid Nails Heavy Duty: $2
- Subway tile: $5.50/sq ft, totaling $70
- Thinset: already owned
- Tiling tools (saw, trowel, float, etc): already owned
- Grout: $11
- Tile sealer: already owned
- MDF frame: $35
- Mantle top: $17
- Crown, baseboard, & decorative trim: $22.75
- 1 x 2″ boxes: $24
- TOTAL: $197.75 (* thanks to holiday gift cards from the family we only spent $147.75 – but without gift cards or already owned supplies this might be a $250 upgrade)
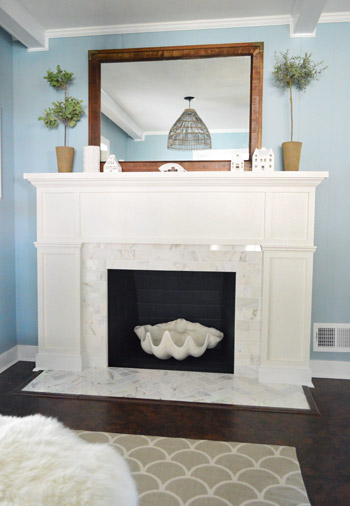
Definitely not our cheapest project, but we love it. The herringbone marble tile and the tailored built-out surround looks pretty darn expensive (at least in our humble opinion). We’ve never had a tiled fireplace so we suddenly feel very swanky indeed. Perchance I’ll start sporting an ascot.
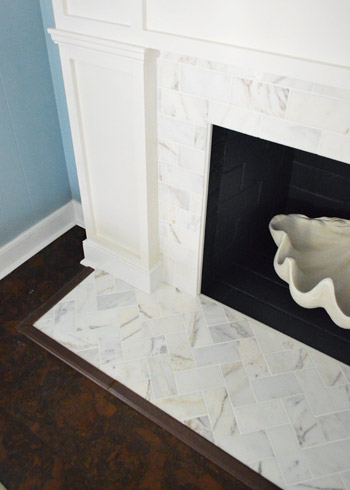
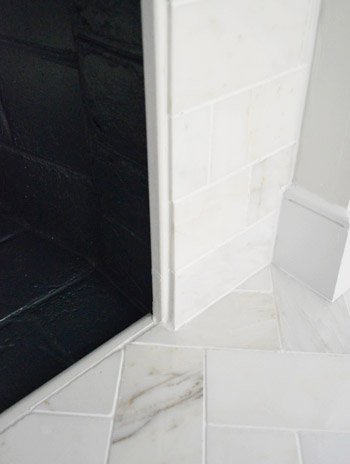
Some of you were curious about how we concealed the exposed edge of the cement board around the firebox. We just used a piece of trim that we had in our scrap pile (it’s slightly rounded on both sides). Before grouting we glued it in place to provide a clean edge to grout up against and now it’s painted to match everything else. Obviously for a functioning wood-burning fireplace that’s no bueno, so you’d probably want to use something like this. And if we ever convert our fireplace to a wood-burning one (which is unlikely since it would require a ton of chimney work) we’ll just pop out the wood trim and install tile edge pieces.
Now back to the gratuitous after shots.
Ok, one more and we’re done.
Just this guy and I’m out.
Oh wait, here’s a good comparison shot that shows how the original fireplace was pretty thin and even a little top-heavy, while the new chunkier tiled-and-framed-out version feels more “focal-point-ish.” In person has even more dimension (unfortunately photos of a white-ish surround with white-ish tile don’t depict all the texture and interest that they have in real life).
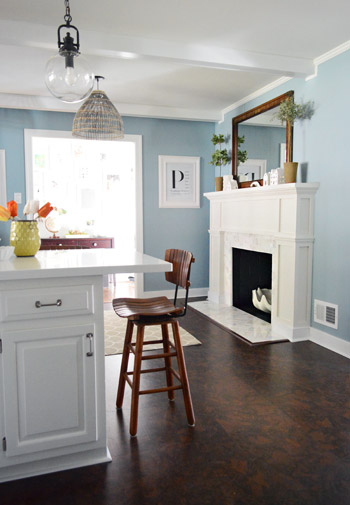
But perhaps best of all, our wall of penny tile on the other side of the room no longer feels like it’s “the fancy wall” while the rest of the kitchen struggles to keep up. The herringbone marble fireplace finally gives the penny tile a run for its money, in the best possible way. According to Sherry “it’s a swank-off in our kitchen.” Fireplace vs. wall o’ penny tile. Who will win? It’s anyone’s guess. (Spoiler alert: Sherry says the wall of penny tile wins because she pets it slightly more than the marble but it’s very close.)

So that’s the end of our little fireplace update. We’re really glad to have it done and are looking forward to some porch and carport updates. So come on end-of-March snow, give it a rest so we can get outside and start working! What are you guys doing? Any tiling, mantel building, priming, or painting? What about placing giant clam shells around the house? Any of that going on? That’s all in a days work for my lady.
P.S. If you want to read about this makeover from the beginning, check out our planning process, how we tiled and how we built out the wood frame around it.
Update – Wanna know where we got something in our house or what paint colors we used? Just click on this button:


Debbie C says
Wow, beautiful job! So classy!
D Gomez says
Hi.
I was wondering if you could include pictures/description of how you made the transition from the cork floor to the baseboard of the new fireplace surround.
Thank you.
YoungHouseLove says
You can see how it did it originally in this post, which is basically the same technique we used this time around:
https://www.younghouselove.com/a-time-of-transitions/
-John
Jessica says
I love it. Wow, you guys! It looks entirely transformed. Great job.
Jessica says
Clearly, I’m important enough to comment twice within two minutes. See below. My screen said something about a duplicate message when I submitted this, then I didn’t see it at all, but . . .oh, nevermind!
YoungHouseLove says
Hahah!
xo
s
Denise says
Love it…Nice work!
Jessica says
I love it. It looks so much better. Not that it looked bad before, but I love a chunky fireplace. Great job!
Caitie says
Looks amazing guys! :)
Kristen | Popcorn on the Stove says
This turned out AMAZING. Easily one of my favorite projects to date. If only we had a fireplace at our current apartment!
It wouldn’t be weird to make a faux fireplace, right?
YoungHouseLove says
Not at all! I was telling John that I want to build them all over the house and put candles in them. Haha!
xo
s
Kathy says
Totally NOT weird! I want one too!
We have one of those “plug & go” electric fireplaces, but you cant build around it because the heat vents out through the top (major fire hazard). Boooo.
Jamie says
My apartment has a faux fireplace!
Whitney says
Wow, it looks great! I love the before, before compared to the after, after! (If that makes any sense!)
SingleMama says
Oh my lord, that is absolutely beautiful!!!
YoungHouseLove says
Aw thanks!
xo
s
Crys Wiltshire says
This looks incredible. We are in the same boat – looking at painting it for now, and then likely refacing it next year. Definitely saving this post for tips when we finally get around to it ;)
Kristi says
Absolutely love it! We have a fireplace makeover on the list so this is extra inspiring!! We do have one problem – our ireplace is between 2 windows but not centered! There is about an inch between surround and window trim on one side and maybe 6 inches on the other side. Any thoughts on how to even things out? (Our house is 100 years old so we tend to cut it some slack!)
YoungHouseLove says
Hmm, could you build a surround to slip over your existing one that’s wider so it can appear centered when you slip it into place?
xo
s
Jenny says
So funny — we’ve lived in our (100-yr-old) house for two years, and I just last weekend noticed that our fireplace is off center, too. The mantel is centered between two doorways (to a sunroom), but I finally noticed that the fireplace opening is not centered under the mantelpiece — it has a couple of inches on one side, and probably 10 inches on the other side. So FWIW, that approach (basically Sherry’s suggestion) seemed to work pretty well for whoever built the mantel at our place, since I sit on the couch facing that thing every day and never noticed it before.
Roo // NiceGirlNotes says
That BEFORE-BEFORE / AFTER photo is craaaaaaazy good. I keep scrolling back up to look at it. Dope makeover, y’all.
YoungHouseLove says
Haha, thanks Roo!
xo
s
Gaby says
Looks great but very similar to the painted brick. Wish there was some contrast between the tile and painted part.
Ariane says
It looks great ! and the herringbone marble is a beauty ! Good job.
Jessaca says
I love it, but I realized that looking at the before shots of the painted white fireplace it doesn’t seem that different from far away (I’m sure it does in real life), but I have a question for you: With something like this change would it add value to your home? I’m only asking because we have a good fireplace surround (it was a new build), but the tile is…let’s just say I’d pick your tile in a heartbeat if I decided to do this to ours. But I know I need to prioritize items in my house (getting rid of contractor-grade materials). How did you decide to spend the money on this now when you know you have other plans for the fireplace down the road?
YoungHouseLove says
Great question! I’m not sure if it would add 1K of value to a house or anything like that, but to get to say “marble fireplace surround” in a listing, for $147, that could be what draws in buyers since it sounds posh. In person the painted-over old cracked hearth had to go, so it was more like that was a deterrent and this new fireplace definitely doesn’t hurt :)
xo
s
Stacey says
Some time ago I watched a local make-over show where the decorators tackled a house which had been on the market for a while. The updates (some similar in nature to this) didn’t necessarily add value to the house but generated far more interest from buyers and the property was sold soon thereafter.
Jessaca says
Good to know since I’ve stared at our fireplace going, “I should just get on that already!” I’ll have to go see this tile in person for sure since your pictures make them read almost yellowy/shell like…which I really like btw. Hope you don’t mind a copy cat! Haha!
Anele @ Success Along the Weigh says
Might not be the cheapest but certainly has a big impact. BLAM baby!!
Emily says
The only adjective I can use to describe this upgrade: delicious. Cause I am eatin’ it UP! Love it :). Well played, Petersiks, well played.
Laci says
Emily, Great comment!! Maybe the best I’ve read…
Erica says
SO gorgeous!! I liked the grellow but I am SWOONING over that blue!!!
Janelle @ Two Cups of Happy says
I got 3 words for ya: balanced, beefed-up & ballin’! It definitely holds its own againsty your tile wall & cabinetry. I’m still loving the hardware you have on those…
YoungHouseLove says
Haha, I think my day has been made by “ballin” being used to describe the fireplace.
xo
s
Kirsten @ Through the Front Door says
It looks GORGEOUS! I just adore the tile detail.
Judy Cassidy says
I’m just curious why you didn’t do the tile all the way to the edge of the wood. I think it looks great but I didn’t know if there was a specific reason for doing that! Maybe all fireplaces are like that and I’ve never noticed!
YoungHouseLove says
We just remade the mantel over the existing one and tiled over the existing surround, so the added trim made it a bit wider but we don’t mind the look at all. Our cabinets have wood trim that overlaps the floor too, so it seems to work in the room nicely :)
xo
s
Kelly says
How can you tell if it’s working or non-working? Yours looks like you could throw some wood in there and have an impromptu marshmallow-roasting par-tay!
YoungHouseLove says
We knew from buying the house (they sold it as-is as a non-working fireplace).
xo
s
heather says
The side by side before and after really show the difference in balance it has in the room. It looks really nice and I super enjoy the herringbone tile. My one question is this: Is there a reason you didn’t extend the hearth to go all the way under the mantel on the edges? Or does it and it’s being all magic-eye on me because the mantel is white and the hearth has a brown trim on it? I guess that’s two questions. I fail at math.
YoungHouseLove says
We considered extending the tile hearth, but since it’s just shoe molding (which also extends around all of our cabinets) it didn’t bother us enough to rip up cork to make it happen :)
xo
s
Erica B says
She’s a real beaute, Clark!
YoungHouseLove says
Haha!
xo
s
Alison says
BAHAHA, that’s my new favorite comment, ever!
Erin B. says
I am drooling over this. Love every detail!
Allison says
Looks great! But I can’t understand why you’d do the makeover before adding gas logs. Such a waste to have a cozy fireplace corner, without a fire (aka, the cozy part). That would have been priority #1 after painting the brick, for me. Maybe I’m a fireplace snob, but that comes from never having lived in a house without a wood-burning fireplace that gets used nearly every single night. Nothing comes close to replace that warmth and ambiance!
Anya says
Hi John & Sherry, your fireplace is beautiful!! I love the white marble, especially with the herringbone pattern. One question I had is that visually I seem to prefer having the white wood fireplace line up with the white tile on the floor, like you had for the first fireplace. Did you think about making the floor tiled area wider? Just curious.. it looks great, and I would LOVE to have a fireplace in my apartment, or even a woodstove. I love warmth.
YoungHouseLove says
We did think about slightly extending the hearth, but since it’s just shoe molding (which also extends around all of our cabinets) it didn’t bother us enough to rip up cork to make it happen :)
xo
s
caroline [the diy nurse] says
A swank-off. You never cease to amaze me. I love how it’s gone from a sheepish little fireplace to one that demands attention. I also really like how it’s been built out- the scale looks great. My fireplace has never felt so insecure before. I’m looking at your boring slate tile!
Katie G says
This has confirmed for me how much I love the blue over the grellow (although I know a lot of the problem was probably that it didn’t photograph true to life). This just feels so grown up and calm. Like Meryl Streep might breeze in and cook an omelette or something.
YoungHouseLove says
Haha, here she comes now!
xo
s
heather says
Katie G wins for working Meryl Streep into her comment. Flawless execution. *many high-fives*
Laci says
I don’t usually read all the comments of a post, but I’m going to have to start! Petersiks, your commentors (like yourselves) are word MASTERS!!
Speaking of word masters: I can’t get “treat yo self” out of my head from last post. Everytime I saw the marble and penny tile in this post, I thought TREAT YO SELF! …and I’m glad Sherry is bringing awareness and advocating for all of us in the I-Pet-Pretty-Things Club!! We’re not weird; we’re just our own kind of normal. :-)
YoungHouseLove says
Haha, it’s true. You guys = hilarious. We love hearing from you guys and basking in our collective weirdness. Haha! Weird is the new normal. :)
xo
s
hjc says
Weird can’t be the new normal because then all of us weirdos would have to become normal to be weird and that would just be wrong (and weird).
YoungHouseLove says
Hahah!
xo
s
Janine Morrison says
that clam shell is divine! beautiful job you two! Here’s to home decor petting.
Alisa says
I am obsesssssssed. Seriously. It’s a good thing I’ve been given strict instructions to not do anything that isn’t on THE LIST or else I’d be all over doing this to our fireplace. I’ll just stick to my trim painting and picking out floor samples *sniff*sniff*
YoungHouseLove says
Aw thanks Alisa!
xo
s
DJS says
What a difference it makes in the over all “feel” of the room. More high end. And the room looks bigger. Nice work guys!
YoungHouseLove says
Yes, in person the difference is crazy!
xo
s
Rene @thedomesticlady says
Oh my word that is gorgeous!! Love the huge shell! So swanky:) I wish I have a fireplace to stick a shell in :) Great job.
http://thedomesticlady.com/2013/03/27/recipe-review-tex-mex-pork-carnitas-pizza/
Sarah says
Absolutely STUNNING!!
Becky says
Looks nice!
Do you ever think about the distant future homeowner’s blogging about this? Like, “our fireplace was so 2013, here’s how we uncovered and restored our 1960’s brick fireplace.”
We’ve wainscotted and crowned our whole 1958 brick ranch and I think about tht sometimes, like a future owner will rip it all down saying we ruined the ” modern” of it all. Oh well, to each his own!
YoungHouseLove says
Haha, I don’t really think about that! I usually think about how the next buyer will say “I’m so glad that smashed orange tile mosaic in the original hearth was tiled over with marble! Haha!
xo
s
Jennie says
Haha, I wonder if a future owner of my house will lament the loss of the BLUE COW wallpaper (true story) that we so unceremoniously ripped down …
rachael says
Beautiful!! I wish I had a fireplace in my house to do this to!
Marcy L says
This makes me so happy! You guys did an excellent job. DEFINITELY sport the ascot… and maybe add a pipe… =)
YoungHouseLove says
I’ll take the pipe and raise you a butler.
-John
Shanna says
I think you should include a monacle like this: http://a0.twimg.com/profile_images/1741151148/hmm-yes-quite.jpg. I think you did a great job by the way!
YoungHouseLove says
Hahaha!
xo
s
Annelies says
This looks amazing ! It also looks much higher than before while it isn’t. Beautiful update ! And paint makes such a difference as well.
Have you already gone through the pics of the hotels you stayed at during the book tour? Still waiting for that post or have I missed it ?
YoungHouseLove says
So sorry, they’re all uploaded but there are so many photos (2,000+)! I’d love to go through them soon!
xo
s
Melissa says
Love this! Great job guys!
Meaghan says
looks amazing! and definitely super swanky and expensive – much more than the price you actually paid. LOVE IT!
Kimberj says
I also have a non-working fireplace in the basement. The previous owners built a large sandstone fireplace that needs a smidge of updating. My biggest concern has been what to put inside it. I’m not so big on the fold out candle stands but I love the idea of the large faux clamshell. Mind sharing where you got it? If you’ve covered this previously, please forgive my asking again. Brain is a sieve lately :P
Many Thanks for all the ideas!!!
YoungHouseLove says
That was from Joss & Main maybe a year ago? They also have them at ZGallerie I think!
xo
s
Kyla says
I love it! I had trouble picturing where you were going with it when you first explained it, but it looks so amazing. Great work!!
Laura says
Your fireplace renovation is really great. The more traditional look compliments the rest of your house nicely. But as an architect who does high end residential work, I have to give you one tip for the next time you tackle another fireplace. The hearth stone should extend as far (or better yet, a 1/4″-1/2″ further) as the mantle itself – and in your case, this would be to the edge of the quarter round on the baseboard. It’s a small detail, but would add another layer of finesse. Not trying to be critical, but it’s the first thing my eye noticed.
Ginny @ Goofy Monkeys says
It’s absolutely gorgeous!!
Side question – since you live in your house, do you do a ton of prep work to get an area ready for photos or are things usually pretty close to ‘picture perfect’?
YoungHouseLove says
Oh man, we definitely just clean up the corner we’re shooting (crayons, dolls, dog toys – you name it, they’re everywhere! We have a toddler and a dog – haha!).
xo
s
Krystle @ Color Transformed Family says
The fireplace is definitely a statement piece in your kitchen now. It looks like it belongs in some New York upscale apartment. Amazing job!
YoungHouseLove says
Aw thanks Krystle!
xo
s
Wyndi Hills says
Looks great! Just thought you’d appreciate that I can’t say penny tile without totally sounding like the crew from Cougar Town while they are playing penny can! haha
YoungHouseLove says
Oh yeah! Penny can!
xo
s
Erica says
Love the fireplace overhaul. It turned out fabulous. Looks like the tile swank off isn’t the only draw in town.
The new mantle seems to be offering a throw down to the vent a hood surround in the kitchen.
Any plans to change or revamp the hood surround?
YoungHouseLove says
Oh yes, we mentioned a while back we’d love to update the vent hood, so it’s on the (admittedly very long) to-do list. Haha!
xo
s
Cara says
Fantastic job, guys. Makes a huge difference. I can’t stop looking at it and drooling! lol
YoungHouseLove says
Aw thanks Cara!
xo
s
Eva says
It looks great. It makes such a nice impact to the room and seems to fit the overall look of your home more.
About fireplace inserts. Have you thought of an Alcohol burning insert? They usually look pretty modern but can be put almost anywhere since they don’t need a proper flue or chimney. Ecosmart makes some but I’ve seen them on Amazon.com too.
YoungHouseLove says
Oh yes, I love Ecosmart! I’d love to do something like that!
xo
s
Stacey says
STUNNING! These are my favourite types of posts!
Wendy @ New Moms Talk says
Wow to the wow! It looks amazing!
This just made my birthday morning a bit more visually happy! Thanks!
YoungHouseLove says
Aw, happy birthday Wendy!
xo
s