Updated January 2022
Do your kitchen cabinets feel a little bit unfinished? Or maybe don’t quite reach your ceiling, leaving a weird gap? We’ll gonna show you how we installed crown molding to give our upper cabinets a simple DIY upgrade. It’s one of my favorite, easy kitchen projects – and we completed it in just 3 hours!
Why We Added Crown Molding To Our Kitchen Cabinets
When we finished our kitchen reno last year we decided to forgo any crown molding on the top of our upper wall cabinets because we decided we liked the clean, modern look of the square edge. Plus we had never installed crown molding before, so I think we were subconsciously too intimidated to try.
But after having learned to install crown molding on a ceiling, we decided it was time to add it to our upper kitchen cabinets.
Steps For Adding Cabinet Crown Molding
This is a surprisingly easy project with only 4 basic steps, so it’s something you can easily complete in a day. Here’s a quick overview of what you’ll be doing:
- Attach scrap wood above your cabinet to nail the crown into
- Measure and cut your crown molding
- Nail in the crown molding
- Caulk and paint
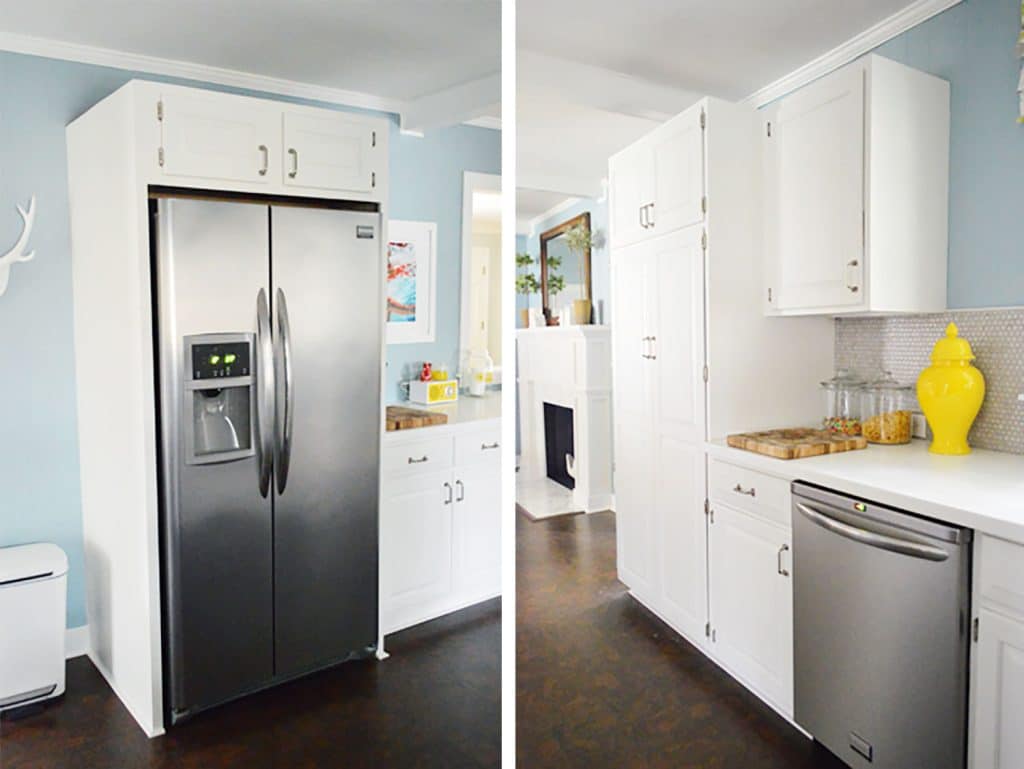
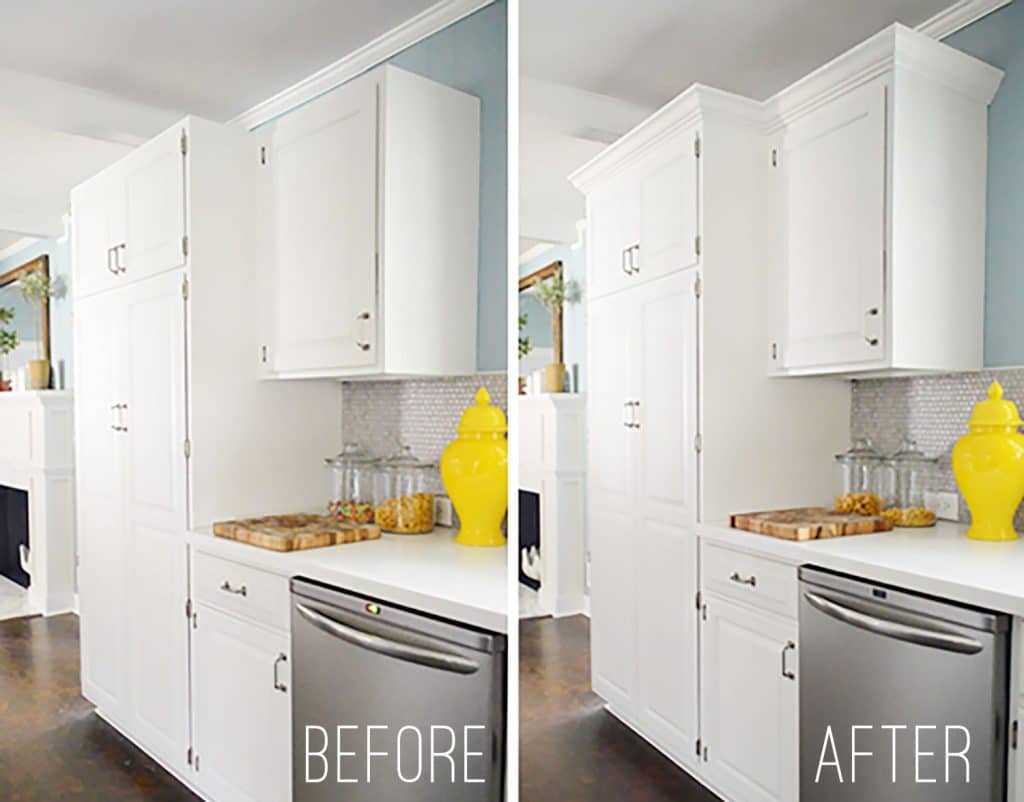
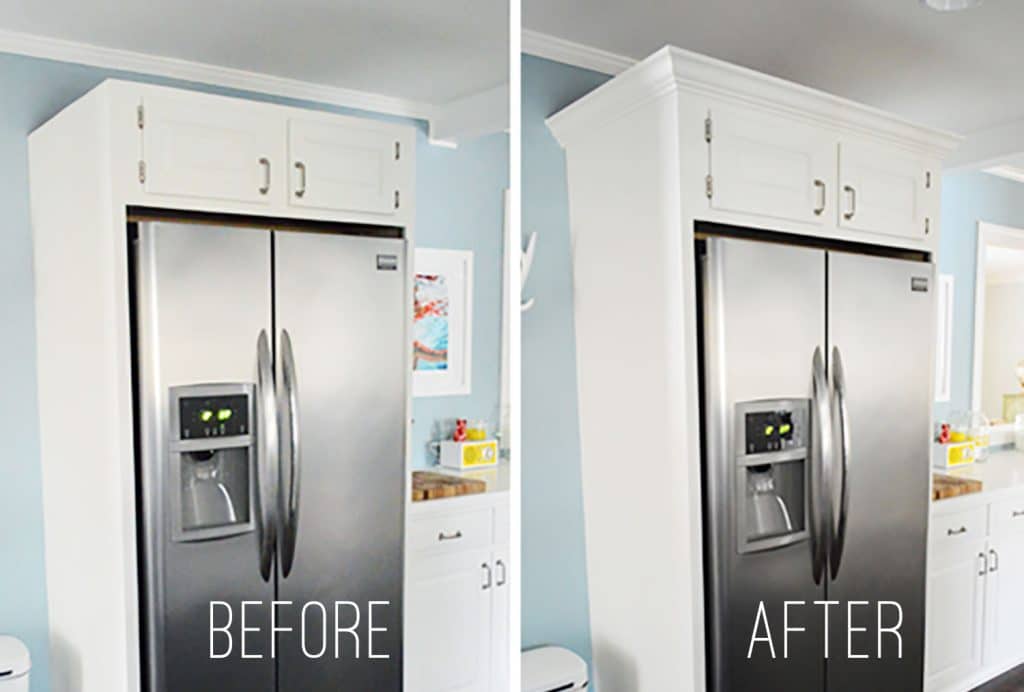
And as you can see above, it makes a big difference!
Tools & Materials Needed
To add crown molding or other trim to the top of your cabinets like we did, there are a few tools you’ll need on hand to make things go faster and more smoothly.
- Crown molding
- Measuring tape
- Nail gun (we currently use this one that doesn’t require an air compressor)
- Wood glue
- Kreg Crown Pro
- Miter Saw
- 1 x 2″ white wood or pine (scrap wood works too)
- Paintable caulk
- Paint*
- Short handle paint brush
- Painter’s Tape
*If your cabinets are wood, you’ll want to source crown molding in a stain color and wood grain that coordinates with your existing cabinets. Check with your cabinet manufacturer because they typically set an assortment of matching trims.
Step 1: Measure Your Cabinets
Before you even purchase your crown molding, carefully measure the top edge of your cabinets to determine how much you will need. Just be sure to buy more than the length of your cabinets. Since crown molding is cut at an angle, your cut piece will actually need to be longer than the top of your cabinets.
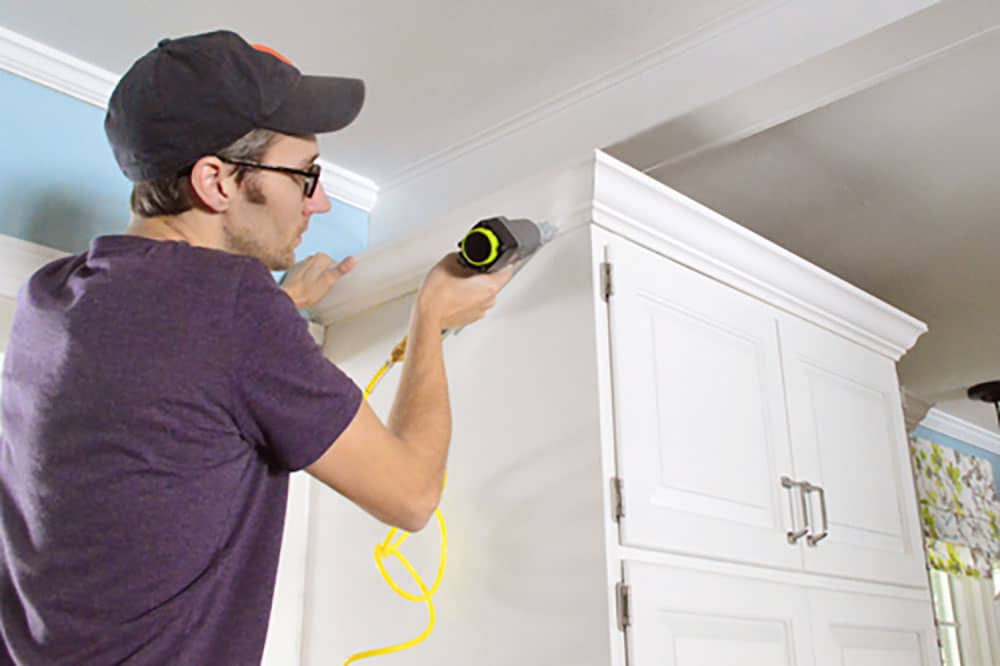
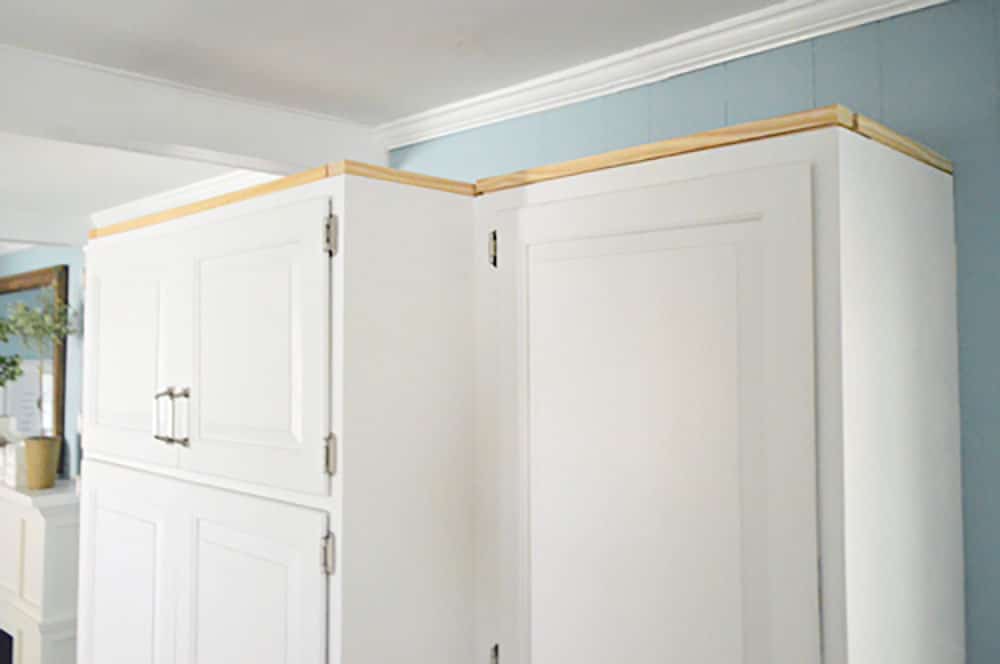
Step 2: Attach Scrap Wood Around The Top
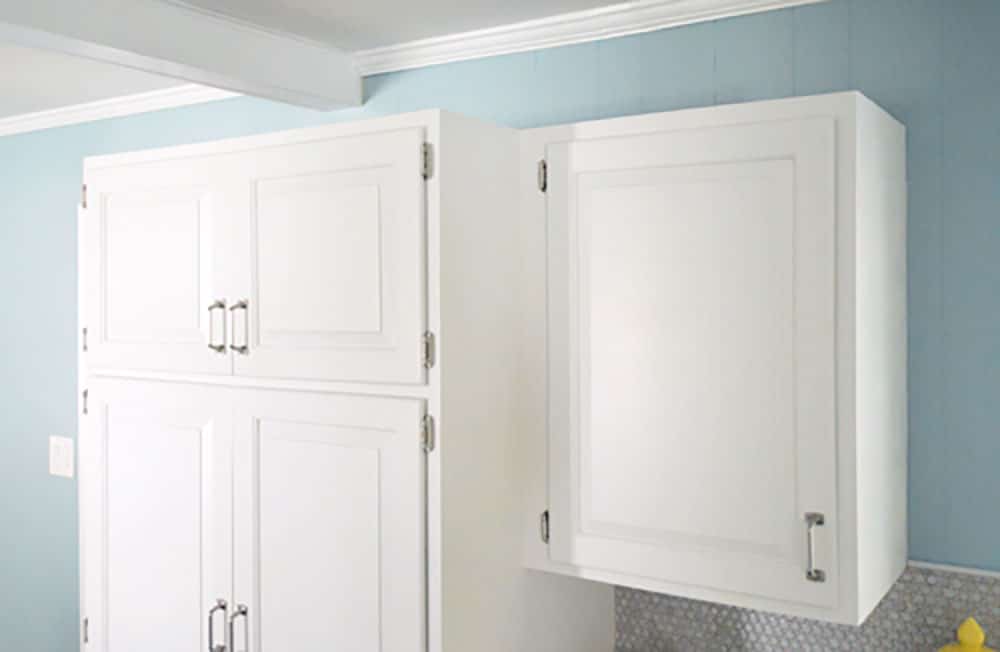
We started off by attaching some scrap 1 x 2″ (leftover from the fireplace build) to the tops of the cabinets with our old nail gun and some wood glue, like so. This extra height provided more surface for the crown to rest against since our cabinet doors leave little space above them. Plus, we didn’t want to cover up any more of the cabinet box than necessary because it would only make them look shorter, not taller.
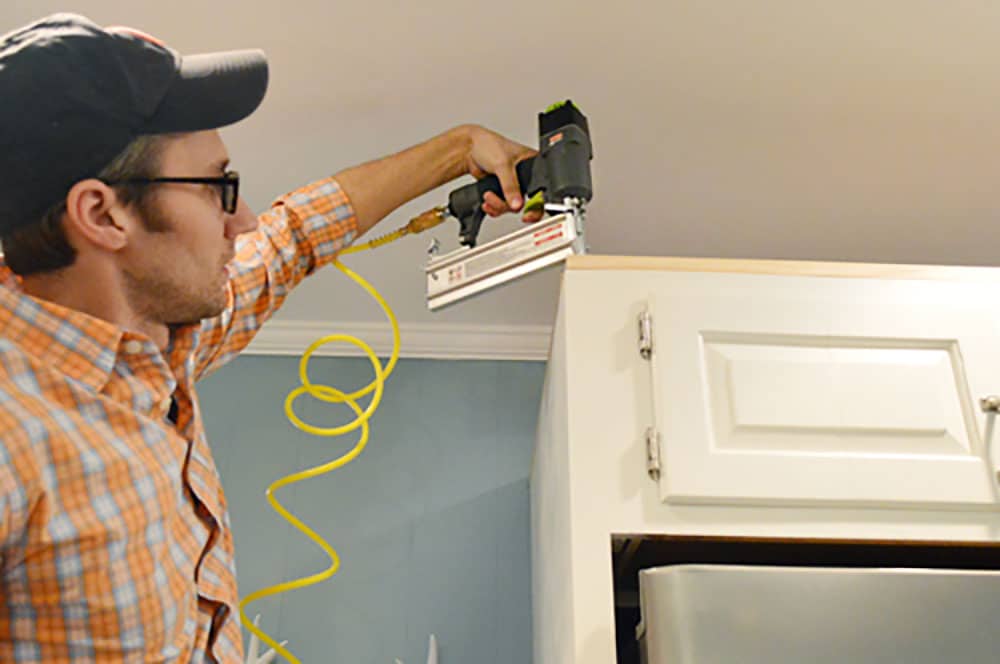
All of this will be hidden by the crown molding itself, so it doesn’t have to be particularly pretty (hence the use of scrap wood). Just be sure to add it along the entire perimter of your upper cabinetry.
Step 3: Cut Your Crown Molding
If you’ve installed crown molding on your wall before, then this part follows the same process. If you haven’t – check out our detailed how to install crown molding tutorial or watch the video below. The gist is:
- Measure (preferably twice!)
- Cut your molding
- Nail it into place
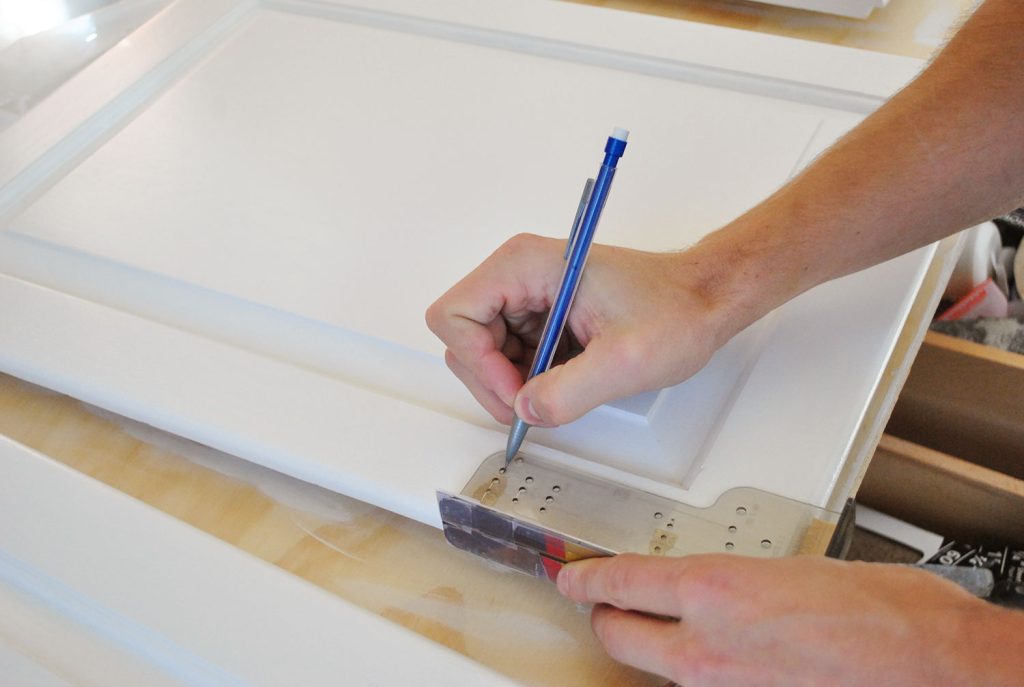
We make our cuts using our miter saw and love using a Kreg Crown Pro to help hold the wood in place as we cut. It makes this sort of process sooooo much easier because it holds your molding at the correct 45-degree angle while you cut. You can see it in action in the video below.
How to cut crown molding
If you’d like see the process of cutting a piece of crown molding on video, this tutorial below covers everything from measuring, cutting, and installing. It shows installation on a bedroom ceiling, but the same concepts work for adding crown molding to your kitchen cabinets.
Note: You can also watch this video on YouTube.
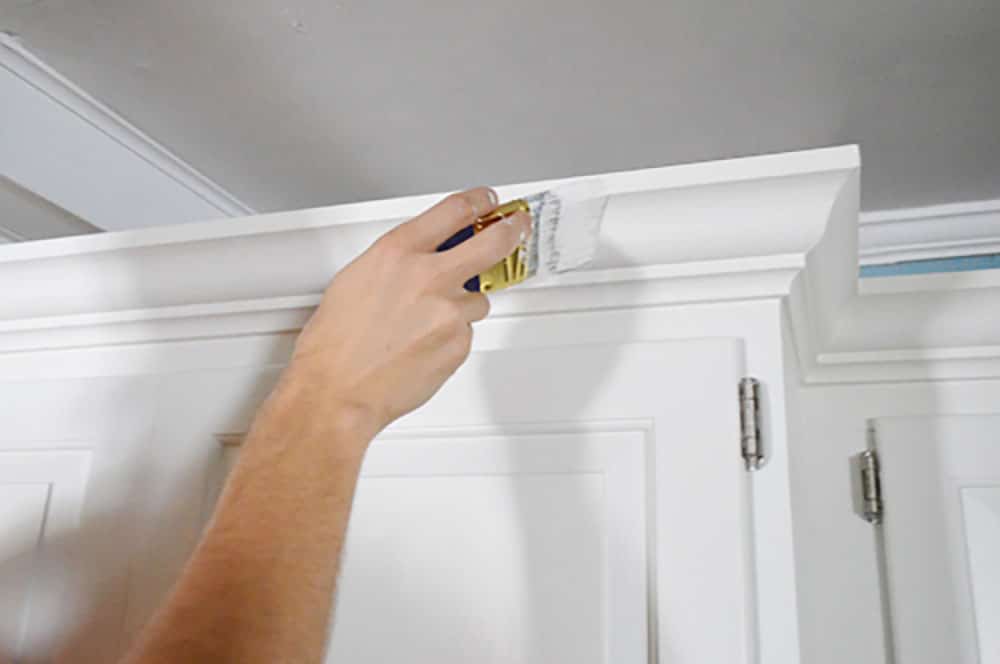
Step 4: Nail The Crown Molding Into Place
Once your molding pieces are cut, use a nail gun to attach the molding to the scrap wood that you added to the tops of each upper cabinet. Just a small nail every few inches should do.
TIP: Tape & Glue Your Outside Corners
These outside corners can be a little tricky. You’ll want them to hold tightly together, but nailing such small corner might splinter or break your wood. Instead, we to squeezed a bit of wood glue between them and tape everything together while it dried. A few hours later we removed the tape and it worked like a charm. Whew.
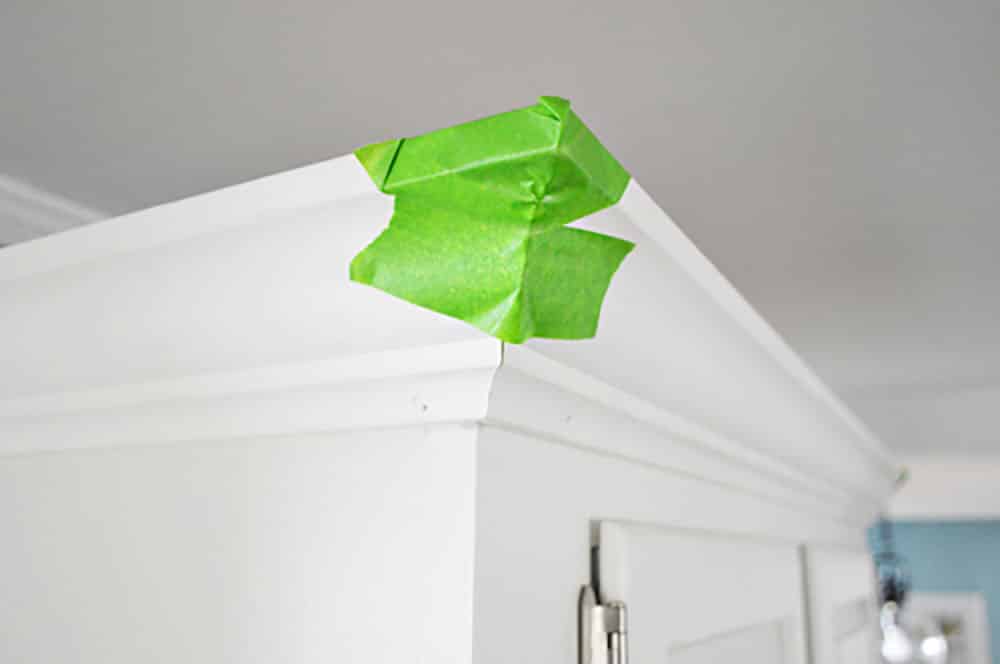
Alternatively you could also try clamping a small piece of scrap wood behind the corner and nailing both pieces of crown into it.
Step 4: Caulk & Paint Your Crown Molding
Once the crown molding was installed around the whole room, we broke out the ol’ caulk gun to fill in some of the seams and nail holes. We like to use the Alex Plus Fast Dry caulk because it is ready to paint within an hour.
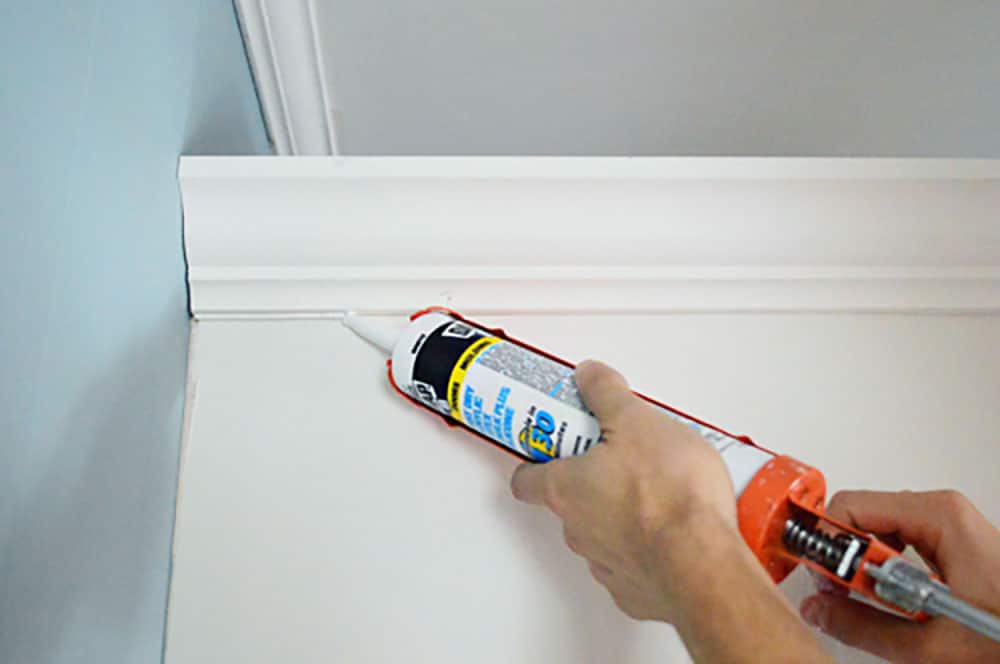
We waited about 45 minutes later and applied a coat of paint in the same color as the cabinets (Benjamin Moore’s Cloud Cover). Since the crown molding was already primed white, it only took one coat, but if you’re doing a darker color you may need two coats.
Once your paint is dry, you’re done! Woo hoo!
How Much Did It Cost?
In addition to this project being pretty easy – it was pretty darn cheap too. Our only expense was the three pieces of 8ft crown that we bought, so the grand total was about $35 for this entire project. Not bad, right?
It’s definitely one of those projects that Sherry and I are kicking ourselves for not doing sooner, but they do say better late than never, so we’re happy we eventually climbed aboard the S. S. Molding. Ahoy.
The crown molding has been a great way to help transition our kitchen from a modern space to a more traditional one, and we think the result is quite stately looking!
More DIY Molding Projects
Want to see more crown molding applications? Check out some other do-it-yourself fixes we’ve tackled.
- Cheap & easy DIY board and batten
- Installing crown molding around built-in bookshelves
- How to add “chunky” crown molding using baseboard
- Making base cabinets look built-in with trim
- Adding traditional trim framing to our bathroom
- A colorful planked accent wall
More DIY Kitchen Cabinetry Projects
Looking for some other ways to update your kitchen cabinets? Here are some other do-it-yourself solutions we’ve used in our kitchens.
- The proper way to paint wood cabinets
- Installing hidden hinges on old cabinets
- How to remove upper cabinets for a more open look
- Staining wood cabinets darker without sanding
- How to paint Ikea kitchen cabinets
*This post contains affiliate links, so we may earn a small commission when you make a purchase through links on our site at no additional cost to you.

Anele @ Success Along the Weigh says
Wow, that’s amazing what a little crown can do! Looks so much more finished and fancy pants! :)
Trini says
I love it! Great improvement to already a fab kitchen… welcome to drop in and help with DIY any time you want! – – and not sure whether you have the phrase in the states… but you two are just adorable ‘dags’.
YoungHouseLove says
Haha, we don’t have that phrase here! Just looked it up though – cute! http://en.wikipedia.org/wiki/Dag_%28subculture%29
xo
s
Aimee says
Looks great! I love how the new molding mimics the molding on the fireplace for a really nice cohesive look.
Janelle @ Two Cups of Happy says
I was totally on-board with no crown, but now that I see it I like it! It makes the cabinetry look like it was professionally built custom for your kitchen – not that you’re not professional, but you know what I mean. Haha.
Jess @ Little House. Big Heart. says
Wow! That looks so much more finished! Isn’t that little Evolv nail gun awesome?! We love ours!
We added some crown molding to an Ikea hack we built for out bedroom and it was just the thing to make it look built in!
YoungHouseLove says
Yes it’s amazing! And your Ikea hack is awesome! LOVE IT!
xo
s
Mary says
WOW! What a difference! Looks great!!
Phoebe says
Love that! It makes a big difference.
Ásta Júlía Aðalsteinsdóttir says
wow that looks so much better!
Evan says
Awesome! They are now screaming for some indirect lighting tucked up there…
Alison says
good, good. excellent. Your public is pleased. Now paint that ceiling dove grey. WE DEMAND GREY PAINTED CEILING.
katelyn says
So pretty guys!! :)
Liz says
Wow, looks awesome!!! That’s a pretty dramatic difference. Someday I’m going to own a home where I can do things like this! Maybe. If I can ever quell my traveling spirit long enough to settle down. You guys travel a lot, but not everybody can be a DIY rockstar :)
Abbey_S. says
Does using the Kreg Crown Pro eliminate the need for a compound mitre saw, i.e. you only need a regular mitre saw?
YoungHouseLove says
The Kreg Crown Pro just helps to hold the modling at an angle so you can make an easier cut (it’s basically just an adjustable platform props up the modling so it’s at the same angle as it would be on your wall or on the top of the cabinet, so it really helps with accuracy). Hope that makes sense!
xo
s
paintergal says
Like it a lot! Wish we could do that to ours. But unfortunately, we have a support beam and soffit that run from the cabs to the ceiling.
Sheila says
Love it! I never looked at older pics and thought that it was missing something, but now seeing it with the crown the older pics look bare and blah.
And every time I see new pics of your kitchen I think about how much I *LOVE* the new color. I thought the old one looked ok, but it didn’t get me super jazzed. But oh, the new color makes me swoon.
LeCheech says
Looks cool, have you put any thought into putting lighting on top so those shadows aren’t everywhere?
YoungHouseLove says
That could be fun for sure!
xo
s
Cait B says
They look great, I actually have the same thing in my kitchen bu for god only knows what reason the cabinets and the crown molding are two different colors (one a light blonde wood the other a medium tone) and I haven’t figured out what to do about it yet.
Watching your kitchen kind of helps me decide becuase my favorite aesthetic is using white cabinets, maybe soon I’ll screw up the courage to break out the white paint!
YoungHouseLove says
You can do it Cait! We painted ours (they were oak originally) and even added on some thrift store ones – paint hides a multitude of sins :)
xo
s
emily @ go haus go says
Looks fabulous! You guys do a great job of living with something until you learn to love or not love it – and then fixing it from there. Decorating isn’t a race – it’s a journey!!
YoungHouseLove says
Aw thanks Emily!
xo
s
Martha says
That looks great! It always amazes me when the two of you pinpoint exactly what was missing in a room and then – BAM – amazing.
Gem says
Looks fantastic! And can I say again how much I love the new wall colour in the kitchen. It really brings together the modern and sophisticated look…
Julia @ Chris Loves Julia says
We are currently smack-dab in the middle of a kitchen reno and this decision is weighing heavily on our minds. To crown or not to crown. Although unlike your home, we don’t have crown molding in any of our rooms–so it is seeming like a particular daunting task. We will most likely skip it, but I have to say–it was 100% the right choice in your kitchen. Wowza.
Marci says
It looks awesome!!!
Also, I’m considering building a pantry in my kitchen that looks about that size. Do you have the measurements for your pantry and a picture of the inside?
YoungHouseLove says
Hmm, here’s an old post with a picture of the inside. I’m afraid I don’t have the measurements :)
xo
s
Jessica says
It’s amazing what crown molding can do for cabinets! We added crown molding and light rail to our kitchen cabinets when we re-finished them last spring and it made a huge difference in the look and feel of the room. It’s such a great improvement for not a lot of time and money!
KK says
I am planning to do the same thing. However, I cannot decide on what type of light rail to go best with the crown moulding. Any suggestions?
YoungHouseLove says
Hmm, anyone have tips for KK?
xo
s
kristi@SimplePrettyThings says
That looks really nice but are those the only upper cabinets you have in your kitchen? I know you have the open shelving by the stove but what about by the peninsula?
YoungHouseLove says
Yup, those are the only uppers (we have open shelving over one wall and the peninsula is in the middle of the room, so there are just two large glass lights over that area :)
xo
s
Rebecca | the lil house that could says
Looks so nice and polished now! I’m loving the recent kitchen updates :)
Jessica W. says
Love it! Do you plan to also do above the fridge on the other side to keep it balanced? Just curious :)
YoungHouseLove says
Oh yes, we did the fridge too :)
xo
s
Jessica W. says
Haha, sorry I just saw the fridge pics. I must’ve skipped over those in my brain :)
YoungHouseLove says
Haha, no worries!
xo
s
Courtney says
Wow that looks really nice. It definitely makes it look more finished. No kitchen projects for us, but we have been working on our front porch herb garden this week.
Alice says
Dramatic difference! Love it.
Sarah says
Love it! I’ve been wanting to do this to our builder grade cabinets. Good to know it’s an inexpensive fix!
Megan says
I immediately noticed, in the picture that shows the panty and the fireplace, the nice flow between the two. Love the upgrade. Good job!
YoungHouseLove says
Wahoo! Thanks Megan!
xo
s
Ellen T. says
Love it. Gives your cabinets a finished look.
We have cabinets with crown molding on top in our kitchen. A few years ago, when we had an electrician in to do some work in our house, I had them put an outlet above the cabinet with a switch down below. My husband then put a string of rope lights above the cabinet hidden by the crown molding. It’s a great light to put on at night as it illuminated the kitchen just enough to not have to put lights on all the time.
YoungHouseLove says
So charming!
xo
s
Karen F says
looks beautiful! it looked fine before, but it looks really beautiful, now…more finished and upscale looking. nice job!
Alisa says
Our kitchen had crappy wall paper when we moved in and it was one of the first things I decided we needed to fix. After taking it down, we discovered the bulkhead wasn’t really finished so there was a huge gap between the cabinets and the underside of the bulkhead (it stuck out about 1inch further than the cabinets). I had been caulking it, trying to disguise the gaps and we just finally threw some moulding up there. Uh, WHY didn’t we do that right away? It literally took us two years (maybe three?) and less than $20 and it looks a gazillion times better. You guys have taught me how far little touches like that can take a room!
YoungHouseLove says
Aw, that sounds like an awesome fix Alisa!
xo
s
Jill says
Lovely! I couldn’t help but notice how clean/streak free/finger print free your stainless steel appliances are… how do you clean them?
YoungHouseLove says
They’re awesome! They have this fingerprint-proof seal (basically it’s like poly over the stainless) and it’s an invisible coating that makes fingerprints not show up. Clara touches them all the time and they still look great! I wipe them down with a damp cloth maybe once every 6 months and that’s it :)
xo
s
Anna says
Hold the phone.. did you put the seal on the fridge or did it come like that? Please say you put it on because I MUST have that!
YoungHouseLove says
So sorry Anna, it was made like that by Frigidaire. I can’t recommend it enough though! I wish someone could come out and apply it to appliances, that would rock!
xo
s
Amy says
World of difference. Love it!!
Kim says
Maybe this is a weird question, but what kind of caulk did you use on the seams? I’m overwhelmed by the number of different types I see at the hardware store–I never know what to use.
YoungHouseLove says
Our favorite is Dap window & door caulk in white (make sure it’s paintable, that’s key!).
xo
s
Maureen says
Love it!!! I am wanting to do this so badly. We bought that same nail gun so that we can start changing out the moulding in our house, so hopefully this will be happening in our kitchen in the not-to-distant future.
Clarissa says
Looks fantastic!!
John @ Our Home from Scratch says
Looks great! Adds a lot of interest. Makes the cabinets look very regal indeed. We did the same thing with our firt home’s kitchen cabinets and we’ll be adding to our built-in project, hopefully this weekend.
Karen M. says
The “Crown” reigns supreme! It looks gorgeous.
Meredith says
Wow! Looks great and what an improvement!! Love it.
Reenie says
Love it!!!
Chelsea says
This is kind of unrelated/kind of related, but do you guys have recommendations for keeping things on top of cabinets in the little space there? I rent and so building up or renovating the cabinets aren’t totally an option for me, and right now, since what I’m renting is a tiny Queens apartment (in Astoria, which was John’s old stomping grounds, right?), leaving it blank and clean and empty is losing some super valuable storage real estate, so right now I just pile a bunch of the less-frequently-used kitchen tools up there. But, so my two part question is:
1) (Not relevant!) Any recommendations for using that space in a way that’s not unseemly but still functional, especially for storing woks, rice cookers, etc.?
2) (Relevant!) Will you guys be doing anything with the small spot on top of your cabinets? I see someone mentioned lighting?
Thanks so much!
YoungHouseLove says
If you have lots of space on top of your cabinets, pretty cookware (colorful pitchers and pots and dishes) could be pretty up there, or a bunch of baskets (or even glass vases in a similar color, like all blue and green ones). As for the tops of ours, we’ll most likely leave them as-is since there’s not much room up there with the new crown in effect. Although lighting would be pretty too!
xo
s
Jen says
As a fellow renter, I have noticed how DISGUSTING that top space can be. I just put my stuff up there and wash it when I take it down to use, but I’ve also thought about getting plywood to cover up the grease and dust…
YoungHouseLove says
Ooh I’ve seen someone put wax paper up there and change it every season or so (gross things stick to it and then can get tossed each season for a clean start).
xo
s
Christi says
We have space above ours and gets sooooo dusty, I just cleaned it since we are moving and it was bad! I have to say, it looked good but try to clean it often!
Cate says
Looks so good!!!!
Sarah @ RixenItUp says
This is a nice upgrade and seems to create a finished look. And since you asked, why yes, I did recently do a cabinet upgrade of my own! Not in the kitchen, but the bathroom. We had some very worn looking honey oak cabinets in there, and one way or another they HAD to be redone. So I restained them a dark espresso color and voila! It’s like we have a new bathroom. http://rixenitup.wordpress.com/2013/03/15/lucy-youve-got-some-staining-to-do/
YoungHouseLove says
Wow- that looks great Sarah!
xo
s
Jennifer A says
Thats a great improvement….. I know if my husband saw it he would suggest now you need to install LED light strips round the back side of the crown so they can glow at night time! We installed the LED strips as under cabinet lighting and we love them!
Jenny says
Looks good! We crown our cabinets, too. We only have the laundry room left, but husband is not overly motivated, haha.
While I like your kitchen, I get overwhelmed by all of the cabinet hardware. Have you considered switching to euro hinges, and maybe choosing a simple knob over all of the handles?
Jenny says
Just wanted to add-I like the handles on the drawers, it’s just the ones on the doors are the ones that seem busy.
YoungHouseLove says
We like them this way for now, but who knows where we’ll end up down the line :)
xo
s
Liz | Hogs Ever After says
Looks snazzy! I think it really helps balance the modern side of the kitchen with the more classic (yet still beautifully clean-lined) fireplace. It makes your frige cabinet look like furniture!
Kristen | Popcorn on the Stove says
I’m a fan – it looks so snazzy now!
laurie says
lol, not sure why but one of the things I noticed in your before and after photos is that there’s less food in your glass containers on the counter!
love the crown molding upgrade too of course.
YoungHouseLove says
Haha, we ate while we worked ;)
xo
s