Yesterday you saw how our board and batten project came out for the Pinterest Challenge, so today we’re back with the full tutorial shebang. And hold onto your safety goggles, it’s 2,000 words long. But don’t let all the words fool you, we’d say that this was one of the biggest bang-for-you-buck / most fool-proof ways to make an easy upgrade that we’ve encountered in a while. Wow, just realized I’m five sentences into this and I’ve already said “bang” twice. Not sure if that’s a good sign or what…
We had long known that adding some sort of molding feature to our hallway was in our future… and now we’re just kicking ourselves for waiting so long. It cost us a mere $57 for the materials (we did buy a tool on top of that, but we’ll get to that in a second) and it only took a few hour-or-two-long work periods over the course of 6 days (including some break days for paint-curing) to finally bring some oomph to our boring hall. So anyone who’s looking to tackle this on nights and weekends could hopefully do it within a week since each step only took a few hours and could be spaced out across each evening.
Planning Our Board & Batten
We were inspired by a few other tutorials – like Ana’s, Kate’s, Sarah’s, and Emily’s – and took pieces and parts of each to figure out what worked best for us. So our tutorial below may not be exactly what your space needs, but between the lot of us there should be a fitting solution in there! Let’s just say that we learned that there are many different ways that you can approach board and batten, so a lot is about personal preference, what suits your home, etc.
As for our approach, there are a few things to note upfront:
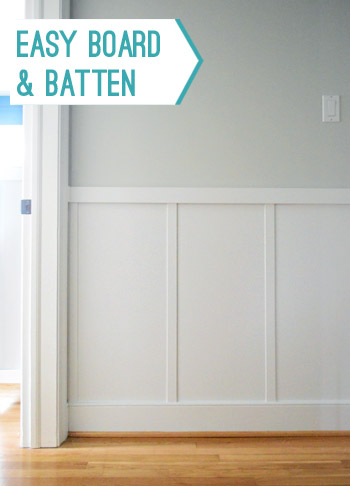
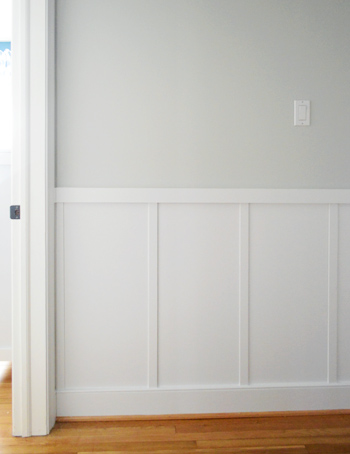
- We did not add any “board” to the wall – i.e. large flat panels. Since our walls are smooth (not textured) we just used the existing drywall as the backdrop for our vertical battens. Once everything was painted it all looked seamless and gleaming, just like a board would have looked. But if you have textured walls, check out Kate’s tutorial above.
- We used our existing baseboards. Why? Because it was easier – and you know we love to use what we have. Simply by choosing battens that were thinner than our baseboards, we could keep them in place and work with them (saving us time and money). But if you can’t or don’t want to take this approach, both Ana and Kate’s tutorials above talk about replacing the baseboard.
Oh, and if you’re not the word-reading type we made two videos of the process for you (one for the building portion and one for the finishing). So here’s how it all went down when it came to installing the rails and battens (including tips for how to keep the boards level, how to space them out, how to keep them from bowing too far from the walls, etc).
And here’s how we finished everything (including how we filled the nail holes, how I cut in without taping off, and a bunch of other stuff that we shoved in there):
And fret not if you can’t watch the videos (if, say, you’re at work) – we broke down all the steps with photos and descriptions right here (note: watching them later if you’re planning to tackle this might simplify things a lot – I always think videos make things less intimidating).
Measuring & Shopping For Materials
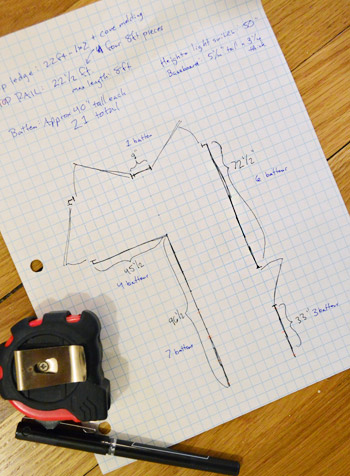
To start, we measured the space and planned our materials. My graph-paper sketch was probably overkill, but it made me feel better. It helped us plan how many boards we needed for the top rail and ledge, as well as count how many battens (the vertical strips) we might need.
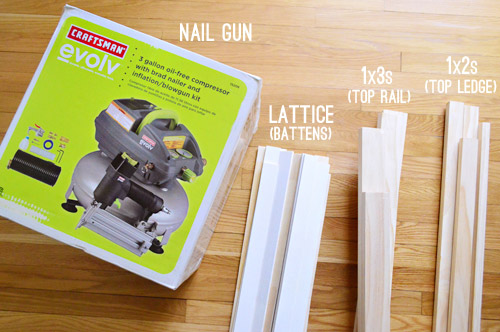
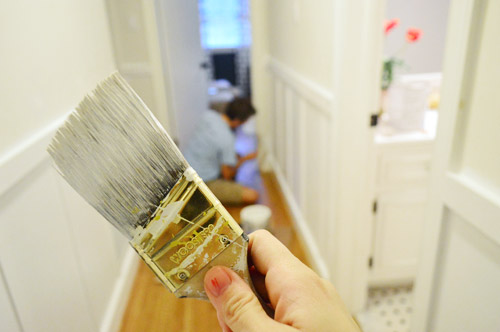
Next up was a supply run. We had most of what we needed on hand, so the only four items that we ended up purchasing are pictured below (the nail gun being a belated birthday gift from my sweet wife who was just waiting for me to pick out the one I wanted). Update: The nail gun shown below is no longer sold, but we’ve switched over to using this compressor-less nail gun these days anyways.
Tools & Supplies Needed
Here’s a full list of supplies & materials that we used (many of which we had on hand, along with the things we purchased above):
- Pneumatic brad nail gun
- Pre-primed lattice strips (our came in 12ft lengths, so I cut them down in store for easier transport)
- 1 x 3″ pine boards (for top rail)
- 1 x 2″ pine boards (for top ledge)
- Measuring tape
- Laser level (optional)
- Level
- Stud finder
- Miter saw (you can also use another saw for cutting wood, or even have them pre-cut in the store)
- Spackle, joint compound, or wood filler (for filling nail holes)
- Paintable white caulk meant for moldings & a caulk gun
- Sandpaper and/or palm sander
- Primer
- White paint (we used an extra durable cabinet-type paint in a satin finish)
- Paint brush, roller, and other painting supplies
*Buy your wood around a week before you start the project and just let it sit in your house (this is called “acclimating” the wood) to avoid any cracks caused by expansion or contraction, which happens if it’s not acclimated when it’s installed.
Installing The Top Rail
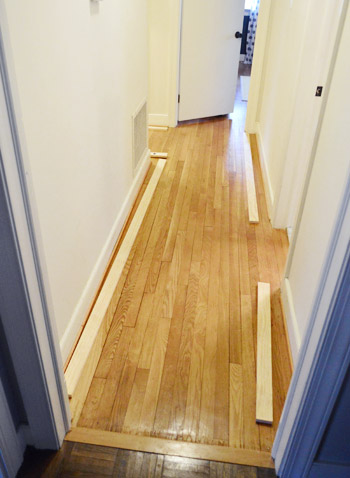
We opted to use 1 x 3″ pine boards for the top rails, which we wanted to attach first (after their acclimation period). So I cut them with my miter saw to fit snugly along each stretch of wall. If you have exact measurements for your space you can even get them pre-cut for you at Home Depot, so don’t let the use of a saw scare you off from this project.
Before attaching them to the wall, we had to do a few things – like deciding the height of our board and batten. We first assumed “the higher the better!” and held it just under our light switches and thermostat. But after stepping back, we realized the high placement was just making our eight foot ceilings look lower than they already are.
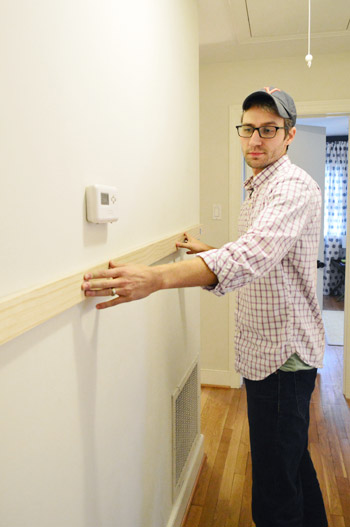
So, as you’ll see, we later landed on a more traditional height of 40″ off the floor, which is a lot closer to the “traditional range.” But again, many aspects of installing board and batten are just a personal preference thing, so go with whatever you think looks best for your space. I’m sure rooms with tall ceilings or ornate crown molding might look awesome with higher board and batten (as well as mudrooms and other entryway areas, etc).
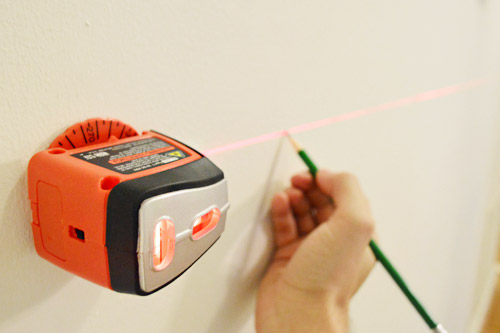
Since floors and baseboards aren’t always level, we relied on this cheap laser level that I picked up a while ago to mark the 40″ line on a few spots along each wall. Those marks created a guide for us when holding our 1 x 3″ board in place.
And since nails are always more secure when they go into studs, we also broke out our stud finder to mark each to-be-nailed spot along the wall. Obviously just remember to make your marks low enough that they won’t be covered when you hold up your top rail piece.

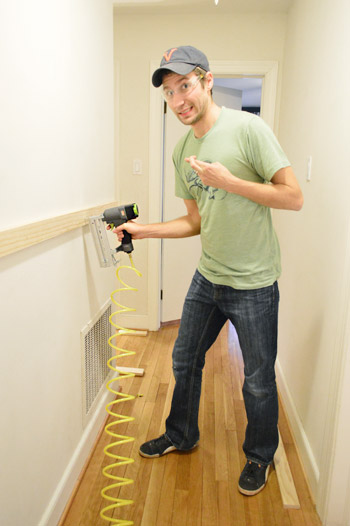
Next up was nailing the rails into place with my new pneumatic (i.e. air compressor powered) brad nail gun (the one photographed has been discontinued, but we switched to using this air-less nail gun anyways). This was my first time ever using one and it intimidated me the first few times, but now I’m in love with it (not as much as Sherry, who says she wants to marry it). I’ll write a separate post about it later, but let’s just say it was the saving grace of this project. It probably would’ve taken us three or four times as long to complete the construction portion of this project without it. We bought a pretty basic, but well-reviewed Craftsman model (here’s an affiliate link to it for ya).
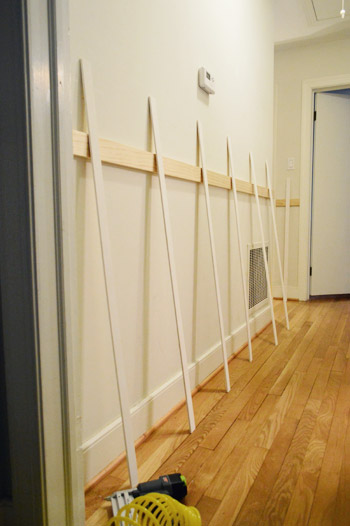
So here are all of the top rails in place. We opted not to glue them to the wall in addition to nailing them into studs simply because if we ever decide to remove or replace this, we don’t want to rip off chunks of drywall in the process. The good news is that the boards are so light – especially all of the vertical lattice pieces – that nails shot into studs with a nail gun are supremely secure… especially with the caulking that we did around any cracks to hold them even more firmly.
But even if you opted to glue things on top of nailing them, it wouldn’t add much time or cost to the project (a tube of Liquid Nails is just a few bucks). Speaking of time, if you subtract the time it took us to set up and figure out the nail gun, I’d say the process of measuring / cutting / nailing these took us about an hour.
Adding The Vertical Battens
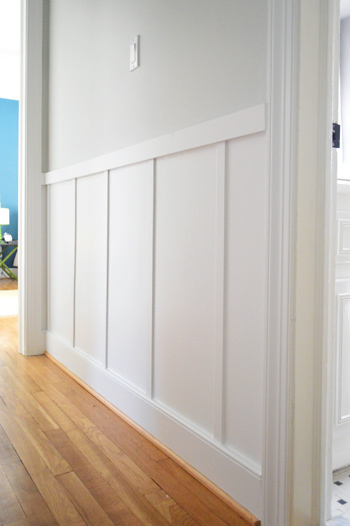
We used lattice strips at Sarah and Emily’s suggestion because they were cheap (66 cents per foot!) and they didn’t stick out past our existing baseboard. Had we used 1 x 2″ boards like some folks do, it would’ve hung over our baseboards. We could’ve replaced our baseboards too, but then they would’ve stuck out past the trim around the four (count ’em four!) doors in our hallway. So yes, chunkier battens could be nice in less narrow spaces (we didn’t want ours to jut out too far and close things in) but in our case we actually thought the lattice + rail setup was ideal and we like the dimensional-but-not-crazy-thick result.
We chose to space our battens at 16″ intervals because our studs are 16″ apart and this meant that more nails would go into studs, not just into drywall. Plus, when we held up a few spacing options it looked pretty darn good (seriously, half of this project is just deciding what looks best and going with it). To make our lives easy, we used a scrap piece of 1 x 3″ board to make a spacer (a 14.5″ spacer kept the lattice 16″ apart from center to center).
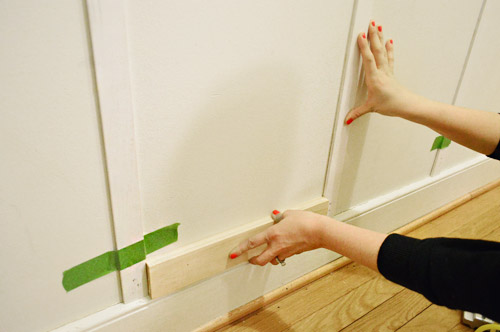
The lattice was light enough that tape held it to the wall while we used a level to make sure each batten was perfectly vertical. Then Sherry went back with the nail gun and secured them in place. Is it wrong to say that watching my lady concentrate so hard while wielding a power tool got me a little hot and bothered?
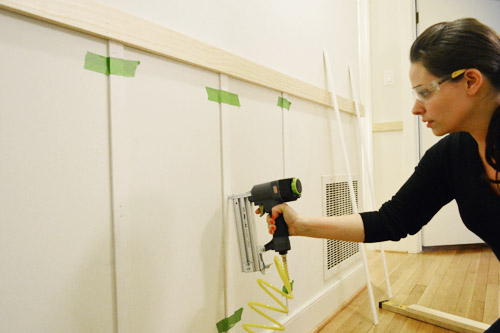
About an hour-ish later, all of the battens were cut to size and nailed into place.
Since we wanted the batten on the facing walls to line up (and that’s where the studs were, which added stability), the placement was pretty easy to determine. But if you were tackling this and not every batten could end up in a stud to accomplish a balanced look, I’d go with balanced placement over hitting every stud (they’re seriously as heavy as a paint stirrer, so they’ll likely hold up fine either way).
At around this stage of the project, Clara saw it for the first time – and here’s her reaction word for word: “Wow! It’s beautiful! Did a man come while I was sleeping and bring that?” Is that kid hilarious or what? She totally didn’t give us credit for it. We think it’s because that morning the heating guy came with an oil delivery for us, so she remembered a man coming to help with something and assumed he came back to fix up the hallway for us. Naturally.
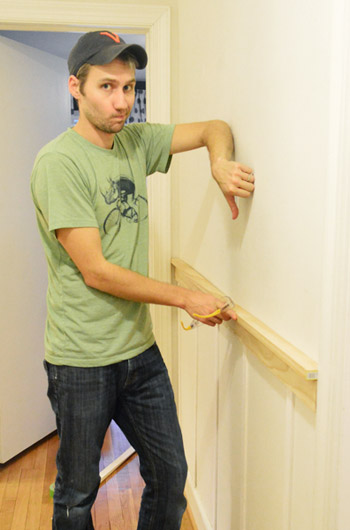
Lots of the tutorials we saw included adding a ledge along the top to sort of beef things up or create a spot to lean art or other items. We bought some 1 x 2″ pine for this purpose but as soon as we held it in place we realized we didn’t really like it. Since it wasn’t going to be a functional ledge for us, it basically just narrowed the hallway more and created a few hazardous little corners for tiny heads to walk into. So we scrapped the idea, returned the wood, and enjoyed calling the construction phase: COMPLETE.
Prepare For Painting
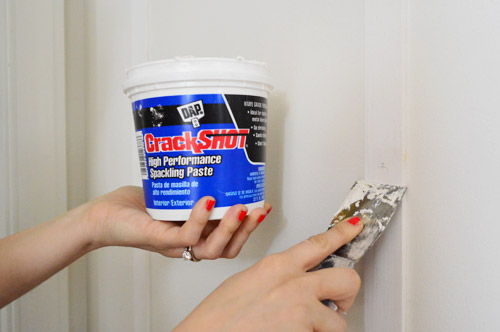
The next day we started to prep the space for painting by filling nail holes and caulking gaps. At the recommendation of some of you guys, we went with spackle over wood putty (we hear joint compound works too) since it’s said to be easier to work with and holds up better over time. It certainly went on easier than wood filler so assuming it keeps looking as good as it looks right now, we’re completely sold on that approach for filling nail holes after your rails and battens are hung.
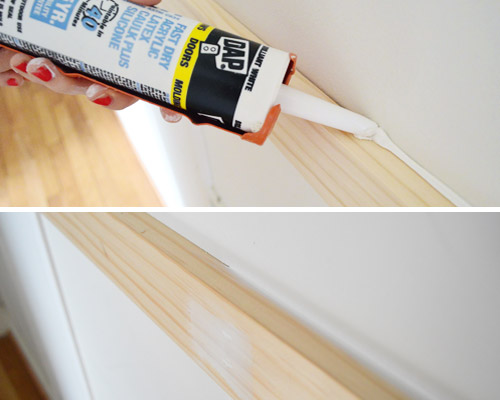
After all of the nail holes were spackled (not a fast process, but not too bad – maybe it took an hour total?) we used paintable white caulk to fill some of the gaps between our boards and the wall. Since our old house doesn’t have perfectly flat walls, this was a necessary step to keep the project looking nice and polished in the end. We didn’t do every edge, just the ones that needed it (across the top rail and a few places along the battens). I’d say the caulking step added another hour of work in case you’re wondering. Oh and definitely watch the finishing video in this post for more details about exactly what caulk we used, how I smoothed it, etc.
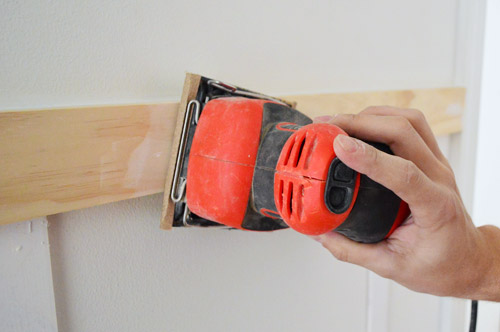
Later that day we broke out the palm sander to get rid of any excess spackle around the nail holes.
Prime & Paint
After that, the rails and battens were ready for primer. We already had Kilz Premium (which is a stainblocking primer) on hand, so we used a brush and a small foam roller to put one coat of primer on each piece of wood to prevent any bleed-through in the wood down the road (always a worthwhile “insurance” step). And we went over the battens too, just to be safe (even though they came pre-primed). Here’s the whole thing primed and almost ready for paint. Just had to let the primer dry.
The next day it was finally time to paint the board and batten. We used Benjamin Moore Advance paint in Decorator’s White in a satin finish leftover from our office cabinet painting project. Advance paint is especially durable (we used it on our kitchen cabinets too) so we figured it was a good choice for hallway molding that might get its fair share of wear and tear.
Admittedly, the finished picture of the painting step isn’t very dramatic since the walls above were still off-white.
So after letting the paint cure for a couple of days we tackled painting the walls above the board and batten. Sherry was still nervous that taping the freshly-painted top rail could peel paint off, so she opted to cut in by hand around the top rails (you can read her tips for doing that here and watch the video in this post and the video here for even more tips). She did a great job, despite not having her usual short-handled brush handy.
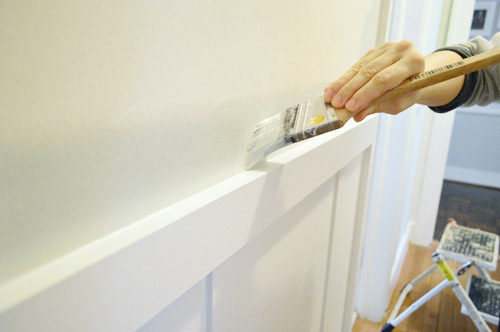
After she was done edging, I went back with the roller and (after a second coat) we had the finish line in sight.
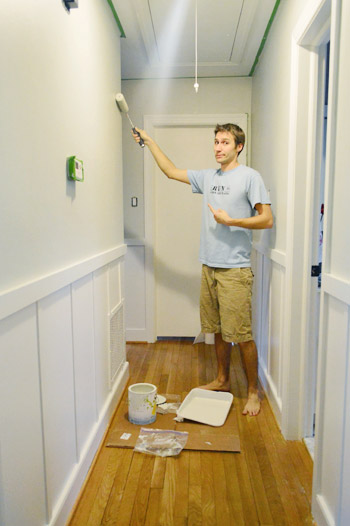
Oh, and if you couldn’t tell – we were painting the walls with Moonshine by Benjamin Moore since:
- we had some leftover from painting our dining room
- we didn’t want anything too bold/dark to close in the hallway
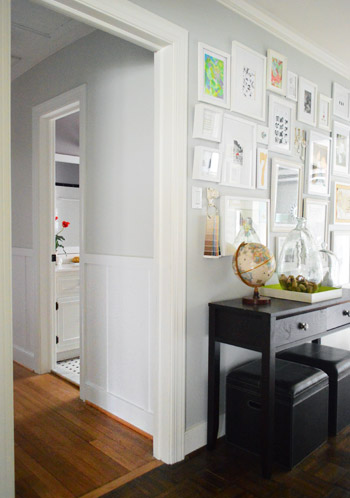
- it’s the color in the adjacent frame-filled hall and we wanted them to relate to each other (so things didn’t feel too choppy)
Note: we still have to paint the trim in the frame hallway the same white color as the board and batten.
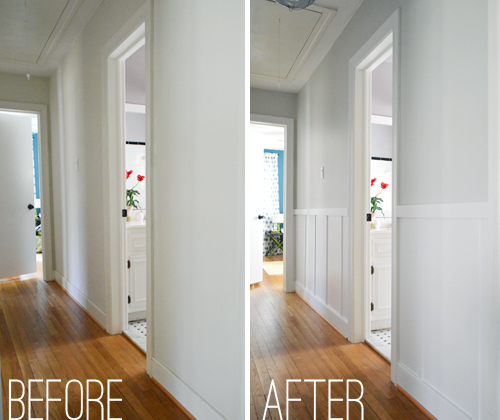
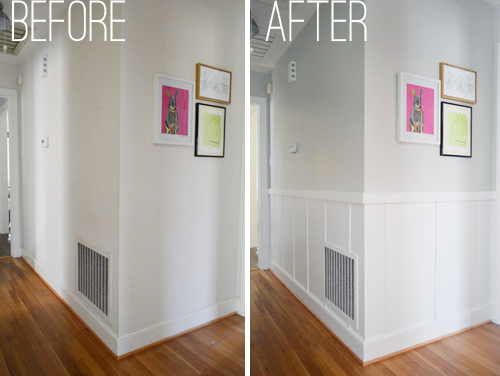
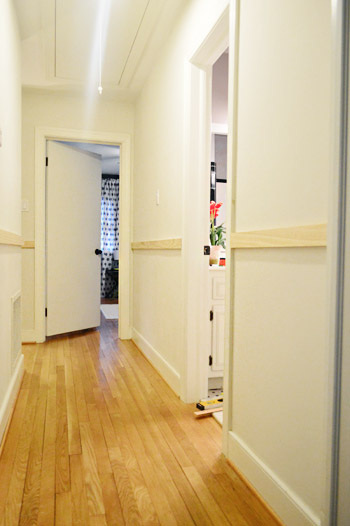
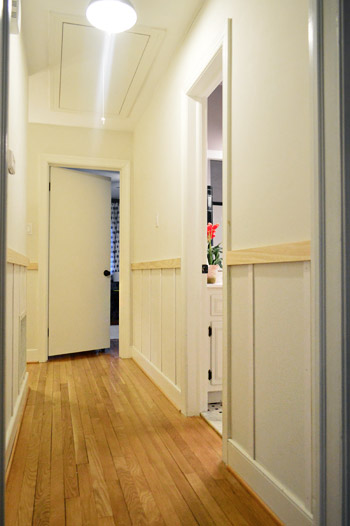
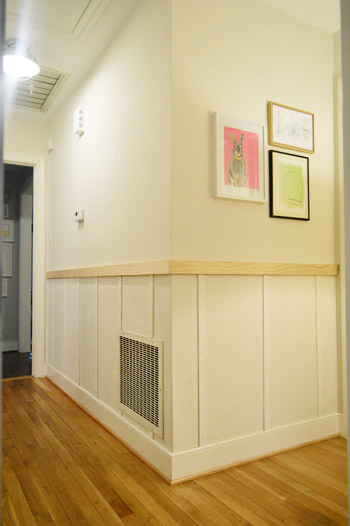
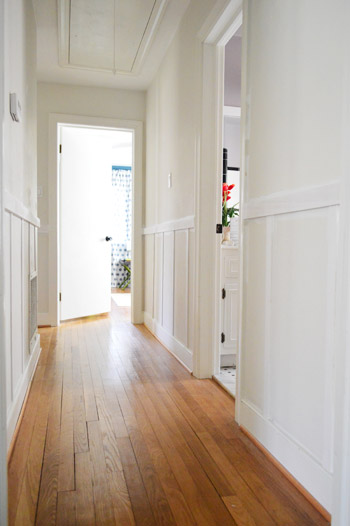
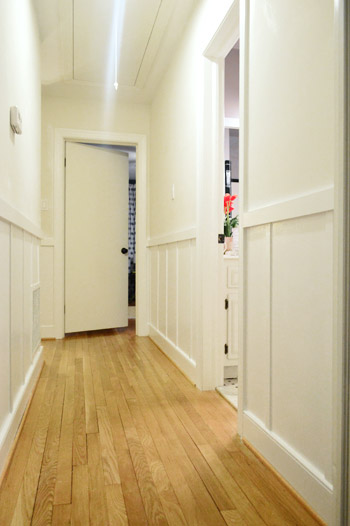
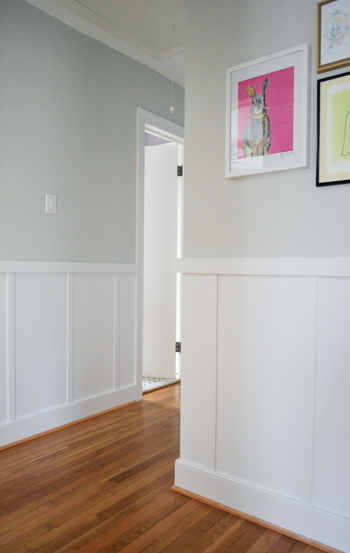
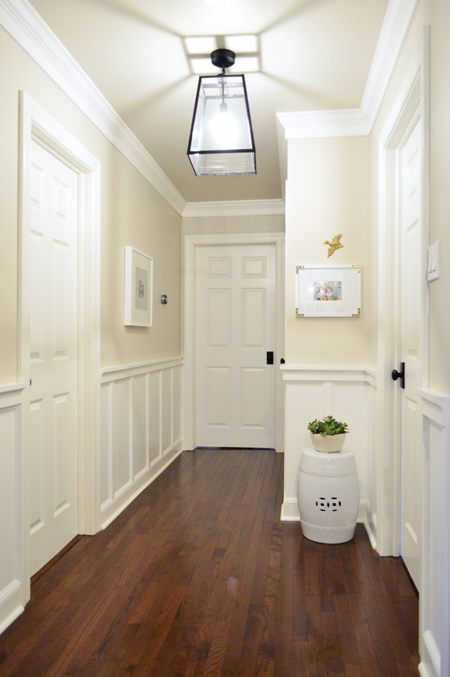
Boom. Just like that we’re ready for after pictures. So here we go!
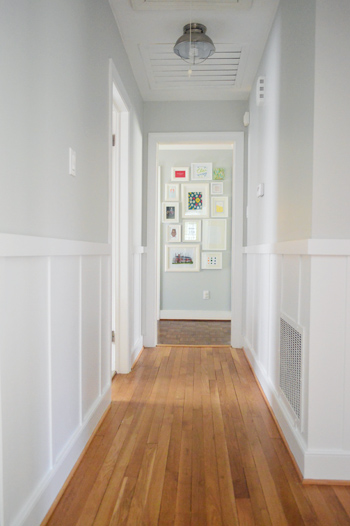
We’re in love with the result. And we’re kicking ourselves that we didn’t do it sooner. You know how you never quite realize how “blah” a space is until you do something to it and wonder why you waited so long? I mean, we walk through this hallway dozens of times a day and all we had done up to this point was hang some art in one small corner (the most hidden part of the hallway, ironically). But now that we’ve got the board and batten up we’re ready to hang some more.
Total Project Cost
Okay, so let’s break down the budget. We only spent money on three items since we had things like paint, spackle, and caulk on hand. And had we actually purchased my nail gun back at my birthday in November as planned, our total cost for the project would’ve been only $57. Crazy, right?!
- Four 12′ pieces of lattice – $32 ($0.66/foot at Home Depot)
- Two 8′ pieces and two 6ft pieces of 1 x 3″ pine – $25 (also from Home Depot)
And time-wise, our project stretched over the course of five days (six if you count the trip to Home Depot for the materials). But if we had the luxury of not having to schedule things around Clara, it probably could’ve been completed in three days (first day for construction & spackling/caulking, second day for sanding/priming/painting the board and batten, third day for painting the wall). Heck, you could probably even ditch that third day if you’re doing this project on an already painted wall.
But if you’re doing the nailing by hand it might take longer (which explains why Sherry had the urge to make out with our nail gun). Oh but if you don’t want to buy one, you can always rent one from your local home improvement store, so that’s another option.
But here we are, roughly six days later and waaaay more excited to walk down our hallway. We’re now in the midst of figuring out what to hang on the walls above the board and batten, as well as choosing what next project we can take on to satisfy the itch I’ve now got on my nail gun trigger finger (after I wrestle it away from Sherry). I smell some crown molding in our future…
UPDATE: We repeated this project in our new house, but with a twist to make it feel a little bit fancier. Check out the tutorial for our new twist on classic board & batten here.
Update – Wanna know where we got something in our house or what paint colors we used? Just click on this button:


marjo says
This is a great project! Pretty sure you mean ‘fool you’ rather than ‘food you’ :-)
YoungHouseLove says
Thanks Marjo! All fixed!
xo
s
Heather says
Loving this post and hate to be the spelling police, but typo in line three…food=fool?
Back to read the rest. :)
YoungHouseLove says
Thanks Heather! All fixed :)
xo
s
Ainhoa says
We did the same thing about a year and a half ago, same method (no panels, reusing baseboards). It was an awesome project!
Blair says
This gave me a chuckle, but I’m sure you didn’t intend for the sentence to say “don’t let the words food you”. Is someone else thinking about breakfast as much as I am? ;)
YoungHouseLove says
Haha, thanks Blair! I’m hungry! Haha.
xo
s
Crystal says
The board & batten looks great and adds so much interest to the hall.
It looks like you have an attic fan (so do I) and in one of the after pictures it looks like it’s painted white. Did you guys paint it white or is that a glare in the picture? I’ve been wondering about painting ours to blend with the ceiling more because it is such a metal eye sore.
YoungHouseLove says
Ah yes, we recently tackled a few other hallway upgrades and owe you the full rundown on those (just had to get our Pinterest project in by the deadline, hah!).
xo
s
Ellen says
Nail guns are awesome! We’ve used ours for SO much trim – particularly when we were redoing our stairs…
The board and batten look great! We want to do some really tall board and batten (kind of like plate rail height) in our dining room – way down the line…
Kathy Z says
First paragraph: But don’t let all the words food you,
I’m pretty sure it shouldn’t fool me. :)
YoungHouseLove says
Haha, all fixed!
xo
s
Michelle says
Typo alert! “fool” not “food”
meganleiann says
You’ve convinced me! Board and battening is now on my to-do list!
susan says
Awesome! You guys did a great job, and I love how it looks. I wouldn’t even add art. It feels serene without being boring.
Jeff H. says
Looks great! I’m a huge fan of our nail gun, too. We kept going back and forth about whether to get one, but found one on sale at Lowe’s. We were super glad we bought it after the first piece of crown molding went up in our family room (pictures will be up on Friday). Now I can’t even imagine trying to get that stuff installed without one, not to mention all the other things we’ve used it for.
Annelies says
It looks wonderful ! I would love to have the same in my hallway ! Good job, again !
Julia @ Chris Loves Julia says
Shoot. It looks awesome. The fourth photo from the bottom (looking into the frame hallway) is the MONEY shot. Money.
YoungHouseLove says
Aw thanks Julia! I love that you can see the frame hallway beyond this one as you walk down the hall.
xo
s
Sarah says
There are so many good “that’s what she said” moments in the 2nd video! :)
YoungHouseLove says
Hahaha, oh yes there are!
xo
s
Ginny says
This looks amazing! Our house has a similar hallway, we might have to try this! On a random note, we have an attic as well that used to have the rope and plastic ball- it annoyed us so we replaced it with a leftover hardware knob. It might not be practical if you go in the attic a lot, but if you don’t it might make a nice finishing touch. Just a thought! :) Keep up the good work!
YoungHouseLove says
Sounds so pretty! I love that idea!
xo
s
Kay says
Wow. Why haven’t I thought of that? I’m short, need a stepladder to grab the rope & ball anyway, why not make it pretty and not dangley instead?
Needle little Balance says
Great project!
Totally random: My mother tongue is german and I´ve never heard the word shebang before I read it on your blog where you use it quite often. I finally looked it up in my dictionary today.
Before I was always reminded of that Ricky Martin song and I was a bit confused. Haha.
YoungHouseLove says
Hahah, so funny!
xo
s
Ade@fortheloveofpainting says
My husband is going to do that on one of our walls, but unfortunately ours is a lot more work. We have texture, so we need to put a backing on the wall to make it smooth. We also have to replace the baseboard to fit with the matching top piece…it will look awesome, although you have the advantage of an older house! Looks great!
YoungHouseLove says
I bet it’ll be so worth it Ade! Good luck!
xo
s
Wendy says
OK, I’m sold. We are so doing this in the hall asap!
YoungHouseLove says
Good luck Wendy!
xo
s
bridget b. says
Love this! And I like the idea of lattices as well. So easy to work with. What do you guys think about the idea of having 2 different styles of board and batten in a house?
We have an open floorplan on our first floor, and I want to do simple board and batten with coat hooks for the 2 foot space by between my front door and garage entry doors. Then, about 10 feet away we have a completely blank wall at the back of our living room that I want to add some board and batten like this: http://pinterest.com/pin/170503535864534403/.
Do you think it’s too busy if the styles don’t match?
Thanks!
YoungHouseLove says
Hmm, for some reason that link isn’t working for me. Maybe Pinterest is being glitchy? Can anyone else see it?
xo
s
bridget b. says
oops! that was from one of my secret pin boards :). here’s the picture: http://www.muse-decor.com/wp-content/uploads/2012/04/living-dining-after-1.jpg
YoungHouseLove says
So pretty! I think as long as they’re both the same type of molding (one isn’t ornate and curvy while the other is boxy) it would look awesome! The board and batten pattern in this link has the same look as the rails and battens that we used so I bet they could get along swimmingly!
xo
s
Kelley says
Looks great, guys. I agree, this is a fabulous way to add punch to a space on the cheap. We did this in our master bedroom to mimic the B&B in other parts of our house. We used the painter’s tape method as well. As for the rest of our project, we kind of made it up as we went and as we ran into unexpected bumps. Here’s the day we were on the tape train! http://www.kelleytime.com/2012/03/board-batten-wainscoting-project-part.html
YoungHouseLove says
Looks great!
xo
s
Rachel says
Looks amazing! I always thought that a board and batten project would be very hard, but you made it seem very do-able!
YoungHouseLove says
I promise you can totally do it Rachel! Good luck!
xo
s
Meaghan says
looks amazing! and I can’t wait to see how it comes together even further with framed art. awesome Pinterest challenge SUCCESS!
Jess @ Little House. Big Heart. says
We have that same brad nailer and baby air compressor! I will say: a) keep your receipt (you can’t return Evolv or have it repaired without it) and b) you might want to invest in a new air hose for it if you plan on using it often (ours started leaking shortly after our first job and couldn’t keep enough pressure to run the nailer)!
Thanks for the tutorial! Do you think you’d be able to add a backerboard between the slats or would it make the whole thing too think? We don’t really want our horrid textured walls showing when we do this in our dining room. (PS sorry I wrote you a book this morning!)
YoungHouseLove says
Thanks Jess! We read that about the air hose and plan to pick up an upgraded one just to be sure! As for the board, you can definitely use that – just check out Kate’s tutorial (linked in this post) to see how she did that with textured walls. Good luck!
xo
s
Pat E. says
I also have the Evolv, but am having a horrible time finding more nails for it. Where are you buying them?
Thanks!
Katie says
We LOVE our nail gun – it has come in handy more times than I can count during our reno. And a use you may not have thought of yet – now that you have the compressor you can get a crown stapler or other pneumatic stapler for doing upholstery work. Changed. My. Life.
YoungHouseLove says
Wahooo! So excited about that!
xo
s
Cara D says
It looks great! I would like to do this in our very long boring hallway but there is no doorway, it just open to the livingroom so I’m not sure if there is a way to end it that would look good. Any ideas?
YoungHouseLove says
Hmm, maybe you can use some molding pieces at the end to create sort of a capped look? Maybe try pinterest or google for images since I’m sure there’s some inspiration out there!
xo
s
bridget b. says
Cara, this post talks about how to frame the end of an open wall. They used pallets (rather than board and batten), but maybe the concept is the same? http://www.cape27blog.com/2012/10/20-diy-pallet-wall/
YoungHouseLove says
Thanks so much for sharing that link Bridget!
xo
s
Cara D says
Thanks so much bridget! I may just try this now.
April says
I love how it seems more connected to the rest of your house. Nice flow of colour and character!
YoungHouseLove says
Aw thanks April!
xo
s
tae says
it looks awesome! i’d love more details on the caulking process. did you smooth it out after you put it on? what kind of caulk do you like to use? we have some cracking caulk that i’d love to fix up!
YoungHouseLove says
Definitely watch the video for all of that info! I did it “live” for you, so you see all the steps and exactly the brand I used :)
xo
s
Maribel says
I recently started painting our baseboards they are nothing to write home about. They are just basic cheapy builder type, maybe one day we will replace them. Well I really noticed how off the wall is there are some spaces between the wall and the baseboard . I read you used paintable caulk, do you sand it to get a smooth line just wondering if you can see the line after painting.
YoungHouseLove says
You actually don’t sand caulk, you apply it with a tube and smooth it with your finger for a nice seamless look (you don’t see any line when you paint it if you smooth it correctly). I’d definitely watch the second video about “finishing steps” where I show you exactly how I apply it in real-time so you can see what works!
xo
s
Cheryl says
LOVE how it dresses up your hallway!! Not to be nitpicky, but in the last paragraph, it says “hand crown molding” instead of hang. My mind “fixed” it after the second reading, but I know how typos bug you…
Love how Clara gave the oil guy credit for all your hard work. Haha!
YoungHouseLove says
Aw thanks Cheryl! All fixed!
xo
s
Anna says
Great idea! :)
It looks awesome!
kaycee says
beautiful! job well done, as always
Diane @ Vintage Zest says
Haha! Maybe this post should have been called “Young Nail Gun Love” based on Sherry’s need to make out with it! I love this idea, and I’m totally pinning it now. :)
YoungHouseLove says
Haha, I love me some nail gun!
xo
s
Renee says
Wow – love it! You made it look so easy. I am thinking we should follow your lead with a hallway too…and then I will probably end up looking for more places to do it :)
YoungHouseLove says
Haha, it’s hard to resist wanting to put it everywhere!
xo
s
Taya says
LOVE!!!!!!!
Katie says
Wheet-Woo. Purrrrrrrrrrrr. Drool.
Seriously. I love this. We installed board and batten in our master bath and seeing your hallway makes me want to put it up everywhere. It looks awesome! And, I totally agree – pneumatic nail guns are da bomb. :)
Constance says
Wow – just wow! This is one of my favorite transformations so far. It looks so “luxe”! I might have missed in the in the 2,000 words, but did you jazz up your attic pull-down door with some batten and a light as well?
YoungHouseLove says
I love that idea!
xo
s
Carrie says
Nice glasses, John! I never noticed them before, but you look super stylish :-)
YoungHouseLove says
Isn’t he hunky with his glasses? I’m on a campaign to make him wear them more.
xo
s
Erin J says
love it!!
Crystal @ 29 Rue House says
It really turned out awesome. I have to admit I’ve been turned off by this design when I see DIY jobs where the batten boards hang over the baseboards so I’m glad to know there’s an alternative that works well!
Kate says
Great tutorial/walk through. Definitely going to be showing this to my hubby so that we can do it for our long hallway. Plus I think my hubby would love an excuse to get another toy (i.e. a nail gun) heheh.
I love you guys! Can’t wait to see what else you have in store for us readers. =)
YoungHouseLove says
Aw thanks Kate!
xo
s
Rebecca @ the lil house that could says
The hall looks great! I don’t know how you’ve gone so long without a nail gun! The possibilities are endless now. Though crown is a killer like everyone says. Our motto with it is… a little caulk, a little paint, let’s make it what it ain’t…
YoungHouseLove says
Haha, I love that motto!
xo
s
Morah says
Wow! That looks so good! Well done guys.
Whenever I paint walls with a roller I get tiny splatters of paint all over that fly off the roller. How do you prevent that from happening? Clearly it must not happen to you if you’re bold enough to paint without taping off your lovely new board & batten! Thanks :)
YoungHouseLove says
It sounds like you might have too much paint on your roller. Also if you use good paint (cheaper paint is thinner) it might not splatter as much and will have more coverage. Also, you want to roll nice and smoothly (not too crazy fast or anything). Hope it helps!
xo
s
Kristen | Popcorn on the Stove says
This definitely changes up the space! I think it looks great :)
Tyesha @House Made Home says
I absolutely love it! I’m so happy that you shared where you purchased your nail gun. We’ve been needing to add one to our DIY bag of things, but the ones that I have seen were just too expensive…I can’t wait to purchase this one!!
Elisa says
Amazing how polished it looks!
Silent Lu says
So many of your blog posts have inspired me in my own house… now I’m wanting to do this too. dang it! XD
Looks great!
Stephanie says
I’m SO doing this. Well, my husband is. haha. I wonder if it would look weird if the board and batten is a soft gray and the walls are white…. hmm.
Stephanie says
also meant to say it looks so great!
Heather says
Jon is so cute!! How do you cope w/ all the cuteness??
YoungHouseLove says
Haha, it’s a hard job being his wife, but someone’s gotta do it!
xo
s
Sara says
LOVED this tutorial! Thank you so much for sharing the step by step! It looks fantastic!
liz marie says
Love this!! This inspires me to do this in our home that we are renovating right now! It adds so much detail and beauty for very little money. Love it!