The stain on our kitchen cabinets was too orange and dated-looking. We loved the wood grain, but just wanted a darker, more contemporary color. We just didn’t love the idea of sanding or stripping off the old finish. Luckily, we found a product that would let us skip that messy and tiring step while still giving us the end results we wanted.
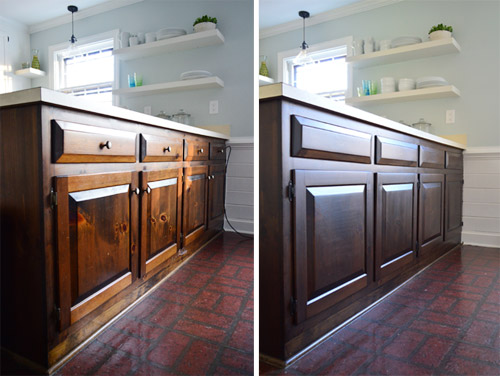
You can see our results above, and read below for how we got there!
What Stain Product Did You Use?
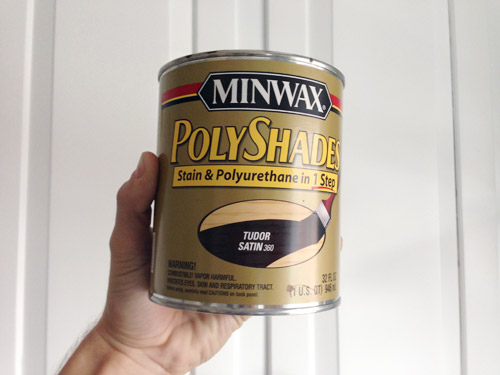
We used Minwax Polyshades for this project, which is similar to a gel stain. Unlike traditional wood stains, which have to soak into the wood to work, a PolyShades coat or gel stain product sits on top of the existing stain, much like a paint application would. Like paint, you need to take a bit more care when applying PolyShades to avoid drips or brushstrokes – but we’ll cover that in more detail below (even on video)!
These products come in lots of colors, but we chose one called Tudor in a satin finish. We had previously used a darker PolyShades color on our bathroom vanity (Espresso) but wanted something slightly lighter in the kitchen. Keep in mind that your final color will be impacted by the color you are staining over, so you may want to test a few colors in an inconspicuous spot (like the back of a door) before starting. And you should always go darker – so from light to medium, or medium to dark.
These products are also oil-based, which means you can skip the usual last step of sealing the stained surface with a coat of polyurethane sealer (like you have to do with water-based stains).
Can You Stain Your Cabinets Darker Without Sanding?
While yes, you can avoid completely sanding and stripping an old stain finish off of your kitchen cabinets, you will need to do some light sanding as part of this project. So be wary of any tutorials that suggest otherwise. But don’t fret – this is the type of sanding you can easily do by hand with a simple sanding block or sheet of sandpaper. Lightly roughing up the surface will help your new stain adhere for longer-lasting results.
What Materials Do You Need?
The best part of this project is probably what you DON’T need. You don’t need any polyurethane sealers or varnish. You also don’t need any chemical strippers, power sanders, or other heavy-duty products to get your already stained cabinets down to their raw wood. Still, you will want to have these supplies on hand:
- Minwax PolyShades or similar gel stain product (we only needed 1 quart for two coats)
- 2 or 3 stain-grade paint brushes (small enough to fit in mouth of stain can)
- 220-grit sandpaper or sanding block
- Extra fine steel wool (#000 grade)
- Screwdriver or drill
- Dropcloth or old cardboard
- Nitrile gloves (optional)
- Wood filler & putty knife (optional)
- Painter stands (optional)
- Degreaser or liquid deglosser (optional)
You will also need a space – like a garage or maybe a basement – to lay out your cabinet doors while staining and drying.
How Long Does It Take To Stain Your Cabinets Darker?
The process is very straightforward as DIY projects go (if you can paint a room, you can do this) but it does take a bit of time, mainly due to the drying process. Ours took about five days total, but yours may vary depending on the size of your kitchen or the amount of cabinetry you’re staining (we were only doing our lowers).
- Prep day
- First staining day
- Second staining day
- Drying & curing
- Reassembly
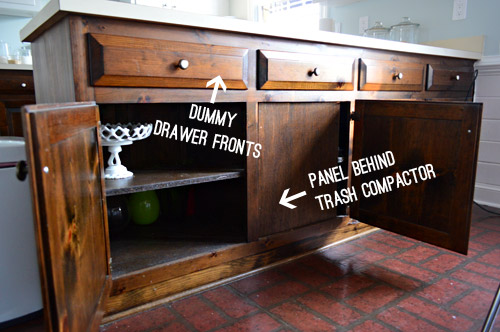
Step 1: Remove Cabinet Doors & Hardware
Before beginning, you’ll want use your screwdriver to remove your door, drawers, and any hardware (knobs, pulls, hinges, etc) so you’ll have unobstructed surfaces to apply stain too. You also want to spread out your doors and drawers apart from the cabinet frames so that those two surfaces don’t accidentally come in contact during the process (which could make things stick together).
We propped all of our doors up on old paint sample cans, but you could also use a set of painter tripods if you’re fancier than us.
Step 2: Patch Any Hardware Holes
If you are changing any hardware (like using a different pull size or hinge style) you’ll want to fill any useless hardware holes now. We chose to eliminate all of the knobs on the backside of our kitchen peninsula for a cleaner look. The drawers were just dummies anyways (they pulled out on the other side) and doors were just secondary/less used access points to the front cabinets.
So Sherry wood puttied the holes, let them dry, sanded, and repeated. We always like two coats of wood putty on big holes like this to account for any shrinking or dips. In retrospect, we should’ve used a darker wood filler that was closer to the original cabinet color.
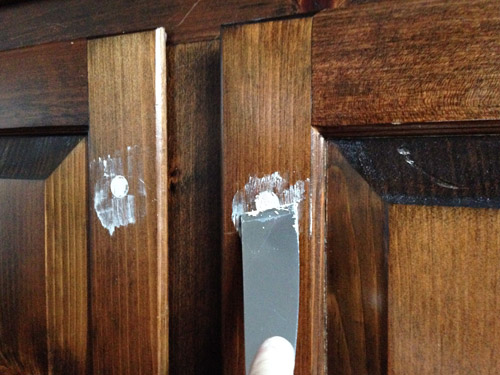
This lighter wood filler is what we had on hand and we made it work by dabbing a little more stain on the puttied parts with each coat of PolyShades.
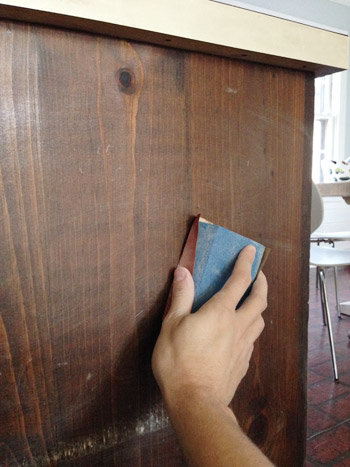
Step 3: Give Your Cabinets A Light Sand
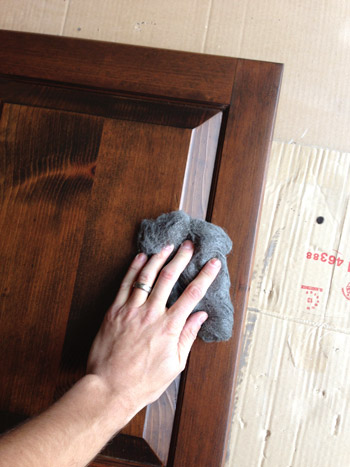
To prepare for staining, you’ll want to sand everything – drawer, doors, and frames – lightly with a high grit sanding block. Again, you’re not trying to remove the old stain. You just want to rough up the surface slightly so that the new stain can adhere.
After sanding, be sure to wipe everything down with a damp rag or paper towel to remove any sanding dust or dirt. Also, if you have any spots that are coated with grease or grime, you may need to use a spray degreaser to make sure the surface is fully clean. We wiped everything down with a liquid deglosser just to be safe before beginning.
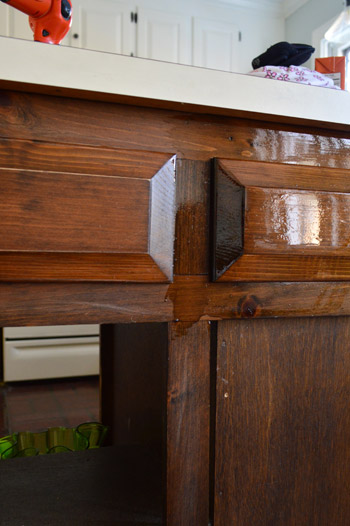
Step 4: Apply Your First Coat of Stain
PolyShades is best applied with a paintbrush and you’ll want to systematically do your frames, drawer fronts, and both sides of any cabinet doors. We actually chose to not stain the backs of our cabinet doors (shhh!) but if you do, be sure to not flip them over until your stain is fully dry.
Also, don’t be alarmed if your first coat doesn’t look much darker going on. It will dry darker and you can always do additional coats until it’s dark enough for you. We ultimately did two coats.
Note: These are dummy drawer fronts that are screwed in place, which is why we didn’t remove them.
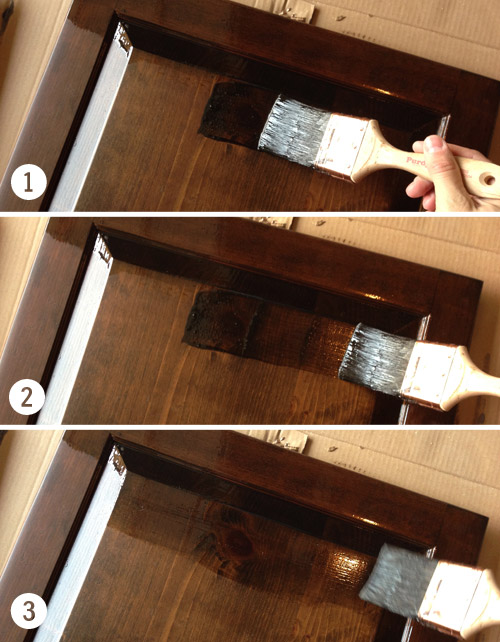
Tip: Applying PolyShades For A Smooth Finish
We had learned from our first project using PolyShades that applying it is pretty straightforward, but it can be a little challenging to keep it from looking drippy or streaky. We came up with a simple method of dragging the brush along everything after it’s applied to smooth it out. I filmed this quick video of myself putting one coat on a door so you could see it in action:
Note: You can also view this video on YouTube
In case you can’t watch the video, here’s the gist:
- The stain goes on pretty thick, which is exciting if you’re going for a darker color. Resist the urge to leave it thick because that excess stain will create drips.
- Don’t worry too much about brush marks at first. Focus first on covering the area that you’re working on.
- Once you’ve got the whole area covered, go back over the whole surface with long, even strokes. This will thin everything out and make your brush lines more even.
Although do as I show in the video (not in the pics below – oops) and brush in the direction of the wood grain. This will help any lingering brush lines blend with the wood grain better.
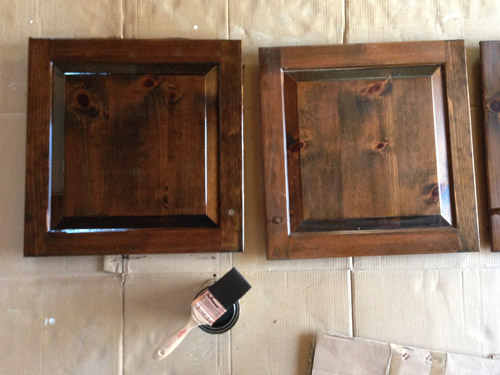
Step 5: Let Dry, Buff, & Recoat
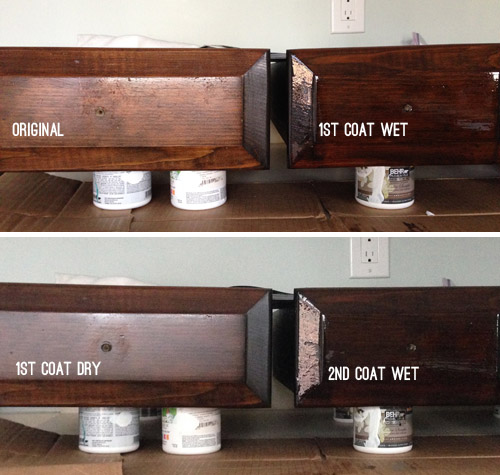
After our first coat fully dried (we gave it 24 hours) it was substantially darker than it looked when wet – phew! If you’re happy with the color, you can be done here. We wanted our slightly darker so we chose to apply a second coat of PolyShades.
Before beginning the second coat, we followed the manufacturer’s instructions and buffed the first coat with some very fine steel wood (000 grade). This doesn’t visibly damage the finish, it just roughs it up enough for the second coat to hold nice and firmly.
You can see below how these coats “build” and gradually get darker. Also, you can tell how the “wet look” wasn’t a good predictor of how it’d dry.
Step 6: Let Second Coat Dry
The next day, as our second coat was almost fully dry, we could finally see the results of our efforts (thanks to not staining the backs of the cabinet doors!). You can see in the side-by-side below that we definitely achieved the darker and more contemporary, less orange and dated look we were hoping for. And we loved that you could still the wood grain coming through!
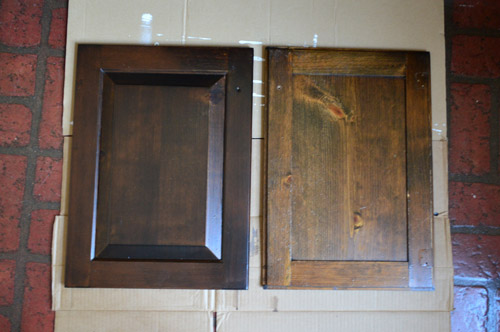
Again, this is the part with a traditional stain you would need to seal your wood cabinets with varnish or polyurethane. But since PolyShades is an oil-based stain and poly in one, you can skip it!
Step 7: Reassemble Your Kitchen
With everything done, you can reattach your drawers, doors, and hardware. If you’re installing new hardware, we’ve got a fully tutorial on how to easily (and quickly!) make new holes for cabinet knobs and pulls. For us, we just used the existing holes and added darker knobs that almost disappeared against the dark stain. So here’s our final look!
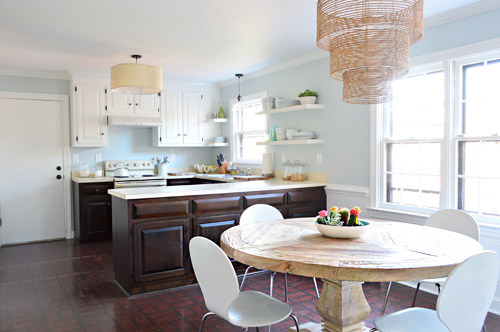
As a reminder, this is where we were last week with those redder and more knotty lowers. Although, this is after we had painted the upper cabinets white.
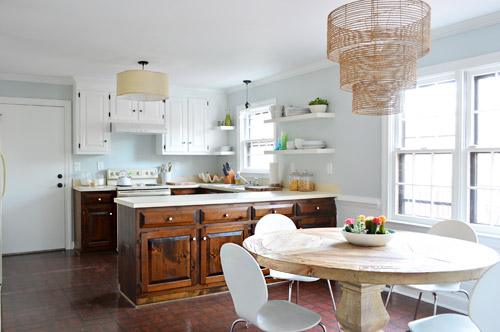
And it’s a far cry from where we started when we bought the house!
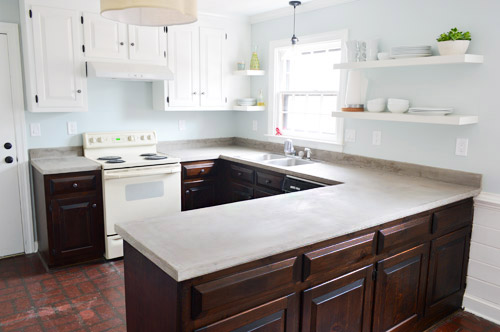
UPDATE: Since originally completing this project in 2014 we soon updated the laminate countertops by applying a faux concrete finish to them using Ardex.
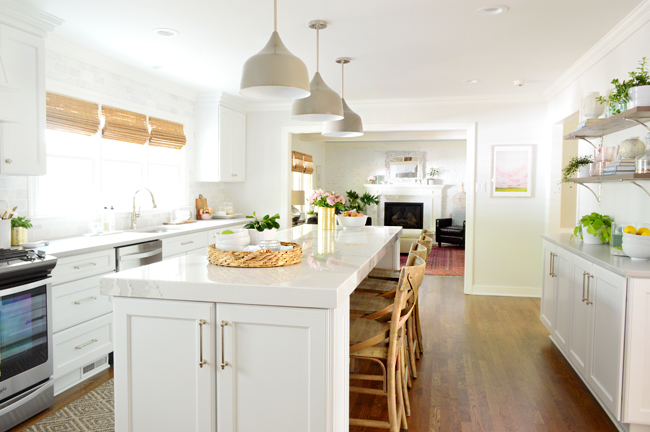
And two years later, we fully remodeled this kitchen with a completely new layout. But the old cabinets held up great for two years while we waited to begin the remodel. You can read all about that in these posts:
- Choosing A New Layout
- Gutting & Rebuilding
- The Big Reveal <– You can find all of the sources for the room right here!
- A Video Tour Of How We Organized Our Cabinets & Drawers
*This post contains affiliate links*
PS: Wanna know where we got something in our house or what paint colors we used? Just click on this button:


Mary | Lemon Grove Blog says
Starting to look like one classy kitchen! I bet you guys are itching to tackle the floors now and get rid of the faux brick :) Excited to see how the counters look with everything, too!
YoungHouseLove says
Yes, counter and floor updates are both things we think will make all the difference!
xo
s
Heidi says
Those cabinets look soooo much better! I’ve passed along your post on how you use this stain to a few friends and it has been so helpful! We got cabin fever because it’s been way below zero in South Dakota, so we took the opportunity to re-upholster our headboard with a gorgeous fabric:
http://www.krusesworkshop.blogspot.com/2014/01/re-upholstered-headboard.html
YoungHouseLove says
That looks awesome Heidi!
xo
s
Vanessa says
This is looking great so far! I love the dark rich color. I am interested in seeing how you tackle the appliances. Even though this isn’t a complete remodeled kitchen it looks wonderful so far!
YoungHouseLove says
Thanks Vanessa! I’m thinking about appliance spray paint since it’s only a few bucks, but we want to make sure we get a good result with it, so we have to do some more research. Will keep you posted!
xo
s
Constance says
Whoa! I’m impressed!! With new countertops and floors, your Phase I is going to look pretty darn “done!”. Great job.
p.s. Do you ever get to take sick days if needed? Hope so!
YoungHouseLove says
Aw thanks Constance! Thankfully we can sit on the sofa under blankets (or in bed with ourselves propped up on pillows) and still get work done, like sizing photos or writing posts, so even if we’re out of commission for DIY stuff, we try to keep up with blog stuff on our laptops since the internet waits for no one. Haha!
xo
s
Wendy @ New Moms Talk says
We took a break from painting to tick off something on our 2014: Growing Beauty list…
Hiking in the Quinault Rainforest. We did short hikes to the largest spruce and largest red cedar trees with our active toddler who was awesome!
It was absolutely gorgeous in sub 30 temps and surprisingly…reminded us of a spot in our backyard that looks very similar to it. Who knew our little house would be near the beach and have a mini rainforest in the back yard?
YoungHouseLove says
So cool!
xo
s
Erin @ Magenta & Lime says
This looks so amazing! One idea for the floors – peel and stick at about $1.08/sf then grout. We did this in our half bath,and everyone thinks it’s actually ceramic tile!!
http://www.magentaandlime.net/2013/03/grouted-vinyl-tile.html
YoungHouseLove says
That’s awesome!
xo
s
Kelly {the Centsible Life} says
I looked at those for our entryway but I ended up being able to refinish hardwoods I found under the gross linoleum we had. Great to see them since we may use them in our powder room.
YoungHouseLove says
SO LUCKY! We wish we had wood under these (we peeked when we bought the house, but no dice).
xo
s
M.C.@ ThousandStoryKitchen says
That is brilliant. I have been inspired to redo my kitchen this way! We have old peel-and-stick in there now and there are yucky gaps, but have no budget to do any real renovation on them. Thanks for sharing!
Jess @ Little House. Big Heart. says
I’ve noticed a trend lately. It goes like this.
Step 1: YHL does something.
Step 2: I’m skeptical of the outcome.
Step 3: I love the outcome.
I wasn’t too sure about the stained lowers, but I’m really loving them!
YoungHouseLove says
Aw, thanks Jess!!
xo
s
Julianna Kohler says
Me, too! I would never have anticipated how much I love this!
YoungHouseLove says
Aw thanks Julianna!
xo
s
erin says
i agree with those steps!
nancys says
I chalkboard painted my old fridge while waiting to get my new one.
I miss that old fridge!
Also, I’m still obsessed with chalkboard paint ;)
YoungHouseLove says
Love that!
xo
s
Brit [House Updated] says
Looks good! I always try espresso stain and depending on the wood, sometimes wood grain shows and sometimes it doesn’t. Good to hear a lighter shade worked out! I am going to try PolyShades for the first time on an ottoman I’m refinishing soon…
YoungHouseLove says
Good luck Brit!
xo
s
Amanda b says
My brother painted all of my appliances for me before I had new ones…He used black paint and they looked amazing! Literally like new for decade old fridge and oven. I highly recommend it..A quick easy fix :)
YoungHouseLove says
That’s so awesome to hear!!
xo
s
Amy says
I really like it! I especially like that the lowers are dark, but not quite as stark as if they were black.
Jules says
Very nice!
Natalie says
OMG! The kitchen looks amazing already!! A few small changes already equal a huge difference! I love these “Phase 1” projects. Because when you are on a smaller budget, these are perfect!! So far this year I’ve done a massive house “purge” I’ve gone through closests and cabinets and been ruthless about things to get rid of. So when you walk into my home, you don’t see a huge difference, but it’s there :) :)
YoungHouseLove says
I bet that feels so good Natalie! I don’t know if it’s nesting or what, but I’m dying to do that!
xo
s
Rachel S says
I agree, these Phase 1 project are so budget friendly and doable! And as good as they look i don’t think i would even miss a complete remodel! Although i do look forward to as many new posts as possible, beacuseYHL get read more often than a newspaper at my house.
YoungHouseLove says
Aw, thanks so much!
xo
s
Diana says
I love doing that! Itching to start again in the new year!!
lolly says
Looks great!
How did you get the stain to stick to the wood putty? I bought the “stainable” kind and used it to patch some wood counter tops I was staining. The stain just didn’t stick properly and definitely looks different than the rest of it… it’s difficult to describe really. It just looks off, and maybe even a bit yellow (I stained the lighter wood putty an espresso color).
YoungHouseLove says
In those spots we just dabbed a little more stain on with a very small brush, which seemed to work (it soaked in more and looked closer in color). The easiest method really is to buy darker putty if you want dark stain to look seamless with it, so maybe scraping yours out and redoing it with something darker will work?
xo
s
Hayley says
@lolly
Don’t mean to butt in, but a carpenter friend once told me to fill in those holes AFTER you stain and poly the rest. Since the putty often stains differently then the wood, doing it after the wood is protected with poly makes it easier to stain and adjust the putty only without effecting the wood around it. Make sense?
YoungHouseLove says
Smart!
xo
s
Lela says
The cabinets look great but, more importantly, LOVE The Darkness reference! Permission To Land is an amazing album. I listen to “Givin’ Up” and “Black Shuck” when I run. Such jams. :)
Janette @ The 2 Seasons says
My blog partner painted her washer and dryer. And they turned out great. Two thumbs up for painting appliances.
YoungHouseLove says
Love that!
xo
s
Megan @ Rappsody in Rooms says
I highly recommend appliance paint. We painted our pea green trash compactor with the black paint and it is amazing! It matches our black refrigerator perfectly and has held up wonderfully. I use my foot to close the trash door most of the time and none of the paint has ever come off! (You can check it out here if you’re interested: http://rappsodyinrooms.com/2012/08/29/trash-talk/)
I love the tuxedo look! What a step up!
YoungHouseLove says
So glad to hear these appliance spray “love notes” from so many of you! It definitely sounds more promising now that we have heard from people who have had good, long-lasting results!
xo
s
Angela N says
Wow, looks spectacular! I love that you stuck with staining the lowers. The color you picked is perfect. Really looks like a whole new room!
YoungHouseLove says
Thanks Angela!
xo
s
Jennifer R. says
Wow, I think polyshades must have greatly improved there formula. This stuff used to be like a mucky glue and would streak and ruin the wood grain very easily. I remember reading a few years back it is best for very small projects (like a hanging shelf). I’m glad to see it works for large projects like this now, too!
YoungHouseLove says
Yes, we were a little nervous because it goes on kinda gloppy-ish at first, but if you brush it around and spread it nicely along with the grain (John’s video shows our method) it seems to work well!
xo
s
Sara says
Chalkboard paint on the fridge?! That would be awesome! I hope you do decide to paint the stove. We considered doing that until we could save our pennies for a new one (which I got from Santa, aka my husband, for Christmas).
YoungHouseLove says
Thanks Sara!
xo
s
Kimberly says
I love the stained-wood lowers. So glad you kept the wood showing!
-signed, an unrepentant wood-lover.
YoungHouseLove says
Haha! Thanks Kimberly!
xo
s
Liz says
Do you know how long you will live with these cabinets and appliances (even in an altered/painted/stained state)?
I think you previously mentioned the cabinets being in rough shape but they look pretty good from these pics! Hopefully that means you don’t have to trash them anytime soon.
As for chalkboard paint – I’m not a fan. I can’t imagine it would look good or even clean for more than a few minutes. I contemplated painting our old junky fridge with chalkboard paint a few years ago when the fad first started but then decided not to. I couldn’t imagine keeping it clean/blogger perfect and looking at the dusty mess all the time! Haha. We just dealt with the ugly appliances for a while until we were ready to buy new – a decision that worked for us!
YoungHouseLove says
We have plans to reuse the cabinets in the garage as a workshop, so we hope never to have to trash them! They do have some gnaw-marks and deep dings in them that this camouflaged, but they’re still there in person (especially if you get close), but they’re great for now and for later in the garage! As for the chalkboard paint tip, thanks! I think we’re definitely committed to thinking everything through before altering these babies (John’s adamant that we want them to be easy to sell on craigslist for Phase 2 so we don’t want to ruin them). Will keep you posted!
xo
s
xo
s
Rachel Laree says
It looks really good!! I would opt for the peal and stick which will really brighten it up. You could go with a light neutral and it will really make those cabinets pop! I know, I know right, not what you wanted to hear.
My refrigerator fan stopped working and it marks 3 weeks tomorrow that we’ve been eating out of coolers. yikes. He’s coming out of town, and we just went through a snow storm, so fingers crossed that he will be able to make it today. X
My kids also got over the stomach flu that they got from someone who failed to mention it at Christmas. :( They’ve been vomiting since the 27th, and with no working refrigerator since the 17th, its been a ZOO to say the least around here! :)) Bleach is my new best friend.
YoungHouseLove says
Oh no! Sounds rough over there. So glad they’re over it!
xo
s
Anne @ Planting Sequoias says
Gorgeous! Amazing what that Polyshades stuff can do. I used it on a coffee table and remember the whole “underwhelmed” feeling but stuck with it and was happy with the result too!
Meg says
WOW! A subtle difference, but I love it. Congrats on getting it done over the holiday. I don’t know how you do it all. Way to go!!
YoungHouseLove says
Thanks Meg!
xo
s
Lisa says
Love the cabinet makeover – We had painted floors in our old (1867) family kitchen as we couldn’t get the old linoleum up. My dad the artist, painted them – & we loved them! Lasted for about 20 years, until cracks in the old crooked floors got the best of us…
YoungHouseLove says
That’s awesome to hear, Lisa!
xo
s
Anne says
It looks great! Can’t wait to see how you tackle those floors. We had the same type in my house growing up. Mom loved that they hid dirt so well but hated everything else about them.
I have been wanting to do the same treatment to our new tiny kitchen since moving in a few months ago. The one thing I can’t figure out is that we have a pantry cabinet that goes from floor to ceiling attached to the upper and lowers and I don’t know if it should go white or stained or half and half. Any ideas?
YoungHouseLove says
We debated a tuxedo kitchen in our last house but had the same pantry issue (and built-in fridge issue) since we didn’t know which way to go with them. I lean towards white (the same as the uppers) but I’d try to picture it to make sure one side of the room won’t feel a lot heavier while the other side’s all white. We did the hutch area in the eat-in part of our kitchen all white here, and it looks great though! That’s not solid like a pantry, but hopefully it helps.
xo
s
CandiceMcC says
We did a white/dark grey Phase 1 and had the same issue with the fridge surround and the adjacent oven/microwave area. Because our appliances are black, I went with grey so it would be more blendy. I wouldn’t go half and half. Could you maybe make it look more like a piece of furniture? Maybe add feet in the kick space?
YoungHouseLove says
REALLY SMART! Never even thought of that, but love it!
xo
s
Anne says
Sounds like I am just going to have to pick a color and go with it. This means I’ll probably stain them all since my husband thinks it is a sin to paint wood. This is just a temporary fix since we will eventually bust out the back wall to enlarge our kitchen but that is probably at least 5 years out unless I go crazy with no counter space before then. Thanks for the advice!
Anne says
Candice, that’s a good idea but I don’t think it’s possible. It is a narrow cabinet attached to the others, one large door on the top and drawers on the bottom. I think I need to post this on the forums with a pic. That would probably help.
Jen says
Are the ends of your cabinets also wood, or do they have the plastic faux wood veneer? We’d like to paint or stain our kitchen cabinets to get rid of the aged golden oak color, but I don’t know what to do with the plastic ends to make them blend in with the cabinets, especially if we decide to stain them a more contemporary shade. Will paint adhere to the plastic ends? What do we do with the ends if we decide to stain?
YoungHouseLove says
Hmm, that’s a toughie. Ours are all wood, so they all took the stain the same way, but I’d worry that something that’s not wood (plastic ends) would react very differently to stain. Anyone tried it?
xo
s
Theresa says
I wanted to ask the same question, Jen! I daydream about staining my oak cabinets instead of replacing them, but I have the faux veneer cabinet ends too and I’m terrified of how awful it will end up looking if the stain doesn’t stick.
YoungHouseLove says
Does anyone have veneer cabinet ends who has tried this! I don’t know how well it would take the stain, but it would be awesome to hear from someone who has tried it!
xo
s
heatherB says
Maybe cover the plastic with thin wood veneer and stain that?
Jeanette says
We’ve painted the ends of our cabinets (veneer) and the result didnt differ from the rest of the kitchen! You just sand it lightly and then use a deglosser to make the paint stick.
Don’t think stain will work though, my mom tried to do that with some old IKEA tables and had to save them with 2 layers of paint afterwards :)
Good luck! :)
P.S I love it, John and Sherry!
Sharon M. says
Check out the Magenta and Lime blog. You can link to it from their comment above on peel and stick plus grout. She stained her kitchen cabs with beautiful results, and in the pics the ends looked like laminate, but I’m not certain.
YoungHouseLove says
So awesome!
xo
s
Kate says
My kitchen has the plastic-y ends (which are just the sides of the cabinet bases) and my om mentioned recently that they sell thin boards that are designed to cover that up. Sure enough, I noticed that the face of the cabinets even stick out a little from the side as if to create room for one of those boards. I wasn’t able to find one that’s a match to my golden oak cabinets (and the laminate is probably as close as I’d get staining something to match), but if I ever stain my cabinets I think I’ll get them.
YoungHouseLove says
Great tip Kate!
xo
s
Cara@theprojectaddict.com says
Wow! your kitchen looks so different! I like the mix of dark and light. Great job!
Kristen | Popcorn on the Stove says
Great update! – the kitchen is looking amazing!
YoungHouseLove says
Thanks Kristen!
xo
s
Kelly {the Centsible Life} says
I wasn’t sold on the idea of stain but it looks great! I know it’s only a phase 1 update but I hope you consider a similar look when you do phase 2.
I spent the weekend bundled up (it was freezing out) and working on getting organized for the new year.
I spent about an hour working on our meal plan for the whole year-so I’m grateful that’s done! You can see how we do it here: http://www.thecentsiblelife.com/2014/01/2014-meal-plan-and-printables/
Today everyone is back to school so I’m wrapping up some organization and diving back into work.
Glad everyone is feeling better!
YoungHouseLove says
Woah, you’re a meal planning master! I love it!
xo
s
Pat S says
Looks great! I can really use your tips on staining.
Happy New Year.
Lisa@Double Door Ranch says
As always, swoon! I really like the idea of painting the fridge with chalkboard paint for an interim fix. Can’t chalkboard paint be made in any color now? It could be cool to try, especially since its only temporary.
I’ve been making big progress on my craft room now that the holidays are over. Was looking forward to a ton more projects yesterday, but a smashed finger sidelined me. That’s what I get for trying to shovel in Chicago! -45° wind chills today!!
http://doubledoorranch.com/2014/01/06/goodwill-hunting/
YoungHouseLove says
Yes, I hear it can be tinted in a bunch of colors! Wouldn’t that be fun? Just gotta get John on board and be sure it wouldn’t hurt resale or end up being something I completely regret (aka: a big chalky mess).
As for your finger… boo! So sorry!
xo
s
Jess says
I continue to be impressed with your success using the Polyshades product. It has such terrible reviews online, but it’s such an enticing prospect: stain over instead of refinishing old wood. I’m pretty certain now that the majority of complaints have to do with not applying it correctly. After seeing your stair rail I was pretty sold but after seeing THIS I’m doubly so. Our orangey mantel has some tudor in it’s future. Thanks!
YoungHouseLove says
Aw thanks Jess! I think we have refined our method since it does go on kinda rough, but if you watch the video our whole “drag the brush lightly to smooth things out in the grain of the wood at the end of the application” tip seems to really help!
xo
s
Stahli says
The cabinets look great!!! I think Sherry’s idea on the floor might last a little better. Having little ones under foot you don’t want to worry about paint peeling.
I feel for you and your colds. I have been sick since New Years Day and now the kiddos are sick too!
YoungHouseLove says
Oh no! Hope you guys feel better soon!
xo
s
Patti says
Love this! I’m so impressed with how everything turned out especially when I saw you were using the stain/poly combo. I haven’t had much luck with that product. I like to do a light sand in between each coat of stain and I found out quickly that it really isn’t meant for that. I use the Zar stains now. To me they’re much more user-friendly.
YoungHouseLove says
Those sound awesome Patti! Thanks for the tip!
xo
s
Elisabeth says
Why don’t you just also use the concrete stuff on the floor? It sounds durable…
Love your blog!!!
YoungHouseLove says
Alas, I wish it was meant for that application, but our floors have too much flex for that to work.
Update: It could work on concrete floors, but vinyl floors with subflooring and crawlspace under them sadly have a lot more flex than concrete floors, which is what we’re dealing with, so it would crack in our application.
xo
s
sarah says
Hey!
Regarding the concrete counter tops: would you still consider doing it if it wasn’t your forever house, weren’t ever going to do a phase two with new/nicer counters, and you were planning on selling in 5 years? Would an inexpensive butcher block from Ikea be a better option? We have some bad formica going on, and I want to change it so I can enjoy my kitchen for the next few years, but worry about how it will affect resale. People are used to formica (our is faux granite), and I just worry it would turn off the average buyer.
Thanks!
Sarah
YoungHouseLove says
Yes, I think I would lean towards investing a little more if I was thinking about resale, so I’d worry that skimming with concrete might not be the most “down-the-road buyer-friendly” choice, although we hear really good things about people doing it for more than temporary (aka: permanent) fixes, and loving it! It might just appeal to a smaller group of buyers than butcher block.
xo
s
Teresa @ wherelovemeetslife says
That’s a pretty impressive Phase 1 makeover. :) I love it!
Also, looking forward to your counter updates. I am smitten with the idea of concrete countertops like those and hope to be able to do them myself one day.
Hope you get over those colds quickly. We rang in the new year with a stomach bug for our 1 yr old and 3 yr old. Boo.
YoungHouseLove says
Aw thanks Teresa! Hope you guys are feeling better!
xo
s
Taurie says
Have you guys ever seen Good Luck Charlie on Disney Channel? They have a chalkboard fridge… so cute! Check it out!
YoungHouseLove says
Never seen it, will have to check it out!
xo
s
Cyndy G says
I love how the house is coming along and envy your creativity and energy level for getting it done! Since I am also an RVA-er, how were you able to get the stain to dry…since most stains seem to require minimum temperatures? I’ve been postponing a project for this very reason.
P.S. Clara is becoming quite the girl!
YoungHouseLove says
We just gave it much longer than it needed, so for example this said 6 hours between coats and we gave it 24 just to be sure!
xo
s
Kate says
What color is the blue in your kitchen?
YoungHouseLove says
It’s Nelson Blue by Ben Moore.
xo
s
Sarah says
I had that album too! That song was catchy.
Y’all could always keep the fridge in the garage for seconds!
YoungHouseLove says
That’s another possibility too!
xo
s
haverwench says
Possibly a dumb question, but is there any reason you couldn’t use the concrete finish on the floors as well as the counters?
YoungHouseLove says
I wish it could be used in that application, but our floors have too much flex for it to work.
Update: It could work on concrete floors, but vinyl floors with subflooring and crawlspace under them sadly have a lot more flex than concrete floors, which is what we’re dealing with, so it would crack in our application.
xo
s
haverwench says
Right, but could you rip out the vinyl and put the concrete finish over the subfloor? Then you would have something decent for now, plus a nice level surface to work with in Phase 2. Sort of a more elaborate version of what you did in your master bath.
YoungHouseLove says
Sadly the subfloor is wood, so it has a lot of flex in it and any concrete layer on top of it would crack (we chatted about our subfloor a little bit upstairs when we laid our hardwood, but essentially that’s why we needed that crazy Elastilon product and couldn’t do a nail-in floor). Ardex over concrete subfloors (for example in houses on a slab, or like the slab in our sunroom) would be awesome… but Ardex over flexible thin wood planks on the floor over a crawl space (which is what we’re dealing with in the kitchen) would be crack city unfortunately.
xo
s
Kristine says
I’m guessing that the stain is safe to do when pregnant and around children? I’m 20 wks and need to do this in our kitchen and waiting until spring/summer seems too long to wait :) I think I’m already nesting (never got that with my first) but we’ve been tackeling soo many house projects lately it is insane- still not sure why I “had” to repaint our bedroom and baseboards by myself while my (amazing) husband finished our backsplash!
YoungHouseLove says
Clara wasn’t around when we used it (she was with Grammy one day, and sleeping upstairs the other day) and I used a respirator since it’s low-VOC but not no-VOC. Once it’s dry though, it’s very low odor (it only listed 6 hours of drying time on the can although we gave each coat 24 hours to be sure). So unlike other Minwax stuff we’ve used (which is super stinky for days and days – honestly I hate how bad they can smell) this is much better about drying a lot faster and having no odor when it’s dry. Ventilating the room (open windows and doors with the garage door open too, etc) really helps too while it goes on!
xo
s
Sarah says
I really think you should pull up the floor and just stain the concrete slab…like the 2008 sunroom project. Only more darker and less yellow.
YoungHouseLove says
I wish it was concrete under there! There’s no crawl space under the sunroom (hence the slab of concrete) but the rest of our house is subflooring (since there’s crawl space under it). If there were concrete I’d rip this up and paint that concrete in a second!
xo
s
Sarah says
lol…aw man…I don’t even know what a crawlspace is (is it like for when tornadoes come?) Everything in Houston area gets a slab.
YoungHouseLove says
You’re lucky! Our crawl space is like 14″ of space (literally you slither on your stomach to access things like pipes and things under the house). Slab sounds heavenly!
xo
s
Alli says
Looks great! I’m sure it will be a night and day difference too once you get new flooring in. It will really make the darker cabinets pop since now they seem to blend into the floor a bit more.
In terms of the chalkboard paint on the appliances, I’d probably stay away from it if you plan on trying to sell them down to road. But, you could always do chalkboard contact paper on them for a temporary fix. It would be removable for down the road. I found another blog that did it for a portion of theirs. http://www.hellowonderful.co/post/5-MINUTE-DIY-CHALKBOARD-REFRIGERATOR
The hubs is going on a two week business trip next week. I’m so tempted to stain our bathroom cabinet while he’s gone! Your post makes it sound do-able!
YoungHouseLove says
Love that idea Alli!
xo
s
Katherine says
The whole kitchen is more sleek and sophisticated; but still homey. I love it!
Linda says
Love the finished look! I prefer natural wood so was pleased when you decided to stain vs. paint :) Here in the Midwest, we were dumped on the last weekend, so the snow days have given me plenty of time to complete procrastinated projects. Most important was wood-burning and staining a bowl that we had at our wedding for people to sign (over seven months ago!) I used the same Minwax Polystain as you– in a lighter shade– and I’m just letting the last coat dry now. So satisfying to get those projects checked off the to-do list!
YoungHouseLove says
That sounds so cozy Linda!
xo
s
Kat says
Sherry, do you help stain and if so, what kind of respirator do you use?
I’m also pregnant.
We’re about to have our uppers painted white and lowers SW silvermist and your photos make me want to stain instead!
YoungHouseLove says
We have one from Home Depot that takes filters (not one of those paper masks, one that looks like a gas mask). Every time someone asks me what it is I wish I knew (it literally doesn’t say anything on it) but it was around $35-40 a few years back and you just want one that provides a ton of protection and takes filters (not those little paper ones, even the ones with a fan in them).
xo
s