Feeling too nervous to install crown molding yourself? We were too. But we just installed crown molding in our daughter’s bedroom and it was surprisingly cheap to pull off (less than $100!) and easy to execute. *PATS SELF ON BACK*. All it takes is the right tools and some attention to detail.
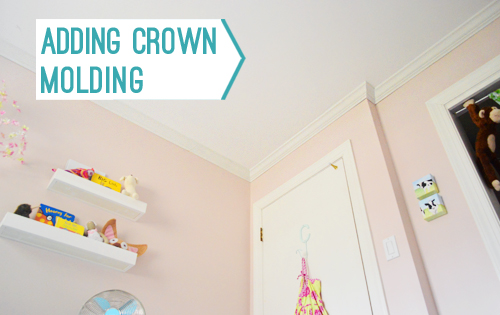
So let me back up, tell you how I did it, and explain why installing crown molding went from one of my most dreaded projects to one I’ll surely be doing again.
Steps To Install Crown Molding
We’ll provide a more detailed photo and video tutorial below, but here are the basic steps to installing crown molding in any room:
- Select your crown molding
- Determine the angle of your cuts
- Set your cutting platform
Adding Crown Molding: Video Tutorial
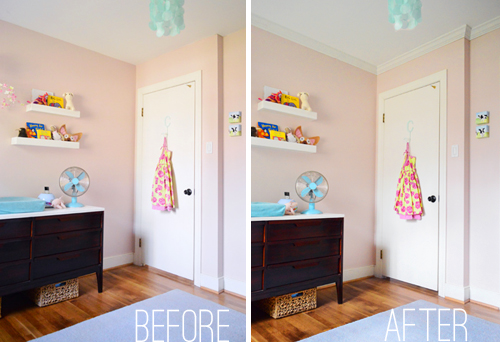
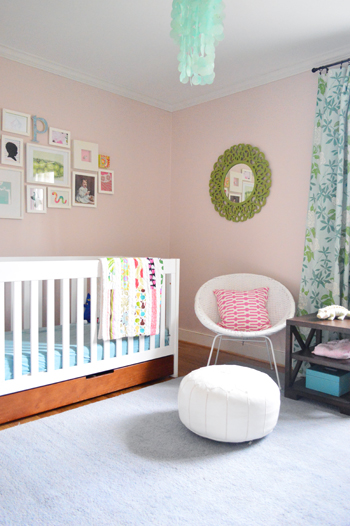
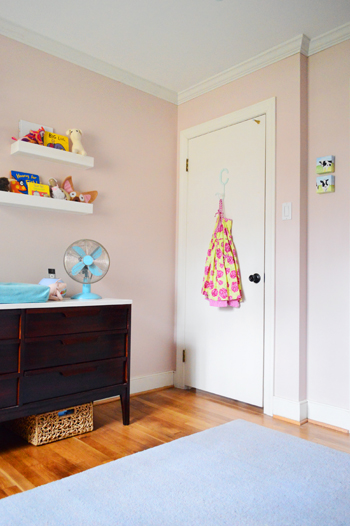
The photos in this post will show you how we installed crown in our daughter’s nursery, but it was so easy that we decided to do all of the other bedrooms too. So in the video below you can see each step in detail as we install crown molding in her big girl room.
Note: You can also watch this video on YouTube.
Selecting Your Crown Molding
I bought standard 3 5/8″ crown molding from Lowe’s because it appears to be what the previous owners installed in our other rooms. It’s almost the most affordable option available. There are other options with different profiles as well. Or, you can use this easy trick to make standard crown molding look thicker.

Each 8ft, pre-primed piece was about $9.50 so, including a couple of extras to cover my butt, my total material cost was $72.
Tools & Materials Needed
You can cut and install crown molding by hand, but simple power tools make this project MUCH faster. We used a miter saw like this one and a nail gun (the ones photographed in this post are no longer available, so I’ve updated these link to our current favorites).
- Miter saw
- Nail gun
- Kreg Crown-Pro
- Measuring tape
- Stud finder
- Pencil
- Caulk & caulk gun
- Paint
- Short handled paint brush
- Ladder or step stool
We already had a saw and nail gun on hand, but we did purchase the Kreg Crown-Pro. It was the real hero of this project!
How To Use A Kreg Crown Pro
I had read great reviews of the Kreg Crown Pro and considering my love of the Kreg Jig, I figured it was worth the $30 price tag to give it a go. Spoiler alert: I love this thing.
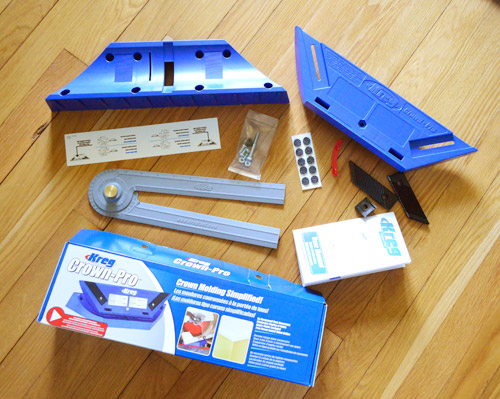
Once assembled (which takes all of five minutes) it looks like this. It creates an angled, adjustable platform so you can cut your crown molding at the same angle that it will sit against the wall. Sounds simple, and it is, but this is a huge help when it comes to cutting crown.
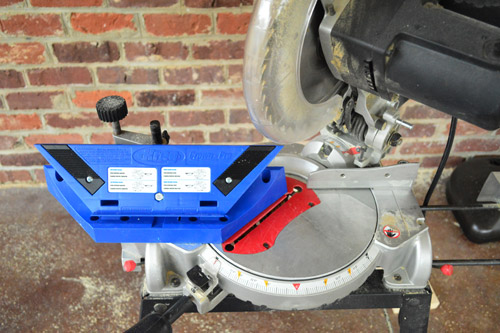
To find the angle the cutting guide should be set at Kreg includes an Angle-Finder tool so you can determine the “spring angle” – or the angle at which the crown leans away from your wall. Apparently, most moldings sit at either 38°, 45° or 52°. Mine was 38°.
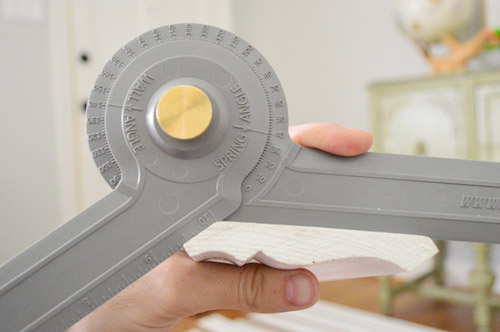
Then you just use the red guide on the underside of the Crown Pro to match.

Now the cutting guide is ready to help you cut.
Determine Your Wall Angles
Before cutting anytime, measure and record the angles of each corner of your room. Walls aren’t perfect, so son’t assume every corner is exactly 90°. And these not-quite-right angles can mess you up if you’re not careful. Thankfully, you can use the same angle finding tool for this task.
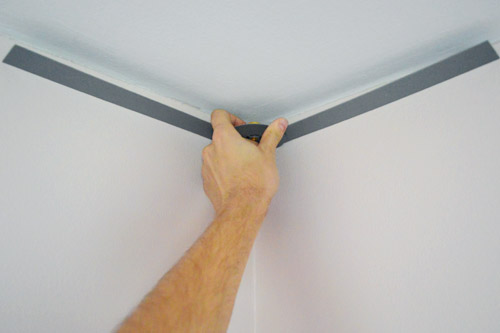
So after measuring and recording every angle, I could figure out how my miter saw should be turned to give me the right cuts. Luckily most of my corners were very close to 90°, so I could set my saw at 45° (half of 90°) for pretty much everything.
For the non-so-perfect corners there was a bit of extra math involved that I won’t get into here because it depends on how your particular saw is labeled, but the instruction booklet that came with the Kreg has a great illustration for this.
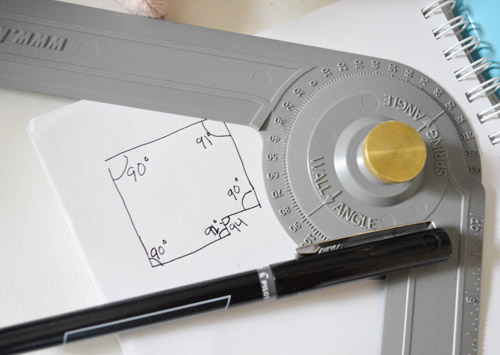
Measure Your Wall Lengths
Next, Sherry and I took precise length measurements from corner-to-corner of each wall using a tape measure. This goes MUCH faster with an extra set of hands or you could purchase an inexpensive laser tape measure tool.

We made a sketch of our room with every measurement to help us stay organized while we started cutting.
Set The Angle of Your Miter Saw
Since you’ll be cutting your molding on an angle, you’ll need to swing your miter saw blade to the left or right. Which way depends on what kind of corner you are adding molding to (inside vs outside) and which side of the corner your piece is going into (right vs left).
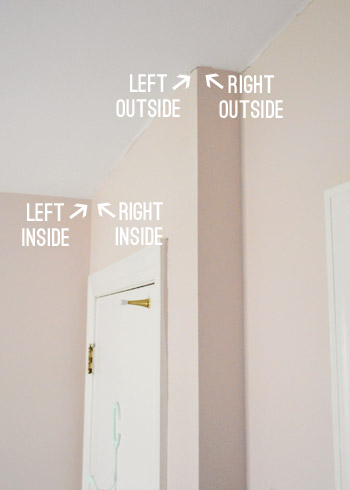
Luckily, the Kreg Crown Pro has a handy guide on the bottom. It shows exactly how your blade should be angled and where you should place your wood to get each of the four most popular cuts.
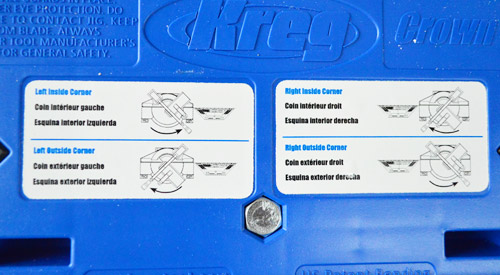
While you’re getting the hang of this, be sure to double check this guide before starting a cut to make sure you’ve got your saw set correcting.
Cutting Your Crown Molding
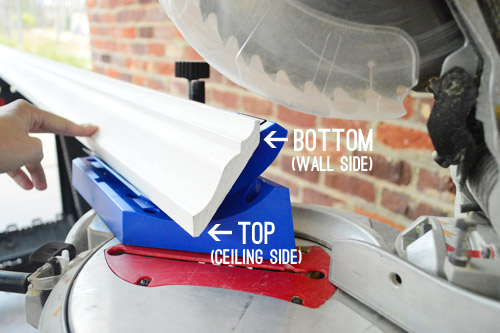
The other important thing to remember when cutting is to put your corwn molding pieces UPSIDE DOWN on the Crown Pro. This means the edge that sits against the ceiling is down on the bottom of your saw.
So with my measurements all taken, my Crown Pro all set up, and my saw blade angled I was finally ready to get cracking, er, crowning.

And remember the old adage: measure twice, cut once. Or, leave a little extra on your first cut. You can always shave off a little extra wood. You can’t add it back!
Nail Your Crown Molding In Place
Securing your cut crown pieces to the ceiling is easy, especially if you have a nail gun on hand. The one pictured was bought for our DIY board and batten project, but we’ve since upgraded to one that doesn’t require an air compressor.
We used 2″ 18-guage brad nails and placed a nail about every 12-16″ inches, hitting both the top and bottom edges of the crown. This keeps it tight to the ceiling and the wall.
I think it took me just about 2 hours to get all of the molding cut and nailed in place this time.
How To Make A Scarf Joint
One shortcoming of the Kreg tool is that it doesn’t address scarf joints. That’s when two pieces of crown meet along a straightaway, not at a corner. This happens when your wall is longer than your piece of molding. I could only fit 8ft pieces of crown in my car, so I had three of these joints in the room.
You’ll get a more seamless transition if you overlap the two pieces (like below) rather than simply butting them together.
To achieve this, you’ll want to cut one side like an inside left corner and the other like an outside right corner. Or you can do switch left and right listed above, as long as they’re opposites.
Finish With Caulk & Paint
Once everything is hung, you’ll want to caulk the seams, gaps, and holes before you point. We used white paintable Dap caulk. Use a caulk gun in the following places:
- Where the crown meets the ceiling
- Where the crown meets the wall
- Where two pieces of crown meet
- Any nail holes (you could also use wood putty or spackle for this)
This will help hide any places your walls or ceilings are flat, while also giving you a seamless surface to apply paint.

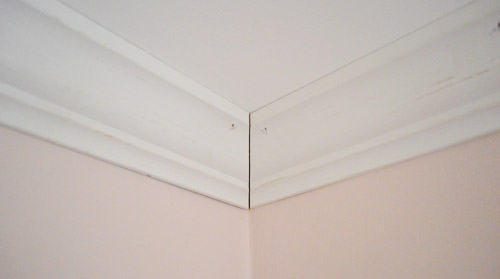
See, much better. And the stuff isn’t even painted yet!

After the caulk dried, we used a small angled paintbrush to apply a coat of semigloss paint that matched the rest of the trim in the room.
Total Crown Molding Project Cost
Our material cost ended up being $67. Add the cost of the Kreg Crown Pro ($30)and my total project cost at just $97. Not bad! We’ve seen enough house listings that say “crown molding throughout” to know that it’s a nice selling point – and now we’re one room closer to a fully crowned house.
More Crown Molding Projects & How-Tos
Since first publishing this post, we’ve tackled a few other crown molding installations – include how to make beefier, more fancy looking molding. Check them out below:
- How To Install Chunky Crown Molding For An Upgraded Look
- Adding Crown Molding To Kitchen Cabinets
- Installing Crown Molding Around Built-In Bookcases
Does anyone have any tricks to their crown molding installations that they’d like to pass on? Or have you had a similarly discouraging first experience with crown, only to crack the crown molding code on your second attempt?

Kristen | Popcorn on the Stove says
It looks great! Are you going to add molding to Clara’s big girl room, too??
YoungHouseLove says
Yup, all the rooms without it (like her big girl room and the guest room) are on the agenda!
xo
s
Aly says
Looks nice!!
Anele @ Success Along the Weigh says
I’m SOOOOO bookmarking this post! We had a friend do ours in every room but the kitchen and we’re pretty happy with it but it is something I would love to be able to conquer at some point. When we finally do move from here, I’m sure the place won’t have crown or at least crown throughout and I’d love to be able to save a rump load of money doing it ourselves!
Jen W says
Nice job! Looks great!
Sarah says
Unrelated to crown molding, which Kreg Jig do you have? I’m torn between buying the mini for $20 or saving up for the full system.
YoungHouseLove says
We have the $99 basic one and then we just bought clamps since those help a ton!
xo
s
Rachel C says
Sarah–I have the mini. I debated and debated which to get, but since it was for a small project and I wasn’t sure if I’d use it much, I bought the mini. It works perfectly well…so well that I use it a lot more than I thought I would. HA! If I eventually wear it out I’ll probably spring for the one John and Sherry have, but the mini works great. I would definitely also get the special Kreg clamp with the pin in one end and plate on the other (hard to see but pictured in this post: https://www.younghouselove.com/build-it-in-build-it-in/)–I found it essential to hold the two pieces you’re attaching nice and securely while you screw them together. Good luck!
Meg Sluyter says
Racheal- Thank you Thank you THANK YOU for sharing that. I have the mini too and have issuses keeping the jig in place with a regular clamp, it wants to move every time I start to drill. I’m so getting one of those clamp, I didn’t even know the had them. -Meg
YoungHouseLove says
Great tip!
xo
s
Julia @ Chris Loves Julia says
We haven’t seen Clara’s room for awhile. It gets me every time. So, so sweet. I REALLY needed this post. We have zero crown molding in our house. We did add crown molding to the top of our built-ins, but we cheated and used styrofoam molding. Yes, styrofoam. It looks like the real thing (http://www.chrislovesjulia.com/2012/03/built-in-billys-part-2.html) but for our bedrooms, we’d love to add the real stuff…if we get up enough courage!
YoungHouseLove says
That’s so cool Julia!
xo
s
robin @ our semi organic life says
Looks great! So much more simple than (I reviewed) the kitchen! How classy!
jeannette says
clara and the potty, i’m so proud? you’re killin’me.
ima start callin’ her miss keep-it-real clara from now on.
YoungHouseLove says
Haha! She’s hilarious on the potty. Let’s just say there are long goodbyes and things like “have a good time!” before she flushes.
xo
s
kara @ launching our life together says
Wow! I can’t believe how much of a difference some molding made! Great job!
bridget b. says
I’ve done shoe molding before and making the cuts was definitely the most difficult part of the process. They can be confusing to visualize and I was also using a miter saw, which was labor intensive. A nail gun makes it so much more fun, though.
Rene' @ thedomesticlady.com says
Oh how I love trim! It’s the finishing touch in a great room. We just finished adding some great new baseboard in our house and I am amazed at how great it looks!
LauraC says
Awww, I forgot how beautiful Clara’s nursery is! So, so pretty! I love how the colors meld together and still think the curtains and light just give the room that extra special “something.” Great eye candy this AM (and the crown molding looks great too, John ;) Thanks!
Sandra says
It looks so good! My walls have waves in them, so getting thing to lay flat against the wall can be a huge pain in the butt. Did you guys run into any of that?
YoungHouseLove says
Oh yes, that’s where the caulking step came in! Our walls are really old and wavy, so we had some spaces to fill, but once they were filled it looked so much smoother!
xo
s
Alisha says
I love it, now I want to get on that in my own home… lovely job! Can’t wait to see more!
Katie@LifesNextBigStep says
Looks so good! I’m always afraid that adding crown to our 8ft ceilings might make the room feel smaller but yours makes it look bigger – I’ll have to look into this!
YoungHouseLove says
Oh yeah, there’s something about crown that draws the eye up so rooms look taller. I also love floor to ceiling curtains to make a room look extra tall (they’re my two favorite tricks).
xo
s
Gabriella @ OLinA says
Crown molding definately makes a room in my books. Great job – it is definitely not a easy task with all those corners. :-D
gemma@thesweetestdigs says
Looks great, you two! Really adds that nice finishing touch to the space and looks so polished. I’m bookmarking this one for the hubby :)
I adore clara’s nursery :) We’re finding out the sex of our babe in a couple of weeks … if it’s a girl, those light pink walls are calling my name!
YoungHouseLove says
Aw, that’s so exciting Gemma!
xo
s
Kate says
We just did our crown too! In the master bedroom and the living room/attached dining room.
Yours looks awesome, and I’m kicking myself for not getting a kreg. Would have saved so much time! But I agree that putting up crown goes much better with the nail gun and two sets of hands!
katie says
Looks great! That Kreg tool seems pretty handy, too. When we first bought our house, we had a contractor try to nail the crown flat up against the wall. It was crazy. I wish I had a picture :)
YoungHouseLove says
Oh my gosh, no way!
xo
s
Petra says
Looks great!!! What area in the molding did you nail? Only the top part where it attaches to the ceiling? I’m looking forward to doing it myself soon.
YoungHouseLove says
We did the base of it (where you can fire it straight into the top of the wall) and the top of it (where you can rotate the gun up and fire it into the ceiling). We’ll have to make a video to show you in the next room we tackle!
xo
s
Allison says
I’d love to put up crown molding in our house, but our kitchen/living room area has vaulted ceilings so that obviously wouldn’t work there. I can’t decide if it would look weird to have it in the bedrooms, bathrooms and basement but not in the living area. Any thoughts?
YoungHouseLove says
I think it would look so pretty in the bedrooms, that’s where I’d start!
xo
s
Kristin @ Little Corbin Hill says
Looks great!
Katie says
We put crown moulding in our master bedroom and dining room this weekend, and were so excited to be working on the same project as you guys! Believe it or not, you can actually fit 16′ sections of the stuff into a Hyundai Elantra if your husband is stubborn enough…
YoungHouseLove says
Haha, that’s amazing!
xo
s
Lauren B says
What is the name of that paint color in her room? I love that pale pink! Thanks
L
YoungHouseLove says
It’s called Proposal by Benjamin Moore.
xo
s
Takeyce Walter says
This looks great. Thanks for posting the process in such detail. We’d like to attempt this in all the rooms of our house. This will be a good resource when we get brave enough to try.
stewart says
This looks fantastic! Well done!
my honest answer says
I didn’t think crown would make that much of a difference to the look of a room – but I was wrong! It looks great, I’m really surprised at the impact, well done.
Thais Bessa says
It makes a MASSIVE difference! Our house has crown molding throughout downstairs, but upstairs is half-half (the older part doesn’t have it but the bedrooms added by a later extension do). So every day I get to compare how my daughter’s bedroom look so crisp and our bedroom so sloppy. It is getting old now, time to do something about it!
I will show these before-after to encourage my husband to give it a shot!
Thanks for the detailed tutorial.
YoungHouseLove says
Good luck Thais!
xo
s
Rebecca @ the lil house that could says
That Kreg thing is genius and worth it just for the angle finder thingy! When we first did ours, the crown we have in our house is too tall to even stand up on the saw. Thankfully our saw tells you exactly how to set everything to get the proper angles. It would have helped if we figured that out sooner you know, by reading the instructions, but I literally took a picture of the page in the booklet so we wouldn’t lose it and/or forget. The whole miter table/bevel angles we used are here… http://thelilhousethatcould.com/2012/02/21/how-to-install-crown-molding/
YoungHouseLove says
Love it!
xo
s
Christa says
My husband just cut crown molding for our powder room. That Kreg Jig tool would have come in handy. Our powder room has 6 walls and several non 90 degree angles. It was a pain to figure out. If we ever do crown again, we’ll have to get that jig. Thanks for the tip. Clara’s room looks great.
Laurie says
Last week I ran out to get a laser level after your post. This week, I’ll be getting a Kreg Crown Pro! I’m not so scared of my 18′ x 24′ family room after reading your post. Thanks.
YoungHouseLove says
Good luck Laurie!
xo
s
Amber @ Pooch and Puddy says
Can I just take this moment to admit that I’ve had moulding sitting in the upstairs hall for, like, 5 months, and I’m terrified of putting it up?
Yeah.
Also when my dad did the moulding downstairs there were so many little joints and cracks, and I’m thinking I need to tackle them with some caulk, because they look sad and puzzle-y compared to yours.
YoungHouseLove says
Oh yes, caulk will make it look awesome! Good luck Amber!
xo
s
Wendy @ New Moms Talk says
Semi related, as we drove to Reno and back this weekend, there were a few YHL points on I-80:
*BM on the side of a mountain (Battle Mountain or Benjamin Moore- your pick)
*Sherwin William trucks and plant (why? see BM)
*our Pinterest Challenge drum kept the sweet girl happy once we landed after 10 bours of driving – http://www.newmomstalk.com/2013/02/27/she-drums-wint…rest-challenge
(Considering there’s not much on 80 in Nevada beyond prisons and beautiful mountains, these things were a highlight for us!)
YoungHouseLove says
Haha, I love it!
xo
s
Shannon says
This looks great! It’s crazy how much of a difference a little bit of crown molding makes. :)
John + Nail Gun + Kreg Crown Thingie = Love.
Taya says
WOW! The crown molding makes such a difference at making the room look “finished.” I might have to spring this idea on my husband to try in our house!
DJ says
John, you did a wonderful job. The Mister has installed crown molding in almost all of the rooms in our fixer upper. I bet he would have really liked the Kreg Crown Pro and a miter saw. He installed all of the molding with a coping saw and circular saw. The crown molding really finishes out the look of the rooms.
YoungHouseLove says
Wow, that’s a ton of work! Hats off to him!
-John
paintergal says
Great tips! We had crown molding installed in our former house. It is a bear figuring out those angles. Definitely pinning this for future use. Love that Kreg tool.
We installed baseboards in our present house. Would that tool be useful for those? Or is solely for crown?
YoungHouseLove says
It was just for crown (since those angles are different). With baseboards you can just lay them flat, so you wouldn’t need the tool to hold them up at an angle while cutting them. Hope that makes sense!
xo
s
Katie says
Looks fabulous!!
Colleen says
I would love to put crown molding in my bedrooms, but my little shaker style house from 1940 has one wall in each room that angles and morphs into the ceiling. It makes painting interesting too, one permanent accent wall or painted ceilings. And floor to ceiling curtains? Nope, the top is eye level (and I’m only 5′ 2″ too!) where the angled section starts.
The nursery looks beautiful!
Natalie says
Did you guys have any bumps or unevenness in the ceiling to contend with? We’ve been gearing up for a crown molding project, but are nervous about how we’ll work around those things in our old house.
YoungHouseLove says
Oh yes, that’s where the caulk comes in! Our walls and ceilings can be a little wavy, but once you hang the crown and caulk the gaps it all looks seamless!
xo
s
Heather P. says
Looks great! I’m glad to hear you found an easier way to figure out how to get those angles right! A change so simple and easy, yet makes a world of difference!
Shannon says
It looks awesome! Can you come do my house? My husband will never get it done because he despises anything to do with wood work. It will get done faster(or at all even) if I teach myself how to do it. :\
YoungHouseLove says
Haha, I’ll send John right over!
xo
s
Brooke Harris says
Looks great! We have crown in our house too. Those cuts sure can be tricky. One tip you might want to try on your next room is to paint the molding first. We painted them with two coats of semi-gloss white paint then put the molding up. Then we just filled the nail holes and put a dab of paint to touch up. You can’t even see the nail holes. Saves a bunch of time!
YoungHouseLove says
So smart!
xo
s
Sarah says
Agreed: faster & easier to paint trim before installing it. Saves the hassle of working on a ladder to paint trim after installation AND you don’t have to worry about ‘oops’ mistakes when the trim paint gets on the ceiling and/or walls.
Jennah's Garden says
We have low ceilings (7.5 foot?) and small rooms. Do you think it would make the rooms look bigger or smaller? We’re probably going to do it in our bedroom (which has a dark/bold color on the walls), and I’ll have to tell my hubby about that Kreg thing. Would it still be useful if you already have a miter saw, or redundant?
YoungHouseLove says
We have a miter saw and it’s definitely helpful! The tool is the blue thing that you lay the crown on and it angles the wood so you can cut it with your miter saw at the right angle! It’s so much easier. As for the 7.5″ rooms, ours are just 8′ tall, and crown draws the eye up and makes them feel taller. Also, floor to ceiling curtains make a squat room feel much taller, so I’d add those too!
xo
s
Jennah says
Sweet! Totally getting that for hubs, then.
We actually used to have floor to ceiling curtains in that room, but it drove me insane because the room is also very small (queen bed + 2 nightstands is wall to wall with just enough room for the closet to open, and I have about 1.5 feet between the end of the bed and the dresser to walk to my side). So one window is totally behind a nightstand and it just looked messy – it actually felt like I could breathe when I switched them out to shorter. I am planning to DIY some curtains, though, so I might give that look another try.
http://www.jennahsgarden.com/2013/01/project-blue-bedroom/
YoungHouseLove says
Sounds so pretty! Good luck Jennah!
xo
s
Holly says
I can’t wait to tackle crown molding in our house. We bought it from a company that flips houses and there is some strange rounded pieces that stop in the middle of walls and come down some vertical corners and were just painted over. I also painted over them when we first moved in b/c I was baffled, but I guess they’ll have to be plied off the wall. I’ll be bookmarking this and looking for the Kreg accessory.
Also, I saw this floating around facebook this morning: http://gizmodo.com/5988025/watch-a-music-video-of-macklemores-thrift-shop-hilariously-made-with-ms-paint
It’s the non-censored version though, in case Clara’s within earshot.
YoungHouseLove says
Thanks Holly! Will check it out when Clara’s napping!
xo
s
Danielle says
Just watched this – SO hilarious! Awesome find!
Cat Alford (@BudgetBlonde) says
It looks so good, yall!
YoungHouseLove says
Thanks Cat!
xo
s
Betsy P says
Just an fyi. Although I don’t live in the Richmond area, we did find that our locally owned lumber yard sold the same crown molding as Lowe’s about half the price. We couldn’t believe it. You might want to check around.
YoungHouseLove says
Such a great tip! Thanks Betsy!
xo
s
Natalie says
Love this! We’ve done crown in a few rooms but it would be nice to finish off the whole house! I might have missed it but are you guys going to add crown to the hallway? I am debating about this since we will be doing board & batten.
By the way, I am a little surprised that the Petersiks are just now getting a nail gun :) Do you guys have cell phones yet? ;) lol.
YoungHouseLove says
Haha, I know, right?! We’re like cavemen using two sticks to make fire.
xo
s
Julie says
Does the kreg tool eliminate having to use the coping saw? Some rooms in my house have crown and some don’t. I’d love to finish it off but the angles really intimidate me lol.
YoungHouseLove says
Yes it eliminates the coping saw! So much easier!
xo
s
Marie K says
You guys are the best part of my day! I look forward to 10:30am every (week) day.
YoungHouseLove says
Aw thanks Marie! You’re so sweet!
xo
s