Ready for more progress on the fireplace? Good, ’cause there’s been lots. Last you saw, we had tiled the hearth and part of the surround with marble subway tile.
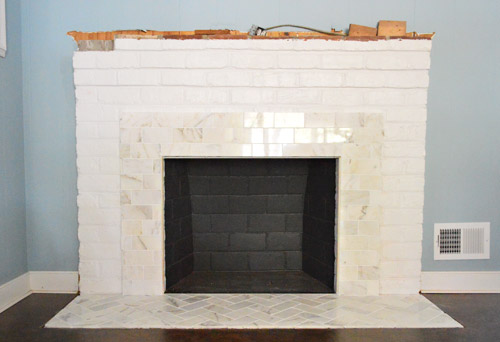
That was the easy step. Well, at least the more straightforward step. Because our next assignment – building out the rest of the frame – involved the addition of a lot more materials.
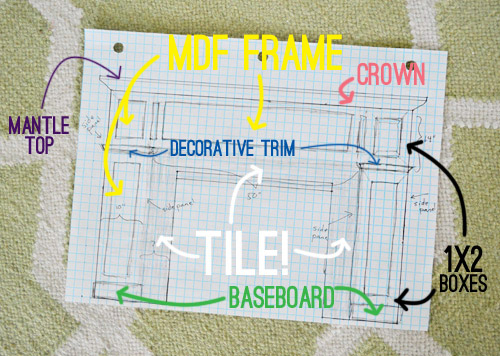
Let’s start with the MDF frame. We decided to work with MDF for the first time since it’s lighter, cheaper, and smoother than wood would be (plus it’s now sold without formaldehyde and it’s FSC certified). A 4ft x 8ft panel cost nearly $35, but the good news is that we only needed one sheet to get all of our pieces.
The first two parts of our frame were the two sides which sat on the floor and extended all the way to the mantel.
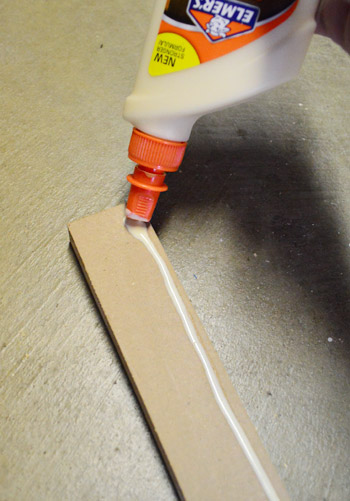
I built them by cutting the two pieces of MDF to size and then attaching them at a right angle using the ol’ Kreg Jig and some wood glue (just to be safe).
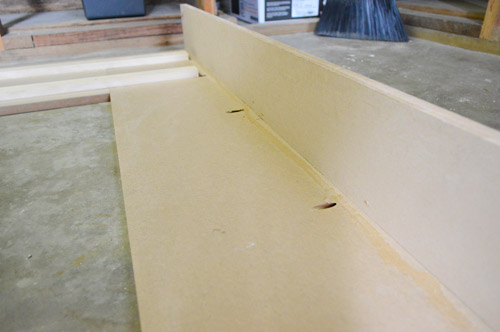
My bottle of wood glue and I actually become good friends during this project. I started to favor my nail gun over Kreg Jig-ing many of the pieces because it’s much much faster (one shot with the gun versus drilling a pilot hole and then screwing pieces together). But since nails don’t hold as tight as screws in the long run, wood glue is nice extra insurance.
To connect the two side pieces, I cut a middle span (using my table saw) and then attached the three pieces together with a couple pieces of scrap 1 x 2″ whitewood.
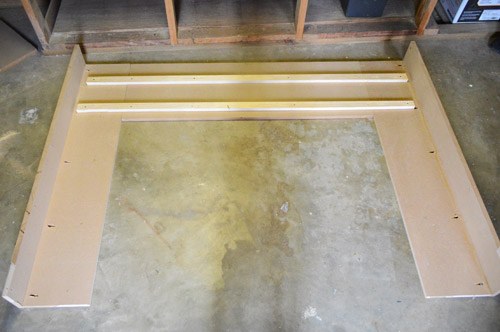
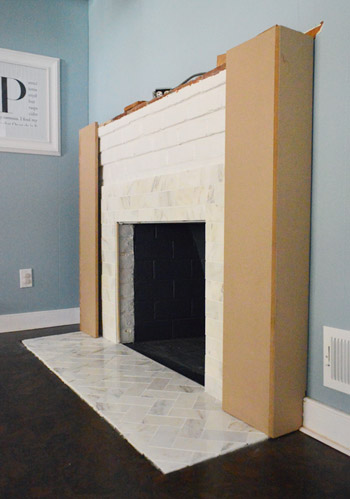
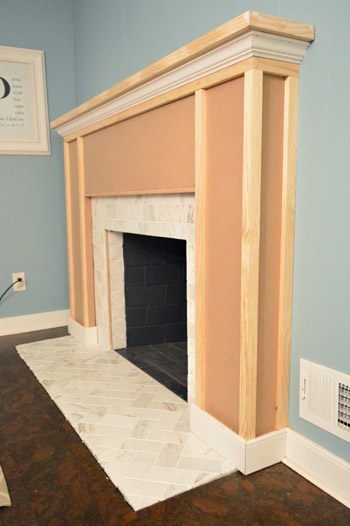
I realize the picture above is a bit confusing, so here’s a photo of the frame in place so you can understand how it’s coming together.
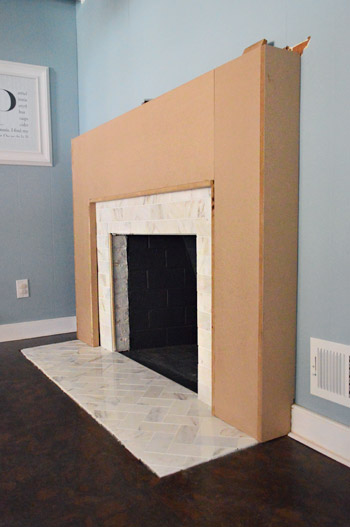
As you can see from the view from above, the MDF frame fits snugly right around the original brick fireplace (which turned out to be pretty gross-looking under the old mantel that we tore off – surprise!).
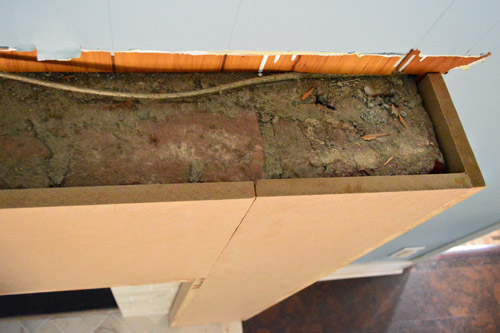
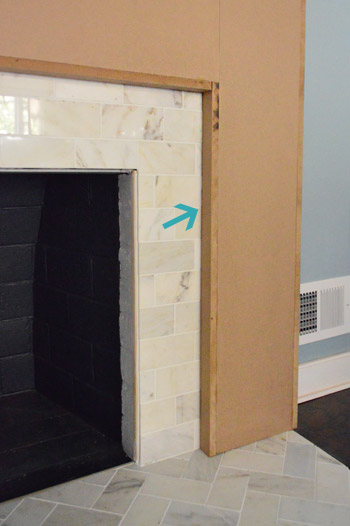
Oh and we had to add some thin pieces of MDF right where it sat against the tile because there was a small gap (see arrow below). That’s because the brick fireplace flared out right under the mantel and got thinner towards the floor (from the side it was actually pretty top-heavy). So even though the MDF sat right against the brick at the top, it floated a couple of inches away from the brick (and tile) at the bottom. It’s nice that from the side it’ll be nice and balanced now.
Here’s the MDF frame from the front. Hopefully this whole thing is starting to make more sense to you all.
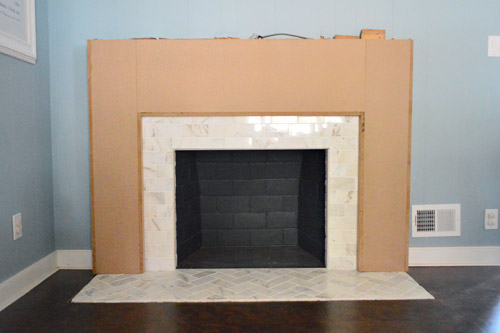
It was actually pretty steady already, but we weren’t about to rely on good balance to keep it in place. So a few masonry screws through the top and along the sides (as well as a line of construction adhesive where the MDF met the brick at the top) made sure this thing wasn’t going anywhere.

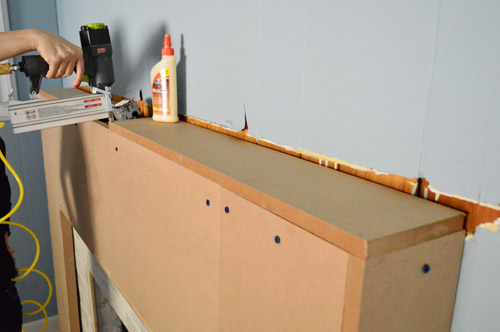
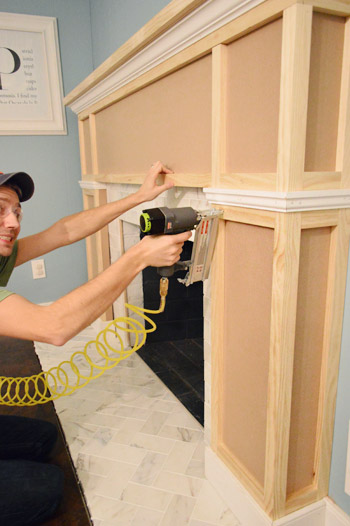
Next up was adding the mantel. The old mantel piece was too small to put back in place and my original plan to secure the new mantel directly to the brick (like the old one had been) failed upon realizing that the brick wasn’t level (it sloped away from the wall slightly). So after some trial and error, we cut some more MDF (still from the same sheet) and added a flat top to the frame with some glue and nails. Look at wifey go.
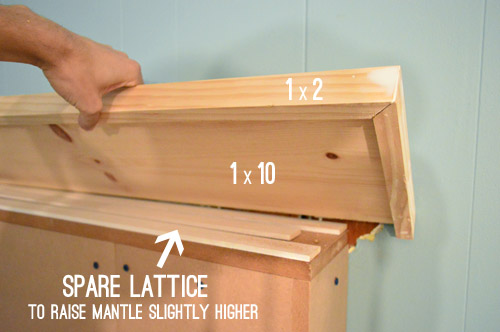
Then we constructed a new mantel top by taking a 1 x 10″ and framing it out on three sides with 1 x 2″ pine strips (so that no raw wood edges were exposed). It’s kind of the same technique we used for our floating shelves in the kitchen. Oh, and we added a few strips of lattice leftover from the board & batten project to raise the mantel a smidge so that it matched the old height (and thus covered all of the unpainted paneling behind it). When finished, this mantel will be exactly the same height as the old one, which is nice because we liked that about the last one (mostly we just wanted to fix the smashed tile hearth, and the side proportions since it got skinny and sloped into the wall from the side).
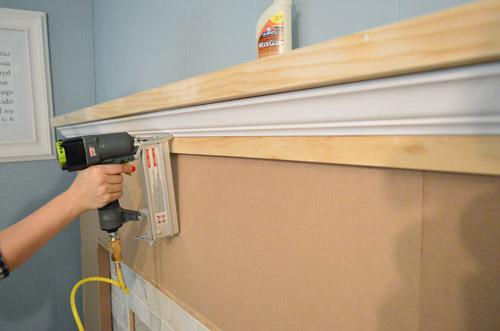
Once we nailed the mantel in place, we wanted to add some crown molding beneath it to give it more presence. But we couldn’t put the crown right against the MDF because we wanted it to sit flush with the rest of the decorative boxes (made from 1 x 2’s) that we’d be adding later. So we had to attached a piece of wood to bump the crown molding out to the right spot:
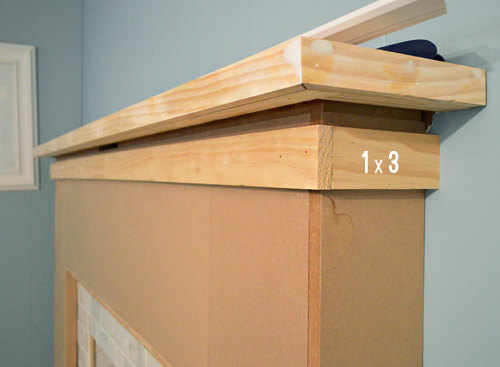
We chose 1 x 3″ boards so that we could use 1 inch of it as a base for the crown to rest against, while the remaining inches could act as the top piece of some of our 1 x 2″ boxes. Look it’s wifey with the nail gun again. Sorry, I’m still getting used to how good she looks while shooting nails into things. Update: Here’s an affiliate link to the nail gun that we bought, for anyone interested in grabbing one for themselves.
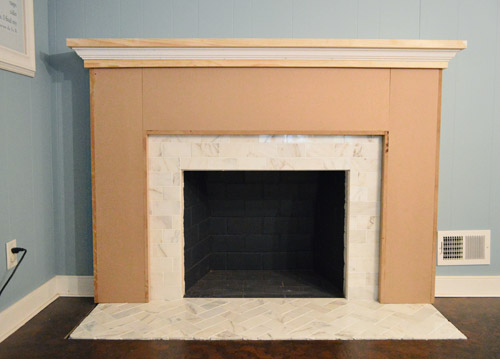
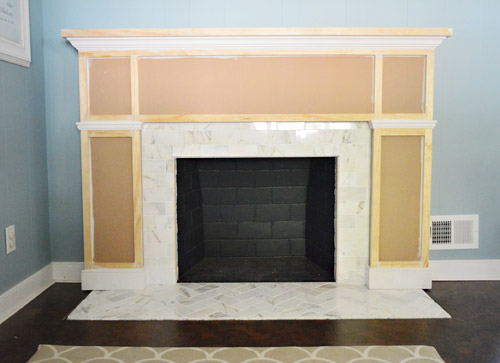
So here we are with the mantel added. It’s starting to look a bit more finished, eh? But we thought this flat-fronted look was a bit too modern for the rest of our kitchen (our cabinets on the other side of the room have more of a traditional shape), so adding baseboard and some framing/details to the wood surround was next on the agenda.
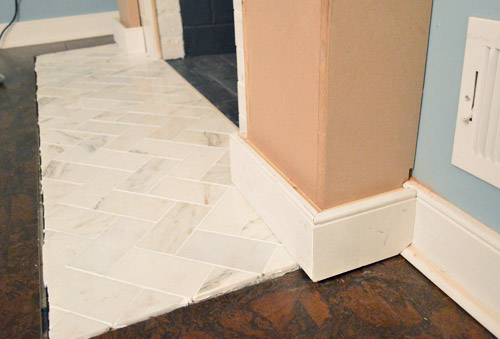
When it came to the baseboard, we had to add some scrap 1 x 2″ boards behind it so that the baseboard didn’t sit flush to the MDF (again, I promise this will make more sense once you see the finished piece).
From there we could start adding the 1 x 2″ boxes that we thought would give the piece a nice, simple detail. So first we added a few vertical strips of 1 x 2s.
And then we added some of the horizontal pieces between them. Are you starting to see the boxes?

We also added another piece of decorative trim right where the vertical “posts” of the fireplace frame seemed to support the middle “span” that stretched across the whole fireplace. It helped to break up the boxes a bit more so we didn’t have these long, skinny boxes on either side. Oh yeah, and this is what it looks like when you’re not aware that your wife is cropping you out of the photo. Smile!
The whole trim process actually went pretty quickly, so we even had time to start caulking some of the seams before the bean woke up from her nap and asked us what we were building now (true story).
Of course, we still have to prime and paint. And we’ve gotta finish trimming out the bottom – especially where the tile meets the cork floor, and add some quarter round where the baseboard meets the floor. So it’ll look a lot more polished when we tie up those loose ends.

Even though it’s not sporting a fresh coat of paint yet, we’re crazy about how this fireplace makeover is shaping up. Because, as a reminder, here’s where we started:

Give us another day or two (Wednesday maybe?) to get all of those finishing touches wrapped up and we’ll hopefully be back with the fully finished product, a complete budget breakdown, and a junkload of photos.

Kristen | Popcorn on the Stove says
The fireplace looks lovely! I love that the mantle is so much stronger looking this time around.
amber says
Nicely done! It’s gonna look awesome!
heather says
While i’m a brick preference lady in my own home, I think this new style definitely fits your home, and you two, more. I personally love seeing other styles that aren’t totally my own because it makes everyones home unique and interesting. It’s fun getting ideas from different styles and seeing how people make changes. I for one know that our new living room/staircase flooring isn’t for everyone (not everyone likes the reclaimed flooring barn look) but for us it’s the bees knees (…or the cows hoof?). So good for you guys for changing it up! It’s going to look great when complete!
heather says
I have no idea why my comment posted as a reply under here – not my intention. Mrs. McClickerson moused to fast apparently on a Monday morning.
YoungHouseLove says
Haha, no worries Heather!
xo
s
Meredith Ericksen says
Well done! A great post about how to transform a fireplace…
Cheers – Meredith
Robin @ our semi organic life says
Wow! You guys make it look so easy with this post. Like you just slapped it all together magically. How much time was spent actually planning the cuts & design of how you wanted it? Did you ever look into pre bulit mantle pieces also?
YoungHouseLove says
We didn’t look into pre-built because our mantel is pretty unusual (higher than most, has an electric outlet in the top that we had to work around, etc) so we just thought “if we can build things like a console table for behind the sofa or a deck, we can probably do this- hopefully…” – haha!). As for how long it took to build out, I’d estimate that it was around 6 hours (we usually work for 2 hours while Clara sleeps, so there were 3 solid days of that schedule).
xo
s
Crystal @ 29 Rue House says
Good morning! That is some before and after! I just love the paint color with the tile…so pretty!
Krissy says
It looks beautiful!! I love the boxy look and all the extra molding.
Jane says
This looks great! I’m really impressed with how your DIY skills have progressed. Quite an inspiration!
Gabriella @ OLinA says
That is so cool. My mother’s fireplace needs to be redone big time and I was thinking we would have to go out and buy a whole mantle piece but this is much better. Can’t wait to see it finished. Thanks for sharing. :-D
Heidi says
Hi – I’ve never commented before but just wanted to let you know this looks FANTASTIC! And for anyone who has ever complained about small projects as posts, they clearly don’t fully understand all the underlying effort that goes into a project like this – and that it would be IMPOSSIBLE for you guys to do these huge undertakings more frequently. Bravo to you!!
YoungHouseLove says
Aw thanks Heidi!
xo
s
Michelle says
I agree with Heidi! Of course, I love the bigger projects, because who doesn’t love a project? But, the smaller posts are so fantastic because it is those little things that do make a house a home and those smaller things are so much more doable (time and dollar-wise) than the big projects. Your posting reminds me that I can’t have everything at once, but I can make it as good as possible for now while I wait. AND, I should slow down so I can enjoy the process by spacing things out a bit.
YoungHouseLove says
Aw thanks so much Michelle!
xo
s
Meg Saunders says
Looking good! I’m excited for the reveal!
Emily says
Oh my gosh, looks SO GOOD! My husband will not be pleased to have another project on his honey-do list :-p
Julia @ Chris Loves Julia says
Hard to believe that’s the same room, let alone fireplace!
Kirsten @ Through the Front Door says
It’s looking so great! I absolutely love the combination of the floor/marble/wall colors. Also, I’m seriously impressed Clara can nap through the nail gun action :)
YoungHouseLove says
She’s amazing! We can hammer right next to her room (she does sleep with a sound machine on but hammering is much louder – maybe it blends in like thunder or something?! Haha!)
xo
s
Ainhoa@ALittleBite says
I love how chunky and strong it looks! So much better than the before.
Lisa L. says
Seriously? I actually really liked the way it looked before, so I was all “meh” when you guys started this. Now I’m just jealous. It looks great!!
YoungHouseLove says
Haha, John and I chatted about how the hurdle for this project would be people thinking “it looks fine as-is” so we were hoping folks would hold out for the after since we knew in our weird-DIY-eyes that it would be so much better (but it’s hard to convince everyone, haha!). So glad it’s coming along!
xo
s
Pam the Goatherd says
Yep! You can put me in the “I thought it was OK as it was” category. That is until I saw today’s post with the new look. Now I definitely agree that it looks so much better with your improvements!!!!
One thing I wonder about, though, is how well it is going to hold up to the changing temperatures once you start actually using the fireplace, since you used nails and glue instead of screws??? It would be horribly frustrating to have nail-pops messing up all that gorgeousness!
YoungHouseLove says
Since it’s not a wood-burning fireplace (we’d love to add a gas insert down the line) the glue and nails along with the kreg-jigging (which did use screws) should hold up really well. So here’s hoping!
xo
s
Jess @ Little House. Big Heart. says
Good thing the Little House has an incredible fireplace already or I’d be tearing into ours to try this!
It looks awesome, guys! Way to go!
Megan says
Okay, when you first said you were going to re-do the fireplace, I thought to myself… it is perfectly good how it is. But wow… this looks awesome and now I see why you wanted to do it. I guess that’s why are guys are so awesome…can’t wait to see it painted! White or Gray?
YoungHouseLove says
I think we’ll go with the same color as the cabinets (it’s a cloudy light gray-white color).
xo
s
Jill says
Looks great guys! Its amazing what a little height on a focal point like a fireplace will do!
Jill
Chelsea @ Riding Escalators says
Oh my gosh! This looks fantastic! You’re making me think about new ways to overhaul our fireplace – besides a complete gut job! Can’t wait to see the finished product!
Whitney says
I have been reading your blog for a couple years now and adore you guys! But one thing always gets me: How do you start your projects without being completely overwhelmed that you might just creat a massive disaster? You are always so confident and it always turns out fabulous… I guess I just don’t have that kind of DIY confidence :)
YoungHouseLove says
We just figure “this could go wrong but it won’t get any better if we don’t dive in, so let’s just go slowly and take things one day at a time.” Most days it works. Sometimes we have epic disasters, haha! But we always survive. Here’s a post about it: https://www.younghouselove.com/2009/12/email-answer-diy-damage/
xo
s
Laura says
Wow! Great work! I’m a little jealous. I’ve been wanting to do something similar.
Ariana says
Remember how I told you your dining room chairs reminded me of a modern day Titanic?? http://marconigraph.com/titanic/cameron/km32a.jpg
The white and marble combo…… totally feels like one of their private fireplaces. http://cache4.asset-cache.net/gc/105870758-photograph-of-a-private-suite-on-titanic-gettyimages.jpg?v=1&c=IWSAsset&k=2&d=R4V%2FQay2ANwpmCZhkZDSEpXxkVv1MaQDmmMs5QbRGG0o2gAjUlzD12jcDUNLlWaPvwVa0sWpMmbCH1zZHJwH4Q%3D%3D
I’ll never let go.
YoungHouseLove says
Aw, man the second image wouldn’t load for me, but I’ll never let go either. Hahah!
xo
s
Danielle says
Wow, what an improvement already! Way to go!!
Maureen says
So awesome! Can’t wait to see it painted!
gemma@thesweetestdigs says
I can totally picture what it’ll look like with a coat of paint and it’s going to be goooorgeous! Love all of the trim you have added — Really gives it a historic feeling with plenty of architectural interest. It may even steal the show a bit from that to-die-for penny tile on the other side of the room ;)
YoungHouseLove says
That’s what I think! Now there’s some competition on the other side of the room! Haha!
xo
s
Brian says
Was just wondering yesterday about Kreg-jigging into MDF for a cabinet project. So you didn’t experience any crumbling when screwing into it? Any tips?
YoungHouseLove says
I didn’t experience any of that – it acted just as wood in that regard.
-John
Annabel Vita says
Looking good!! Will you be putting any wood appliques or other decoration to that big span below the mantle?
YoungHouseLove says
We thought about that but think we’ll leave it as-is at least in the beginning (and then add something if it’s feeling bare).
xo
s
Amber says
It is so great that you are tackling this project right now. I am a long time reader and I just purchased a house and was planning on doing the exact same thing with the brick fireplace! Now I know how to add tile to it!
One question: Did you trim the corner 1×2’s or cut them on an angle? I can’t tell from the pictures.
Looks great and I can’t wait to see it with paint!
YoungHouseLove says
We didn’t cut them on an angle, but on the outer side-corner (you can see it in the photos) we cut one of the 1 x 2s in half (so that it looked balanced and not too thick on that side). Hope it helps!
xo,
s
Stacey says
PRETTY!
Lisa E says
Nice job you two. Can’t wait to see the completion. I love marble. Very classy. Clara must think everybody’s parents do DIY while kids nap and will be surprised someday when she finds out otherwise, lol! Of course lots do, but then again, lots don’t, as you know.
Bethany says
It’s always so interesting to see the difference in ‘norms’ for one family or another. For instance, I was about 8 or 9 years old before I realized that musicals aren’t real… because in my house everyone DID randomly burst into song at any given moment. My parents are notorious for having a running musical soundtrack as they go throughout their day. To each their own!
YoungHouseLove says
Haha, I love that!
xo
s
kim says
it looks so nice already!
we’re still renting a quirky little apartment, but your blog is helping me make a mental list of all of the fun projects i can do once we can start painting, tearing out walls, etc. :)
Emily says
Love Love LOVE it! And its not even done yet! Great design concept with those boxes. You guys sure are smart :). Kudos on this awesome upgrade. P.s., those tiles are b-e-a-utiful! *. Imagines Clara and Sherry petting them and telling them stories before bed*
YoungHouseLove says
Aw thanks! Her little animals were jumping from tile to tile yesterday morning – so cute!
xo
s
Tia says
Looking great! No fireplace in our house, but we’re working on some built-ins; Your visuals helps my brain wrap around some of the trim work. Merci!
Wendy @ New Moms Talk says
It looks beautiful!
I’m wondering if you ever considered putting up a ready-to-be-disassembled mantle in the event that you needed to change anything for any reason.
My Dad built the mantle in one of our homes after he re-drywalled the room and had fireplace issues. It looked gorgeous and came apart by taking out 3 screws.
YoungHouseLove says
That’s so smart! We thought building it out this way made it the easiest, but we should still be able to get it off should we need to since it’s built like a slipcover almost (it’ll take more than removing three screws though!).
xo
s
Kellie says
I’m a sucker for an old brick fireplace, so I probably would have left it (that smashed tile on the floor is something else though!). But I have to say, this is looking fantastic!
Tyesha @ House Made Home says
I looks great already! I can’t wait to see the finished product!
Anele @ Success Along the Weigh says
Lookin’ good! I can’t wait to see the end result. You’re really making me want to tackle that horrible gunmetal surround on our fireplace!
Erica says
So thankful for you guys! We are going to do a fireplace makeover in a few months and this will TOTALLY help us out! Thanks for all you do!
Kelli @ Little Cottage of Mine says
Wow! From concept to execution you guys should get your license and go pro! You got this!
Allyson M says
I have to say.. I actually miss the old painted brick fireplace! I feel like it added a little touch of character & charm to the house. I do like what you’re doing to it, but I still miss the old one!
Megan @ Rappsody in Rooms says
Wow. Call me impressed. You made that all look so easy breezy. And you really motivate me to think that I really can do bigger projects. I just have to have guts! I love how this look is coming together! Can’t wait to see more!
Cassidy says
Eeeek! This is looking gorgeous! I was excited to see you guys redoing it (I never cared much for the brick), but this just exceeded my thoughts! Perfecto!
stephanie says
my husband and i literally just ripped out our fireplace mantle from our builders. looks so similar to what you guys are building. we are opting for a stoned fireplace and continuing up our 10 ft ceilings. if only you were closer – we could have hooked you up – probably going to list it on craigslist!
YoungHouseLove says
Aw man, someone’s going to love it!
xo
s
JebberA says
Looking good!
I have one question about this project … How have you finished the edge where the cement board meets the opening of the fireplace pit? I understand the layers are brick, cement board, tile. Doesn’t the cement board edge show between the tile and brick?
YoungHouseLove says
Oh yes, we have to share detail shots of that and explain. We basically trimmed it out with an end-tile look so you didn’t see the side of the cement board and tile. Detail shots soon!
xo
s
Linda says
OMG! I’m so impressed – especially since I seem to remember a post where John said he wasn’t even very handy with tools like screwdrivers, etc. For me, that’s what so inspirational about your blog – you didn’t start out with years of how to do things under your belts, yet with patience and a willingness to learn, look where you are!
YoungHouseLove says
Aw thanks Linda! It’s true, I was telling John I feel like he’s a true carpenter now. Such a difference from where we started. We seriously didn’t even know how to built anything at all a few years ago. Just goes to show that over time with some patience anything is possible – even for novices like us :)
xo
s
Kim says
I totally agree Linda! Especially because I’m at the “total beginner” end of the DIY spectrum. I received some old power tools as a gift… now if I can just work up the courage to use them :) Right now I just open the closet door and stare at them warily
YoungHouseLove says
You can do it!
xo
s
Bethany says
Did you consider replacing the paneling with drywall when you were doing this project? It would stink to decide to replace it after your beautiful mantle is installed.
Hubby and I decided that we were going to replace our flooring…which turned into also replacing the trim…which turned into also replacing the doors…which turned into replacing some wood paneling with drywall…which turned into getting new blinds for our living room…I swear, our projects always turn into “when you give a mouse a cookie…”
YoungHouseLove says
Oh yes, if it bothered us at all we would have replaced it when we completely redid the kitchen last year. We actually like painted paneling- to us it’s like beadboard so it adds interest and the verticality can even make a room feel taller. So we’re down with painted paneling :)
xo
s
karen @ paperfancy.com says
Thanks for being so detailed in your descriptions. Love how the finished fireplace turned out! What a difference…
Stefani says
Fancy schmancy! Lookin good! I wasn’t initially sure why you were doing anything because I thought your FP looked good but I’m getting it now :)
Liz H says
You guys are so awesome- look at you go! That fireplace is looking amazing already!!
Shirley says
Wow! Can’t believe how far the fireplace has come! Truly inspirational!