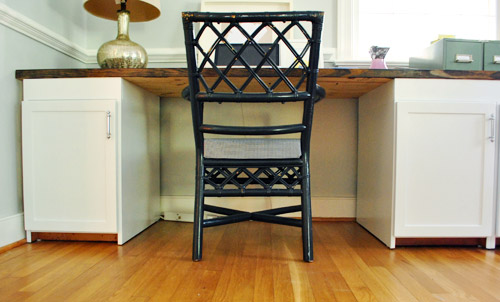
Yup, we got a little trim. As you read in last week’s Day In The Life post, we recently tackled the add-trim-to-the-hooter-and-the-hotter-office-desk project. The basic game plan was to add some simple baseboard or molding to the bottom of our cabinets so they looked more like built-ins. In other words, the bottoms were looking a little unfinished…
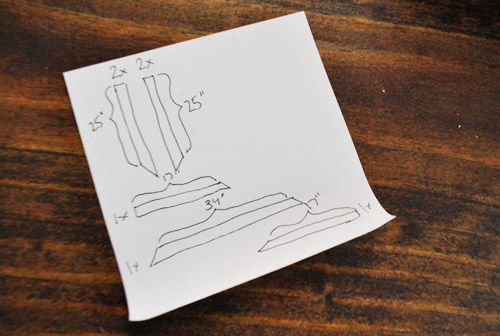
I took measurements and headed off to the store with my little cheat sheet. Notice how I mark which way my cuts go? When I’m making angled miter cuts I’m so anxious about cutting the wrong way that I leave myself as many reminders as possible.
One very critical measurement, not shown here, was the trim height. We had less than 3″ of distance between the floor and the cabinet doors, so traditional baseboard wasn’t gonna work. I actually ended up (dramatically) bringing home trim that was very similar (actually, maybe exact) to what we used around our bathroom mirror. Total cost for three 8ft pieces = $14.

I measured my pieces and again left reminders about what angle my cuts needed to be…
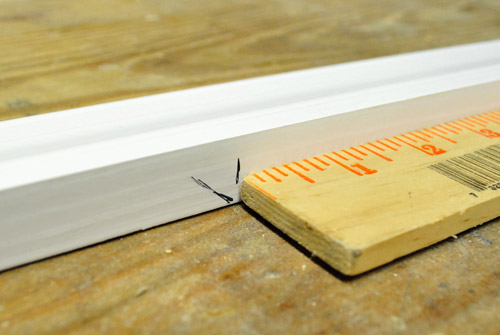
…so that even at the last second I could make sure I didn’t have my blade or trim piece in backwards or something.
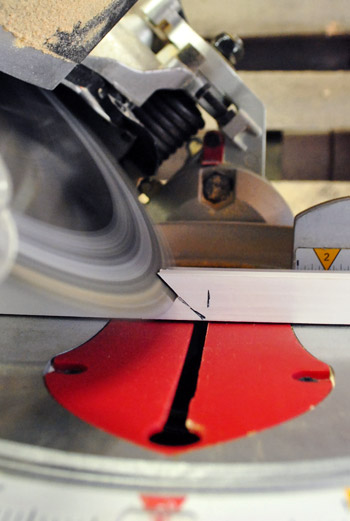
I checked each piece as I cut it just to make sure the lengths and angles were right.
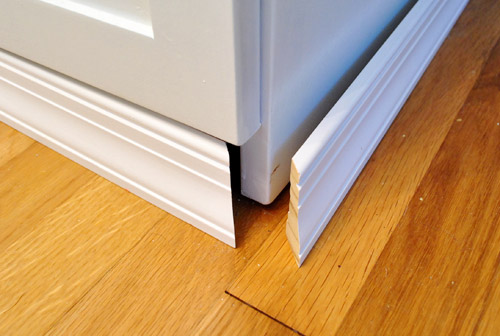
After everything seemed to be lining up, it was time for the nailing portion of the day’s festivities. I hammered the small finishing nails in most of the way with my hammer, then finished it off with my nail punch (which helps get the nail set into the trim slightly without banging up the surrounding wood).
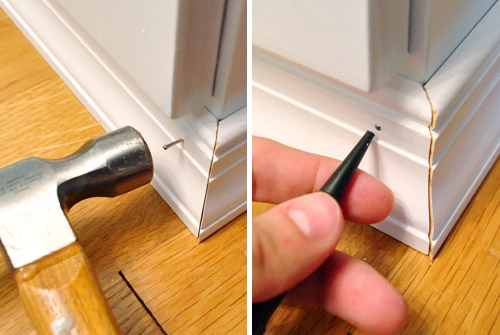
Of course the edges weren’t 100% perfect, but that’s what a bit of caulk is for (just rubbed into the edge with a finger). It’s also good for hiding those slightly sunk nail heads (thanks to the nail punch). Though we actually haven’t done either of those things yet. Oops. Soon…
I put two or three nails in each piece of trim, securing it to the cabinet – not the floor – and was done in almost no time. If the white of the trim weren’t so darned close to the white of the cabinets already, we’d probably have painted them immediately. But they actually look great as they are (so we plan to paint them when we caulk stuff, just to finish things off).
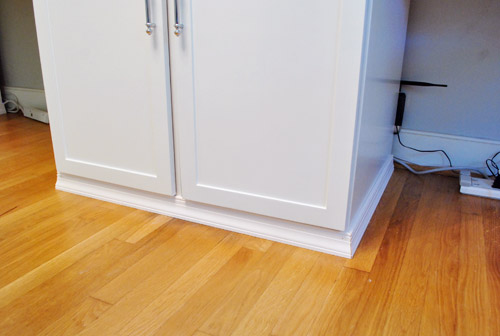
What wasn’t looking so great was the mess of cords in these pictures. We’ve just sort of been ignoring them up to this point, but after taking the pic above we suddenly realized that they were ruining the finished look of our new trim. So we decided to finally do something about it.
Sherry’s side was easy because she only has two plugs in one small power strip (her computer and lamp – although for some reason her lamp wasn’t plugged in for the picture below). The outlet is hidden behind the desk, so we thought ahead and plugged the power strip in before finishing the desk. Luckily I was able to just tuck her strip out of sight behind the cabinet since there’s a smidge of space to allow for the plug (there’s no space between the countertop and the wall, so it looks 100% seamless from above – you only see that small crack where the cabs don’t sit right against the wall if you’re on your knees under the desk). Oh and ignore the raw bottom of the countertop in all of these pictures (it’s also not seen except by someone who is Burger’s height, but we’ll probably do something about it someday because we’re anal).
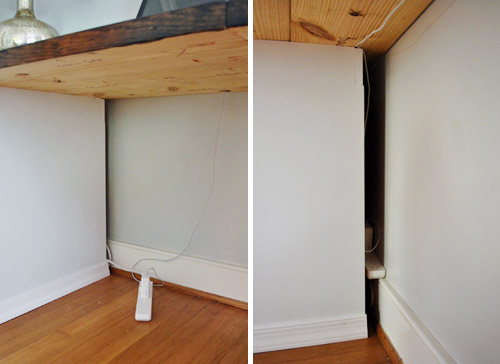
My side was a bit crazier, since I had a larger power strip (from our old office set-up), more plugs (computer, phone, external hard drive, etc) and that big honking wireless FiOS router. Behold the hot mess:

Since tucking it away like Sherry’s side wasn’t an option (stuff was way too bulky to slide behind the cabinets), I opted to hang the power strip on the wall right under the counter, that way it’d be virtually out of sight. The power strip already had notches for screws on the back, so I just used a homemade guide to make sure I drilled my holes in the right spots.
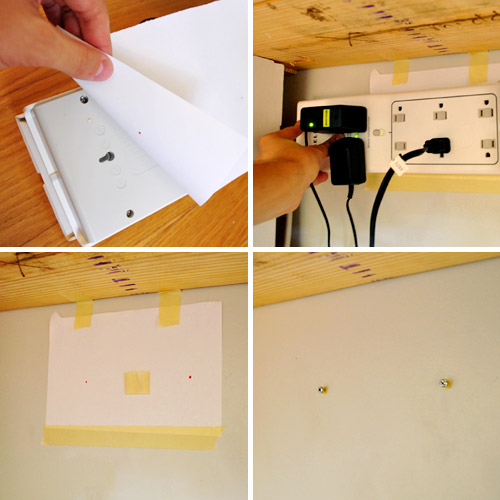
In case the pic isn’t self explanatory enough, my basic system was:
- I taped a piece of paper to the back of the strip and poked holes through the paper with a red pen, marking the notches.
- I then held the strip where I wanted it on the wall and taped the paper to the wall
- When I gently pulled the strip away, it un-taped itself and left me with two red guide dots
- I just drilled right through the paper so I had perfectly placed holes for my anchors and screws
- Then I hung the strip on the wall and plugged everything back in (and slid the router behind the cabinet)
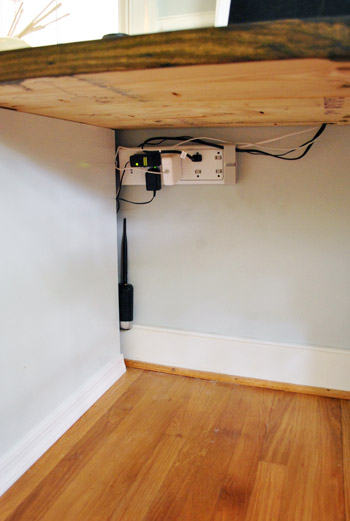
Still looks a bit messy in the pic above, but when you stand back to look at the whole room it’s not very noticeable at all. So your eyes can just concentrate on the freshly added trim instead. Note: of course we still have to hang art and window treatments and add bright lamps/shades and rearrange tons of desk stuff, so other than the newly completed desk there’s not much about this room that’s done.
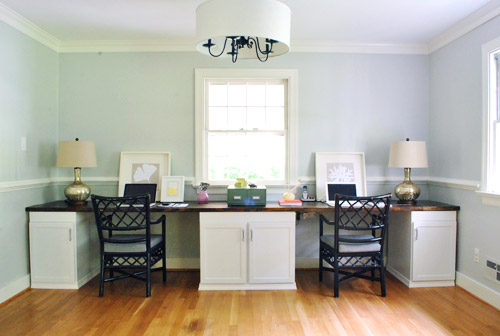
Just as a reminder, here’s what the room looked like without the added trim and cord organization. We think it was well worth $14 for the extra polish that it adds:
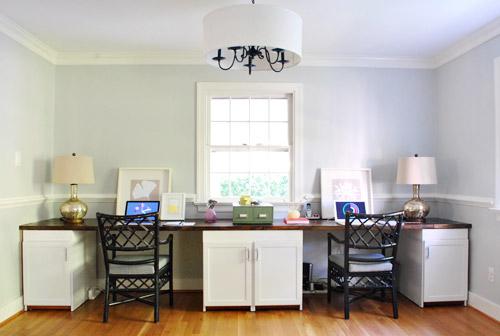
Oh and here’s what the room looked like right after we moved in nine months ago, just for some way-back-when reminiscing:
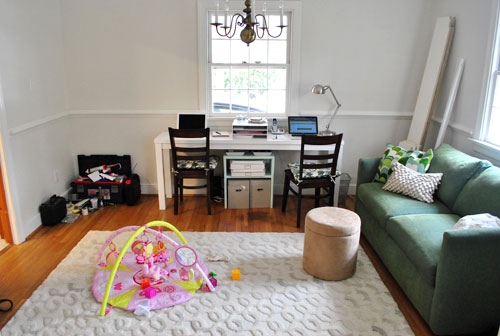
This room in general has really come along in the last month or so. Which is nice since we spend so much time in there.
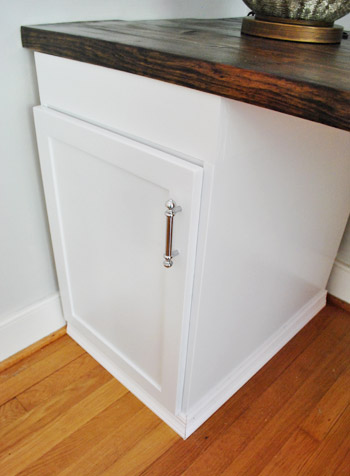
Oh, and I had once talked about trying to add some trim to the side edges (where they almost meet the wall) to complete the look, but Sherry and I had about fifteen pow-wows on the subject and finally decided it wasn’t worth the trouble (to make it look truly flush I’d have to do lots of cutting around the baseboard and that didn’t sound like much fun – and doing it half-heartedly would probably just make it look worse). So once we caulk those newly added trim corners and nailheads, I think we’re pretty much calling this desk project D-O-N-E. Here’s how much we spent in total on our 13 foot long wall-to-wall double desk:
- Cabinets (from Habitat For Humanity ReStore): $6.30
- Kilz Clean Start No-VOC Primer: $0 (leftover from painting the kitchen paneling, but it would be around $20 to buy for those wondering)
- Electric sander & sandpaper: $0 (already owned, but would be around $25 to buy)
- Benjamin Moore Advance paint (in Decorators White, satin): $40 (thanks to 10% off haggling/begging)
- Pre-primed & unprimed wood to build up cabinets (from Home Depot): $51
- Framing lumber for counter (from Home Depot): $27.30
- Stain & poly for top: $0 (already owned, but would be about $8 and $20 respectively if you didn’t have any)
- Drillbit for boring cord holes in counter: $4 (from Lowe’s)
- Trim for bottom: $14 (from Lowe’s)
- TOTAL: $142.60
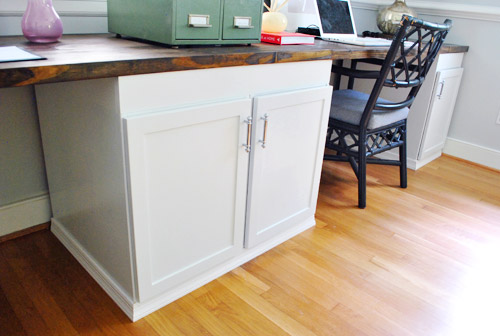
Not surprisingly, our attention has already moved on to another project in the office and we CAN’T WAIT to share it with you. Lets just say that Sherry’s epically sore, there’s paint in her hair, and she’s nowhere near done. More details (and pics) tomorrow for sure. Until then, have any of you guys added trim to make something look more built-in. Or launched a full-scale cord organization? Tell me about it.
Psst- To check out our entire desk building adventure from start to finish, here’s the post about planning the layout of the room, here’s the post about buying the cabinets, here’s the post about other cabinet research we did, here’s the post about sanding/priming the cabinets, here’s the post about building them up to desk-height and painting them, here’s the post about building and staining the counter, and here’s the post about drilling cord holes into the counter.

Angela says
Ok I haven’t read the post yet but I had to share first… I had my first young house love dream last night. Oddly it took place in my old house’s bedroom (I haven’t lived in that house in 5 years!) and Sherry and I were chatting… I kept blubbering on about different blogs you had written and how I loved you guys so much, and you were totally not interested and I could tell you were bored w/ the conversation and just didn’t know how to respond since you knew nothing about me, so after attempting to make small talk you just went and got Clara so that we could just play w/ her as a distraction and avoid talking. Meanwhile the entire time in the background John was removing extra curtain rods from all the windows in the room. So odd.
YoungHouseLove says
Bwahaha. I love that John was working on curtain rods in the background. Sorry I was so rude in your dream! Everyone who knows me knows I’m more than happy to chat about anything for hours! Haha.
xo,
s
Angela says
Hahah I forgive you for your rudeness in my dream. I know you guys aren’t like that at all and I’m sure you’d be super sweet if we met in real life, so I’m not sure how my subconcious came up w/ all that :)
YoungHouseLove says
Haha, sometimes in other people’s dreams John is the rude one- so I guess it was my turn. Haha.
xo,
s
Nikki says
First comment? :) Love YHL!
rashmi says
WOW! This is just amazing!
I have just started planning my craft room and I am so inspired by this post! Thanks for sharing
Kristen @ Popcorn on the Stove says
The trim really makes the desk look nicer. As for the plugs, that was a clever solution! I would’ve tried hanging them under the desk (like the unfinished wood part) but I do like that it’s less noticeable now.
Can’t wait to see the other project you’re hinting at. Is it painting those chairs??
YoungHouseLove says
Nope, not the chairs. Details tomorrow!
xo,
s
Heather says
If you painted the ceiling, I can’t wait to see the color! Desk looks great!
my honest answer says
The desk looks great! I also love John’s little drawings – you should pick a few favourites from past projects and put them in the frame wall. It would be a great way to remember the process of designing something, and remind you that you did it all from scratch.
YoungHouseLove says
That’s a cute idea! I love those little drawings too.
xo,
s
Angie @ The Country Chic Cottage says
I **need** to do some cord organization!! I have a plan for a newish desk (my old desk modified). So the cords will come after that! :) Thanks for the cord inspiration! :)
ALittleBite says
The desk looks a lot better with the added trim! I love it.
And I’m gonna take a guess about the project: stencil on the ceiling?
YoungHouseLove says
Nope! But that would definitely leave me sore. More deets tomorrow!
xo,
s
Amanda @ Our Humble A{Bowe}d says
I love the new trim. It most definitely looks nice and finished now. Amazing $14 addition. Um, I hate cords! In my office, we drilled a small hole in the cabinet right under the desktop at the very back. I shove all of the cords through that hole and then into the outlet in the cabinet. It’s so nice and clean. I wonder if you could try that? Maybe with a power strip if you don’t have an outlet in the cabinet…
YoungHouseLove says
We thought about making holes in our cabinets but decided we’d rather not cut into them so we’re happy with our little tuck & hang solution. They’re totally out of sight in person!
xo,
s
Amanda @ Our Humble A{Bowe}d says
Oh, I didn’t mean that your solution didn’t work. Sorry if what I said seemed rude. I think your solution is great, and you can’ see it. That’s all that matters. I was apprehensive about drilling into my cabinet, too. :) And, I hope you’ve done some stenciling. Just sayin…
YoungHouseLove says
Oh no worries! It didn’t sound rude at all! And you might be onto something with your guess about what I’ve been up to. Haha. Can’t wait to spill the beans tomorrow!
xo,
s
heather says
“so we’re happy with our little tuck & hang solution” bwwaahahahahahaha. Hard to believe in a little under a month I’ll be 28.
YoungHouseLove says
Haha, I walked right into that one.
xo,
s
bridget b. says
don’t feel bad heather, i’m 32 and “tuck and hang” also made me sniggle-giggle.
p.s. am i the only one who blushed a little at the post title? lol!
YoungHouseLove says
Oh man, the post title? We meant haircut! Haha. That was a total head-hair reference.
xo,
s
El says
Love the addition of the trim!! Looks great and does lookg built in. Amazing budget project.
I’m guessing you’ll paint the trim later since it is just pre-primed from the store and doesn’t hold up very well as such without a coat of paint. Scuffs real easy and will look dingy after a little while and dust sticks to it more without paint too. Don’t ask how I know – lets just call it slow in remodeling and getting paint on things.
YoungHouseLove says
Yeah, I figure after I caulk I’ll paint it.
xo,
s
heather s. says
Oh good – I’m glad you’re painting the trim. In the post y’all said you weren’t painting it but I figured two self-proclaimed anal people like yourselves would have to paint them since they are just primed from the store. ;) I once looked at a house and the owners figured they didn’t need to paint the primed trim and it just looked horrible in person – always paint the trim people!
YoungHouseLove says
Haha, yeah we’re too anal not to do that when we caulk.
xo,
s
Elaine says
The desk turned out great. The trim really adds to the finished look.
Krysta @ Domestic for Dummies says
The office really has come a long way! It looks like it is a lot more comfortable for you two to work side by side now. Will you be hanging up those prints or leaving them on the desk?
YoungHouseLove says
We think those are too small to hang on the wall so eventually we’ll hang something larger and maybe put those on our bathroom?
xo,
s
amanda says
Wow looking from where you started to now you guys must feel so spacious at the desk. Even though the desk is obviously bigger it makes the room look bigger and more spacious!
Kim says
Was it stenciling?
YoungHouseLove says
Maybe… details and pics tomorrow!
xo,
s
annabelvita says
It does look sooo much more finished with the trim, but I agree the extra 0.5 per cent more ‘finished’ it could look with the trim running along the back does not justify the effort…
I made a charging centre out of an over the door shoe hanger (http://annabelvita.com/how-to-stop-cords-and-chargers-being-your-dir) because we charge our laptops out in the open in the main room of our flat and there isn’t a good place to hide the cords. Well, there probably is… but I sorted storing the chargers and ran out of steam!
YoungHouseLove says
Such a smart idea!
xo,
s
ashlie says
That’s funny – I recognize this project from Offbeat Home! It’s so funny how you can “run into” the same people online!
lisa says
looks great….i also think it’s funny that katie bower’s blog is talking about her son’s hair trim…..and yours is about the wood trim. haha. did you 2 plan that?
YoungHouseLove says
Haha, total accident. Hilarious though!
xo,
s
Kaytie @ GardenKitchenHome says
No YHL dreams for me, but I have to say the trim work is dreamy. It makes things look so… cohesive! And not $6!
Merideth says
I remember when your old desk looked so long and large in your old house – now compared to the built in, it looks tiny! The room is really coming together :)
YoungHouseLove says
Isn’t that funny? We have so much more breathing room now! Whew.
xo,
s
RC says
Will you add filler wood pieces and caulk to the outsides of the far left side and far right side units so the sides appear flush to the walls? In the photos the shadows on the side make it seem a little less built in but maybe it’s okay in person…
YoungHouseLove says
We mentioned in the bottom of this post that we’ve debated how we could make those look better with trim and actually don’t have confidence that it’ll be a nice flush fit (we have to cut wood around the quarter round and trim and try to get it flush and the perfect height so we’re just not confident enough to believe it’s worth the effort – haha). In short: we worry it’ll look worse and don’t mind how it looks now in person so we’re done with the desk I think!
xo,
s
Lisa - ourhomefromscratch says
Looks great! It’s amazing what a little trim can do to complete a project. I thoroughly enjoyed the outlet piece – great for super organizers like myself.
Erin @ One Project at a Time says
Wow! What a huge difference that trim makes. But mostly I’m feeling like a dummy because I’ve never thought of that trick to hang things with inverted holes. (Wait… is that right? Yeah, it just sounded bad. :)) Genius!
Jessi says
When we wall-mounted our tv I was so worried about cords. But we found a plastic sheath, I think it was $10 or $15, that we painted to match the wall. That runs horizontally from the tv and isn’t very noticeable — certainly easier than going through the wall.Then, like you guys, we mounted the power strip on the wall. Ours is behind a bookcase.
Btw, loved the Q&A video, especially “taking the baby to market.” Already making my husband nuts with that one. But I need to google the hooter-hotter thing. It sounds familiar. Did you hear that in a kids book or was that a true DIY Dr. Seuss moment?
YoungHouseLove says
Haha, I think that was just me getting tongue tied on camera. Which is actually exactly how I usually react when I get nervous. Haha.
xo,
s
Karen F says
It’s amazing what a difference $14 of trim and a few nails make. Looks awesome!
Brittany says
The trim looks great and my guess for the project is…Chevron on the ceiling?!
Ashley says
It looks awesome! I really want to do something like that with my husband’s desk (which right now is 3 cabinets with a large piece of green counter top on it). He’s had it that way since college and we’ve been talking about going more “grown up,” but it has to be large for his desktop and gaming stuff. I showed him this and he says “We can do that! Just not white in my ManCave!” haha
Thanks for the inspiration/motivation!
Meredith says
I’m so inspired to do something similar to my office space. Seems like those office/something else spaces really need some attention to make them look good.
Diana says
Looks great. Question: what kind of caulk to you guys use for all your trim-caulking and before-painting caulking? I am overwhelmed by the caulking choices at Home depot and am looking for a recommendation. Thanks!
YoungHouseLove says
We like the Dap window & door stuff (make sure it’s the paintable white kind). Hope it helps!
xo,
s
Laura says
I’m still in awe that you got those cabinets for $6! hahaha.
Pip says
What a difference the trim makes. It’s like your cabinets are all dressed up for a formal occasion. No more blogging in jammies – cabs have set the dress code ;)
YoungHouseLove says
Haha, love it. Oops but I’m still in pajamas. Better get on that.
xo,
s
Jenny says
The trim really makes the cabinets look more professional – office furniture – nice
Wendy says
One thing I love about you guys – You pay attention to the details. Love this. I would have never taken the time to install that beautiful trim, but that’s what makes you so fabulous and me, just kinda a wanna-be. ;-)
seriouslysassymama says
Your office looks flipping awesome. I hope Sherry has paint in her hair because she was stenciling the walls? Maybe?
liz @ bon temps beignet says
It looks so much more polished with the trim pieces. Awesome job y’all :)
Meagan says
the stencil?!?!?! cant wait to see what ever it is.
and the trim look phenomenal…totally makes the desk look built in beautiful!
miriam says
I thought it looked good before, but the trim makes it look even better! The cord control looks great, too. We really need to do something similar, but we we’re totally clueless when it comes to drilling holes and putting anchors in the wall, and we’re kinda chicken to try it since we’re renting! Do you know of any good tutorials out there (or would you be willing to do one yourselves, hint hint)?
YoungHouseLove says
I have an idea for renters! Why not go out and grab some heavy duty 3M velcro? It’s 100% removable and will hopefully be strong enough to install so it holds up your power cord until you want to take it down and move. Hope it helps!
xo,
s
miriam says
Oh, we used that velcro to hang a 24″x36″ frame and I think we have some left over! Hadn’t thought to use it for the power strip since it says “picture hanging strips” on the package. Thanks for the reminder to think outside the box… literally!
YoungHouseLove says
So glad! Good luck!
xo,
s
Jen @ The Decor Scene says
Looks much more built-in now. Love how it turned out. I can’t believe what a great price you have spent for that desk so far. $142.60….you couldn’t even come close to that to buy something like this from a store. Awesome YHL!!! :)
Lindsey says
I’m green with envy on those perfect angles. Hubby and I have tried at least 10 times to cut some dang trim for two interior windows in our basement (they are on an interior wall, between play room and craft room so I can spy on kids while I craft, and to let some natural light into the craft room since it’s sub-terranean and windowless). Our 45s NEVER work! Arg! What’s the secret? Should we be using something other than a miter box???
Love the polish the trim adds to the cabs. And I concur that doing all the work on the ends to make them truly flush would’ve been annoying and not worth the effort.
YoungHouseLove says
John’s dad actually has a miter saw that he stores in our basement (in return for “free usage” from us, haha). So maybe the saw is easier or more foolproof than the box? Could you rent one from HD for the day?
xo,
s
Lindsey says
Ah, miter SAW! I bet that would work a lot better than the, ahem, electric knife we’ve been using.
I wish I was kidding. We’re ghetto like that.
YoungHouseLove says
Aw, I hope it makes all the difference! Good luck!
xo,
s
Sara says
Miter boxes are a pain. Miter saws are sooo much easier to get clean and precise cuts.
heather s. says
Huh. I did *all* of the trim in my house with the miter box (not saw since I didn’t own one at the time) and the 45 was perfect. Maybe its the house. ;)
Kate says
A miter saw has been on my wishlist for Christmas/my birthday this year. I’ve always wanted once, and now that we have a house I would have room. We’ll see if we can find a cheap enough one to justify the expense!
HeatherM says
My husband has stickers that go on his miter saw, and they seem to help with the 45 degree angles quite a bit. He has found that the larger blade on his new saw makes the miter cuts easier too (not all saws allow the same sized blade). He just bought his new saw so that he can make his own picture frames when he shows his work in gallery shows, and he has been really impressed by how easy it is to use the new rigid miter saw compared to his dad’s old one (probably a ryobi). Miter cuts aren’t all skill- a good saw makes a huge difference!
Laura says
I love how the cabinets have evolved!
We just used a cheap base cabinet from Lowe’s, nailed bead board to the 3 unfinished sides to make an island in our kitchen. Then, we added baseboard around the bottom to add a more “finished” feel, and I think it looks gorgeous (topped with a handmade butcher block)! We painted it a light gray.
YoungHouseLove says
Ooh, that sounds dreamy.
xo,
s
Lindsay L. says
I bet 100 paint cans that Sherry painted the ceiling! Can’t wait to see the project! (that’s not to say that I didn’t thoroughly enjoy reading this one too John) :)
Lindsay L. says
Oh man, a lot of people are guessing a paint stencil on the walls. I hope I didn’t bet too high! Sherry it seems like y’all are getting less comments now that we all realize how consuming comment moderation is…does it seem like that to y’all too?
YoungHouseLove says
Hmm, good question! I’m not sure, but I sure hope not! We love hearing from you guys! We usually get around 100 within an hour and a half, so with the post being up 40 minutes and having nearly 70 comments we’re probably right on track to hit the normal amount. Who knows though! Definitely don’t stop chatting with us guys- we love it!!
xo,
s
lena says
the desk looks great, but just wondering, how come you guys decided not to remove the baseboard on the side walls and install the desk flush to the wall, to look like a true built-in?
YoungHouseLove says
With old plaster walls, removing the extremely securely nailed in baseboard was a daunting job so we left them. Our only priority was to keep the counter 100% flush on all sides, so when you’re walking into the room or sitting down at the desk it’s one giant seamless surface. Maybe it’s an in-pictures thing about the tiny space next to the cabinets, but in person it’s definitely not what you notice at all (all eyes seem to go to the dark stained counter and the new trim gives everything an even crisper look). Hope it helps!
xo,
s
Mary@The Good Life says
AHhh. That makes sense. I think its maybe the darkest part of the photo, maybe that’s why my eyes keep getting drawn there, too. How about a video? lol with all your extra free time? If you’re doing that stencil, I am PRAYING for a time lapse vid! It’s looking great, really, and now I get what the 15 pow-wows were talking about with the baseboards and all that jazz. Can’t wait for tomorrow’s surprise!
YoungHouseLove says
Haha, we’ll have to try to make a video of all the office progress sometime soon! John’s sister came over and said “the blog photos don’t do this desk justice at all- the top wood part is really amazing in person.” Here’s hoping a video will capture it better!
xo,
s
Julia @ Chris loves Julia says
Lol!!!! “The hooter and the hotter.” I’m glad that showed up again. I think that you should keep inserting these little funnies in your posts. …not that you don’t make me laugh on the daily.
Lindsay @ A Walk in the Closet says
Wow, what a difference a simple trim around the bottom can make. Thanks so much for sharing this DIY. This post is a testament to how much the small details matter. Thanks for sharing!
Shelly says
I love the wall color, love the light fixture revamp, and the desk looks fantastic! It’s turning into my favorite room in your house so far. Will you be doing a window treatment in here?
YoungHouseLove says
Oh yes, that’s definitely on the list. The funny thing is that besides the desk the room is completely unfinished! We’d love to hang art, do the windows, bring in a chair and ottoman, maybe a rug for more color, bright lamps or shades, etc. Lots to do!
xo,
s
Adriane Wacker says
I love the base trim…it’s funny the little things you don’t notice in first pics. Now that you have the base trim, it looks WAY better!
susan says
Gorgeous! I can’t wait to see what you busy bees have been up to. susan
Katie says
Looks great! I noticed that you started including what things you already owned would have cost – that’s really helpful, thanks!!
YoungHouseLove says
Yes, that was a request from a few readers so we’ve been trying to remember to work that in!
xo,
s
Rachel says
Looks great! The trim makes a big difference!
Hillary says
Love seeing the desk totally completed. I would love to see a post that focuses on how to mitre trim. We are thinking of framing a builder grade mirror in our hall bathroom as well as putting trim up around our windows. We were just given a hand-me-down chop saw and we are intimidated by making cuts for mitered edges. I saw some of John’s notes, but could you provide a post with more steps on how how-to, tips, tricks, etc?
YoungHouseLove says
Our big secret is a miter saw (it makes the angles very easy so you just pull it down and back up and you have your cut). Maybe try renting one from a home improvement center for the day and doing all your cuts and then returning it? It really makes it go nice and fast!
xo,
s
Bailey says
With respect to making the cabinets look more flush against the walls, have you thought about removing a portion of the baseboard from the walls? That way the cabinets would sit flush against the walls and line up with the ends of the desktop. Anyway, the desk looks incredibly awesome!
P.S. The baseboard would be easy to reinstall should you decide to relocate the desk / repurpose the room at some point in the future.
YoungHouseLove says
Yup, we thought about that but since our baseboards are extremely secure with long nails into the old plaster we were afraid of opening a can of worms by pulling it off so we were happy to make do. In person since the counter goes wall to wall and is completely flush you don’t really notice the sides at all- at least we think it looks great as-is! Haha.
xo,
s