Well, that can of worms is officially open. We’ve started making some changes in the kitchen. I realize this isn’t totally new news, since we removed the wallpaper in there a few weeks ago, but towards the end of last week we used that little jolt of momentum to start down the path of some more serious changes.
We still want to live in this house for a nice long time (and save up some money) before we take on our full kitchen reno – we’re still changing our minds daily about what configurations and countertop materials we’d like for the long haul – but this is officially the beginning of a series of what we hope to be pretty transformative “Phase 1” improvements so that we can enjoy this room and make the best of it in the meantime (you can read more about those Phase 1 updates and why we like them here).
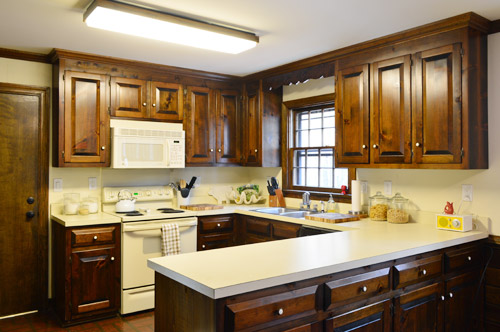
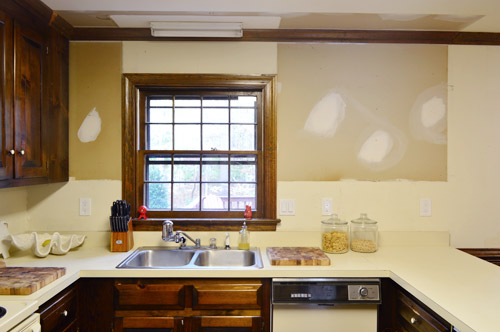
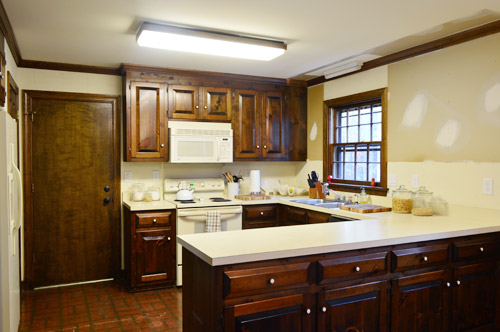
We had hoped getting the wallpaper out would make a greater aesthetic improvement on the space. But instead it just kinda underscored how brown, beige and blah everything is in there. The appliances, counters, and walls kinda wash together in color that certainly isn’t improved by the fluorescent light – while the dark cabinets, trim, and doors just feel looming and heavy in person. Our first course of action was something Sherry’s been ready to do since day one: remove some upper cabinets. Both of us miss the look and the functionality of the open shelves that we had in our last kitchen, so pretty much since move in day, Sherry has dreamed of swapping this long upper to the right of the window for some open shelves to lighten things up.
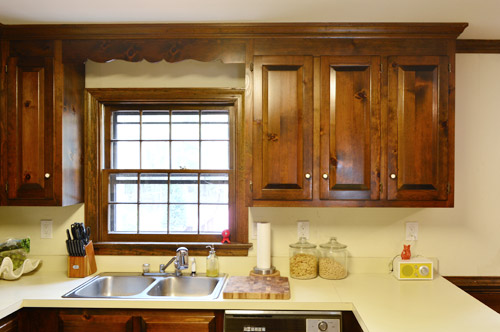
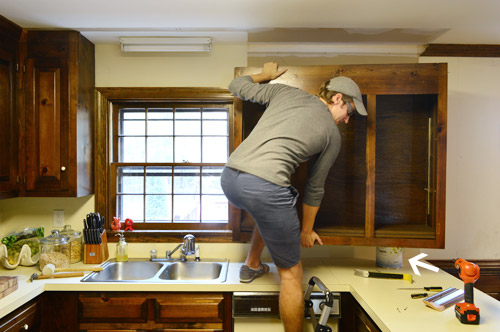
So Sherry unloaded everything that was in them (fortunately we’ve barely used the uppers flanking the microwave, so there was plenty of room for all of this displaced stuff), and then I could start demoing away. First I carefully pried off the crown molding with a crowbar (since I planned to reuse it) and then pounded at this header piece across the window with a rubber mallet.
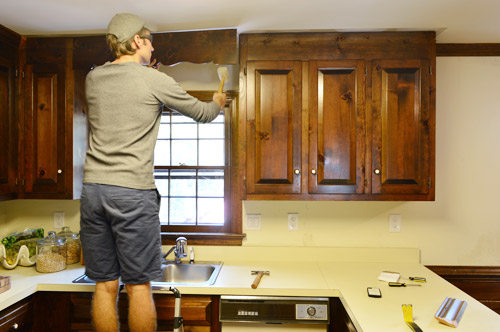
That was the easy part.
Taking the cabinet down was tougher than we anticipated. We figured it’d just call for removing a few screws like the last kitchen, but it turns out these cabinets were nailed in. So instead it took lots of prying and good ol’ fashioned jostling to free it from the wall. Since it was pretty heavy I took the doors off (so they weren’t flapping in my face the whole time) and I put a can of paint on the countertop to prevent it from crashing down directly on the counter when it eventually came loose. It also saved my foot from getting smashed.
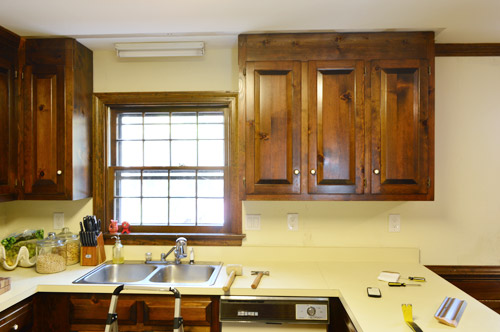
Despite some lack of paint behind it, we consider it an instant improvement. Especially when you’re sitting at the table on the other side of the kitchen. To have a clear shot of the window (which we’ll maintain with some open shelving) is really nice.
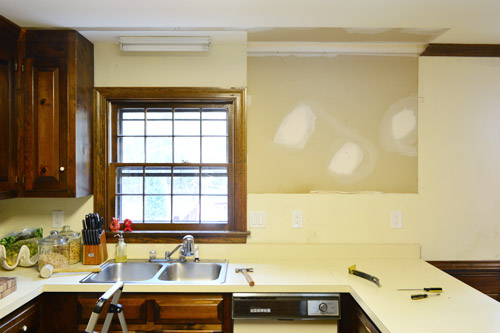
So much so, actually, that we decided to take down the small upper on the other side of the window too. We realized that would keep that wall looking more balanced and would let the window breathe visually.
The plan will be to put a pair of floating shelves on either side of the window. We actually already own a set of long white Ikea Lack shelves for the right side (we purchased them about two years ago with plans to put them in our last home’s sunroom, but that idea fell by the wayside and we never even took the shrinkwrap off). And they sell a shorter version that will be perfect for the left side. So even though we’ve removed some cabinetry (which we plan to reuse in the garage) we won’t be losing lots of kitchen storage.
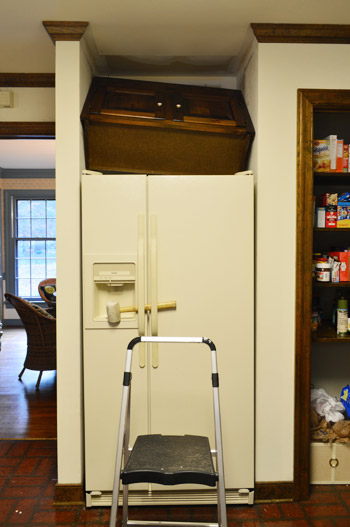
Before we hang those open shelves, we’ve got some painting (and priming) to do to those walls first. But with our cabinet mojo firing at full steam, we turned our attention 180 degrees to another cabinet issue. This utterly useless upper cabinet that was tucked waaaaay back behind the fridge.
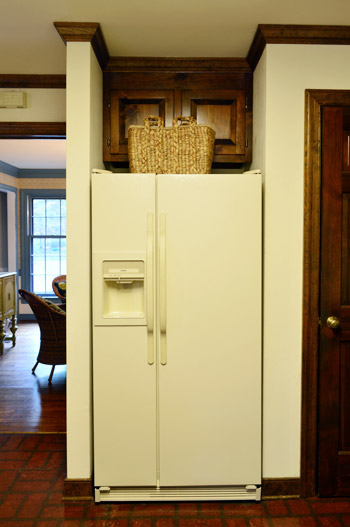
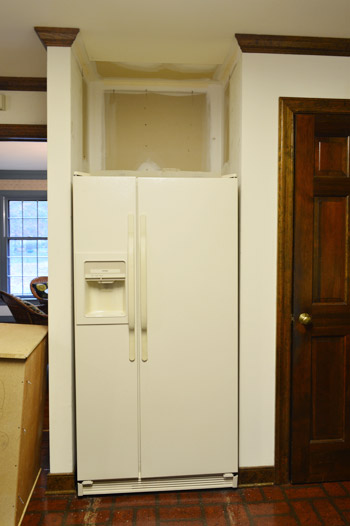
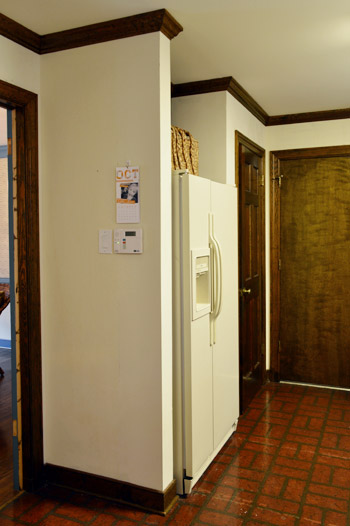
It was so far back that neither of us could reach it without a stool (and I’m a pretty tall guy, so that’s saying something), which is why we threw the basket up there as a lose attempt at disguising it. We wanted to move it forward to be flush with the wall so that it’d be reachable and make it look a bit more like the built-in fridges you see in modern kitchens. Like the other cabinets, I pried off the trim and shimmied its nails loose from the wall. Aaaaaaand then it got stuck.
Turns out the wall narrows slightly as you come out and the cabinet was built-in quite snugly. But with a few more pulls (and a couple of drywall dents) it eventually came out. And happily, the dents were covered when we rehung the cabinet.
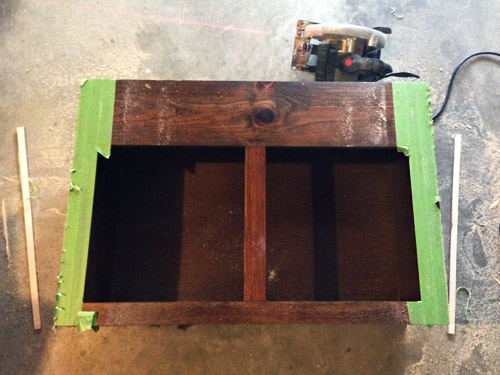
The snug fit alerted me to another problem though. Since the nook narrowed towards the front, I’d have to trim it before putting it back up to get a nice seamless fit. Fortunately the overlapping part is just the face of the cabinet, so it was easy enough to shave off a quarter of an inch on each side with my circular saw. I put tape down on the edges before cutting to help discourage the wood from chipping or scratching during sawing, which worked (the tape sort of shreds itself but protects the wood).
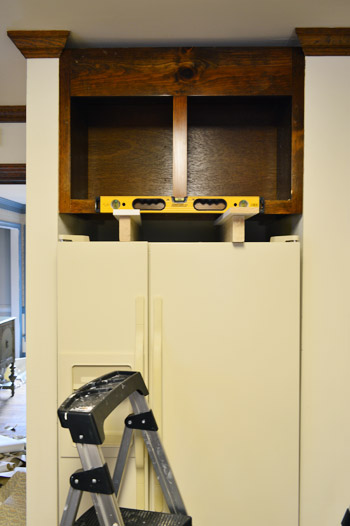
The other problem to solve was how to hang it. It previously had been nailed to the back wall, but now that we were looking to float it about 14″ away from the back, I decided to construct two simple braces out of 2 x 4″s. They were sort of U-shaped, with the short side pieces that would be screwed into studs on both side walls for stability. That gave me a nice, long, sturdy front board into which I could secure the cabinet with screws.
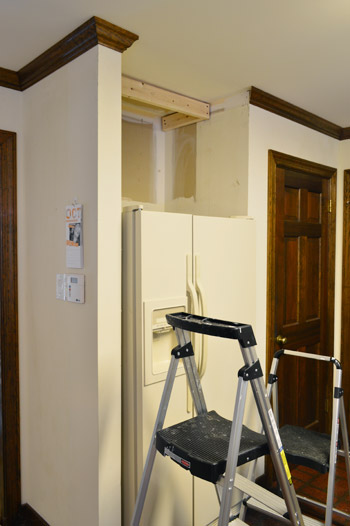
I made two braces – one for the top and one for the bottom of the cabinet – so you can see the bottom one wasn’t installed yet in the photo above. I was very very careful with my measurements during this step, because if I attached the braces too far forward or back, the cabinet wouldn’t sit flush to the wall. There was a lot of measuring three times before cutting once.
Thankfully my triple-checked measurements worked out great and the cabinet sat perfectly where we wanted it. I propped it up in place with some wood, checked that it was level, and then screwed through the back of it into the braces (being sure that my screws went through the thick framing of the cabinet, not just the thin, flimsy back panel).
Not only did it look much nicer, but now we could actually put stuff in it. Functionality for the win! The last step in this project was reinstalling the crown molding – a careful process since I was matching existing cuts (of the pieces I didn’t take down) and because I didn’t have any spare pieces on hand- just the ones I had removed at the start of this project. So all it would take is one bad cut and I’d be, well, very angry at myself.
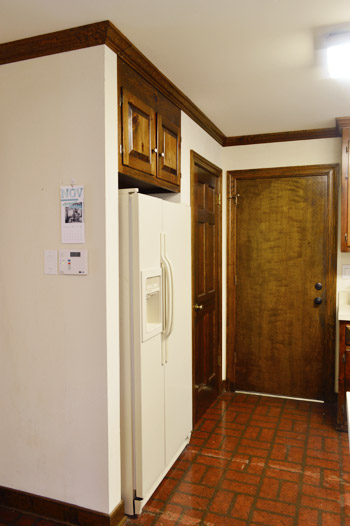
But it worked out well and I got those gaps filled. We’ll eventually be painting these, so I can do some caulk touch-ups then so they’re even more seamless in the long run. And man, it looks a whole lot better than the strange empty wall-hole-looking thing above the fridge that we started with:
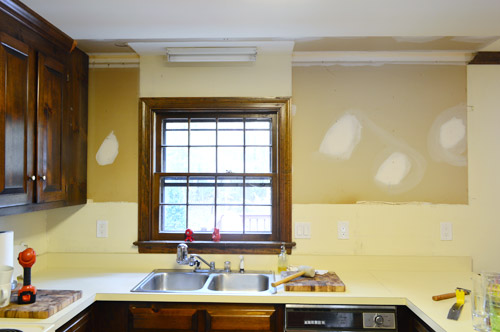
I also hung the crown molding on the other side of the room so it goes all the way around again. This wall looks especially crazy right now, but with some paint and shelves and a pendant over the sink, we think it’ll be a huge improvement.
While I wouldn’t consider the space amazingly transformed yet (it’s far from that!) we think these first couple of changes are steps in the right direction. It’s hard to tell in the photos, but in person it already feels noticeably more open and less heavy.
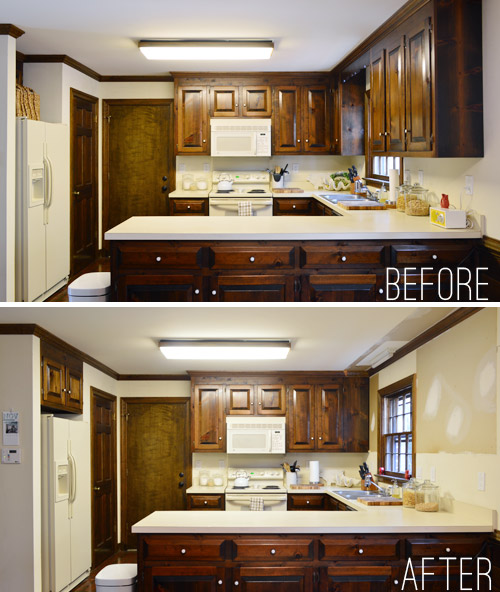
I felt kinda silly putting “After” on that photo above because it doesn’t really deserve that title yet. And actually, there are quite a few steps in this “Phase 1” kitchen makeover before we’re ready to call it done. So here’s our Phase 1 To-Do List as we’re currently envisioning it:
Remove wallpaperMove fridge cabinet forwardRemove upper cabinets on window wall to prep for open shelves
Reinstall crown molding- Paint pantry and garage doors
- Paint walls and ceiling
- Hang floating shelves on window wall
- Paint trim and paneling
- Possibly craigslist the existing microwave and get a countertop one (the we can put in the pantry?) and add a cheap range hood (we’ve seen some like this for $20 on craigslist) to lighten up that wall?
- Update or upgrade the old cabinet hinges and knobs
- Paint the cabinets
- Make solid back to the peninsula (the cabinet doors aren’t functional on that side, and we think it’ll be less busy with a sheet of beadboard or nicely framed out wooden look)
- Replace florescent lights (including the one over sink)
- Replace and center the light over table
- Get a rug for eat-in area? Possibly install peel and stick tiles everywhere?
- Curtains for windows?
Lots of bullets, huh? But thankfully almost every one of these steps will also be “paid forward” to Phase 2 (for example, painting the trim and walls and ceilings and doors and replacing lights will all be things we can carry into Phase 2 of the renovation down the road as well). So there aren’t very many things we’re doing just for Phase 1 that won’t come in handy for Phase 2 later. It’s sort of like the before is the first step on a staircase, and the major reno is the third step, and Phase 1 will just act as that second step to bridge the gap and bring us closer to a bigger transformation down the line (and make us smile in the meantime).
You can also see that there are a whole lot of question marks going on, but we have faith that if we just focus on the one-step-at-a-time approach we can figure things out as we go. Oh and one thing missing from that list is new appliances (except for possibly a tabletop microwave/inexpensive craigslist range hood) which is because as much as we don’t adore the creamy oven and fridge (and as much as we know they might interfere with the final look of Phase 1) we’re trying to be smart and hold off on getting new stuff ’til we’re ready to do a full reno because that way we can stay open to future options like a wall oven, or a gas range, or who knows what else.
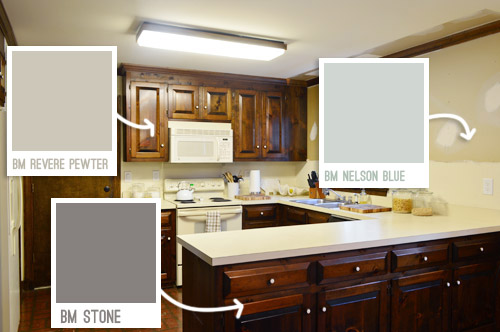
In addition to working around those appliances, we’re going to try to work with the off-white counters for this phase since we’ll likely reconfigure things in here down the line (so our final countertops will likely have different dimensions). Sherry has already brainstormed some colors that she thinks will lighten up the space while working with the existing counters and the cream appliances, and this time we’re not going to our default “paint the cabinets white” instinct!
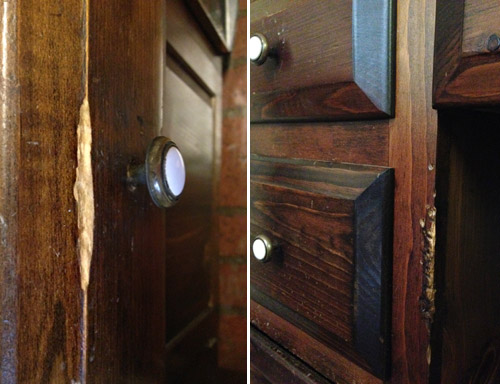
Speaking of replacing the cabinets – I know a few folks have wondered why we’re not going to permanently work with these guys. We’ve talked before about how not getting new cabinets was one in-hindsight regret of our last kitchen reno. But also, these cabinets aren’t in great shape when you get closer. There are so many chips and dents and scratches and gnaw marks (??) in both the doors/drawers and the cabinet frames themselves, that despite any amount of attempting to putty and sand them before painting, we don’t think they’ll ever look flawless (and even if we got new doors, the frames are still gnawed). But the good news is that I plan to repurpose them for a garage workshop, so they won’t go to waste – and painting them will not only allow us to enjoy them more in here before our bigger reno later, but it’ll also accomplish a nice clean look for the garage when we eventually use them out there.
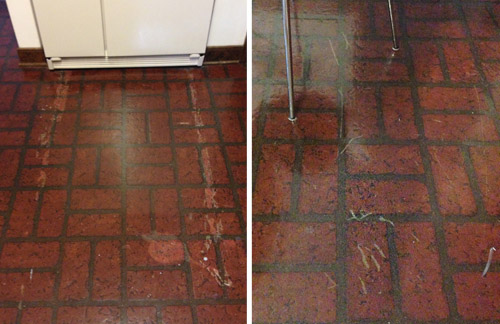
The other question that comes up a lot is why we don’t try doing something with our fake brick floors, like painting them like Jenny did with hers. We would LOVE to be able to do that, but our floors are faux brick vinyl, not brick pavers – so they’re one solid vinyl sheet as opposed to a grouted stone-like material. And while we’ve seen some great tutorials from folks who have painted theirs, ours already scratch so easily that we’re pretty sure it’d be a lost cause. The top layer of vinyl is so old and crusty that it flakes off when we do things like roll the fridge out or move a chair too suddenly. Boo. Update: the plus side of this situation is that our house was built after asbestos was phased out, so we don’t believe there’s a risk for that with the flaking floor – just extreme ugliness.
So if we really can’t take them any longer, we’ll probably do some cheap peel-and-stick tiles over them like we did for Phase 1 in our first kitchen (it took us about a day and ran us $100 but we were so happy about the difference they made for the year or so before we could afford our major kitchen reno in there).
Has anyone else opened up a can of project worms lately? Sherry’s crazy excited about it, but I’ll admit that I didn’t quite realize that taking down a few cabinets would result in a page long to-do list (silly me, after seven years of this I should know that by now). But as much as I’m bracing myself for all of the work that we’re about to dive into (priming and painting all of that trim, woodwork, and cabinetry is going to take a while), I’m kinda relieved just to be doing something instead of groaning every time that we walk into the room. Bring it on kitchen!

Starr @ The Kiefer Cottage says
We just swapped bedrooms with our daughters, so we’re in the process of creating our small “love cave” and letting the girls turn our huge master into a kids’ paradise. Lots of painting on the horizon.
YoungHouseLove says
That sounds awesome Starr! Lucky girls!
xo
s
Brandy says
I’m so glad to hear that we are not the only ones to give up the master room! Our girls were going to have to share a room so my husband and I gave up the master for them. People thought we were nuts but it has worked out well. My husband works the graveyard shift so it’s usually only one of us in our room at a time anyway.
YoungHouseLove says
That’s so sweet Brandy!
xo
s
Sarah In Illinois says
We swapped our master for his kids tiny bedroom so they can share the big room until we can add on. It really wasn’t bad to downsize, but I can’t wait for our own suite!
Bren says
We did the same thing when our son and daughter shared rooms. It really made sense. A couple use less space than two kids. And the closet really worked out for their clothes and their toys. Luckily, both rooms had bathrooms.
Wendy @ New Moms Talk says
The morning after we moved into our place in September, I started tearing out the built ins while my hub and our baby daughter slept. They were just horrific and unsafe (rough edges= baby fingers splinter nightmare).
Our walls still look like your kitchen walls, as we quickly turned our focus to the yard. While it’s sunny, we work outside.
The work outside has been completely worth it. As of yesterday, we’ve Craigs Listed (for free)- 2 greenhouses, 3 fence sections, a ton of scrap metal and more.
Sometimes you just have to open the can of works, knock out a built in, or start Craigs Listing stuff. It all comes together, bit by beautiful bit.
YoungHouseLove says
That’s awesome Wendy! You’re powering right along!
xo
s
Wendy @ New Moms Talk says
Just wondering…do you ever get to a point in the middle (or the start) or a project where you go, “that’s for what we’ve been waiting?” or “now, it feels like our place.”
That moment happened yesterday for me, with the 3 fence sections gone. Our yard went from disjointed and closed in to one big free space and it just felt like the yard was mine/ours.
YoungHouseLove says
Yes! We usually think some step of a project will have the biggest payoff (ex: removing something) but then we get to a different stage (ex: tiling the entire back wall of our kitchen) and then we’re like “THERE IT IS!” – that moment creeps up on you. And it seems to be different every time!
xo
s
Wendy @ New Moms Talk says
Awesome, thanks for sharing!
When you get to that point with this house, it might make a really cool post (if it’s meant to be).
What was going through your heads when it happened? Did your vision change for the project? Were you anticipating the moment then or before?
I love those moments that click, so maybe it’s just me, but others might enjoy it as well.
YoungHouseLove says
Aw thanks Wendy! I love that idea.
xo
s
Annabel Vita says
Oooh, sounds like fun! I think painting those doors will definitely help brighten things up, and no room looks nice with fluorescent strip lighting!
Somer says
I never realized how much cabinet space you have! Taking the top section down didn’t even make a dent in storage. It looks so much better already! So excited to see how you paint the cabinets!
Rene @thedomesticlady says
I told my husband this weekend that I am ready to bite the bullet and paint our cabinets. Can’t wait to see your transformation!
http://thedomesticlady.com/2013/11/01/retail-therapy-lets-talk-hair-products-argon-oil/
Rene @thedomesticlady says
PS I also to my husband that I wanted opening shelving around the window in our kitchen to make it look less crowded…great minds….
YoungHouseLove says
Love that!
xo
s
Melanie says
Kitchen remodels are my favorite! Your H2 kitchen remodel was favorite YHL project to date. Looking forward to seeing this one unfold!
YoungHouseLove says
Aw thanks Melanie!
xo
s
Brit [House Updated] says
Wow, I feel like your kitchen can breathe now! And I am really glad to see painting cabinets is on the phase 1 plan. I think a rug in the eating area would look great and brighten the space, but it can be tough when you have kid crumbs and mystery goobers everywhere (speaking from experience). Yay for progress!
YoungHouseLove says
Yeah, I’m wondering if an indoor-outdoor one (or some sort of jute/natural fiber) might fare the best? Not sure…
xo
s
Lisa E says
Looking good. We completed a Phase I of our kitchen earlier this year. I agree, a rug would bring a wonderful pop of color. My two cents worth is to go with the indoor/outdoor rug as I’m thinking the jute/natural fiber would have more hiding places for those crumbs. I believe the indoor/outdoor rugs have a smaller weave, unless I’m mistaken.
YoungHouseLove says
Thanks for the tip Lisa!
xo
s
heather says
I’ve picked up a couple natural fiber ones at Homegoods that don’t have a backing of any kind on them and they are SO easy to clean. I use a rug pad underneath them to stop slippage, but when they get dirty they can easily get thrown into the washer & dryer. I haven’t seen any noticeable shrinking or fading.
YoungHouseLove says
Thanks Heather!
xo
s
Lisa E says
There you go, I stand corrected! Good to know!
Amy says
Yeah!
That is all. Carry on.
Erin @ Magenta & Lime says
Love this! We did something similar in our kitchen, and absolutely love it! Now if we could just get a move on with updating the floor and counters…
http://www.magentaandlime.net/2013/02/the-kitchen-of-our-dreams-open-shelving.html
YoungHouseLove says
Wow, that looks awesome Erin!
xo
s
katie {deranchification} says
Y’all always have such great vision — it already looks so much more open without those cabinets on the window wall! Can’t wait to see the new open shelves :)
Karyn says
Ooooh, I can’t wait to see the progress on your kitchen!! Love the paint choices too.
Just a quick typo note, in the paragraph following the 12th picture (the one showing the top brace installed in the fridge cubby) you have written: “I made two braces – one for the top and one for the bottom of the cabinet – so you can see the bottom one waasn’t installed yet in the photo above” with an extra “a” in wasn’t.
YoungHouseLove says
Thanks Karyn! All fixed :)
xo
s
gia says
Thank Goodness! I couldn’t imagine you two living with that kitchen until you saved up for a major reno! Can’t wait to see what you do in the mean time.
Anele @ Success Along the Weigh says
Oh man, that is definitely a can of worms! LOL But it does look less dark now that those cabinets are out. I think since you guys plan to live in this place for a long time that you deserve to eventually go the new cabinet route. I love the color scheme you have for the phase 1 paint. It’ll definitely be a major upgrade.
Enjoy your worms sir! ;)
YoungHouseLove says
Ha! Thanks Anele.
-John
Stephanie B. says
Hopefully they are sour gummy worms, because let me tell you, real, dirt covered worms do not sound much like “enjoyment.” ;)
Lisa @ Double Door Ranch says
That makes such a huge difference already! Those dark cabinets felt so claustrophobic in photos, and I’m sure in real life too! I’m so pumped to see this room evolve.
I sure did open a huge can of worms this weekend. I got started on my craft room, which I lovingly refer to as Disaster Central. I started stripping the wallpaper border and even included a $herdog shoutout!
http://doubledoorranch.com/2013/11/04/strippingwallpaper/
YoungHouseLove says
Aw, thanks for the shout out Lisa! It’s looking awesome (and very much less disaster-central-ish) already!
xo
s
Karen L. says
Yay for progress! It does look so much lighter in there already! Funny thing is that our best friends, who moved to Charlotte two years ago, had the exact kitchen configuration, cabinets, and counters in their house in Woodlake. We have so many wonderful memories in their kitchen but they’d always wished they’d done something fun to the kitchen to make it more attractive. Now I get to watch y’all do it instead! :)
YoungHouseLove says
So funny! A few folks have sent us photos of their kitchens that are configured exactly the same way as well, so it must have been popular a few decades ago!
xo
s
Stephanie @ The Simplebees says
Um… I just realized that my kitchen is very nearly the same. We don’t have the pantry. Instead we have a doorway leading to our livingroom. However that doorway is currently blocked with a “faux” sectional because we were having difficulty with our livingroom furniture arrangement with a large bank of windows on one wall, an off centered fireplace, and two doorways (ummmm and a family of 7 that needs lots of seating!) We wanted to see if we would be happy with the change in the traffic pattern. So far so good! So we will have that doorway closed in.
I even have the fridge in the under the stairs cubby. One difference is that there is a sharp slant to the area and so our fridge could only be *so* tall and still fit. Smallest stainless fridge ever (not really working for a family of 7.)
John and Sherry- have you shared your phase 2 dreams for the kitchen? We also have a wall we want to take down.
Impatiently saving my pennies,
Stephanie (Also from Chesterfield County!)
YoungHouseLove says
Aw thanks Stephanie! I think the closest we’ve gone to mapping out Phase 2 ideas is this post about changing the layout, but we’re still thinking about a lot of stuff, so we’re not sure where we’ll end up!
xo
s
Megan says
Looks great so far guys! Just an idea…the cupboards to the left of the window look a bit ’empty’ where you removed the narrow cabinet, leaving a flat panel. You could maybe hang one of the old doors there as a faux door to make it look like a full cabinet run?? Probably a daft idea, but it was the first thing that jumped out at me in the after pics!
Good luck with the next phase of the kitchen :) x
YoungHouseLove says
Oh yes, once we have the open shelves hung there it’ll hopefully look better (since hanging open shelves on top of a faux cabinet door might look a little funny). If we were leaving it open, a fake door there would be an awesome solution though!
xo
s
Julie says
Paint. Those. Cabinets!
So dark and sad. The opposite of the Petersiks!
Sarah J. says
i love how pulling that little cupboard forward helps that space feel so much more like a built in fridge, not just the fridge shoved in a hole in the wall. and taking down the ones around the sink is so exciting! i can’t wait to see how it turns out! i love your stage one updates, cuz that’s where we are at with our house. saving for a couple big projects, and trying to come up with some little fixes that will help us enjoy it for now. :)
Manda Wolf says
Looks really good! I can’t wait to see how it looks once it is painted! I vote for the peel and stick floor tiles!
charlotte m. says
Love what you’ve done. I am so glad you have started. In my house the kitchen is the heart of the home and I need that room to be what I want and need. It was the first thing we did after we bought the house. I love the idea for the paint colors on the cabinets. Lighter, but not white. Smart! Great job on the cabinet above the fridge too!
Stephanie says
SO EXCITED that you started on this!!! Can’t wait to see it all come together!!!
Geertrude says
That does look a whole lot better! Your phase 1 list looks promising. Can’t wait to see the result.
No cans of worms here. Just a mountain of laundry after a month away from home.
DawnSC says
I’m so selfishly excited to see that you’re going non-white with cabinets! I’ve been wanting to paint our cabinets that are currently a hideous painted brown. But my husband is against white for the bottom because of our pets (he thinks they would end up looking dirty). I’ve been showing him pictures of some options, but now I know I might have some YHL pics to show him! Can you finish it tomorrow so I can show him now?? That’s no problem, right, thanks. ;)
YoungHouseLove says
Haha, I wish!
xo
s
Farrell says
Oh Ditto! We have ugly brown painted cabinets and my hubs says the same thing about white cabinets and our two big/dirty most of the time labs! The room is so dark and gloomy with that cabinet color. Can’t wait to see the color Sherry and John choose to lighten things up!
Kim says
I had new white cabinets in my last house and after seven years many had discolored. My current house had white painted cabinets when we moved in. They look lovely when they are clean but they are constantly dirty and extremely difficult to get clean without harming the paint – expecially the lower cabinets and the one above the stove. I love the look of white but I’m going with a medium brown when we remodel next year.
Samantha Cobos says
Look so much more open! I would love to know how you are going to install the “LACK” floating shelves. We bought the 12″ ones for our bathroom but there are just keyholes on the back and they did not land on a stud (of course). We tried metal anchors but with a little weight they just pulled out of the wall… It was very frustrating and we ended up patching and using EKBY http://www.ikea.com/us/en/catalog/products/S69002469/
YoungHouseLove says
Oh no! We installed them in our first house (the super long 72″ ones) and we got heavy duty wall anchors from home depot (the metal we-don’t-mess-around-ones) and loaded those up with tons of weight (pictures, dishware, etc) and they held up amazingly well for years (they’re still up today I think and the previous owners had a TV on them!). Maybe try a few other types of anchors (we didn’t use the ones with the little weights). Good luck!
xo
s
JG says
If you get a good drill bit, you can drill a new hole in the metal bar that lines up with the stud. The drill bit might never be the same, so you might want to use one you don’t care about being part of a set… It is easier if you mark the hole and drill it on a flat surface, not vertically while installing it.
Heather says
Oh, that dark trim… Gives me nightmares. It was all over our house in Arkansas, and had seen better days. Ripping it down gave me so much satisfaction, And instantly made the room look bigger. Good luck!
http://www.bakecreatelove.com/2013/04/our-house-is-finished.html?m=0
YoungHouseLove says
I loved scrolling through those before and afters Heather!
xo
s
Laura @ Rather Square says
Ambitious plans! But I’m excited to see your progress along the way. (I know what you mean about putting an “After” label on the second kitchen photo – I’ve been using “Progress” on my blog’s “after” because there’s still a long way to go!)
Robin @ our semi organic life says
How fun! I know I need all the cabinets I can get since we have a TON of kitchen stuff. We like to cook a lot, so open shelves would never work in our kitchen… but I LOVE seeing it in others! Also love that window you have #lucky
YoungHouseLove says
Wahoo! You have no idea how much we love that window. It’s the first window over the kitchen sink that looks into the outside world (in our last two houses it looked into a glassed-and-walled-in sunroom) so you can totally picture me standing there watching dishes and singing A Whole New World…
xo
s
robyns says
I’m not surprised this can of worms has busted open….we are heading into the holidays and everyone who reads this blog knows you guys love some huge house DIY to get into the holiday spirit!! And considering Sherrie hasn’t done any “secret” projects yet to surprise John, I fully expect a post about him coming home and finding Clara’s bathroom stripped down to studs….pregnancy hormones and the nesting instinct are no joke!
YoungHouseLove says
Haha, I know it! We have been ALL OVER THE PLACE lately! So I can’t wait to see what random room or corner I’ll find myself in, just going crazy. Haha!
xo
s
Rachel says
haha, it’s true! Is this going to be Christmas 2013?!
YoungHouseLove says
Haha!
xo
s
Tara Sherman says
Love it! Such a big difference! Our guest room is currently BM’s Stone, and while it’s too dark for that space, we love the color. A little paint will continue to make a world of difference.
emily says
I actually heard Sherry laugh when I saw the picture of the stuck cabinet. You should do a video soon. Because Sherry’s laugh always makes me smile and brightens my day.
YoungHouseLove says
Oh man, I was snorting. We both were like “are you joking?! How did they get this thing in there?!?!”
xo
s
Erin says
Ahhh! The kitchen can breathe now! I think I actually heard the rest of the kitchen let out a sigh of relief. That really opened it up!
Janelle @ Two Cups of Happy says
Sometimes when reading your blog I shout ideas at the screen, like when I’m watching TV. Today, I mentally shouted (since I’m at work) to remove the little cabinet to the left of the window. And then scrolled down a bit to see you had. It’s much more open now! I’ve also been loving two-toned upper/lower cabinets, so I look forward to seeing if you go that route.
YoungHouseLove says
Haha, I love it!
xo
s
Lisa @ Double Door Ranch says
Hahaha this comment reminds me of this pic.
http://pinterest.com/pin/397090892116076503/
YoungHouseLove says
Bahahaha!
xo
s
rachel laree says
Yayyyyy, I just knew it was going be the kitchen today!! I cannot wait until its complete as i am thinking about redoing my kitchen with gray paint for the cabinets and white walls. Will you share what color scheme you might be going with? ;) need ideas!
YoungHouseLove says
John actually added the paint color names to a visual in this post, but those are just first thoughts. I’m thinking a light blue-gray on the walls, white trim, and soft pewter cabinets up top (to not clash with the cream counters and appliances) with some stone colored cabinets on the bottom. Semi-tuxedo style should be fun I think!
xo
s
Rachel says
You guys are seriously amazing. We did a similar removing cabinets project in our new house and the results were amazing especially compared to the amount of effort it took to do it. http://www.andthen-shesnapped.com/2013/07/demo-day-one.html?m=1 also we painted our kitchen revere pewter with an accent wall of BM boothbay gray in the kitchen nook. They look great together you might want to check out that color if you haven’t.
YoungHouseLove says
Wow! I love how you opened things up to take advantage of that view!
xo
s
Evie says
WELCOME HOME, Petersiks! :-)
YoungHouseLove says
Aw thanks Evie!
xo
s
Kara says
I love it already, good job on the above-fridge cabinet move! That’s mighty impressive measuring skillz you gots!
Maybe instead of feeling weird about slapping on an “After” label (but it is technically an after, so it’s fine) – you could opt for a “Current” label? Just an idea.
Looking forward to the rest of Phase 1!
YoungHouseLove says
Yeah, I always use “Progress” when I do the House Tour page, but I think it somehow slipped John’s mind since he’s a Before & After guy. Haha!
xo
s
Wendy says
As I was reading this I thought “They should paint the cabinets grey” so I was happy to see you are on the same page! We just finished an 8 month “phase 1” kitchen makeover…it has to last us about 5 years though (if we do phase 2 it will involve putting an addition on our house). I regret not replacing the (few) cabinets that we have for phase 1…none of the doors line up and it drives me nuts! When do you think you’ll be ready for phase 2?
Jenelle says
It’s funny how acronyms mean different things in different places. On your paint swatches, you labled them “BM Revere Pewter,” “BM Stone,” and “BM Nelson Blue.” After a minute of scratching my head, I realized it meant Benjamin Moore. It made me giggle because I am immersed in a world where BM means breast milk. :) And I think to the general population, BM means… something else. titter titter. So anyway, I was reading the colors as “Breast Milk Nelson Blue” and “Breast Milk Revere Pewter.” Thought I’d share the laugh.
YoungHouseLove says
Haha! That’s so funny, because my friend’s parents used to say “do you need to go to the bathroom? Is it a BM? to her” and it cracked me up! Makes me think of them to this day!
xo
s
Theresa M. says
Kudos to you, John, on the cabinet moving. Those kinds of jobs usually involve much more than meets the eye.
An indoor/outdoor rug is the way to go. I have two, a runner that leads from the garage, and an 8×10 in the sunroom that leads directly outside. With 2 German Shepherds that had sensitive tummies, those rugs have seen the absolute worst in accidents. A hose and some dishwashing soap and they are good as new. I doubt you can say the same for sisal or jute. We’ve had them for 10 years.
YoungHouseLove says
Thanks so much for the tip Theresa!
xo
s
heather says
It already looks a lot better without upper shelving! I love the look of open shelving. I have one open shelf in our laundry/pantry nook area that I love but it made me realize that open shelving in our kitchen wouldn’t go well haha.
As far as worms, I’m trying so hard NOT to open any cans. So hard. My cans of worms have more to do with agriculture though. I pretty much want chickens, and a second garden, and a green house or high-tunnel…and and and….
I need to remind myself to slow down. We have a house to finish.
Kristi says
How did you guys match the wood crown molding? We have beautiful wood trim and we want to put crown molding into a few rooms, but have no idea where to look for it.
YoungHouseLove says
We just reused the stuff we pulled down, so there was a long run of crown in front of those cabinets along the sink wall that we pried off carefully, and then rehung once the cabinets were down. Same for the one over the fridge (we carefully remove the crown that went into the nook and in front of those cabinets) and just used the piece from in front of those cabinets again once we moved it forward.
xo
s
Megan @ Rappsody in Rooms says
Wow! You did open a can of worms! But it is exciting to see the progress already! I love that you took down those cabinets. It really does open up the room. It must also be freeing to try out things in Phase 1 since you know it will all be gone someday in Phase 2!
Erin says
I’m so delighted you’ve started in on this, as I have a kitchen that is very similar way to your “before”, and I’m dying to do a Phase 1 on it. We won’t get to full reno in this house – it’s not a forever or even long-ish-term house – but getting to Phase 1 will make both living in it now and reselling it later much more pleasant. Removing those upper cabinets makes such a huge difference – I wish I weren’t so storage-starved in my kitchen and could do the same!
Can’t wait to see ongoing developments!
Sarah says
It’s looking good so far!
Have you guys heard or read anything about using ARDEX on countertops? I’m not sure how you guys feel about concrete though.
YoungHouseLove says
Yes, I few blogs I read have used that and it seems cool! We actually love concrete, but it’s one of those Phase 1 steps that would get undone in Phase 2, so we’re not sure if it’s worth the trouble. I don’t think it costs much (concrete is so nice and inexpensive) but we wonder if it’ll be a ton of work (or hard to remove when we go into Phase 2). Will have to see where we end up!
xo
s
Kate says
Those couple changes look great! I can’t wait to see what you do next. =)
jenn aka the picky girl says
I’m actually mortified to admit this, but [a certain number of months] ago, my toilet started leaking at the base. I pulled it up and went to get replacement tiles and a new wax seal when I realized Lowe’s didn’t carry and couldn’t order those couple tiles. So I bought different ones which turned out to be a nightmare.
My bathroom has sat like that (half old tile, half new) ever since while I decided what to do about it. Thankfully, I think I’ve decided, and now I cannot wait to go buy flooring (though the installation, I’m not so excited about).
YoungHouseLove says
Aw, we all have projects like that Jenn! Good luck with everything! You can totally do it!
xo
s
Joules (from Pocketful of Joules) says
I’m really impressed at your self control on taking your time. If I were you I’d have already painted those cabinets… probably within the first week or two of living there. I can’t wait to see how Phase 1 comes along!
Erin says
Bring it on! I can’t wait to see what you have planned!
Krissy says
Old linoleum is the worst! When we moved in, ours was ancient and already tearing. Any time a chair was pulled out at the table, or the appliances were reorganized, we’d end up with HUGE slices. Then we got Murphy, and he decided the flaps needed to be chewed up. It was a long, rough road before we got our kitchen where it is now.
I love the open look on that wall!
YoungHouseLove says
Oh man, that sounds like chaos, but it also sounds like your kitchen is awesome now! Gotta love a crazy Before, to make you appreciate the After even more!
xo
s
Stacey says
I once had a kitchen that looked like yours. It felt sooooo good to remove that dated piece of curvy wood over the sink, then paint the cabinets. Love that you removed some of the cabinets too and re-purposed one over the fridge. Looking fantastic already. Can’t wait to see the difference with the paint!!
Aimee says
I actually kind of like the curvy wood piece over the windows. Reminds me of my grandmother’s kitchen. Hers had small shelves along the sides of the window, so it opened it up and didn’t look overwhelming. It also, as we’ve just seen, hid a ugly flourescent light fixture.
I loathe cabinets over appliances. They’re always awkwardly small yet deep and too high to get at without climbing. I’ve got one over my range hood and hate it. What I do like is there are none over my refrigerator and I can utilize the space by hitting it with a pretty stick of baskets for storage instead. I’d never have hung that monster back up!