We hoped to have all of the nursery’s extra chunky crown molding painted, cut, hung, caulked, and touched up by the end of the weekend, and we just made it by the skin of our teeth (where did that gross expression come from anyway?).
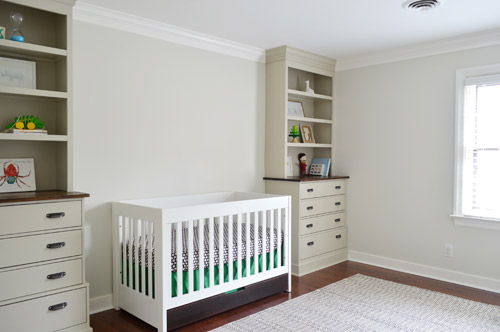
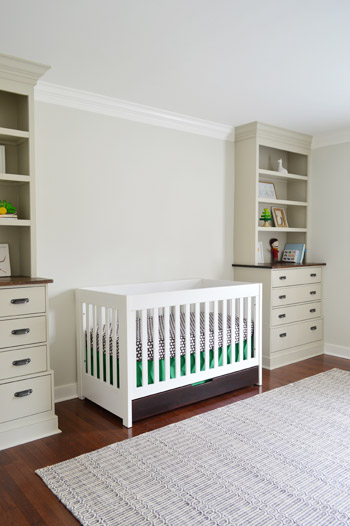
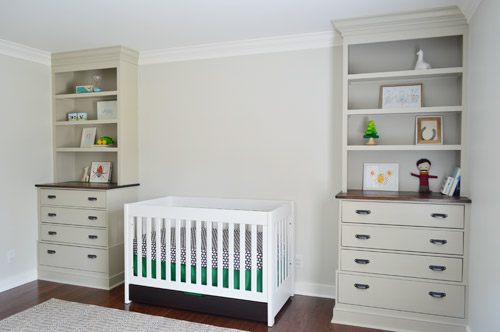
Crown is always one of the those “it’ll be nice” things on a to-do list, and then whenever we add it we’re blown away by how much of a difference it makes. Even the most basic and boxy rooms suddenly look taller and just generally upgraded in a surprisingly significant way. Which we always appreciate since a lot of the rooms in our homes have been devoid of amazing architecture (no extra high ceilings, arched doorways, cool columns, etc). So between the addition of our little corner built-ins, and the new extra chunky crown, this 11 x 13.5′ rectangle of a room is really coming along.
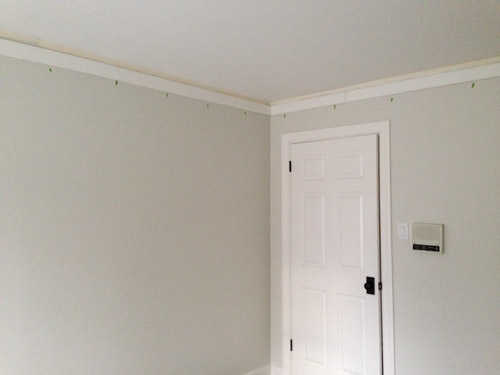
You know, after eight months of looking like this.
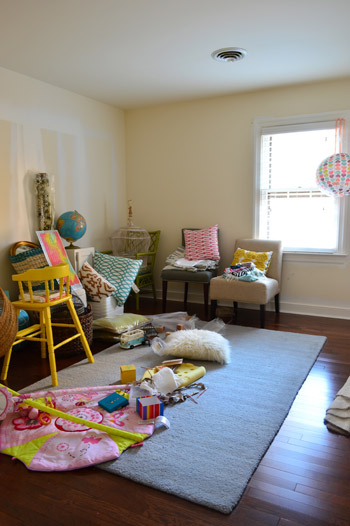
Don’t get me wrong – we still have a long way to go (there are three completely unaddressed walls, and not nearly enough color/fun/personality yet), but this chunky crown molding is a pretty glorious sight. It erased all of those unfinished cracks and crevices and made the room feel so much more polished in a few short days.
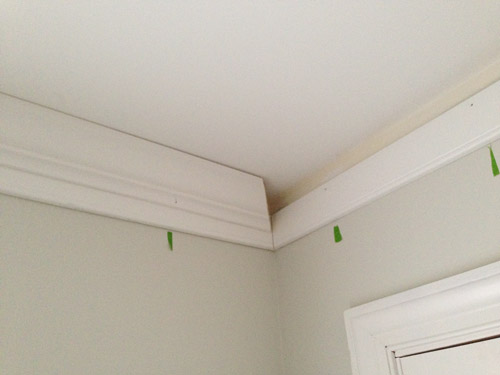
As for how we installed it, we followed the same method that we tried out in Clara’s room, which is to use 3 1/4″ baseboard as the first “layer” – and run that around the room first. We used a spacer to drop it an inch and a half down from the ceiling for more of a chunky look, a level to make sure it stayed straight, and we marked our studs with painters tape so we knew just where to fire the nail gun into the wall to hold them up.
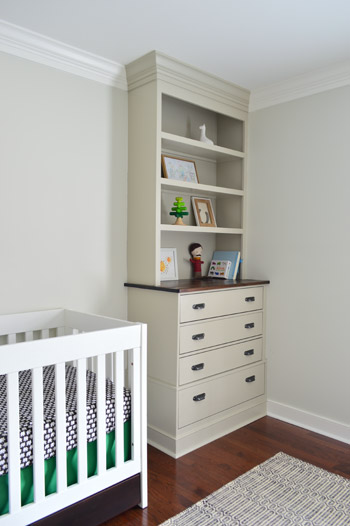
The second “layer” involved hanging actual crown molding (we got nice beefy 4 5/8″ stuff from Home Depot) right over the baseboard, for that extra chunky look. You can see how the left piece has been “crowned” and on the right there’s just baseboard waiting for us to hang crown over it to complete the look. This is how all the crown on the first floor of our house was done, along with the stuff in our master bedroom, so we wanted to keep any new crown that we added looking cohesive.
We went with pre-primed baseboard and crown to save ourselves a step, so we just had to lay it out on the floor with a drop cloth and paint it before we hung it. We prefer that to painting it in place because it’s a lot faster, and then we only need touch-ups after hanging it and caulking it. It was funny to paint just a tiny bit of it with the built-in color, and the rest of it white, but we’re really happy with how it all turned out.
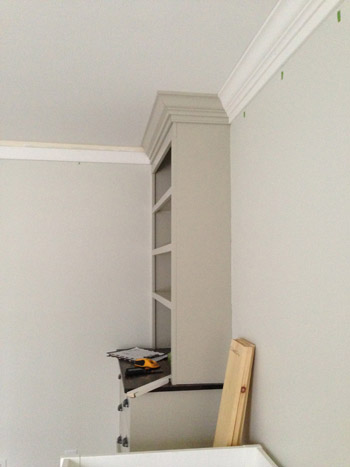
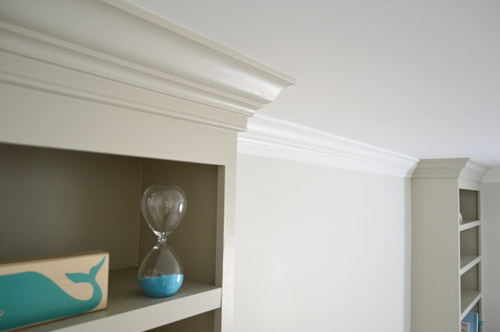
Here’s the crown between the built-ins after it was hung but before we caulked it or did any paint touch ups. See the slightly imperfect wavers of the ceiling above it? Those are nice and finished looking when you squeeze a line of caulk up along that crevice and just drag your finger across it to force it into those small gaps. And if you wipe it fast enough (we apply it about a foot at a time) you can usually get it off the pre-painted ceiling and crown so it’s just in those cracks and there’s no need to touch up the ceiling or crown again for the most part, which is nice.
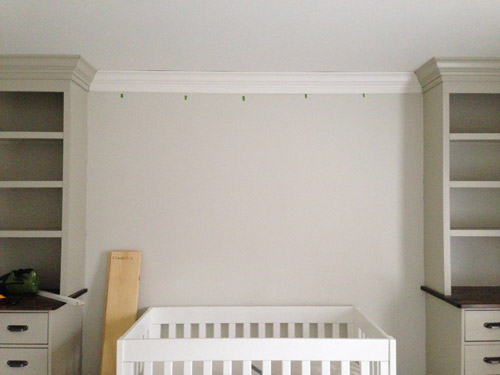
After some final paint touch ups (mostly along the nail marks that we filled with caulk), and removing all of those tape marks for the studs, it gets a lot better looking. Like so:
For anyone looking for additional details and photos of this chunkier crown effect using baseboards + molding, you can click here to read about how we installed it in Clara’s room. The cost of hers rung in at $137, and that’s a significantly larger room, so although we can’t find the receipt for this latest trip to Home Depot, we’re guessing it was around $115 to do the nursery. And you’ll want to add a tube or two of caulk and a can of paint to the project cost if you don’t have those on hand already.
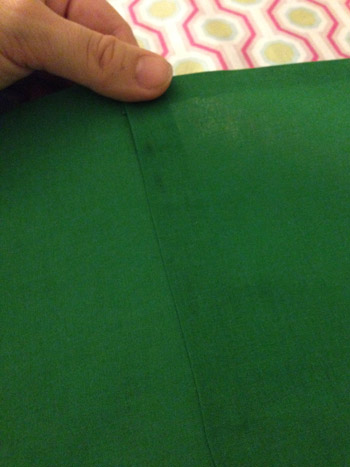
I also finally got to dive into the crib bedding arena, which you all know I’ve been excited about thanks to John’s revelation that I wander around the house impersonating Golum and whispering “CRIIIB SKIRT.” Here’s a close up of the sweet little organic crib sheet that I found on sale from Pottery Barn for $9.99 (I think we paid something like $25+ for organic crib sheets before Clara was born, so I’m psyched to see that these have become a lot easier to find & more affordable in the last four years).

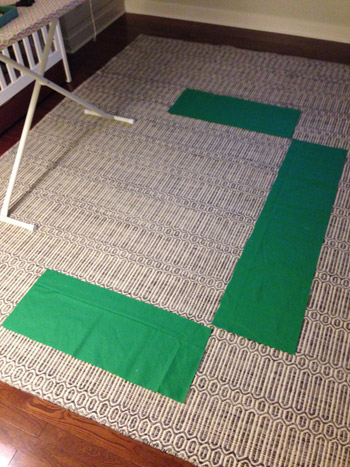
The green rectangle behind that parade of adorable elephants is just 1.5 yards of fabric that I grabbed from JoAnn during one of their 50% off sales. So the grand total for the 1.5 yards of fabric that I needed to make the crib skirt was a wallet-busing $3.73. You know I did The Mom Victory Dance at the checkout, right? For those not in the know, that involves all sorts of ridiculous movements like high fiving your embarrassed husband and waving your hands around like you’ve won the lottery when in fact you have just saved something like $3.50.

Once at home, I laid out my fabric and cut out three pieces (two sides and a front) which will make up the crib skirt. To get the measurements of those three pieces, I just measured the crib skirt area’s height and width in that section, and then added 3″ to each measurement (to account for 1.5″ hems on each side). So for example, if the measured height for the side panel of the crib was 10 inches, I added three more to make it 13 inches. And if the measured length of that side panel was 28 inches, I added another three inches to make it 31.
Oh and it would be a nice moment for me to mention that if you’re using any fabric with a pattern on it, make sure your three panels all go in the same direction and have the pattern level or centered (so you don’t end up with wonky stripes or something from cutting things in the wrong direction). You might need more yardage for certain patterns or longer crib skirts.
I debated sewing these panels together or just using Heat N’ Bond hem tape, but since the crib skirt that I made for Clara was with Heat N’ Bond, and it held up really well, I figured that was a good choice again – especially since this is more of a tucked away element in the room (for example, I sewed Clara a quilt, but I used hem tape for her crib skirt, since it’s less of a hands-on item).
As far as what materials you’ll need if you’re attempting to make a crib skirt using this method, you’re all set with fabric, hem tape, scissors, and an iron. Oh and some velcro tabs, but we’ll get to that in a minute. First you just need to use hem tape on all four backsides of each of your three panels to hem them for a nice finished look in the front.
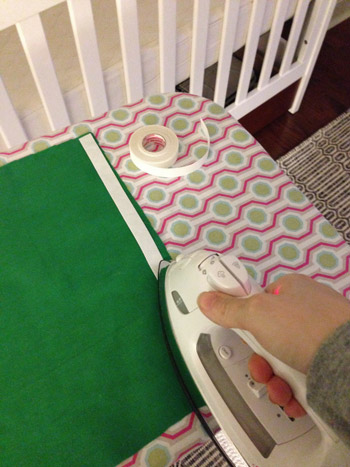
It’s really easy stuff to use, just iron it on, peel off the backing, fold the fabric over, and iron it again to make a hem. The fabric panel on the left of this picture was hemmed on all sides, and the panel on the right was also hemmed all the way around, and then I laid one more strip of hem tape down the side (along the back edge) so that I could join these two panels by ironing it on, peeling the backing, moving the second panel over the first one to overlap them, and then ironing that edge so they were fused together.
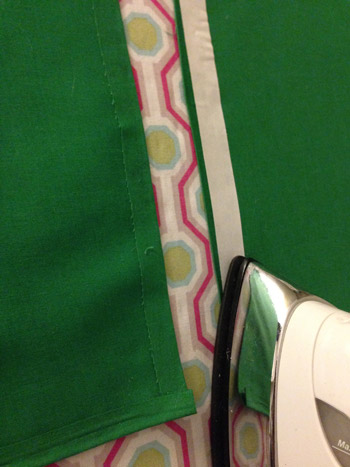
Once you turn it over, you’re left with a nice clean seam in the front of the fabric. And that seam will fall on a corner of our crib (behind one of the legs) so it won’t be seen.
I joined the middle panel to the two end panels this way on both sides and then it was ready to be attached to the crib. I used small velcro tabs around the metal frame of the crib to hold our skirt in place (you can get them at JoAnn or Michael’s which is also where they sell Heat N’ Bond).
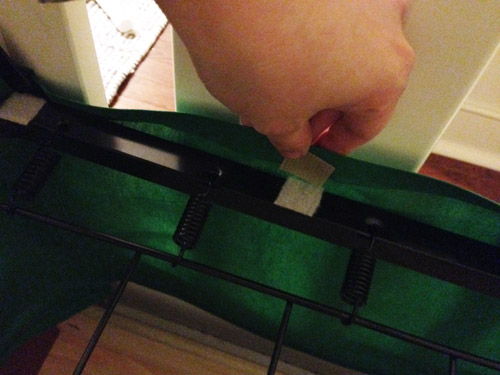
Velcro is a nice option because it makes it easy to remove and wash it if you ever need to (hem tape is washable if you follow the directions and avoid high heat).
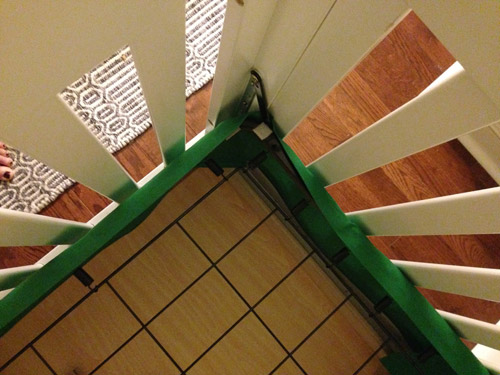
Our crib mattress will be lowered once the little guy is more mobile, so we won’t always need this skirt to bridge the gap between the bottom of the mattress and the drawer, but it’s such a fun little addition. Especially for $3.73.
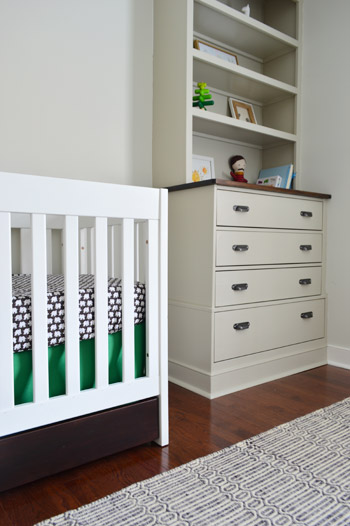
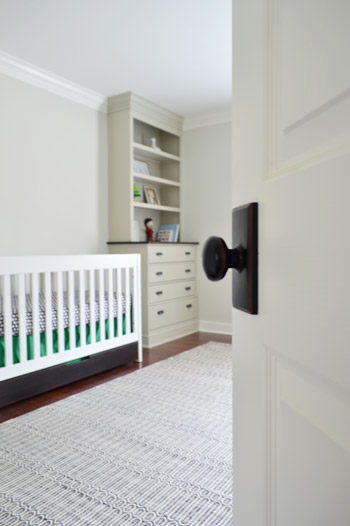
We also used two coats of satin PolyShades gel stain (in Tudor) to make the bottom drawer of the crib a little darker, since it was looking kind of reddish-orange in comparison to the floors and the wood dresser-tops. We thought a hit of darker color would be nice to ground our light-colored crib, and it would also tie into things like the dark hardware on the built-ins, the chocolate elephant crib sheet, and even the oil-rubbed bronze doorknob that leads to his room.
We sealed the PolyShades with two satin coats of Safecoat Acrylacq, which is an awesome non-toxic sealer that keeps things from off-gasing, since Polyshades is low-VOC but not no-VOC.
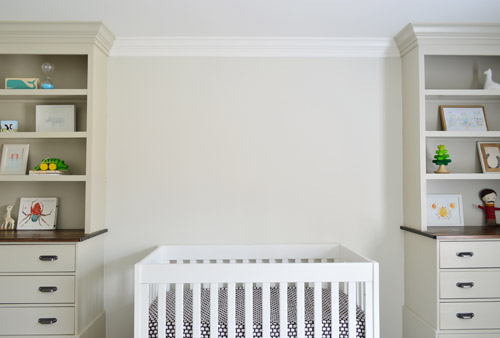
It’s probably obvious that I just tossed like eight things on the built-in bookcases so they weren’t painfully bare, but I literally gave them four minutes of my time, so I can’t wait to gather some baskets and frames and books and toys and other fun nursery items to fill them in for real. (Shout out to the lone giraffe on the top right shelf). I think they’ll end up being super functional and a nice way to add a lot more fun/color/personality to the room, so I can’t wait to get cracking.
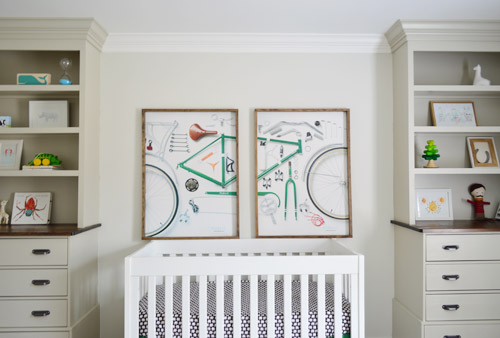
For the space above the crib, we’ve been debating everything from large scale art to some sort of accent like a slatted wall or a giant mobile. We even tried leaning the bike prints up there just to see what they’d look like, but we think they’re better suited for the opposite wall since they look a little busy with the built-ins.
So we’re planning to fill those built-ins “for real” and then see where we end up with that wall. I think we’re leaning towards a really fun large scale mobile – maybe like this but with hits of bold green, black, and white? And maybe another animal instead of birds (Burgers? Or whales since he’s The Barnacle?)…
What did you guys work on this weekend? Do you have any mostly-empty bookcases that you’re ready to go nuts on? Or some bare walls that are begging for some action?
Psst- To see our nursery progress from the very beginning, here’s the planning and rug-buying post, the dresser-sourcing post, the wall and ceiling painting rundown, the first half of built-in building, and the second half of the built-in project.

Kristin says
Absolutely adore it!
saskia says
This room is really becoming an amazing space for the little one!! I love seeing the updates on this room!
YoungHouseLove says
Thanks so much Saskia!
xo
s
Teresa says
“By the skin of your teeth” is from the book of Job 19:20.
I’m an amateur research librarian. :)
YoungHouseLove says
So interesting! Thanks for the tip, Teresa!
xo
s
Sarah MC says
“The Skin of Our Teeth” is also a play by Thornton Wilder; it won the Pulitzer Prize for drama in 1943.
Heidi says
The crown looks great! This is gonna be one lucky baby! We refinished a turqoise kids desk with a walnut stained top this weekend.
http://www.krusesworkshop.blogspot.com/2014/02/from-trash-to-two-tone-treasure.html
YoungHouseLove says
That came out gorgeously Heidi! LOVE the top that you fitted right over it, and that blue is a great color!
xo
s
Kathryn says
Holy moly, Heidi! What an amazing refurb. Love everything about that.
Anele @ Success Along the Weighn says
Crown molding always gives that perfect finishing touch! It looks especially nice on the top of the shelves too. Nice job!
Amanda says
How perfect! I love how it’s coming along!!! I was scrolling through and thought that sheet looked familiar…my son Emory has the same one. It washes great, we love it. Can’t wait to see more :)
YoungHouseLove says
Love that!
xo
s
Cat @ MaryMarthaMom says
Gotta love a good Mom Victory dance :) Y’all have been so busy! It looks fantastic. I think you made the right decision by having the crown of the built-ins be gray as well.
I love the look of crown moldings, but we have textured ceilings and I’m not sure how that would look. We hate the ceilings (they’re like that “firework” pattern) and would not want to draw more attention to them. Do you think that we could put up crown molding? Or would it highlight the hideous ceilings?
YoungHouseLove says
Anyone have tips on this for Cat? On one hand I would think it does draw the eye up (so it might make people notice those ceilings more) but on the other hand, it might elevate the textured look so people focus more on the moldings and the ceilings don’t seem as bumpy by comparison? Anyone have experience with crown + textured ceilings?
xo
s
Kaely says
We have popcorn ceilings (yuck!) in most of the rooms in our house and if anything I think the crown distracts you from the awful ceiling texture. It gives your eyes a nice visual stop point, something to rest on to keep you from dwelling how much you hate the texture of your ceilings.
Megan CC says
I have the funky firework pattern on our ceilings too and wondered the same thing about crown. I moved to Ohio from California recently and had never seen ceilings like this until house hunting in Ohio, it was in pretty much every single house we looked at. Is it an east coast thing? Anyone that has experience with crown and the ceiling patterns please let us know how it looks!
CandiceMcC says
We have those same ceilings but our house (the downstairs anyway) is filled with big, chunky crown. I love it. I don’t think it draws attention to the ceiling. I’d like to add it to the rooms upstairs that currently are crown-free (they’re like commoners–too many princess movies around here). I wouldn’t hesitate due to the possibility of highlighting the fireworks.
Holly says
We also have this ‘firework’ type of texture ceiling. I think crown molding is a plus with any room. Ours was already up when we moved in…it was a newly built house. I think you could put it up. I am not sure if they did the texture first..??? It would seem that the texture went up first. I am assuming it would be harder for the texture to go up after the crown molding, just because they have to get so close to the molding. Maybe you tube has something aout it. Good Luck!!!
Natasha says
It doesn’t make the ceilings look any uglier, so I’d give it a try!
We have textured ceilings and we added crown. I think crown gives the whole room a better feel no matter if your ceilings are textured or not.
SUsan Valle says
We’ve added it to a room with popcorn ceiling after a renovation and need to move a wall. We also have large dental molding with popcorn ceiling in our down stairs. just fill in an small gaps with Calk and it looks seemless.
Brittany says
I have popcorn textured ceilings and the crown molding looks great! The ceilings are painted the same color as the walls and I think that helps to distract.
Sue Riggs says
The nursery is coming along beautifully, nice job, as always! I will be trying the Heat n Bond shortly for the first time, I feel confident. you make it look so easy. Fingers crossed!!
Thanks!
YoungHouseLove says
Good luck Sue!
xo
s
paige @ LPD says
How does the heat in bond hold up in the wash for you? I used it once on some store bought curtains I didn’t feel like hemming with my machine. Once I washed them though, the heat and bond hem got all weird and warped and released the fabric in some places. It kind of turned me off to it, but maybe there’s some trick I just don’t know? I’ve just sewn anything since, but sometimes it would be nice to just be able to iron it.
YoungHouseLove says
It has been great as long as I follow the no-heat directions (we do cold water washing for the most part, so it’s usually automatic for us) and then I just tumble dry low them and they seem to be good.
xo
s
paige @ LPD says
Weird, I washed according to the instructions too.
YoungHouseLove says
Hmm, maybe it’s the kind you used? We use the HEAVY DUTY stuff (there’s regular heat n bond and “heavy duty” heat n bond. Maybe that’s it? There are also different widths (we like the thin stuff) so maybe the thicker stuff puckers more?
xo
s
paige @ LPD says
probably just my bad luck honestly. Sewing just works better for me I guess ;) Thanks for the reply though!
YoungHouseLove says
Aw, I have terrible luck sewing for the most part, so we’re even. Haha!
xo
s
Marianne in Mo. says
It may have been the fabric the curtains were made of, or possibly sizing that was on the fabric. If the fabric had any texture to it, maybe it didn’t grip??
YoungHouseLove says
That’s a good theory!
xo
s
Jenna @ Wife in Progress says
This room is coming along very nicely! It’s very crisp and clean which is always a great look for a nursery.
Stephanie says
Looking good so far! What about a DIY abacus for above the crib? Like this:
http://www.anythingpretty.com/2011/04/i-think-this-is-my-best-idea-ever.html
YoungHouseLove says
That would be fun too!
xo
s
Emily says
I am so glad you posted this, Stephanie! I am looking for ideas for our nursery. This would be something that our kids could use for years to come. :)
Susan says
My kids are out of the nursery stage, but I want that abacus thingy for me. So fun and pretty.
Kathleen says
Really outstanding job you two! They look amazing with the room and I love all the colors you chose.
YoungHouseLove says
Thanks so much Kathleen!
xo
s
samantha says
Ugh, I am in love with those built ins. Working up the will power to install the crown that’s been sitting in my basement for ages as well. This might have been enough motivation to put my big girl pants on and get to it!
On a side note, I was flipping through an article on closet organizing on my msn home page when I came across a very familiar photo. Right away I said “that’s jon and sherri’s first house bedroom closet!” and immediately fact checked. Now I feel super creepy but also weirdly proud of myself.
The article:
http://t.lifestyle.ca.msn.com/living/decor/eight-ways-to-make-the-most-of-a-tiny-closet#image=7
Samantha Promise-i’m-not-a-stalker C.
YoungHouseLove says
So funny! I loved that little bedroom. Oh, memories.
xo
s
betty says
gosh, I just really love how this is coming together! I need to start adding crown to my house as well!
ps. it was great listening to you guys speak on sunday! I wish I could have stayed to at least say hi (and maybe snag a pic with my fav blog couple), but we had to head out and it looked like the wait was going to be longer than we could have stayed. oh well, maybe next time :)
YoungHouseLove says
Thanks so much for coming Betty! It was awesome to look out at all of your sweet smiling faces!
xo
s
Diane says
Burger is the Crown Prince!
YoungHouseLove says
Hahaha! He totally thinks he is. Somebody get him a scepter (made of pretzels and peanut butter).
xo
s
Wendy (New Moms Talk) says
We had an awesome Saturday of blending agape, eros, and philia in the back yard while we burned more before snow came.
Sunday I made stuffed heart ornaments for Valentine’s Day that blend with the music heart ones I did for Christmas.
Oh, and we finally finished and hung the swing that was our daughter’s first birthday gift…two months later!
YoungHouseLove says
Sounds like an awesome weekend!
xo
s
christina says
I couldn’t read the full post without starting to sing this song to myself. Big & Chunky from Madagascar 2. So so funny!
You like your molding big, and chunky!
YoungHouseLove says
Haha!
xo
s
Mallory says
What a pretty shade of green! It’s much less vibrant than the mood board, I love it! And that elephant print? I die of cuteness.
Thought you two might get a kick out of this: I’ve been blogging for nearly two years and today my husband is going to be joining as my co-host!(co-writer?) haha, you two seem to have such fun as couple bloggers, we thought we’d give it a try too!
http://www.fromaliforniatokansas.com
xo,
Mallory
YoungHouseLove says
That’s so much fun Mallory! Happy blogging!
xo
s
Bill in NH says
Nursery is looking great, but what is lastest on the washer situation??????
I been a wreck all weekend wondering how it was going.
Bill
YoungHouseLove says
IT CAME! And it’s glorious! I have been dancing and doing laundry all weekend while kissing the washer.
xo
s
Kathryn says
I was wondering the same thing, Bill!
So glad it’s finally there and getting the job done! Hopefully that the last of the house deciding to surprise you for a while.
YoungHouseLove says
AMEN! Here’s hoping!
xo
s
Karin says
I swear it’s the only time I did a jig while doing laundry! ;D
cheryl says
Is chunky a new design trend? A way to hang the molding? Or a brand? I don’t quite get it.
YoungHouseLove says
It’s a way to beef up crown molding (you make it extra chunky with the baseboard). I don’t think it’s a new trend or anything, since the molding in the entire first level of our house was hung this way, so I’d just call it a “method” for hanging molding to make it look extra thick (aka: chunking it up).
xo
s
amy says
Those built-ins might be my favorite thing you have ever done! They look awesome!!
YoungHouseLove says
Thanks Amy! I keep telling John he’s a bona fide carpenter now. He’s all dismissive and shy about it, but it’s true, right?!
xo
s
Kathryn says
Er, no. Nope, he does not get to be dismissive about this. After constructing everything from decks to children’s toys to built-ins to fireplace upgrades, he’s just going to have to face it. He’s a legit craftsman.
YoungHouseLove says
I know, right?! Dude’s too legit… too legit to quit.
xo
s
Larissa says
Hey Hey!
Lucy S says
John IS a bona fide carpenter! I was just showing my husband the nursery the other day, and I was like, of course this is PhD DIY-John’s a carpenter! as I showed him the built ins… It all looks great.
I think I must be the only person on the planet who sort of wishes the molding was white on top of the built ins. OF COURSE, they are your builtins and should be how you like them! It’s all good… :)
Paige says
Loved your talk at the home show yesterday — my husband and I bought a super-cute historic house in Union Hill this fall, and much of what you said really hit home. I’m dealing with learning to decorate for myself instead of others, prioritizing projects, working on a budget, etc. Also, I picked out my living room color/scheme before we moved it, and a few months in, I’ve realized it’s not right for us or the house. I was afraid to start over — even though we’ve put less than $500 into the room, but you gave me confidence to go ahead with a change. Thanks!
P.S. Love the crib sheet! One of my good friends had that for her little boy.
YoungHouseLove says
Thanks so much for coming Paige! We loved seeing you guys there, and I’m so glad our chat could help in some small way. All the best with your place!
xo
s
Alli says
I’m so jealous of the space in those rooms! I would love more space in our son’s room.
I came across this mobile that could be a fun project too. More on the contemporary side I suppose, but would look great with green papers to match your crib skirt.
http://www.mintdesignblog.com/2013/08/diy-baby-mobile/
Also, some friends of ours made a mobile for their little one who is due any day now. I love how it turned out, but especially the hanger they made for it.
http://feistyoptimist.blogspot.com/2014/01/last-diy-projects-of-2013.html
YoungHouseLove says
Really cool! Love the both! You’re right about the hanger from the wall being genius in that second one! And I really love the origami shapes of the first one!
xo
s
Amanda says
It’s looking great so far! I’m loving the shelves and the bicycle pictures! Ahhhh it’s so fun decorating a nursery!!!
Suzy says
Awesome! I have been trying to figure out how to attach a bedskirt to my kids’ bunk beds without sewing for the longest and now I know what to do! Thanks so much. The room is looking lovely.
YoungHouseLove says
Thanks Suzy! And good luck with those bed skirts!
xo
s
Kimberly says
I know – velcro!!! I wish I had thought of that way back when. And Petersiks: bravo on the nursery. It looks beautiful and while I was skeptical on painting the trim to match the built-ins, you all were right again! It looks really amazing.
YoungHouseLove says
Thanks so much Kimberly!
xo
s
Ashley says
Hi, love the room, is that an Ikea crib???
YoungHouseLove says
Here’s the scoop on our crib-hunting spree back in 2010 for ya: https://www.younghouselove.com/2010/02/nursery-progress-crib-notes/
xo
s
Julia says
We bought that same whale on our honeymoon in Maui! Love seeing it in Baby P’s nursery. So sweet.
YoungHouseLove says
So sweet!
xo
s
caroline [the diy nurse] says
It looks amazing! We just added it to one wall in our kitchen where the cabinets meet the venting and then the ceiling. We can’t get over how much more “built-in” it looks. So fancy!
YoungHouseLove says
Sounds really pretty Caroline!
xo
s
Lisa@Double Door Ranch says
Swoon! I absolutely love it. I’m still terrified of installing crown, but I dream of it someday.
This weekend I decorated for my upcoming Galentine’s Day party and intended to lounge and do nothing Sunday but ended up in the city helping install an over the range microwave. Can’t stop, won’t stop.
YoungHouseLove says
Haha! Go Lisa, go Lisa, go.
xo
s
Katharina says
A little explanation:
http://en.wikipedia.org/wiki/Skin_of_my_teeth
YoungHouseLove says
Thanks Katharina! So interesting!
xo
s
karen says
awesome!!
Jane says
Im so in love with the built-ins.
I’m also working on our first nursery – for a girl. But going a more neutral tone. And I will use white, green and some pink/purple as accent I think.
Just love how elegant your boy nursery looks. Very inspiring!
YoungHouseLove says
Sounds really pretty Jane!
xo
s
meghan says
two things- thank you so much for doing those built ins. I have my eye on doing on with an existing entertainment center and the DIY you did is a major help!
second, I ordered a mobile from this place for my third daughter. very lightweight, colorful, and fun. you might be able to DIY one too.
https://www.etsy.com/shop/thewonderlandstudio
YoungHouseLove says
Love their stuff! Thanks for the link!
xo
s
Peggy says
What about an oversized clock for above the crib? I saw one online the other day and took a screenshot. It was a bicycle wheel minus the tire. It had the gear wheels behind and long red clock hands attached to the centre. Simple but cool.
YoungHouseLove says
Ooh, that’s fun too!
xo
s
emma says
Target has a beautiful rustic oversized clock on clearance for $25! I’m eyeing it but can’t figure out where it would go b/c its so big. One thing to do is sleep with it in your room b/c the ticking may be annoying.
YoungHouseLove says
Great tip!
xo
s
Laura says
My vote is for large scale mobile above the bed. I think that would look awesome!
Elaissa says
I bought this mobile in rainbow colors for our baby and love it! I ended up putting clear nail polish on all the metal links to ensure that they didn’t come undone.
https://www.etsy.com/listing/100538196/under-the-sea-baby-mobile-whale-sea?ref=favs_view_23
Love how the nursery is coming along!
YoungHouseLove says
Love that!
xo
s
Sarah @ An Inviting Home says
Love seeing how it is all coming together! I’ve been working on painting some backpack hangers that we just installed. Nothing like finally getting to a much needed school project 5 months later! :-)
~Sarah
YoungHouseLove says
Haha! It’s going to be so nice to have those!
xo
s
Jen @ Jen Spends says
I did a circus-themed nursery for my son and I totally have a thing for elephants now. I love the pop of green in your room–one of my favorite colors.
YoungHouseLove says
Sounds so cute!
xo
s
Peggy says
https://www.etsy.com/listing/33627225/clock-made-from-a-recycled-bike-wheel
YoungHouseLove says
Love!
xo
s
Cheryl says
Looks super polished, y’all!
I spent -gulp- 70 something dollars on a dang crib skirt. I hide my face with shame when I see how simple it could have been.
How about a shelf above the crib, right near the ceiling, connecting the built ins? It would give it even more heft and then you have created a smaller square to do a textured headboard effect above the crib or maybe paint a stripe pattern or even a stencil since I know how $herdog loves to rock a claw hand after 24 hours of stencil ing.
Whatever you do I’m sure it will look fab!
YoungHouseLove says
Aw thanks Cheryl! We thought about some sort of header to connect those (or shelf) and we’re not sure it won’t look top heavy (since the crib doesn’t fill that whole area) – but a twin bed will someday, so you never know where we’ll end up!
xo
s
April says
The Barnacle’s nursery is looking so handsome!! Love, love, love the built-ins. I did a similar hack when I made my daughter’s crib skirt but used those large office clips instead of velcro on the metal frame. Yay for just having to make rectangles!!
YoungHouseLove says
Really SMART!!!
xo
s
Jackie says
The crown looks great! Congrats on getting that completed – what a feat! Something is slightly off with the collection of colors for me – I think it’s the addition of the color in the crib drawer. I’d love to see that a pretty green or perhaps stenciled or painted with a cool pattern or with bicycles or something. Maybe it looks good with the chair though? Ha I don’t know what I’m talking about. Thanks for showing the progress!
Best,
Jackie
YoungHouseLove says
Oh yes, we have a whole lot more color/pattern/textiles/etc that we’d love to layer into the room (for example, the pillow on the chair will be green like the crib skirt – there will be a lot more dark elements like the drawer and a lot more light elements like the crib, the built-ins will most likely have every color of the rainbow on them, etc).
xo
s
Jennifer R. says
Hi Sherry & John,
Just wondering – what was the grand total for the built ins? I bet you listed it somewhere and I just missed it. The dressers are going for $299 each and John said he spent about $60 on each side adding the trim and shelves. Is that right? So about $720 plus $110 for the crown?
Looking to do something similar in our home but afraid we will get into it and it will be more than we bargained for. It’s quite a big project. Thanks in advance! And the Barnacle’s room is looking awesome so far!
YoungHouseLove says
Yes, that sounds right! Around $360 for each side and then add the $115 crown for the full total. :)
xo
s
Beverley says
Great job with the crown molding! I think a whale mobile would be super cute. Something like this would certainly add the color you mentioned (http://www.pinterest.com/pin/42291683972980563/)
YoungHouseLove says
Adorable!
xo
s
Emily says
Looks so great! You inspired me for the crib in my little guys room! I love the simplicity and mod of it! Nursery decorating is so fun.. You guys make me want to own a forever home!… Someday!
YoungHouseLove says
Aw, good luck Emily! And you’re right, nurseries are some of the most fun rooms to figure out ever!
xo
s
Candice says
As usual, everything you guys DIY looks so professional.My sister Alice and I spent the weekend (we are beginner DIYers) painting our grandparents’ 130-year-old Victorian parlor table aqua and topped it off with a new marble top we got for free. It looks great and so 2014, not 1884! I wish I could attach a photo.
YoungHouseLove says
That sounds so pretty! Would love to see a pic (you can share them on our Facebook page or link to them in the comments if you upload them to a free photo sharing site like Flickr).
xo
s
Harmony says
I really like the fresh look of the nursery, it is beautiful.
I also really love looking up the origins of words and phrases and had never looked up “by the skin of your teeth”.
It’s a bible quote:
It refers to the thin porcelain exterior of the tooth (rather than the gums). In other words, Job escaped with his teeth, but just barely. Job is comparing the narrow margin of his escape with the shallow ‘skin’ or porcelain of a tooth: the equivalent, in fact, of a ‘hair’s breadth’.
YoungHouseLove says
So interesting! Thanks for the info Harmony!
xo
s
Caroline says
Oh I wish for some builtins eventually! But until then…
I absolutely LOVE this room. And I think a giant mobile suspended from the ceiling would be perfect! I always worry that prints/low hanging things over a crib will be pulled in when baby is big enough to reach them (or bang the wall hard enough to knock them loose). Not that I know from experience ;)
Can’t wait to see more!
N Shirley says
I was thinking the same thing. Your first baby was well- behaved but due to the law of averages you just KNOW your new baby will be swinging from the chandeliers or something. I would make sure whatever you put above the crib is well attached or out of reach! My son removed the window blinds one day from his crib and went into a big boy bed at age two because he figured out how to get the bars off his crib. Your darling Clara is very verbal- the next little guy may be a future engineer!
Susan in Va says
Sherry, this room has gone from good to amazing! I love the sophisticated use of color, and the built-ins truly rival what a professional carpenter could do. I’m blown away (and you’ve only done half the room so far…can’t watt for the rest.)
YoungHouseLove says
You’re so sweet Susan, thanks so much!
xo
s
Robin says
The crown certainly give the room a high end look even though it’s hard to take your eyes away from those built-ins! They are amazing!