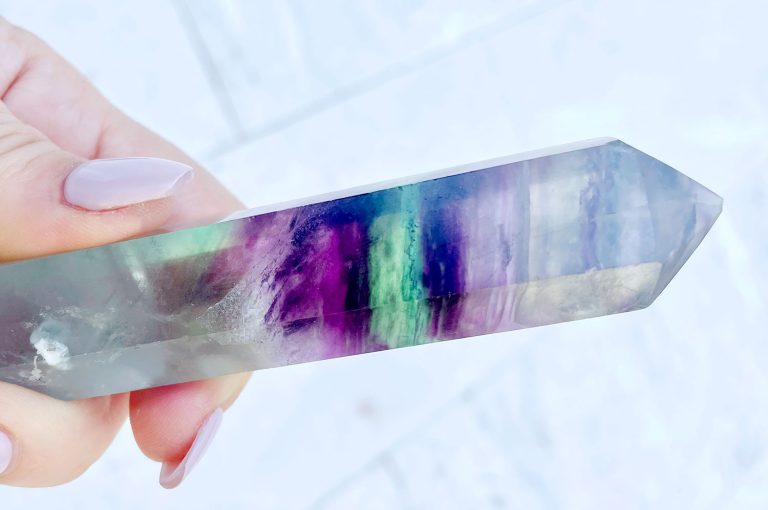
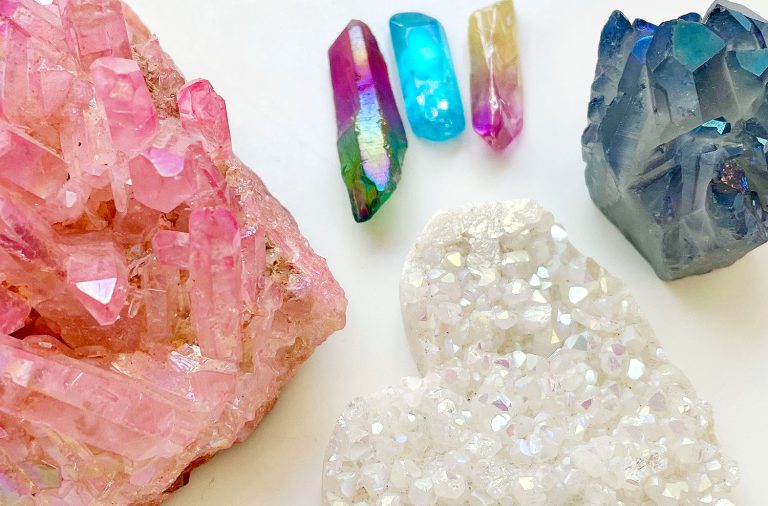
Don’t Try This At Home

This project gets that “don’t try this at home” warning for two reasons:

  1. It involves fire & broken glass so please use extreme caution & attempt it at your own risk.
  2. I couldn’t get it to work so you may not want to waste your time trying it anyway.

Yup, despite some die-hard persistence on my part, I couldn’t get this project to work successfully. Which sucks because I was really excited about it. According to the instructions I found in Men’s Health, it was a simple way to take beverage bottles and turn them into glass tumblers. Cool right?

Despite the project not working, we figured we’d share it with you anyway. Perhaps you’ll see where I went wrong or it will inspire you to try your hand at it (hopefully with a better outcome). If nothing else, it serves as proof that not everything goes smoothly around here 100% of the time. Plus I’d filmed just about all of my dozen or so attempts and I hated for the footage to go to waste. So check out the how-not-to video below (or watch it here on YouTube). Note: We recommend additional safety precautions like safety goggles, a fire extinguisher, and safety gloves (although Men’s Health didn’t mention them). Again, tackle this project at your own risk since glass plus fire can equal ouch!

And for anyone who can’t watch a video (if you’re at work perhaps) just keep scrolling for the written play-by-play below (which includes the sanding step that we accidentally left out of the video).

My first step was to gather the supplies that the article suggested:

You’ll also see that I conducted this project on a spare piece of patio slate so that I wouldn’t risk burning our driveway below. The basic concept of the project is that by concentrating a lot of heat around the bottle in one clean line then suddenly cooling it with cold water, you’ll break the bottle apart leaving an un-tapered cup for drinking. So the first step is tying a string around the bottle right before it begins to taper.

I tested this once before taking any video or photos and discovered one loop of string didn’t create enough heat to break a Boylan’s bottle, so I used two loops with my Izze bottles (seen above). Once you’ve tied the string, you remove it from the bottle and give it a good soak in some lighter fluid (doing your best to keep your fingers dry).

Once soaked, you put the string back on the bottle and cut off any excess (so as not to invite the flames to move down your bottle away from the spot where you want it to break). Putting the string back on inevitably got my fingers wet with lighter fluid so I washed them off in the water (so as not to invite any flames onto my hands).

Then came the fun part: lighting the string on fire. The article said to hold the bottle while doing this so that you can rotate it and help the flames spread evenly. I did this in some of my attempts, but usually just let the bottle sit on the slate so I didn’t have to have my hand near the flame. I just was sure to light the string on all sides before setting it down.

It produced something pretty like this! Oooooh, fire…

Now the article said I would hear a crack after about 10 seconds. That never happened for me (no matter how long I waited) so I jumped ahead to the next step which was pouring the cold water on the bottle which seemed to induce the cracking sound. I thought this might be where I was going wrong, but if I ever waited for the flame to go out completely before dousing it with water the bottle wouldn’t crack at all.

Ultimately, the goal is to get something like this:

Except you’ll notice in that picture that the break isn’t totally clean. In fact it’s a lot more jagged than I would like – and certainly not something I’d put my lips to and drink out of.

Sadly, this is actually one of my more successful attempts. I hoped that I could solve the jaggedness during the next step, which was sanding the edge so it would be smoother (you can see this being done below on my other semi-successful attempt). The sanding definitely make the edge smoother but it would’ve taken a lot of sanding to get a perfectly flat top to this glass. We did the sanding outside btw, oh and beware of inhaling any nasty silica dust if you take this on.

In the end this is what my three Izze bottles looked like. I didn’t even bother sanding the blackberry and blueberry ones since their breaks were so jagged. Sigh.

The blueberry Izze also illustrated a reason bottles like these aren’t perfect for this project. Since their logos are actually plastic labels stuck to the bottles, they can get melted and burned in the process (which is why cutting off the excess string is helpful).

After my attempts with the Izze bottles I questioned where I went wrong. I wondered if it was my bottle choice (not just for the label reason, but also because the article did suggest using a thick-ish bottle). So I tried the project again – as you saw in the video – with some IBC Root Beer bottles. They were both thicker and didn’t have plastic labels. But unfortunately the results were no better.

The thicker glass made them much tougher to break and the couple that did break were pretty jagged (while the others refused to break at all). I only got one that was semi-decent but for the most part it just looked like I had been in a bar fight.

In the end we didn’t end up keeping any of them, even though some could’ve made for decent little vases (assuming the flowers would cover the uneven edges). I have all sorts of theories about where I went wrong: was my string too thin? should I have started with cold bottles? is there some other bottle brand that would do better? But ultimately I’m just figuring it’s a “too good to be true” project and I’m not sure my belly can handle any more soda right now to try it again.

Have any of you guys tried this project or something similar? Have you had more success than me? If so, please leave your tips so someone else can try this with hopefully better results!


Bird Play: Freebie Winner!

I’m not sure what Sherry and I debated more this week – our answer to this week’s giveaway question about what bird we’d be (all we know is we’d have a birdhouse with lots of white painted furniture in it) or what photo we’d pick if we were up for the prize from Modern Bird Studios. But that prize is reserved for one of our lucky readers, which definitely brings a smile to our faces.

And even if you don’t end up with a free 12″ x 24″ customized hand-painted modern art piece this week, more smile-inducing news is that you can score one at a discount. Yup, Modern Bird Studios is giving everyone 15% off when they use the code YOUNGHOUSE through September. Plus you can check ‘em out on Facebook and Twitter for more updates on other giveaways and to see their latest creations.

But on to our big winner. That lucky lady or lad (thanks to the always random selection style of our bird-brained pal random.org) is… Jackie, who’d like to be a pretty goldfinch. Congrats! Do you already have a photo in mind for your personalized piece of art?

Next week not only brings the start of September – can you believe it??? – but another gifted giveaway, so pop back over on Monday as usual (and yes, there’s a clue in there somewhere). Stay tuned…

See our Giveaway FAQs page for more info. Pics from Modern Bird Studios.


Do It Yourself & ReadyMade

You may recall that back in April when Sherry’s belly was still full of baby we had some visitors stop by Clara’s nursery, including one wielding a big camera.

Well the pics from that double-duty photo shoot for Do It Yourself magazine and Kitchen + Bath Makeovers have finally seen the light of day. At least the ones for Do It Yourself have (the others will be popping up later this year). In fact, a bunch of you have already mentioned seeing them in the Fall 2010 issue that’s out now.

Our usual “He Said, She Said” advice column took a one-issue hiatus in order to share those photos of Clara’s DIY-riddled nursery. There’s even a never-before-seen angle that necessitated a ladder outside of Clara’s window to capture the shot. To check it out and read all the fine print, just click the image below for an enlarged version (and click it again to zoom):

Of course there’s plenty else to see in the issue. We love that they’re calling it their “second chances” issue since it’s all about breathing new life into old salvaged items. Feel free to check it out at Barnes & Noble or even Home Depot.

In other magazine news, I’m pleased to share that my little lady – well, not my littlest lady – was featured in the latest ReadyMade magazine. See that mention of “Speed Clean Your House” at the very bottom of the cover? That’s where Sherry comes in…

Just flip to page 30 for Sherry’s interview (or click the image below to see it larger). You can also read it over on ReadyMade’s website if that’s your preferred method of mag absorption. We hope cleaning up is even easier thanks to the roundup of quickie ideas. Oh and the tip about chlorine bleach was added by the writer, just in case anyone who knows about our bleach aversion was wondering.

As usual, the issue has a bunch of other cool projects and why-didn’t-I-think-of-that ideas in there (like the green-roofed doggie digs on page 38). It reminded us how much we enjoy reading ReadyMade. So feel free to check the rest of the mag out whenever you get a moment!

But enough about us, what are your cleaning shortcuts and secrets? We’re always looking to get ‘er done even faster/easier, so spill it.


Crushin’ On Ms. Meyers

This post isn’t about our favorite soap. It’s actually about another Meyers that we’ve loved for just as long: Nancy Meyers.

We kinda late to the game when it comes to exclaiming that we’re certified members of the Nancy Meyers fan club (she’s already been mentioned by many a blogger, so consider this measly addition to the chatter as an invitation to join the bandwagon if you haven’t already). But where do we start? Oh yeah, so Nancy Meyers is a screenwriter / director / producer who just happens to make movies where well-designed interiors are often one of the main characters. Take this awesomely open example from the 2006 movie The Holiday:

That’s Kate Winslet’s English home in the film, which she swaps with Cameron Diaz’s LA home (pictured below) as part of both ladies’ efforts to take a break from life and… well I guess you don’t need to know the whole plot. But clearly the homes are key elements of the story and Meyers (who grew up around interior design) sure has a knack for creating spaces that will have you drooling.

It was actually a bunch of you who recommended that we watch The Holiday about a year ago. At the time we didn’t pay attention to who directed it. But sure enough, about five minutes into things it was totally clear to us that Nancy Meyers was to blame for the painfully amazing decor (along with her fabulous crew, who deserves just as many kuddos as Nancy herself!). We were dying to live in Cameron’s house. And we finally got around to renting It’s Complicated a few months ago just for the eye candy – and it didn’t disappoint.

That photo doesn’t really even do it justice. But believe us when I say that John and I felt like packing up and moving to Santa Barbara after watching it. If only so we could visit the bakery that Streep’s character runs. I couldn’t find a good pic of it online but trust me, it’s uh. mazing. (we highly recommend renting it just for the scenery).

Speaking of renting, we can’t forget to mention 2003′s Something’s Gotta Give. This one features a stunning Hampton’s beach house that Diane Keaton retreats to to write award-winning plays (and date both Jack Nicholson and Keanu Reeves… we know, odd combo). But seriously, just check out this house:

And we can’t mention It’s Complicated and Something’s Gotta Give without shouting out Beth Rubino, the amazing set director who worked with Nancy Meyers for both flicks.

Oh and a funny buried connection is that the inspiration room that we loosely based our very own kitchen on was actually a Nancy Meyers kitchen from House Beautiful (click here for that suuuper old post, and check out the TV screen in the top right corner of the kitchen, which is playing Something’s Gotta Give as a nod to the designer herself). Talk about six degrees of separation! Some other Meyers movies that you might want to check out: the 1998 remake of The Parent Trap featuring a pre-disaster Lindsay Lohan (although John and I caught it on ABC Family the other day and agreed that the interiors are “meh” compared to the others). You can also break out your VHS player to rewatch 1991′s Father of the Bride (and its 1995 sequel). So a big wet kiss goes out to Nancy and her amazing team on each movie who makes all the stunning scenery possible!

And since we’re chatting about on-screen decor, do you have any movies or TV shows that you’d recommend for good home decor eye candy? We remember loving a modern home in Hancock and of course we adored a few of the scenes in I Love You Man (especially the shop where Rashida Jones works). What about you guys?

Images courtesy of Cote de Texas (who btw has a very extensive write-up on Nancy Meyers if you’re looking to dig deeper), IMDB.com, OutNow, and Architectural Digest. Although they’re ultimately all probably courtesy of Universal Pictures.


Reader Redesign: Somebody’s Nesting

It’s about time that we featured some projects from our über-productive pregnant Twitter friend Jen Woodhouse (who also happens to have moved recently from Nashville to the Richmond area). Jen’s been furiously nesting ever since landing here in Virginia and we thought you guys would love to see some of her projects (all of which you can learn more about on her blog The House of Wood). Here’s her letter:

Inspired by your awesome Craigslist dresser project, I refinished an old dresser and will use it as a changing table/dresser for our little Eggroll. You can read more about the project here.


And since I find myself wanting to show-and-tell all my DIY stuff with you guys, here’s a tufted headboard that I made along with some artwork that I created on the cheap above it! Read more about the artwork project here and see a step by step of the headboard here.


Lastly, here’s a fun little project for anyone else who feels the urge to organize baby clothes. I bought these blank clothing dividers from an online supply store (just google “clothing dividers”) for $0.29 each. I created a template (which you can download here), found some adorable backgrounds via Google images, and tweaked them in Photoshop. Then I printed them out on white full-sheet labels, cut them out, and stuck them on. You can see more here. So that’s what I’ve been up to. As always, thanks for the inspiration! – Jen


Thanks for sharing all of your projects with us, Jen! We’re having trouble picking a favorite so we’ll just say that they’re all awesome and we bet your little Eggroll can’t wait to come out into the world and see them. What do you guys think? Care to name a favorite project from the slew of fun transformations above? Anyone else out there nesting? Or refinishing furniture, making art, whipping up a DIY headboard, or making clothing dividers just because? Spill it.

Oh and don’t forget to check out: our weekly BabyCenter post! This time we tackled a fun little craft project that can definitely transcend the nursery or the playroom (read: you could just as easily whip one up for your living room if you’d like). Here’s a sneak peek:

Check out all the other photos along with a step by step tutorial right here. Fun, fun, fun.