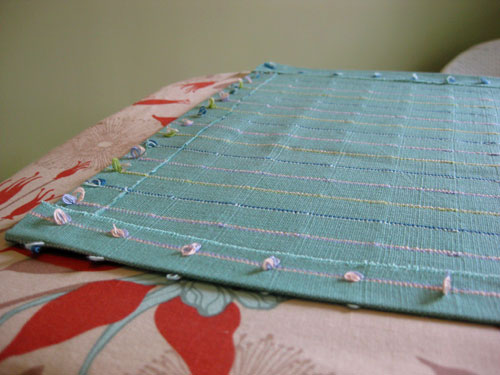
Some of you may remember that we wanted to make an adaptation of a crib skirt (a fitted band of fabric that would hide the view under the bean’s mattress and into her storage drawer below) so we’re back to share the simple step by step process. And if you guys know me at all you’ll fully anticipate that I didn’t even pick up a needle and thread. Yup, I used my favorite iron on hem tape along with scissors, a tape measure and an iron. About forty short minutes later I had a custom fitted crib skirt (that’s removable and washable too). Here’s how it all went down:
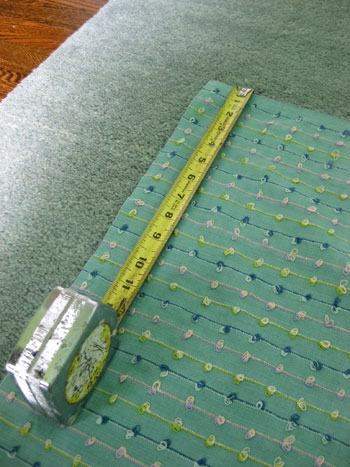
First, I measured the vertical space between the bottom of the mattress and the top of the drawer, which was the same height all the way around the crib. Then I measured the horizontal distance of each side of the crib, which left me with two smaller lengths for the sides and one longer one for the front of the crib (I opted to make a three sided skirt because the back won’t ever be seen). Then I added three inches to each measurement. For example, if the measured height for the side panel of the crib was 12″ I added three more to make it 15.” And if the measured length of that side panel was 30″, I added another three inches to make it 33.”

Then I simply cut out a 15″ x 33″ piece of fabric for that side and moved on to the next side of the crib, using the same add-three approach.
After carefully cutting everything out, I was left with three panels, all of the same height and two of the same width (while one was longer since that was the front panel). Note: if you’re using any type of printed fabric, be sure to cut everything out in the same direction, so you don’t end up with a crib skirt with one vertically striped panel and one horizontally striped panel- unless that’s the look you’re going for.
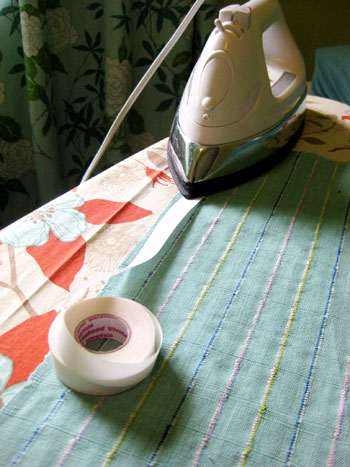
Then it was time to whip out my iron along with the scissors and my trusty Heat N’ Bond Ultra Hold (my favorite heavy duty iron on hem tape, available any craft store like Michael’s). Since I wanted all four sides of each panel to have a nice finished edge, I simply cut my hem tape to the length of each side of the panel and ironed it in place ON THE BACK of the fabric, as close to the edge of the panel as possible. Tip: when ironing on hem tape, keep the clear side down and the paper side up- you never want your iron to touch the clear side or it’ll get all gross and goey.
Then after ironing that strip of hem tape in place on the edge of my panel of fabric I just gave it about ten seconds to cool off a bit and got to work peeling back the paper, which left me with a strip of sticky stuff (it almost looks like clear double sided tape):
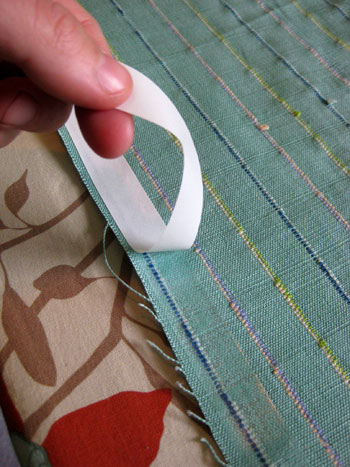
Without disturbing my little ribbon of stickiness, next I folded over the fabric so that it just covered the double-stick-tape-looking strip and ironed that fold into place.
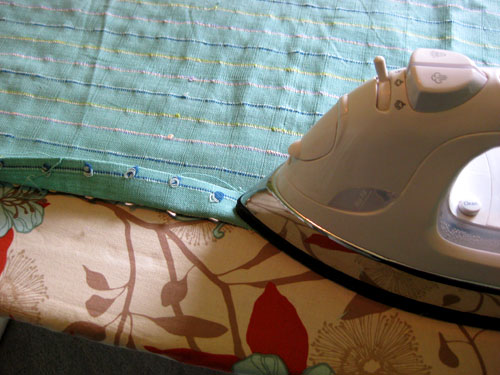
Voila- I was left with a finished looking hemmed edge without any puckering or pinching (a common issue I have when I sew). Then I just repeated this process on all four edges of my two side panels and on the top and bottom edge of my front panel (I left the two sides of my front panel unhemmed because I’d be joining them to my already hemmed side panels).
Then place the hemmed edge of one of your side panels next to the unhemmed edge of the front panel that you want to join together (eventually you’ll be joining all three panels, but pick one side panel and one front panel to start with). Add another ribbon of hem tape right on top of that side panel edge that you already hemmed. Once you peel of the paper that strip of sticky tape on top of your side panel’s hem will be how you join the side panel to the front panel. Then it’s as easy as ironing them together…

… for a nice finished seam when you flip everything over and look at it from the front of the fabric:
Just replicate this step to join the other panel (or panels, if you’re making a four sided skirt) and you’ll be left with one long hemmed band of fabric. Of course if you had enough yards of fabric you could have just cut one long strip and hemmed the edges of that without worrying about making and joining side and front panels, but most people are cheap like us and want to be able to do this project with just one or one and a half yards of fabric (which is what we used) so cutting the panels and joining them at the edges of the crib is a necessary step.
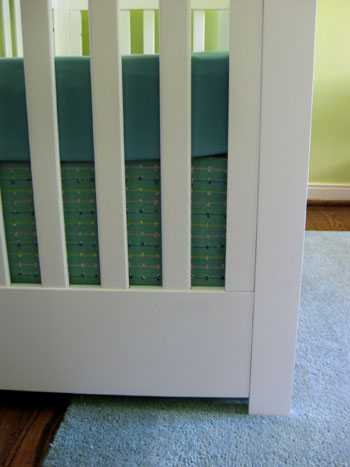
Then all that’s left to do is secure this polished looking fitted skirt to the base of your crib. We opted to use velcro to hold our skirt in place, which also makes it easy to remove and wash (yup Heat N Bond is totally washable and extremely durable as well):
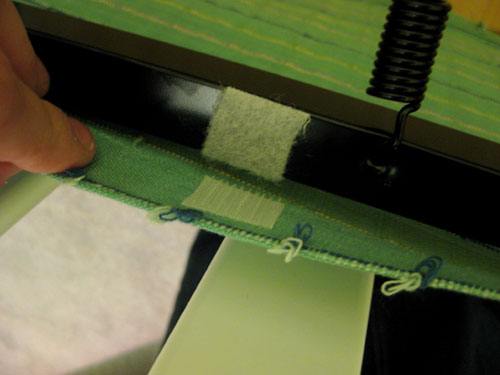
Plus since our crib’s mattress has a lower setting, we know that someday we won’t need this skirt (because the mattress will later be lowered to right above the drawer so there won’t be a gap to bridge anymore) so we love the fact that it’s easily removable. As for those velcro details, we just cut out a few inch by inch squares of it and placed them around the top of the crib’s metal frame (three or four per side) to hold everything in place. Note: You might want to give the side of sticky-backed velcro that’s attached to your fabric a stitch or two to hold it in place so you don’t have to worry about losing ’em in the wash.
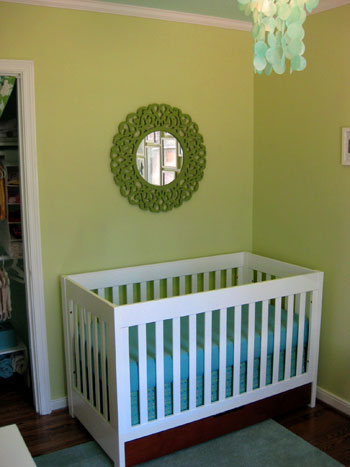
And once we put the mattress back on it was just as polished and fitted and sleek looking as we hoped.

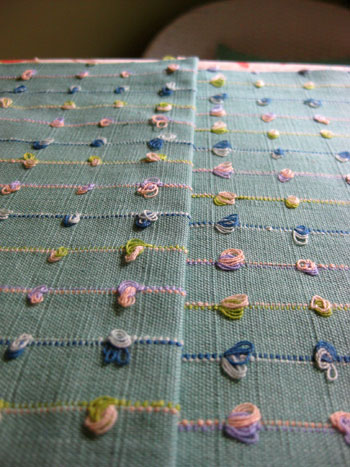
We love how the colors coordinate without matching perfectly (we wanted them in the same family to avoid a high-contrast stripey effect since we don’t mind letting the curtains be the star textile in the room).
So that’s how we made a washable and removable crib skirt without breaking out the sewing machine or breaking the bank. In fact we completed the entire project in less than an hour and only spent money on the fabric, which was just $14 for a yard and a half (learn more about our crib skirt fabric hunt here).
And there you have one more way to make a custom crib skirt (we actually made a more traditional floor-length version right here – which is a better option if you want to be able to slide things under it for storage). Is anyone else out there planning to whip up a made-it-myself crib skirt of their own? Have any of you crafty people already crossed it off your to-do list? And while we’re on the subject of skirts, where does everyone stand when it comes to bed skirts in general? Too frilly for grown ups? A great way to hide storage systems and overflow items? Do tell.
Psst- Wanna see our nursery progress from the very beginning? Here’s our painting post, our big shopping spree, our crib hunting rundown, our curtain-making tutorial, our fun little chair search, our mirror-painting extravaganza, this DIY faux sheepskin project, our big dresser makeover, and our closet organization efforts. Fun, fun, fun.

dana says
great idea! i can’t wait to see the room in it’s entirety!
Renae says
Love this! Plus you can make it shorter when you lower the crib. Nice work, and that’s coming from a sewer from way back. :)
stephanie says
hi sherry,
cute project today! did you guys see the Trend Spotter article today on Richmond.com?
YoungHouseLove says
We did! And we’re so excited. Thanks for the heads up. And congrats to you too!
xo,
s (& j)
Katie B. says
thank you so much for posting this! you have inspired me to make my own bed skirt and closet drape… i am awaiting my fabrics to arrive any day now!! i was so excited today, i had to blog in anticipation: http://funtimeswiththebeckers.wordpress.com/2010/03/23/easing-the-panic/
~Katie B.
Superartsy says
I read one of your comments about not using a bumper. I have decided not to use one either. But i am thinking of using a “breathable bumper” instead. Have you heard about those? Any opinions?
YoungHouseLove says
Yup, we’ve heard about those (and know of a bunch of people who have used them and love them) but we just think that going without is the best choice for us (we also know a lot of people who have gone that route and are happy with that decision). It’s totally personal preference though. Good luck!
xo,
s
Kristi says
Sherry–
Puhlease tell me you saw this. Thought of you right away.
http://windhula.blogspot.com/2010/02/z-gallerie-inspired.html
YoungHouseLove says
We had seen all those fun ceramic animals over at ZGallerie but we hadn’t seen that blog post. What a great transformation she whipped up with that owl! Thanks so much for sharing the link.
xo,
s
jbhat says
It looks perfect. And even your ironing board fabric is cute and fun.
jbhat
Chic Coles says
Awww how sweet! It has been so fun to see the evolution of the nursery and this is such a sweet detail!
Abby says
So cute! I want to be your kid and have a cool room!!
Laura says
Hi! I love your blog! I was wondering if you had any how-to’s for a bed skirt for a normal bed…would I just follow the same directions and just make them for the measurements of a normal size bed??? Thanks!
YoungHouseLove says
Hey Laura,
We haven’t tackled a bed skirt tutorial for adults yet but we’d love to whip one up someday. Feel free to google around for instructions in the meantime!
xo,
s
Michelle Kersey says
I love it!!
I am making all the bedding and curtains for my baby’s room.
I haven’t sewn a crib skirt before, but I do pretty well with everything else I’ve made. I know you’re the heat n bond girl, but as long as I’m good at sewing, I should be able to get a nice hem…. right?
I love bed skirts, have one on my bed. It’s ruffled, which I don’t like, but it serves it’s purpose for now. We have our mattress on a metal frame b/c we made a headboard out of an antique door and don’t have a footboard. So, the bed skit is a necessity for us to hide the box spring and metal rails. (and the cats that like to hide under the bed like it too) Eventually, I might tackle making my own bed skirt for my room.
Amanda says
Adorable…
Question: Your ironing board is covered in that awesome Joel Dewberry fabric from last summer…did you find a cover made in it, or did you make it yourself? If the former, WHERE?!?! If the latter, THAT is a tutorial I’d love to read!
YoungHouseLove says
Hey Amanda,
We actually received that ironing board cover as a gift from a friend so we’re afraid we have no idea where it came from. Maybe try etsy or ebay? Hope it helps!
xo,
s
Anna says
Love this! I was actually hoping you would make a bed skirt. I ordered the same crib and am planing on making a skirt for it, so you just made my project a million times easier. Plus, I have the same Dwell Studio Elephant Bedding as in the other bed skirt project so now I know what kind of material to look for!
Amanda says
Etsy! Of COURSE!! I love Etsy, but for some reason I always draw a blank when I’m looking for something unusual.
Found a bunch of cute ones – my ironing board and craft room thank you. :)
Natalie says
LOVE the new crib skirt! Very crafty :)
Roeshel says
It’s so pretty and a great solution. I’ve never used the hem tape but you make it look easy. I might have to try it sometime. :) Thanks for sharing – the nursery is looking adorable!
Dana @ House*Tweaking says
Oh Sherry! I love the nubby little texture that your bedskirt adds to the crib. Just too sweet. Can’t wait to see more of the nursery progress…what a labor of love!
JenWoodhouse.com says
Some people have mentioned that the under-the-crib storage drawer is a dust collector because there’s no top attached… any plans on how to combat this problem?
YoungHouseLove says
Yup, for both baby safety and the dust issue we’ll be placing a stiff board of untreated wood under the crib mattress which we have read is a huge help when it comes to keeping things in the drawer looking nice and pristine. We figure that between the board and the skirt there’s really no way anything can sneak through and get into the drawer so it should be a pretty simple solution.
xo,
s
Leslie says
Great instructions! Mine turned out so well. Love these tutorials!
YoungHouseLove says
So glad to hear that yours turned out well. You’re speedy!
xo,
s
Hesper says
I recently found your blog and really love these tutorials! I bought some fabric online to give this a try and I didn’t know it at the time, but it looks like due to the print (red letter day-trees), I’m going to have to piece the longer piece together. Do you have any recommendations for doing that?
Any advice would be really appreciated!
YoungHouseLove says
Yup just use the same method that we outlined above for joining corners to piece the long edge together (it’ll look best with the seam in the center of that side so it feels balanced and deliberate-like it was meant to be there). Good luck!
xo,
s
Monica says
Hi,
You have done a wonderful job with the Nursery!! can’t wait for the final reveal!!
Can you please share where you got your rug from and what material is it (wool, alternative?)
Thanks much!!
YoungHouseLove says
It’s 100% wool and from a local outlet store. Feel free to follow the “big shopping spree” link at the very end of this post for more info. Hope it helps!
xo,
s
Britt says
Can you describe the color of the drawer of the crib? On Wal-Mart’s website, it looks very orangey/red but in your pictures it looks darker.
YoungHouseLove says
It’s not a cool dark wood, but a warm dark wood with subtle reddish-brown undertones. Definitely not as red as it is on the site though. The photo of the crib at the end of this post is the most true to life: https://www.younghouselove.com/2010/02/nursery-progress-crib-notes/
Hope it helps!
xo,
s
rosemarie says
LOVE this tutorial! My mom lived on that hem tape (she always called it “perky bond”), so every curtain in her house is “perky bonded!” I think I will follow in her footsteps.
You’ve inspired me and my future baby thanks you!
Mary Beth says
I wanted to thank you for this tutorial. I actually just made my own crib bedskirt following your directions. It turned out lovely. You just saved me a bunch of money, not to mention, I was able to make what I actually wanted, rather than having to settle for something that wasn’t just quite right.
YoungHouseLove says
So happy it worked for you! Doesn’t it feel great to DIY something on the cheap? Love it.
xoxo,
s
ChristenL says
Hey Sherry and John,
I know this is an old post, but my husband, Frank, and I are adopting a baby boy from Russia and in the process of putting together the nursery. We’re using this crib skirt tutorial! :) While reading the comments I came across the board under the mattress idea. We want to do this, but can you go to a place like Home Depot and ask for a board cut to those standards? How did you get yours?
Sorry if this seems like a simple question. Neither of us are wood workers. ;)
Thanks!
YoungHouseLove says
Yup, we got the pros at Home Depot to cut a 1×12″ board into three slats that measured the length of the crib to create three pieces of wood that we could lay next to each other like slats to create a firm surface for the mattress. Hope it helps!
xo,
s
tara says
Hi guys! Once again, we have gotten some inspiration from you! :) We did a no-sew crib skirt based on your instructions here. Thanks for the ideas, and for doing no-sew options for us sewing-challenged folks ;) http://themclambs.blogspot.com/2010/09/little-mclambs-no-sew-crib-skirt.html
YoungHouseLove says
Love it! Thanks for the link!
xo,
s
Jill L-G says
Hi There!
I’m just wondering how many yards of fabric you guys bought for this project.
Thank you so much for the step-by-step guide!!
YoungHouseLove says
Good question! We think we got 1.5 or 2 yards at the most. Since you can cut a few strips from fabric horizontally (so you can get a bunch from even 1.5 yards) and you’re connecting them at the corners you just have to make sure you have enough yardage for the longest side of your crib. Then you can probably cut the two shorter side strips from the same 1.5 yard on top or below that strip for those parts. Good luck!
xo,
s
Nikirii says
Awesome! Have you made a crib bumper without sewing?
YoungHouseLove says
Sadly we haven’t tackled that yet, but maybe you can google around for a tutorial?
xo,
s
Tabitha Hope says
Thank you thank you! I am pregnant with my 3rd baby, its a girl… I am not a fan of buying crib sets at all! I have never had a girl before and I have only found ideas that I love on etsy… and YOU!!! wow, I am so happy of the money I will save and the time. My baby girls room will be what I imagine, and not from a bag! I have a folder of print outs, swatches, and clippings, and now can see this all coming together. *** You both are amazing, and so have helped alot of families save money and bond with cool projects! Thank yoy for sharing everything! Completely entertaining, and fun:) You deserve a show!!! Beautiful bb girl, congratulations!
~Tabs
Karen P. says
What color is the carpet in Clara’s room? I don’t know if it’s the different lighting when you take pictures or my computer monitor, but sometimes I think it is blue and sometimes I think it is gray. I just painted my office Autumn Blossom and am on the hunt for carpet. I have the same curtain fabric too. Should I be looking in the grays or blues?
YoungHouseLove says
It’s a soft gray-blue. Kind of a neutral goes with everything blue (as opposed to a bright nursery looking sky blue rug). Something with muddy or gray undertones will keep the ol’ office from looking too kid-ish. Hope it helps!
xo,
s
Stefanie says
This looks absolutely perfect. I’m curious what you did once you lowered the mattress (have you done that yet? I assume Clara could be pulling up in no time.. your latest progress shots don’t seem to have a lowered mattress yet). Did/would you just remove the skirt, or is there still space for some little itty bitty skirt?
YoungHouseLove says
We lowered the mattress and just removed the skirt since it was attached with vecro. Now the mattress sits right above the drawer, so it looks great. Hope it helps!
xo,
s
Tracy says
Hi sherry,
Just wondering…what are your thoughts on creating your own queen size bed skirt? I love the idea of velcro for easy removal, washing, etc. That is the part I hate most about bedskirts-having to remove the whole mattress each time to wash, etc. I have 2 dogs so it would be much easier to have a velcro type bed skirt like you made for the crib. Do you think that would work (or be worth it) for a big bed??? Thoughts?
THANKS, and as always…you ROCK!
YoungHouseLove says
Oh yeah I bet you totally could!
xo,
s
Joshua says
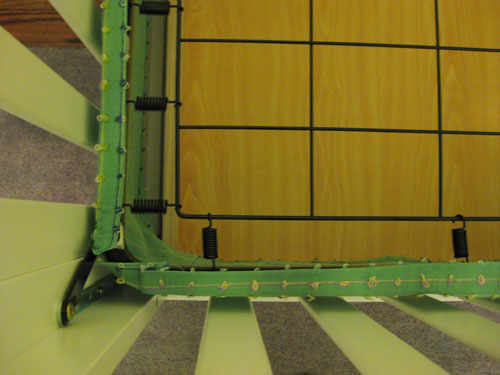
How did you negotiate the fabric around the metal arm that connects the mattress bed to the frame? We have a Davinci crib and it looks exactly like yours. It looks as if you might have cut the fabric around the metal arm, but we can’t tell for sure.
-Josh and Steph
YoungHouseLove says
We didn’t cut our little fabric band at all, but see from that pic where you look down on the skirt, it just sort of threads under the metal arm for a second, but the velcro on either side of that arm holds it up so it doesn’t sag. Hope it helps!
xo,
s
Amber @ Amber, Dom & Baby Make 3 says
This is awesome! We actually have the Baby Mod crib as well and it’s great to find a tutorial to help fill that weird space between the mattress and storage area! Thanks so much!
Amber says
Great idea! I actually got my fabric tonight and started on the project!
I do have a question though, the metal frame that holds the mattress (not exactly sure what the name of it is) at the front where the arms are connected to the crib itself (your picture #10 down has this piece in it in the bottom left), I’m having a hard time getting the fabric to lay down because its having to lay unevenly over those arms…I hope you know what I’m talking about, I cannot figure out for the life of me how to get this to lay flat and look tailored and seamless. My front panel is pulling up on both sides to raise up over these arms.
Is there any suggestion or solution for me?
YoungHouseLove says
You can kind of see in that picture what worked for me, I actually came up from underneath around the whole crib, so see how there’s a gap on top next to the arm? I just wrapped the fabric around the rim whenever I could reach it (practically everywhere except for where those arms got in the way) but since those were obscured and the fabric tucked right up under them it all worked out. I would just try pulling the skirt on from the bottom and just velcro-ing it around the rim wherever you can (without pulling up on the front panel to raise anything over the arms, just let it rest right under them in those areas). Good luck!
xo,
s
Kelly says
Not sure if you guys will see this, since it’s way old.. but did you have any problems w/the velcro sticking to the crib?? I had the hardest time this weekend getting it to stick at all, but it finally did about the third time I tried. I thought I was in the clear, but I checked today and it had all fallen down again! What am I missing? Maybe it’s the humidity in my house? I am thinking of just tying ribbons around the whole thing to hold it up :)
YoungHouseLove says
So sorry we didn’t. Maybe you got defective velcro? Or something not as heavy duty? The ribbon idea sounds awesome though!
xo,
s
Lydia says
Success!! Thanks y’all! I don’t want to buy a full crib bedding set for our little one on the way, in part because we’re also going bumper-less. I couldn’t find a crib skirt I liked, and it was fun together-time for the hubby and I to pick out fabric we liked at a local fabric store. I ran into a bit of a speed bump when I realized I’d need to cut a slit in the skirt to work around a support bar our crib has below the crib mattress, but the skirt is up and we love it! Now we just need a mattress… :)
YoungHouseLove says
So glad it worked out!
xo,
s
Erika says
Thanks for this! I’m due on Tuesday and completed this project in about an hour. Sweet!
Erika says
I even have a ton of fabric leftover, so maybe before Tuesday you can whip up a tutorial on easy valances. :)
YoungHouseLove says
Haha, not sure we’ll get to that by Tuesday. But I bet there are some awesome tutorials on google or pinterest for that! Gooood luck! So glad the skirt came out well (and so quickly!).
xo,
s
Candice says
Hi Sherry,
I just wanted to say how much your nursery inspired me. Our daughter was born in October and I just posted photos of her nursery. I think you will recognize a lot of your ideas there. Thanks so much for the inspiration!
YoungHouseLove says
Aw, so glad! Off to check them out!
xo,
s
Peaches says
Thanks for posting this. I loved the idea so much that I had to make one for our little girl who will be arriving in the next two months. I love how it turned out. To see it visit http://djpeach.blogspot.com/2012/03/new-crib-and-crib-skirt.html I also linked it to your blog if that is okay.
YoungHouseLove says
Thanks Peaches! It looks amazing!
xo,
s
Ashley B says
Thank you so much for this tutorial! It was extremely easy. I followed everything on your site, except I didn’t connect the 3 panels. The construction of the crib made it awkward such that the fabric would lay right, and I didn’t see a reason to connect them anyways. Nonetheless, it made the job even easier & it didn’t affect the appearance :) Thanks again!
http://bartoblog.com/2012/04/11/little-girls-first-bedroom/
YoungHouseLove says
Looks awesome!
xo,
s
Jen says
Thanks for the great tutorial! I know this is years later but I found it through pinterest and used it today for my daughter’s crib skirt! It was so easy!
Mollie says
St Jude’s children’s research hospital wallpaper is COVERING your entire page so I can’t read your tutorial here!
YoungHouseLove says
Sorry Molly, that’s an iPad/iPhone glitch (we didn’t change anything on our end but it seems to randomly happen to smart phone users). If you empty your cache/cookies/data it should load right again!
xo,
s
Courtney says
I know this is an older project for you guys but just wanted to say thanks! I made this tonight for our daughter’s room and it looks adorable. I love that I was able to pick my own print but not pay a fortune to special order one. =)
YoungHouseLove says
Aw, so glad!
xo
s
Joanna A. says
Hi guys,
I am 3 weeks away from my due date with our first little one and after reading such great things on your blog about the crib we ended up buying the same one. I have a question…what do you store in the pull out drawer?? Thinking it might be a good place for toys but just wanted to see what you guys use the awesome storage feature for.
Thanks!!
-Jojo
YoungHouseLove says
That drawer has been so handy for so many things over the years! In the beginning it was out of season sleepwear along with a spare set of sheets for the crib and blankets for tummy time on the floor. Then it went to a place for snow gear (her snowpants, her hats and gloves, etc) and now it has some toys in there along with that!
xo
s
Sarah says
Hi,
I love your crib skirt and used this same exact technique in my baby boys room. He is now 2 months and the Velcro on the metal crib has come up and won’t stick well to the metal?!? Any suggestions? Thank you!!
Sarah
YoungHouseLove says
Oh no! Could you sew shoelaces to the corners and use them to tie it in place since the velcro and metal don’t work well?
xo
s
Stephanie says
I really love your crib! What brand is it and where did you buy it? We are looking at something similar at IKEA but I LOVE yours much much more!
YoungHouseLove says
Thanks! Here’s that post for ya: https://www.younghouselove.com/2010/02/nursery-progress-crib-notes/
xo
s