Some of you may remember that we wanted to make an adaptation of a crib skirt (a fitted band of fabric that would hide the view under the bean’s mattress and into her storage drawer below) so we’re back to share the simple step by step process. And if you guys know me at all you’ll fully anticipate that I didn’t even pick up a needle and thread. Yup, I used my favorite iron on hem tape along with scissors, a tape measure and an iron. About forty short minutes later I had a custom fitted crib skirt (that’s removable and washable too). Here’s how it all went down:
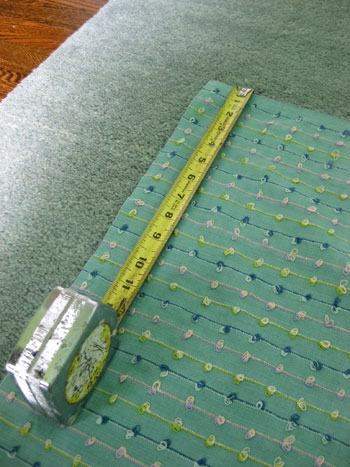
First, I measured the vertical space between the bottom of the mattress and the top of the drawer, which was the same height all the way around the crib. Then I measured the horizontal distance of each side of the crib, which left me with two smaller lengths for the sides and one longer one for the front of the crib (I opted to make a three sided skirt because the back won’t ever be seen). Then I added three inches to each measurement. For example, if the measured height for the side panel of the crib was 12″ I added three more to make it 15.” And if the measured length of that side panel was 30″, I added another three inches to make it 33.”

Then I simply cut out a 15″ x 33″ piece of fabric for that side and moved on to the next side of the crib, using the same add-three approach.
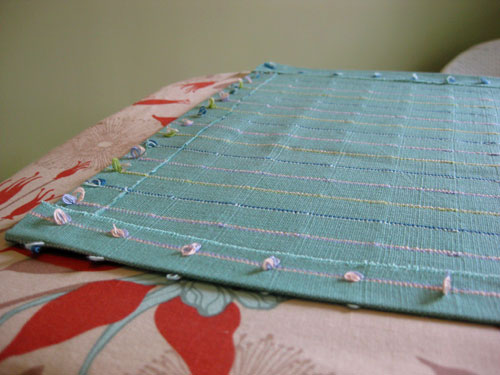
After carefully cutting everything out, I was left with three panels, all of the same height and two of the same width (while one was longer since that was the front panel). Note: if you’re using any type of printed fabric, be sure to cut everything out in the same direction, so you don’t end up with a crib skirt with one vertically striped panel and one horizontally striped panel- unless that’s the look you’re going for.
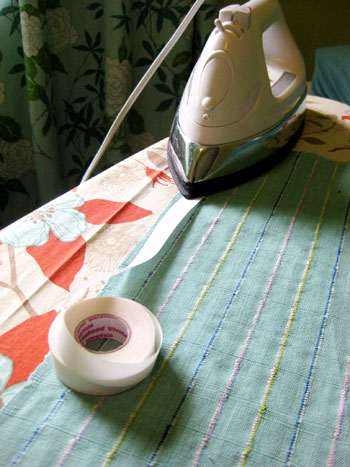
Then it was time to whip out my iron along with the scissors and my trusty Heat N’ Bond Ultra Hold (my favorite heavy duty iron on hem tape, available any craft store like Michael’s). Since I wanted all four sides of each panel to have a nice finished edge, I simply cut my hem tape to the length of each side of the panel and ironed it in place ON THE BACK of the fabric, as close to the edge of the panel as possible. Tip: when ironing on hem tape, keep the clear side down and the paper side up- you never want your iron to touch the clear side or it’ll get all gross and goey.
Then after ironing that strip of hem tape in place on the edge of my panel of fabric I just gave it about ten seconds to cool off a bit and got to work peeling back the paper, which left me with a strip of sticky stuff (it almost looks like clear double sided tape):
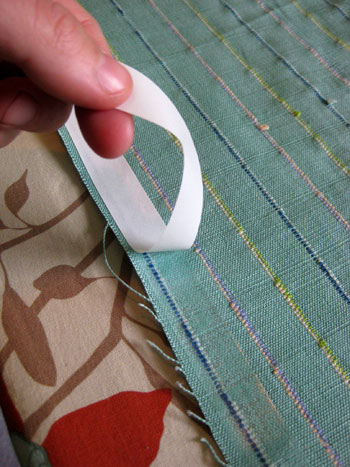
Without disturbing my little ribbon of stickiness, next I folded over the fabric so that it just covered the double-stick-tape-looking strip and ironed that fold into place.
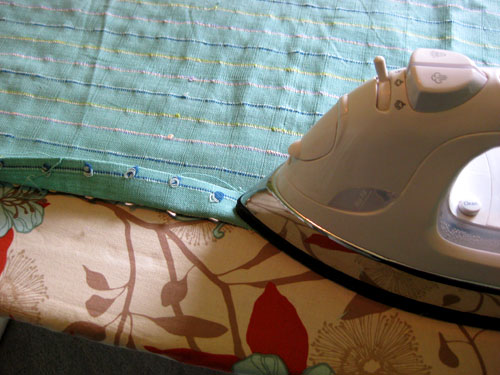
Voila- I was left with a finished looking hemmed edge without any puckering or pinching (a common issue I have when I sew). Then I just repeated this process on all four edges of my two side panels and on the top and bottom edge of my front panel (I left the two sides of my front panel unhemmed because I’d be joining them to my already hemmed side panels).
Then place the hemmed edge of one of your side panels next to the unhemmed edge of the front panel that you want to join together (eventually you’ll be joining all three panels, but pick one side panel and one front panel to start with). Add another ribbon of hem tape right on top of that side panel edge that you already hemmed. Once you peel of the paper that strip of sticky tape on top of your side panel’s hem will be how you join the side panel to the front panel. Then it’s as easy as ironing them together…

… for a nice finished seam when you flip everything over and look at it from the front of the fabric:
Just replicate this step to join the other panel (or panels, if you’re making a four sided skirt) and you’ll be left with one long hemmed band of fabric. Of course if you had enough yards of fabric you could have just cut one long strip and hemmed the edges of that without worrying about making and joining side and front panels, but most people are cheap like us and want to be able to do this project with just one or one and a half yards of fabric (which is what we used) so cutting the panels and joining them at the edges of the crib is a necessary step.
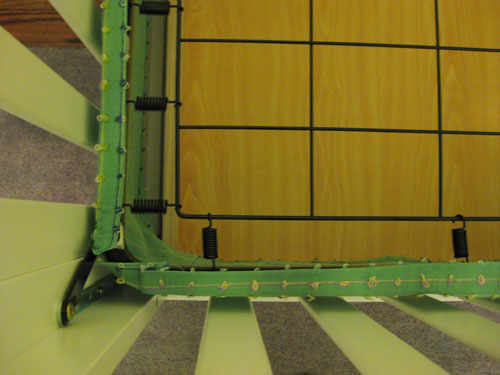
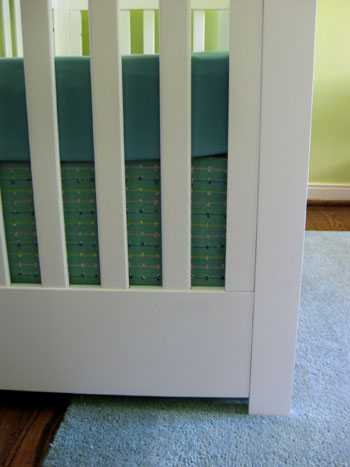
Then all that’s left to do is secure this polished looking fitted skirt to the base of your crib. We opted to use velcro to hold our skirt in place, which also makes it easy to remove and wash (yup Heat N Bond is totally washable and extremely durable as well):
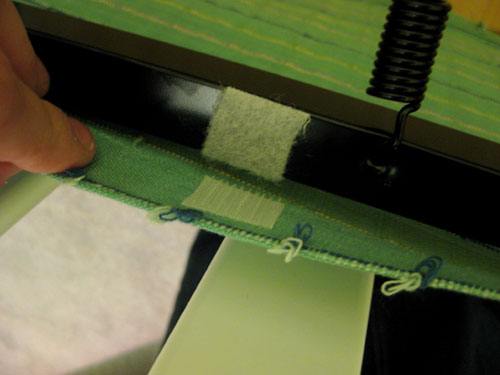
Plus since our crib’s mattress has a lower setting, we know that someday we won’t need this skirt (because the mattress will later be lowered to right above the drawer so there won’t be a gap to bridge anymore) so we love the fact that it’s easily removable. As for those velcro details, we just cut out a few inch by inch squares of it and placed them around the top of the crib’s metal frame (three or four per side) to hold everything in place. Note: You might want to give the side of sticky-backed velcro that’s attached to your fabric a stitch or two to hold it in place so you don’t have to worry about losing ’em in the wash.
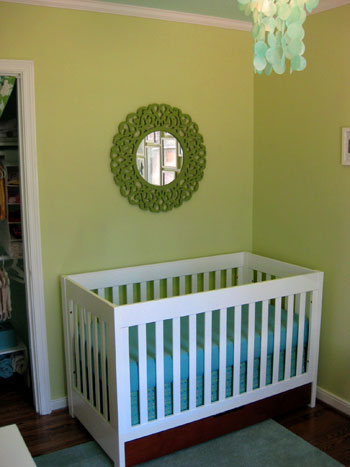
And once we put the mattress back on it was just as polished and fitted and sleek looking as we hoped.

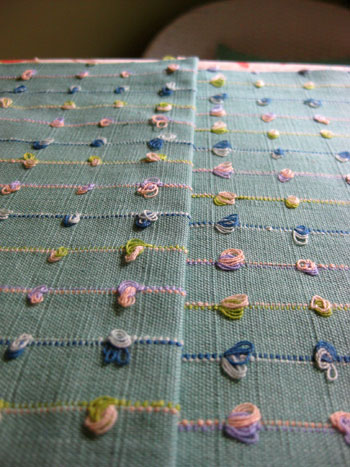
We love how the colors coordinate without matching perfectly (we wanted them in the same family to avoid a high-contrast stripey effect since we don’t mind letting the curtains be the star textile in the room).
So that’s how we made a washable and removable crib skirt without breaking out the sewing machine or breaking the bank. In fact we completed the entire project in less than an hour and only spent money on the fabric, which was just $14 for a yard and a half (learn more about our crib skirt fabric hunt here).
And there you have one more way to make a custom crib skirt (we actually made a more traditional floor-length version right here – which is a better option if you want to be able to slide things under it for storage). Is anyone else out there planning to whip up a made-it-myself crib skirt of their own? Have any of you crafty people already crossed it off your to-do list? And while we’re on the subject of skirts, where does everyone stand when it comes to bed skirts in general? Too frilly for grown ups? A great way to hide storage systems and overflow items? Do tell.
Psst- Wanna see our nursery progress from the very beginning? Here’s our painting post, our big shopping spree, our crib hunting rundown, our curtain-making tutorial, our fun little chair search, our mirror-painting extravaganza, this DIY faux sheepskin project, our big dresser makeover, and our closet organization efforts. Fun, fun, fun.

Laura@JourneyChic says
Yes! My crib just arrived at our local Walmart today, and as soon as we pick it up and assemble it I’ll take measurements for the skirt. The fabric has been chosen (more on that here: http://journeychic.com/2010/03/16/nursery-update-the-crib/), and my mom and I are making a skirt that’s adjustable so that it will work regardless of the mattress’s height.
Sarah McGuire says
At 9 mos. pregnant, I’m a little too tired to whip out the sewing machine, so I was thrilled to see this. I’d thought about using the Heat N Bond, but couldn’t figure out how to attach the skirt to the crib. The velcro is genius. Just one question..
I’m assuming it’s the sticky backed velcro. If you just stick it on the fabric, will it make it through the washing machine and dryer, or should I give it a couple stitches to keep it in place?
Beautiful job on the nursery, and thanks for the tip on getting an eco-friendly crib at Walmart. We went with the “Cadence” style by the same company. You definitely saved us some dough!
YoungHouseLove says
Hey Sarah,
Wow, 9 months. That’s so exciting. And yes, a quick stitch or two through the squares of velcro that are stuck to the crib skirt will definitely hold them in place for future washing. And we’re so glad to hear that you scored an affordable crib that you love!
xo,
s
Cheryl says
Heat N’Bond — ingenius. That will so make my no-sew life easier! Thank you. I could make napkins this way . . . tablerunners . . . and finally repair hems on pants that I have stacked in the closet.
jen says
As someone with zero ability to sew and all the desire to DIY, I love your approaches to projects. You make it all simple and easy to understand which I so appreciate.
I will def be using this project and am pumped to start shopping for fabric! I have about a million things to do in the meantime, but this will make the project list!
lauren says
I’m not a fan of bedskirts. I think there are much more options now in terms of a more modern, crisp bedskirt, but for me, I prefer sleek modern furniture without the fuss of a bedskirt. However, this crib bedskirt is too cute!
Lisa says
Hi honey, everything looks beautiful! All best wishes on a happy birth experience and healthy baby. If I can offer one small observation, the mirror positioned above the crib, it kinda scares me everytime I see the picture…I’m not sure that’s the best spot for it given your little bean is will be lying directly underneath? Sorry to be a scare monger, but with being a mom to a 2 year old, I just had to share my thoughts…
Cheers, Lisa
YoungHouseLove says
Thanks for the suggestion Lisa! If you head over to the post about the mirror you’ll see that we hung it extremely securely on the wall and actually plan to screw directly through the front of it and into the wall once the beanette is a bit more mobile to make it a permanent wall installation (even thought the crib height will be dropped so she probably won’t be able to reach it anyway). Of course our little one’s safety is our primary concern!
xo,
s
Lauren P. says
Cute!
Vonda says
Love this idea (especially since my sewing machine is trapped under our 40″ flat screen until since we don’t want to mount in since our plan is to move this Fall)!
ALSO, you’ve made the news again. Check out this article on Richmond.com (another local fav or mine).
http://www2.richmond.com/content/2010/mar/23/trend-spotter-local-design-blogs/
YoungHouseLove says
Hey Vonda,
Thanks so much for the link. So exciting! Off to check it out…
xo,
s
heather s. says
Looks great! I’m a fan of bedskirts that are very cleanlined with simple pleats only. Since I live in a small home, I utilize the space under my beds for storage and it’s nice to hide everything with a simple skirt.
Jessica @ How Sweet says
I love this idea because I can’t imagine sewing one darn thing!
Jill Stigs says
LOVE LOVE LOVE it! Turned out fantastic you guys.
I have a bed skirt on my bed only because the legs are ugly! LOL
CasaCullen says
oh my gosh…i don’t know much about cribs and skirts but i DO know the majority of baby stuff is WAY overpriced so bravo, YHL, for a DIY that rocks! i love that the colors aren’t matchy matchy too! she’s gonna be the happiest lil’ peanut in her pretty room ;) cheers!
Dena says
You rock the Heat N’Bond! I did giggle when I saw the picture of you measuring your fabric with a tape measure from your toolkit! :)
Have you made anything for the baby, herself (not her room)?
YoungHouseLove says
Hey Dena,
Not yet… we keep joking that our baby has more clothes and toys than most celebrity babies (our family and friends have been incredibly generous) so we fear that we’ll run out of room if we start making her something. We’ll probably create a book that’s personalized for her to read (about her family and how much we love her) using Flickr though, so stay tuned…
xo,
s
Melissa says
Wow, I’m SO glad you posted this! I’ve been looking for a crib skirt & have had no luck; within the last week I had decided I should make my own… the only problem is that we don’t own a sewing machine & can barely sew a button back on our pants to save our lives, haha. This sure gives me hope – so thank you! I love the fabric you chose too, adorable! Looks great!
Christa M says
Love the fabric, love the simplicity!
I use a bed skirt if I like the one my bedding set comes with. I do currently have one on the bed.
Tricia Rose says
Ladies, you break my heart! I sew all the time, and have had some bad experiences of iron-on tape (besides all the rescue work for friends who tried it). I promise that if you lose your dread of sewing, it becomes positively blissful!
Besides, there is nothing more delightful than making baby clothes.
Keeley says
This room is lovely. You two have great taste and I want to thank you (again) for demonstrating that a girl’s room doesn’t have to be pink. The fact that you did it on a realistic budget is a super bonus!
Ashley @ Mutschler Family, Dallas Edition says
I LOVE this! I am definitely going to try this with my daughter’s crib. I LOVE the fabric too! The Beanette is going to have such and awesome room!
Amanda V says
Sherry I know you swear by this heat bond tape and I’ve still been sewing, sewing and sewing the hems of everything. I’m going to make the switch very soon so I don’t spend such a long time making a simple project a huge headache!
Thanks for the helpful tips!! The nursery is looking so beautiful. The mirror really does make that one wall pop!
Ann says
So cute! You have the perfect baby room, it is so adorable!
Nikki says
It turned out wonderful! Great idea.
chantalle says
ohbrooke.com is about to have a baby in a few weeks, and she made her own bedding as well as accents for the nursery. Head over there and take a look, it is really cute. I also happen to know her personally and she is awesome :)
andrea says
The velcro is an Excellent idea. I made a crib skirt for my son’s room, though I spent hours trying to get a box pleat in the front with a sewing machine. The hem tape is a great idea.
I used a twin sheet set I found on clearance for the fabric. I had enough to make the skirt, a curtain for the closet and the pillow case made a cover for a throw pillow in a different room.
Christin says
Really love it. Fantastic work. I do some sewing, but I’m not pro at it. I love how you can do so much with the adhesive hem! SO going to use that! No crib skirts in the immediate future – but definitely will when we do have kids. As far as beds go, I like hiding the box spring – b/c it’s not that pretty really and takes away from the overall look of the bed. And I like hiding the storage bins under the bed when we have them, but I have yet to find a bed skirt that isn’t too frilly and froophy. I’m not a big ruffles and lace kind of girl, but I don’t want ultra manly either. I have put a bottom sheet over the box spring before that compliments the comforter. It works well to make the box spring look nice, but it doesn’t hide under bed storage. I’d LOVE to get a bed that has real drawers built in underneath!
Calliope says
I always love your ideas ppl! And since I’m totally and completely incapable to even hold a needle I thank you dearly…!
Recently I also copied this idea from a blog (that for the life of me I can’t remember now, sorry): I removed the matress off my bed, laid a crisp white summer piquet blanket over the bed frame, made sure that it touched the floor beautifully (I even made pleats in the corners that I secured with pins), put the mattress back on the bed and…voila! a new, totally free, totally easy, totally changable bed skirt!
And the great thing is that one could do it with even a sheet long and wide enough to cover the entire bed.
And then I copied that idea to my son’s crib…gotta love those money-free, needle-free and time-free decorating projects!
dansem says
Hey there! I have another little tip for the velcro: whether you stitch it or not, make sure the “hookey” side (that’s a technical term, I’m sure) is on the crib so that the softer (fuzzy) side ends up on your fabric. That way when it needs a wash it won’t collect all the bunnies and become gross/non-clingy… Does that make sense? I sure hope it does…
YoungHouseLove says
Great tip! Thanks so much.
xo,
s
Michelle says
Cute! I really like the look you created. This skirt still keeps with the more sleek, modern feeling you have going in the room.
We have a bed skirt on our bed, but only because the bedspread doesn’t reach the rails, so you could see some of the box springs. However, we have the skirt tucked in the rails, so it doesn’t look like a bed skirt per-say.
p.s. I know you guys are America’s Next Top Model fans and I wanted to let you know that I actually know Furonda from Cycle 6. We had some political science classes together at the University of Arkansas and worked on a group project together! I thought you would enjoy that tidbit!
Stephaine @ Geezees says
WOW! What an amazing job!
The nursery looks beautiful!
Heather says
Where on earth did you get that cute ironing board cover?! I haven’t seen that before, it’s so sweet!
Heidi H. says
I LOVE it! The colors, the look & how easy it is!! The fact that it only took about an hour has me in shades of green over here! I made all of the linens & decor for our daughter’s nursery when I was pregnant with her as well. Roman shades, drapes, crib skirts (two, because we has two cribs) crib sheets, changing table pad cover & even a memory board. It took a few weeks & I can still remember the backpain fro
leaning over my sewing machine at eight months pregnant! Your way would have been mucho easier!
Unrelated question: How low do you go? I mean, how low do/did you hang your CB2 pendant light over your dining table & how low is your capiz lamp hung in your bedroom?
Thanks for the tips & for sharing your beautiful nursery!
Heidi
Stephanie lmy says
Your nursery is so cute! I love that you are using blue in a girls nursery! This is exactly what I wanted to do for our little one’s nursery. We kept the gender a suprise and everyone kept ragging on me for using blue, saying it was too boy. But I love what you have done! You have inspired me to modify Jade’s nursery a bit to include these colors!
Steph says
I adore your nursery! It is so cute and so YHL!
I currently have a bedskirt only because my bed is on a metal frame with wheels! Yuk! I’m happy to say that I’m expecting my new black sleigh bed in May and can’t wait to toss out that bedskirt!
Victoria says
Sherry,
Did you recover your ironing board? Can you post a how-to on that? Did you replace the foam that came with the board? What did you use instead, how did you secure it. My iron board foam keeps sliding off to one side and the elastic on the fabric is old and busted.
Thanks!
Victoria
{The Classy Woman} says
It turned out great! I’ve seen your drapery fabric before in your previous posts but I have to tell you it is so pretty! I went on a hunt for fabric last week and the stores here just don’t offer a ton of selection. I loved seeing the photo of you surrounded by fabric bolts, I’m dreaming of finding a local store like that! There are other stores here that our great for my design clients but I like the discount bolt sections that can’t be found in those stores.
BTW-If you are interested, I’ve got a spring giveaway happening right now and I’m giving away a jar of Clinique facial cream!
http://theclassywoman.blogspot.com/2010/03/spring-giveaway.html
YoungHouseLove says
Victoria- Nope, we just put on a new cover that a sweet friend of ours sent our way. Sorry we don’t have a tutorial on hand about that, but rest assured if we ever take that sort of project on we’d definitely post all about it!
Heidi H- The standard height for hanging pendant lamps over dining tables is 32-34″ from the top of the table to the bottom of the pendant (so that’s what we went with). And as for our capiz chandy in the bedroom, we hung that about eight inches from the ceiling, so it has a bit of breathing room but not too much. Hope it helps!
Heather- We wish we knew the source of that adorable ironing board cover but it was sent over by a friend of ours so we don’t know where she picked it up. Maybe try etsy or ebay?
Michelle- That’s too funny. We always forget those models are real people.
xo,
s
Rose says
OMG you guys!!! That is sooo freaking adorable. As always you guys have outdone yourselves :) I love love love the colors of your nursery. As someone who doesn’t own a sewing machine I’ll definitely be looking into getting that tape!
Katie says
This is great! I’m definitely impressed with how easy it is to remove and it looks like there’s no question about the velcro being washable. But I’m wondering how well those unserged edges (the turned up hems) are going to fair in the washmachine. My guess is not too well.
A simple zig zag stitch to finish the edges would work for those of us who don’t own a serger. The no-sewing-machine way would probably be to turn the hems twice so the unfinished edge is completely inside and therefore won’t fray in the wash machine.
Or maybe I’m way off base and it’s a non-issue to start with.
YoungHouseLove says
Katie- We’ve actually hemmed a number of curtains this way (over three years ago in some cases) and they hold up really well after washings (no problems with fraying- the fused bond behind the hem keeps the fabric from fraying past that point so the hem is always protected if that makes sense). Hope it helps! And thanks for tossing out that serger tip.
Marcie- Our crib measured 11″ between the drawer and the mattress and 28″ wide on the sides (and 52″ across the front). Just add three inches to those measurements and you should be all set. Although we would strongly urge you to set up your crib and measure it just to sure it’s not an inch or two off (sometimes different distributors or manufacturers can make the same crib and things will be slightly different in different areas of the country, depending which warehouse they come from). Hope it helps!
Caitlin- Nope, no bumper for us. We know it’s a personal decision so that’s just what works best for me and John.
xo,
s
Heather says
It looks great, guys! And I love that you did it all without sewing a stitch…totally doable!
Marcie says
Hey Sherry,
What were your actual measurements for the panels? We purchased the same crib and I’m excited to try out this tutorial. I didn’t know if the 15″ x 30″ side panel was just an example or what you really used. Did you get about 54″ in length for the front panel?
Thanks again, so excited to try this out!
–Marcie
Caitlin in MD says
I apologize if you’ve addressed this question before, but are you going to have a bumper in your crib?
L says
Hi guys, the bedskirt looks great! I make a lot of curtains, and I think I might try the hem tape approach the next time I have a non-sheer fabric. Those are some crisp hems! If you ever do end up needing to sew something, try adjusting the tension of the sewing machine–that can often help with the bunching you mention. I usually do some practice stiches on scrap fabric to figure out what tension works best for that fabric and thread.
Rebecca P says
What a great project. Your baby is going to be so lucky to have such creative hands-on parents!
Caitlin in MD says
Thanks for your reply – I was just curious. I am due in August and am getting our nursery together now – was leaning towards NO bumper, as well. There are a lot of decisions to make, and it can be overwhelming :)
YoungHouseLove says
Oh yeah, we hear you on the tons of decisions thing! Good luck with your wee one on the way!
xo,
s
Krista H says
You need a walking foot for your sewing machine to stop the puckering fabric. I always have problems with my fabric sliding and stretching as I sew and then things don’t come out nice and clean like I like them. But, if you use a walking foot, it keeps the fabric from shifting like that and stops all of the puckering. It’s definitely awesome! Of course, I would opt for the no sew option whenever possible:)
Meredith says
Wow, great idea!!! Looks really cute!!!
Jennifer says
The nursery is coming along so well. The skirt fabric is very adorable.
We are past the crib stage in our home, and we are thinking of making a headboard (like you did) for the guest bedroom. I am not a fan of bedskirts on adult beds – too dusty, and too tempting to hide things under the bed that I should just throw out. Anyway, we currently have a metal bed with a head and footboard and have just put a fitted sheet (matches the other sheets) on the box spring to hide its ugliness.
Question: In your bedroom w/ the homemade headboard, I noticed that you used a bedskirt. Do you think I could have a similar headboard, but merely wrap the box spring in a fitted sheet, or do you thing the bedshirt is essential to the look?
YoungHouseLove says
Hey Jennifer,
Oh definitely, the bed skirt is totally not essential to the headboard look. We just used it because we inherited it from John’s sister and we wanted to hide lots of under bed storage!
xo,
s
Kristiina says
What I love the most is how you’ve incorporated so many patterns and shades in such a clean, crisp way…I’m really trying to break out of my solid color box and you guys inspire me at every turn ;)
As for bedskirts, it depends on the bed. We have one now because without it, the bed would look ‘undone’.
Thanks :) -k
Katie says
Very nice! And I like that we got a sneak peak of you artwork in the mirror!
Carol N. says
The skirt looks super cute on here! I probably would sew it, just because I love to sew, but the heat n bond is a terrific product. For adult beds, I actually prefer to NOT have a bed skirt. It keeps me from stashing things under the bed (and forgetting about them) and it is easier for me to clean and vacuum too. Plus, we love having the wooden side rails on our beds show.
Tracey Dunham says
This is so clever! Love reading your blog- you give me such inspiration for creating a stylish yet affordable home. All the best for you and your soon to be little one! :)
-Tracey
Mandi says
Good job, love the fabric choice! There’s nothing wrong with doing the “sewing” this way at all, and I think it makes fabric-deco projects a lot more accessible to everyone. You guys are so uber-competent with all things DIY, I highly encourage you to give a sewing machine (lessons, maybe) a try too at some point – I think it’ll open a world of possibilities to you. Most home dec projects only involve straight line sewing. It’s definitely one of the easiest skills I have acquired, compared to other home-care skills. (Maybe it’s just a disklike for you, and that’s cool too.)
In terms of skirts in general, I’m a fan of anything that declutters a view, especially if it facilitates extra storage. I much prefer the skirt-and-comforter look in general, compared to a bedspread – unless the whole look is supposed to be 30’s/40’s vintage.