When we last left off in our deck saga, our hero (that’s me in this case) was avoiding battling the heat as he tediously valiantly drilled in screws across the middle of our deck. Since that chapter of this drawn out harrowing tale, John The Weary Daring continued this mind-numbing history-making task.
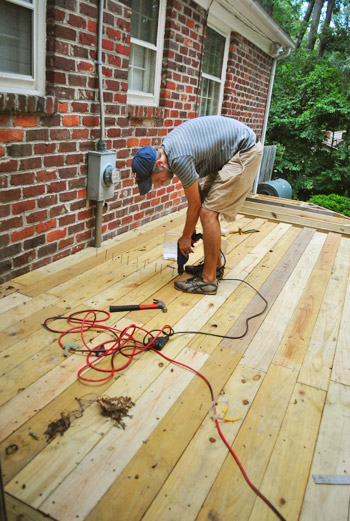
Since that’s about as exciting as I can fake my latest day of deck work, I’m just going to skip to this part where you can see the middle of the deck all laid down and screwed into place. Let’s just say I was glad the deck was finally more solid surface than it was holes for me to fall into.
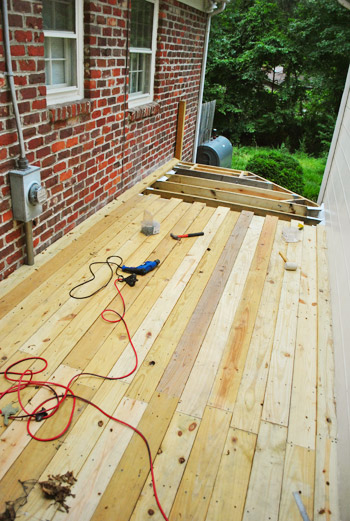
I could just fast-forward through this next part since it was, in essence, just more board screwing. Er, ahem – board attaching. But of course, since I was at the end of the deck there was some special planning / measuring / calculating I had to do. So let’s dive into those details for a second…
Luckily I didn’t have to worry about cutting the boards right away. I learned from several tutorials that when you get to an open edge – especially when you’re doing the “picture frame” border, you’ll want to cut all of your boards with a circular saw once they’ve been placed. That way you get a cleaner and more even edge than if you were trying to measure and cut each board independently and then placing them all.
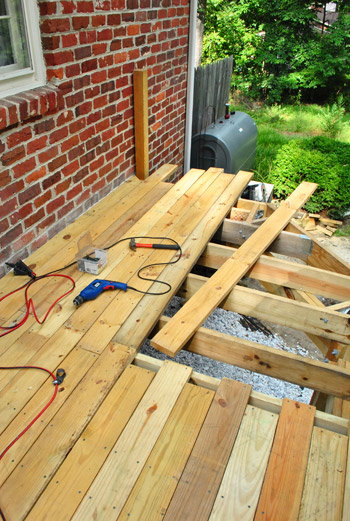
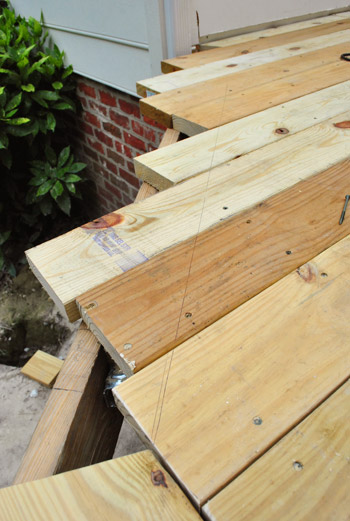
So once my jagged little edge was all screwed into place, I brought out my miter-cut frame piece and used it to mark where the edge of my boards needed to be sliced with a nice clear pen line. Like so:

Before cutting, I was sure to set the depth of my circular saw to 1 and 3/4″ so that I’d only cut through my deck boards and not into the girders below.

Then I revved up the saw, started cutting – momentarily stopped to fake a photo op (I’m no good at keeping a straight cut line with my left hand, but my right was occupied pressing the shutter – another task my left aint’ so great at) – and then finished down the line, stopping before I got to my last board (which is part of the “picture frame” design, so it was already pre-mitered before I screwed it in).

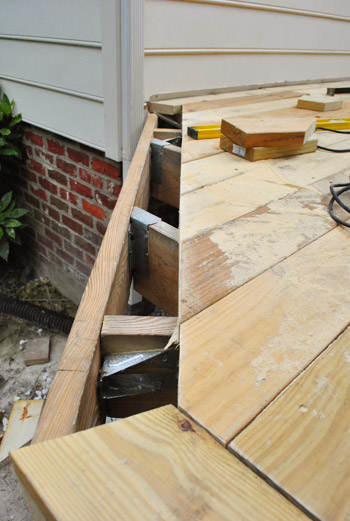
Here’s my end piece dropped into place (after sanding my cut edges to smooth them out). Not too shabby, right?

Cutting that half of the end was pretty easy, actually. It was cutting the next part that took me some time because it was on an angle. My geometry is pretty rusty so it took me a few test attempts on scrap wood to figure out what angle the two picture frame boards should meet at.

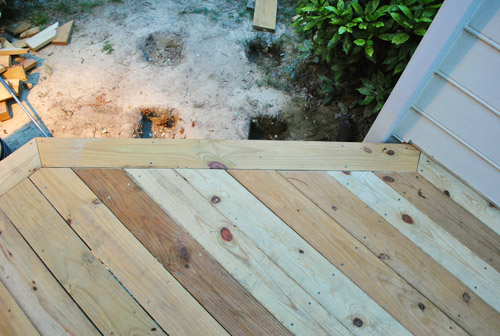
But once I got it right, I repeated my process of marking my cut with a nice obvious pen line, and then broke out the saw again.
Here’s the clean, cut edge looking all pretty… and sawdusty too, I guess.
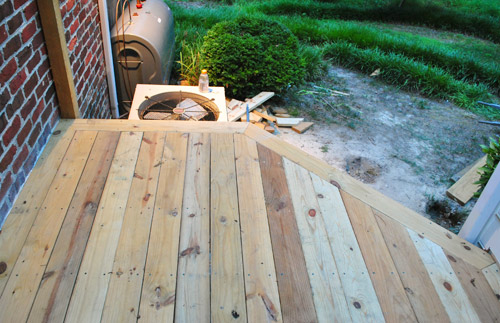
Here’s the final frame once I got everything screwed into place. I have to say I’m pretty darn proud of myself for figuring this out and not ruining any boards in the process (minus the test scrap pieces that volunteered as tribute).
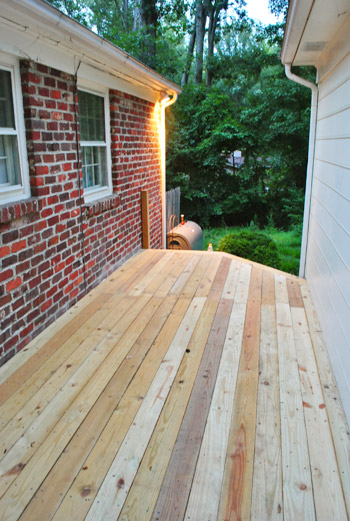
And here’s that end all finished up. Looking at this makes us REALLY glad we opted to do the picture frame. Just that little touch seems to make it look a lot more “pro.”
So with that, my friends, all of the deck boards are officially down. Can I get a woo to the friggin hoo? Because there were moments in this process where I never thought I’d get to something that actually looked and felt like a deck. In this picture you can also see that we ended up with two zippered seam details, and we’ll be centering the dining table between them like Sherry did in the rendering here. We’ll share more close-up seam photos soon (we think it’ll really pop when we seal the boards and furnish things so that they’re sort of a built-in detail around the table once everything’s in place).
The only bummer is that now I have to deal with the things that I’ve been back-burnering in my brain this whole time: the railing and the stairs. Something tells me they’re not only going to require a lot of math, but that they’re also elements of the deck that the inspectors will be especially mindful of. Could this spell disaster for our hero? To be continued…
Anyone else perform some DIY project heroics lately? Even if they’re just heroic in your own mind?
Psst- Wanna catch up on all of the deck action? Here’s where we shared our vision for the space, then we removed the plantings and the old balcony, followed by selecting our materials and documenting our first day of building progress. Then we dug our post holes, learned that we failed our first inspection, revised our plan and dug more holes (which got approved) and proceeded to set posts. Next it was time to install our joists, do a bunch of last minute prep for deck boards, get started laying decking boards, whip up a mood board with our design plan and continue laying deck boards. Whew, all caught up.

Stephanie says
That deck is looking AWESOME.
If it were me, and I just completed all that work, I’d be rolling around and patting the deck in joy.
But I’m kinda weird so, you know, to each their own. :)
YoungHouseLove says
Oh yes, there was rolling. And hugging. And jumping. And jump-hugging.
xo,
s
Ali says
Absolutely love it! It makes me wish we had a little area like this to build one for our house. We’re still working on a paver patio. And by working on, I mean we haven’t quite gotten around to measuring yet ;)
Shannah @ Just Us Four says
Looks great! The only issues we really had with railings and stairs on our deck was the hand rail on the way down the stairs. We figured, since the railing was hand height, it qualified as a railing and met code. It is probably county specific but, in Loudoun County, it doesn’t. We had to go back and add a secondary hand rail before they would clear us. Good luck!
We’re still doing basement duty right now. Drywall went up over the weekend so we are feeling quite accomplished at this point!
YoungHouseLove says
Thanks Shannah! I’m planning to place my posts so it meets the required 36″ height. Here’s hoping!
-John
Amy says
It looks awesome! The extra details like the picture frame edge and zipper seams really finish it off well!
Sarah@SBrandesDesigns says
Wow its looks fantastic! I’m interested to see the railings. Are you still thinking about making a built in planter?
YoungHouseLove says
We’re actually over that idea since we think potted plants are more flexible (can be moved, etc) in case we end up wanting to use that corner for a Clara activity table, etc.
xo,
s
Megan says
Looks great! I really like the frame detail.
We are currently working on a “play yard” for my daughter. We already built her a swing set and we’re attaching that to a giant 7×7′ structure to house her brand new spiral slide that my parents bought her as a birthday gift. Here it is in progress http://thebrickbungalow.blogspot.com/2012/07/lilys-play-yard.html I need to post an update because my dad and husband started the stairs. It’s been tricky because the back of the structure is a little over 6 feet in the air. My husband poured a concrete pad for the stairs to sit on but then there’s the math of angles and how big the treads will be and all that jazz. Let’s just say that it took a whole day to do the math and get things ready for the treads to be put in place because my dad didn’t bring some of the correct tools and we didn’t have them. Long story short, we got about 2 treads in place before they had to leave. But it’s almost functional and I made it down the slide after tighting what felt like 1000 bolts (to test we did it correctly before sending a 3 year old down!). Good luck with the rest of your deck, that’s our next project for the fall!!
YoungHouseLove says
So cool!
xo,
s
Caitlin @ Desert Domicile says
It looks great! I love the zipper seam and the picture frame border looks amazing! I finally finished making over the $15 campaign dresser I got at Goodwill. The total makeover came in under $10 and I’m still shocked and how much better paint can make something look haha
YoungHouseLove says
That sounds awesome Caitlin!
xo
s
Karen J says
Awesome! The progress is slow and painful but the payoff will be huge. Saw these cool prints mentioned in the Dallas Morning News recently; thought you two might enjoy them:
Article: http://www.dallasnews.com/lifestyles/home-and-gardening/headlines/20120810-tools-capture-this-photographer-s-imagination.ece
Etsy Shop: http://www.etsy.com/shop/ourfatherstools
YoungHouseLove says
So cool! Love them!
xo,
s
Tamsen says
WOOOHOOOOO!!! Looks Great!!
Brandi says
la-la-love!
Jamie says
Yippee! It looks so good! Hopefully you will get it done by the time the weathers starts to cool and you can relax and enjoy it..
Kelly says
You really are a hero. (Almost) job well done! It looks great. You’re in the home stretch now.
(Loved the Hunger Games reference too…)
Ashley @ sunnysideshlee.com says
Looks fantastic!!
Kelly says
WOO HOO! That’s for you, John, and all the men in the world who persevere to finish long, tedious tasks.
And the weather has just turned a bit cooler and less humid…so you can enjoy the deck!
Eve says
It looks fantastic! I love the picture frame detail, too – something to keep in mind for a future deck project, if we ever re-do ours.
Tiana says
Wow, you guys did a great job! Can’t wait to see the finished product.
Betsy says
…and I feel fine
jill says
Woo to the friggin’ hoo is right! This is a monumental job, and you’re doing beautiful work! I look forward to the finale!
Amy says
It looks so great! I loved the Hunger Games reference!! Can’t wait to see what it all looks like once it’s sealed and decorated!
Jen@The Decor Scene says
The deck looks awesome guys!!! Great job. Good luck with finishing the railing and stairs. You can do it John!!! Can’t wait to see it all styled. :)
Jessie says
man, i cannot say it enough…. you guys totally rock!
Kudos for taking on such a big (and daunting) project.
my hat’s off!
YoungHouseLove says
Aw thanks Jessie!
xo,
s
chrissy says
WOW — this looks fab! I’ve been following your deck saga and left for vacation, and just checked in online wondering if perhaps you’d be closer to finished. Et voila! Keep up the good work, guys :)
YoungHouseLove says
Aw thanks Chrissy! It has been a long time coming but I guess the big stuff always ends up taking us some time. I think we worked on the kitchen for four months, so the deck isn’t so bad by comparison. Haha.
xo,
s
Elizabeth says
Holy crap, it looks awesome! In these photos, you can see the spaces between the boards better. I can’t wait to see it all finished up :)
Anna in Ohio says
“…minus the test scrap pieces that volunteered as tribute.”
Thanks for making me spit Diet Coke on my work keyboard, guys. Good going…
:-)
Betty says
Looks like you will be using that by Labor Day!
Katherine says
It all makes me want to sign up for a carpentry class with NOAH {a little arc humour}. For many reasons I’m sure you were praying for winter.
Looks good…… almost ready to sit on with a cold something, something in hand.
susan says
The end of the deck as you know it!
BUT-do you feel fine? LOL
First deck I ever helped out with was 20’x30′ UGH.
My then two-year-old twins watched through the sliding door as my dad and dad-in-law taught us what they knew about building-which was probably more than I’ll ever know.
That was in 1990. I’ve done two more decks since then, and probably one more coming next year, but reading about yours has brought back some fun memories ( especially since both of those great men are now gone)…thanks for that!
PS-what does Burger think of the deck? I think he needs this: http://www.walmart.com/ip/Kittywalk-Systems-Ultra-Breezy-Bed-in-Royale-Print-Dogs/13180440
YoungHouseLove says
Bwaahahhahahahhahahahha, Burger totally needs that! Hilarious! I was thinking he has definitely earned a little floor cushion to plop down on – he watches his daddy and
cheersbarks him on!xo,
s
Paola says
Congratulations!!!
Ryan says
The deck is looking great you guys! Keep it up : )
Julie says
Yay! That looks so great. Is John the builder for hire…. in Chicago??? :) While my husband is the smartest man I know – a builder he is not. I can say that since he will not see this! Shhhhhhh.
Congrats again! Beautiful work!
YoungHouseLove says
Haha- sure, I’ll send him right over!
xo,
s
Anne says
so exciting!!! congratulations, it looks amazing!
Michele @ Kitchens Ireland says
Looks great and so clean looking! I think I seen from the comments that it is pressure treated but will you add a color to this?
YoungHouseLove says
We’re still debating if/what stain color we’ll use and we’ll definitely seal it (which will give it a rich color). Will definitely keep you posted!
xo,
s
karen says
i get tired just looking at all the pics. kudos to you john!!
Erin says
The deck looks amazing! The stairs and railing will come together, I’m sure the hero will prevail.
Thank you for the perfectly timed Hunger Games reference.
May the odds be ever in your favor!
Stephanie leach says
Watching a lot of Sesame Street lately?? Ha!
Anika says
WOW – it’s truly looking like a deck now! Well done John! We’re all so impressed with all your work and time spent on the project.
I noticed earlier in the comments you guys talked about eventually staining the wood; I’m so excited to see that, I think that would really help it look finished and professional. Can’t wait to see the whole space finished and styled!!!
Honeybee Mama says
So proud! I wish we had a lovely deck in our backyard around our hot tub! And covered. We desperately need shade back there. One day…one day I will have a hero like you!
Kristin H. says
I am officially beyond amazed you guys have now built a patio AND a deck!!!! Any comparisons between the two? I’m guessing the deck was more challenging/difficult but maybe that’s just because it’s fresher on my brain. Looks totally incredible guys! I’m in awe :)
YoungHouseLove says
I think the deck was waaay more math/planning/permit-getting and the patio was actually more grunt work (we hauled over a ton of stone from the carport to the patio to piece it together). Both have a similar theme, which was “this takes so long!” – haha! But I think it’s the “foundation” beginning stuff that’s really important for both of them to come out ok (leveling things, setting posts, etc) so taking the time to do it right definitely makes it worth it. Hope it helps!
xo,
s
DJ Sherry says
I’m really proud of you John! This was a big time carpenter project and it turned out very professional and your craftmanship is spot on. The physically hard work and heat was a lot to deal with…pat yourself on the back. Great job:)
Rebecca says
“I have to say I’m pretty darn proud of myself for figuring this out and not ruining any boards in the process (minus the test scrap pieces that volunteered as tribute).”
My favorite sentence from your blog in a while. HAHA! Love it. :)
Debbie C says
Awesome job John the Daring! It looks so good, I love the zippered detail and frame.
Stephanie says
It looks so great! I love the seam and the edging. Awesome job :) Can’t wait to see it all styled up!
McKenzie says
ACK!! we have semi recently replaced all the doors and casings in our house. We opted to get a slightly fancier trim because it only had flat cuts and we thought it would be easier than figuring out the angles. So…much…caulking… might….never….finish! Its one of those things I have to walk away from sometimes. But darn it, it looks so pretty :)
YoungHouseLove says
Aw man, I bet it looks awesome!! Congrats on all that hard work.
xo,
s
Jenna at Homeslice says
The edge looks awesome. Great job!
Allison W. says
…..and it looks fine!
Chrissie says
It’s the end of the deck as we know it, and you feel… tired, probably. But the result is amazing! It looks really professional, like it should be wearing a tie or something. Not that a tie makes you professional… maybe it could carry a clipboard?
I don’t know where you get your motivation from – if I’d done that I probably would just collapse for a few days before I even thought about railings and stairs.
Sarah says
That looks sooooo good!!! You definitely deserve a relaxing meal on that deck now.
Loved the Hunger Games reference!
Suzanne L says
To Our One And Only, “John The (Darling)Daring”
“woo to the friggin hoo”
Smiles,
Suzanne in NW IL
Melissa says
Hehe, the boards that volunteered to be tribute. Also I cannot wait to see the finished deck! I’m sure you can’t either. It’s looking great!
Caren says
The deck looks amazing! I can’t wait to see the end result!
Lately all I’ve had is failures. Even painting trim failed miserably. But a few months ago I refinished the hardwood floors in one room. I just hired a guy to finish the rest of the house and he was thoroughly impressed with the job I did, so at least that’s one win!
YoungHouseLove says
Oh Caren, I’m so sorry! We had so many failures back in the day- still do actually! Haha. And it’s totally a win if the guy you hired was impressed. That’s awesome!
xo,
s