When we last left off in our deck saga, our hero (that’s me in this case) was avoiding battling the heat as he tediously valiantly drilled in screws across the middle of our deck. Since that chapter of this drawn out harrowing tale, John The Weary Daring continued this mind-numbing history-making task.
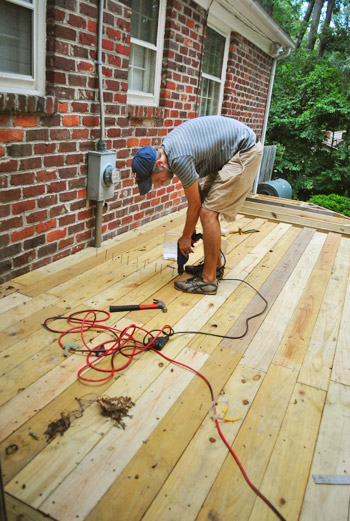
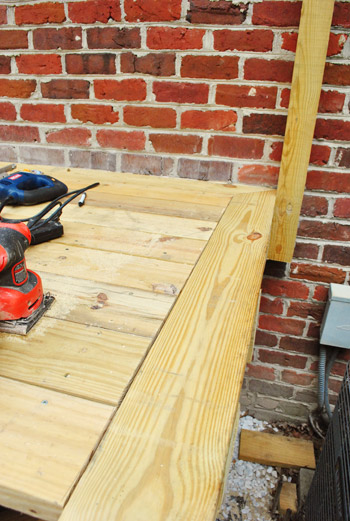
Since that’s about as exciting as I can fake my latest day of deck work, I’m just going to skip to this part where you can see the middle of the deck all laid down and screwed into place. Let’s just say I was glad the deck was finally more solid surface than it was holes for me to fall into.
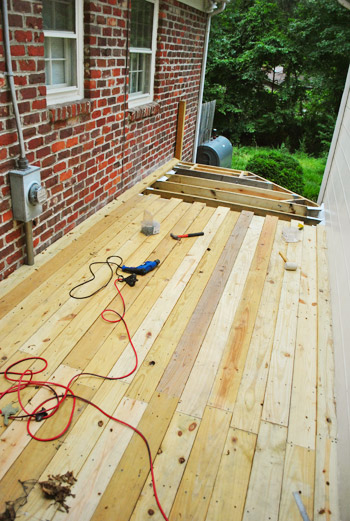
I could just fast-forward through this next part since it was, in essence, just more board screwing. Er, ahem – board attaching. But of course, since I was at the end of the deck there was some special planning / measuring / calculating I had to do. So let’s dive into those details for a second…
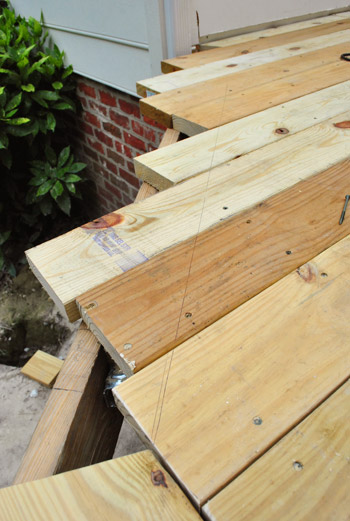
Luckily I didn’t have to worry about cutting the boards right away. I learned from several tutorials that when you get to an open edge – especially when you’re doing the “picture frame” border, you’ll want to cut all of your boards with a circular saw once they’ve been placed. That way you get a cleaner and more even edge than if you were trying to measure and cut each board independently and then placing them all.
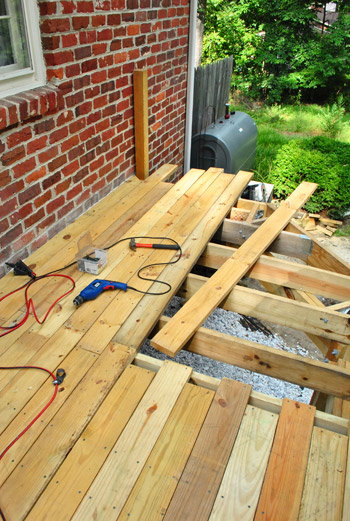
So once my jagged little edge was all screwed into place, I brought out my miter-cut frame piece and used it to mark where the edge of my boards needed to be sliced with a nice clear pen line. Like so:

Before cutting, I was sure to set the depth of my circular saw to 1 and 3/4″ so that I’d only cut through my deck boards and not into the girders below.

Then I revved up the saw, started cutting – momentarily stopped to fake a photo op (I’m no good at keeping a straight cut line with my left hand, but my right was occupied pressing the shutter – another task my left aint’ so great at) – and then finished down the line, stopping before I got to my last board (which is part of the “picture frame” design, so it was already pre-mitered before I screwed it in).

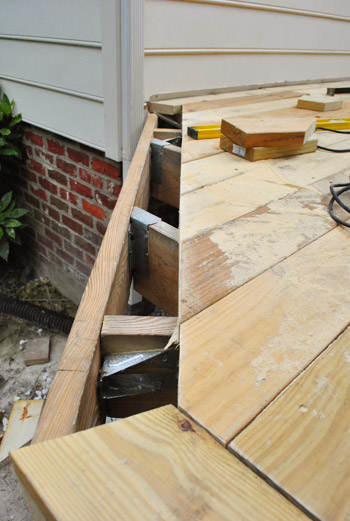
Here’s my end piece dropped into place (after sanding my cut edges to smooth them out). Not too shabby, right?
Cutting that half of the end was pretty easy, actually. It was cutting the next part that took me some time because it was on an angle. My geometry is pretty rusty so it took me a few test attempts on scrap wood to figure out what angle the two picture frame boards should meet at.

But once I got it right, I repeated my process of marking my cut with a nice obvious pen line, and then broke out the saw again.
Here’s the clean, cut edge looking all pretty… and sawdusty too, I guess.
Here’s the final frame once I got everything screwed into place. I have to say I’m pretty darn proud of myself for figuring this out and not ruining any boards in the process (minus the test scrap pieces that volunteered as tribute).
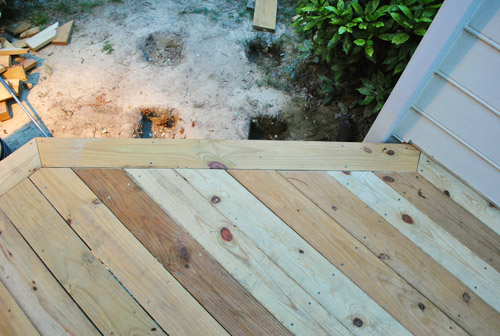
And here’s that end all finished up. Looking at this makes us REALLY glad we opted to do the picture frame. Just that little touch seems to make it look a lot more “pro.”
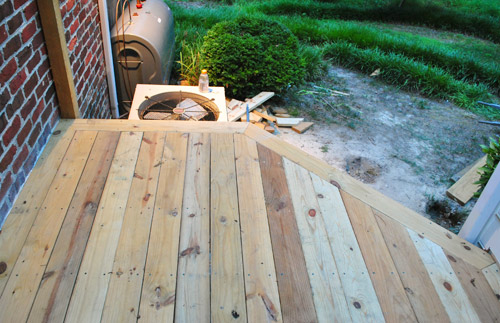
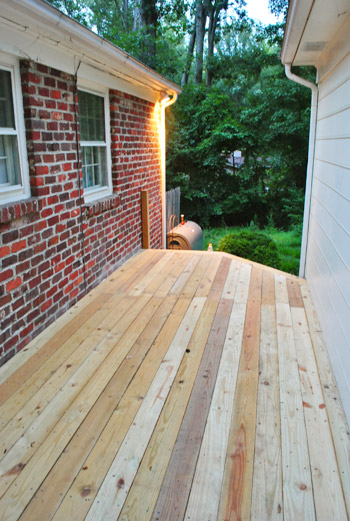
So with that, my friends, all of the deck boards are officially down. Can I get a woo to the friggin hoo? Because there were moments in this process where I never thought I’d get to something that actually looked and felt like a deck. In this picture you can also see that we ended up with two zippered seam details, and we’ll be centering the dining table between them like Sherry did in the rendering here. We’ll share more close-up seam photos soon (we think it’ll really pop when we seal the boards and furnish things so that they’re sort of a built-in detail around the table once everything’s in place).
The only bummer is that now I have to deal with the things that I’ve been back-burnering in my brain this whole time: the railing and the stairs. Something tells me they’re not only going to require a lot of math, but that they’re also elements of the deck that the inspectors will be especially mindful of. Could this spell disaster for our hero? To be continued…
Anyone else perform some DIY project heroics lately? Even if they’re just heroic in your own mind?
Psst- Wanna catch up on all of the deck action? Here’s where we shared our vision for the space, then we removed the plantings and the old balcony, followed by selecting our materials and documenting our first day of building progress. Then we dug our post holes, learned that we failed our first inspection, revised our plan and dug more holes (which got approved) and proceeded to set posts. Next it was time to install our joists, do a bunch of last minute prep for deck boards, get started laying decking boards, whip up a mood board with our design plan and continue laying deck boards. Whew, all caught up.

Amber says
It looks really great! Can’t wait to see it stained. :)
Erin @ His & Hers says
Impressive! It makes me tired just thinking about it. You guys are superheroes.
Kim says
What a fantastic job! So impressed.
how2home says
*gasp* it’s almost done! it’s looking so good. Love the way you laid down the wood pattern, simple and symmetrical. Great stuff guys :) Can’t wait to see how Sherry will be decorating this spot!
Carol Farrish says
I am utterly amazed at how great that picture frame work at the end looks. Great job.
Karen F says
the deck looks amazing! nice work, guys. you’re so inspiring!
Ellen says
We are DIY-ing our den remodel. It feels like it’s taking forever.
http://www.kellyandellen.org/house/2012/08/our-project-creep-den-remodel/
YoungHouseLove says
Woah! Nice hole in the wall! Good luck with everything Ellen!
xo,
s
Krystle @ Color Transformed Family says
It looks great. I love the attention to detail with the zippered seam and border. The stairs and railing would intimidate me too though. Geometry… math in general was never my strong point.
eileen marie says
I’m not one to point out typos because well, who cares? But it made me lol when you said, “I must saW…” instead of I must saY. Looks like the deck has saws on your mind! :). The extra work for the zipper seams & especially the picture frame? Totally worth it! The deck looks really polished. Can’t wait to see the finished project!
YoungHouseLove says
Totally have saws on the mind! Thanks for the tip Eileen Marie.
-John
Sheila says
“I have to SAW I’m pretty darn proud of myself for figuring this out and not ruining any boards in the process”
Thanks for the LOL to go with my morning coffee!!! And I SAW you’re doing a great job keeping things moving forward on this project. Good luck with the stairs and railings!
YoungHouseLove says
Haha thanks Sheila! Must have sawing on the brain!
-John
Suni says
Looks SUPER FANTASTIC!! I love the zipper seams, and your border around the edges… it’s like eye candy!
Our heroic, if you can call it that, project this weekend was finally putting the finishing touches of trim around our front door we installed 4 1/2 years ago.. yes.. I said 4 1/2 years.. pathetic I know, but it’s been scratched off the to do list!! You two are beyond inspriring, making me want to tackle my to do list more reguarly! Thanks. :)
Linda says
Umm, just this weekend I got brave enough to test the bathroom wallpaper to see how it would come off – after 7 whole years….after all that fear that it would be the totally untractable wallpaper that drives people to drink, it appears to be the dry strippable type and so far is coming right off. So 4 1/2 years is nothing, nothing!!! I do have to thank John and Sherry for giving me the nerve to at least start!
YoungHouseLove says
So glad Linda! That’s awesome!
xo,
s
AndreaReneeJ says
My husband and I are kettle corn vendors, so we worked this weekend. However, the fair was “slow” enough that we could each go to the mobile blood donation truck that was parked nearby and donate blood! We felt pretty heroic doing that (my hubby went first, and when he came back he held his fingers in a wide circle and said, “the needle they used was THIS BIG.”), and we were glad to be productive during a slow day of business.
Your deck looks fantastic! I think the zipper detailing is the icing on the cake. You’ve been so meticulous throughout this deck-building process that I know the stairs and railing will go just fine. :)
Alison says
Looking good! I would never have the patience to take on that big of a project.
Melanie says
Teehee. You said “saw” instead of “say:”
“I have to saw I’m pretty darn proud of myself for figuring this out and not ruining any boards in the process”
It works in a punny way. ;p
The deck looks great!
YoungHouseLove says
Hahaha, such a funny subconscious mistake!
xo,
s
Sara says
I just bought a desk off of Craigslist and I’m in the process of stripping paint for the first time! It is definitely not easy work and I was completely unprepared for how much elbow grease goes into it! I’m halfway through tackling though and excited to finish it up!
julie s says
i am dying to see some globe string lights hung between those roof lines…..just a suggestion ;-)
can’t wait to see the finishing touches you guys come up with!
YoungHouseLove says
Oh yes, we have string lights on the agenda (check out the deck mood board I made a few weeks back). Can’t wait!
xo,
s
Erin @ WriteTasty says
Looks amazing. I want to see it all done up with some lights swagged overhead for ambiance! You’re so close! :)
Anne @ itsabaltimorelife says
Wow looks really good…I especially like the frame detail! So worth the extra work :)
Lindsay says
It looks SO GOOD!! You should be really proud of it!
The Mrs @ Success Along the Weigh says
Lookin’ good!
Ann says
John, this looks great. It looks very professionally done and I really like the picture frame design. You did your homework on this one and learned it!
Ann
Shabby French Country Cottage Basement
Amy @ a new old house says
The deck looks AWESOME! I love the framing you did to finish off the edges. Great job!
Heidi P. says
WOOOOW! It’s beautiful!
Jill says
It looks wonderful! You must be so happy to have that much done. Can’t wait to see the final shot once it’s got stairs and a rail and whatnot. Awesome job!
We have been busy splitting our existing bedroom into a bedroom and a nursery, and relocating our closets into other spaces in the house. Is it wrong that I want all the construction stuff out of the way so I can start making things look pretty?
YoungHouseLove says
Haha, totally normal DIY emotion! I have that too!
xo,
s
Liz says
Wow, Amazing job!!!
Love the way you framed it!
You guys are so inspiring!
Dianne says
I don’t know how your are planning to finish the deck but I can tell you we loved the product that we used on our porch ceilings.It was so easy to use and turned out great….Your deck is turning out great…soon you will have many happy memories on it.
YoungHouseLove says
Ooh we’d love some info on that!
xo,
s
Catherine says
Woo to the friggin hoo, John! It looks great!
Megan says
I think the hero has does a fantastic job and will enjoy that deck for many seasons to come!
Katie Richards says
I love the deckboards! It makes me long for the days when we’ll be building a porch off the front of our little ranch.
I, very heroically, installed all our baseboards and base shoe through the kitche/eating area/hallway/entry with the hubby this weekend and spent hours cleaning up and prepping for caulk throughout this week. At 8 months pregnant, that’s a lot of crouching and getting up all at once!
YoungHouseLove says
Whew- that sounds like a ton of work! Congrats!
xo,
s
Kati H says
Eh, just leave the stairs off. Then not only will you have made a deck, but an obstacle course/in home gym.
YoungHouseLove says
Haha- maybe we should just add a fire pole to slide down.
xo,
s
Becca says
It looks fantastic!!! Great job! I love the zipper seam and the frame around the edge. It is amazing how details like that can have such an impact.
Danielle says
Fantastic! But is it wrong that I was more excited about your Hunger Games shout out? I just finished reading the books (a little behind on the eight ball) but you snuck the reference in well…..and the deck looks awesome to boot!
Lynn @ Our Useful Hands says
Whew…you finally did it and are rounding the bend. Hopefully the weather will be more forgiving as you start in on the stairs. The framing looks great. And you did all this with your own 4 hands guys! This weekend I did a very “Dude Get on That Already” DIY project of organizing hair accessories for our beanette. Wanna see?
http://ourusefulhands.wordpress.com/2012/08/13/this-is-my-brain/
My best, Lynn
YoungHouseLove says
Cute!!
xo,
s
Lauren B says
Great job John! Looks fantastic. Just wondering, have you guys ever considered turning the window in the black and white hall bath into a french door leading out to the deck? We had a door going from the back yard into our bathroom as kids and it was very helpful. Also, there was easy bathroom access when there was a party in the backyard. Just a thought. Again, beautiful work.
Lauren B.
YoungHouseLove says
We actually couldn’t turn that window into a door since the door would basically open to where the toilet is, but we’d love to turn the master bedroom window into a french door someday (sneaking out there from our bedroom for some morning reading before the bean wakes up could be fun).
xo,
s
Janice says
Can I get a woo to the friggin hoo?
heck yea! WOOOOOO TO THE FRIGGIN HOOOOOOOOO! woo-hoo-woo-hoo
first, this is beautiful! REALLY.
And second – you all are making me believe I can DO this stuff!! I have now taken down two ceiling lights – one the chandy in my dining room which I spray painted and put back. And then this weekend I replaced the ceiling light in my kitchen, had to rewire it three times (because I kept getting pieces out of sequence, dang screw/locks – cords have to be threaded THROUGH all that stuff) and SOON, I am going to move the hole for that light, like you guys did in your bathroom, so it is more central in the ceiling! Wooo to the friggin hoo yea! YAY ME!
Thanks for being an inspiration and for doing it all step by step so I can follow along.
YoungHouseLove says
Yay Janice! You go girl!
xo,
s
Jennifer B. says
I giggled out loud at the Hunger Games reference. Nice one! :)
Kate says
Best. first paragragh. ever.
Kate says
*paragraph. Duh.
Kristy says
Woo to the friggin hoo! Great job, as usual!
Ellen says
Super, amazing job! Seriously impressed!
skye @ neathering our fest says
It’s lookin awesome guys!!
And John, if it makes you feel any better, it took us nearly a year and a half to build our deck, start to finish. It’s about 37 feet long and 10 feet wide and wraps around the side and back of our house. It was a MONSTER project and still needs a few finishing touches here and there but for the most part, it was worth ever ounce of sweat, blood and curse words when we sit out there and enjoy it!! (you can see the reveal here: http://www.neatheringourfest.com/2012/05/my-30th-birthday-huge-project-reveal_11.html)
Have fun decorating and enjoying your new space outdoors!!
YoungHouseLove says
Woah- what a project! It looks awesome!
xo,
s
Stefanie D. says
john – we also just finished deck…many conflicting opinions of how long to wait for pre-treated wood to cure before painting or staining? how long are you going to wait?
YoungHouseLove says
In our area most folks wait around 3 months (John’s sister went by that time frame and it worked well for her).
xo
s
Amanda @ Our Humble A{Bowe}d says
Looks great! I love the zipper and edging detail. Very nice touch to make it look more polished.
My hubby just finished installing our new roof: http://ourhumbleabowedblog.com/2012/08/08/a-new-roof-over-our-heads/ That two month, sweltering process is definitely nice to have done.
YoungHouseLove says
That looks awesome Amanda! Congrats!
xo,
s
MJB says
I think this is the first deck post without a photo of Clara looking out the window at the progress. Is she bored with construction already? I have to say I’m a fan of Clara and Burger photos, so include one next time — or a shot of Sherry serving iced tea and wiping your sweaty brow.
We have a huge deck built in rare 100 degree weather in MN. My brothers and husband did the heavy lifting and I cooked like a farm wife (I’m not) and served cold drinks. I feel loved every time I sit out there because of all the hard work and fun times that went into it.
YoungHouseLove says
Haha- they both were gazing out at daddy, just didn’t get it on film. Will have to do a better job next time!
xo,
s
John@Our Home From Scratch says
Looks brilliant.
Jessica@HomewithBaxter says
Nice work John! It looks great!
Linda says
I wish I could send you a bottle of the best champagne to celebrate – or frosty drink of your choosing…truly, you should be so proud of yourself….I bet Sherry is just overflowing with pride for her man.
YoungHouseLove says
Aw you’re sweet Linda! It’s true, I can’t believe how much John has tackled with this project – he’s totally my hero!
xo,
s
Laura says
Looks awesome!!
What are you plans for the ac unit? I know you worked around it with the deck, but I came across this on pinterest and thought it might be a nice idea for you guys: http://www.canadiangardening.com/how-to/projects/easy-to-build-lattice-screen/a/1319
Can’t wait to see the stairs and railing!
YoungHouseLove says
So charming! We definitely have thought about screening it like that (with lattis or even just with greenery that still lets it vent but doesn’t make it feel as out-there and naked! haha). Will keep you posted!
xo,
s
Kate says
Wow, John, it looks really good. So excited you guys are almost to the fun stuff, like staging the deck. Have you thought about putting window boxes with flowers under those windows to dress it up? Unless that makes it harder to get by the table you put out there.
YoungHouseLove says
That could be so cute!
xo,
s
Paige @ Little Nostalgia says
I’m so impressed! Giving you a big round of applause over here!
Alyssa says
It looks great, John!! All your hard work has paid off once again:)