“Can’t we just lay some decking already?!” That quote’s an homage to this kitchen post from last December about all of the little annoying prep steps we had to squeeze in before we could get down to painting cabinets – and I feel like we just hit the same stage in the deck project. Which means we’re making progress, but we’re impatient little DIYers. After getting all of the joists set in place we were soooo excited to finally lay down the decking… until I realized I had a bunch of nitty gritty details to take care of first. Womp womp. But not to worry, you’ll actually see decking going down at the end of this post (and that process continues – wahoo!) so we’re a lot closer to the end of this project than the beginning. Whew.
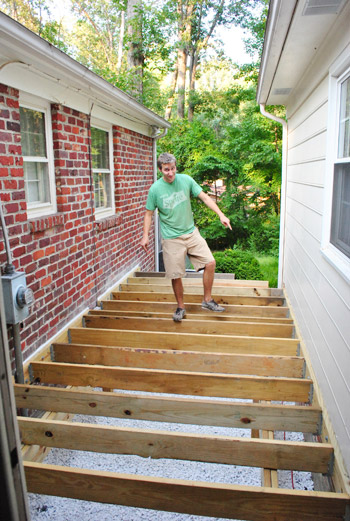
The first item was actually getting an inspection. A voluntary one at that. Shocking, I know. Technically our next mandatory inspection from the county was a final one, once everything was complete. Call us insecure, but the idea of finishing the whole thing only to find out we’d made a mistake at this stage (and thus having to undo lots and lots of stuff) gave us cold sweats. So Sherry called the county and found out we could have an optional “framing inspection” just to make sure we were on the right course. Yes, please.
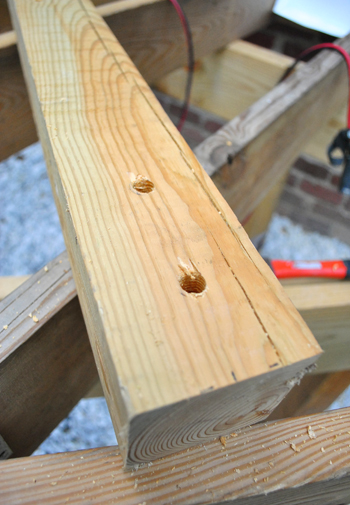
I’ll spare you the suspense – we passed. Though technically I made a minor error by notching my 4 x 4 posts (see below). Our county only allows notching of 6 x 6 posts. If you use 4 x 4s like me you’re supposed to attach to the top of the post with special bracket. But this inspector (a different guy from the first two) was sympathetic to the fact that I had already done it – and acknowledged that their instructions aren’t 100% clear on this point. I guess it’s more important when the deck is bigger, higher, and will be holding more weight, but since ours is just a few feet from the ground and only 8 feet wide he wasn’t worried at all. I’ll share a quote from him (probably my favorite thing I heard all day): “this thing’ll hold up five elephants and about 500 of those (points to Clara through window).”
In short: assuming we’re not planning on hosting the circus anytime soon (or a party with 499 of Clara’s closest toddler friends in attendance) he was happy to give us the okay to proceed. These inspectors seem to be getting nicer each time. Maybe the next one will bring me cookies?
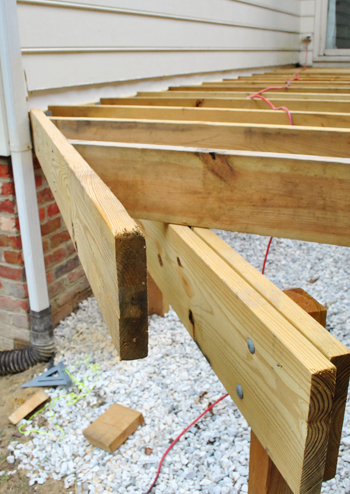
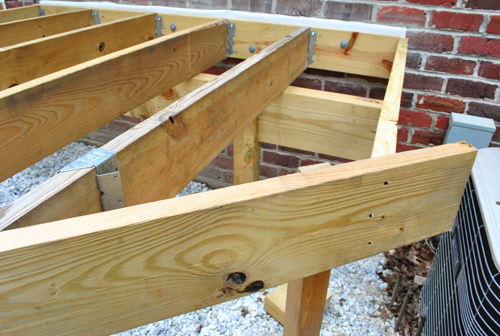
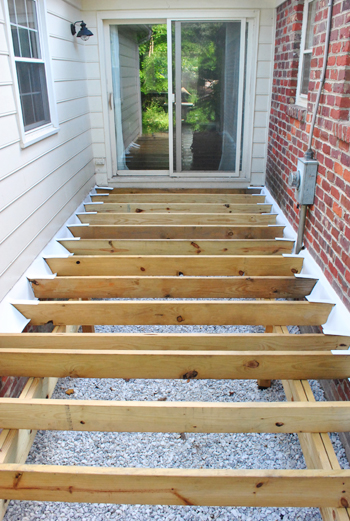
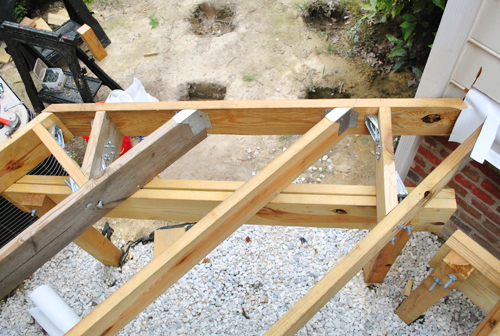
So proceed I did. My first task? Completing the framing around my joists by adding the two band boards that would finish off the exposed edge of the deck that currently sported some uneven joists just dangling over the edge.
This is the angled portion of our deck (where the stairs will lead down from it) so it took some special attention – and more than a few miter cuts. My first task was to cut off the excess portion of the two joists so that I could attach another 2×8 to the end. So I held a nylon string in place to help me mark where my 45-degree angle would go.
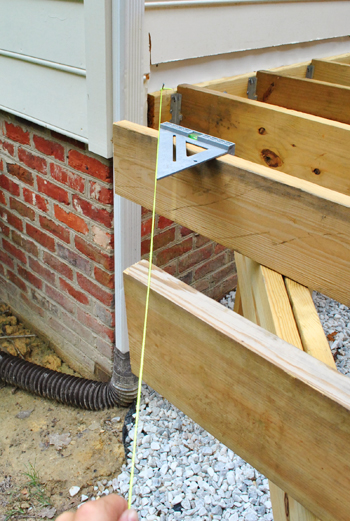
With my tops marked, I used my “Ross Gellar” Pivot ruler to mark where I needed to slice my joists at an angle.

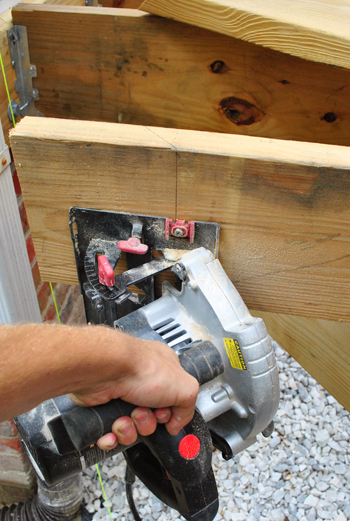
My circular saw can do angled cuts just by adjusting the saw’s table, so I was able to cut these two joists in place. Note: this isn’t actually how I hold the saw when I cut (since my hand is nowhere near the trigger) – it’s just the only way I could hold it and take a picture at the same time. So yes, let’s call this a bad reenactment.
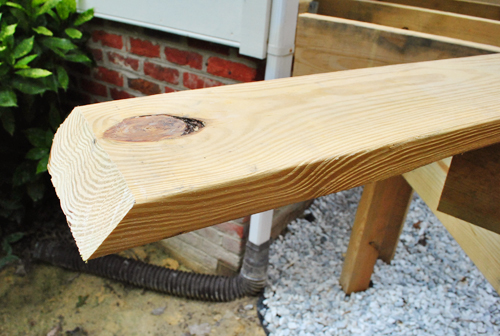
Here are my two boards cut at the angle.
Then I took the 2 x 8 that would act as my band board across the two cut joists and cut it to size – including an angled cut on one end where it would rest against the house at an angle.
Here it is all in place. To actually get it there I balanced it on one hand while I temporarily hammered it in place with the other (using some nails I set in place before holding it up). Once the nails had it in place I secured it with screws.
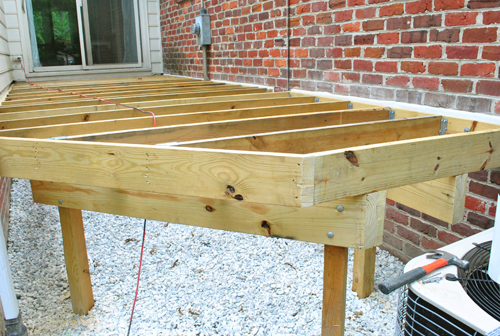
So that was all fine and dandy for finishing one edge. But I still had this open end that needed a board of its own.
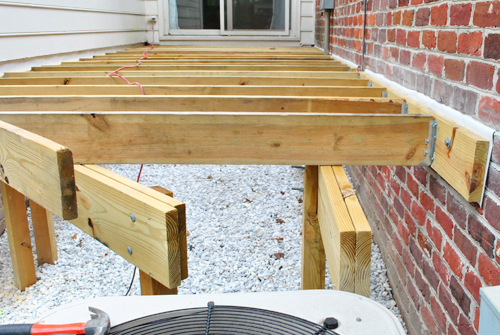
So I started off by cutting another 2 x 8 to size – once again with a mitered cut on the end so it would rest flush with the board I just finished attaching. It’s just resting loosely in place in this shot below:

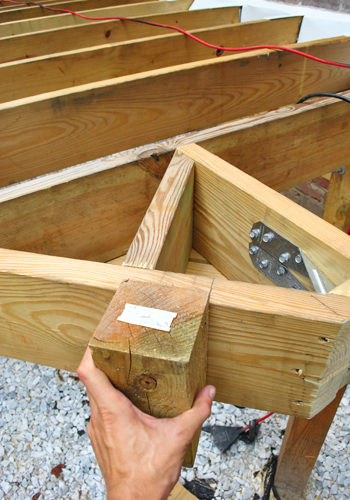
Because before I attached it I realized I needed to trim the girders that it was resting on because they were too long and they stuck out the edge. I did this intentionally when putting the girders in because I knew I could always cut off excess inches, but adding it back would be tough.
I used my circular saw to cut them most of the way through, and then finished off with my reciprocating saw (since my circular saw doesn’t cut deep enough to go through two 2 x 10s).
Then I was able to set my board in place (resting on the edges of girders) and screw into the rim board against the brick and the angled band board.
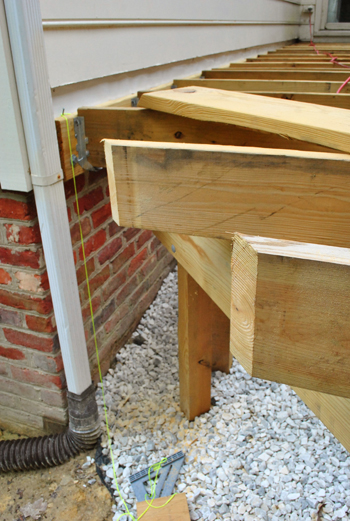
And once I cut the excess off of the angled band board I was finally getting the finished edges that I was looking for.
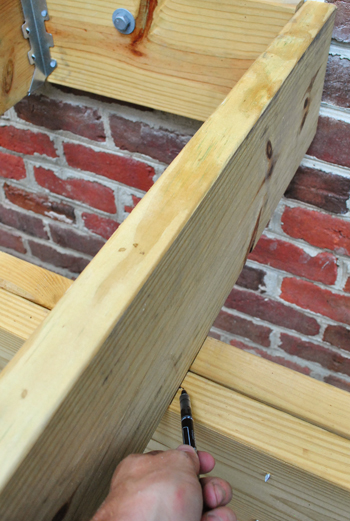
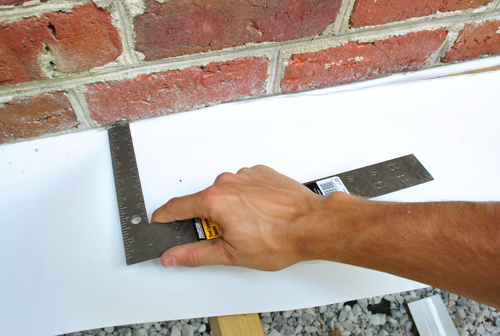
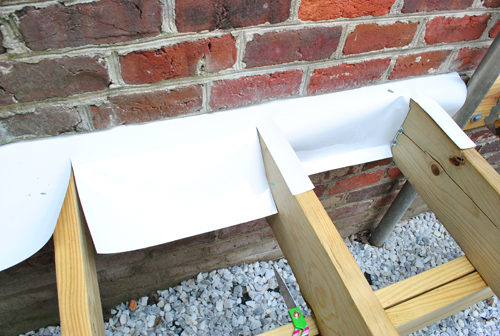
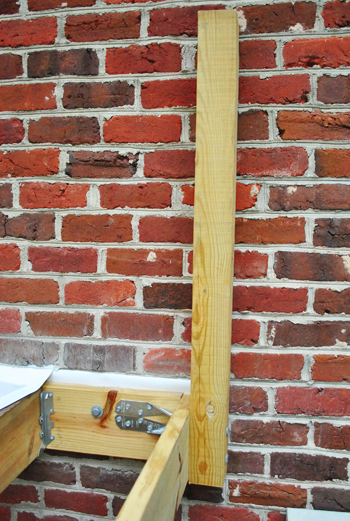
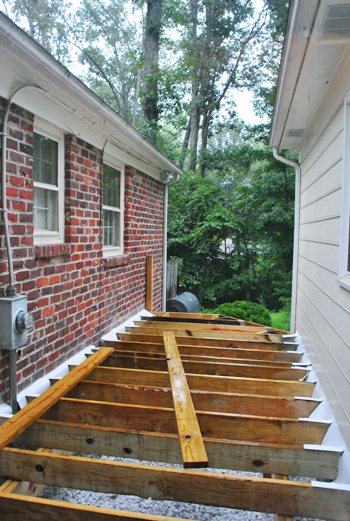
With the end of the deck looking better, I turned my attention to my next nitty gritty task: adding counter flashing. If you recall, one of the conditions of leaving my ledger boards (the ones that caused me to fail my first inspection) was to add this additional flashing over the tops of the boards.
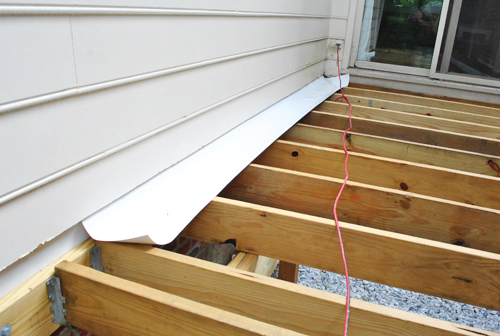
On the siding side, I just slid the flashing up under the bottom piece of siding and nailed it in a few places like before. On the brick side I also repeated my process of folding over a small piece and then stuffing it into the crevice I cut in the mortar (the same crevice the original flashing also went into).
Once this was in place I used scissors to cut the vinyl to go around the joists. The idea here is that the counter-flashing will further protect moisture from damaging the ledger boards and the house by directing water away from both. And you can see on the far right how I folded up a small lip at the bottom of the flashing to be sure the water drips away from the brick.
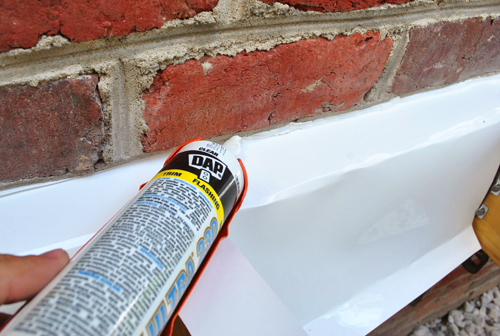
To keep the flashing in place on the brick side I also ran a line of clear silicone caulk in the crack. Not only does it act like a glue to keep the flashing in place, it also keeps moisture from collecting in the crevice.
The flashing was more tedious than it was difficult, but I was still happy to have it done and be one step closer to putting in my deck boards.
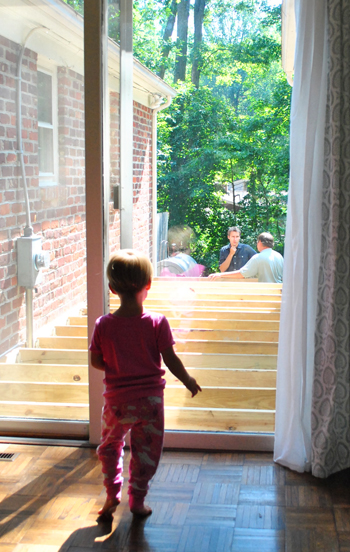
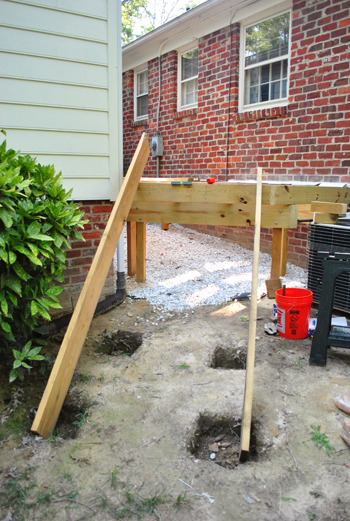
I was just about to start on the deck boards when I realized one other task that was worth thinking through while the “bones” of our deck were still exposed: the stairs and railing. This whole time I’ve sort had a “I’ll cross that bridge when I come to it” attitude towards the stairs and railing. And suddenly I found myself at that bridge. After all, if I was going to have to add any special reinforcements or attachments to secure the stairs or railings I figured it was easier to do that now.
So I started off by figuring out where the stairs would attach and where I’d need to put in guard rail posts. I borrowed two spare 2 x 10s to act as my stair placeholders (based on the placement of the already-dug holes for my stair posts).
That helped me determine where the posts needed to go on the deck itself. I’ve decided to do the stair railing “inside” the stair stringers so that the steps kind of wrap around the posts a bit.
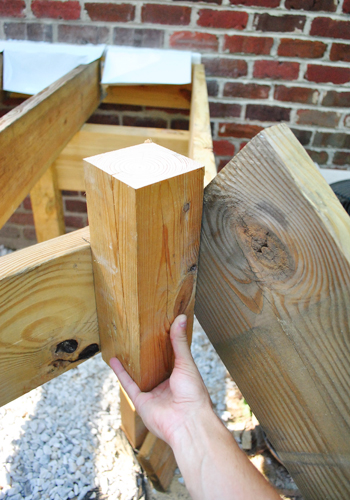
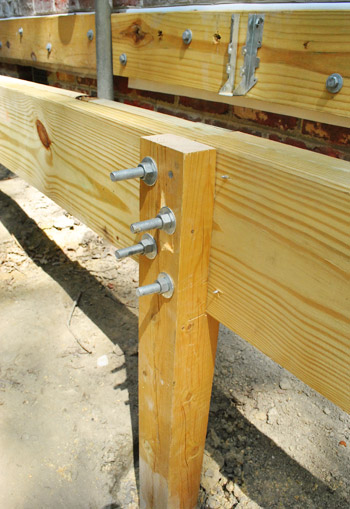
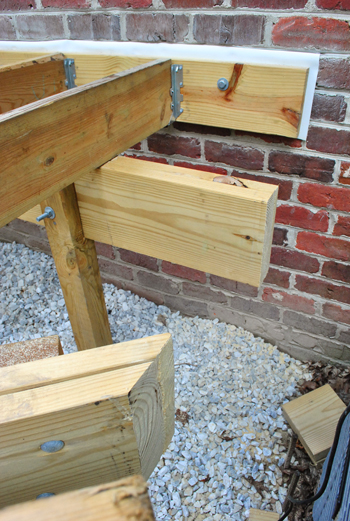
Once I was able to mark where each of my 4 x 4 rail posts would go, I had to determine how they’d be attached. Fortunately, the instructions provided by my county were super easy to understand.
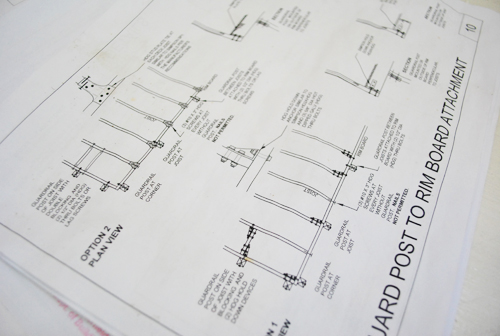
I can not emphasize enough how sarcastic that last sentence was. I stared at the page for what seemed like days trying to figure out what it was telling me to do. Then I called Sherry over who was just as confused as I was. Part of our confusion came from the fact that nothing indicated what to do with the angle we had. And we couldn’t find any of the products they suggested on the sheet.
But we finally found these Deck Tension Ties on our third trip to Home Depot (after overlooking them on the first two) and this Deck Magazine article that gave me some sort of indication as to how to deal with my angle situation.
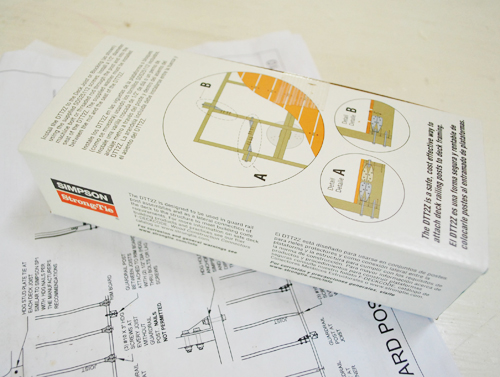
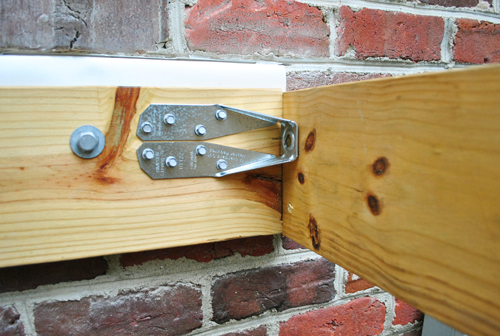
My understanding is that the old system of just bolting a guard posts to the outside of your deck is no longer considered as secure as it should be. That same Deck Magazine article explains it better than I should attempt to (there’s a reason I’m not an engineer) but I just trusted that these would help me pass inspection and keep my railing from folding over when we lean on it. You can see below how it got screwed to the rim board against the house.
Then I drilled a matching hole in my 4 x 4 post (which I had already cut to meet the 36″ railing height requirement in our county) along with a second hole below it.
Then I used two 1/2″ bolts to attach the post to the deck – the top one going through the tension tie. It felt very secure, so I’m thinking (hoping?) this is an inspection-passing guard rail I’m starting to make.
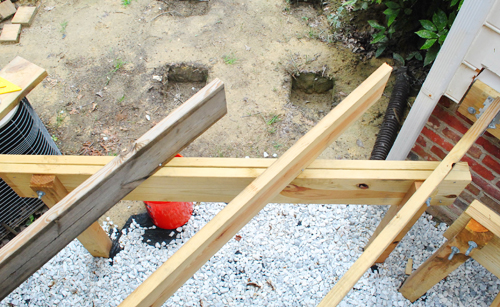
But of course I have more than one post to install. And the others – which wouldn’t be right against the rim board attached to the house – required some additional blocking. You can see below how I added a piece of scrap 2 x 8 between the two joists (which I secured with screws) and then bolted a tension tie to either side of it. That’s known as additional blocking.
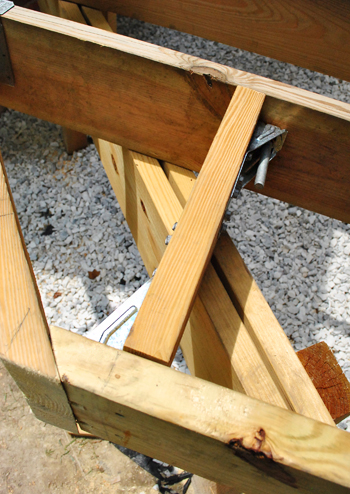
I decided not to actually attach any more posts yet (since I though they’d only get in the way as I install deck boards) but I wanted to get all of the hardware in place while I could still easily access everything from the top. So without bolting the next post in place, I moved on to adding the extra blocking and tension ties for my two posts on the angled portion of the deck.
Here’s what it looked like by the end of it all. You can see I also added some hangers where my joists met the angled band board. I’m not sure they were necessary, but they made me feel better about it. Maybe now this deck can hold six elephants?
I realize my glossed-over description of making these preparations for the guard rail may make it seem like an easy, speedy task. But it actually took me two days of work to complete. Partially because none of my power tools would fit into the small spaces, so I had to do a lot of the screwing and bolting by hand. But it also took so long because of the weather. Yep, just when I had become accustomed to working in extreme heat I now have been enjoying pop-up thunderstorms that have cut more than one afternoon of work short. And although we’d be faster with Sherry on the case, we have lots of book stuff due, so when she’s not blogging and watching Clara (for example, when the bean’s napping) there’s book proofing and a pretty detailed resource section at the back of it to compile.
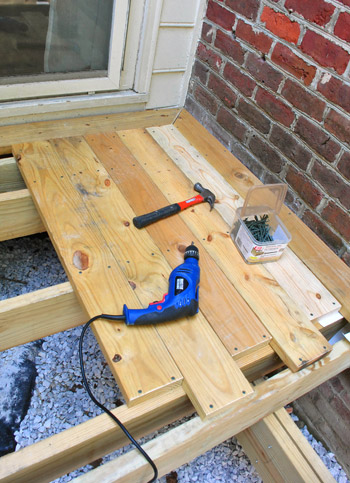
But even though the thunderstorms are delaying my progress, they’re definitely not stopping it. In fact, I’ve finally gotten some actual deck boards down. And since you’ve patiently endured this otherwise not-very-exciting post, I give you a little bit of visible progress to hold you over until I can make more progress and come back next week with some more oooh-and-ahhh-worthy photos. Oh yeah, we’re going all out when it comes to the board layout. Not only are we mitering the corners to create one big frame around the entire deck, we’re also adding a few zipper-like seams with the boards (first mentioned here). So far we love how it’s turning out. Can’t wait to get more done and share the pics!
Now that we’re finally getting somewhere, all this work is starting to pay off. It’s about time, right?
So what nitty-gritty / annoying / unglorious tasks have you tackled recently? Have you finally done those paint touch ups you’ve been putting off? Switched all the batteries in your smoke detectors? Weeded your patio? Replaced your air filters? Oh man, this is starting to sound like my to-do list…

Renee says
It looks great! How often do you think you’ll be on this deck as opposed to your back patio?
The more spaces you create to live in, the more you have to clean! ;)
YoungHouseLove says
We plan to eat meals outside on the deck whenever the weather is nice (spring through fall) since it’s located right off of the kitchen, whereas the patio is off of the living room and sunroom (we use it more for casual stuff like reading outside, Clara playing with chalk or in her rock box, etc). Thankfully they both add value to the house (which never hurts when it comes to resale) and liveable outdoor square footage for us is really valuable since we love being outside so we’re the kind of people who will use it all!
xo
s
Becky says
this is really a comment about the freebie post so you don’t need to actually post this. for the last few weeks, when i’ve tried to comment on the freebie posts, i get an error message that says i’ve already posted that exact comment to that post. the first week, i thought maybe it was right and i had forgotten, but it’s happened more than once since then… not sure what’s happening. anything you guys can do about that on your end? i’m just hoping no one else is posting with my email address… thanks!
YoungHouseLove says
So sorry for the trouble Becky! My guess is that you’re not answering the bonus question so your answer is just “Print Me!” which is what a lot of other commenters are saying, so the computer might be calling that a “duplicate entry” – that’s why we toss the bonus question in there. If you say “Print me! I would print ________ because ______” it’ll be a totally unique entry and shouldn’t be looked at as a duplicate (since no one else would have posted that exact comment). Hope it helps!
xo,
s
Alison says
Maybe the next one will bring me cookies?
Ha! :-)
Kristen | Popcorn on the Stove says
Exciting! And I agree with you on the mid-point inspection (I would’ve done it, too). Can’t wait to see what pattern you decide to lay the boards down in.
Brittany says
I just finished painting the base boards/shoe molding from putting down new flooring about 8 months ago. It was one of those simple tasks that we kept putting off. Also we started painting the outside accent colors of our craftsman bungalow this weekend. Up next mudroom and kitchen remodel. We have our work cut out for us!
Rachel says
I know what you mean about those nitty gritty detail things. We have been working on a raised bed garden and it looked like things were coming together but the husband wanted to bolt and make things more stable before I could start planting. By the end of a week I just wanted to plant something already!
Nora Rose says
Looks great! Can’t wait to see the final result! Notched boards are by far the most unglorious thing I’ve seen. We saw a lovely house with notched beams in the basement. No fun for anyone.
Are you going to use stair risers or make your own? We had to redo our deck stairs when we first moved in because the original owners reversed the rise and run making them very steep and ungainly. However, replacing them with precut risers was pretty easy (for my BF to do ;) ).
YoungHouseLove says
Right now we’re planning to make our own (but keep with the standard scale/rise so they’re easy to use). We’ll keep you posted for sure!
xo,
s
robin @ our semi organiclife says
What progress! Can’t wait to see how you attach the stairs. And the actual boards look great! And what freak storms we’ve been having I know!
Nikki Kelly says
We’ve been working on some hardwood flooring upstairs. I totally understand the frustration of those little prep tasks feeling like they take forever. Ripping carpet up is not the only step before laying new floors. There’s base boards, tack strips, padding, a million staples and door jambs to undercut. It’s almost a days work just to get ready! Hopefully it will be done next weekend though, good luck on the deck.
Hopefully you’re entering the home stretch and you’ll finish soon. Speaking of finishing, have you picked a stain color? I remember the inspiration pic had a grey finish to it but don’t remember if you are going with that or not.
Nikki Kelly @ the ambitious procrastinator
YoungHouseLove says
We haven’t picked a stain color yet since in our area you wait (usually 3-6 months) to seal/stain the decking since you want it to acclimate first (it’s pressure treated, so it’s protected from the elements). Something about doing it too soon actually damages things!
xo,
s
Heather C says
It’s coming along so nicely! I just can’t wait to see the finshed product! I want to see what you guys are going to do as far as decorating goes! Any ideas yet? Perhaps a small deco-teaser to get this not-so-handy gal through all the tedious buliding posts?
YoungHouseLove says
Yes, I’m trying to get a mood board together for later this week (Thursday if all goes well)! It’s so much fun to imagine things…
xo,
s
Courtney says
I replaced my 72-year-old windows last weekend, so I’m fiiiiiinally getting around to painting the trim inside my house (which it’s needed for the whole 2 years I’ve been there). It’s tedious and no one notices it but me, but to me it makes a huge difference!
Mary S. says
Love the border and the zipper seam will look great. The heat is overwhelming, 22 record heat days here in Michigan. FINALLY spread the last two bags of mulch on Sunday, keep in mind the first bags were spread in May!
LauraCinIndy says
Have you ever thought when starting a project this involved that maybe it would have been easier to just hire this one out?
I am glad you DON’T think like that but I was wondering if it ever crossed your mind.
YoungHouseLove says
We always ask ourselves that with every big project. We think about whether we:
1) think we can realistically learn how to do something ourselves and trust our result
2) will find joy from doing it ourselves
3) will find added value in doing it ourselves (ex: in this case, we’re saving about 9K)
If the answer is no to any of those, we usually hire it out! Haha. For example, we always rely on help from the pros when it comes to heavy duty structural and electrical stuff, since we don’t trust ourselves with that as much (when you ask what’s the worst that could happen and the answer is “the house collapses” or “house fire” it makes a good case for the pros!). But when it’s just spending time building something that we think we can handle and are excited to tackle (even if it takes a while) we’re game!
xo,
s
The Mrs @ Success Along the Weigh says
I always get brain scramble reading these because I just can’t fathom taking something like this on. I bow to you!
You also reminded me I have touch up painting I need to do. (groan)
Teri says
Looking good John!!
Jamie says
Do your decking boards have spaces between them? I can’t really tell in that photo. I have no idea what the rules are, but it seems like most decks I’ve seen have a space between. Great job John! I’d never have the patience to learn and do all that. I like my DIY more loosey goosey!
YoungHouseLove says
They have very slight spaces between them. The rule with pressure treated wood is that it usually shrinks a bit over time, so you can place them pretty close and they should be just fine.
-John
Paloma R says
Whoo. I’m exhausted just reading this! I made some shelves with a ledge from scratch the other day for this weirdly shaped cabinet in our kitchen and I was so proud of myself, but this puts it all to shame.
You guys are so awesome and such an inspiration. Keep up the good work! I can’t wait to see you guys enjoying the end of summer on your amazing, DIY-ed deck!
Angie says
Love the mitered corners and zipper seams!! Did you consider using the Kreg deck jig so there would be no exposed screw heads on top of the decking? Knowing your love of the Kreg jig, I was surprised you didn’t use it! My hubby just rebuilt our old awful deck using the deck jig and the top is sooo nice and smooth!!
YoungHouseLove says
That sounds awesome! We did think about that, but ultimately we both grew up with decks with screw heads that we thought were beautiful and held up for decades so exposed screws didn’t bother us. We’re lining them all up so they look nice and clean like the inspiration deck with the zipper seam that we linked to!
xo,
s
Angie says
Our experience was different than yours — the deck we replaced had screw heads popping out that were ugly and a major trip hazard, so we were glad to be able to conceal them on the new deck. Can’t wait to see your finished product!!
Jen says
Your deck posts are making me realize why decks are so expensive! This is one DYI project that is way over our heads..
John@Our Home From Scratch says
You’re doing a great job with this, John. I’m taking notes.
Amanda says
Yay for progress! It always feels so good to get to the next big visible chunk of a project!
I always feel like we just got over the last big hump in a project, only to find out that we have a million tedious little humps before we can see the next big change…we just tiled our master bathroom (shower surround and floor) and I’ve had to scrape the grout off around the penny tile on the floor – the dehazer method didn’t work unfortunately. It took a couple of days of being on my hands and knees, and it was so exhausting/frustrating that I couldn’t even find a way to blog about it yesterday…I’m working up to it, so hopefully I’ll have something on it either tomorrow or Friday.
YoungHouseLove says
Ugh, I totally feel your pain Amanda! I know it’s such hard work, but it’ll feel amazing when it’s all done and you’ll be so glad you got it all gleaming!
xo,
s
tae says
this is so awesome! it is kind of amazing that this project makes both the kitchen overhaul and the patio project look easy by comparison! i remember how floored i was last year when you guys did the patio yourselves! maybe that in-ground pool is less crazy than it seems…
YoungHouseLove says
Hahaha- yesssss! That’s what I’m trying to say to my sweaty and sore hubby. He’s not buying it. Haha.
xo,
s
Peggy McKee says
What is the deck flashing made of–and where did you get it?
Many thanks, Peg
YoungHouseLove says
It’s sort of like a vinyl-ish thin membrane/plastic. You can get it in a roll at Home Depot or Lowe’s.
xo,
s
Katy says
Can’t wait to see the zipper seams! I have been happily painting away for a redo. I finally learned a trick when painting to keep my brushes from drying out from a family friend. Now painting this darn room doesn’t seem like that much of a chore! http://thefirstapartment.blogspot.com/2012/07/handy-house-tip-paint-brushes.html
Can’t wait to see the rest!
~Katy
Matt says
It’s hard to tell in the last picture, but the top decking boards look very close together (possibly touching) Just a tip that you want those about a nail width (16d is typical) apart, to allow for wood expansion & water runoff. My apologies in advance if you were already aware of that :)
Also, did you look at any of the hidden fastener systems? They have many options now, some pretty inexpensive and it’d give you a nice clean look on top with no exposed screws. Just a thought.
Love the mitered frame and “zipper” interlock, very cool!
YoungHouseLove says
Thanks Matt! We’re using pressure treated wood that the engineers/designers said can be placed pretty close (pressure treated wood is known to shrink up and not expand very much over time, especially when it’s installed in hot/moist weather) so we’re definitely accounting for that! As for hiding the screws, we both grew up with decks with exposed screws and they were beautiful and held up forever so we have decided to be traditional and just line up all of our screws like the zipper seam deck that we linked to as our inspiration. It’s functional too because we can easily tighten any screws over time that might get loose (since they’re so simple to access) which should keep things nice and secure for the long haul.
-John
Julia @ Chris Loves Julia says
I love the zipper seams. I remember drooling over them in your inspiration photo months ago and I can’t wait to see it all come together at your very own home. EEeeee! And funny, we actually DID finally get our smoke detector batteries changed out AND paint touched up in our bedroom–but get this. The paint (we had to get more because we were completely out–is slightly off! So now, we’ll have to see how long it stays that way. Hahaha
YoungHouseLove says
Haha- nice! You guys are doing all the stuff we should be tackling! Haha. Oh well, soon!
xo,
s
Aislynn says
It’s interesting to see how different the building codes are in different areas. I know here we’d never be able to get away with notched posts or 4″x4″ supporting a deck!
The deck looks awesome :) I can’t wait to see the finished product.
YoungHouseLove says
So funny! I think it really does vary so much by county!
xo,
s
Christa @ a*typicaljourney says
I love love love that you guys are actually going all-in with the zipper seam. I loved it so much when you first wrote that planning post that I am actually in the process of building a headboard with the same detail. It looks so good except I wish I had either gotten boards with more variation in color or multiple colors of stain to make the seam more prominent. It looks awesome but from certain angles the seam disappears, which makes the headboard just look like a plain ol’ plank headboard. Oh, well though – live and learn! I can always sand it back down in areas and restain if I want :)
SOOO excited you guys are finally laying boards – this project is way bigger than you would think building a deck might be!! I also really love the mitered frame – it’s going to look SO good!!
Keep on keepin’ on :)
Brenda says
Yay progress! I think that border on the edge is going to look super swanky. And while I’m sure my dad would enjoy this post more than I (he actually builds stuff, I’m more of an arts and crafts kinda gal), I appreciate all the work that you’re putting into this.
Lindsey d. says
Very slowly starting the tedious project of repainting trim in my house. The previous owners used the same flat white paint on all the walls and although I’ve repainted every wall over the past three years, I still need to tackle the trim. Ugh… Just thinking about it gives me a headache.
Sarah says
Loving the deck! Looking awesome! It is probably the camera angle, but the deck boards look REALLY close together, how much space between boards is suggested for expansion, draining, etc?
YoungHouseLove says
As for the board spacing, we’re using pressure treated wood that the local engineers/designers said can be placed pretty close (pressure treated wood is known to shrink up and not expand very much over time, especially when it’s installed in hot/moist weather) so we’re definitely accounting for that. We’ll chat more about that in the next post all about installing the deck boards!
xo,
s
Krystle @ ColorTransformedFamily says
Looks great! I love how you are installing the decking.
We have been working on repainting our bedroom for the past week and a half.
Paul Orange says
Looking good guys! I think outside space and treating gardens like rooms (ie, planning garden room designs, using the garden as an extension to the living room/kitchen/dinning room) is a great idea.
Caitlin C says
Loved the comment from the inspector. I literally laughed out loud at my desk this morning! Thanks for the bit of humor to start my day off right- love you guys! Awesome job on the deck.
cheri s says
I can see the two (or the four!) of you sitting out on that litte corner piece, enjoying your new deck :)
YoungHouseLove says
Wahoooo! I can’t wait! I have promised to be John’s soda wench for all the hard work he’s putting in out there!
xo,
s
Devon @ Green House, Good Life says
Switched out the batteries in our smoke detectors? We recently changed out all of the detectors themselves, actually. (They had some malfunction issues that brought to light why combination smoke/CO detectors might not be such a great idea.)
Does your electric provider send a meter reader around, or do you have smart meters that report your readings electronically (by RFID, I think)? Just wondering if you’re going to have a meter reader enjoying your deck once a month, or if you can totally cover up the meter.
YoungHouseLove says
Ours are all electronic in our neighborhood! Although if they have to service anything they can thankfully still access the box since it’s above the deck.
xo,
s
Jillian says
It’s coming along and looking great! You guys are my inspiration for my own DIY projects. My husband and I just moved into our first home (a ranch!) and it is slow-going to get things in order. It’s been 2 months and we still don’t have a towel bar in the master bath… your progress on major projects inspires me to get my little projects done! I just finished painting the master bath last night and tonight I will hang the shelves and towel bar. If y’all can build a deck, I can certainly hang a towel bar. At least that’s what I tell myself.
YoungHouseLove says
Yay Jillian! You can do it! Sending you lots of good towel bar hanging vibes!
xo,
s
Lauren@FilingJointly says
Ok, LOVE the zipper seam, it’s going to look completely amazing. Since you shared the inspiration pictures, I’ve been so hoping that the zipper seams would make an appearance on your deck.
As far as what tasks I’ve tackled lately, I FINALLY (like almost two years later) sorted through all two thousand of our wedding photos and chose which ones we want to frame/canvas. You can see a bunch of them here:
http://www.filing-jointly.com/2012/07/how-ryanor-as-he-calls-himself-one-that.html
YoungHouseLove says
Oh Lauren. I love your wedding so much. You’re the most beautiful bride and those pictures make me hold my breath. LOVELY!
xo,
s
Lauren@FilingJointly says
Ahhhh you’re making me all blushy!
I swear I never look even semi-lovely in real life. My hair and makeup girls were CRAZY! They waxed my eyebrows, upper lip, sideburns (!?)and part of the back of my neck and then sprayed me with seventeen coats of makeup whilst I sobbed quietly.
YoungHouseLove says
Hahaha, I think you’re gorgeous – they had a good canvas no matter what you say!
xo,
s
Sayward says
“whilst I sobbed quietly” – dying!!! Also, most gorgeous wedding ever. Also, most hilarious description of a wedding ever.
Amanda says
So amazing! You must be so proud of all your hard work. I’m certain you’ll feel great when you’re able to step back and say “I built this.”
I’m about to embark on a tedious and not very visible project — cleaning and organizing our basement. We use our basement for storage, and it’s kind of turned into grandmother’s attic in there — so, we need to pare down some things, re-organize, and try to make it a lot tidier (and more usable). Of course, in this case, I’m thankful it’s not visible!
RLR @ Mom's Magic says
Our kids are “keepers” – they hold on to every little kids meal toy, coloring sheet, rock, string, etc. So while they are off at “grand camp” with my in-laws, I am cleaning their rooms. Toys bins, under their beds, corners of their closets….
I’m also paring down books (so hard!) and perhaps rearranging furniture and rethinking storage solutions. Kids’ needs are so different than ours! And our kids even approach this kind of thing differently based on their personalities.
This is definitely not my favorite task, but so much easier to do when I’m not on a “length of the school day” timeline. I’m glad to be able to take a break now and then.
Skooks says
Oh yes . . . i walked around caulking, sanding, and repainting some holes in the wall that have been adding up after we decided to move a bunch of stuff from one room to another. And after that I took a magic eraser to parts of the walls and trim where the kids have gotten things looking fairly unspectacular. Boring job, but someone’s got to do it!
YoungHouseLove says
That sounds awesome to someone like me! Haha. Seriously, I am craving doing that now…
xo,
s
Amy E. says
you’re definitely not alone on the nitty-gritty, not so fun-but required before the funstuff tasks; my husband and i are renovating our master bathroom. except we’re both working full time and have a 16 month old at home. since demo about 2 months ago (don’t worry, we have a 2nd bath), we’ve been working on it almost every night and every free weekend. we’re starting to get sick of it. but, on the other hand, we’re still really happy with how it’s coming together. the end is approaching, but not fast enough for our liking!
Erin says
This is looking fabulous! Your first meal on the new deck is going to be so wonderful after you have put in so much work.
Paul Collins says
This just has to be the best built deck in all of Richmond VA! Im serious!
Lindsey says
Oh, the tedious labor that DIY can be- what troopers you guys are! It is going to be so awesome so soon! And you just reminded me that I have paint touch ups to do, as well as probably changing our air filter… ack!
Jen@The Decor Scene says
John you are doing an awesome job!!! I give you a lot of credit, because this seems like a really crazy long job for you. You get 1 gazillon points for being an awesome DIYer!!! :) I can not wait to see this project finished and then to also see it decorated. I’m sure Sherry is really getting excited about that part of it. :)
I wish we could get the things we wanted to do outside done, but this crazy weather you guys are getting we are getting also in NY. Hot for days, then rain. We work during the week, so if the weekends aren’t sort of nice, we can’t paint the deck stairs. Hopefully by the Fall we will get this done. ;)
Wendy - Old Town Home says
Congratulations! You’ve made some great progress. This project looks like a total bear, and we admire you for pushing through the nitty gritty steps to get it done! Home reno isn’t just about the fun painting, decorating, and staging at the end.
I have to laugh. We were just talking the other day about the “boring stuff” that comes with home ownership, including the importance of changing air filters. http://www.oldtownhome.com/2012/7/9/Cleaning-Our-Air-Intake—A-Gremlin-Task/index.aspx Not exciting, but definitely necessary. :-)
Lindsay says
FANTASTIC progress! Can’t wait to see it done! J, I’m still waiting here in Pittsburgh for you to start our small deck. I make a mean batch of chocolate chip cookies.
YoungHouseLove says
Haha, be right over!
-John
Bethany says
Hey younglife’ers – I don’t normally comment (hello from vancouver island bc!) but here’s a quick TIP that I share with EVERYONE. BEST STAIN EVER:
Behr Weatherproofing Stain
(in this specific combination)
2 Coasts – Semi Transparent “CEDAR”
1-2 Coasts – Semi Transparent “WOODBRIDGE”
I have used this colour combo with a couple of clients now. It’s bang-on for colour. Stains can be horrid in hue – this I know.
Good luck!
YoungHouseLove says
Thanks for the tip!
xo,
s
Martha says
“since you’ve patiently endured this otherwise not-very-exciting post…”
My husband thought it was exciting. He walked by, saw a picture, and said, “Wait. Wait. Back up a picture.” Unfortunately, he saw the ledger board and went into detail why it was a bad idea. He knew someone who did that and with the contraction and expansion inherent with wood, the foundation cracked. So you may have failed the first inspection, but it may have saved your foundation.
I showed him the notched 4×4 and he said that was just an inspector showing off. With the size of the deck, the notched 4×4 would spread the load.
YoungHouseLove says
Whew- so glad!
-John