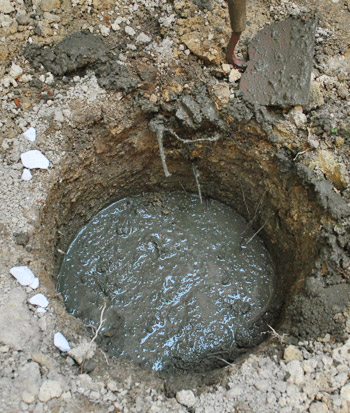
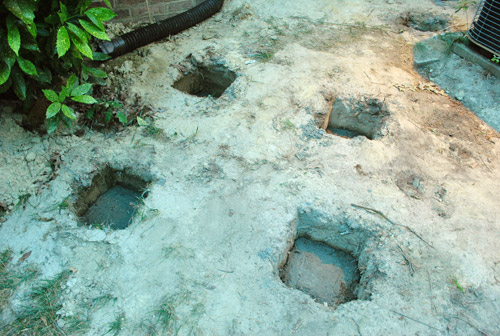
With my deck holes dug and officially blessed by the county inspection office it was now time to – well – fill them in. There must be some irony in there somewhere, right? As I had done when setting my fence posts last year, I started off by putting a couple of inches of rocks in the bottom for drainage since the deck experts in our area unanimously recommended it under the concrete that we’ll be pouring to hold the posts in place (we dug the holes at least 21″ deep, so that by adding 2-3 inches of gravel at the bottom, they still met the 18″ required depth for our county).
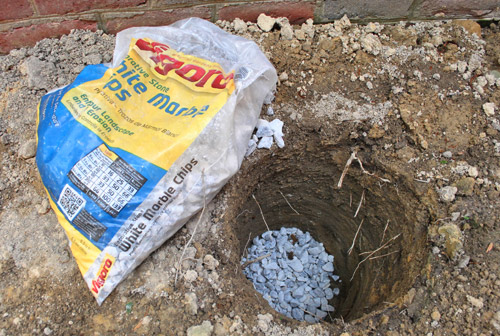
Imagine my surprise when my cascade of rocks caused some of the dirt to start hopping around. I guess some tiny frogs had gotten trapped and were so well camouflaged that I didn’t see them until they hopped to escape being crushed. But have no fear, I rescued them before continuing with my rock pouring.
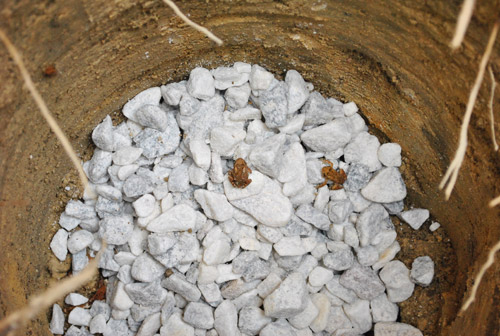
I took extra care to spot any frogs in my other holes before I started dumping rocks – but apparently my animal vision needs some work as I managed to miss this whopper of a toad.
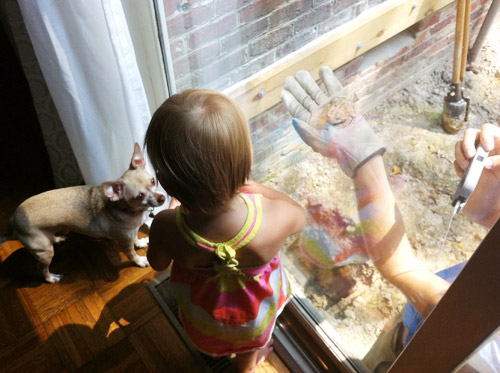
But after he made himself known I was able to rescue him (with my own bare gloved hands). It provided a nice impromptu nature lesson for Clara, who watched intently from behind the sliding glass door.

I love this picture (not because you can see me playing iPhone paparazzi) but because I imagine Clara giving Burger a little biology lesson: “See what we have here, young chihuahua, is called a frog. It goes ribbit ribbit.” They both were equally interested.
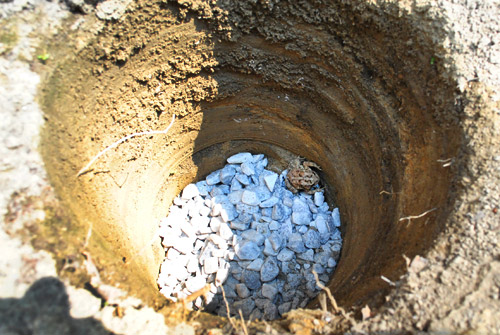
But enough about frogs. Let’s get back to our deck posts. Once my holes were all de-frogged (I only found one more) and had about 3-inches of drainage rock on the bottom, it was time to put the concrete footing in. A lot of you have suggested pre-cast Dek-Blocks, but they’re not allowed in our county. However, we are allowed to use these other pre-cast concrete blocks.
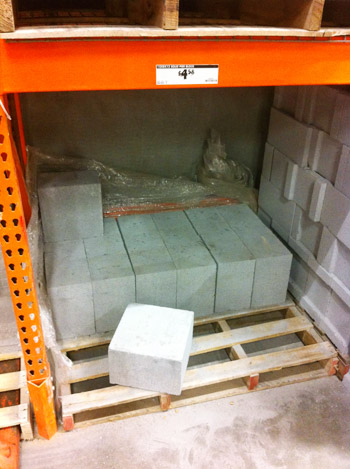
But I opted to go with mixing my own concrete. As straightforward as the precast blocks initially felt, I realized it would require each of my holes to 12 x 12 inches square to get the darn thing all the way in (most of my holes were round, so I’d have to do more digging). And I’d have to make sure the bottom of the hole was flat and level so the block would sit level. So I figured mixing my own concrete would actually make my life easier because it would fill any shaped hole and sort of level itself. Plus concrete had already come with my lumber order from 84 Lumber.
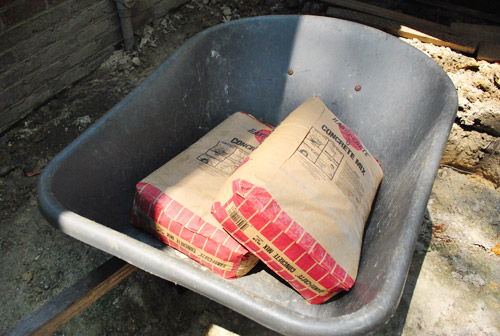
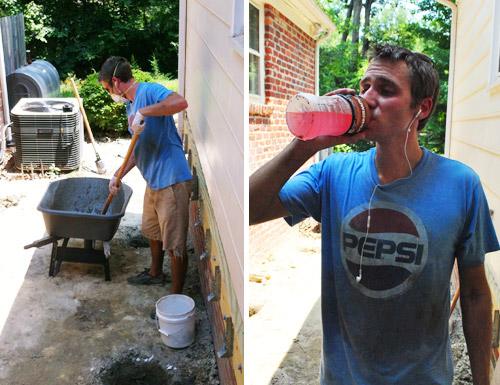
To mix it, I opened each 60lb bag in my wheelbarrow and added water until I got a creamy consistency.

I stirred it with a garden hoe. I won’t blame you if you giggled at that sentence.
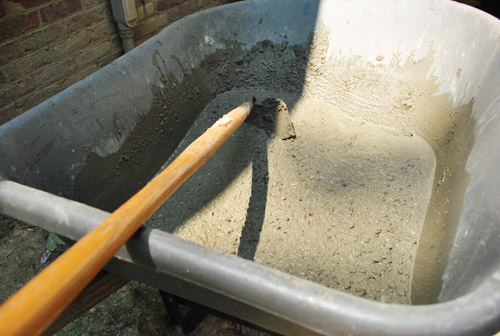
This batch that I photographed (my first) was a little soup-ier than I had intended, so in subsequent batches I didn’t use quite as much water. It still dried just fine though. And you can see how it sort of naturally flatted itself to be nice and level on top. Pretty perfect for setting posts on!
Mixing and pouring the concrete wasn’t really that interesting of a challenge. Nor would it have been that challenging had it not been a bazillion degrees outside. See that orange exclamation mark? That’s it warning me about the Heat Advisory for our county. You know, the kind that warns against being outdoors and doing any kind of physical labor?

So yeah, it pretty much sucked. I was a sweaty, dirty mess within about zero-point-one seconds of starting the project. I did my best to stay on the shaded side of my work area and I drank plenty of fluids (sorry that picture on the right looks like some weird cross between a Powerade and a Pepsi commercial).
By the time all 12 holes had their 8″ of concrete in them, I was too hot to remember to take any pictures. So here’s one I snapped later that evening once the fire in the sky had gone down a bit.
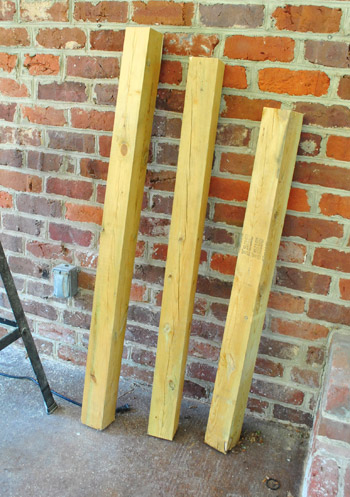
The next day my extra materials from 84 Lumber arrived. This is the stuff I had to order when my county made me revise my plan to include more posts and girders after giving me the a big fat F. Pretty measly compared to my first order. But at least now I had the 4 x 4″ posts for my next step of the project.
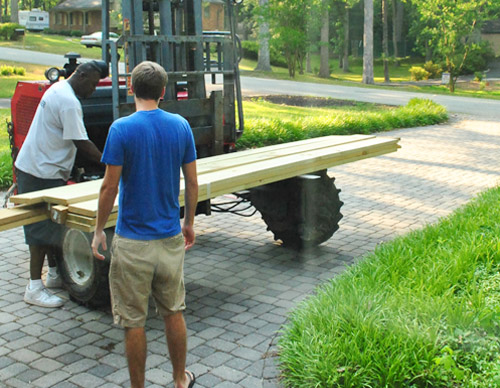
I had purchased some 12-foot long posts which – thanks to my barely 4-foot tall deck – meant I could get 3 posts out of each one. Score.
I staggered their sizes a bit since the ground slopes away from our house a bit.
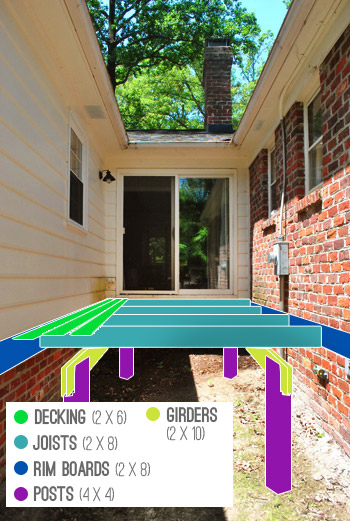
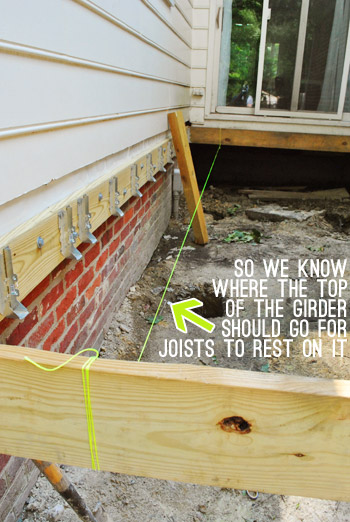
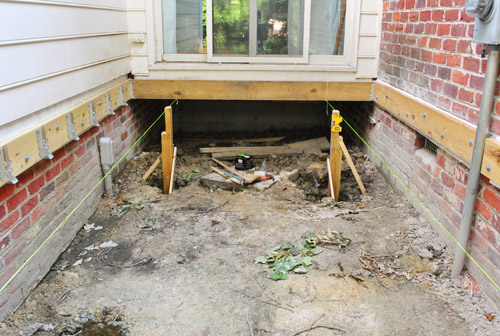
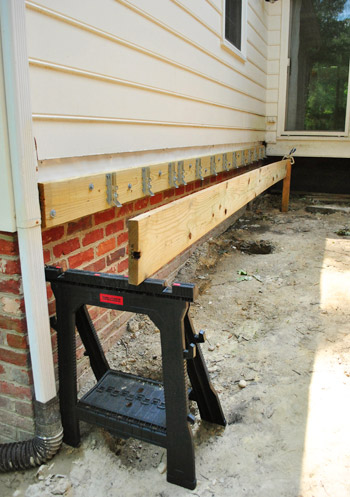
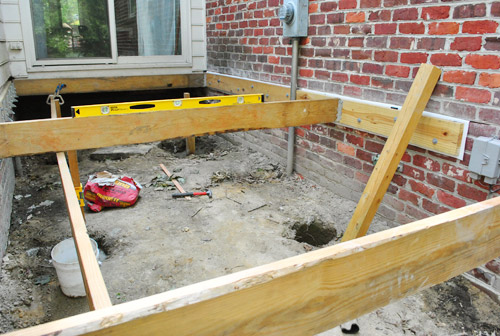
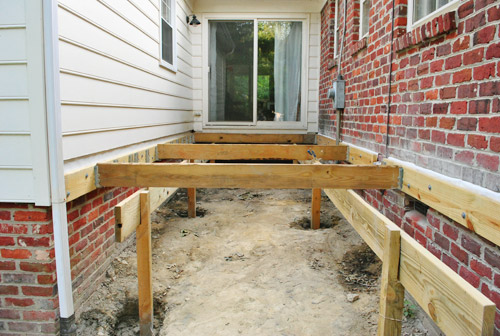
Setting these posts was going to be a bit more complicated than my previous experience doing fence posts because this arrangement is, well, a bit more complicated. Basically my posts would support big 2 x 10″ girder boards that run the long way below the deck. The joists (the boards that span the short way across the space) will rest on the girders. The joists need to line up with the ledger boards already attached to the house (which I will now call rim boards, since they won’t support the weight of the joists as originally planned – instead they’ll just provide extra stability side-to-side). This picture might make a little more sense of that description:
So before putting any posts in, I set up a few guides to help make sure I was staying in line with the rim boards that I had already attached.
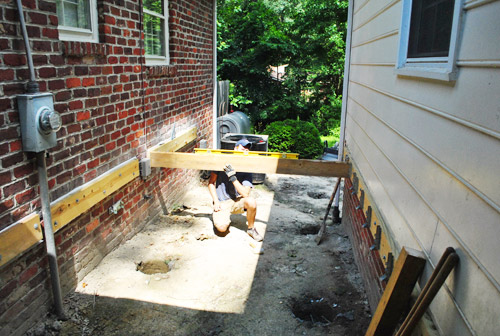
After temporarily hanging joists on each end of the deck, I tied some nylon string to connect the bottoms of each – this would represent the top of my girder beams where the joists would eventually rest. The string was much easier than trying to temporarily hold up a 18-foot-long 2 x 10″ board.
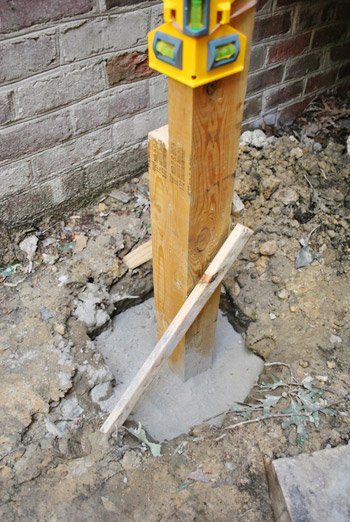
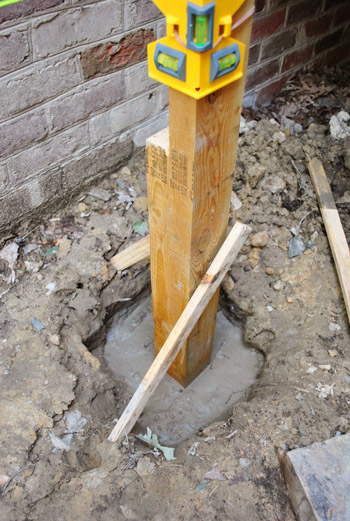
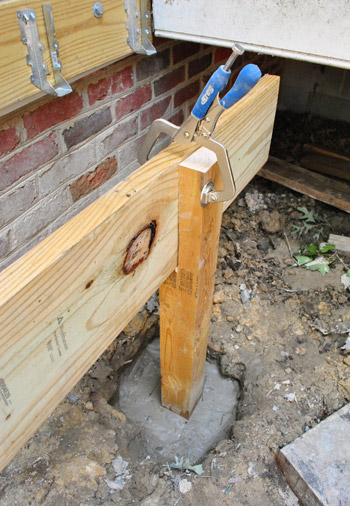
With string pulled taught, I rested a post in the hole and held it pretty straight (double-checking it with my post level) while I marked where the string hit it – thus indicated where the top of my girder would eventually be.
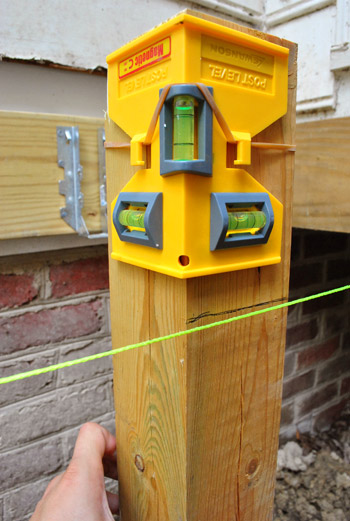
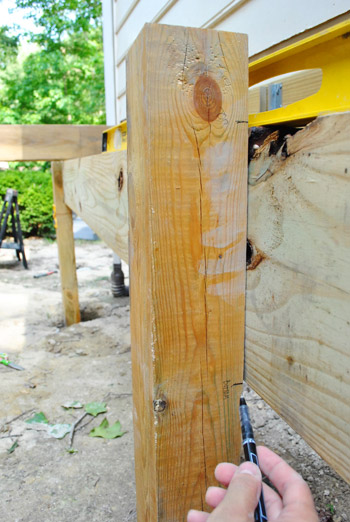
Our county gives us two options for attaching girders. You can buy a metal post bracket that sits on top of the post, or you can cut a notch into the post for the girder to sit on. I chose the later option, primary because it’s what I had seen done here. And it felt a bit more secure than the alternative. So I used my top mark to then measure and draw where I’d need to cut my notch so that one 2 x 10″ would sit at the perfect height.

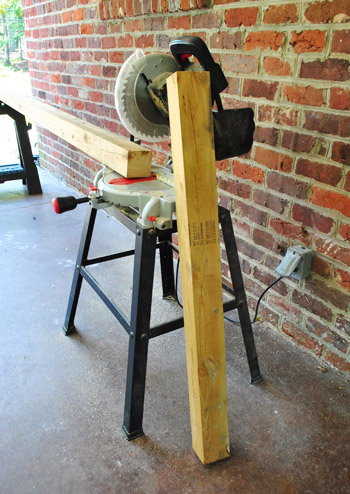
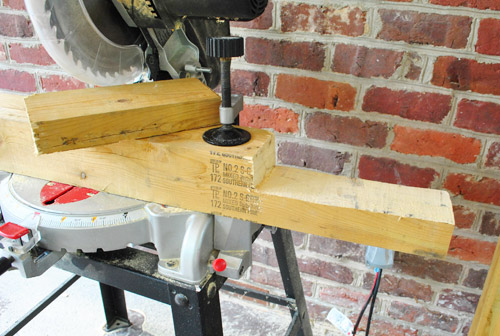
I used my reciprocating saw to cut the notch. I have no pictures of this because it took everything in me to keep the saw steady on my lines. But here’s the result below (ignore the miter saw, I just used it as my work table because it had built-in clamps).
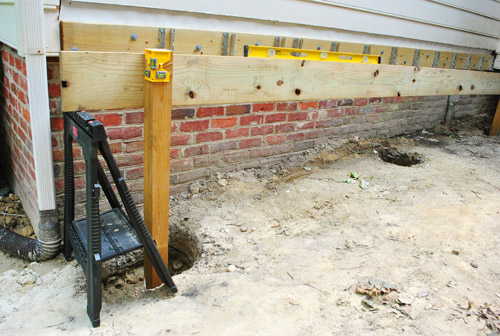
With my notch cut, I moved the post back into place, checked my cuts against the string, and then used some stakes to hold the post perfectly straight up and down.
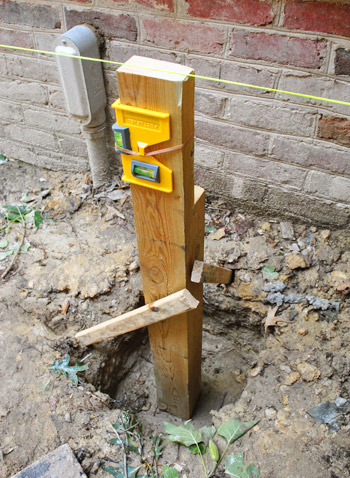
To keep my posts in place for the long run, I could’ve just packed dirt in around the edges. I didn’t really trust that method, so I defaulted to the same method I used for my fence: Quikrete no-mix concrete (which is also an approved method in our county).
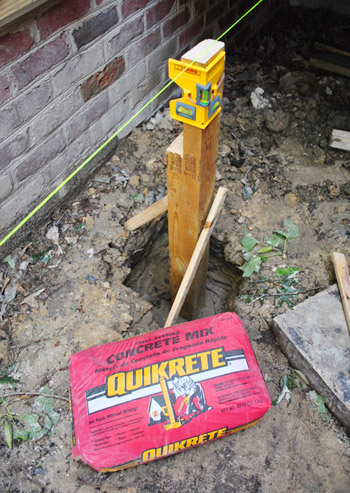
I love this stuff because you just pour in the dry powder…
…add water…
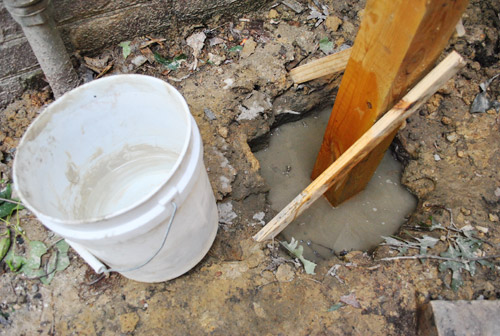
…and it soaks in and dries hard. It’s certainly easier than the stuff I mixed before (which I used instead because it’s what 84 brought me, so I didn’t want to waste money or materials).
I then repeated the whole string-mark-notch-stake-cement process for another post on that end. It really wish it had been as fast as typing that sentence just was, but it was actually a fairly long process (maybe three hours from setting the joists ’til finally putting cement in) and this day was not much cooler than the last so I was pretty spent. Fortunately I couldn’t do anything more until my cement was fully cured, so I had a good excuse for stopping.
The third deck workday was girder day. I would’ve loved to have had my dad’s help for this step, but alas he was visiting my grandma in West Virginia so I was stuck setting this 18-foot-long board all by myself (Sherry was inside taking care of Clara, keeping up with the blog, and doing last minute book-proofing stuff, but was available to come outside for a few moments as I went to confer/lend a hand).
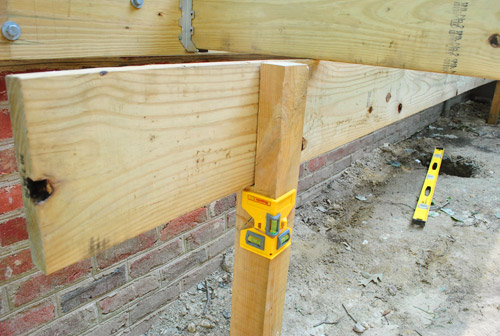
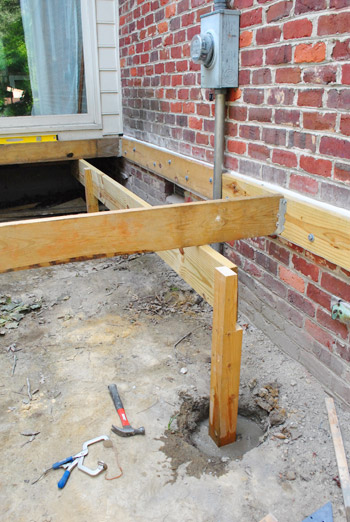
As much as I enjoyed my nylon string method, I figured using my actual girder to set my additional posts would be a more trust-worthy method. I clamped it in place on the already-notched post from the previous day…
…and used a sawhorse to help me keep it up on the other side. At this point I was trying to mark my post (which was just resting in the hole at this point) with where I should cut my notch. The sawhorse made the girder a bit high, so I performed quite the juggling act moments after snapping this photo: holding the board up, checking that it was level, and then marking my post with a pen.
But I got my mark made, cut my notch with the reciprocating saw, and brought the post back into place so that I could double-check everything: that my post was straight up and down, that my girder was level (well, sloping down slightly for water run-off actually), that the joist that sat on the girder was level, that my post was as far from the house as my other post, etc…
Once that was all checked, I was able to cement the base of it (using the no-mix Quikrete again) without having to secure it with stakes. The weight of the girder board actually held it in place quite nicely.
And speaking of the girder… since it was now held up on both ends, I was able to mark my middle post with no trouble at all (each of my two girders is held up with three posts). Dare I say it was actually easy?
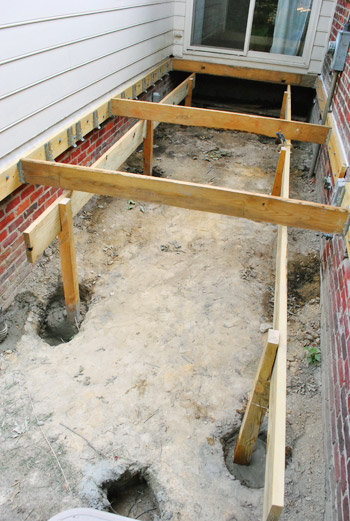
With one side of posts all done (and my girder held temporarily in place with nails and clamps), I was able to move on to the other side. This side was a bit trickier because it was too long (21 feet) for one girder board – so I’d actually have two separate girders that would butt up to one another at the middle post. So I decided to temporarily set another joist across the middle so I’d have a reference point for the height.
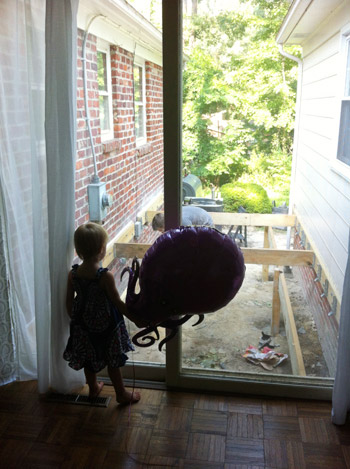
In case you’re not convinced as to how truly exciting this whole process is, just look how engrossed Clara is. I’ve become her favorite new spectator sport. Heck, it was so thrilling that she even brought this octopus balloon over to see all of the action while Sherry caught it on camera.
So here you can see how the girder board will share the middle post with another board that will span the rest of the space.
By the end of this (again very very hot) afternoon I had all six posts set in concrete and all of my girder boards temporarily held in place. Why temporarily? Well, the girders have to be doubled up (i.e. two 2×10’s thick) but that was a process I knew I’d need another set of hands for, so I had to wait for my dad to return from my grandma’s house since we knew it would take longer than Sherry could provide while taking care of Clara (aka: it was a longer-than-a-Clara-nap project).
Then once that step is done, I have to add two more posts and a girder to create the angled edge at the end of the deck (you can see the two empty holes towards the bottom left of this picture – one of which is shared by another post). But I figured I’d wait to get these first girders set before I tackled that step.
Sorry for such a long post, but it’s been a productive few days on the deck. I know it’s just barely starting to look like a deck – but I think big visual rewards are just around the corner. Once these girders are up I can install of the joists (which should be pretty speedy), and then come the actual decking boards. Woo hoo! I’m working up a sweat just thinking about it, but that’s probably just because my sweat glands are on overdrive lately.
What have you been sweating over lately? Are you doing any outdoor projects out in the blazing sun? Or just enjoying the outdoors in a more relaxing method – like by taking a beach day?

CherylM. says
WOW!! you’ve been busy!! Nice job so far!! And thanks for saving the frogs!!
Katie says
I am totally amazed that you guys are building a deck and can actually figure out how to do it! It looks great so far and if I squint I can see all 4 of you out there enjoying dinner (hopefully on a cooler day than when you put the posts in!). Random side note question…on Clara’s 2nd birthday slideshow you have a part at the end where it says “so here’s to a great two” and the word two changes color from white to pink…how did you do that? I’m working on my daughter’s 2nd birthday slideshow (using imovie) and would love to add that detail. Thanks!
YoungHouseLove says
We actually used Final Cut Pro to edit that video since it’s software we had to buy to make a little book video. I don’t think iMovie gives you that much type freedom. Hope it helps!
xo,
s
Stevie says
My husband has used iMovie on our Mac to make a few videos here and there and has had pretty good luck with the text options. At the bottom of this post on my blog is a video he made showing our nursery a few years ago after my daughter was born.
http://www.lilymakesthree.com/2012/07/change-is-brewin.html
I think if you just google “adding text in iMovie” there should be some pretty good tutorials out there. We’ll be making one for my daughter’s second birthday this month too!
Katie says
Thanks YHL and Stevie! I’ll definitely check it out!
RLB says
That is some impressive work John, particularly since you were going at it alone and in that heat.
What a great lesson you’re teaching Clara. She’ll have this hard work, DIY ethic engrained in her.
annabelvita says
This is so incredible!
I must admit that weather app snap made me me super jealous. Here in England, on the other hand, we had the wettest June on record! And July isn’t shaping up much better either. Boo.
Barb says
Looking great!! Coming along. Soon it will be done…think glass half full. Why,I can all ready see a family dinner out there!
Frog legs, perhaps? Just kidding…honest!! Seriously!
Hydrate, hydrate, hydrate.
Stevie says
Looks great! We had full intentions of redoing our deck this year but with the heat and me being preggers (read: absolutely no help whatsoever) – it looks like we’ll just be sanding down and staining for now!
Gabriella @ Our Life In Action says
WOW – so I am no longer going to complain about the heat…ours is up to 90. 102 – you got us beat!
The deck is coming along nicely – exciting!!
And lastly, those baby frogs were so cute! Amazingly enough, I have only spotted one frog this year and lucky for him because I was cutting the grass at that time.
Crystal @ 29 Rue House says
I can definitely get a visual! So excited for you guys!
P.S. You’re using my favorite pen…I hate writing with anything else!
The Mrs @ Success Along the Weigh says
I am in awe. Looking at all of that gives me a headache and I so would’ve called a contractor! So kudos to you!
We were sweating being without power for a week in 100+ degree temps while trying to keep the homestead afloat.
Meredith says
Um, I don’t even like washing the dishes by hand when it’s that hot out, because I get sweaty with the hot water. John, you deserve big time kudos. (And probably some ice cream).
I used to be a competitive swimmer, and frogs would always turn up in the gutters of the outdoor pool in the summer time. It was a favorite pastime of the boys to play with the frogs/scare the girls by throwing the frogs at them/etc. Ah, memories.
YoungHouseLove says
Oh yes, I remember those pool frogs! I was a summer lifeguard/swim instructor and all my kiddos would love looking for them in the filters!
xo,
s
ilikebeerandbabies.com says
Toads and holes. Toads and holes. TTTTTTTTtoads and holes.
Kristen | Popcorn on the Stove says
Looks like you made a lot of progress, even with the heat! I spray painted lamps outside during a heat wave and I was so miserable so I don’t know how you were able to handle that!
Very cool about finding those frogs and being able to show them to Clara. Maybe frogs will be the next worm for her!
Megan says
Great job. And good job on saving the toads, babies and all. I love having toads around because they eat bugs and slugs and anything that’ll fit in their mouth. We have one (had maybe? haven’t seen him in awhile) in my flower garden. He loved it when I would water his little hidey hole that was under one of my succulents. Can’t wait to see the rest of your deck, we’re about to embark on our own deck building progress but ours will be set on top concrete, so it adds a whole new level of excitement.
Lizzy says
Uuugh! I’m exhausted just reading this – I can only imagine how you feel! I’m impressed that you have taken on this challenge! So far, it looks like it is going to turn out awesome. I bet you guys are going to love this new space.
I recently saw a similar deck (I forget which site) and they had those pretty string lights draped overhead. They looked similar to the ones you used at your backyard wedding and thought it would give your deck a romantic touch too!
YoungHouseLove says
Oh yes, we have planned to drape lights overhead between the two houses since day one! Can’t wait to be at that “final touches” stage!
xo,
s
Julia @ Chris Loves Julia says
Oooo man! Cafe lights! I can’t wait!
Way to go, John! I am seriously, wow, so impressed.
Me, Ed and Pea says
Holy crap John…this is some serious work. And all by yourself!? You should be extremely proud of yourself already. Also we live in NoVA and the heat was unbelievable last weekend!!! My husband was out all day working in it too – you men are nuts! haha
Janelle D says
Nice job! Sending you cool weather vibes.
tae says
what a mammoth project! bravo! love seeing your progress.
Jamie B says
Oh, man, I’m tired just reading this. My dad built decks and sheds and fences and barns all over our 5-acre property when I was growing up, and while I recognized the obvious physical effort, I didn’t really think about how much mental effort it takes – calculating and measuring, etc. I hope you’re really proud of yourself, John, for doing this by yourself.
Hillary says
Wow John this is so impressive! You are taking DIY to a whole new level with this deck project. Congrats on your progress so far, can’t wait to see the next steps and finished project!
Rosie B. says
So, your county doesn’t allow Dek-Blocks, but it does allow you to hold those posts in place with dirt!?!?!?! This makes me laugh! Great work, John, especially in that MISERABLE heat wave. I couldn’t do my outdoor paint project because it was too hot for the paint, so I spent my heat wave trying to soak up as much A/C as possible. ;) I’m so happy for the weather we are now having.
Nat says
My dad and I started my parent’s front porch project this past weekend. 105 degree day = extremely sweaty and incredibly grimy! I also have a picture depicting how gross I was by the end of the project…
http://greennackeacres.blogspot.com/2012/07/so-long-porch-well-half-of-it-anyways.html
YoungHouseLove says
Love the grimy face!
-John
Maureen says
John, I am SUPER impressed. I cannot wait to see how this turns out! We will be doing a bit of a facelift to our deck this summer, replacing boards, railings, etc., so this project really has my attention. lol
Dare I say that you make all this look so easy? :)
Reenie says
Great job John!! I don’t know how you can stand it out in the heat. I wait until 8:00 p.m., to even go out and mow and/or water.
Love the pic of Clara and Burger looking at the frog. I can’t believe that she didn’t want to play with the critter. It won’t be long before you have a helper ~ in building things =)
Andrea Ferree says
I have a test today that I’m sweating over! Am I the only one that hates history?!
Ann L. says
I’m in awe of the fact that you (or anyone) are able to do this…it is so beyond my capabilities and comprehension. Great job! Looking forward to seeing more progress and the final deck reveal, I’m sure it’ll be so rewarding.
Allie ~This Yellow House says
It’s looking so good, I love seeing the process of it all! The picture of Clara seeing the frogs is so adorable! My three year old little boy’s favorite animal is frogs :-)
Your iPhone said it was 102 but felt like 110. Yikes, that’s hot!! Be careful in that heat!
Caity says
I’m confused and exhausted just reading this, John! Kudos…it looks awesome so far!
Megan says
Love these deck posts. We are getting ready to build one about the same size on the back of our townhouse. We also had permitting issues (we actually have to have a hearing before our permit will be finalized), etc. so it’s nice to know we’re not the only ones! I’m curious about the deck posts. You poured the concrete one day, then set the posts the next day, was the concrete cured and the posts sat on top, or did the post sink down into the concrete? My dad is in charge of this step and I haven’t bothered to ask him how it will work yet!
YoungHouseLove says
The post sit on top of the cured concrete and then you can add additional concrete around the sides to keep them in place (though some people just do dirt). The only thing our county is a stickler about is that it sits on on level, solid concrete that’s at least 8″ thick.
Good luck with your project!
-John
Melanie says
That pic of Clara w/ the octopus balloon would make an adorable little silhouette image for your hall ‘o pics.
Pamela @ Pink Hammers & Sippy Cups says
This is amazing, you are doing such a great job!! Sherry must be so proud of you :) Careful with working in the heat!!
Allison says
Great job!
I am currently almost 7 months pregnant and my husband is making our crib and a dresser from scratch. He spent last week (the hottest on record here in Minnesota) working in our garage on it with three fans trying to cool it down in there. He was able to get the temp down to 96 at least, haha!
He’s thankfully gotten a few “cooler” days here lately that are more tolerable to be out in the garage.
Keep up the good work! I know from watching my husband that the sweat is definitely an adequate word to add to “sweat equity”. Once done, it will all be worth it!
Lisa says
Wow, this is a lot of hard work! But I’m starting to see it!
Sooo exciting, great job guys!
Kristen says
Wow. Well John, you did it again. I read every word of this entire post about a subject I’m not super duper interested in that was packed with knowledge I will more than likely never need. I love to read your posts though, for just that reason. You’re a great writer and somehow you managed to keep me engaged to the end! So congratulations on your awesome progress and for saving those sweet little froggies!
YoungHouseLove says
Awww, thanks Kristen!
-John
kate says
so awesome — great work john!
Jess @ Little House. Big Heart. says
So the pictures of Clara and the toad are too adorable!
I can’t wait to see the finished project! Kev and I just heard back from our insurance last night about the giant hail storm to go through Dallas. We’re getting a new roof AND getting our deck and 8′ privacy fence restained! Woo to the hoo! Who knew hail would necessitate professional restaining of our deck? We’re sure not going to argue with the insurance man!
Natalie @ barnesdailycircus says
The graphics and color coded pictures that you guys have to help us understand the deck building (as well as options for the kitchen bar area) are pretty impressive. I am just not that computer savvy. Kudos.
The deck is shaping up awesome! I can’t wait to see it finished. And by finished I mean when Sherry can get out there and start “decorating.” I know you guys will style it beautifully :) Good luck with the rest of your build!
Allyn says
Such cute frogs! And such a cute Clara!
But seriously, props to you for not going all Hulk rage in that heat. Yuck.
Jay says
They are NOT frogs – they are toads. Hopefully Clara got her facts straight before ‘teaching’ Burger.
karen says
good work john!!
Teri says
Kudos to you for building your own deck in this heat. Looks exhausting! I hope you have many nights of cool breezes sipping fruity drinks on your deck when you are done!
Betsy says
OH, the deck is going to clean up this weird little corner so nicely! That’s some hard work though; good job!!! Can’t wait to see the results.
The photo of Clara and the toad is beyond cute!
Mandi says
As much fun as the Final Reveal, and Before and Afters pics/posts always are, I actually LOVE these nitty-gritty, underneath-the-pretty type posts the most – no apologies that it’s not “pretty” yet! This is what is going to keep you from crashing down to the ground, after all – give me engineering any day.
<– might NOT be a physics nerd . . .
beth says
amazing progress! we have frogs living in our tiny northern virginia townhouse front yard – they are cute outside, but imagine my surprise the day i found one in the house!!
Brittany says
Powerade is actually owned by Coke so you’ve got some conflicting commercials there, if only you had a Gatorade :)
heather says
Just curious what the decision make was on how to do the footings in a back fill versus another method like with post base hardware? Was it required by the county?
YoungHouseLove says
The county didn’t specify any hardware, so it felt like the less complex route to backfill.
-John
Andree Caron says
I was going to ask a similar question… I absolutely love watching Holmes on Homes, and the one thing I clearly remember him saying is to never have wood and concrete touch. I can say that it’s true as the deck posts we have here that touch concrete have deteriorated, but the deck here is very likely more than 10 years old…
The concrete will “sweat” and the wood will absorb the moisture… That said, it might not be a problem where you live if your county said it was fine that way. I was so sure you we’re going to just poke some metal spikes into the cement before it dried. Can’t wait to see the finished deck! That was some brutal work in that temperature!
YoungHouseLove says
Yes, I believe it all has to do with the climate (in many other areas you have to dig post holes that are three times as deep as ours but since we don’t have as much winter/freezing/snow/frost) things are different! We are just sticking to the rules of the county and are glad to know people like John’s dad who have used this method and it has held up for over three decades!
xo,
s
Jessie says
Man, John, you are totally rocking it!!!
you guys are super amazing! keep it up! enjoying seeing the progress!
Lindsay B says
I’m so impressed by how much you guys have learned in the past few years! In the first house, you had your patio, crown molding, etc. done by a professional. And now you’re tackling a deck all by yourself! It’s just amazing to me. Kudos!
Donna Jean says
it’s starting to look like a deck! how exciting! but i can’t believe that you were working on it in that oppressive heat – just the thought of walking to the mailbox to check the mail was enough to make me sweat!
love the balloon, too. we walked into martin’s yesterday to order cupcakes for my son’s b-day party this weekend and as soon as we were in the door he starts saying octopus over and over again. i was very confused until he added the word balloon. if only his party was an ocean theme…
gayla says
John—
very cool! I am really amazed by all of this. To me it seems like such a big undertaking! (and scarier than the kitchen— how that makes sense ill never know)
but i think it is looking fan freaking tastic!!!
:) love that Clara is so interested in watching dad work!
Emma says
Wow-wa-wee-wah! Amazing work John. I have no idea what’s going on there but it looks super up to code. Good luck with the rest of the project!