Updated January 2022
Do your kitchen cabinets feel a little bit unfinished? Or maybe don’t quite reach your ceiling, leaving a weird gap? We’ll gonna show you how we installed crown molding to give our upper cabinets a simple DIY upgrade. It’s one of my favorite, easy kitchen projects – and we completed it in just 3 hours!
Why We Added Crown Molding To Our Kitchen Cabinets
When we finished our kitchen reno last year we decided to forgo any crown molding on the top of our upper wall cabinets because we decided we liked the clean, modern look of the square edge. Plus we had never installed crown molding before, so I think we were subconsciously too intimidated to try.
But after having learned to install crown molding on a ceiling, we decided it was time to add it to our upper kitchen cabinets.
Steps For Adding Cabinet Crown Molding
This is a surprisingly easy project with only 4 basic steps, so it’s something you can easily complete in a day. Here’s a quick overview of what you’ll be doing:
- Attach scrap wood above your cabinet to nail the crown into
- Measure and cut your crown molding
- Nail in the crown molding
- Caulk and paint
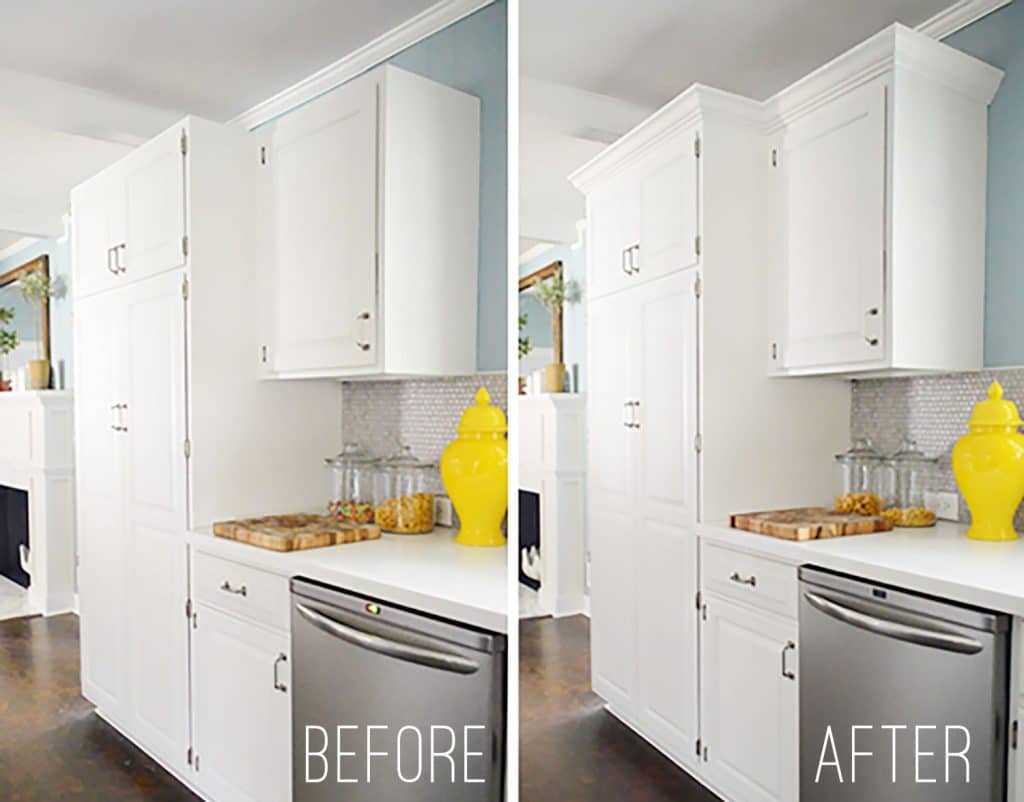
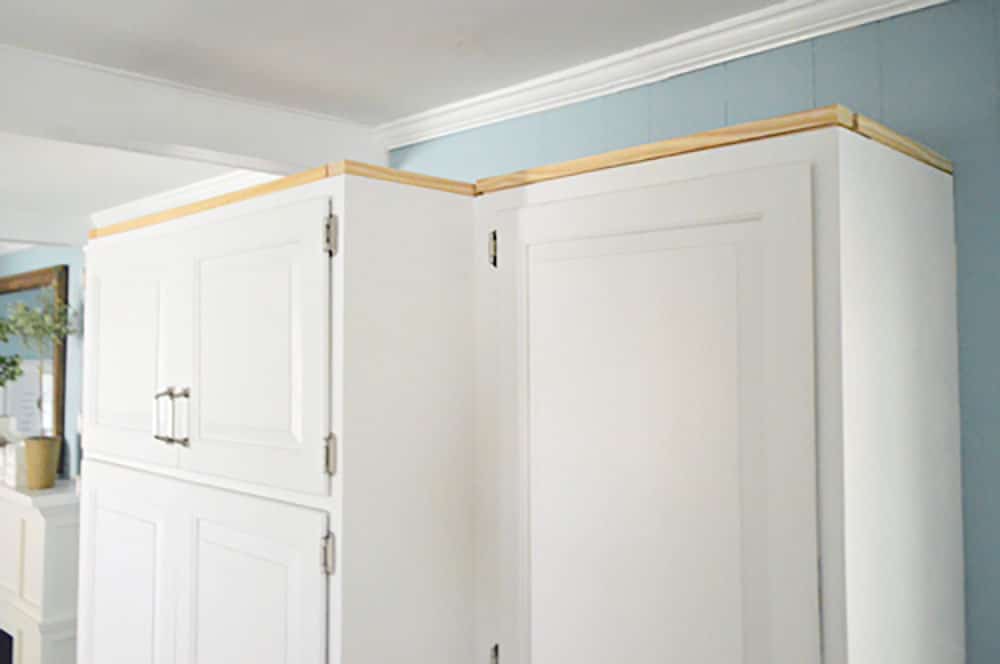
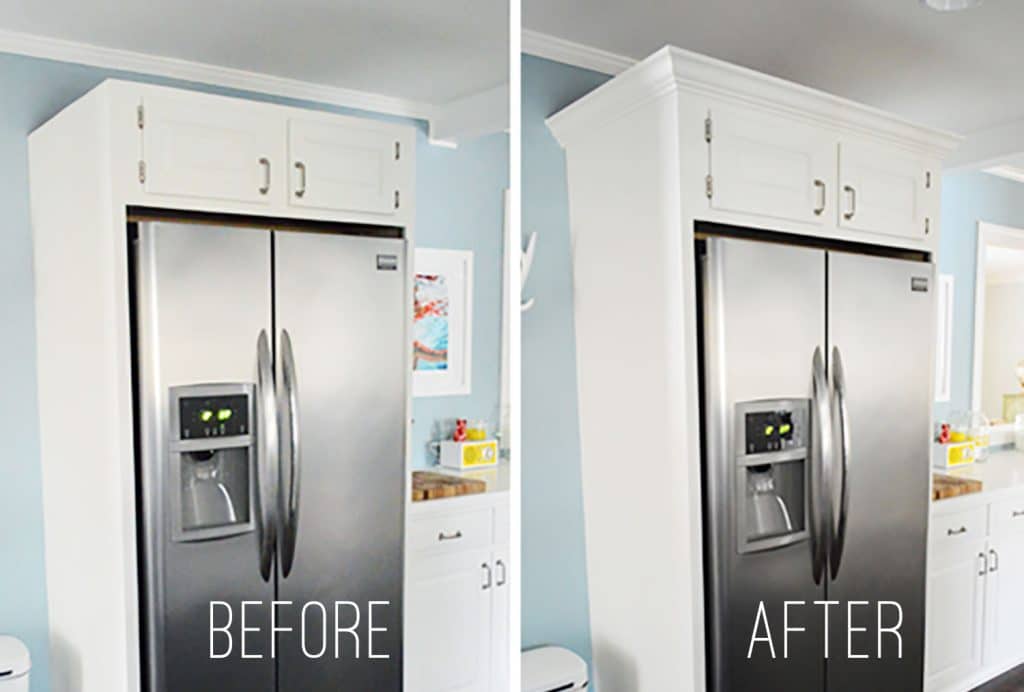
And as you can see above, it makes a big difference!
Tools & Materials Needed
To add crown molding or other trim to the top of your cabinets like we did, there are a few tools you’ll need on hand to make things go faster and more smoothly.
- Crown molding
- Measuring tape
- Nail gun (we currently use this one that doesn’t require an air compressor)
- Wood glue
- Kreg Crown Pro
- Miter Saw
- 1 x 2″ white wood or pine (scrap wood works too)
- Paintable caulk
- Paint*
- Short handle paint brush
- Painter’s Tape
*If your cabinets are wood, you’ll want to source crown molding in a stain color and wood grain that coordinates with your existing cabinets. Check with your cabinet manufacturer because they typically set an assortment of matching trims.
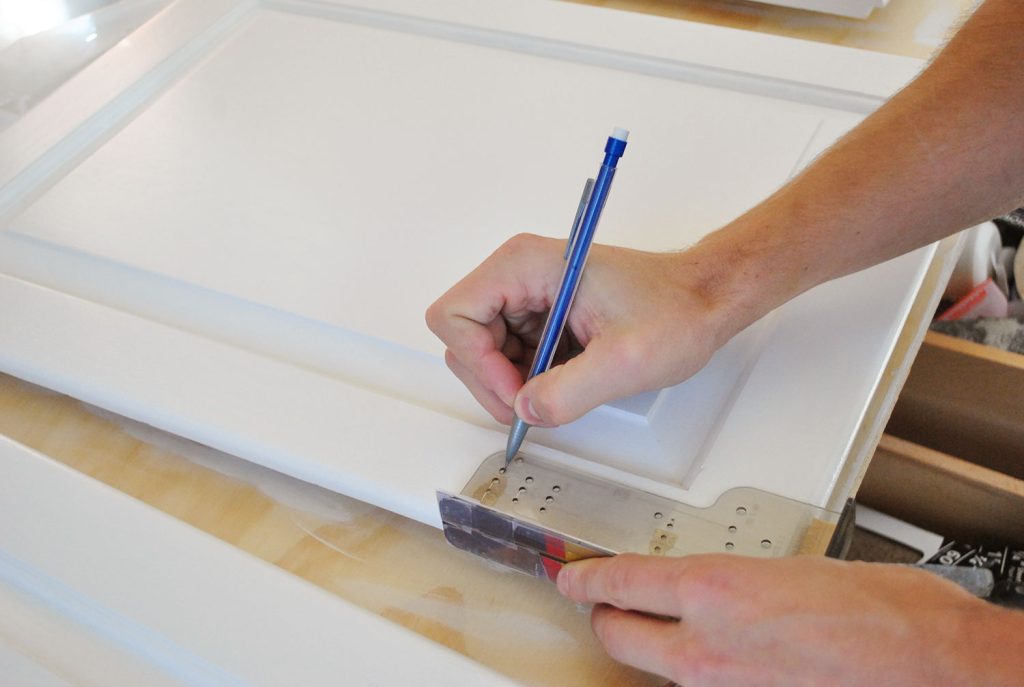
Step 1: Measure Your Cabinets
Before you even purchase your crown molding, carefully measure the top edge of your cabinets to determine how much you will need. Just be sure to buy more than the length of your cabinets. Since crown molding is cut at an angle, your cut piece will actually need to be longer than the top of your cabinets.
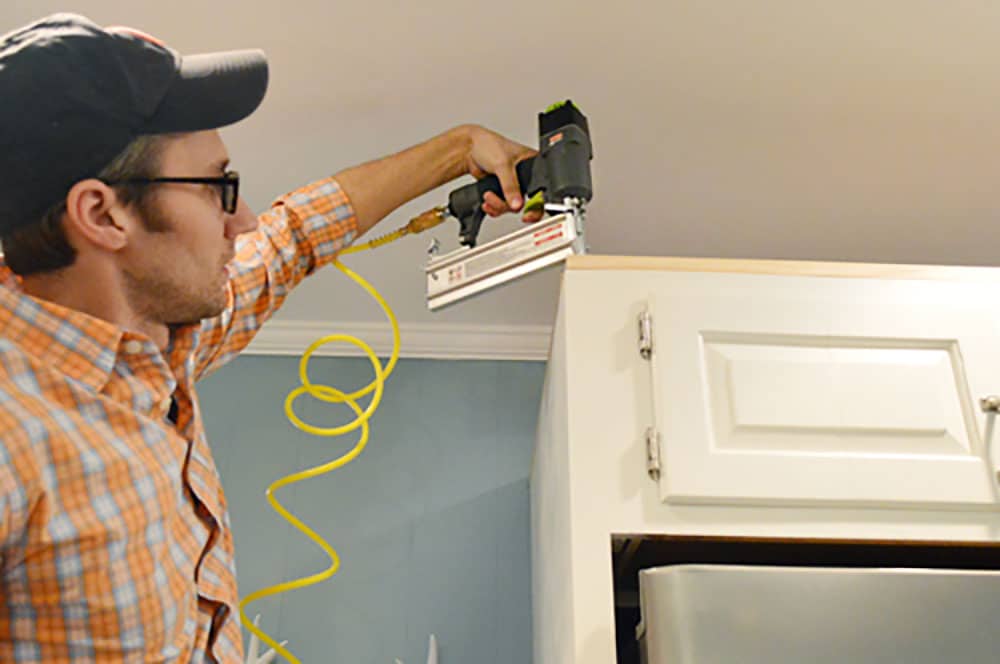
Step 2: Attach Scrap Wood Around The Top
We started off by attaching some scrap 1 x 2″ (leftover from the fireplace build) to the tops of the cabinets with our old nail gun and some wood glue, like so. This extra height provided more surface for the crown to rest against since our cabinet doors leave little space above them. Plus, we didn’t want to cover up any more of the cabinet box than necessary because it would only make them look shorter, not taller.
All of this will be hidden by the crown molding itself, so it doesn’t have to be particularly pretty (hence the use of scrap wood). Just be sure to add it along the entire perimter of your upper cabinetry.
Step 3: Cut Your Crown Molding
If you’ve installed crown molding on your wall before, then this part follows the same process. If you haven’t – check out our detailed how to install crown molding tutorial or watch the video below. The gist is:
- Measure (preferably twice!)
- Cut your molding
- Nail it into place
We make our cuts using our miter saw and love using a Kreg Crown Pro to help hold the wood in place as we cut. It makes this sort of process sooooo much easier because it holds your molding at the correct 45-degree angle while you cut. You can see it in action in the video below.
How to cut crown molding
If you’d like see the process of cutting a piece of crown molding on video, this tutorial below covers everything from measuring, cutting, and installing. It shows installation on a bedroom ceiling, but the same concepts work for adding crown molding to your kitchen cabinets.
Note: You can also watch this video on YouTube.
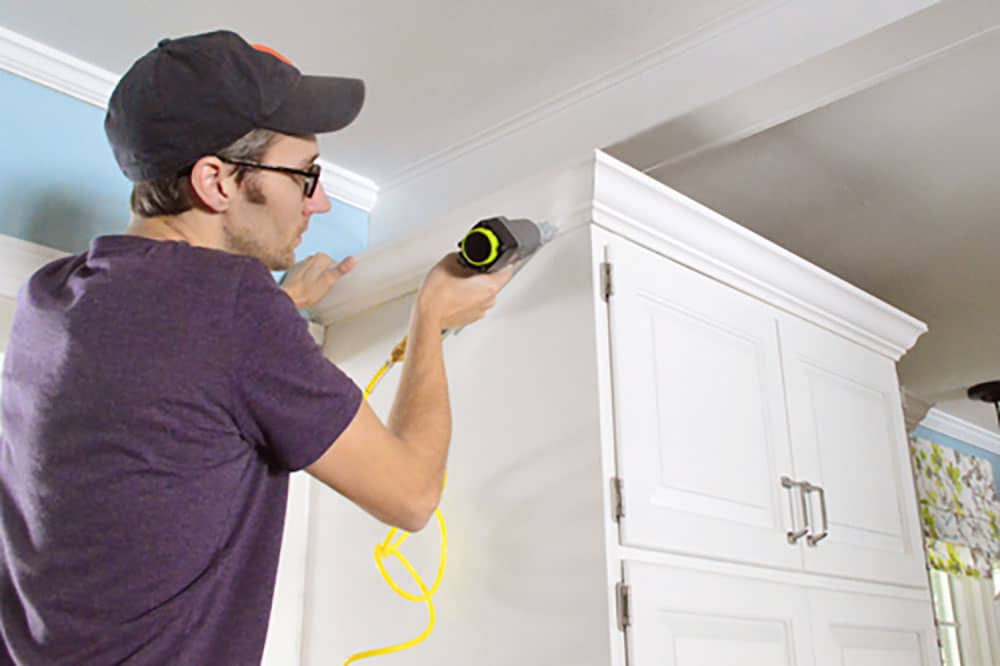
Step 4: Nail The Crown Molding Into Place
Once your molding pieces are cut, use a nail gun to attach the molding to the scrap wood that you added to the tops of each upper cabinet. Just a small nail every few inches should do.
TIP: Tape & Glue Your Outside Corners
These outside corners can be a little tricky. You’ll want them to hold tightly together, but nailing such small corner might splinter or break your wood. Instead, we to squeezed a bit of wood glue between them and tape everything together while it dried. A few hours later we removed the tape and it worked like a charm. Whew.
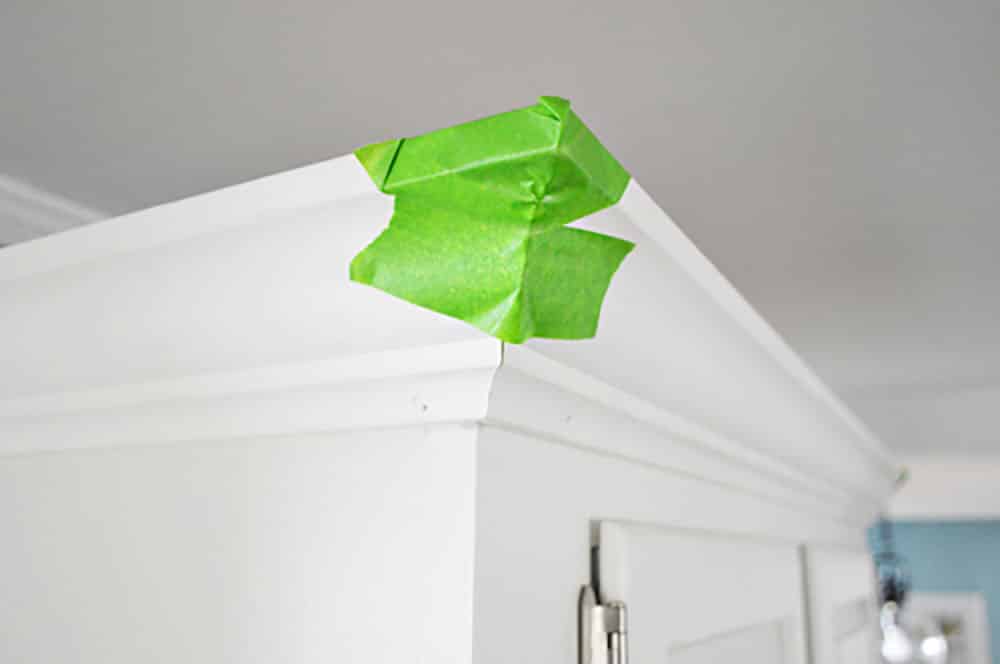
Alternatively you could also try clamping a small piece of scrap wood behind the corner and nailing both pieces of crown into it.
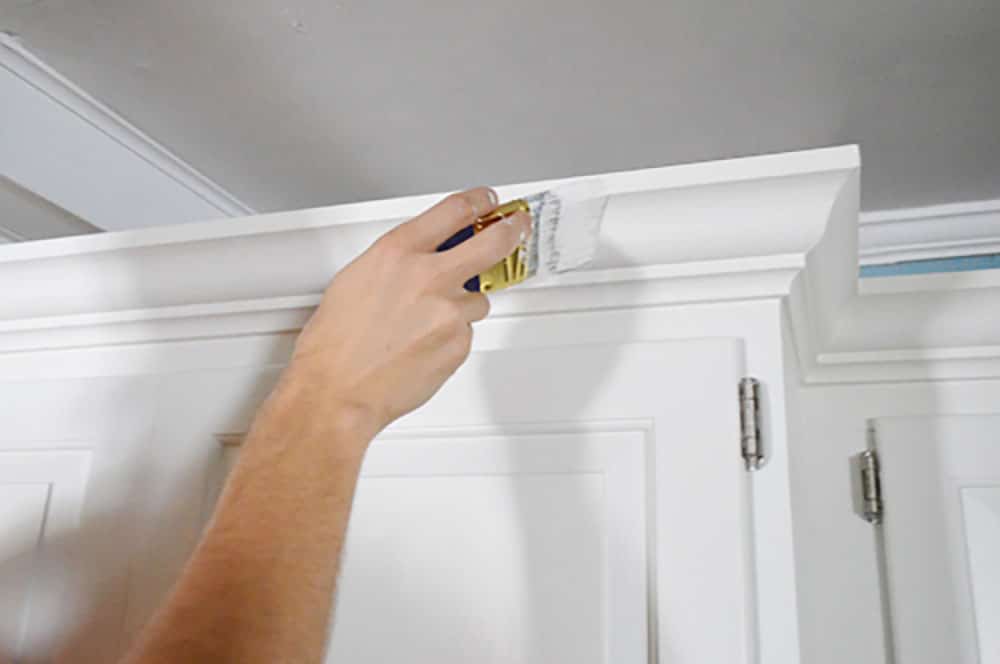
Step 4: Caulk & Paint Your Crown Molding
Once the crown molding was installed around the whole room, we broke out the ol’ caulk gun to fill in some of the seams and nail holes. We like to use the Alex Plus Fast Dry caulk because it is ready to paint within an hour.
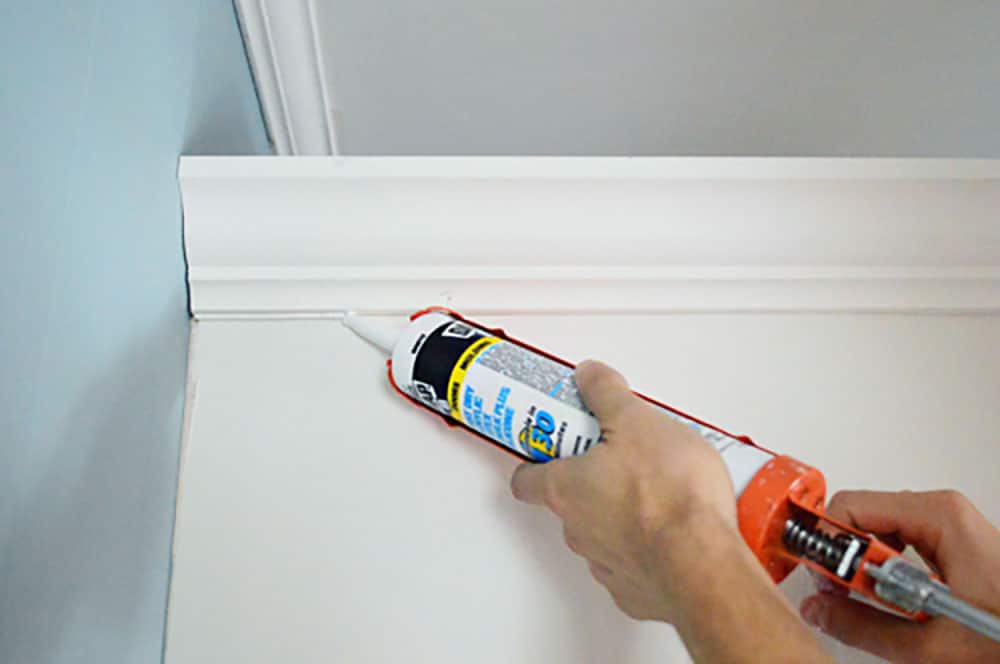
We waited about 45 minutes later and applied a coat of paint in the same color as the cabinets (Benjamin Moore’s Cloud Cover). Since the crown molding was already primed white, it only took one coat, but if you’re doing a darker color you may need two coats.
Once your paint is dry, you’re done! Woo hoo!
How Much Did It Cost?
In addition to this project being pretty easy – it was pretty darn cheap too. Our only expense was the three pieces of 8ft crown that we bought, so the grand total was about $35 for this entire project. Not bad, right?
It’s definitely one of those projects that Sherry and I are kicking ourselves for not doing sooner, but they do say better late than never, so we’re happy we eventually climbed aboard the S. S. Molding. Ahoy.
The crown molding has been a great way to help transition our kitchen from a modern space to a more traditional one, and we think the result is quite stately looking!
More DIY Molding Projects
Want to see more crown molding applications? Check out some other do-it-yourself fixes we’ve tackled.
- Cheap & easy DIY board and batten
- Installing crown molding around built-in bookshelves
- How to add “chunky” crown molding using baseboard
- Making base cabinets look built-in with trim
- Adding traditional trim framing to our bathroom
- A colorful planked accent wall
More DIY Kitchen Cabinetry Projects
Looking for some other ways to update your kitchen cabinets? Here are some other do-it-yourself solutions we’ve used in our kitchens.
- The proper way to paint wood cabinets
- Installing hidden hinges on old cabinets
- How to remove upper cabinets for a more open look
- Staining wood cabinets darker without sanding
- How to paint Ikea kitchen cabinets
*This post contains affiliate links, so we may earn a small commission when you make a purchase through links on our site at no additional cost to you.

Mr. & Mrs. P says
We have the same trim onto of our cabinets! It just ties everything together.. Its the cherry on top! great job!!
Christy Niebaum says
Your cabs are bringing sexy back (yeah!).
YoungHouseLove says
Haha!
xo
s
Joan says
It is amazing what a huge impact $35 can make. You are giving me courage to tackle my dream of adding crown to my ceilings!
Kristi says
I’ve always wanted to do this! We mentioned it to a window installer, and he told us you can purchase crown that mounts to the top of the cabinet (so you don’t need to add the 1×3 strip first). I haven’t come across it yet, but just thought I’d mention it in case anyone else is looking!
YoungHouseLove says
Smart!
xo
s
Megan says
Yes! I’ve been on “team molding” since the kitchen reno was completed but kept quiet since it’s your kitchen, not mine! I think it looks great with the fireplace redo, it really ties both spaces together. [Borat voice] Very nice!
Megan says
I’m glad you gave it a second look. To me, it is what makes a room look finished. The affects of crown molding never cease to amaze me. Well done!
Heather @ What Does She Do All Day? says
The molding looks great! I’m a modern meets traditional kind of girl, too, so of course I love it! I already have the crown on my cabinets. I just need to get around to painting them (oh, oak cabinets I loathe you)!
Cara D says
It looks very nice! I like a mix of modern and traditional. Perfect timing as I am getting ready to put in built in bookcases adn want to add crown. I’ve never done anything with crown molding before. Will this jig work with a 10″ miter saw? Also when doing regular crown on the ceiling you can nail into a stud on the wall, do you try to nail into a joist on the ceiling or just the drywall?
YoungHouseLove says
By jig do you mean Kreg Crown Pro? It works great with our miter saw (we think it’s pretty universal). With regular crown molding you can nail into a stud (since drywall isn’t as strong) and then we just fired a nail into the ceiling at the same spot (held nice and firm, probably because at least all of the base nails went into studs). Hope it helps!
xo
s
Cara D says
Yes, I meant Crown Pro :) Thanks. I am going to order one of these with my amazon gift card. I did get the Kreg pocket hole jig after one of your post and I LOVE it! It is fun to use and it actually gave me the confidence to build from scratch instead of just making over existing furniture.
YoungHouseLove says
So glad Cara! Good luck with everything!
xo
s
Gabbi @ Retro Ranch Reno says
Ahhhh, what a difference a little crown can make! It looks awesome! :)
Jess @ Spool and Spoon says
LOVE the before and after! Just emailed a link of this to my husband and much to my surprise, he instantly agreed that we can and SHOULD tackle this project. Yay!
Melissa says
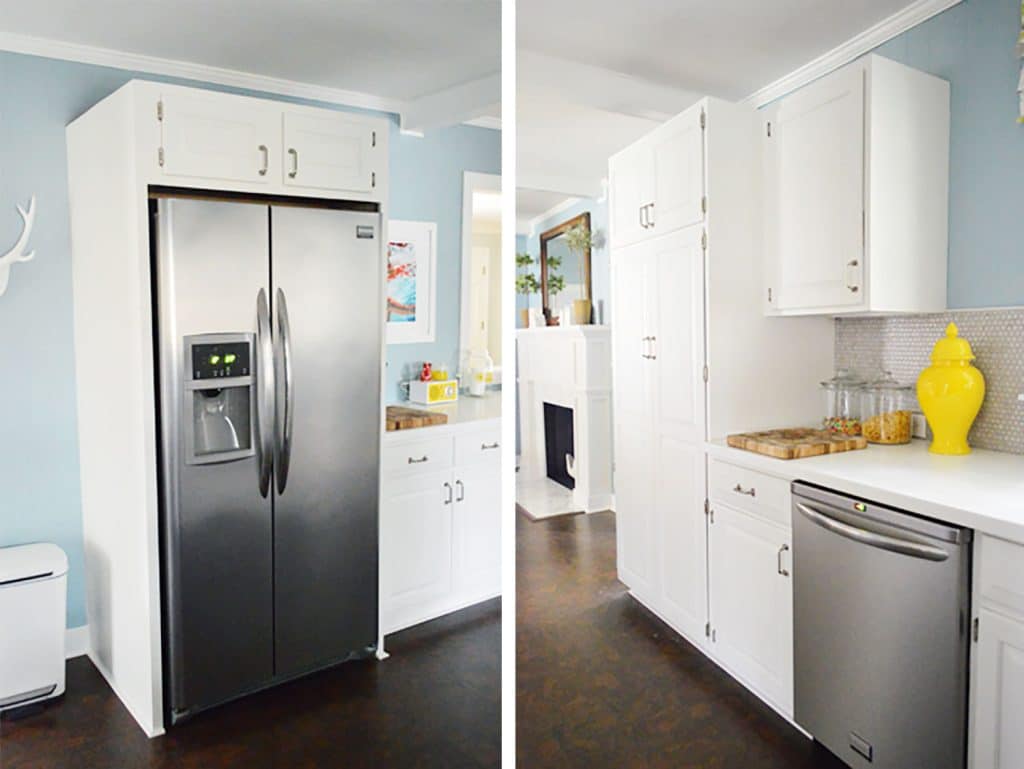
It looks great!! I can’t tell from the pictures, but what did you guys decide to do about lining it up (or not) with the door next to the pantry?
YoungHouseLove says
I think in the second pic you can see it, but the front of the pantry lines up with front of the base cabinets since it’s that deep :)
xo
s
Tom Corliss says
Yet another great project. It is funny, when we were younger we did not like trimwork so much but, as we have matured and completed tons of DIY projects we hae truly loved using crown trim. We use it in every room including bathroom and hallways.
I see you use DAP caulking. I would suggest you try Polyseam seal by locktite. It does cost a little more but it is suppior quality and it has adhesive in to to insure a continued tight joint fit in the future. Again great work.
YoungHouseLove says
Never tried it! Sounds awesome.
xo
s
jeni says
I just LOVE how you guys can pull a space together! Your kitchen is amazing and reading about all your DIYs gave me the courage to do our kitchen too! We jumped on the white cabinet train, and I used a walnut stain pen to add a little detail. I could not figure out how to hang the crown, so I used case molding! I actually like it BETTER! :) Here is a link to my kitchen! http://jensidea.blogspot.com/2013/03/from-drab-to-fab-kitchen.html I would love any feedback you could give me!
Thanks
Jeni
YoungHouseLove says
That looks awesome Jeni!
xo
s
Jennifer says
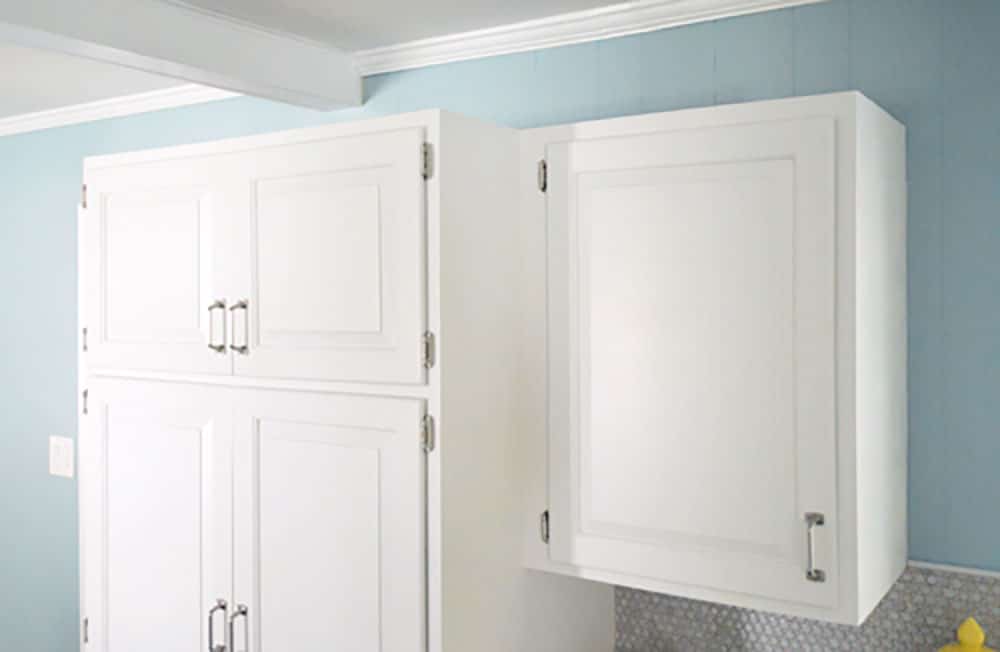
I wish the cabinets went to the ceiling! The crown molding looks weird b/c it just stops like 6″ from the ceiling.
YoungHouseLove says
There are beams in the kitchen so the cabs can’t go to the ceiling because they’d run into them (looks wonky) :)
xo
s
Keisha says
Ties in well to the new fireplace, looks great!
Gayla says
WOW! What a big difference the crown makes. I mean.. its the difference in a commoner and royalty.
haha! love it!
Jen says
You guys, I LOVE the kitchen now! I hate to say it because I don’t want to hurt your feelings, but I wasn’t a fan of the grellow. It was so loud and bright. :/ I LOVE the blue. You guys are awesome. <3
MJB says
Maybe because I’m more traditional-modern than super modern, I love the changes: the perfecta trifecta (crown, paint, fireplace.)
lesli devito says
I am loving the glasses!!! and the trim looks amazing!!! You guys just keep topping yourself! NO PUN intended!!! xo
Misty says
Oh wow, that looks O-masing! So much more polished and finished looking! I love it!
Tirsa says
Such a nice finishing touch.
Karen Z says
Looks like a million bucks! It really upped the caliber of your kitchen! Love it.
Grambie of Six says
As both a Certified Kitchen Designer and someone old enough to be your mom, may I just say this: I’m SO proud of you two!
YoungHouseLove says
Aw thanks!
xo
s
Karen Z says
Hey, a question for you, if you have time to answer (totally understand if you don’t!). So. Our last house, I painted all the doors and trim white. I painted all the walls. I painted the kitchen cabinets (properly, which as you know takes mucho effort!) This house, similar story: I am in the midst of painting and staining the stair railings, the trim, the doors, the walls. I like painting, but I am burning out, especially on the white trim, which takes 3-4 coats, as you well know!
So my question: What self-talk do you do to keep yourself painting? How do you keep chugging along when it is such tedious work? I know you have done cabinets, trim, molding, fireplace surround, board and batten, furniture pieces, and SO MUCH MORE. My life is so full and busy, as is yours, and recently the last thing I have wanted to do was pick up my angled brush and get to dippin’. Do you have any secrets to your diligence?
YoungHouseLove says
I like music! I turn on some good tunes (we’re fans of Pandora) and that helps the time go by. I’ve even been known to listen to things (like NPR podcasts or even TV shows like Law & Order, even if I can’t see them). For some reason it helps me plug along. Oh and eat first! Painting when you’re hungry stinks. Haha!
xo
s
Karen Z says
Thanks so much! I will make sure I provide sufficient entertainment for myself. I think I don’t do that consistently. I do think that can be the key to mental health ;)
And yes- snacks help with the happy! :)
Kathryn says
Loved this question, Karen Z.! And thanks for answering it, Sherry! I think for myself, getting psyched up to do a project is one thing, ‘toughing it out’ is another entirely.
My tip (although I’ve in no way done something like a seven hour paint marathon. We’re talking spring cleaning rampage here at most.) is audiobooks on the iPod. Obviously not ideal if you’re doing something where an aspect of concentration needed, but as far as pure elbow grease grunt work, I’d go slightly batty without them! Plus, you get the added benefit of getting to engage in ‘book-chat’ even if the task at hand means curling up with a book is a luxury you don’t have. (They’ll never know you just listened to it, honest!)
YoungHouseLove says
I love that!
xo
s
HK says
Double sorry for not noticing my comment posted. I went through every page of comments twice before posting my last comment and then of course I noticed my original comment posted. How did I miss it!? Twice!?!!? UGH I should have known you two are not comment Nazis.
YoungHouseLove says
No worries HK! Sometimes it’s hard to find it :)
xo
s
Amy M says
I just installed crown molding to our existing kitchen cabinets. It makes a world of difference! They went from “builder’s basic” to more of a custom look in just a few hours. The only tricky part for me was matching the painted and antiqued look that the cabinets had been painted before we moved it. Now that it’s done, I wish I had done it sooner.
Nice job!
Loren says
I’m generally not a fan of crown molding on cabinetry, I always feel like it looks to ‘fussy’. But these before & after photos may have changed my outlook. The after looks so much classier and more ‘finished’. Great choice!
Nicki D says
I am soooo glad you posted this! My husband and I plan on tackling the crown molding on our kitchen cabinets this weekend. I couldn’t figure out how to actually attach the molding, when I saw the picture of the scrap wood being attached I had a total Ah Ha moment!
Thanks again!
YoungHouseLove says
So glad!
xo
s
JC says
Your new motto should be “Put a crown on it”.
YoungHouseLove says
Ha!
xo
s
Ellen says
Wow. It really made a HUGE difference. Looks great!
Kristen says
OK, now that you’re steering slightly more traditional AND you’re becoming millwork experts, will you please coffer the ceiling in your living room? I’d like you to work all the kinks out before I do mine :)
(Cabinets looks great – bravo to you on the recent tweaks to the kitchen!)
YoungHouseLove says
Ahhhhh, wouldn’t that be insane?! Oh how I’d love to. The only challenge is that those beams aren’t evenly spaced (why???? whyyyyyy????) so the squares would all be different sizes :(
xo
s
Fiona Potter says
SO PRETTY. Molding used to be this tacky, old fashioned thing, but with clean colours and lines it makes a room look so much more classy!
Also, it just goes to show that sometimes all you need to do is to shake things up a bit.
Heidi says
Looks great guys!
Hannahhenning says
Wow! Love the crown molding! A fantastic upgrade! Looks especially good with the new wall color! (I think that’s enough exclamation points for one comment, don’t you?!) Oops.
YoungHouseLove says
Haha! Not to worry, I overuse them too! See?! Ha!
xo
s
Kathryn says
You guys are just crowning kings and queens! You may need your own country soon!
Cat Morris says
Totally off topic here, but have you seen the blog “One Hundred Dollars a Month” by Mavis? She’s like you guys, except she has a gardening and cooking focus. I say she’s like you guys because she has a cool DIY projects, a totally can-do attitude, is into saving money and is a very fun read. You have to scroll through a few days to see the range of stuff she does.
How to build and plant a square foot garden
Send in the gomes project
Here is a little wall project I could totally see you guys doing!
Living Wall Planter
YoungHouseLove says
I love it! She’s awesome and I love her projects.
xo
s
Meredith says
This has nothing to do with anything, but I was randomly re-reading old posts and was reminded that you guys applied for The Amazing Race together before you became a couple. I totally bet you’d make it on the show now as celebrity bloggers! (I realize you’d have more logistical challenges as you now have Clara…) I’ve never heard of the “YouTube hosts” pairing they have this year—and you’re best-selling authors! Just in case you’re looking for something to add to your extremely busy lives. :)
YoungHouseLove says
Haha, you’re so sweet! Thankfully we didn’t get picked because I later realized I’d be TERRIBLE on that show. I have no sense of direction, I’m a terrible driver, I’m a total stress case, and I only run when I’m being chased. Haha! I’d be epically bad! John would rule though, so I hope he goes on with his sister or brother in law someday. I’ll hang back with Clara. Haha!
xo
s
Carolyn says
Isn’t it amazing what a little crown moulding will do and how dramatic it makes something look? I’m always impressed by it. Look at you guys go! You are very busy. It’s looking great. I’ll have to search your blog for the hexagon tile you did. Looks like a ton of work but so gorgeous!
Felicity says
So much better!!! I wonder what you’ll crown next…
Krystle @ Color Transformed Family says
I really like it with the crown molding. The lack of molding had never bothered me but now that I see the before and after pictures I agree… molding is best.
Stephanie says
Great job! I just bought this rug from from Target’s new line called Threshold. http://www.target.com/p/threshold-floral-bell-hand-tufted-indoor-outdoor-area-rug/-/A-13976913#?lnk=sc_qi_detaillink I put it in front of the kitchen sink…well worth the $29.99 to brighten up the space!
YoungHouseLove says
Love it!!
xo
s
Mary A says
Love it! I am working on a bathroom cabinet right now. I decided to paint and wanted Benjamim Moore Advanced like you used on your cabinets. Be glad you live in a major city;my local Ben Moore retailer could not even order it for me. I am ordering from a store 30 miles away and they could not order the Advanced primer in a quart size.
YoungHouseLove says
Oh no!!! It’s the best paint. I hope it becomes available out your way soon!
xo
s
sara says
I love your blog and have been following it since you started with your first house, I haven’t been following it for awhile, but I still am a fan of the projects and all. But I wonder if you ever just stop and say “I think we are done” I mean I love all the rooms and everything, is it always in need of touch ups, new paints, new rugs etc…when do you think that you’ll be truly done with your home and sit back and relax in your ‘already beautiful home’ and be fully settled in. It just feels like the house has been a projects for years now. I love it, don’t get me wrong. Just a thought :)
YoungHouseLove says
Oh yes, we learned with our first house that it takes forever so instead of rushing for the finish line it’s all about enjoying the ride! It took us 4.5 years with that house to be “done” and we’re on year 3 here, but we love DIY (it’s completely our passion and we did it for fun well before it was our full time job). Here’s a post with more on that subject :)
xo
s
Mary | lemongroveblog says
That looks mighty classy! I love it :)
Emma says
Ooooohhhhhhh (said as the Minions from ‘Despicable Me’)
YoungHouseLove says
Haha, best movie ever! Makes me cry every time.
xo
s
Christine says
I love crown moulding! It always adds such a finished look.
eileen marie says
$35= much more higher-end looking kitchen!
Elizabeth says
Wow, I’m amazed what a big difference it makes, love it!
Leah says
Honestly – When do you guys sleep? I’m serious. On average, how many hours of sleep do you get every night? Between your blogging, your book, your side projects (i.e. Shades of Light), you DIY projects, partying (Clara’s birthday, etc.) and hanging with your family…when do you sleep?!
YoungHouseLove says
Hmm, in all honesty we go to bed around midnight to 1am and get up around 7-8. So not too bad (6 hours on a bad night, 8 hours on a good one). We’re definitely busy bees and we work nights weekends, and even on vacation, but I think since this all started as a hobby it’s still fun for us, and it’s what we’d be doing on nights and weekends anyway (although probably not on vacation, haha!
xo
s
Koliti says
Ahhh…the crowning touch!
Things happen in their own due time…
If you had “tried” to do all of this crown molding before the Kreg Crown Jig and the nail gun – the “cuss-word factor” rating would have been through the roof. You would have had to “bleep” out every other word of your post :)
Now nothing is safe from a little crowning addition.
And John is a happy (and sexy!) nail gun slinger.
As for cheap (free!) upgrade…I have a round flat “pseudo” flush-mount ceiling light fixture in the kitchen – that I would look at and think, “it bugs me that you don’t sit flush against the ceiling”. I dug around in my metal stash and found aluminum slightly-corrigated 4″ wide edging (originally for the garden?) – I cut a length to wrap around the circumference of the light fixture with a little over-lap and taped the over-lapped edges together with aluminum tape – and viola! A nice snug “sleeve” that wraps around the light fixture and sits flush against the ceiling and that can be “wiggled” off for access to clean, change the bulb, etc.
YoungHouseLove says
So smart!
xo
s