Updated January 2022
Do your kitchen cabinets feel a little bit unfinished? Or maybe don’t quite reach your ceiling, leaving a weird gap? We’ll gonna show you how we installed crown molding to give our upper cabinets a simple DIY upgrade. It’s one of my favorite, easy kitchen projects – and we completed it in just 3 hours!
Why We Added Crown Molding To Our Kitchen Cabinets
When we finished our kitchen reno last year we decided to forgo any crown molding on the top of our upper wall cabinets because we decided we liked the clean, modern look of the square edge. Plus we had never installed crown molding before, so I think we were subconsciously too intimidated to try.
But after having learned to install crown molding on a ceiling, we decided it was time to add it to our upper kitchen cabinets.
Steps For Adding Cabinet Crown Molding
This is a surprisingly easy project with only 4 basic steps, so it’s something you can easily complete in a day. Here’s a quick overview of what you’ll be doing:
- Attach scrap wood above your cabinet to nail the crown into
- Measure and cut your crown molding
- Nail in the crown molding
- Caulk and paint
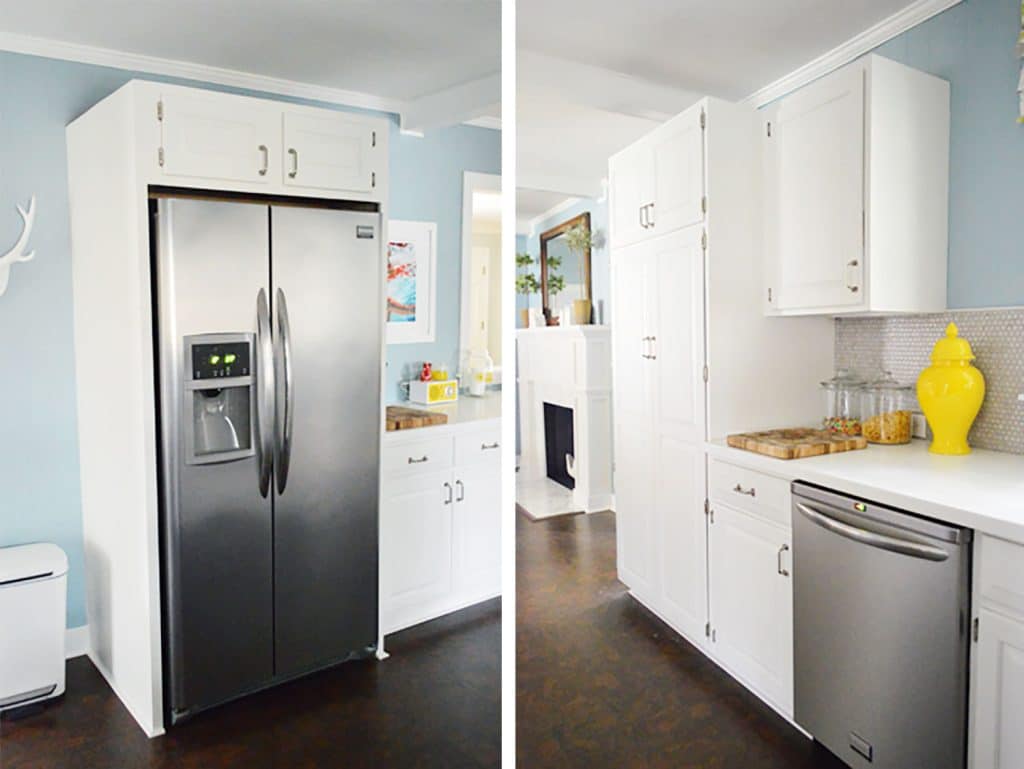
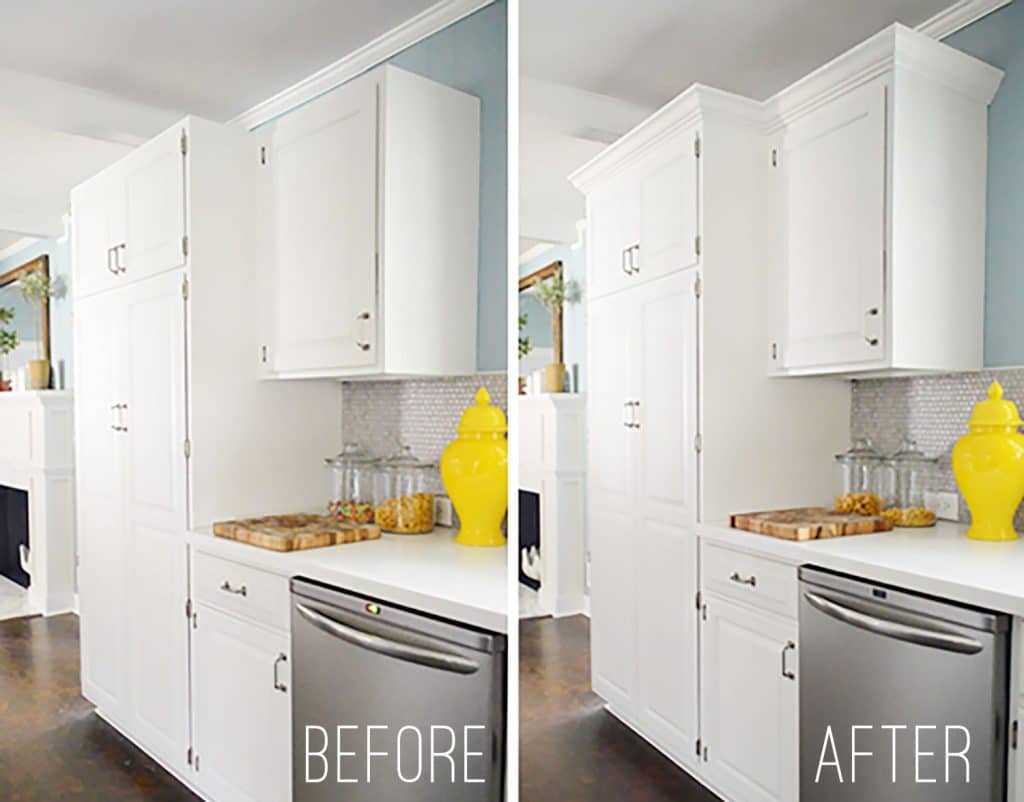
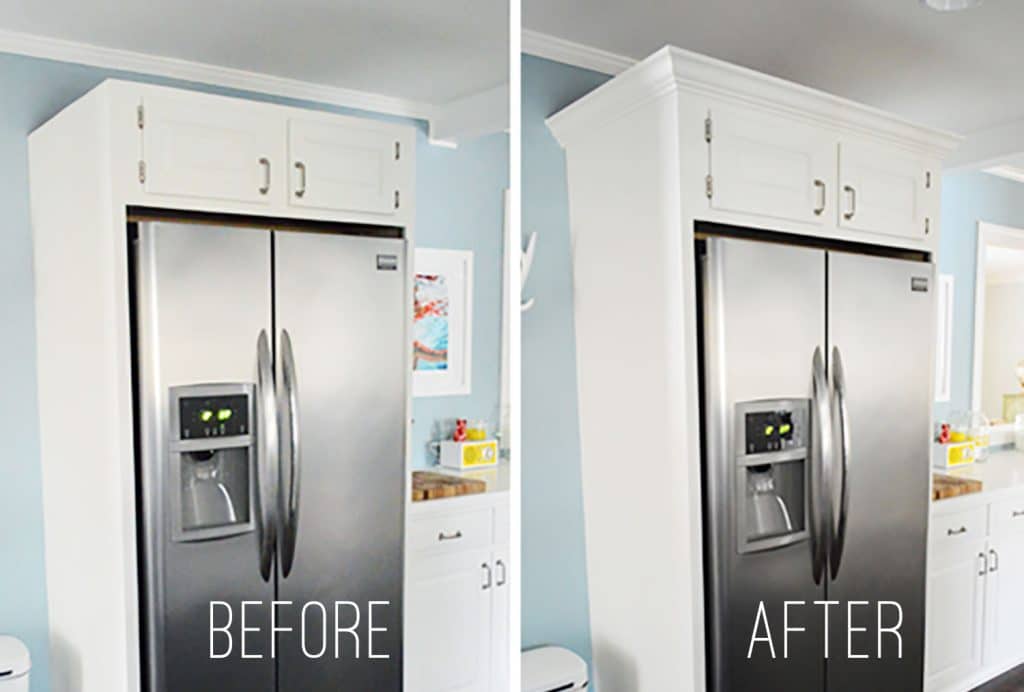
And as you can see above, it makes a big difference!
Tools & Materials Needed
To add crown molding or other trim to the top of your cabinets like we did, there are a few tools you’ll need on hand to make things go faster and more smoothly.
- Crown molding
- Measuring tape
- Nail gun (we currently use this one that doesn’t require an air compressor)
- Wood glue
- Kreg Crown Pro
- Miter Saw
- 1 x 2″ white wood or pine (scrap wood works too)
- Paintable caulk
- Paint*
- Short handle paint brush
- Painter’s Tape
*If your cabinets are wood, you’ll want to source crown molding in a stain color and wood grain that coordinates with your existing cabinets. Check with your cabinet manufacturer because they typically set an assortment of matching trims.
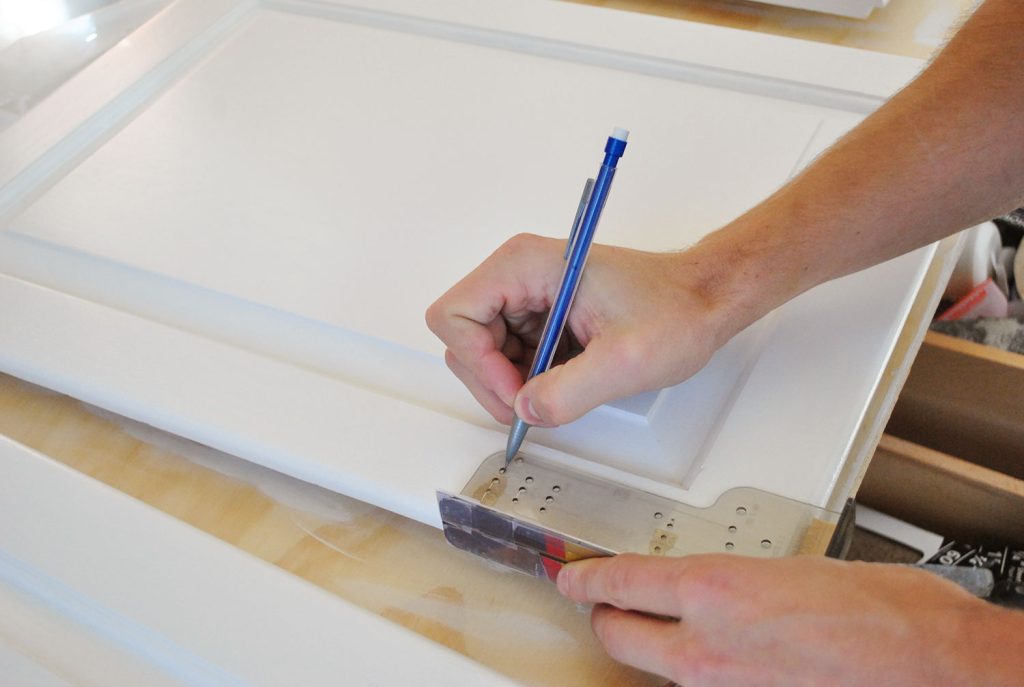
Step 1: Measure Your Cabinets
Before you even purchase your crown molding, carefully measure the top edge of your cabinets to determine how much you will need. Just be sure to buy more than the length of your cabinets. Since crown molding is cut at an angle, your cut piece will actually need to be longer than the top of your cabinets.
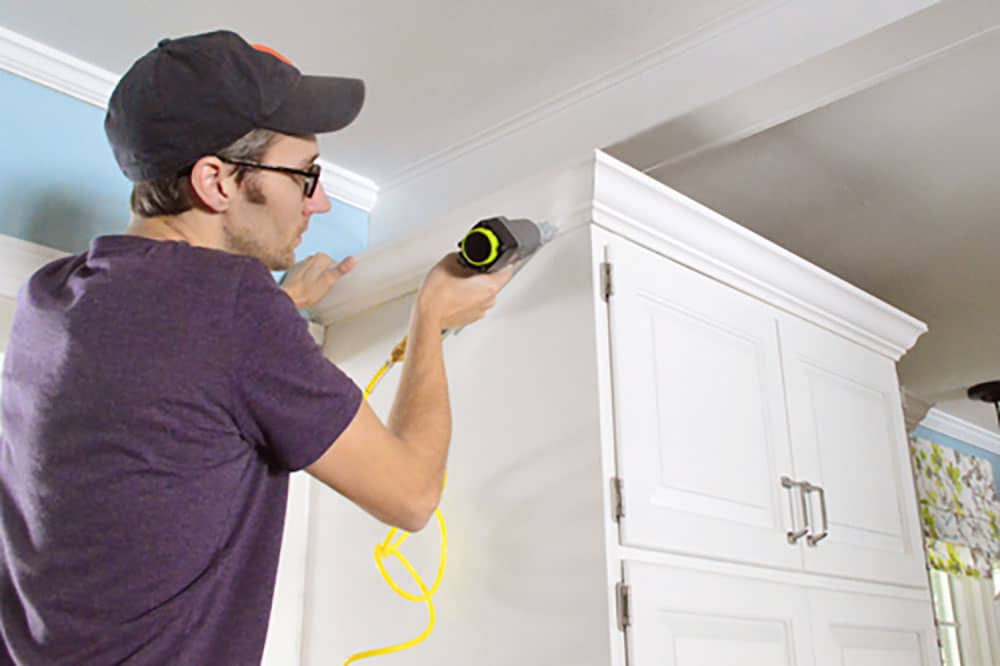
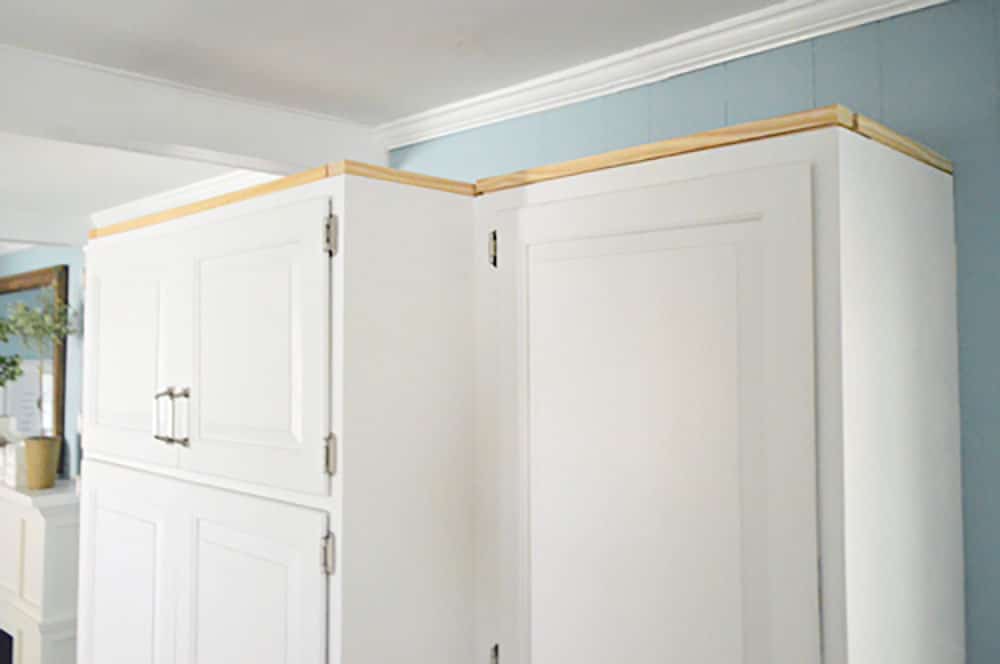
Step 2: Attach Scrap Wood Around The Top
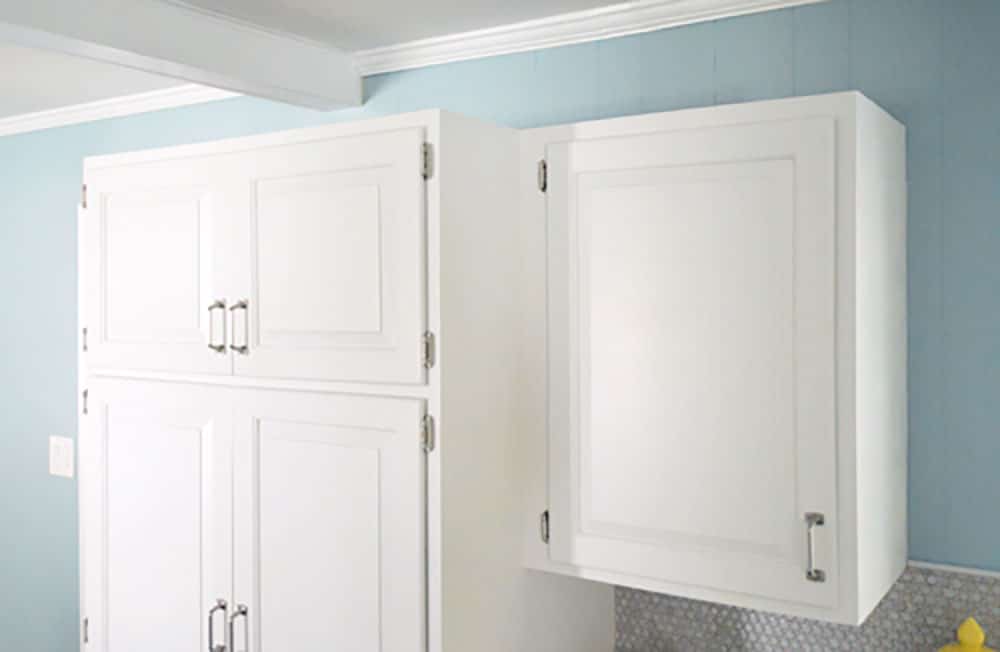
We started off by attaching some scrap 1 x 2″ (leftover from the fireplace build) to the tops of the cabinets with our old nail gun and some wood glue, like so. This extra height provided more surface for the crown to rest against since our cabinet doors leave little space above them. Plus, we didn’t want to cover up any more of the cabinet box than necessary because it would only make them look shorter, not taller.
All of this will be hidden by the crown molding itself, so it doesn’t have to be particularly pretty (hence the use of scrap wood). Just be sure to add it along the entire perimter of your upper cabinetry.
Step 3: Cut Your Crown Molding
If you’ve installed crown molding on your wall before, then this part follows the same process. If you haven’t – check out our detailed how to install crown molding tutorial or watch the video below. The gist is:
- Measure (preferably twice!)
- Cut your molding
- Nail it into place
We make our cuts using our miter saw and love using a Kreg Crown Pro to help hold the wood in place as we cut. It makes this sort of process sooooo much easier because it holds your molding at the correct 45-degree angle while you cut. You can see it in action in the video below.
How to cut crown molding
If you’d like see the process of cutting a piece of crown molding on video, this tutorial below covers everything from measuring, cutting, and installing. It shows installation on a bedroom ceiling, but the same concepts work for adding crown molding to your kitchen cabinets.
Note: You can also watch this video on YouTube.
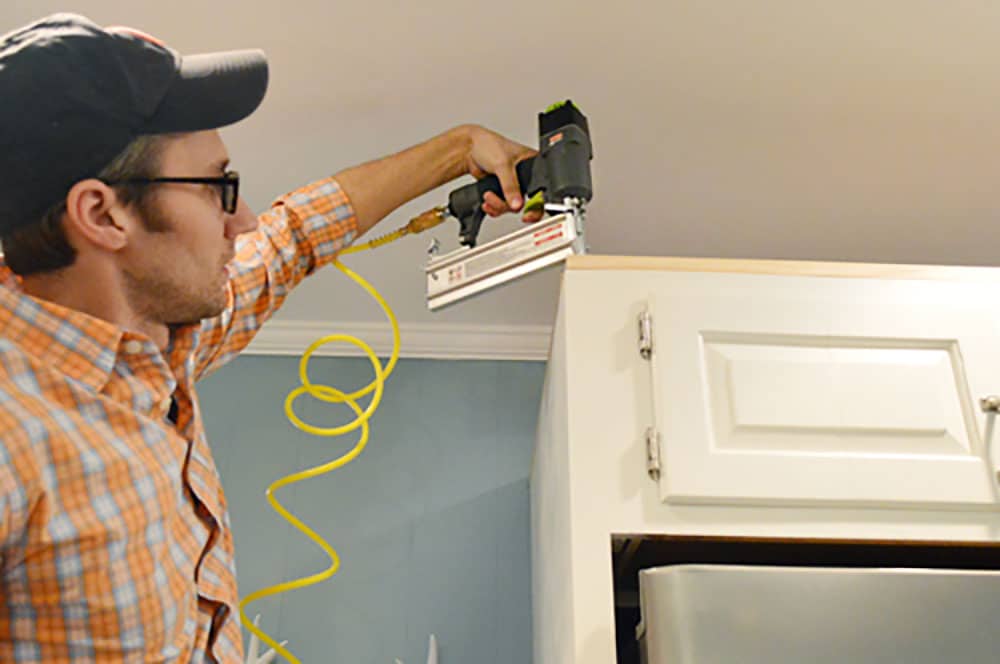
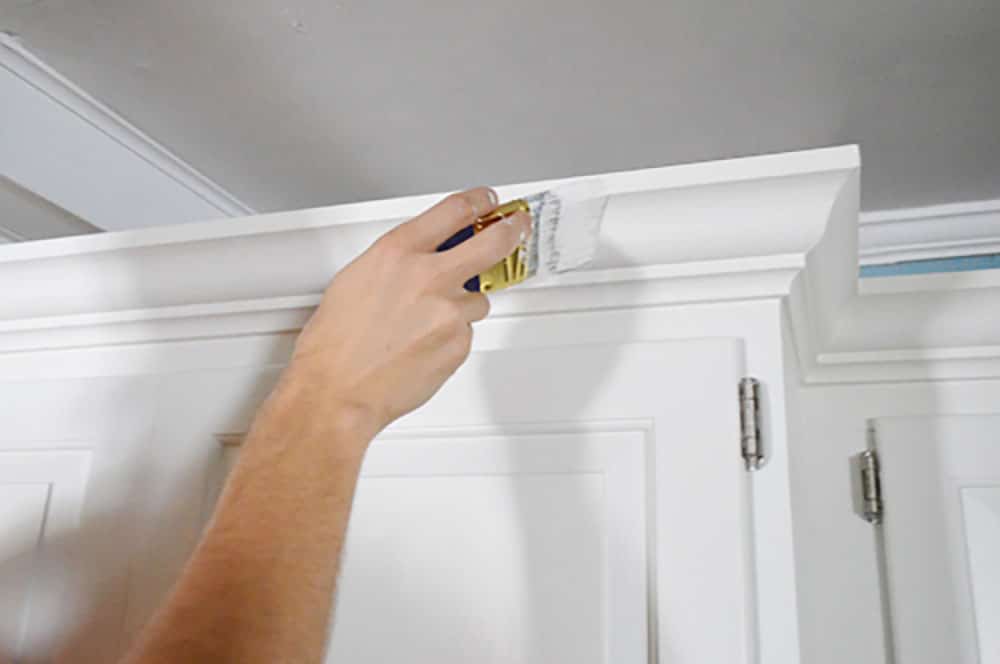
Step 4: Nail The Crown Molding Into Place
Once your molding pieces are cut, use a nail gun to attach the molding to the scrap wood that you added to the tops of each upper cabinet. Just a small nail every few inches should do.
TIP: Tape & Glue Your Outside Corners
These outside corners can be a little tricky. You’ll want them to hold tightly together, but nailing such small corner might splinter or break your wood. Instead, we to squeezed a bit of wood glue between them and tape everything together while it dried. A few hours later we removed the tape and it worked like a charm. Whew.
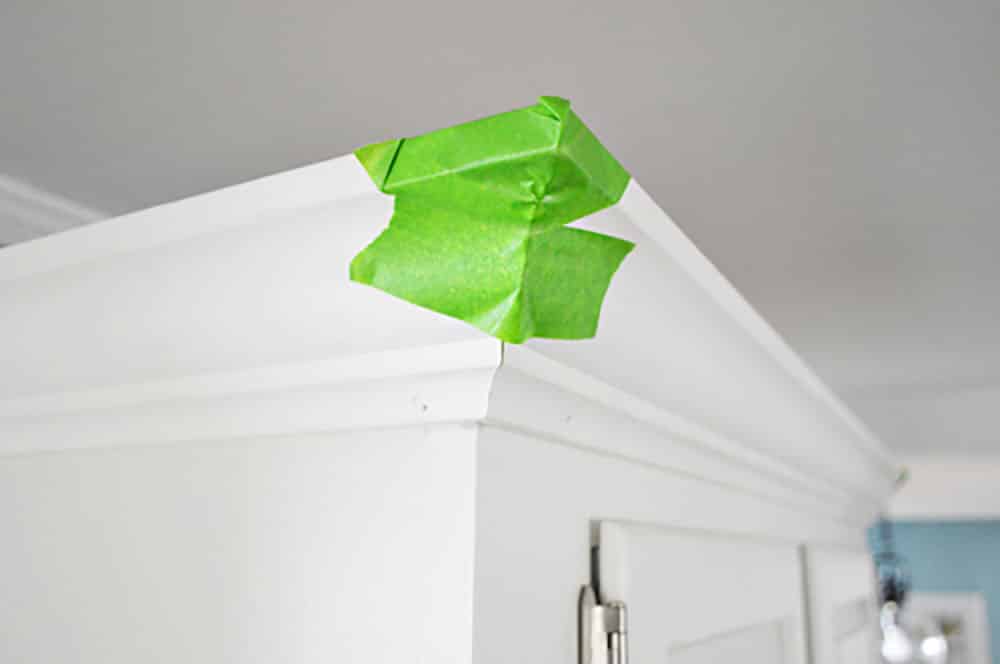
Alternatively you could also try clamping a small piece of scrap wood behind the corner and nailing both pieces of crown into it.
Step 4: Caulk & Paint Your Crown Molding
Once the crown molding was installed around the whole room, we broke out the ol’ caulk gun to fill in some of the seams and nail holes. We like to use the Alex Plus Fast Dry caulk because it is ready to paint within an hour.
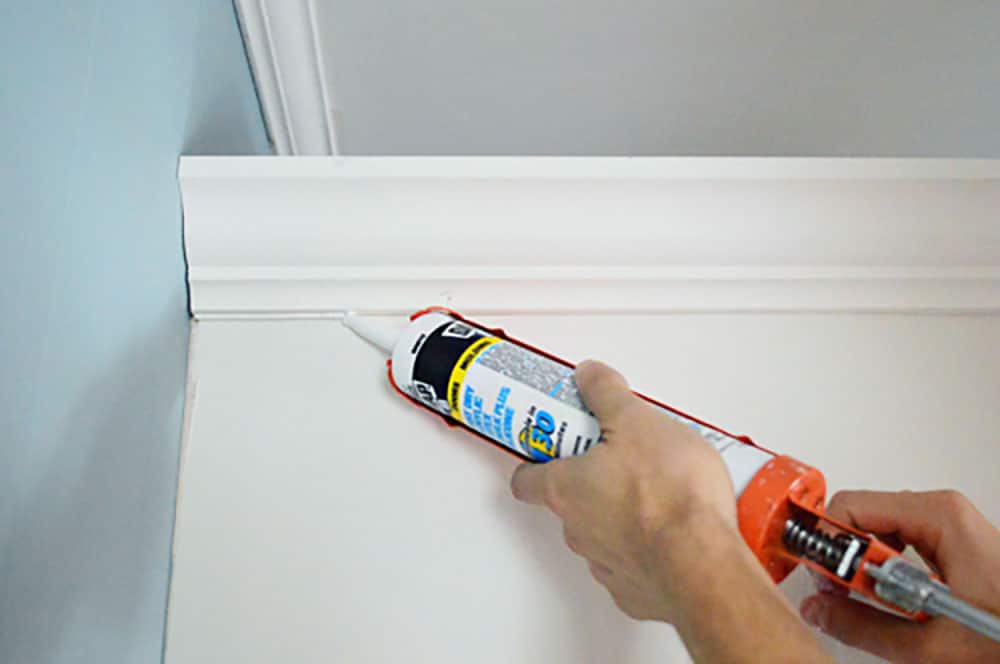
We waited about 45 minutes later and applied a coat of paint in the same color as the cabinets (Benjamin Moore’s Cloud Cover). Since the crown molding was already primed white, it only took one coat, but if you’re doing a darker color you may need two coats.
Once your paint is dry, you’re done! Woo hoo!
How Much Did It Cost?
In addition to this project being pretty easy – it was pretty darn cheap too. Our only expense was the three pieces of 8ft crown that we bought, so the grand total was about $35 for this entire project. Not bad, right?
It’s definitely one of those projects that Sherry and I are kicking ourselves for not doing sooner, but they do say better late than never, so we’re happy we eventually climbed aboard the S. S. Molding. Ahoy.
The crown molding has been a great way to help transition our kitchen from a modern space to a more traditional one, and we think the result is quite stately looking!
More DIY Molding Projects
Want to see more crown molding applications? Check out some other do-it-yourself fixes we’ve tackled.
- Cheap & easy DIY board and batten
- Installing crown molding around built-in bookshelves
- How to add “chunky” crown molding using baseboard
- Making base cabinets look built-in with trim
- Adding traditional trim framing to our bathroom
- A colorful planked accent wall
More DIY Kitchen Cabinetry Projects
Looking for some other ways to update your kitchen cabinets? Here are some other do-it-yourself solutions we’ve used in our kitchens.
- The proper way to paint wood cabinets
- Installing hidden hinges on old cabinets
- How to remove upper cabinets for a more open look
- Staining wood cabinets darker without sanding
- How to paint Ikea kitchen cabinets
*This post contains affiliate links, so we may earn a small commission when you make a purchase through links on our site at no additional cost to you.

Ashley @ LibertyBelles says
Wow looks great! It makes such a difference!
Kimberly says
I always like your no-molding upper cabinets but now seeing the before and after side-by-side, they definitely look more complete. I like it! I am in the middle of a less than $50 kitchen “remodel” (more like a spruce up) that I am hoping to share soon!
YoungHouseLove says
Ooh that sounds awesome! Can’t wait to see it!
xo
s
Maureen @ The Parkland Project says
I love it. Looks so much more finished and with such little work it was definitely a win. :) Just remember royalty wears purple and gold.
Brittney says
When we renovated our kitchen, we wanted to do the crown, then decided against it. Maybe you have changed my mind again! Looks great!
Heather says
That looks amazing! I’m loving your wall color more & more!
We’re almost finished with a complete kitchen makeover over here (just in time to list our house for sale =(…)
Here are the HIDEOUS before pictures: http://www.bakecreatelove.com/2013/03/ugliest-kitchen-ever.html
So far this is the only after picture I have… after the husband added some molding to the top of our cabinets. I love how much more class it gives a room! http://distilleryimage8.s3.amazonaws.com/01b4d3aa9afc11e2802a22000a9f3c9c_7.jpg
YoungHouseLove says
Wow- that’s such a transformation!
xo
s
Emily says
So interesting to see your tastes evolve… your first house was more of a traditional aesthetic and then this house journey began in a more modern vibe, and now you seem to be coming back around and marrying the two! Isn’t it wonderful how we evolve throughout our lives and our homes tend to visually reflect that!
YoungHouseLove says
It’s so funny how we flex one way and then seem to come back over the other way – it’s definitely a journey :)
xo
s
Jo says
I too noticed the swing back to the more traditional look. I just hope you guys don’t start being too “safe” with your spaces, that’s something I’ve loved with this house – how you think outside the square.
I certainly can’t say that your recent kitchen upgrades (paint, fireplace, crown) are bad, in fact the complete opposite, but they are heading away from my own personal style. But hey, I don’t have to live there LOL.
YoungHouseLove says
I think we’ll always love random enough things (a gaggle of ceramic animals, giant bike art, bright pops of color in our accessories/art/pillows, bold modern rugs, and patterned curtains like polka dots and ikat). That way, even if some elements of the room are more traditional, there will always be other objects and items that spice things up (like the basket light over the fireplace, the finger painted art we made for over the stove on that wall full of penny tile, etc). We’ve definitely learned that everything can’t fight to be the star, so it’s nice to layer classic + modern + unexpected touches so the space feels cozy and welcoming but still personalized and like us.
xo
s
Suesan says
I’m in the process of renovating the kitchen in my 163-year-old house. We are doing the cabinet molding now and I’m happy to see your trick with the board on top of the cabinet and the old glue-and-tape-the-corner trick. Thanks for the ideas and love the HRH, King Pantry.
Megan @ Rappsody in Rooms says
Love it! it really is all about the details, isn’t it? I like the ideas in the comments of lighting, but not sure how much you would actually use it. Always looking good in your house!
Karen Little says
What an “instant” upgrade, not only in looks, but also in resale value. Great job and great way to tie-in the fireplace surround as well. Love it,y’all!
YoungHouseLove says
Aw thanks Karen!
xo
s
sherri barron says
Yay! So glad you took the plunge! They look so much more finished now. Great job. I think we need one of those Kregs. The hubby hates doing molding.
Ginny @ Goofy Monkeys says
Lookin’ good! I will forward this on to my husband who looked at me like I was bananas when I suggested we add crown to the top of our kitchen cabinets when we renovate.
Lindsey d. says
“It’s definitely one of those projects that Sherry and I are kicking ourselves for not doing sooner.”
– This statement is the DIY equivalent to the woman with a perfect BMI bemoaning how fat she is. You’ve now used it for at least three projects and I’m sick of it. Please stop saying it. If you had been sitting around doing NOTHING to your house, maybe you could. But you have built a deck, refaced your fireplace, installed french doors, designed a big girl room, written a book and toured, and completed a million more projects in the past year or so that I can’t even list.
I think you are trying to say the project had a big impact; if so, say that… Please stop making the rest of us who don’t have the type of productivity you two have feel bad. :)
YoungHouseLove says
It’s more about questioning the order that we chose to tackle things than insinuating we’re not doing anything. We’ve definitely worked hard to share 2-3 updates a week for the past 3+ years without much of a break at all (it’s our full time job) so it’s more like “why did we put off crown molding and do something else, like redo John’s basement workshop only to realize what a difference crown makes in the room where we spend all of our time (the kitchen)?!?!.” Hope that makes sense!
xo
s
Julie B. says
With an abundance of respect, Lindsey, if you read that sentence and feel bad about your productivity, that really has nothing to do with John & Sherry.
You have to love yourself first. No one can make you feel productive or not productive – that is a choice YOU make.
Lindsey d. says
So my final statement didn’t come out the way I intended. I didn’t actually feel bad about MY productivity; I felt bad that John and Sherry seemed to feel bad about theirs. Sherry has explained it a bit, but I still think they need to stop berating themselves about the molding. I want them to remember what they’ve accomplished in the meantime instead of fussing at themselves for not doing this project sooner.
It’s perfectly understandable to put off a project you are intimidated by only to later learn more, get the right tools, tackle it and find out it’s easier than you thought. I had the same experience roasting a whole chicken. :)
Trust me, I love myself… Self-confidence is not a problem I have. That said, I do wish I had more time to work on house projects. I’m in the middle of one now that I’m sure I’ll say at the end “why did I wait so long?” And then I’ll remember the trips I took, the bike rides and runs, the time with friends, the holidays and festivals, and the other projects I completed and not worry about the year+ it took to finish this one project.
Lindsey d. says
My final statement didn’t come out the way I intended. I didn’t actually feel bad about MY productivity; I felt bad that John and Sherry seemed to feel bad about theirs. Sherry has explained it a bit, but I still think they need to stop berating themselves about the molding. I want them to remember what they’ve accomplished in the meantime instead of fussing at themselves for not doing this project sooner.
It’s perfectly understandable to put off a project you are intimidated by only to later learn more, get the right tools, tackle it and find out it’s easier than you thought. I had the same experience roasting a whole chicken. :)
That said, I do wish I had more time to work on house projects. I’m in the middle of one now that I’m sure I’ll say at the end “why did I wait so long?” And then I’ll remember the trips I took, the bike rides and runs, the time with friends, the holidays and festivals, and the other projects I completed and not worry about the year+ it took to finish this one project.
Megan Ferden says
It really does look fantastic!
Brenda says
It’s a nice balance with the top of the fireplace. It brings the swanky look to a whole new level!
Jon says
Looks awesome! Now you guys need to add a little light valance molding under the upper cabinets and install some under cabinet lighting!
The look would be complete! And it would help balance out the molding on top now. :)
Gabriella @ Our Life In Action says
So pretty…or should I say handsome for King Pantry. ;-)
Random Side Note – is it wierd that I looked at how much cerial or pasta was in the jars (before and after pictures)…lol I think I am watching too much Sherlock Holmes.
Great job! :-D
YoungHouseLove says
Haha!
xo
s
Jillian {Her Split Ends} says
LOVE it!! such a fabulous difference
nicely done kids
~ Jillian
Sam @ The Junk House says
I liked the cabinets before, but I love them now! It looks so much more finished!
Nina says
Yes! SO much better!! I was really hoping you guys would reconsider – it’s really amazing what a little bit of molding can do for cabinets! (And walls!)
Great job guys!
Ashley@AttemptsAtDomestication says
I definitely am aboard the S.S. Molding! After you guys did your fireplace the rest of the kitchen looked a tad too modern, but I love love love the crown with cabinets. It looks so good!
caraL says
Wow,your choice of colors (blue walls, gray tile, and stainless appliances)provides the bright modern touch you like and the crown just polishes it off! I’m a fan of brighter colors along with a few traditional touches. BTW, I liked your green walls but you hit a home run with the blue.
Heather P. says
It’s funny how a detail so small makes such a big impact! I think I can see why it took until now to upgrade the molding – I don’t know if it would’ve made sense to do it before the fireplace refacing, but now that your fireplace is all fancy-fied, it makes things look a bit more cohesive.
Unfortunately, I’m in an apartment, so no crown molding for me just yet…but I appreciate seeing how you guys have done it, so that someday, when the time is right, I can get it done myself!
cporoski says
How much of a difference does the nail gun make with hanging molding? Does it make the projects alot easier?
YoungHouseLove says
SUCH A DIFFERENCE. Probably saves us around 2 hours or so (that’s an average guess) when compared to using a nail punch.
xo
s
Kerry H says
I’m loving the upgrades you guys are doing to the kitchen!! Big changes (fireplace) or small changes (molding) – whatever it is, it’s working!! I think everything is helping the kitchen to have a more finished look to it! But I’m not sure I would have appreciated it as much if we hadn’t seen it w/o the molding first so I’m glad you guys are doing it all in stages. Looks wonderful!
Rachel says
The molding made a huge difference!
Stacy says
The crown looks awesome! I would love to add crown anywhere in my home but unfortunately it isn’t going to happen. My ceilings are just too low and I think it would look silly. Maybe in our next house.
Gaby {lifeineight.com} says
That pantry definitely looks more “royal” now! ;o)
Melissa @ HOUSEography says
Looks great – so much more finished. We did a similar update on our pantry wall a few years ago which really improved the look. http://www.houseography.net/2011/06/pantry-wall-makeover.html
YoungHouseLove says
Looks awesome!
xo
s
Crystal @ 29 Rue House says
It looks great!! Definitely one of those things you don’t even realize could be better until you do it! I wonder if it looks better because the cabinets are a more traditional style v. having something like this http://www.ikea.com/us/en/catalog/categories/departments/kitchen/11471/
I’m thinking about painting our cabinets black, at least all the bottom ones. We only have three upper cabinets (surrounding the wall mount microwave) so maybe those too.
Kristin says
The crown looks fab! This type of project scares me because I feel like I would mess it up or it wouldn’t look right. But, you are convincing me to come over to the dark side. :)
I’m in the middle of a DIY kitchen upgrade so I’ve been working on refinishing the cabinets. The doors are in good condition but the frames are just fair. I am using the Rustoleum Cabinet Transformations kit in Porcelain (with the antique glaze) and actually, I’m quite surprised by myself. The kit is great for first timers although now that I know the steps, I would opt to buy the contents separately to save a little dough.
JebberA says
YES YES YES! It does tie in nicely with the fireplace and the overall evolving style of Camp Petersik. :o)
Tyson says
Hey John – cool glasses – are they rx or safety specs? Where did you get them?
YoungHouseLove says
They’re RX (I wear contacts half the time and glasses the other half). They’re from Warby Parker if that helps (I think they’re called Crane).
-John
Nicki says
I have been working on my kitchen since August. I have a full time job and 3 kids, so my spare time is limited. So far, I have painted the cabinets, made no sew cafe curtains, and right now I am painting a faux subway tile backsplash. I am off this week so trying to finish it off. It is a VERY long process. Probably 12 hours of work time so far, but it looks amazing! After that, it will be painting the island and the back door. Then I can officially say one room in our home is done!
YoungHouseLove says
That’s amazing Nicki! Congrats on all your hard work- you’ve gotten so much done!
xo
s
Christina @ Homemade Ocean says
That looks amazing! Who would think a little crown molding could make such a drastic difference. They look much more substantial now…I like :)
The Norwegian Girl says
Awesome idea! I love how fancy it looks with the crown!
Amanda, RD- The Nutritionist Reviews says
What a great upgrade! I love how a small change changes the look so much.
Jessica says
Wow, that looks great! It’s amazing how much taller the room and cabinetry look by just adding a strip of molding! Will you be adding molding to the other side?
amber says
It looks so snazzy up in ‘thurr’. Ya, sherry you like my attempt at talking street to you?!? #whitegirlfromoregonandiknowit
Gretchen says
Thank you for doing Before & After shots from the same angle. It’s so hard to appreciate the difference when folks snap before and after shots from different view points. The new molding looks GREAT!
HK says
If you want to see how to take your cabinets to the ceiling without moving them, go here to Remodelando la Casa – http://www.remodelandolacasa.com/2012/01/closing-space-above-kitchen-cabinets.html. Cristina remodeled the cabinets beautifully. Built a new range hood cover, added a bookcase to the island, added a microwave to the island, built a refrigerator cabinet and tiled. Bland contractor home looks awesome now.
She also explains crown molding corners. With pictures.
PS Check out her “my projects” page and Don’t miss her tips on nail pops in your drywall.
YoungHouseLove says
Oh yes I love that! We just have beams that run across our kitchen ceiling, so the cabinets can’t go to the ceiling without awkwardly smashing into them :)
xo
s
Laree @ Ever Heard Of Euless says
I love the update. I’ve been thinking about adding crown to a couple of things in my house. But there’s one big thing holding me back that I’ve never seen anyone address – how much harder is it to clean the tops now? I know, dusting the top of cabinets isn’t something that is done that often, but isn’t it harder to do now that it’s a giant box?
YoungHouseLove says
I just get up on a stepladder with a dustbuster around once a year (did the same thing before the crown). Thanks to the nozzle of the vacuum it’s not hard at all :)
xo
s
Karyn says
I must’ve missed the paint update but I literally just painted my kitchens similar blue last week! Once the weather warms up ill be painting my cabinets white and adding crown to the top too! Thanks for the tutorial because now it doesn’t seem so scary!!
janice says
Looks great! And someone was hungry during the process! :)
YoungHouseLove says
Haha! We get our strength from cereal in this house.
xo
s
Lindsay says
Looks great!! Adding crown makes a huge difference. We put it up in our kitchen too :)
LMN says
I agree that your kitchen looked super modern compared to the rest of the house. This “new” kitchen definitely makes the awesome floors stand out and really pulls the other rooms in as well. fabulous for sure!
Katk says
Hey guys! Looks great! When I put trim on my cabinets, we glued a cube of 1×1 in each corner. That gave us something to attach the trim on and stabilize the corners without gaps. Of course wood glue is always a good thing to add too!
Tania says
Aghhh. Now I need to add “crown mold our 2 upper cabinets” to my to do list. Item number 5,678…! :-P
Kim @ Yellow Brick Home says
Wow, I love projects that are inexpensive and make huge impacts. It always makes us wonder why we didn’t do it sooner!
Gina says
I tried scanning the comments but got lazy so forgive if this has been asked – why didn’t you take this cabinet to the ceiling?
YoungHouseLove says
We have beams in our kitchen, so there are only three cabinets (we mostly have open shelving and a peninsula in the middle of the room with glass lights over it) and we were working with the cabinets that we had, so we opted not to try to go to the ceiling since the cabinet would crash awkwardly into the beams :)
xo
s
Mr. & Mrs. P says
We have that same trim ontop of our cabinets!! It just the cherry ontop! Beautiful work!!!