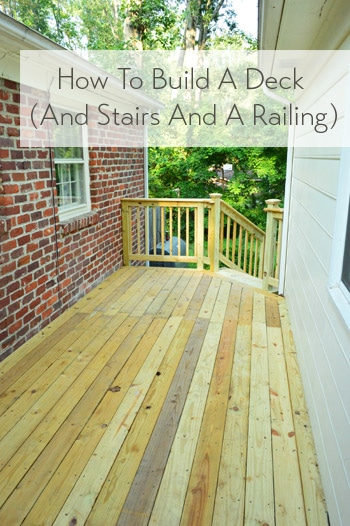
The deck is officially done. Sound the celebratory cowbells! I actually finished it on Friday and we’ve spent the last few days crossing all appendages and waiting for an inspection (I couldn’t bear to share my triumph until I was actually sure it was a to-code triumph). The inspection finally happened yesterday afternoon, and – ta-da! – we passed. Relief flooded over me like all the sweat that I put into building this thing (lesson learned: build decks in the spring or fall). Here she is in all of her wood-riddled, approved-by-the-county glory:
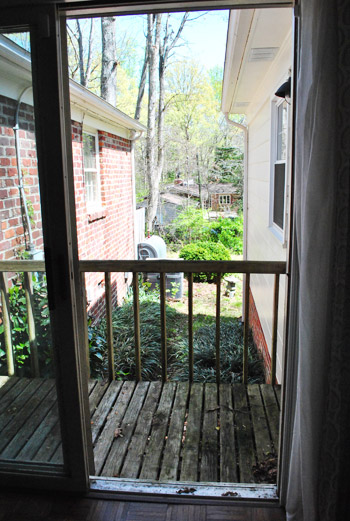
It’s definitely an upgrade from the tiny rotting balcony that we started with:
We thought it’d be great to have it done when Sherry’s mom came to visit from NY today, so I put my head down, powered ahead, and sweated through my belt for one last leg of this deck building marathon.
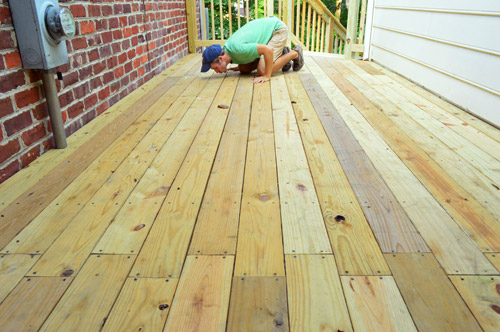
Admittedly it was a bit more of a marathon than I expected. We originally thought this deck would take us three or four weeks of on and off work to complete, but between the heat, thunderstorms, inspections, equipment rentals, material deliveries, summer travel (we ended up being gone more than half of the weekends since starting) and generally being a one-man show who has never built a deck before… it took ten weeks instead. But that doesn’t make the victory any less sweet to me.
I actually kind of enjoyed having an excuse to go outside (despite the extreme weather) and tinker around with something during the occasional Clara nap or Saturday morning. It was weirdly peaceful – getting to ignore emails and diapers for a few hours and just saw stuff. And of course having my dad’s help with the auger when it came to digging those post holes was the best. Nothing like a father/son project to get the serotonin pumping.
So if you’re wondering how long a deck project could take, I think an experienced team could knock something like this out in a week (you’d need a few days to pause for inspections in our area, so a weekend wouldn’t do it). But if you’re doing it almost entirely alone as a first-timer, and can’t work all day every day (maybe you can devote a few afternoons or evenings during the week and a day or two every other weekend like I did) it might realistically take you a month or two – depending how inspections go, if it’s raining for two weeks straight, etc. But I can promise you one thing: there’s an insane amount of satisfaction when you sink that last screw.
Now let’s rewind for a moment and I’ll try to breeze through how I got the stairs and the railing done. Once all of the decking was laid down, I cut and attached the remainder of my four posts (you can read more on how I did that in this post).
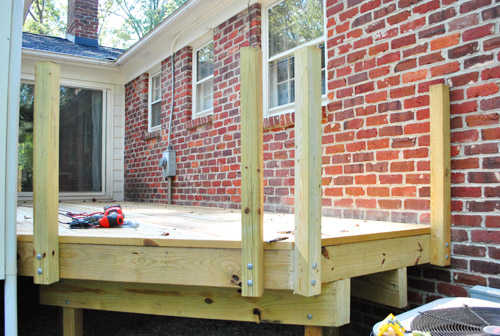
Even though the stairs were next on my list, getting the railing posts up was important to help me plan the stair stringers – which are the diagonal boards that run down the side of the staircase, where the steps actually rest.
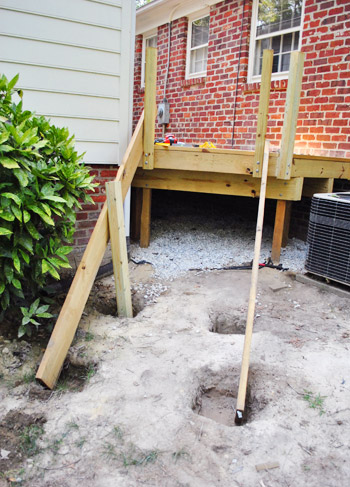
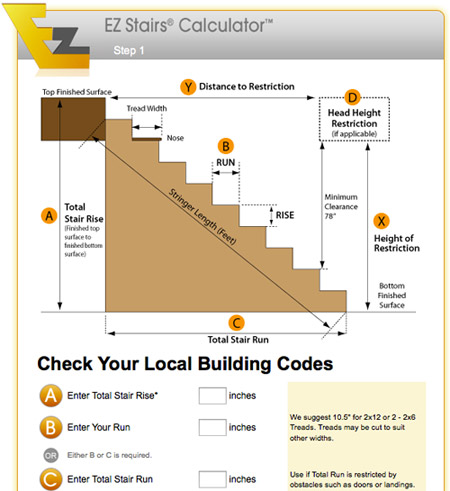
You can buy pre-cut stringers, but I tackled cutting my own (to save money and time since that’s the lumber they provided in our delivery). Figuring out the lengths and angles of everything was kinda scary until I found this website that did most of the math for you. Thank goodness for the world wide web.
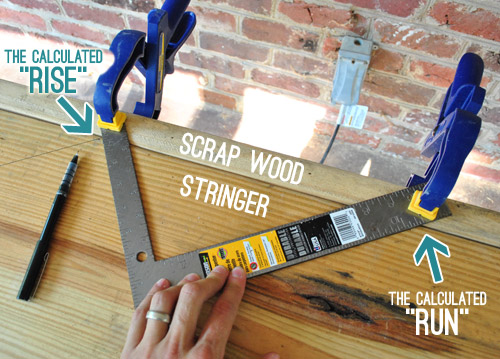
Once I had my rise (the height of each step) and run (the width of each step) calculated, I learned a cool trick from this video for marking your 2 x 12″ board for cutting. I basically clamped a straight edge (in my case, a piece of scrap wood) to a framing square (the L-shaped ruler) so it intersected at my measured rise and run. Then I could hold the scrap wood flush against my board and the framing square would create a perfect guide for marking my cuts:
With the length of my board marked, I broke out my circular saw and carefully cut along the lines.
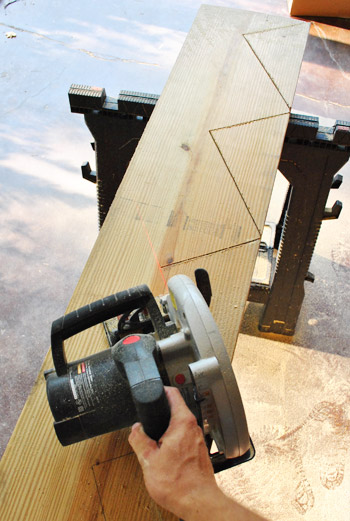
You’ll notice above that despite looking cut from above in that last picture, the triangular pieces weren’t falling away. That’s because the circular-shape of a circular saw doesn’t always allow you to reach those deep corners all the way through. So I went back with my reciprocating saw to finish the cuts all the way.
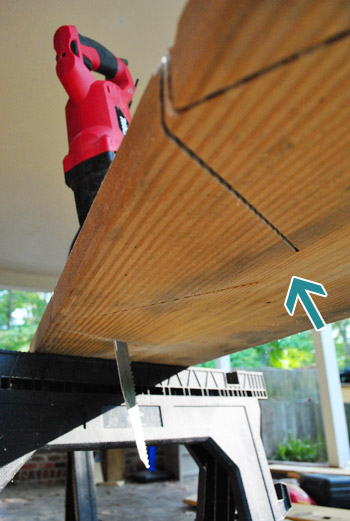
Once one stringer had been cut (and tested in place to make sure it fit) I used it as a guide to mark and cut two more 2 x 12 boards, since I’d need 3 total stringers for my 48″ wide steps.
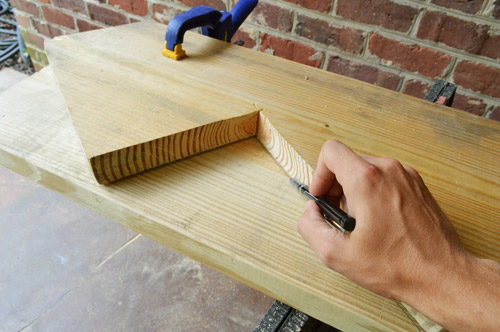
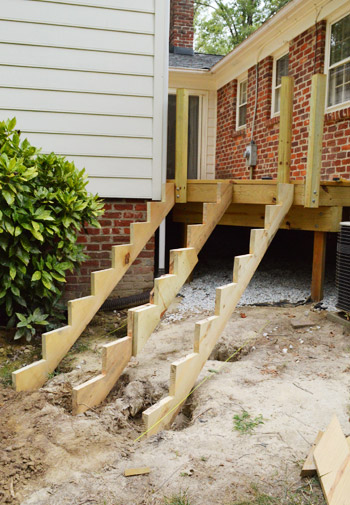
So here are my three cut stringers in place. You’ll notice the one in the middle has a weird extra piece in its center. That’s because a not-so-conveniently located knot in the wood caused the tip of one step to break off. Rather than go buy (and re-cut another whole board) I just patched it by cutting and screwing a short piece of wood to patch it (making sure it would be to code first).
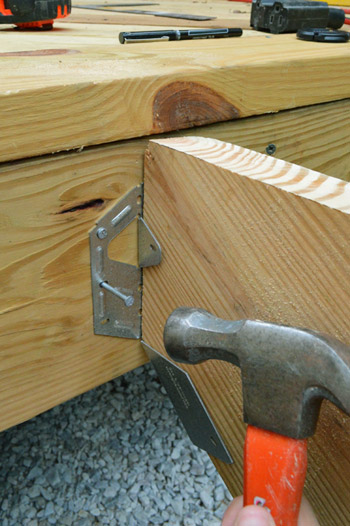
To attach the stringers to the deck I used these angled hangers that I snagged at Home Depot.
Oh yeah, and I was sure to check that the steps were level the whole way down. Don’t want wonky steps now, do we?
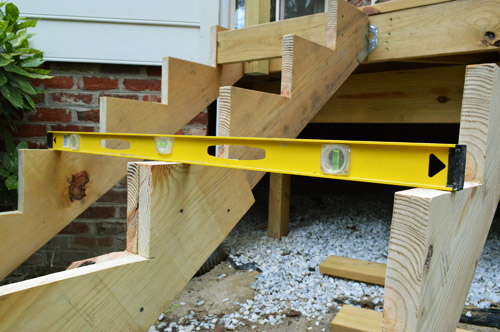
Speaking of wonky, I did install some blocking between the stringers. They weren’t perfectly level themselves, but they’ll be completely hidden, so that’s okay. The point was that by using equal sized scrap boards the blocks still served their purpose of keeping the steps an equal width the whole way down (we didn’t want the steps getting subtly narrower or wider on the way down).
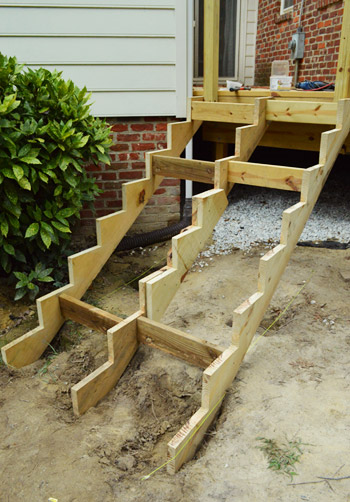
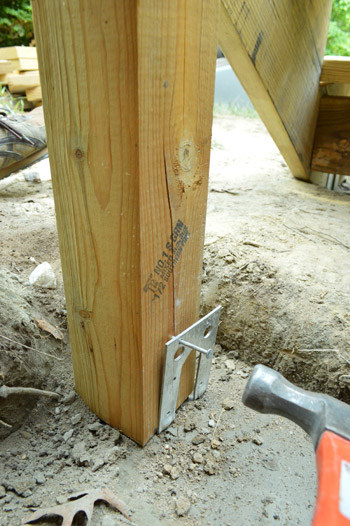
Next came setting the posts that would support the staircase in the middle and the bottom (using the footing holes that I dug back when I started the deck). To attach these posts, I decided to use these anchors I found at Home Depot this time around.
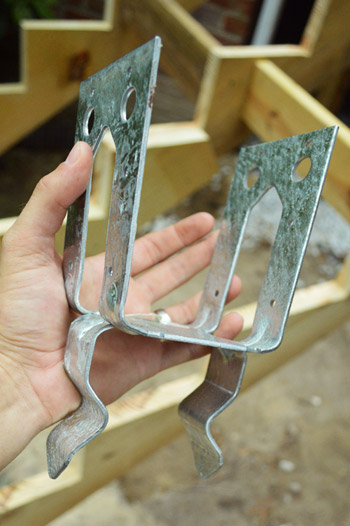
I basically set them in some wet concrete (after carefully marking where they needed to go to line up with my steps – which admittedly was a somewhat maddening process). Then I let them dry.
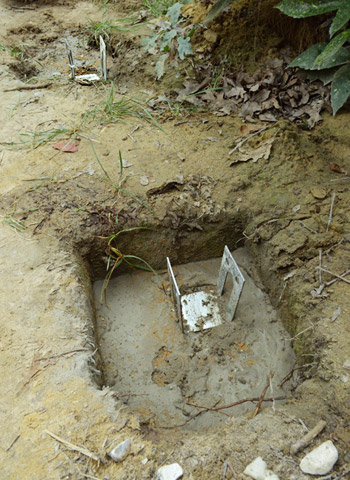
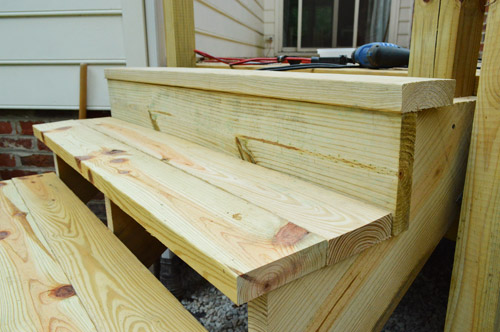
Since my concrete needed 4 hours to cure, I filled some of that time by beginning to cut the wood for the steps. We wanted the steps to match the decking, so we used two 2 x 6″ boards for the base of each step (which included a small overhang) and a 2 x 8″ board for the back of each step.
Once my concrete was dry and my post anchors were solidly in place, I set my posts, checked that they were level, and nailed them into place. You can see this anchor was not 100% exact in its placement – but that’s part of the reason they’re open on one end. That wiggle room was a lifesaver.
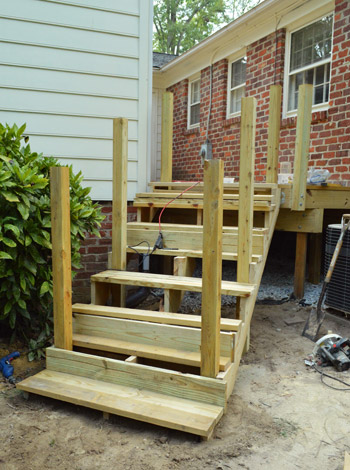
So here are all of my posts set (but not cut to size yet) and a random assortment of step boards just loosely laid in place. Looks kinda like a staircase. Looks kinda like a hot mess too.
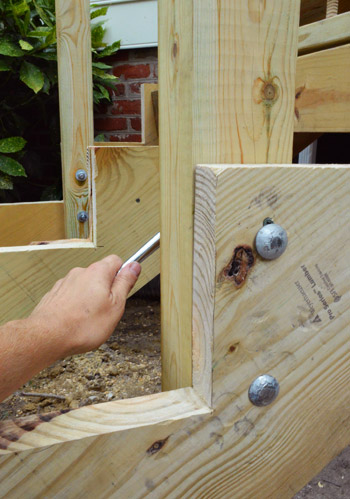
Oh yeah, and I bolted the posts to my stringers the same way I bolted the railings to the end of the deck.
Then came the task of screwing all of the step boards into place. This task took surprisingly long and a surprising amount of screws.
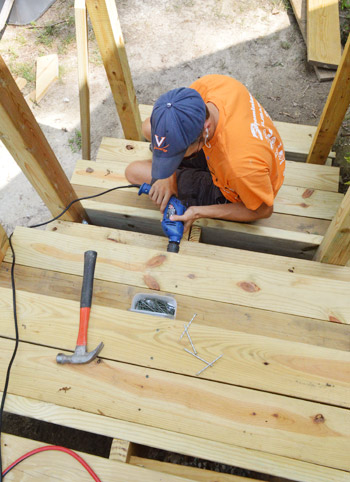
With all of the stair boards in place, I turned my attention to the guardrail. The first two parts of the guardrail were the 2 x 4″ rail boards that would span between the posts on the top and bottom. Our county requires no more than 4″ gap between the deck and the rail (it’s also known as a sweep space, so you can easily sweep debris off the deck). I saw someone use a 4 x 4″ post as a guide for this since it’s an easy way to keep the rail level so I did the same thing. Worked like a charm.
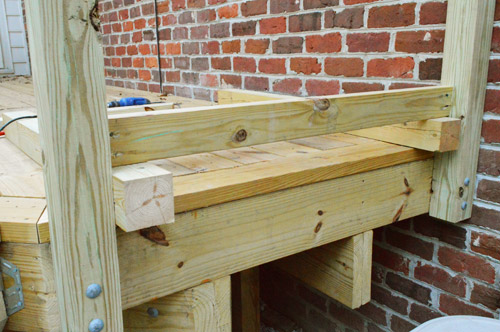
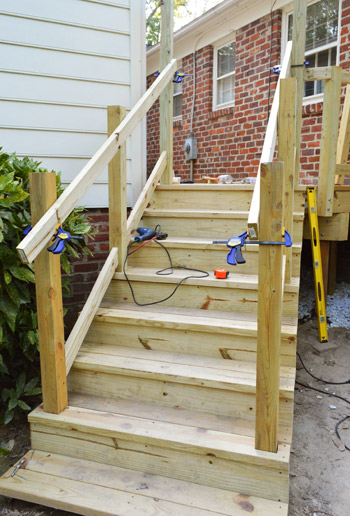
Attaching the railings to the stairs was a bit more involved since I had to make sure I was meeting several standards for how much of a gap was at the bottom and how high it had to be compared to the nose of each tread. Once I had figured all of that out, just cutting the angles and keeping things in place while I screwed it all together made my brain hurt a little. But eventually I got all of the railing pieces in place.
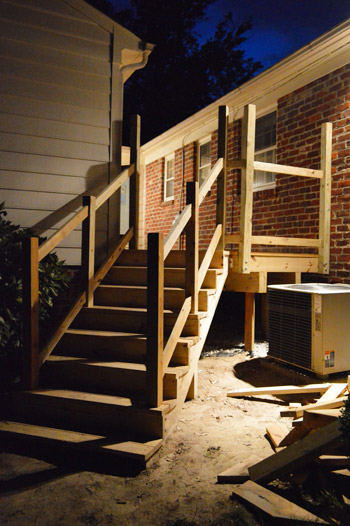
Oh, and you may notice that the four posts attached to the deck got significantly taller. I had to replace my original posts because I realized too late that I had cut them too short to satisfy the railing height requirements on the steps. It’s a long story so I’ll just leave it this: it kinda sucked and that’s why it’s nighttime when this photo was taken. Oh well live and learn. They weren’t going to be staying that tall, but after replacing them once I decided this next time that I’d cut them in place once I was certain my railing height would pass inspection – just to avoid any more surprise do-overs.
The next day I could finally start putting the balusters in. Those are the vertical pieces on a standard deck railing. We debated doing something more intricate or modern (like all horizontal rails or a built in planter) but opted for the traditional look because that’s what we have out on the patio side of the house (there’s a fence and a railing out there). Both that railing and this one are visible from the living room (out various sliding doors) so we wanted them to match. I’m also glad we went the traditional route because it was super easy to do (since I could use my post as a guide to meet the spacing requirements again).
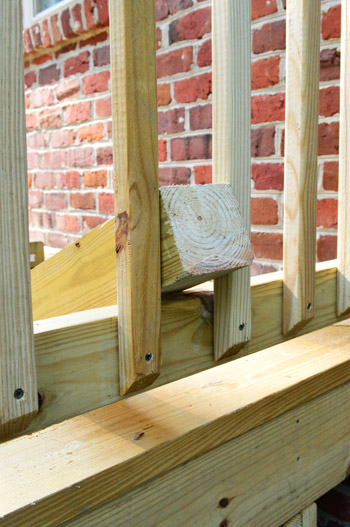
The last part of the guardrail is the rail cap, which is the flat ledge on the top. It’s made from a 5/4 x 6″ decking board. Cutting those angles and notches around the posts was an adventure too, but I won’t bother you with the details. In short: I lived to tell the tale!
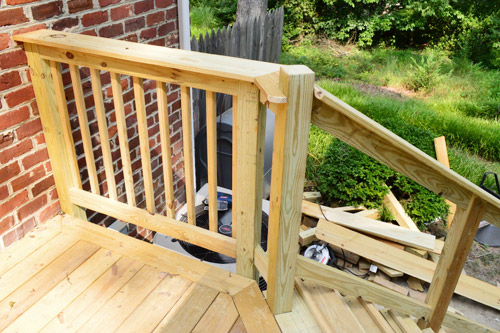
Oh yeah, and you can see now that I eventually cut all of my posts down to size when I was sure they all met code. Thank you reciprocating saw for that.
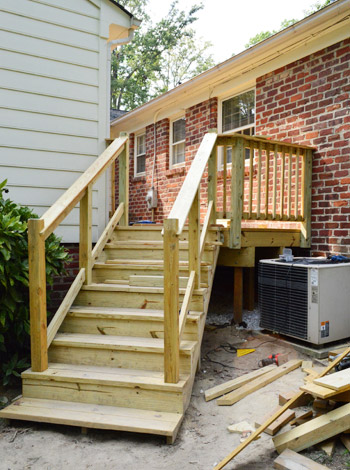
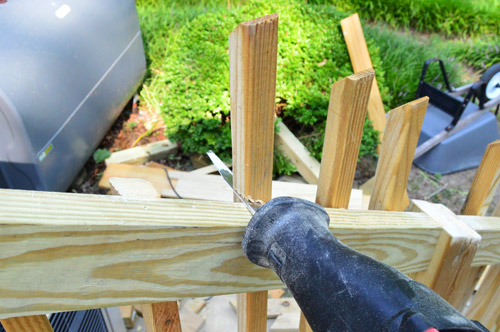
When it came to attaching the balusters to the stair railing, I didn’t even attempt to pre-cut them to size like I did on the other railing. Instead I temporarily removed the rail cap I had cut and screwed the balusters into place with the excess length extending out the top. Then I used my reciprocating saw to cut them down so the rail cap would sit flush again on top of them for a finished edge.
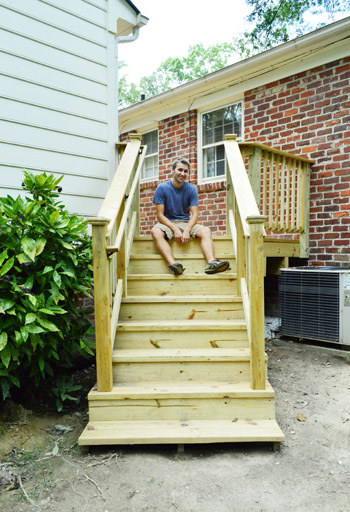
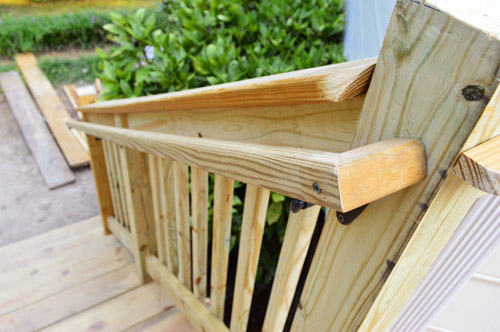
With the balusters in and rail cap back on, I started putting the finishing touches into place – like this handrail that we’re required to add since our stairs have more than three steps.
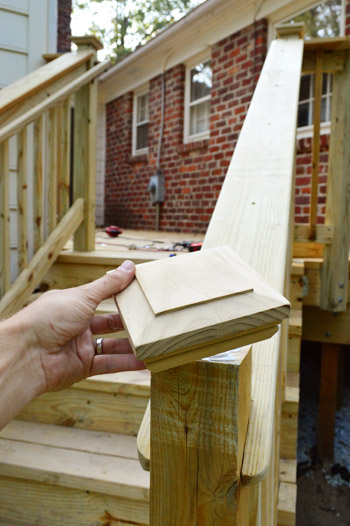
And we added these decorative wood caps ($8 at Home Depot) to the posts at the top and bottom of the stairs. They attached with just a little bit of caulk and definitely make things look nice and finished.
And with that, the railings – and therefore the steps – and therefore the entire deck itself… was finally done!
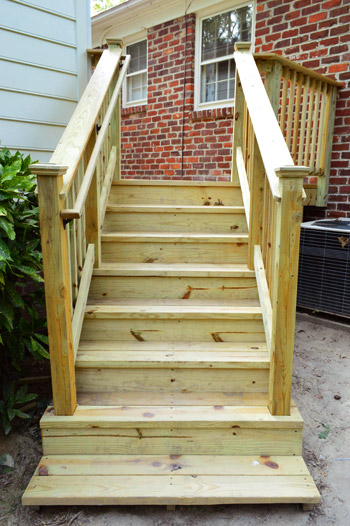
I have to admit, I’m still kind of impressed that I made this.
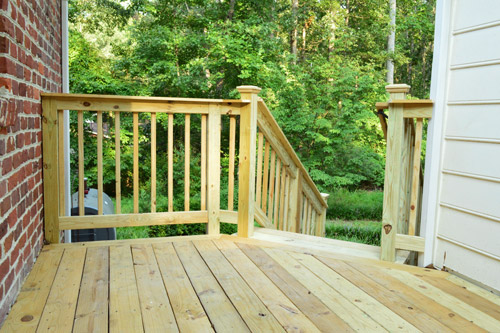
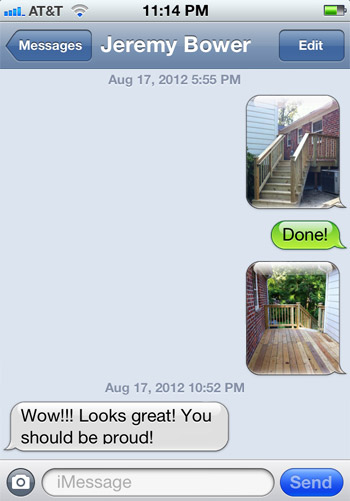
And what do you do when you’re proud of the deck you just built? Naturally, you text your mom.

Well, your mom and your bro-friend.
Although being totally built and county approved doesn’t mean it’s totally done. We still need to seal it (we’ll be tackling that as soon as we catch our breath and research the right product for the job) and of course we need to furnish it. As for the budget breakdown, once we seal it we’ll share the full rundown. Until then, you can find me sitting out on the deck, sans furniture, drinking a nice cold soda. Or telling Sherry that I’m not building another deck for at least ten years. Yes sireee, I’m glad to have this done. Although to anyone wondering, I still think demoing our first house’s bathroom and rebuilding that from the studs was the hardest project I’ve ever done. But the deck is hanging in there at second place. Anyone else finishing a deck or some other project that took longer than you expected but is still intensely satisfying to have checked off the ol’ list?
Psst- Want all the deck details? Here’s where we shared our vision for the space, removed the plantings and the old balcony, selected our materials and documented our first day of building. Then we dug our post holes, failed our first inspection, revised our plan/dug more holes, and set posts. Then we installed our joists, did some last minute prep for deck boards, started laying decking boards, whipped up a mood board and finished laying deck boards.

Laura D says
Great job. My husband and brother-in-law built our deck five years ago and it was definitely a project. Can’t wait to see how you guys decorate it. Curious if you will use the deck or patio more for entertaining, or both. Enjoy!
Sandy says
Looks wonderfully inviting!! But we need the “peering out the window” photo of Clara.She’s been with you as an observer and cheerleader the whole way!
YoungHouseLove says
I know, right! I plan to have a bunch of her out on the deck enjoying it soon!
xo,
s
Kate says
See, this is one of the reasons I love your blog. Sometimes you guys tackle projects and I’m like, WHOA that’s way easier than I thought it would be, I can totally do that! And I get all inspired and go out guns a-blazin’ and make something cool for our house.
And other times, I get to read through your big projects like this and reassure myself that there is no way in H-double-hockey-sticks I am ever tackling that by myself, completely without DIY guilt.
*happy sigh*
YoungHouseLove says
Haha, thanks Kate! You made us laugh out loud.
xo,
s
Andrea says
woohoo! cheering loudly, stomping feet, applause! amazing accomplishment!
Melanie says
Awesome job! So impressed at how you guys go about major projects like this! You always do tons of research and do the job right! Very inspiring.
Marcy says
I am so impressed! I love seeing how your vision becomes a reality (with all of your projects)… very inspiring to other DIYers =) What a great post!
Katharine says
Looks great! And the stairs and railings look beautiful!
Melissa says
Beautiful work! And I know it means that much more to you since it was all done by YOU!
Marlena says
Congratulations! It looks amazing!
Rebekka says
So impressed with your craftsman work, John! Your posts have been so thorough on this project. (I find myself exhausted after each one – trying to imagine being in your shoes.) You have a lot to be proud of!
Can’t wait to see all the fun stuff you do with your new deck!!
<3
Ashley@AttemptsAtDomestication says
It looks awesome John! You did an excellent job! I thought of this project on Saturday when my husband and I were at the VMFA walking on their zippered seam deck!
Morgan says
This is fabulous. Can’t wait to see how you guys “dec” it out. lol
selena says
It looks great, John! I have enjoyed keeping up with the progress of the deck. I’m so proud you can officially stamp this with the ‘completed’ stamp. Even though it’s not sealed, it still qualifies in my book :)
Alicia says
I am impressed with everything you do but this takes the cake! You should feel so proud. That is amazing. Once upon a time I would have considered building my own deck but after watching you and your hard work I now know there is no way. It really takes a lot of patience and thought not to mention the intense labor. Great job!
Giulia says
Congratulations! Well done! I can’t believe you need a handrail and that the railing doesn’t serve that purpose. Seems a little over the top for me, but I guess rules are rules and someone must have fallen not holding on to the rail.
Sara says
Wowee. I could use a new deck too ya know, and I live in Chesterfield! Ha ha. Great job!
Kate says
Wow John!! The deck looks fantastic!! Makes me excited and want to redo our deck (which REALLY needs it), but that will not happen until next spring. I can’t wait to see the whole shebang after being stained, sealed, and furnished. =)
Annie says
All the way through reading this I could smell raw timber…and wanted to suck on some raw timer…It looks amazing, and delicious!
Yours Sincerely
7 Months Pregnant
YoungHouseLove says
Hahaha, that’s hilarious! I hope your lunch isn’t wood, but it’s delicious!
xo,
s
Stewart says
Round of Applause Mr. Petersik. Well done.
Kelli says
Haha! It is nice to know that there are other “weirdos” out there! When we finished painting /decorating our daughter’s bedroom, severaI times a day I would walk down the hall and open the door as if it were the first time I was seeing it….just to revel in the accomplishment!
Deb D. says
Kudos! So impressive. You really should be proud — that is some serious sweat equity you put into your beautiful house!
Ally says
All Clara’s rigorous “supervising” paid off :)
JBoom, if the ol’ Blogging/Author thing doesn’t work out, you definitely have a career in wood :)
xox
Kaitlin says
Beautiful deck! Yay for a website that does most of stair math for you! My dad was calculating how much wire he needed for a mostly triangle shaped electric fence and called me to do the trigonometry for him :)
Kelli says
It is nice to know that there are other “weirdos” out there! After we finished painting /decorating our daughter’s bedroom, severaI times a day I would walk down the hall and open the door as if it were the first time I was seeing it….just to revel in the accomplishment! :D
Amanda says
We re-did our kitchen last year, and I still sometimes just sit in there and admire our work!
Laura says
Wahoo, congratulations, John! What an awesome accomplishment!
Bethany says
Nice work, John! Looks great!
Seriously Sassy Mama says
Very nice! Morning coffee would be great out there.
Michelle Kersey says
Congrats John!!!!! You did a great job and REALLY should be proud!! I’m impressed. :)
Erin says
It looks fantastic! We did a deck this summer too, also with pressure treated wood. You might want to look into it, but we were told to wait a while before we treat the wood to let it dry out and for some of the chemicals in the pressure treated lumber to settle. If you treat it too soon (seal/stain/paint, etc), it will discolor by next spring because of the mix of chemicals. I’ll try to find something more solid to refer to, but you might just want to enjoy it as is for now and wait until november or even april to treat it.
Can’t wait to see pictures of the fam enjoying it!
Erin
YoungHouseLove says
We heard that too although certain sealers can apparently be used right away while others call for more waiting time – not sure why. Once we land on whatever we’re going to use we’ll be sure to wait the recommended time!
xo,
s
Monika says
The pressure treated wood, by its design, is meant to repel liquids in order for it to be longer lasting. So basically the treated wood doesn’t “know” that a sealer is good for it and water/snow/acid rain (haha) is bad and just repels both! As the wood gets slightly weathered, the top layer of it loses some of the repeling chemicals the wood is treated with (sadly for health and the environment they leach right out), and then the sealant is much more likely to penetrate. Some stains were made to circumvent the treatment chemicals to stain the wood without having to wait for the top layer to leach out. I’m sure you’ll make the right choice either way! Good luck!
YoungHouseLove says
Thanks Monika!
xo,
s
Alicia says
Wow, this looks awesome! You are both very inspiring, I love seeing you take on projects and come out with great results! And what a great use of that space!
Crystal @ 29 Rue House says
Hooray!!! Congrats on finishing and passing inspection John! It looks amazing and definitely not a beginner deck. I’m going to pull out the “John said it was easier than a bathroom remodel” card to my hubby when I ask him to start our deck next year but hopefully he’ll have forgotten it by the time I ask him to start the bathroom remodel.
Cheryl says
FABULOUS! Such a better use of that space.
If you do some sort of lattice to screen under the deck and stairs you may want to make one panel hinged so you can easily get under there without tearing off the lattice. Hopefully you won’t have to get under there often – but you know you will at some point!
YoungHouseLove says
Smart idea!
xo,
s
Gabriella @ Our Life In Action says
BEAUTIFUL! Well done John. So love the fact that you included the text messages in this post….niiiice! ;-
)
Tad says
I was hoping that Jer’s response would of been “Yeah that’s nice bro, but my deck is still bigger.” LOL
YoungHouseLove says
Haha, totally could have been.
-John
Stephanie N says
Just reading all the cuts and what not made my brain hurt so I can’t imagine what yours was doing!!! :)
Congrats! Its looks great! Amazing accomplishment!
PS~
I would suggest pretty potted plants around the AC unit. Just so that if something needs to be done to it, that planted plants don’t get all smooshed.
YoungHouseLove says
That’s a great idea! We’re also thinking about screening it with lattice somehow. Will keep you guys posted when we flesh things out a little more.
xo,
s
Tracy K says
YAY!!! You two never cease to amaze & impress! Love my hubby, but wish he had just a tiny bit of handymanness. (Yes-I realize that’s not a real word) ;)
Congrats & enjoy!!!
Mindy says
I love how time realistic you guys are on things like this. We are planning to build a deck next year, and it’s nice to know that it’s not going to happen in 2 days like our neighbours who hired the pros to do theirs.
Kelley says
CONGRATULATIONS! Can you hear me cheering all the way from Raleigh, NC? This is so exciting, and impressive. Looks totally pro and I love the extra details you guys put in – the zipper seams, the border, and the caps on the posts. Excellent job. Can’t wait to see it all sealed and furnished!
Kasey M. says
HB and I were at a cousins house. HB was there to help them build a deck, I was inside helping Kelly get the house ready for her upcoming baby shower. Let me just say your posts gave me a new appreciation for how hard the four guys outside must have worked building that deck. Only the stairs remained when we left at 9:00 PM! (It was a small deck).
YoungHouseLove says
That’s amazing!
-John
Karen says
I’ll echo Jeremy’s comment…. WOW! Great job… you should be proud.
I love the little touches that make it look so custom. The zipper seams, the caps on the stair posts, the angled edges of the balusters and the rounded edges of the handrail.
I can see you petting it and oohing and ahhing… LOL
Can’t wait to see it “decked” out.
AnnMarie says
Unbelievable accomplishment! You DIY so many impressive things, but this is in a whole other league! We just stripped and stained our deck, which had us giddy for days….so I can only imagine how this must feel. I’m excited to see what you decide with it next :-)
HeatherV says
Your deck looks awesome! We are hoping to redo ours next spring, if you want to travel to Omaha, NE we would love the help!!
YoungHouseLove says
Sounds like a plan Heather!
-John
karen says
Yahoo!!!! What a awesome job!
Julia says
I’m seriously impressed, what a beautiful deck! You will enjoy it for many years to come!
Erin @ One Project at a Time says
Wow! I’m so impressed! How were you cutting such clean lines with the reciprocating saw? I love that type of saw for demo, but find it shakes so much you can’t get a really straight cut. You must share your secret!
YoungHouseLove says
They weren’t perfect, but since I knew my rough edges would be covered by the decorative caps and the top rail I was just aiming for level. It still took some concentrating to get there (and it helped to have the saw at its fastest cut speed).
-John
renee says
Congrats on a stunning and fruitful project!
Sorry to nitpick, John – put I think you meant testosterone, not serotonin (as that would make you sleeeeeepy)
:)
YoungHouseLove says
Wait, doesn’t tryptophan make you tired, right? Serotonin makes you happy, doesn’t it?
xo,
s
renee says
Duh – you’re right, sorry John. Keep up those great endorphins, while you’re at it!!
YoungHouseLove says
Haha, endorphins is probably the best word of all!
-John
Sandra T says
BRAVO!!! It looks great! And geez, that was ALOT of work!
Susie says
John, that is some seriously impressive work!! Especially for a guy who used to say he wasn’t handy… You guys works so hard — you totally deserve a place to sit and have an ice cold beverage at the end of a long day!
Sheri says
Wow!!! Great job!
Amanda says
Love!! Your deck just looks so super fantabulous!! It’s making me really excited to start planning ours (we won’t actually be doing anything with it until next summer, so I have a lot of time to work out the deets).
We literally just finished our master bathroom this week – like all the pictures are hung and everything (I wouldn’t let us use it until every last thing was in place).
http://kissletsathome.com/2012/08/21/master-bathroom-reveal/
YoungHouseLove says
Wow, so pretty!
xo,
s