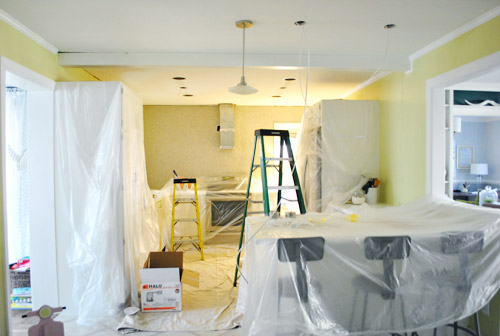
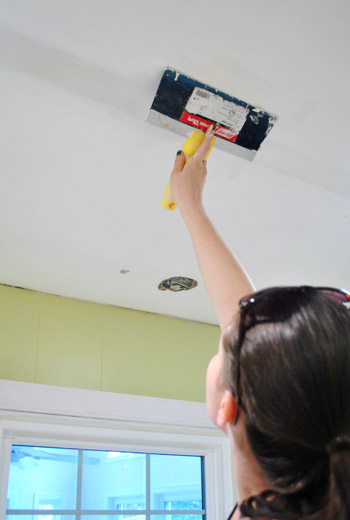
We did it. We tiled the entire back wall of our kitchen in a counter-to-ceiling backsplash move that we like to call Project Crazy, and we lived to tell the tale. We still have to grout, add a big ol’ industrial range hood and chunky open shelves (those will just be screwed right through the tile with a special drill bit) but when we squint we can almost picture it… As for the top seam where the tile meets the ceiling, there’s crown molding that runs around the entire room (although we removed some of it on the window wall) so we’ll be adding that back around the whole room so the top of the
Rearranging The Nursery
Last weekend I rearranged Clara’s nursery. Again. And I owe you guys the details (a few of you even noticed things had moved around here and requested an update), so whoop, here it is. Let’s dive right into the moving madness. Heck, free use-what-you-have rearranging isn’t that bad, is it? No heavy breathing required. From you, at least (I did my fair share of creepy mouth breathing while pushing things around). It actually was only a few simple switches, but the room still looked tore up from the floor up for a little while: As usual, Clara was in there “helping Mommy dec-rate.” Decorate only has two syllables according to the bean. I love that
Painting And Reupholstering A Stool
This is another post that John wanted me to name Stool Boom (here’s why John likes that name). Anyway, a while back I redid a stool that wasn’t ours. It just showed up in the mail and I spruced it up. More on the mysterious mail thing in a minute. First here’s how I got ‘er done. This is a terrible before shot, but picture an old beat up periwinkle blue stool with nails and holes and a rotting wood top: The first thing I did was get all the old nails out with the back of a hammer: Then I primed it and painted it a rich navy color (I just grabbed a $3 test
Making Burlap Fabric Mats For Frames
Since lots of folks have asked for close up photos and more of an explanation about our little art switcheroo above the sofa, here it is. It’s such an easy project that anyone can do (probably for under $5 if you have the frames and some small photos or prints that you love (images from greeting cards or postcards could even work). So we figured we’d share the goods while we work on our backsplash (those goods will be up tomorrow am!). Our frames above the sofa started out with colorful paper in them ($5 worth of craft paper from Michael’s to be exact). That added some fun oomph for a while, but the beauty
How To Cut Penny Tile
Oh man, backsplash-ing is 50% scary and 50% suuuuuper excitiiiiiiiiinnnnnggg! Sorry, got carried away there. Maybe it’s 90% super exciting and 10% eeeks. Anyway, we began wrestling with it a few days ago and it’s taking a bit longer than expected (we spent nearly three hours just figuring out how to cut it, prepping our work space, and mixing up thinset before ever getting started). But by the end of the day (after Clara had gone to bed) we had accomplished this: Isn’t it awesome? Well, at least the beginning of awesome. I keep doing awkward things like stroking it and saying “oh yeah” and then blushing and backing away slowly. There’s plenty about the
A Few Mail-Friendly Christmas Gifts
It’s time for: Secret Santa: Revealed. That makes me laugh because I imagine some man with a deep serious voice introducing a show with that name after Dateline or something. Anyway, since a bunch of you have asked for the Secret Santa dirt (and I couldn’t wait to spill who I had and to learn who had me!) here it is: I had… (drumroll? anyone? can I at least some table slapping or something?)… House Of Smiths! It was so much fun to pack up two little surprise care packages for her. The first one included two decorative frames from Michael’s that I personalized with some paint in the name of some Christmas cheer (they
How To Make DIY Blackout Curtains
File this under “A Lazy Mom’s Trick To Get More Sleep.” I made no-sew, mind-numbingly-easy, shortcut, DIY blackout curtains. Enough adjectives for you? I’m an over-explainer. Anyway, this isn’t the professional way, it’s the cheater way. Haha. First the why. Although the faux wood blinds on Clara’s bedroom window provided a decent amount of light-blockage, I knew blackout fabric would make the room pitch black in the middle of the day (which means it might help with the just-one-forty-five-minute-nap that we’ve been getting these days). To JoAnn fabrics I flew, and purchased 5.5 yards of blackout fabric (which sort of felt like the white fabric on roller-blinds). Thanks to a 50% coupon I got it
How To Make A Homemade Play Kitchen From A Cabinet
We did it. Holy cats, we did it. Just a few days before Christmas we started Clara’s homemade play-kitchen (in secret of course, since she thinks Santa brought it)… and we actually finished it on Christmas Eve! Yes folks, it was a Christmas miracle. We went into it with a goal of spending under $99 since this basic play-kitchen from Ikea is that price – but we wanted to add a bit more detail like oven knobs that actually turn, an oven light that goes on and off, a wire baking rack inside the oven instead of a shelf, and a real faucet (not plumbed of course, but movable!). So here’s how we made our own
Painting Our Wood Cabinets Cloud Cover by Benjamin Moore
Ok, so we completed the door-painting process a few days ago (picture us doing the droopiest super-tired happy dance that you’ve ever seen) and we’re now into the “waiting game” portion of the cabinet painting process. But we couldn’t wait to share all the photos of everything both during the painting-process and now that they’re all glossy and finished, so here ya go: We used Benjamin Moore’s Advance paint in Cloud Cover in a satin finish (it’s a soft tonal taupey-gray color, so it’s not quite as bright as our glacier white counters for a subtle layered look). Benjamin Moore Advance paint (in the satin finish) actually came recommended by a few pro cabinet painters
Priming Our Wood Kitchen Cabinets
Between finalizing our 260+ page book manuscript (due Jan 4th- ack!) and hosting/enjoying family time (and lots of delicious food), we’ve also been priming! Can I get a “holla!”? Or more likely, a “you’re crazy.” Thank goodness our guests are so understanding! Oh man, and it feels great to be seeing some progress. The beauty of primer is that it always looks a little rough (so you don’t have to stress about getting it to look perfect). By nature, it’s just a sticky sub-layer that helps grab paint and hold on for the long haul, so as long as you apply things thinly and evenly (drips = baaaaad), you’re all set to just follow the
Twenty-Twelve Resolutions
Every year we publicly proclaim a few of our resolutions in the hope that it’ll light a fire under our arse (arses?) and help us “get there.” So without further ado (except for this gratuitous and very much in-progress pic of the cabinet doors being primed)… … here they are: Resolution #1 – To Get Around: We’re excited for 2012 to be a good travel year for us, since we have been invited to speak at the Portland Home & Garden Show in February (really? us?) and at the Haven Conference in Atlanta in June (we’re the keynote speakers, which makes us excited and nauseous all at the same time). So we’ll hopefully get to
The Best Way To Prep Cabinets For Paint
I guess that title should really be “Puttering Around With Putty (aka: Wood Filler) And Sandpaper And A Spackle Knife And Deglosser.” But that was too long. In a nutshell, we prepped all of our cabinets for primer by: puttying all of our cabinet frames and drawers and doors sanding everything (to smooth the putty and rough things up for primer) deglossing everything (to further aid with adhesion) laying all doors and drawers out in the sunroom (on lifts) so we’re ready to prime But that’s not enough detail for chatterbugs like us. So let’s get into the nitty-gritty. First we used Elmer’s ProBond Professional Strength Wood Filler (we asked around for a favorite filler
- « Previous Page
- 1
- …
- 49
- 50
- 51
- 52
- 53
- …
- 124
- Next Page »


