Oh man, backsplash-ing is 50% scary and 50% suuuuuper excitiiiiiiiiinnnnnggg! Sorry, got carried away there. Maybe it’s 90% super exciting and 10% eeeks. Anyway, we began wrestling with it a few days ago and it’s taking a bit longer than expected (we spent nearly three hours just figuring out how to cut it, prepping our work space, and mixing up thinset before ever getting started). But by the end of the day (after Clara had gone to bed) we had accomplished this:
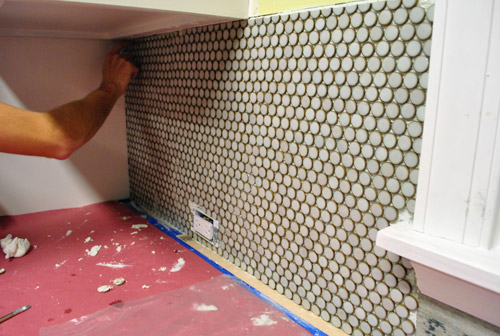
Isn’t it awesome? Well, at least the beginning of awesome. I keep doing awkward things like stroking it and saying “oh yeah” and then blushing and backing away slowly. There’s plenty about the process to share, but for now we’ll just give you a look at our preferred cutting method and how we got there and elaborate about what we learn as we go (since we have the rest of this wall and the entire oven wall – all the way to the ceiling – to do).
First we tried some tile nippers at Home Depot that worked great on our test tile sheet (we brought one with us to try things out in the store). But once we got home with it, it was giving us results like this when trying to cut each penny tile in half:
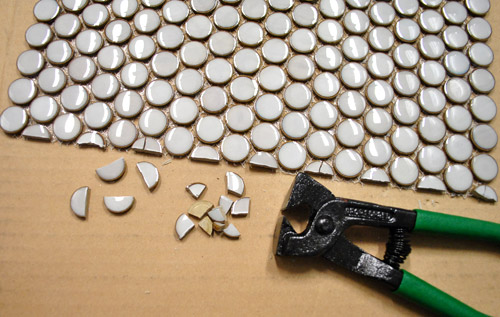
Ugh. See all the cracked and uneven tiles still on the sheet? Not good.
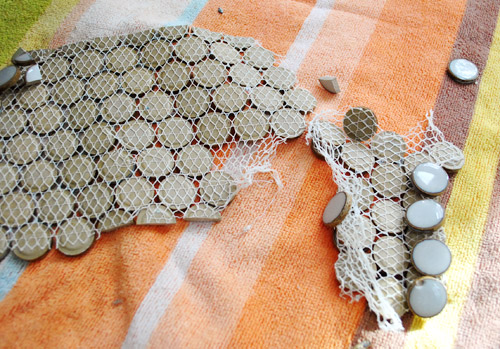
Since that didn’t seem to be working, we turned to the wet saw. John is usually a big fan of the wet saw, but the wet saw wasn’t a fan of the penny tile. Specifically the mesh that held the penny tile together in a big sheet.
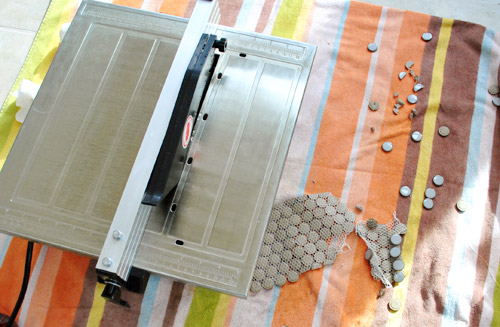
The water from the wet saw (even without using much water at all) caused the mesh to break apart, so it wasn’t working for us (even though we’d heard others have success with this method – so maybe it depends on the type of mesh that the tile manufacturer uses).
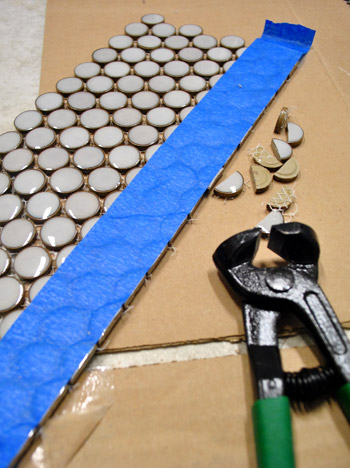
So we decided to give the nippers another shot (at least the sheets were staying intact when using them). After some trial and error, we landed on this pretty reliable technique for our tiles (though it may not work for other types of penny tile since things like thickness probably vary):
For those who can’t watch the video, here are the highlights (although seeing it in action whenever you can will probably paint the best picture):
- We used a piece of blue painter’s tape to mark our cut line, which seemed to also discourage the tile from cracking when snipped
- We made sure the nippers were as centered as possible on the tile to be cut (if they’re too close to one edge of the tile it had a much stronger chance of shattering)
- We squeezed gently with the nippers at first (sort of like flexing your hand a few times) and gradually squeezed harder and harder until it broke. This seemed to score things or somehow prep them for a cleaner cut.
- It wasn’t a flawless method, but it had a MUCH higher success rate than anything else.
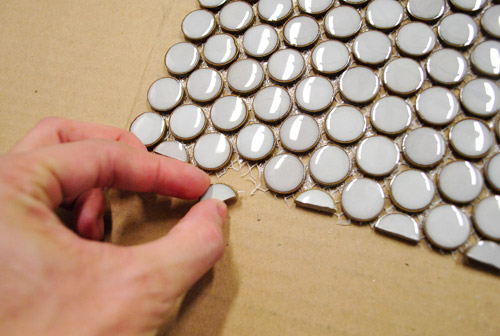
- When one tile shatters, you can just pull it off the mesh and replace it with a non-shattered one, so we did a lot of this (we called it back-filling). Once you add thinset you can stick missing tiles back into those spots and it looks great (obviously you have to pay attention to spacing them to make sure they fit in without being too close or too far from the surrounding tiles but it’s not too hard and you can step back a few feet to check your work).
- The thinset is “open” for about 30 minutes, which means you can tweak things for a fair amount of time if you notice anything that doesn’t line up, needs to be shifted, etc. Then it starts to harden and things are pretty much set for the long haul.
- It took us about 2 hours to do this much of the wall (after spending around 3 hours refining our cutting method, pre-cutting all the squares to fit this section of the wall, prepping our workspace, etc).
So that’s what we’ve learned so far. We’ll be back with more thinset info like step by step pics of us spreading it and fitting the tiles together in a staggered pattern to avoid seams (just wanted to be sure we had our method down before pausing to take photos of that stuff). But now that we’re straight we’ll get that done during our next tile sesh. This is definitely going to be one of those we’ll-share-photos-and-more-details-as-we-go-and-it’ll-be-real-time-so-it-won’t-be-in-30-minutes-like-on-HGTV things, but we can’t wait to make our way around the room and share all the pics (and more videos) as we go! Here’s hoping that big wall o’ tile over the stove isn’t too much of a doozy…
Psst- Check out another adventure in tiling from our first house’s bathroom here.

Joy says
Looks great so far!
Amanda @ Our Humble A{Bowe}d says
Oooh, love it so far! It’s funny because we just installed our marble back splash yesterday. Post to come later this week, but here’s a peek: https://www.facebook.com/pages/Our-Humble-ABowed/120919047970619 Now that I see your tile again, the color of the gray penny and our marble looks very similar.
YoungHouseLove says
Oh yeah- totally similar in tone for sure! Yours is looking gorgeous!
xo,
s
Melanie @ Mailbox Journey says
Ahh! So exciting! I can’t wait to see it when it’s finished.
sara says
Looking great!
Btw, My husband and I love Armagedeon!!! On of our favorite movies!
Jennifer Fankhauser says
Can’t wait to see it all finished!!
emily says
I know it’s just a tiny piece of the overall tile process, but it looks *great* so far! Congratulations!
Lindsay says
Hi! We just put up our moss penny tile backsplash over Christmas. We were inspired by your Lucky Penny post! We went with the nipper method, too. My husband ended up nipping a bunch of tiles in half, some in thirds, and some even smaller. We put all the good halves in one bowl, the thirds in another bowl, etc. I was the tile placer and ended up putting most of the cut tiles up individually. So much easier than trying to cut the edge of a whole sheet at once. Good luck!
YoungHouseLove says
That’s exactly what we’ve done! So much easier to reach in and grab what you need since they’re semi-sorted!
xo,
s
Ellen says
I’ve been anxiously waiting for this part of your kitchen re-do, since we’re going to be embarking on our own backsplash adventure in a couple months! Fantastic work so far, guys! Thank you for your general awesomeness!
Lindsey @ arkadian belle woods says
I am so in love with the back splash! I think this is my most favorite tile ever! So gorgeous! Your kitchen is going to make my head explode when it’s done! lolz
Lizzie says
MUST. SEE. WIDE. SHOT. :)
YoungHouseLove says
Haha, just picture a big ol bucket of thinset and tools all over the rest of the counters! More wide shots when we get a little further!
xo,
s
Robyn @ Our Backyard 2 Yours says
Oh my gosh!! I’m so excited to see the finished product. I love penny tile and am currently trying to find a spot for it in my home.
Ellie says
woot woot! go you guys. looking great :)
Erin @ One Project at a Time says
So exciting! I think putting up the backsplash tile is the best part to any kitchen reno- it’s like putting on jewelery to your outfit, it brings the sparkle and makes all the difference! I love our new backsplash, and after a few months of living with it we’ve definitely decided to paint the cupboards white. I can’t wait! http://oneprojectatatime.blogspot.com/2011/07/44-just-splash.html
YoungHouseLove says
Ooh can’t wait to see pics of those white cabinets!
xo,
s
Heather says
I can’t wait to see the outcome, it’s going to be gorgeous! I love the penny tile!
anne says
Wow! It’s going to look so good! Are tile nippers hard to use? We want to replace our backsplash in the coming months … I’m so glad to have your advice as a resource.
YoungHouseLove says
You pretty much just have to figure out a system that works for you (as described in the video) – but once you get that down it’s not too hard!
xo,
s
anne says
Thanks! I just wasnt sure how hard they are to use physically, i.e. if they make your arm or hand sore after a while.
YoungHouseLove says
You have to apply a decent amount of pressure, so after a few hours of snapping them we had a bit of a hand cramp, but nothing too bad.
xo,
s
karen says
do i sense a monday morning drinking game with the word ‘penny tile’?? lol
looking good guys!!
YoungHouseLove says
Haha- it could work!
xo,
s
Lauren says
Penny Tile
Penny Tile
Penny Tile
I’m playing with coffee since I’m at work. Boo work.
abode love says
AHHH! I’ve been waiting for this post like a crazy person… it looks amazing! I cannot WAIT to see the finished kitchen, it’s going to be amazing– LOVE this backsplash!
abodelove.com
Cait says
Looks great so far! :) Look forward to the rest of the photos so I can live vicariously through you guys until my husband and I have our own house!
Ashley@AttemptsAtDomestication says
It’s looking really good! Can’t wait to see the finished product!
Kristen @ Popcorn on the Stove says
This is looking great! I really love the circles on the wall. Bravo for doing this yourselves!
abode love says
I have been going crazy waiting for this post, it looks fabulous and I can’t wait to see the final product! The tile ya’ll chose is AMAZING!
abodelove.com
Vidya @ Whats Ur Home Story says
OMG. That is awesome. Can totally see how it goes (was a lil skeptical about the round tiles at first). I actually short listed a few glass tiles at Home Depot this weekend for our backsplash. Would definetly check back on this post for the details when we end up doing ours. By the way, ordered a stencil from Royal Design studio for our dining room. Thanks a ton for the inspiration (would have never had the courage to attempt it had I not seen your posts) and the YHL coupon code.
YoungHouseLove says
Aw, good luck with the stencil! We’d love to see pics when you’re done!
xo,
s
Karen F says
eeek! I’m so nervous/excited for you guys! Good luck!!
Lauren says
Looking soo good so far! I actually had a feeling that this morning’s post would feature the penny tile.
I’m probably psychic.
(Oh and this has absolutely nothing to do with the post and feel free to delete this comment but just wanted to say that yours was the first blog I ever ever read, starting years ago. Since then I’ve gotten blog obsessed and even started my own, which is actually starting to gain a reader or two. So I just wanted to say thanks for the inspiration!)
YoungHouseLove says
Aw so glad Lauren! I drop in your blog from time to time (when you leave a link usually) and always laugh out loud.
xo,
s
Lauren says
Ok well that’s only the most exciting thing ever!
Not sure how I replied to another comment here either. Turns out I might be pyschic today, but also sort of computer-challenged.
YoungHouseLove says
Haha, can’t have it all! Hilarious.
xo,
s
Monika says
It’s looking great and professional! As always :) One question. Why didn’t you start with a full round tile on top and then you’d only need to trim the bottom tiles (the ones closest to the counter)? I would just think that would eliminate half of the tile snipping… not sure though. I also think your large wall tiling will actually go faster and smoother because you’ll have all this practice by then, and plus you will have so much less tile snipping to do and lots of the segments will just be placed whole. You guys are doing great!
YoungHouseLove says
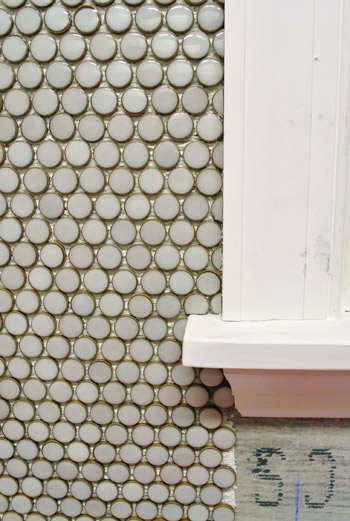
If we started on the top we’d have to trim the bottom, so we started on the bottom and trimmed the top. We figured it was the same difference and we heard in many places that it helps to keep you level if you start with full tiles on the bottom and follow the line of the level counter with them (putting cut ones against it makes you worry your cuts could be off and it could slope up or down). Hope it helps!
xo,
s
Monika says
Oh yes! That makes sense. The picture looked like you trimmed on both top and bottom but (silly me!), it was just the angle of the photo and now I see that the bottom tiles are whole. Btw, those snippers remind me of giant nail clippers. LOL! Perhaps not the most pleasant of visions ;)
Diana says
Sherry and John, I just love this! Planets align… tiling our kitchen backsplash is on our agenda for today (we are using white subway tile). I am encouraged by your tips. Great job being patient with your prep… it is easy to be so results-driven and skip some of those steps!
emmarose says
Why’d you stop next to the window? Arent we going up to the ceiling with that gorgeous tile?
I have my penny tile ordered, not looking forward to next week though lol
YoungHouseLove says
We’re going up to the ceiling on the stove wall. The wall shown is the sink wall (to make the stove wall the accent wall with shelves and a vent hood we’re just doing a standard 18″ backsplash on the sink wall). Hope that makes sense!
xo,
s
Kelly says
I kept refreshing your website curious to see what you had been up to all weekend and I almost peed my pants when I saw the first pic!! :o) GO GO GO!! You guys are doing an awesome job!!! Can’t wait to see the wide shots!!!
I would probably be stroking the heck out of it too. HA!
Kelly
Jess @ Little House. Big Heart. says
I love, love, LOVE it!
I cannot wait to see the finished product so I can use it to start trying to convince the hubs we need to update our back splash!
Lindsay B says
Lookin’ good, guys! Can’t wait to see more progress!
Jaimie says
We were thinking about doing a penny tile for our fireplace surround, but after reading this I’m glad we decided on something else. All that trial and error with the cutting would have made me crazy, and we’ve already had enough issues as it is. That being said, it does look really awesome! Can’t wait to see it finished and grouted.
Allyn says
Is it weird that I just want to sit on your counters and rub it (insert inappropriate joke here)? Gorgeous! Can’t wait to see it all!
Penny says
Inappropriate joke?
“That’s what she said.”
You’re welcome!
YoungHouseLove says
Haha, for some reason I’ve been saying things left and right that deserve that comeback. I’m not even aware until John snorts in the background. Apparently my “how to paint cabinets” video was full of them and I didn’t notice until John was editing it!
xo,
s
LoquaciousLaura says
I’m so curious — on the wall by the window, where the tile doesn’t go all the way up — what will you do for a border/transition between the painted paneling and the penny tile?
Looking hot! So excited!
Also, out of curiosity … do you know if tile nippers can be used with larger tiles (i.e., 4×4), or is that pretty much wet-saw territory?
YoungHouseLove says
The full wall of tile is the oven wall (the window wall will have 18″ backsplash with a “cap” on the top edge of the tile to finish it off! More details as we go!
xo,
s
Heidi P. says
Ah, I wondered about that window wall. This is so so exciting. And I’m amazed at how calm you were w/ the cutting dilemas. I’d be freaking out and wanting to call in the pros. Way to go!
YoungHouseLove says
Haha, I think finally after four years of this we have learned that sometimes things go bad and you just have to give it some time to work on it and usually (not always, but usually) we can figure it out! Whew.
xo,
s
Katy B says
Did you try scoring them before snipping? I did this on some 4×4 tiles. Can’t say it would work on your tiles, but I have to wonder.
YoungHouseLove says
Yup, we tried scoring them with limited success (maybe our blade wasn’t sharp enough?) so the flexing and squeezing snap tile approach from the video seemed to work the best!
xo,
s
Alisa says
Oh man, we can relate. We’ve spent the last week (with help from my dad) tiling our basement. It’s been a multi-step process. For us: 1) self leveling concrete 2) sealant 3) tile + thin set for the non cut tiles 4) all the tiles that needed to be cut with the wet saw 5) thin set all those new tiles in place…steps yet to be finished 7) grout 8) sealing the grout 9) painting the walls 10) floor molding …and I’m sure I’m missing some! I think once my hubby and dad got into a groove with the thin set process it went relatively smooth.
YoungHouseLove says
Wow it sounds like you did so much in the past week! Congrats!
xo,
s
Lisa in Seattle says
Oh Alisa, you have my sympathy. We’re about to recarpet our basement, with some areas being switched over to tile. (Also painting. Also baseboards.) But the only DIY steps involved will be 1) remove credit card from wallet and 2) breathe into a paper bag when the contractor’s total invoice is presented. As much as I love DIY blogs, I’m not cut out for the work at all.
Brandi @ His Shabby Her Chic says
It’s looking terrific so far! Good luck with finishing it all up. Cutting it definitely doesn’t look like a whole lot of fun.
Janine says
Thanks for the tutorial. I am so excited to put our backsplash up but am really nervous about how to do it.
silly eagle books says
Wow, it’s going to be beautiful when it is finished! Hard work, but worth it. ;)
vanessa
Ashley says
I can’t wait to see the finish product. You guys amaze me at the projects you tackle!
Seriously Sassy Mama says
I love everything about that tile. The color the shape, it is perfect.
Brandan WH says
Oh, it’s going to look so nice once you’re all done. I’m also a big fan of penny tile although my husband is not riding the same fan boat. Oh, well. I’ll have to live vicariously through you!
KiTx says
This is going to look soooo amazing! We’re in the midst of an unplanned kitchen update ourselves (a little pre-New Year’s flood courtesy the washing machine “inspired” us and our home insurance to get new flooring) and watching your kitchen get put back together might be the only thing keeping me sane while the drying fans blast in the background! Can’t wait to see the finished product!
Katie says
It looks awesome!! We are having our milk colored penny round installed this week on our bathroom floor, and we can’t wait!
One question though – was there a how to lay the tiles/stagger them tutiroal you watched or read? I am trying to familiarize myself with the process before our handyman does the work, but didn’t find anything online for a “how to”…any help would be much appreciated! : )
Thanks!
YoungHouseLove says
Yes, we’re planning to take more photos and talk about the alignment/pattern soon hopefully! We’re going with a staggered pattern (sort of like a vertical brick-layer’s pattern) so all the seams/edges don’t line up and are staggered instead (so they’re hopefully less noticeable). More on that soon hopefully! It’s hard to take photos when our hands are both so messy but we’re hopefully going to be better about it as we go (and get more comfortable with everything)!
xo,
s
KathyG says
Gorgeous! Just wondering, when you picked the penny tile, did you have a conversation with yourself about how it was going to be a more difficult install? When I first saw it, I thought how gorgeous, but uhoh on the install.
YoungHouseLove says
We actually think there are pros and cons to the install! It’s a lot easier to work with in some aspects since you can pop tiles off the mesh to size things a lot faster than a large tile. You just have to be careful with alignment but you always have to be worried about that (even with subway tile or big tiles). We think it’ll definitely be worth the trouble! In general we just like to dive into stuff that we love and try to learn and figure it out as we go!
xo,
s
Shannon @ Bungalow960 says
Looks awesome already! Are you going to go with a traditional white or gray grout or are you going to surprise us with something totally off the wall?
YoungHouseLove says
We’re using the same grout as the sample in our original tile post (called “lucky penny” I think if you want to search it on our sidebar). It’s a soft white color so with the soft gray of the tile the tones are very “carera marble” without costing an arm and a leg, haha.
xo,
s
Petra says
Looks wonderful! I’ve done some mosiac for fun, and have used the tile nippers. They take up a lot of practice/patience, but with the rate you’re going, looks great! Take your time.
Amy says
It looks great so far! Doing tile seems super-scary to me so I’m anxious to see how this turns out.
DonnaVDL says
I’ve been waiting for this post because my husband and I were contemplating penny tile in our bathroom but then pulled the plug on the project when he researched installation online and found a lot of negative reviews. Lots of people having a hard time keeping the tile running straight. How has that gone for you so far? We’re watching your progress…perhaps we’ll give it a shot if we hear from you that the experience wasn’t too painful.
YoungHouseLove says
We read the same stuff (about folks not watching the pattern and having issues with it lining up) so we have been paying special attention to all the rows and just stepping back to see if they line up. You have 30 minutes to shift things and get them right so it’s not too bad if you pay extra close attention to it as you go!
xo,
s
Riki says
When you first shared your penny tile with us, I showed it to my step-dad who has been laying tile for 30 years. His first comment was . . . “Nice, but that stuff is a pain in the a$$ to cut!” So clearly you aren’t the only people to have this problem.
It looks amazing.
Kelly @ Eclectically Vintage says
I love penny tiles and have them on my girls bathroom floor and shower! Can’t wait to see it completed!
Kelly
Kristina @ Rhody Home says
I love penny tile! Can’t wait to see it grouted!