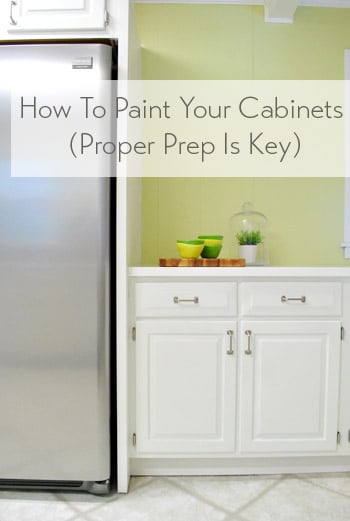
Painting your kitchen cabinets is a perfect way to give a dated kitchen a fresh look, without splurging on a big overhaul. It doesn’t cost much and with the proper preparation, it’ll look great and last long. We’ve outlined each of the steps below, including a video recap of all of the steps that we used to updated our wood kitchen cabinets.
(Rolls up sleeves, looks into the mirror, smiles, fixes weird fly aways, and whispers “let’s do this.”)
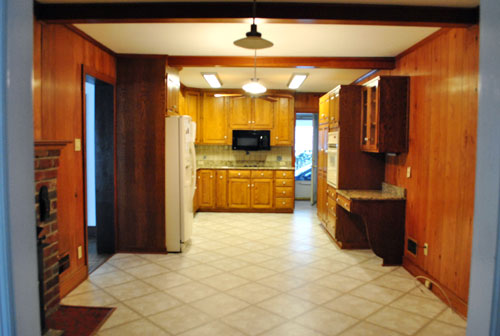
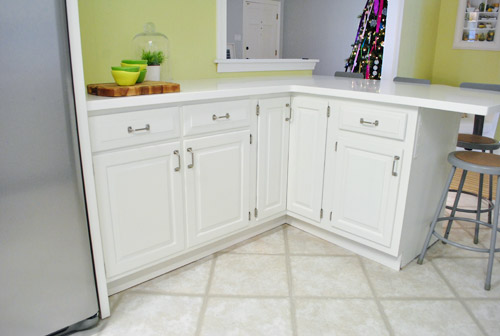
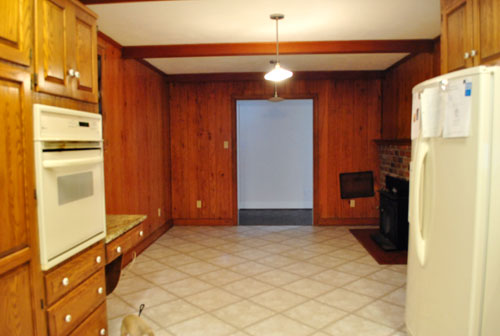
It’s finally here. The day that we get to wake up and pad into a kitchen that used to look like this…
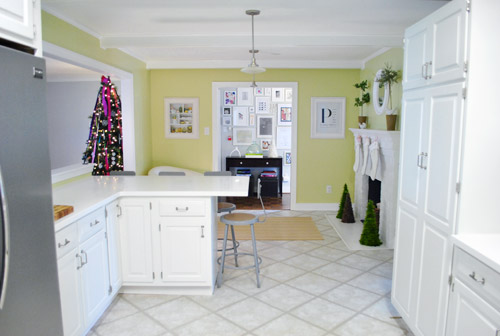
And see this…

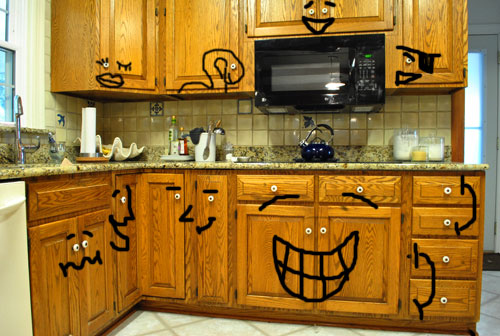
So here’s how we did it from soup to nuts. Wait, first let me gush a little more. Seriously, it doesn’t even feel like the same room. Scroll back up and picture yourself standing next to the fridge in the “before” shot. The cabinets felt about two feet away from you on all sides. I can’t explain it, but it was like the room didn’t respect my personal space and was always inching towards me. It was all up in my area. Now when I stand at the sink or pantry, I literally feel like I could perform a small musical number (with a minimum of six Glee backup dancers). It just feels so much roomier. Plus no weird cabinet knob-eyes are looking over my shoulder anymore. Bonus.
But let’s get back to the present. Ahh, much better.
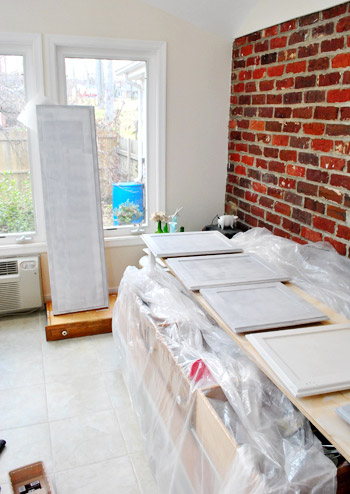
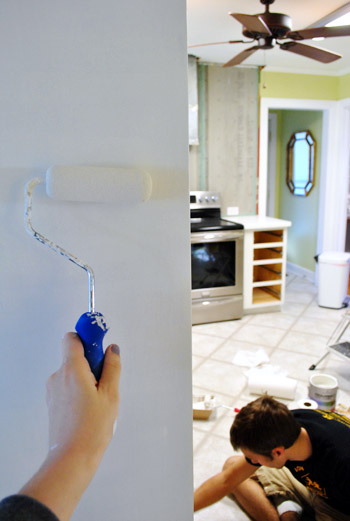
Our big cabinet-painting victory hardly happened overnight. We’ve been slowly working up to this sucker for a while now. First we painted the paneling, the fireplace, and the beams. Then we rearranged our cabinets a bit, got new appliances and, oh yeah, got a big beautiful hole busted in the wall. Then some cabinets came in, others came down, and eventually new counters made their way to us. Finally, the painting project was upon us. So first came the primer…
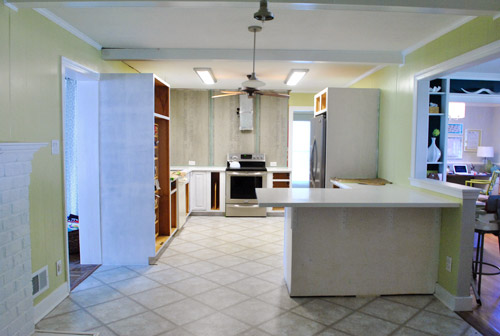
… and, at long last, the paint. Speaking of the paint, we used Benjamin Moore’s Advance paint in Cloud Cover in a satin finish (it’s a soft tonal taupey-gray color, so it’s not quite as bright as our glacier white counters for a subtle layered look). Benjamin Moore Advance paint actually came recommended by a few pro cabinet painters that we know. We went with the satin finish because it’s specially formulated for cabinets (they actually came out with satin first and only added semi-gloss later to help folks who wanted more shine). We used it on our office cabinets a few months back (which still look great after Clara has beat on them relentlessly with wooden fruit) so it’s safe to say that we’ve been extremely happy with it. The fact that it’s low-VOC, self-leveling, and amazingly durable is pretty much the best thing ever.
Since a bunch of you have asked, here’s a rough timeline of the cabinet painting process (we just worked on nights after Clara went to bed and weekends during her naps, so it’s a good indication of what anyone with a day job might be able to follow):
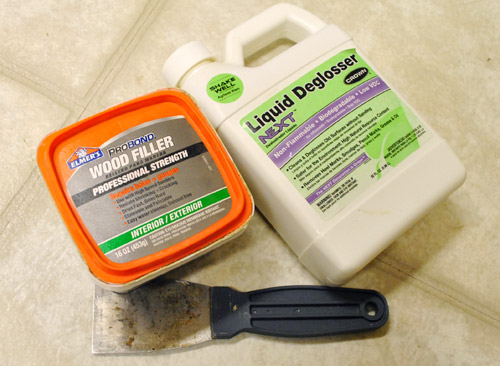
- Day 1: We removed the cabinet doors (including drawerfronts) and hardware (including hinges), applied wood filler to cracks and hardware holes, let everything dry for a few hours, lightly sanded the putty spots by hand, and refilled them with a second layer of wood filler wherever necessary. We did the same to the cabinet frames. Our wood filler of choice was Elmer’s ProBond Professional Strength Wood Filler.
- Day 2: With the wood filler completely dry, we used a palm sander to smooth any putty spots and rough up all cabinet doors in the sealed off sunroom (it’s a dusty job). We then emptied out all the kitchen cabinets and covered appliances with drop cloths so we could also use the sander on our cabinet frames (roughing everything up = better adhesion). After everything was sanded, we wiped it down with a liquid deglosser (we like Next from Home Depot because it’s low-VOC and biodegradable). Read a lot more on the puttying, sanding, and deglossing steps of this process here (there are lots of pics too!).
- Day 3: Cabinet door backs and cabinet frames were primed (we love Zinsser Smart Prime which is high-quality, stain-blocking, and low-VOC – the primer trifecta). We applied it with a high quality 2″ angled brush to get into all the cracks and a small foam roller to smooth everything out and ensure that we were applying super thin and even coats (there’s a video of the application process a bit further down in this post)
- Day 4: We flipped the cabinet doors over and primed the fronts, leaving them to dry another 24 hours, just like the backs. Read more about the priming steps of this process here (there are extra pics too!).
- Day 5: With the primer all done and dry (be sure to read the can – ours said not to over-prime, so one coat did the trick), during Clara’s nap we flipped the cabinet doors over again and painted one coat of paint on the backs (we used Benjamin Moore’s Advance paint in Cloud Cover). We applied it with a high quality 2″ angled brush to get into all the cracks and a small foam roller to smooth everything out and ensure that we were applying super thin and even coats (there’s a video of the application process a bit further down in this post). Clara woke up before we could paint the frames, so after she went to bed that night we put a first coat on the cabinet frames.
- Day 6: We applied a second coat of paint on the back of the cabinet doors and the frames after Clara went to bed. As for applying any sealer or topcoat, the general pro recommendation for cabinet painting is to use high quality stain blocking primer and 2-3 thin and even coats of super high quality paint with ample drying time between coats (Benjamin Moore’s Advance paint is meant for cabinets without any top coat, since sealers can drip, yellow, and even cause things to stick/crack since they thicken the application).
- Day 7: We gave the doors a full day to dry before flipping them over and applying a first coat to the fronts (the reason we did the backs first was that just in case the backs got marked up while we painted the front, at least the front would remain pristine). The day of drying time did the trick though, so the backs look as good as the fronts.
- Days 8 & 9: We applied the first and second coat of paint to the front of the doors over these two days. Read a lot more on the puttying, sanding, and deglossing steps of this process here (there are lots of pics too!).
- Days 10 – 13: We let the doors dry and cure for the recommended time on the can (always read the can!).
- Day 14: We drilled for and installed the hardware on all of the doors (more on that in a sec). We also hung the doors but ran out of time before getting to the drawer fronts.
- Day 15: We installed hardware on the drawer fronts, put the drawers back in, and restocked the kitchen. A droopy but spirited happy dance also ensued.
All that info above (and those three bolded links to the previous posts on puttying/sanding/deglossing, priming, & painting) should be enough to get you going on any cabinet-painting project – but just because I always think a video is worth a thousand pics, here’s a quick one that runs through the process for you. Although at some points I’m so delirious that I make up words (putty brush?) and refer to primer as paint about a dozen times. But it definitely can be helpful to see exactly how to putty a hardware hole or how to prime and paint a cabinet door. Enjoy!
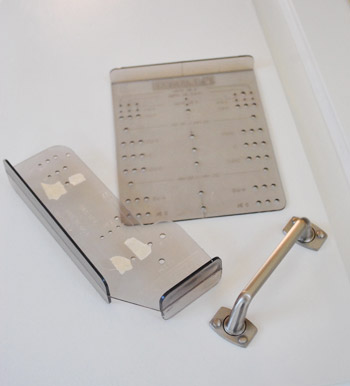
As for the hardware installation details that we promised in our timeline above, we bought these handy Liberty Hardware guides at Home Depot for $7 to help us place everything evenly (centered side to side, and consistently at the same height so all the doors match up). Let’s call it the best seven beans we’ve ever spent (it’s incredibly nerve-wracking to drill through your freshly painted cabinet doors, to say the least – so any tool to make it more of a science is a friend of mine). My only tip is to double check everything ten times before drilling. And see those white blobs on the template on the left? Those are small pieces of masking tape that we used to surround “the good holes” (the ones we were using) so we didn’t accidentally drill into the one to the left or the right.
We also realized that using a small piece of scrap wood would shift all of the handles a smidge closer to the edge of the door, which we realized we liked best (after holding the handle in various places on the template). So we used this scrap wood piece…
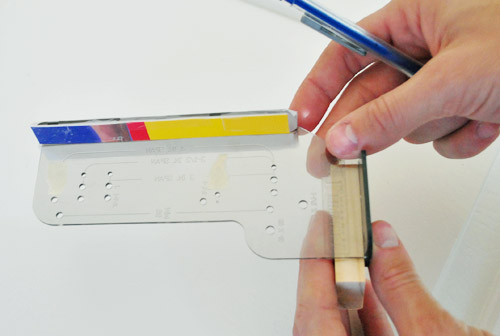
… for marking each door with a pencil…
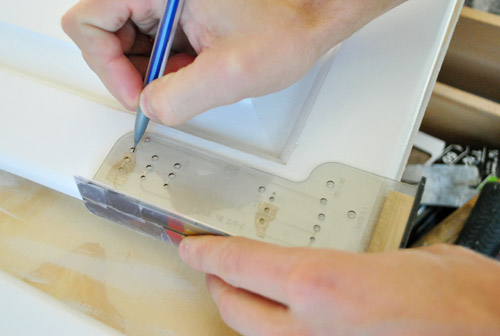
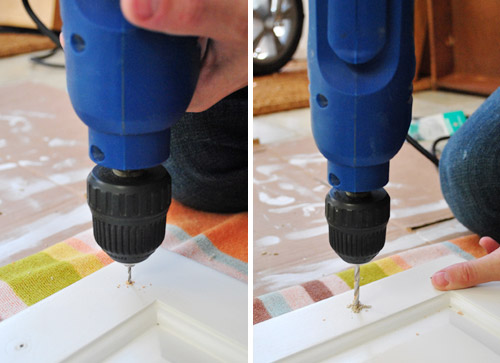
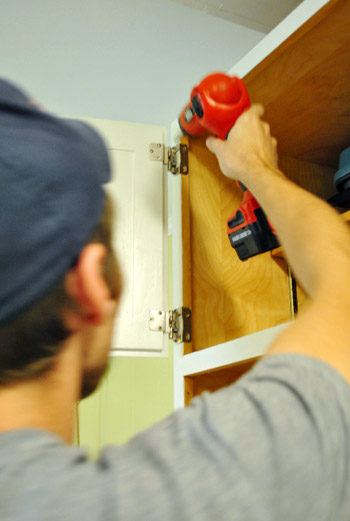
Then John drilled a small pilot hole first (to make sure he was going straight into our marked dot and ensure the wood wouldn’t crack or splinter). Then we went back through with a larger drill bit that would allow the screw that was provided with our hardware to slide right on through.
By some miracle, everything ended up looking nice and even. Whew. You know how sometimes when you reuse something (ex: our oak cabinets from the early 80’s) you think it’ll somehow be wonky or look cheap after something like a paint job? I’m happy to report that they look so solid and amazing. We had completely new cabinets in our first house’s kitchen (to the tune of 7K – ouch!) and we’re just as happy with these. I guess sometimes solid oak from 30 years ago is just as good as solid oak from today. Haha.
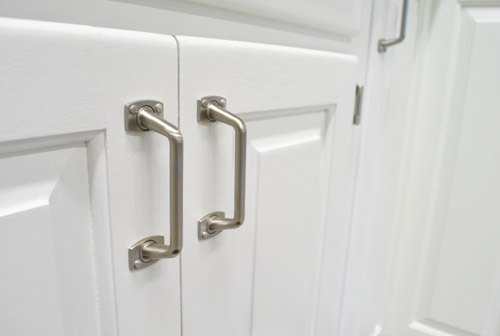
Oh and our new hardware is from here for $3.24 per handle. We love the way the satin nickel looks with our stainless appliances (and we think the soft gray backsplash will only add to the fun. We got all the same hardware for every door and drawer, but just placed them horizontally on drawers and vertically on doors. Speaking of money, here’s our entire budget breakdown:
- Wood filler (Elmer’s ProBond Professional Strength Wood Filler from Home Depot): $7
- Primer (we used Zinsser’s Smart Prime from a local Benjamin Moore store: $22
- Benjamin Moore’s Advance paint (in Cloud Cover in a satin finish): $40 (thanks to a coupon)
- All new hardware (see that link above): $84
- All new hinges (from a local hardware store here called Pleasant’s): $89
- Hardware templates (by Liberty Hardware from Home Depot): $7
- Total cabinet makeover total: $249
Not bad when you compare that to the 7K total of the new white cabs that we selected for our first house’s much smaller kitchen. Le yikes. And we love that we added an entire peninsula with secondhand cabinets for under $95 (one of them was even free) – which is definitely one of those DIY coups that makes ya proud. All that storage and extra workspace is already coming in handy.
Anyway, to get back the whole putting-the-room-back-together thing, after we added the hardware, we just needed to reattach the hinges…
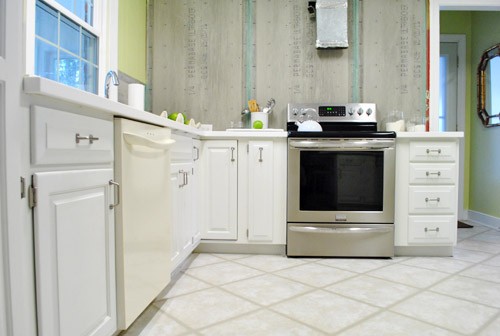
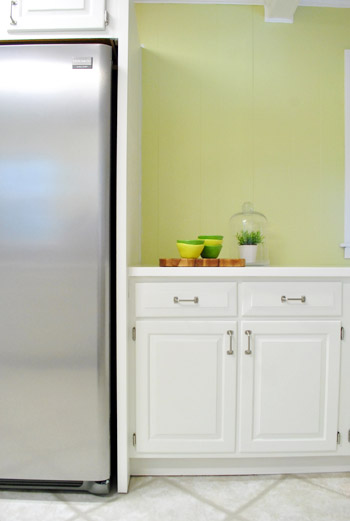
… and enjoy the view (don’t mind the clashy dishwasher- we’ll install our stainless one after we lay the cork floors so they’ll run underneath it).

I’ve totally been doing that thing where you spend way more time in a room than necessary, just staring at things. I keep gravitating towards the kitchen (ex: Clara, let’s go read this book on the floor next to the refrigerator!).
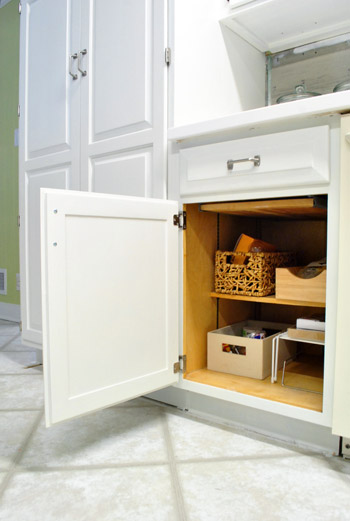
Oh and here’s a shot of how things look with the natural oak color inside the cabinets while the doors and fronts are painted. We don’t mind the two tone look at all, and this way we can toss things in there and pull them out without worrying about scratching or peeling paint (we did the same thing in our first kitchen and in our office built-in cabinets, and they really hold up nicely). Our tip would be to just keep a nice clean line around the frames when you prime/paint them (using a small foam roller sort of does that for you). That way it looks intentionally two-toned and not crazy-sloppy when you open the door. And yes, that is a slide out cutting board. Our cabinets may be old, but they still have their tricks. Haha.
For those who can’t watch the video above to see my shot of the painted cabinets up close, the picture below might shed a little light on the whole oak-grain thing. Using high quality primer and good self-leveling paint helps hide a lot although it doesn’t guarantee 100% invisible grain (we don’t see any evidence of grain on the oak cabinets in the office but do see a hint of it on the kitchen cabinets, so it probably just depends how much grain your cabinets have to begin with). We don’t mind painted wood that looks like painted wood though, so a little grain is ok with us, as long as the paint is nice and even and glossy.
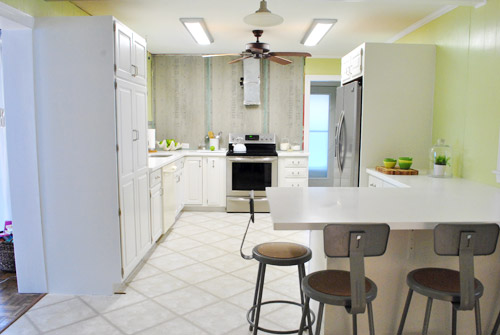
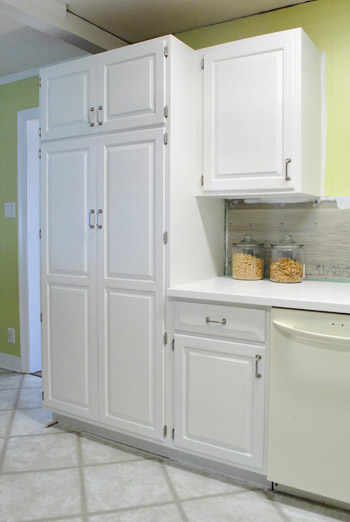
Words can’t express how much additional function/workspace our little peninsula added to the kitchen. It’s amazing to think that none of these cabinets were here before our makeover! And the fact that we gained a 3 x 5′ counter on that peninsula already makes eating/baking/spreading out and doing crafts there a regular occurrence.
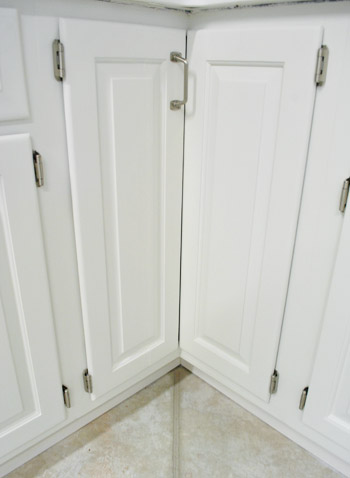
We mentioned in this post that two of the retrofitted cabinets were 100% seamless, and it’s these babies in the corner. We don’t think Sherlock Holmes himself could tell, even with his nose an inch away from them. Hurrah!
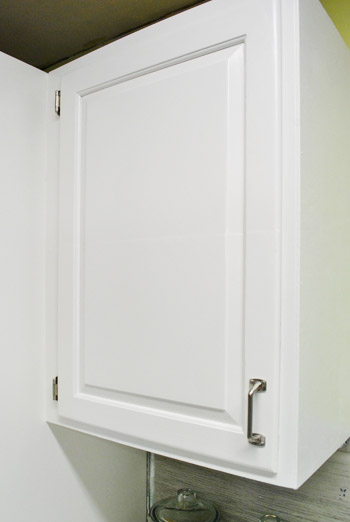
As I mentioned here, the three other retrofitted doors are tad less than perfect. By this I mean if you look at them from an inch away for five minutes (bobbing your head back and forth to catch the light bouncing off of them) two out of ten people might notice a tiny seam. The cabinet hanging above the cereal jars in the photo below is one of them. See how it’s almost impossible to pick up from far away…
But when you get super close and the light hits it just the right way you might be able to catch a super subtle horizontal line? In person it’s so unnoticeable that we can’t decide if it’s worth doing anything about, but we’ll keep you posted if we decide to sand them one more time and use some sort of buildable primer and a few more coats of paint to hopefully make them as perfect as the two corner cabinet doors are.
I don’t know why I love this shot but I do. John’s totally my hero for figuring out how to build in the fridge like that. Mah man.
Oh my gosh, can you even believe that room looked like this last December when we moved in? In case you can’t tell, it’s hard for me to wrap my brain around that.
The doorway to the dining room definitely helps bring the light in – and the glossier cabinets and bright white counters definitely brighten things up too.
Here’s the other side of Dark City:
And the same view now that I’m the Mayor of BrightVille!
Of course there’s still tons to do, like…
- hang our backsplash tile
- add floating shelves & a range hood
- redo all the lighting (two pendant lights over the peninsula + inset lights in the cooking area)
- install our mocha cork floors (can’t wait to balance out the brightness with some rich contrast!)
- install the new dishwasher
- add quarter-round and crown molding
- possibly tweak our stools (we’re waiting for the room to take shape a bit more)
…but it’s definitely progress. Hooray, progress. So who’s about to embark on a cabinet painting adventure of their very own? I hope this post full of details (and especially that little video we whipped up) come in handy! Have fun and don’t forget to make up words (might I recommend putty brush?).
Update: Our painted cabinets are still holding up great. Check out a little update post here.
Psst – Wanna know where we got something in our house or what paint colors we used? Just click on this button:


melinda says
I LOVE your kitchen!!! I was wondering what brand and color of white you used for your paint??
YoungHouseLove says
Thanks! We used Cloud Cover by Benjamin Moore.
xo
s
Angelica says
Great kitchen painting tutorial. Planning on painting my kitchen cabinets white and loved your step by step information and tips. One question though- is a topcoat something you used in your project? Do you think it’s a necessary step? Why use latex versus oil based paint for the cabinets? love your website.
YoungHouseLove says
Nope, almost every expert agrees that proper prep (sanding, deglossing, and priming) along with using a high quality self leveling paint (like BM Advance) is all you need. A topcoat of sealer can actually crack or yellow, so it’s best to skip it and go with good prep and great paint. As for using latex, it’s just the newest stuff on the market meant for a job like this and it does it amazingly well. A year later and our cabinets look mint!
xo
s
Angelica says
Thanks for your quick response. I will definitely check out the BM advance paint for the kitchen project. I already painted our master bath cabinets black to somehow calm down our dark emerald green cultured- marble bathtub and vanity counter. I sanded, deglossed and primed those cabinets with good products after seeing your tutorial. thank you so much for your help. -Angelica
YoungHouseLove says
Sure thing! Good luck!
xo
s
Maria says
I’m finally putting this tutorial to use and painting my ugly cabinets! So far so good! I can’t thank you enough for putting this out here.
I installed concealed/European hinges on my cabinets, which didn’t have them originally. I’d love to see you guys create an entry about choosing the right concealed hinges and installing them. It’s really easy with the cheap Liberty hardware guide, which comes with a 35mm Forstner bit, but the internet kept telling me I’d need aaaaall this expensive equipment to do it, or even a drill press! The only other thing I needed was a 5/16″ drill bit. I want to spread the word!
YoungHouseLove says
That’s awesome Maria! Thanks for sharing!
xo
s
Lydia K says
Hi guys! Y’all are so awesome.
We’re about to take on a similar project in our kitchen (and probably downstairs bath, as well) – a bit of a bandaid on an ugly kitchen while we save the bucks to do a full reno. Our cabinets will be going from pretty much exactly what yours looked like to a matte black with shiny nickel handles. I’m loving all the detailed instructions on how to tackle this, as well as the realistic timeframe for how long it takes. (It always blows my mind on DIY shows when they redo an entire kitchen in like 2 days. What the what?!)
There’s one problem we’re having that I’m not quite sure how to handle, though. The outside panels (the two ends of our L-shaped kitchen uppers) are both finished in this sort of wood-like sticker decal. I’m pretty sure underneath it’s just particle board. I wondered, can I sand that down just like any other finish, and paint right over it? Or should we get some thin finishing board and just cover it up with fresh wood before we paint? I can’t seem to find an answer to this anywhere, though clearly everyone has to have faced this problem before when updating boring builder-grade cabinets. Wondered if you had any insight. Thanks!! Love the blog & the book!
YoungHouseLove says
Hmm, I bet any number of those things could work. I would try painting over it first (can’t hurt) and if that works you’re done. If it doesn’t work, then you can sand it or peel it and try to paint what’s under it (or reface it if that turns out to be the best solution). Good luck!
xo
s
Sarah says
Okay, I would love more info on the coupon for your Benjamin Moore Advance Paint. $40?! I haven’t even found it near me, but I’m looking, and I’m thinking it will be more like $70…
Thanks for your blog. Love it, love it, love it.
YoungHouseLove says
The local store where we get our BM paint is called Virginia Paint and I “like” them on Facebook, which is how I see when they share coupons and discounts (sometimes $5-10 off, and it’s usually $50-60 depending on the type of paint). I’m sure that varies a lot by store though. Hope it helps!
xo
s
Emily says
Since it’s been over a year that you guys have painted your kitchen cabinets, I’m super curious as to how they are holding up? I am wanting to paint our kitchen cabinets, but I am still nervous that they won’t last for the long haul.
YoungHouseLove says
They’re mint! We swear by this method and also by the specific primer and paint (we have no idea how they’d hold up if you used different materials and applied them in different ways) and we’re so happy with them! Clara bangs on our cabinets with cars and I don’t even flinch anymore. Whew!
xo
s
Ronda says
Thank you! You, your website and ideas inspire and support me in redecorating and making my ‘old’ home more beautiful and comfortable! Your family is adorable! Best for you.
dawn says
i’m shocked, your kitchen looks AMAZING! so amazing that now i want to do our kitchen. a quick question, why did you choose to use a brush vs a paint sprayer? again, it looks amazing, job well done!
YoungHouseLove says
We don’t own a paint sprayer, so that was our main reason – and we’ve had such great luck with brushing and rolling that we didn’t see the reason to go out and buy one for just this purpose.
-John
Barbara says
I love that you left the inside of the cabinets natural for all the reasons you mentioned, but are they sealed in any way or just raw wood? We are building cabinets with a smooth furniture grade wood, but I wonder if I should seal the inside and if so, with what?
YoungHouseLove says
They seem to be sealed (not super glossy though, maybe just a matte coat of poly?
xo
s
Angelica says
Hi again. Quick ? I started using the BM Advance paint (after primer was dry) and the foam roller seemed to leave behind a ton of tiny air bubbles. Did you experience this when foam rolling? It seems to have less bubbles when I switched to a synthetic 1/4 inch nap roller. I do love how the BM paint levels brush strokes but the air bubbles won’t go away. I have never had air bubble issues when painting other furniture with Behr paint.
Angelica says
One more question – Did you sand between paint coats for an even smoother finish? I did a very thorough job deglossing and sanding my cabinets and doors before priming and painting. I notice after the first paintcoat some dust or particles get caught on the paint. Did you experience this? Did
YoungHouseLove says
Weird! We haven’t had that issue with bubbles, but they usually come from riled up paint, so perhaps you shook it a lot before rolling or were rolling the foam roller faster and it was bubbling? Just a guess though. As for sanding between coats, we didn’t, but if you have anything but a nice smooth finish I’d sand using a high grit paper between coats, just to get things nice and smooth :)
xo
s
Angelica says
Thanks for your input. Your amazing kitchen makeover is helping me get through painting my 28 doors and 18 drawers. I am loving the BM Advance paint (even if it is taking a bit of practice to work with it). So happy to have discovered it through your awesome tutorial.
YoungHouseLove says
Aw, good luck Angelica!
xo
s
Kay Long says
I really like what you did to your kitchen. Thank you, so much, for the helpful tips.
Jeff says
Hi Sherry,
Great job! I’m getting ready to paint our kitchen and am planning on using the same paint. I’ve it can yellow a little, but not as much as traditional oil paint. Have you noticed this at all?
Thanks,
Jeff
YoungHouseLove says
We haven’t noticed that at all! Ours still looks great (and not yellow or tinted) :)
xo
s
Jeff says
Then Advance it is. Thanks! Now if I could just find someone to do all of the sanding for me.
YoungHouseLove says
Haha! Good luck Jeff!
xo
s
Suzanne says
Hi, just a quick question. In your video, you rolled the primer and paint on without brushing it out. Did the Advance level out enough so that texturally, the brushed sections and the panels were fairly even? Is there any orange peel texture at all in the sections that were rolled out, or did the paint completely smooth out? Your kitchen looks AMAZING!!! Thanks for sharing with your readers!
YoungHouseLove says
It all dried smooth! The key is to apply it thinly and evenly with a foam roller and apply it like the video. If it’s thick it won’t be as smooth when it dries :)
xo
s
Suzanne says
Wow, the paint sounds amazing! Can’t wait to finish sanding & get painting!!! Thanks for your reply.
Leah says
Thank you SO much for documenting this, as well as the video. We are about to start a major kitchen remodel, even knocking out half a wall and putting in a bar to make it more of a pass through kitchen. Our cabinets are real wood and we are keeping those but the ’70s brown as got to go! Your blog and video are a HUGE help and I have taken notes as well. Thank you!
Becky Jones says
I love how your cabinets turned out! I will be painting my kitchen cabinets in the next couple months and am trying to make sure I’m very prepared… One question for you. My cabinets are not solid oak, they are veneered and dark, would I still use the same process that you guys did in your kitchen or would it be different?
YoungHouseLove says
Yes, since they’re wood (just a front of wood) as long as you don’t sand too deeply it should be great!
xo
s
Ashlee says
I was wondering if it took the paint a long time to cure? Do you still put your cabinet doors up if they have not cured? I am so new at this and just primed with your smart prime recommendation and am soon going to paint and wanted your thoughts.
Thanks so much!
YoungHouseLove says
Oh no, after the primer it should feel a little tacky, but after the paint it should be fully dry before you hang them (so if they still feel sticky I’d wait longer). Hope it helps!
xo
s
Ashlee says
One more question…I have been priming with a foam roller and it isn’t bumpy, but it has the look of an orange peel. Is that normal and will it do the same thing with the paint or will the self leveling of the BM Advance paint take care of that?
Thanks for responding to my questions! You are so helpful!
YoungHouseLove says
Yeah primer usually just looks imperfect, so I’d just let it go on, let it dry, and then gently sand it if it feels bumpy after it dries. Then with the paint, if you have little prickles in it that stay once it’s dry you can gently sand it before coats, but it should go on a lot smoother than primer. Good luck!
xo
s
Jenn says
Looks amazing! Was going to do this to our kitchen before we moved and changed my mind not to. You renewed my faith that it’s not brain surgery and I’m so ready to take the painted cabinet plunge. I’ll be going at it alone, since my hubs doesn’t think it’s a good idea. How long did the whole process take and do you recommend taking everything out of the cabinets before starting? Thanks in advance! Hope all is well!
-Jenn
YoungHouseLove says
It took us a few days since we did it a little at a time (we had a toddler and were working through her naps, etc). I would take things out of the cabinets if you can or at least push them back so they’re not in the way if you can’t :)
xo
s
Lara says
I’ve been using this paint throughout our house on doors, trim, etc. and LOVE IT. However- I’m wondering if you could help me with any tips on touching up? Our pocket doors have some light scratches where they hit against the wall before the paint was fully cured. Because of the self-leveling nature of this paint, I’ve been afraid to go in and touch-up as I would regular latex wall paint since I think it may be noticeable. Have you had any experience with touch-ups? Thanks in advance!
YoungHouseLove says
I would sand them a smidge and then do a touch up and see how it looks. If it’s crazy I’d do another coat once that dries on the whole plane (the entire door) if you can muster it, since that will most likely solve it if a touch up doesn’t work.
xo
s
Kimberly @ Turning It Home says
I’m sorry if this has already been answered, but how much paint did you use for this project? I’m assuming under a gallon, since it only cost you $40 for the Benjamin Moore paint. Just checking, since you know what happens when you assume… :)
YoungHouseLove says
Oh yes, under a gallon and we had a coupon for our local paint shop (they sell BM). We expected it might be more than a gallon but we were probably left with 1/4th of the gallon still remaining (I’m sure priming helped get good coverage and the paint itself is nice and thick). Hope it helps!
xo
s
Rachel says
I’ve always LOVED how you share details about how you do things. Superb. :)
I don’t remember you mentioning this except that you liked the cabinet color layered with the counter – after living with the whites for over a year, did you like how the cloud cover cabinets looked with your white trim? Is the difference stark and noticeable? Maybe it depends on the tones that come out compared to the wall color??
YoungHouseLove says
I really think colors read so differently in other houses (ex: our cloud cover swatch looks gray here and looked so white in our last kitchen). The difference was subtle in that kitchen though. I’d just bring home a bunch of swatches and see what you like best.
xo
s
Tiffany says
Where did you guys get your Zinsser Smart Prime primer? I live back west and am having a really hard time locating it and am worried I’m going to have to pay crazy shipping charges if I order it online. But, I guess I shouldn’t complain much since I got the Advance paint for $18 a gallon!!
YoungHouseLove says
Home Depot used to sell it. Maybe try amazon.com if it’s not in stores anymore. I hate that it’s hard to find now!
xo
s
Amy says
It looks great! My husband & I are looking to remodel our home and this is definitely inspiring us. Thanks!
Maria says
Hi Y’all
I am about to have my kitchen walls and cabinets painted. We have black granite countertops and wanted to lighten up the kitchen by going for all white look. Would you paint the cabinets the same white as the walls or use different shades?
YoungHouseLove says
I would go for the same shade I think, just so nothing looks dingy or yellowed by comparison.
xo,
s
Serenity says
Did you sand the paint between coats? I am at that crossroad and wondering if it makes a big difference.
YoungHouseLove says
We didn’t because we like to do such thin/even coats that there’s nothing bumpy to smooth down, but if yours isn’t smooth, definitely use high grit paper between coats to get it nice and perfect.
xo
s
Kathleen says
Hello!
I am thinking of trying the BM Advance paint for a dresser.
Can you tell me about the cure time – and any sticking of the doors to the cabinets bases? I am concerned about the dresser drawer faces sticking to the dresser front.
Thanks in advance for any thoughts-
Kathleen
YoungHouseLove says
It’s the best! We have used it to paint office built ins and kitchen cabinets and furniture, all of which never have any stickiness once they’re dry and are super durable. Just read the can for the cure time info before and after coats. Good luck!
xo
s
Beth says
Sorry if you mentioned this and I just mentioned it, but what type of roller did you use when you painted the cabinets in your last kitchen?
YoungHouseLove says
A brush and a small foam roller is our favorite method.
xo
s
Britni says
I am getting ready to paint my cabinets, and I am going to follow this project, but I just have a few questions…
1-Did you label your cabinets when you took them down? I have read/heard that this is done when painting cabinets so that there aren’t any issues when putting them back up. If you did, how did you label them?
2-When you primed/painted the fronts and backs, what did you sit them on…I notice that they are raised from the table. I have seen in other projects people use hangers or a latter.
3-With the paint you used, you did not have to use the top coat/primer, correct? Also, how much paint did you purchase?
Thanks for any feedback!!!!
YoungHouseLove says
1. We just placed them in a way that they were in order (the order that we took them down as you went around the room) so when we hung them we just followed that order again.
2. We used small blocks of scrap wood to rest them on (just like a 1 x 2 x 1″ rectangle)
3. Advance paint is made for cabinetry and furniture painting and doesn’t call for a top coat since that’s built in. We only used one gallon and still had some leftover!
xo
s
Molly says
Hey Guys-
Did you sand between the first and second coat of paint? I am using the same BM paint and the can says “if a second coat is required, wait 16 hours to sand a re-apply.” I am really worried about getting dust in the finish if I sand between coats so I was wondering what you all did. Also, did you have any problems with chipping? Thanks!!
YoungHouseLove says
We didn’t sand! We use thin and even coats so there shouldn’t be any drips or marks that need to be sanded out (that way we don’t have to worry about the dust in the finish as you mentioned). It’s super durable paint. We were really happy with it.
xo
s
Britni says
Hi! I have one more question…(sorry for the bother)
As for sanding…I see that you said at first you used 60 grit paper then went back with 200 grit paper. I only plan on filling in any cracks on the cabinets, I do not plan on filling in hardware holes, so should I still sand with both the 60 and then the 200 grit or just one or the other? What would you recommend?
Thanks!!!
YoungHouseLove says
Using both would still be good if you can (one roughs things up really well so the primer/paint grips and the second one smooths things back out so it’s not too rough, but well sanded underneath). Hope it helps!
xo
s
Collier says
Sherry & John,
Do you recall how many gallons of paint you used for your cabinet makeover? We are moving into our first home in a month and need to paint all of our cabinets … Budgeting for this is a bit of a mystery!
Best,
Collier
YoungHouseLove says
Just one gallon with paint to spare! Of course we also used primer first, and applied thin and even coats of paint, which must have helped. Good luck!
xo
s
Collier says
Thanks, Sherry!
I realized after I asked the question, that you had just answered it a few comments before. (Whoops!) Either way, thank you for your response!
Your blog has been so inspiring and while I’m terrified to start working on our very first home, I’m so happy I have this website to use as a resource along the way!
Thanks for everything,
Collier
YoungHouseLove says
Thanks Collier! Good luck with everything!
xo
s
Amy K. says
I really love what you did to your old kitchen and can’t wait to see what you do at the new house. I have a quick question- We are getting ready to paint our kitchen cabinets an undecided shade of white (leaning towards Decorator white or Chantilly Lace) and I was wondering if you would paint the doors and trim throughout the rest of the house the same color?
Thanks!
Amy
YoungHouseLove says
Oh yes, I’d keep them the same color so one doesn’t look yellow by comparison.
xo
s
Liz says
Hello! Quick question: now that you have a paint sprayer, if you were doing this project again, would you opt to use the sprayer or would you still go with brush/rollers?
Thanks so much (and also congratulations!!)
Liz
YoungHouseLove says
If we had a sprayer and were pros at it, we’d use that! If we just bought one and this was our first project I think they’d be drippy messes (takes a while to master) so I’d definitely still do this method.
xo
s
Michelle says
We’ve stopped painting our cabinets. We’re also using Advance paint and using small foam roller. Shurline brand the ones that say they are “perfect” for ultra smooth surfaces and cabinets. However, when rolling there are a million tiny bubbles, and when the paint dries they leave tiny little craters. What brand rollers are you using? I would love to know. Your cabinets came out so smooth and perfect.
YoungHouseLove says
Oh no! Could it be a reaction of whatever’s under it? Did you sand/degloss/prime first? Other than that it could be the roller or the speed of application (I hear if you roll too fast it can rile up the paint and create bubbles). Our foam rollers just come from Home Depot (they’re the only brand that they sell in that size, and they come in a pack of a bunch of them). You also can wait until a coat dries and sand between coats to smooth things out. Hope it helps!
xo
s
Ashley Pena says
So I’ve had this page bookmarked pretty much since you posted it. I am officially beginning the process in our kitchen this week and I couldn’t be more excited! Y’all definitely gave me the courage to tackle it. Thanks for the inspiration! (quick note: the Next deglosser is a Lowes brand, not Home Depot)
YoungHouseLove says
Thanks Ashley! The distributor must have switched! And good luck with your cabinets! Hope they turn out awesome.
xo
s
Michelle says
Yes, the surfaces have all been deglossed and primed. :/ Also, I did try rolling slowly to see if it would stop, but it didn’t. I was hoping it was just our rollers causing the issue. I’ll be checking out what they have at home depot for rollers to see if they’re a different brand. The only way for me to prevent the bubbles is to brush by hand, but since we have so many cabinets, it would be so time consuming.
YoungHouseLove says
Hope it’s just a roller issue and it’s all fixed soon Michelle! Best of luck!
xo
s
Readytopain says
It looks great. The hardwork definitely paid off. My question is what type of paint roller did you use? e.g. foam roller, short nap polyester? What type of brush?
YoungHouseLove says
A small foam roller! Love them! And a short 2″ angled brush. You can see them in the video I think if that helps!
xo
s
Dana L. says
Hi! I am currently following the steps in this post as I paint my kitchen cabinets! This is super easy to follow and I appreciate how you lay everything out for your fans; so awesome!! I just have one question…On my can of BM Advance Paint, it says to sand before applying the second coat of paint. Did you guys do that?? Your cabinets look great, and hopefully you’re happy with them, so I’m just wondering if you included that extra step.
Thanks!!
YoungHouseLove says
We didn’t since our paint was smooth to begin with, but if you have any areas that feel bumpy or raised or just want a smoother finish you can sand!
xo
s
Jadee Nickerson says
Hi John and Sherry! Thank you so much for this tutorial! I am done with all the prep work and about to start painting my cabinets…woohoo! Quick question- how long did it take to paint one coat on the cabinets doors and frames? Trying to get a good timeline of how many hours I will be painting each night. I would love to get the kitchen back together by Thanksgiving. Fingers crossed!
Jadee
YoungHouseLove says
Oh man, it was a few years ago so it’s hard to remember but I think maybe 5 hours or so? You can do it all in one day if you have a big chunk of time, although you can’t do the back of the doors that way (you’d need to wait another day to flip them) and then it might take 2 hours to do those again.
xo
s
Jadee Nickerson says
Thank you!!!
Lizzie says
Hello – you said you had a coupon for the paint. Was that something you found online?
YoungHouseLove says
Oh Facebook I “liked” the local paint shop where we get our paint (Virginia Paint) and that helps to alert me when they’re running deals and stuff. Hope it helps!
xo
s
Rachel says
Your tutorial is amazing and totally makes me think we can do this in our kitchen. One question — did you reuse your hinges or were you able to find new ones that match the pattern of the old ones (so you didn’t have to putty and re-drill holes)? Any suggestions?
YoungHouseLove says
We got new hinges (our old ones were rusty and brassy so we found some in stainless steel like our appliances) but I think we were able to reuse those holes! We did get different pulls so we had to putty the old holes since the new ones were placed in a different spot based on their different shape.
xo
s
Ann V. says
Hi there, did u have trouble with brush strokes? We are having a hard time with this paint. it seems like we need to apply it thick and I feel like there are brush strokes! help!
YoungHouseLove says
Thin and even is the key! We didn’t apply anything thickly since it cures better and hides brush strokes if you go thinly and evenly. Also, the foam roller really helps keep the brush strokes away. The video in this post might help if you have a second to watch it. Good luck Ann!
xo
s
Brian says
Wow, now that’s a contrast. You say it doesn’t even feel like the same room. That’s an understatement!
The paint looks great!
http://watsoncoatings.com
Marilu Luna says
Sherry and John I desperately need your advice. I’m seriously repainting my kitchen cabinets from oak to white and wanted your opinion on which method should I proceed with. Painting them myself or using that Rusteolum product that refinishes cabinets. What would you suggest since you guys have done such a beautiful paint job on your own kitchen cabinets in House #1, #2, and #3. Thanks!
YoungHouseLove says
Thanks Marilu! We have no personal experience with the Rustoleum kits but have heard good things. Personally we have loved this method though, and it has worked well for us (and held up nicely). Hope it helps!
xo
s
Erin says
Hi guys!
We’re painting our cabinets next weekend. Would you say that BM Advance and SW Pro Classic are comparable in quality/application?
Also, did you sand between coats? I have heard both from the paint stores, so am a little confused.
Our particular cabinets are very very lightly stained & glazed (a antiqued-looking beige) that we are painting WHITE, of course!
Any insight you might have a moment for would be greatly appreciated. Congrats on #2!
Thanks :)
Erin
YoungHouseLove says
Thanks Erin! We have never used SW pro classic, so I’m afraid we can’t weigh in on if they’re comparable in quality/application but we’ve generally heard good things about SW paint and have had awesome experiences with the Advance ourselves (we used it on our office built ins, our kitchen cabinets at our last house, and again here in this house’s kitchen). As for sanding, we just apply thin and even coats and don’t sand between them, but if you have drips or high/low spots it can’t hurt!
xo
s