I guess that title should really be “Puttering Around With Putty (aka: Wood Filler) And Sandpaper And A Spackle Knife And Deglosser.” But that was too long. In a nutshell, we prepped all of our cabinets for primer by:
- puttying all of our cabinet frames and drawers and doors
- sanding everything (to smooth the putty and rough things up for primer)
- deglossing everything (to further aid with adhesion)
- laying all doors and drawers out in the sunroom (on lifts) so we’re ready to prime
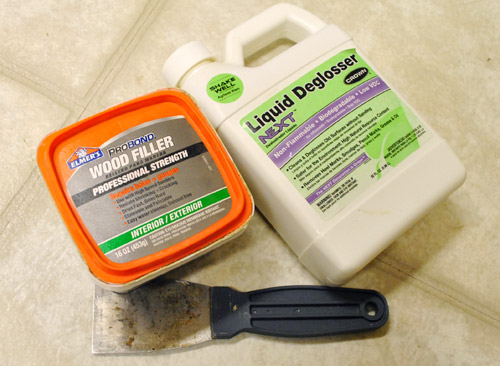
But that’s not enough detail for chatterbugs like us. So let’s get into the nitty-gritty. First we used Elmer’s ProBond Professional Strength Wood Filler (we asked around for a favorite filler among contractor friends and two mentioned this one) to fill any cracks, old hardware holes, etc. Since our new door and drawer handles will call for two holes instead of one, it was important to hide the old holes with filler so once they’re primed and painted they’ll be completely invisible.
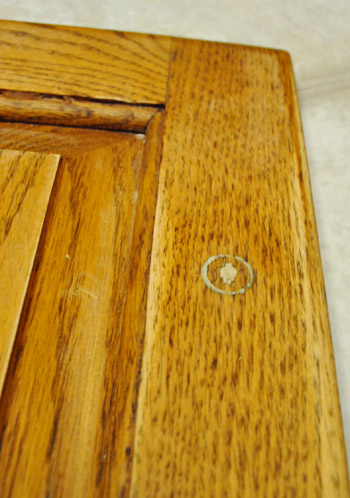
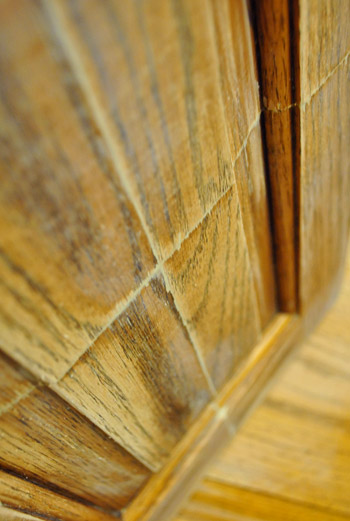
After using a spackle knife to firmly scrape the putty into the holes and cracks to fill them, the holes from the old hardware looked a little something like this:
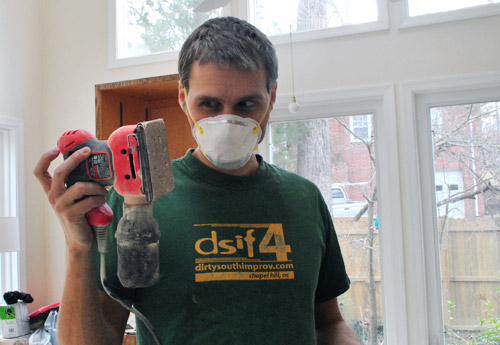
Then it was sanding time. This is John’s Dexter face (not as good as his impression here):
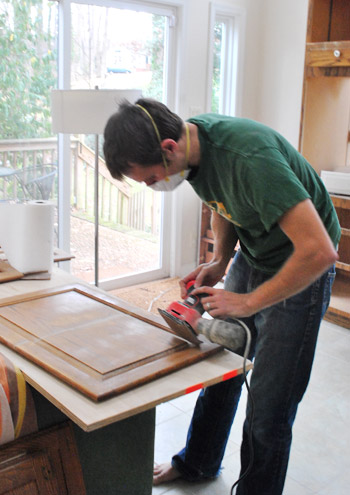
After carefully puttying and allowing for drying time (we just read the container to see how long to wait), we went to town with the hand sander (using 60 grit paper followed by 200 grit paper) to not only smooth out the parts that were puttied but to rough everything up so primer and paint would stick for the long haul. There are some folks who skip steps like sanding and deglossing but we’re Team Edward Team Super Thorough. Although shortcuts are tempting, we like to go the extra mile in the name of the best adhesion possible for more long-lasting durability (it might take us a day or two more on the front end, but if it gets us years or even decades more on the back end it’s well worth it).
Oh and you can see that the cabinet above is one of the ones that we retrofitted using a pro method (pocket holes with wood glue and a number of heavy duty hidden steel screws) – so these doors are just as durable & sturdy as the rest of the doors in the kitchen. Once we puttied and sanded it the seams were pretty smooth. So we’re still crossing our fingers that primer + paint will add up to undetectable door surgery. Which is always the best kind of door surgery. If not, we’ll buck up and pay for a carpenter to create perfectly matched doors since the half-sunk ones that we have are rare/impossible to find in the custom sizes that we need. We just thought attempting to reuse these solid oak doors was worth a try first (you know we like to use what we have to save money that we can then put towards other things to elevate the room, like new counters/floors/backsplash, etc).
Here’s a photo of another door that was retrofitted:
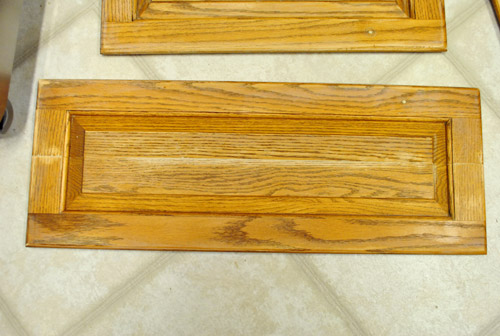
As you can see, the putty is lighter than the wood tone of the doors, but when you run your hand over the seams they feel nice and flush, which should be the key to a seamless finish. It’s easy to believe that primer and paint will fill gaps and hide flaws, but in our experience they DO NOT! They actually settle into fine lines and dings and cracks and emphasize them. So our big tip to you is before you get near the primer or the paint to get your doors as smooth and seamless looking as possible. Any inconsistencies in color (like the lighter putty) are ok, since primer and paint will cover that. But any inconsistencies in smoothness or dings/cracks won’t likely be hidden by primer & paint, and might even be more noticeable once the wood tones are gone and the door is one solid color.
Once those few retrofitted doors were puttied and sanded while the rest of the doors were just sanded (other than getting a dab of putty to hide the old knob holes) it was time for the liquid deglosser.
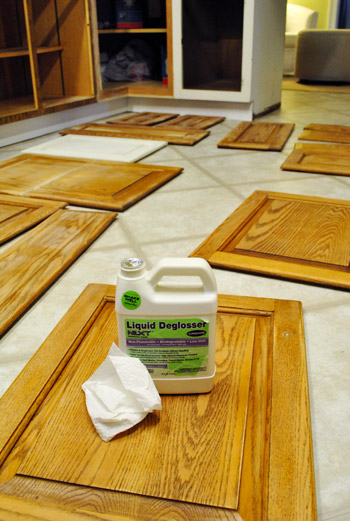
We like using Next Liquid Deglosser because it’s low-VOC and biodegradable (and still gets the job done). It removes any sort of oil or grease and strips down some of the shine on things (our doors weren’t too shiny after our rough-everything-up sanding session, but you know we like to be thorough). Especially in a grease-prone room like a kitchen, this step is a good one (the wipe-down also helps remove any sawdust that remains after sanding).
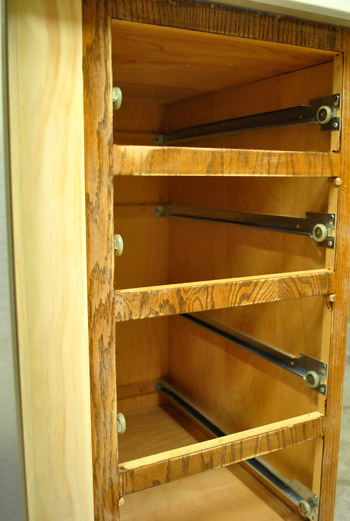
Oh and we also puttied the cabinet frames whenever necessary (like when there were dings, cracks, and screw holes that we wanted to hide). See this screw hole on the edge of the side of our pantry? That’s where another cabinet used to be attached, but since we reconfigured the layout that hole is now exposed, so we filled it and sanded it to make sure it won’t be visible once we prime and paint.

After puttying any areas of the cabinet frames that needed attention, we let them dry and then sanded everything (again to smooth any putty and rough everything up for the best possible adhesion). Then we deglossed everything for even more “adhesion insurance.” Are you sensing a theme? We want that primer and paint to stick for the long haul, goshdarnit. We’ve used this cabinet painting method in our first house’s kitchen, in John’s sister’s house (where it lasted over years until she moved – when it was still going strong), and I also used it to paint the cabinets that we used to make our built-in office desk, so we’re huge fans of how long-lasting & durable things end up being. Even though it’s a pain in the butt to get through since you’re dying to pick up the paint brushes and rollers already. But we’re there! We’re fiiiiiinally there!
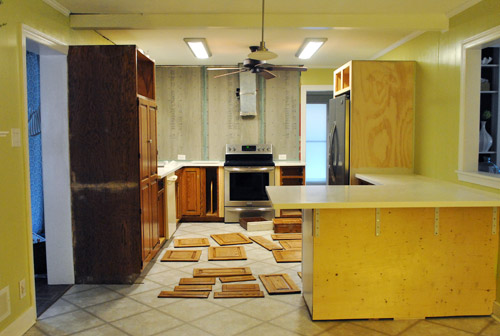
Here’s how the kitchen was looking after all those goings-on. Not gorgeous – but lovely because progress is a beautiful thing!
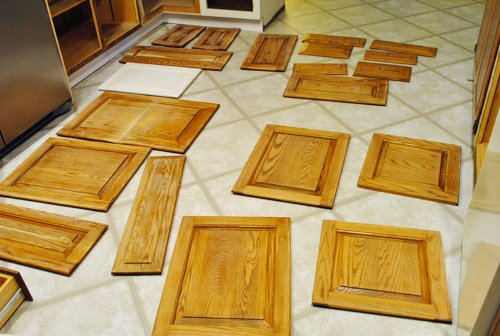
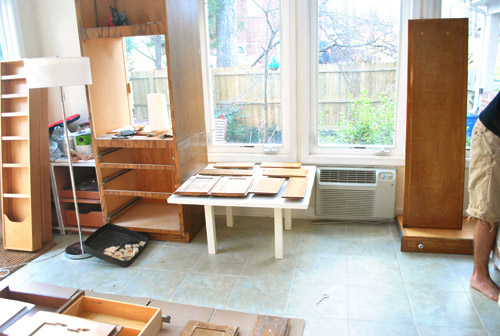
Then it was back into the sunroom with all the doors where we laid them all out for the priming and painting phase.
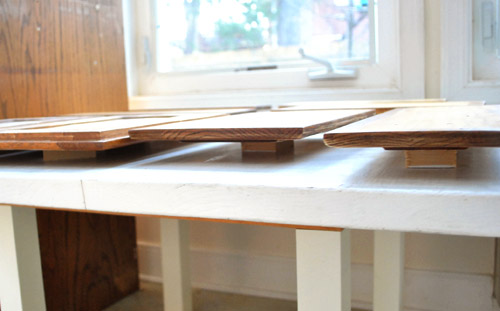
Oh and see how they’re all sort of popped off the ground a bit? John cut down a bunch of scrap wood pieces that we had in the basement to make little “risers” for them, so we can easily paint the part that faces up AND the sides without worrying about any doors dripping/sticking/sitting in a puddle of primer or paint.
Enough chit-chat, there’s priming and painting to do! We’ll be back with a primer peek later in the week… and once everything is dry and ready to be re-hung we’ll share the full monty reveal with tons of details, photos, and even a video about the full priming & painting process for anyone who wants to tackle this project (hopefully sometime next week, assuming everything is all cured up and dry by then). Exciting stuff. What have you guys been up to? Tell me we weren’t the only ones puttying our pants off (figuratively speaking).

Wendy - Old Town Home says
Looking good! And the key to a great finished paint job is all in the prep. Hang in there!
We’re trying to get back into the swing of renovation projects now that Christmas is over. Before we pick back up on our master bath reno, we’re going to be making custom storm windows. http://www.oldtownhome.com/2011/12/26/A-Storm-Window-Commitment/index.aspx Not the most exciting project, but a necessary one this time of year, and we hope our public announcement means we’ll actually get it done.
YoungHouseLove says
Wow – that’s awesome! Good luck!
xo,
s
paige says
lovely jubley!
Linda says
I feel like each post is just a little bit more of a tease as to what everything will look like once the painting starts. I, for one, am pretty dang excited! I can’t imagine how much you guys must be chomping at the bit to get it all done – I admire your patience. haha
xoxo Linda
YoungHouseLove says
Haha- we’ve been dying to get there… but we’re there now! We’re officially in primer progress!
xo,
s
Heather says
I’m dying to see the finished product! I can imagine you guys are ready for that part too. I’d be like hurry up and finish I want my new kitchen already :)
Melanie @ Mailbox Journey says
Lots of work, but I’m sure it will be worth every second in the end!
Jennifer says
Yes!! Take your time. I hate waiting too, but you are right. It is so worth it! Rushing just makes for more work in the future!! We are all waiting…and trying to do it patiently! Good luck!!
Melody says
I love how thorough you are, taking no short cuts. Can’t wait for the big reveal, I’m on the edge of my seat!!
Amanda @ Our Humble A{Bowe}d says
Priming, finally! Such an exciting time. Not really, but the painting is because you’re finally seeing the finished look. We just shared our cabinet painting tutorial (http://ourhumbleabowed.wordpress.com/2011/12/19/how-to-paint-cabinet-doors-and-drawer-fronts/) and the reveal of our installed drawer fronts (http://ourhumbleabowed.wordpress.com/2011/12/20/i-like-big-drawers-and-i-cannot-lie-2/) I’m sure yours will look fantastic!!
Sunny says
What are you going to do about the backs of the cabinets that you retrofitted? Did you puddy those holes too? Are you going to paint both sides of all the doors? What about the insides of the cabinets? Sorry about so many questions! Just curious. Looks great!!
YoungHouseLove says
Yup! Full putty job on both sides and we’ll paint both sides of the door so they look as good coming as they do going! More details as we go!
xo,
s
Pip says
So thorough – the cabinet gods should heap maximum adherence upon thee. Happy Priming!
Sew View says
Ha ha. Ditto.
Molly says
Great job, guys! I have slooowly tried to become a more patient person when it comes to this sort of stuff. Way better to do it at the beginning than to rush through it and kick yourself in the end.
I did a little puttying on this side table I painted red. Still have no clue what the hole was for in the first place! Maybe a cord?
http://thenestinggame.com/2011/10/12/red-spindle-table/
Keep going!
YoungHouseLove says
Oh my gosh that looks amazing! And hooooooray for all the wood puttying goin’ on! Woot.
xo,
s
Wrenaria says
Molly – Looks to me like it might have been one of those lamp tables, where the lamp is attached to the top as a permanent feature (but in this case someone removed it).
Looks lovely in red! Nice work.
Micha says
There is NO-THING more important than proper prep work. Trust me *grimace* I’m repainting every inch of painted woodwork in our 1915 home because previous owners didn’t use primer, used the wrong primer, didn’t sand, didn’t clean …. gah! It’s taking forever but at least I can sleep at night knowing -our- paint job will last :o)
YoungHouseLove says
Aw man, that stinks but it’ll be so worth it in the end! Good luck!
xo,
s
Kate says
I know the effort will be worth it in the end! A week before we hosted 17 people in our home for Christmas we decided it would be the perfect time to build and install open shelving on a blank wall in the kitchen. Fortunately I took the week off. I spent an entire 2 days filling, sanding, priming, and painting. But they’re perfect and lovely.
Kate says
I feel like I’ve been waiting for this moment since you moved in! Very exciting!
Do you plan on painting in interior of the cabinets, drawers, etc?
Can’t wait to see the end result!
YoungHouseLove says
We’ll share all those details as we go!
xo,
s
Ashley@AttemptsAtDomestication says
I can’t wait to see them painted!
Erin M says
How exciting! Can’t wait to see the next step(s).
Lauren says
I love coming back in to work to check out your progress! I was down in NJ with my mom this weekend and spent all of yesterday helping to paint their bedroom and brand new in-progress master bath (then cleaning and returning furniture to the bedroom). We chatted away about how much more fun it was to be painting than out shopping at after-christmas sales!
YoungHouseLove says
Aw that’s my idea of a good time!
xo,
s
Kristen @ Popcorn on the Stove says
You’re getting there! Can’t wait to see how painting goes!!
nancyo says
way to go! My weekend had no DIY projects involved. I’ve vowed to finish up remaining projects before beginning anymore. This week, I’m finishing up something that I’ve built thanks to Ana-White.com .. so, I took the holiday to run, swim and work off the extra holiday calories.
Non-DIY related … does John do improv? Or, is he just a fan of dirty south improv? If he does do improv, will we some comedic relief on YH Life?
YoungHouseLove says
Haha, he does. He did it in college and also a bit when he lived in NYC before we met (at Upright Citizens Brigade). It’s funny now because some of the kids he knew from there have made it big (they’re on SNL and The Best Week Ever) but he’s really happy to be into DIY and “daddy-ing” these days. Gotta love that funny man of mine.
xo,
s
Vicky says
Help! The background to every post has changed to a tile effect of a video of Sherry in a black shirt with the play button symbol. All the words that land on the black shirt are unreadable, I’m trying to view it on my iPhone, I’ve tried reloading, restarting the Internet app, I’m freaking out that I’m not going to get my daily fix of young house love now. It started when I clicked on videos in the side bar. Any idea how I can fix this? Thank you!!
Vicky says
Nevermind!!! It’s fixed!! I restarted my phone and that put it back to normal :) SO relieved! Off to read today’s post!
YoungHouseLove says
So glad! Yes, iPhones can be very glitchy, but we hear clearing the cookies/data can help if it gets weird. Glad it’s back to normal!
xo,
s
Sara says
I wish I could renovate my rental kitchen – this just looks like more fun every time I see a new picture! Just wanted to stop in and say Merry Christmas and that I asked for the Black and Decker 12 Volt Compact Drill you guys recommend in your Amazon shop and I got it and I love it!!! Thanks for always being awesome you guys!
YoungHouseLove says
Aw, so glad! Happy drilling!
xo,
s
Molly M. says
Have you used the Liquid Deglosser on other projects? Would you suggest it for refurbishing/refinishing a rocking chair for my daugher instead of regular stripper? Do you degloss, sand, then degloss again?? I am very intrigued with this product as I am starting a faux finishing/mural/painting business and have not used it before. I have a slew of questions but won’t bog you down since you have priming to do! Good luck!
YoungHouseLove says
A deglosser isn’t as thorough as a stripper, so if you plan to stain something you’ll need to strip it down to bare wood for the stain to sink in evenly, but if you’re priming and painting, deglossing, sanding, and deglossing again might be all you need to rough things up for primer and paint. Definitely don’t skip the sanding step though! Hope it helps!
xo,
s
Katy says
I’m sure every detail Team Thorough sees to will be worth it in the end! I’m definitely one prone to cutting corners to make it a little simpler. Call me Team Lazy. Your posts consistently remind me that in the long run, being thorough is way easier. Looks like Team Lazy is actually Team More-Work-Down-the-Road. Thanks for helping me redefine my lazy!
YoungHouseLove says
Haha, go Katy, go! You can do it, girl!
xo,
s
Aimee says
Nice tutorial. We are closing on a house this Friday, so there will be some putty in my future. I will look forward to the detailed instructions on priming/painting.
Sally Duren says
We are right there in the thick of it with you! Except we have to replace our fifty year old lower cabinets due to some serious rot. bummer.
YoungHouseLove says
Aw man, such a bummer! Good luck with everything!
xo,
s
Jaime says
Have you all spied Barker Doors for the impossible to find cabinet doors? Its the only place I was able to find online that sold custom doors for super cheap to the public. I bought all my new cabinet doors from them and I am pleased as punch! http://www.barkerdoors.com
YoungHouseLove says
Yes, sadly they don’t do the half-sunk ones that we need that work with the same hardware and stick out the same width (we want them all to look identical, which is quite the challenge)! We really did look everywhere!
xo,
s
Elisa @ The Self Life says
Ooo, we’re replacing some cabinets with glass doors. Thanks for the link!
Shannah says
Please don’t feel that you need to make this comment go live since I know you moderate comments. This is just faster than tracking down an email adddress for you.
I wanted to give you a heads up since you are read worldwide. The word “bugger” is fun and funny for us Americans, but (speaking as someone who has lived all around the world) it’s not a very nice word to use at all. It’s a pretty graphically strong curse word (think F bomb with some multiples) throughout the Commonwealth. You might want to do a slight edit.
Ref from this post: “But that’s not enough detail for chatty buggers like us”
Love your blog and want to keep you embarrasment free!
YoungHouseLove says
Ack- thanks for the tip! Off to change that!
xo,
s
Skye @ Neathering Our Fest says
Wow – good little tip to know! :) Thanks for sharing! (And thanks Sherry for posting this.) :)
Emily says
Most of my British and Irish friends use it fairly frequently (I live in Boston, its chock full), and while it has a different meaning than your use, I’ve never considered it a multiple of the F bomb. Someone might say bugger off, and that more or less means F off, or they may call someone a filthy bugger, but its really not all that terrible. But then again, maybe I have filthy friends?
YoungHouseLove says
Haha, I remember seeing people in British films saying “bugger off!” but I always thought it was more like sayin “shut up” – haha. Things definitely can change meaning from place to place though! We’ve also heard that giving the peace sign (holding up two fingers) can mean eff-you in some other places! Such a surprise!
xo,
s
Annabelvita says
As a Brit I wouldn’t say it’s that rude when used to describe a person. It does have a sexual meaning but I think a lot of people use it without thinking like that.
YoungHouseLove says
So interesting!
xo,
s
Chrissie says
In Australia it’s considered pretty harmless as well, it’s kind of like the little second cousin of swear words – it can be used in place of a swear word, but it’s not considered rude by most.
There are a LOT of words in English and Australian English that seem to have dirty meanings that the rest of the world couldn’t know (like root – what the?), but (despite the odd immature giggle) I do know that people in other countries aren’t generally aware of those subversive meanings and can understand the context they’re being used in.
It’s great that Shannah let you know about it, and it’s good to be aware of different language uses, but I just wanted to clarify that over here at least, chatty buggers are just fine :-)
YoungHouseLove says
Haha- thanks Chrissie! SO interesting!
xo,
s
Emily says
The peace sign has to be backwards to be dirty – like with your palm to you, rather than away. But you kind of give it with the same gusto as the finger, so there really isn’t any confusion between the peace sign and the F-off backwards peace sign.
And like Chrissie in Australia mentioned, there are lots of bad words in both American English, British English, Irish English, etc., etc., that can be confused.
For example, a fanny in America is not a butt across the pond. You write an American English blog – it would be impossible to try and keep up with every variant of English!
YoungHouseLove says
Haha- so funny about the gusto at which the backwards peace sign is given!
xo,
s
Holly says
I was sanding and using wood filler yesterday as well on an old dresser!
Looks great, good work! Looking forward to seeing the final results :)
YoungHouseLove says
Woot! Wood filler in the house.
xo,
s
Joanna says
It’s looking great! It occurs to me – did you consider putting just one door through the whole process (resize, putty, sand, prime, paint) to see if you liked the results instead of doing the whole set together? I would worry that after putting all that effort in I’d be reluctant to go to the plan B even if I wasn’t completely satisfied with the results.
YoungHouseLove says
Nah, we figure since we have 20 something drawers and doors to paint that five of them being retrofitted isn’t a big deal since we like to only have to dirty the paint brushes and rollers as few times as possible (aka: doing it all at once, if it works will save us some extra brush scrubbing on the back end). And if it doesn’t at least we’ll have tried them all!
xo,
s
Laurel M. says
The day after Christmas my husband sanded a 60 year old “trashy table with potential” so we could refinish it and fit our entire soon-to-be family of seven! I promise to follow you step by step!
Jennifer Rizzo says
We did the exact same thing to our old oak cabinets last year. I was so glad I puttied them and filled in the grain. I was so happy with how they turned out! You are going to love them!
Julie says
Okay, I’m just going to finally come out and say it, everytime I see I shot of the sun room I think ‘Wow, that would make the perfect playroom!’. I have to know if it has been considered. As a Montessori teacher, and nanny, and parent I have seen the playroom in many parts of the home. And it seems unless it is in the middle of the action it often goes ignored. Love the progress by the way!
YoungHouseLove says
Of course! It’s just on a separate heating/cooling zone (we have to heat and cool that room separately) and it’s separated from the house by an exterior sliding door- so it just seems a bit more “external” than connected to us (which is why we love painting and project-ing in there, since it seals the fumes out of the house). But I’m sure as Clara grows and gets more independent it’ll be a great room for her to spread out in!
xo,
s
Skye @ Neathering Our Fest says
You two just keep doing your thing because it is just pushing me to GET OURS DONE! I love it! I also agree with doing things right beforehand and a couple of extra days that really pay off in the long haul are SO SO worth it! :)
Mary says
John, face mask but no shoes using an electric sander? I dunno about that…
YoungHouseLove says
Feet don’t breathe, do they? Haha. Just kidding, but door sanding in our sunroom isn’t splintery or anything – so bare feet aren’t dangerous for that step (we often paint barefoot too since we can feel when we have something on them and avoid tracking it into the house that way)! Our method is actually to wipe down our bare feet and then slip socks on when we walk inside (and then shake those socks out in the bathroom before hopping in the shower) to keep from tracking the dust all around. Otherwise it gets caught in our shoes and we accidentally track it in at some point later in the week or something.
xo,
s
Christine says
My husband works in construction safety so I immediately spied the bare feet. Be careful, John! One unforeseen little slip with that sander and you could have a trip to the ER ahead of you…and that is one post I would not want to read! Dirt or no dirt, it’s much harder to deal with stitches than it is to mop the floor!
Cristina s. says
Don’t worry we spent time this weekend prepping & priming our banister… You’ve taught me to be a stickler for trim in glossy white ( something the previous owners did not care for lol)
YoungHouseLove says
Haha- go Cristina! I bet it looks great!
xo,
s
Kaytie @ GardenKitchenHome says
Consider me inspired to play more by the rules. I’m guilty of cutting corners when I get bored, and it can show in certain projects. Maybe my problem is that I don’t do things in the assembly line set up that you do. (So not enough space in my little Philly condo.)
Good job, guys!
Seriously Sassy Mama says
Do you think the wood filler would work with nicked molding? I rent and just want to clean it up a bit. Also, thanks for the deglosser info. I have a dresser and a table I want to redo!
YoungHouseLove says
Oh yes, I bet it would. If it’s painted molding (or will be painted) sometimes white paintable caulk can help fill in little nicks and cracks too, so that might be worth a try if you give putty a go and it’s not as pliable as something more tooth-paste-ish might be. Good luck!
xo,
s
heather says
I love how thorough you guys are—it’s a good thing. I’m crossing my fingers for you guys that the cabinets looks even when they are all painted up, I know how much it means to you guys (and to not have to pay the $800).
We took the weekend off of house items and headed up to my father in laws on Christmas where we ate way too much homemade pizza, beer and hot tub time (while it was snowing out). A white Christmas topped by white Christmas hot tub time isn’t half bad. We had four dogs there (over 60lbs each) and six adults haha, it was so fun.
My sister in law is redoing their kitchen now, so you guys came up and we realized we all read it (minus my husband and my father in law) so you guys and your reno was brought up in convo :) I’m glad to see the progress!
Kate Battle says
I’m glad you guys are tackling this project now! I’m getting ready to paint my kitchen cabinets (starting after my New Year’s Eve party) and I can use all the advice I can get! Never thought to do the liquid deglosser step, but I am highly considering it. May I ask where you purchased the low voc deglosser? Sometimes the eco friendly stuff is hard to find!
YoungHouseLove says
It’s from Home Depot! Just check out their cleaning and stripping product aisle or ask where deglossers are! It should be right in there among them! So glad things are getting greener at big box stores!
xo,
s
Kate Battle says
Thanks guys!
Amen to the greener at the box stores comment! Especially when you are working indoors in the winter in Wisconsin…hard to get much needed fresh air when its 15 degrees out!
Karen says
Rah, rah! Go John and Sherry! You guys are doing SO great! This is the hard part, where nothing is pretty and it feels like it’s been forever since the heart of your home was “normal” and you start feeling like you’ll never see the light at the end of the tunnel.
You will! I’m here to encourage you! And you’re doing such a fantastic job of getting things right in this draggy-on prep part.
I know you have a zillion and one things on your plates right now–you are both amazing at juggling what you do. It will all pay off in the end with a beautiful kitchen for your family, and lots of hits and comments.
Have a WONDERFUL day. Kiss that little girl of yours and kiss each other as well, and take some deep breaths as you slug through everything this week.
You are sweet, intelligent, hard-working people AND fabulous parents. It shines through in each and every post. That’s why the world loves you so much.
God bless!
YoungHouseLove says
Aw thanks so much Karen. You’re the best.
xoxoxooxo,
s (& the fam)
Melissa says
Just found your blog about a month ago and love it! (trying to catch up on all your posts, lol) It’s definitely helped get us back in renovation mode after taking a long break post-baby – our son Ned is almost 1 year to the day younger than Clara. Loving the info so far on refinishing the cabinets as that’s what’s up next in our house. We’re going to start in the bathroom for practice first and then hopefully move on to the kitchen. Can’t wait to see the painting during/after pics!
Meg@ Keeping up with the Jenks' says
Just wanted to drop in and offer words of encouragement. Y’all amaze me (I mean are you sleeping?)
I wish I was DIYing something, can’t wait to get our house built! I’m itching for a project.
YoungHouseLove says
Aw thanks Meg! Clara actually slept until 9 this morning (it’s a post-Christmas miracle!) which is really nice since we went to bed at 2am last night! I feel like a new woman after my 9am wake-up. Although I guess I still didn’t get 8 hours. Maybe after Jan 4th when we hand in the final book manuscript! Haha. Gotta have a goal, right?
xo,
s
Meg@ Keeping up with the Jenks' says
yay for Clara sleep, boo for 2 am bedtimes. We were up at 630 because Isla June was hungry (what the!?)
Its super mommy power to just keep putting one foot in front of the other during these crazy times, y’all can do it! Good luck!
YoungHouseLove says
Aw, sorry Isla June had you up so early! Probably a growth spurt! Grow baby grow!
xo,
s
Amanda says
I’m so excited to see the finished product! And I’m still amazed at how seamless the franken-doors look after you added putty and sanded! It’s going to be fantastic. :)
Ang says
I’m so jealous! Waaaa, I want a new kitchen. I have been waiting soooo long. But patience is a virtue and I’ll get mine soon. But this isn’t about me it’s about you! :) I truly can’t wait to see it finished! I LOVE how frugally you are doing it all. Great job! I’m dying to see the backsplash too. So close!!!
tjack432 says
Ahhhhhh such a tease! The title should have been “teasing you with putty”
I am looking forward to the big cabinet reveal.
karen says
Call me a ‘putty dummy’, but I’m not sure what yo mean by-(pocket holes with wood glue and a number of heavy duty hidden steel screws).
YoungHouseLove says
Here’s that post all about retrofitting the doors for ya: https://www.younghouselove.com/the-doors/
xo,
s
Sylvie says
Could you comment a bit on your sanding prep & cleanup? When we painted our paneling, we had sanding dust EVERYWHERE (we used the same sander as yours). I tried using tack cloths for cleanup and that in itself was a sticky mess! How do you contain all the renovation messes? I understand sanding outside or in a separate room, but what did you do when you sanded the cabinets inside the kitchen?
YoungHouseLove says
We cleared the room (art off the walls, chair out of the corner, stuff off the mantel and counter, etc) and then did all the sanding. Then we swept things off from top to bottom (starting with the tall items like the fridge built in, and working down to the floor. Then we swept the floor and followed that up with swiffering to get all the remaining dust up. Hope it helps!
xo,
s
Shannon @ Bungalow960 says
We found some old doors in our basement (our house was built in 1924, so they are the awesome solid oak kind) and puttied and sanded our hearts out to restore one for use on our master. There’s something satisfying about making something smooth… haha.
YoungHouseLove says
Haha- nice! Sounds like a major victory!
xo,
s
El says
Hi,
Now that the holidays are about over we are going to be painting our cabinets in our new to us home. Which, btw, have creepy squiggly mouth pulls instead of eyeball knobs! I know your detailed method has been proven successful, but I was wondering why you didn’t choose to use the Rust-Olium Cabinet Transformations (I think that’s what its called) We are debating between the two ways and like the no sanding possibilities that the kit provides. But your method is a plus to us because we are thinking of doing a pop of color on the bottom and white top. It’s a huge kitchen with the totally 80’s oak cabinets! So- what say you:)?
Love your blog!
Thanks!
El
YoungHouseLove says
The Cabinet Transformations kit isn’t low VOC, which is a pretty major factor in our house (with a kid and a pooch and a penchant for anything eco, it’s just something that we value, but we know it’s not everyone’s top priority). We also heard it doesn’t have a sanding step, which makes us a bit leery since we love that method for a super durable possible finish. I also think it would have been $100+ to do a kitchen of our size, so we knew buying high quality primer + paint (even through Benjamin Moore) would be less. I also think it just comes down to knowing this method works for us since we’ve done it a number of times, so it’s what we’re most comfortable doing again. Hope that makes sense!
xo,
s