Our recent road trip to see Katie and her amazing house gave us that tickle to get down to business when we got back home. You know how your DIY momentum is up and you’re moving right along ticking things off your to-do list and then the dust clears and you’re just spent and need a little break? Like, mehaps, a road trip? That seems to be the way it goes with us. When it comes to house progress, we tend to work in fits and starts. But then something sparks that get-back-to-business excitement and suddenly we’re done with our four-ish day Hammer And Paint Brush Hiatus and are refreshed and ready to go. Yeah, so that happened.
I guess being on the road produced that absence makes the heart grow fonder effect. Not that we were mad at our house, but we just weren’t raring to go when we left like we were when we got back. So the morning after our 9.5 hour drive I woke up early, sorted through a million (ok, a thousand) photos, wrote that shopping post that went up in the afternoon, caught up on comments/Facebook/Twitter/email, wrote this house crashing post for the next morning, and then it was dinner time. Then I up and made dining room curtains. And they might just be my favorite things in the whole darn house.
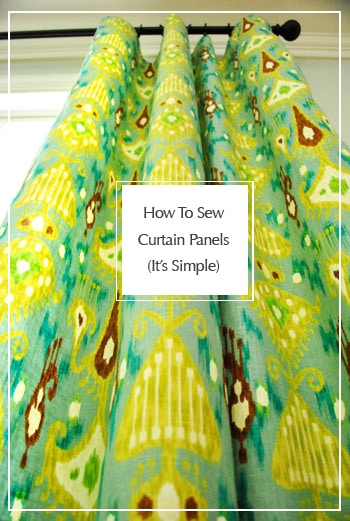
Seriously, I love them.
You guys know we’re into our hallway frame gallery a little too much (along with our giant bedroom light fixture and humongous gray sectional). And I adore my weird horse art and miscellaneous ceramic animal menagerie. But you’d think I carried these curtains for nine months and went through 48 hours of labor to bring them into this world – that’s how much I love them. And it only took me about an hour and a half – two tops – to make them. Wham, bam, thank you Katie (for the kick-in-the-pants inspiration that your gorgeous house provided).
Here’s how it all went down. We already mentioned snagging this deeply discounted Robert Allen curtain fabric from a local fabric outlet called U-Fab (for any non locals, here’s an affiliate link to the same fabric on amazon). It was fancy schmancy designer fabric that I’d been in love with forever, but it was marked down to $12.99 a yard (as opposed to the original cost of $40+ a yard!) thanks to a bit of an irregularity in the fabric (a white stripe that ran down one side, which I knew I could work around).
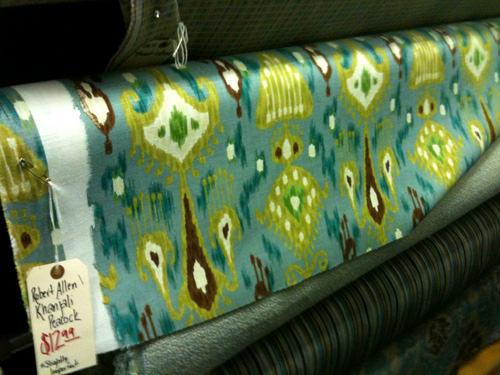
Since I wanted two 90-ish inch panels for either side of the big picture window in the dining room I calculated that five yards would do the trick, which factored out to $32 a panel (still not dirt cheap but a whole lot cheaper than the regular price of that fabric, which would have run me $100 a panel). Score.
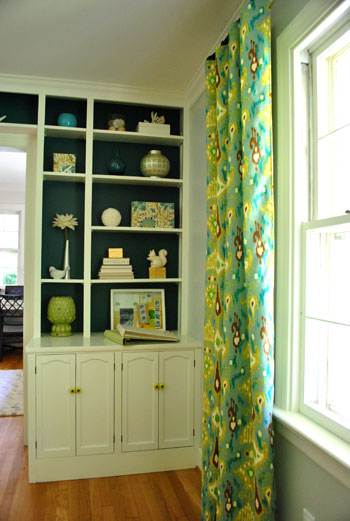
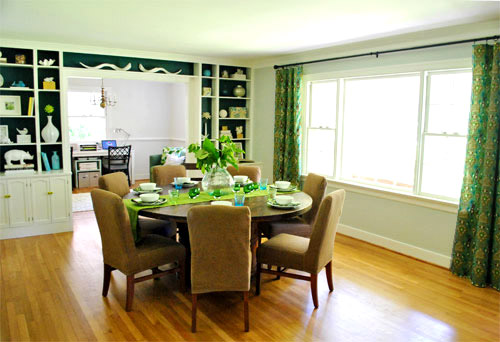
We’re just not really curtain closing and opening folks (except in the nursery since we close the blinds and draw the curtains – anything for five more minutes of sleep) so we don’t plan to draw them shut (we add white faux wood blinds or bamboo shades when it comes to actually gaining privacy, although since we usually hang out in the back of the house when it’s dark enough to see into the windows, we’re not in any rush to add privacy blinds or shades just yet). But we do love hanging curtains high and wide to let the light stream in and add height and drama. Which means we didn’t have to worry about the width (since we’d need a lot more of that than what we had to cover the long picture window). And boy are these babies a fresh little slap in the face compared to the white Ikea Vivan curtains that we embraced in nearly every room of our last house.
But on to how I made them. First I rolled out the fabric on a 5 x 8′ rug in our office (one of my completely not patented ways to get straight cuts since you can line up the fabric with the corners/edges of the rug to be sure it’s square before snipping away). Then I just pulled out my tape measure to see how long I wanted them (90″ each before hem allowances, which would make them about 87″ long after hemming – but then I add ring hooks which make them 90″ again):
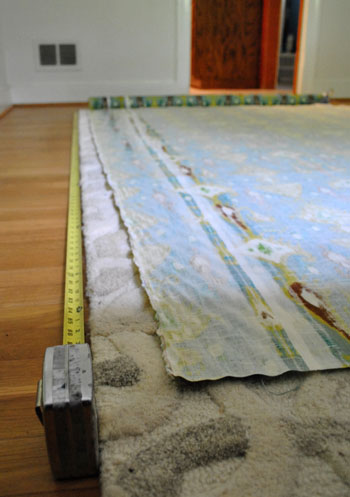
It was as simple as lining up the end of the fabric with the 90″ mark on my tape measure and then cutting the other edge against the rug at the 0″ inch mark, for a nice straight cut (sure enough, I was left with a nice 90″ long rectangular swatch of fabric).
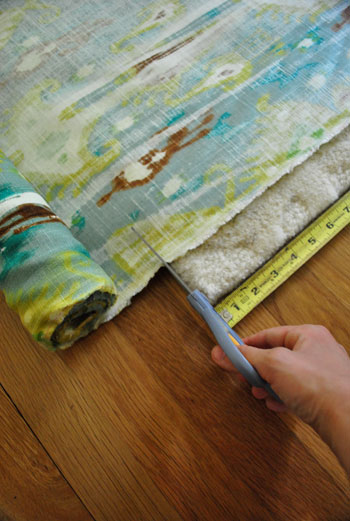
When it comes to the width, I just usually go with the width that it comes right off the bolt (which is wider when you get upholster fabric like this- ours was 57″). But remember it had that defect running along one side of it, so I just cut three inches or so from that side (again I used the edge of the rug to get a straight cut). But I didn’t completely cut off the white part since I knew once I hemmed it, it would be completely invisible (even from the back). You can see the normal white edge that comes on fabric on the right of the swatch below and the irregular white defect on the bottom half of the left edge below:
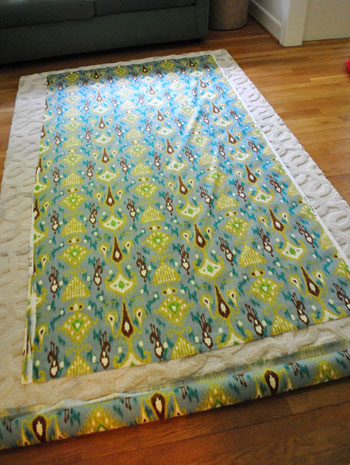
So there I had one 90 x 54″ curtain panel cut out, and just needed one for the other side of the window. So I laid the freshly cut one on top of the uncut remnant of fabric and used it as a template to create another panel of exactly the same size:
Then I washed both curtain panels so they would be “pre-shrunk” and easy to launder from here on out (one of our main goals is to have as many “washable” surfaces in the kitchen and dining room as possible). Oh but it’s always smartest to preshrink fabric before you cut it, I just knew I only had enough fabric to make two panels of this size so whether I washed or cut it first (or cut and washed it later) I’d end up with the same sized panels in the end. I grabbed them fresh out of the dryer instead of letting them sit there to keep them wrinkle free for the most part.
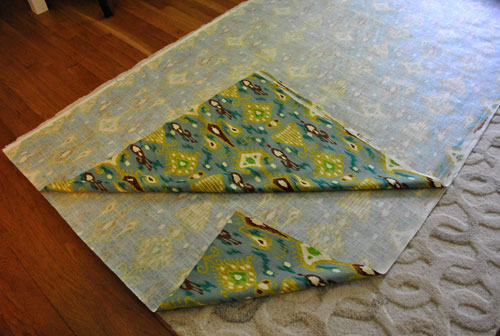
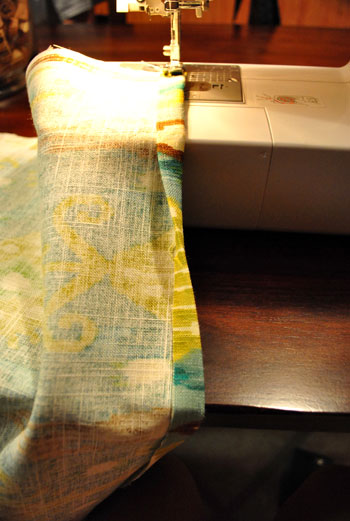
Next I had to decide between my trusty curtain-making method of using iron-on hem tape or the slightly scary idea of using Oh Brother (my new sewing machine) to attempt to do what I used to use hem tape for. After a decent amount of out-loud debate with myself, I decided to try my hand at sewing curtain panels- just to see if I could do it (but you can find full curtain making tutorials with hem tape here and here). Even without my hem-tape security blanket, I did break out the iron to make a half inch “seam” down one of the short sides of the curtain. It just seems like now whenever I dabble in sewing, I find myself trying to iron instead of pinning – just to see if it’ll work. Am I a rebel or what?
The ironed seam definitely stayed put while I dragged the giant fabric swatch back into the kitchen to sew the hem, so I happily skipped the pinning step and even boldly (well, maybe that adjective is a stretch) decided to try another hemming technique that some of you have commented to tell me about in previous I’m-a-shaky-little-sewing-novice posts. I took the ironed seam and folded it over one more time, then I sewed down the seam to create a nice finished looking hem (even from the back). That extra fold hid the raw cut edge of the fabric, if that makes sense. And even with my extra folding step, there was thankfully no pinning required. Sweet.
See, here’s what it looked like completely folded over as I sewed down the seam.
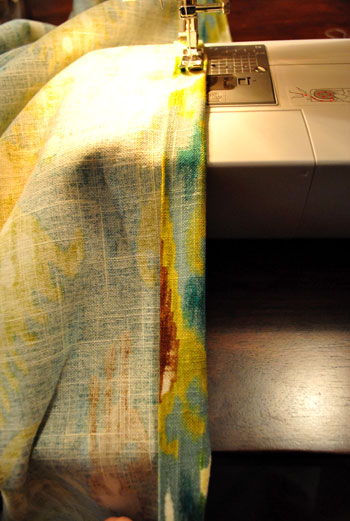
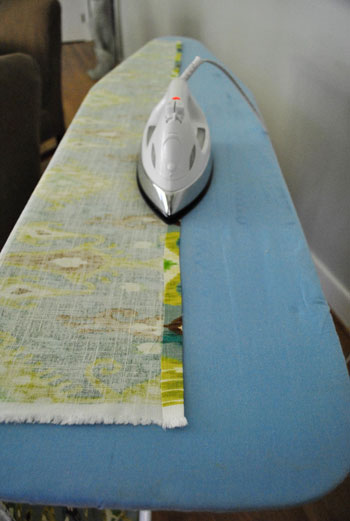
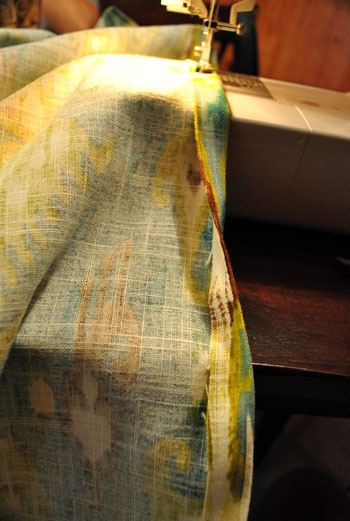
And this method surprisingly worked on all sides (I worried the long 90″ sides of the panels wouldn’t take to ironing and would need to be pinned, but it went just as well as the short sides). And as for the defect, you can see how when I folded the hem over one more time, it became invisible and I was once again left with a finished looking edge from both the front and the back.
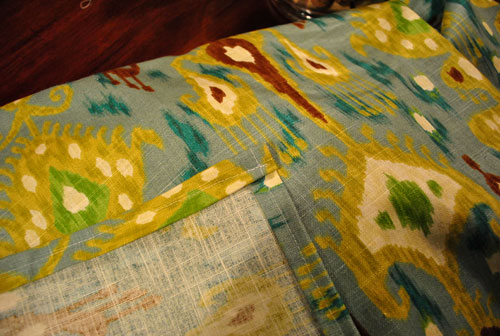
Here’s how the back of a corner looked once I was done with my quickie ironing-then-folding-then-hemming technique:
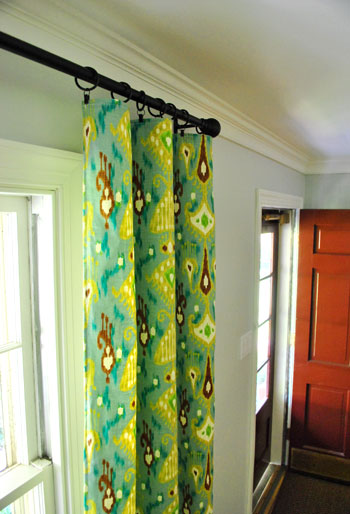
Then I clipped seven oil-rubbed bronze ring clips to each panel (from Target) and slipped them onto a super long oil-rubbed bronze rod. Oh how I love not having to sew a rod pocket or anything complicated thanks to the magic of ring clips. I ended up getting the curtain rod from Lowe’s since the ones at Target weren’t long enough – I ended up needing 144″ of length (that’s what she said).
Our curtain hanging method (also not patented or even endorsed) is for one of us to then stand on a chair (in this case, John) while the other one steps back and looks at the length of the curtains and how they hit the floor while the chair-stander raises and lowers the rod ever so slightly until the floor-stander screams “perfect- don’t move an inch or I’ll kill you” and then runs up to hold a rod bracket under the perfectly held rod to measure the distance from the crown molding or ceiling that it should be hung to keep the rod right where it’s being held.
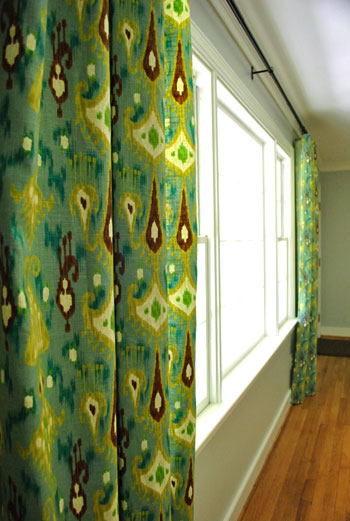
Of course this only deals with the height of the rod and not the width, but we typically like to go as wide as we can with the curtains so they drape in front of the wall instead of blocking light and hanging in front of the window. In this case we went as wide as our extra long rod allowed (19″ outside of the window molding on each side). See how the panel just kisses the window and blocks wall instead of light?

Oh and notice how the curtain also seems to just graze the floor ever so slightly? Poor John raised and lowered the curtain on that chair fifteen times until it was juuuust right. We’ve tried measuring the wall or the panel instead of doing the by-eye real-test (involving two people, a chair, and some serious arm strength and balancing skillz) but you just can’t beat the result. At least we can’t. So we keep going back to it. And I tell John he’s my Atlas when he’s up there holding the rod up. Gotta keep team morale up.
Here’s another rod shot for you. You can also see how the curtains just hang slightly in front of the window trim here as opposed to blocking the whole side window, which is only 20″ wide. Since we mentioned that we hung the panels 19″ wide on each side of the window trim, you can totally see how if they were hung flush with the trim they would block all but one inch of that 20″ side window. Which is definitely not what we were going for.
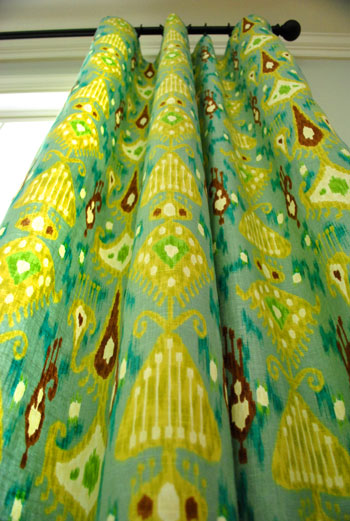
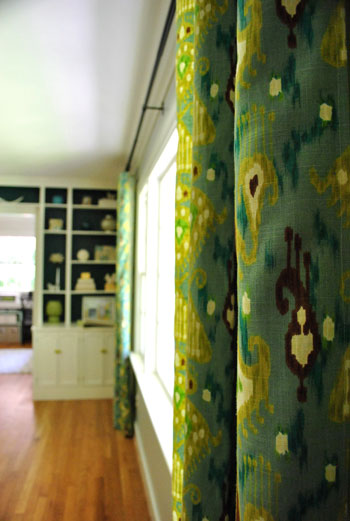
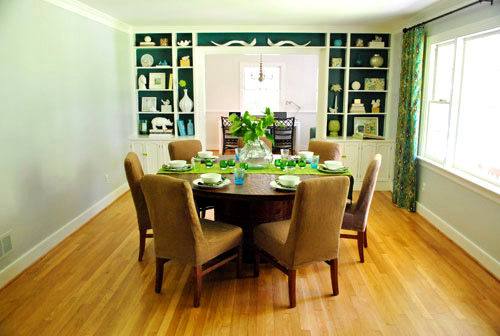
You’ll have to excuse all of the wide shots of the room in this post. Things like the curtains and the room in general are coming off greener/yellower than they are in real life (the green grass/trees/bushes outside were casting a yellow-green tint through the big light-filled window, and I was too lazy to photoshop it). John will definitely be in charge of photos of this room next time around. As for the true color of the curtains, it’s best depicted in the closer shots without a lot of window going on, like the ones above.
Actually this shot is probably the most accurate to what they look like in real life. I’d describe them as mostly blue with hits of green, chartreuse, white, and brown. Crazy busy but also crazy gorgeous if you’re me (and miracle of all miracles, John loves them too). Who ever would have thought that two white curtain fiends like us could branch out and embrace curtain color and pattern? I wonder if my mom will like these or they’ll finally be a choice that she won’t endorse. What say you, mom?
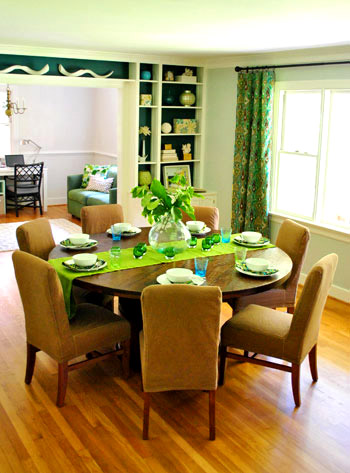
Here’s another wide shot where they look more yellow/green than they really do in real life (they’re more like a teal blue color when you glance at them from afar) but you get the idea. Oh and the dark rod ties into the other deep tones in the room (the chair legs and dark dining table, the deep color on the back of the built-ins, etc). So that’s why I chose it over stainless or white. I always think a dark rod hung high and wide is like eyeliner on a window.
Mmmm, here’s a good shot of my favorite detail in the fabric. See those smeary turquoise blobs? They tie so deliciously into the slightly darker teal on the back of the built-ins. Yummy. Even the little yellow-green knobs that we added to the base cabinets of the built-ins relate perfectly to the pops of bright yellowy-green chartreuse in the curtains. Hooray for happy accidents like that (we had no idea what curtain fabric we’d pick when we snagged those babies at Hobby Lobby).
Oh yeah and I had some fun setting the table. Not that anyone’s coming over today. Or tomorrow. I just wanted to pull out a runner and some plates and cups and clip some random branches from outside. Why? I don’t know. Why do birds sing? I guess the colorful curtains got me hot and bothered enough to break out Sue the Napkin (times seven) and add some fun to the big empty wood table.
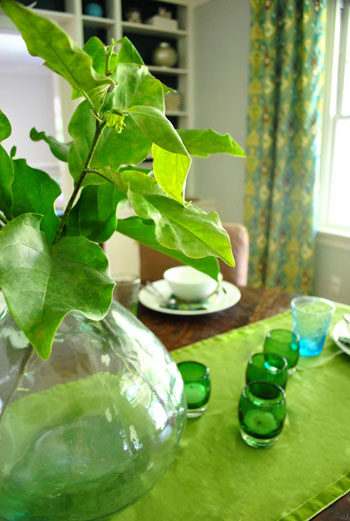
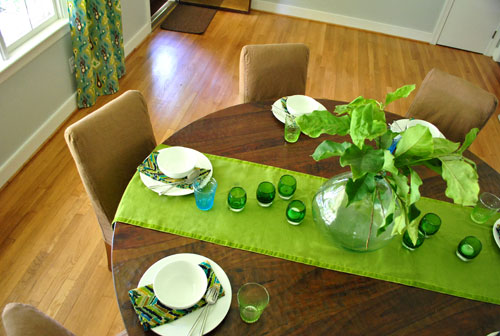
And guess what? I’m leaving everything there tonight. Just because I’m weird and I can’t wait to wake up in and morning and pad in there and smile. Kind of like how I paint a room and the next morning I run in and look at it again. Just grinning at the wall like a fool.
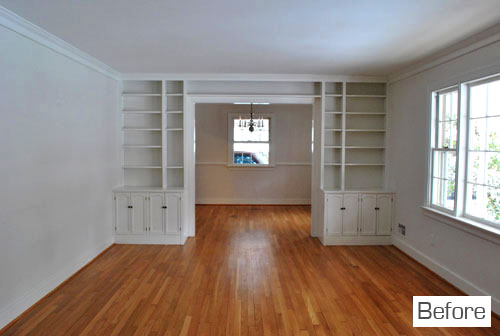
Isn’t it amazing how much of a difference curtains can make? Well, that and some rich color on the back of those built-ins. Here’s a little flash back to the room as it looked when we moved in:
And here it is now (albeit a little side-heavy with that bare wall on the left- for now):
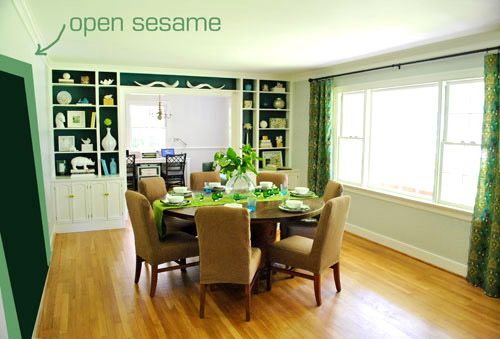
Thought I was done? Nope. One more thing. Here’s a terribly rendered depiction of the doorway that we can’t wait to add that will connect the dining room to the kitchen (we plan to mirror the size of the picture window so the whole room feels nice and balanced). And of course adding a big chandelier over our giant table will add a lot more function (the room doesn’t have any ceiling fixtures!):
It’s so funny to remember that this room was a formal living room when we toured this house (and the office was the dining room). In fact we dug up these old shots that we took during our first walk through:

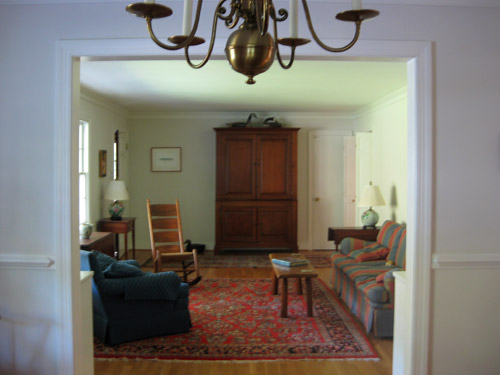
Gosh, that feels like a million years ago and it was less than six months back. As soon as we walked in we were struck by three things: we reeeally wanted the house, we wanted to change up a few of the rooms, and we reeeeally wanted the house. Yup, we were sold upon entry. I don’t think we ever got into the specifics, but the sellers weren’t 99% sure they even wanted to sell. In fact the night after we walked through the house for the first time they took their stuff out of storage. A sure sign to the realtor that they might take it off the market. Thank goodness it all worked out and they ended up accepting our offer.
As for looking past the way a room looks when you’re house hunting to see “the real space” we just completely discount furnishings and wallpaper and paint color and even entire room functions. That’s how we could look past the dining table and the sofa to almost immediately proclaim that converting the dining room into an office and turning the living room into a big spacious dining room would work more for the way we live. You know, since we have a huge family that we couldn’t cram into the former dining room, a giant living room in the back of the house (no need for two), and a penchant for open living and big wiiiide doorways. We just can’t help ourselves. Anyway, have you guys made any curtains lately? Knocked down any walls? Set the table for nothing but kicks?
Pssst – Soooo not a sewing person? I wasn’t either. Here’s a tutorial for making no-sew curtains with iron-on hem tape (and here’s another one for good measure).
Update – Wanna know where we got something in our house or what paint color we used? Just click on this button:


Leave a Reply