There are definitely some projects that we’ve taken on (and hired out) along with a few accessories that we’ve brought home that stand out in our mind as particularly worthwhile, especially because they were all around $100 (some much less, some a bit more) and they made a heckova difference in our casa’s function and form department. Without further ado, our top ten list:
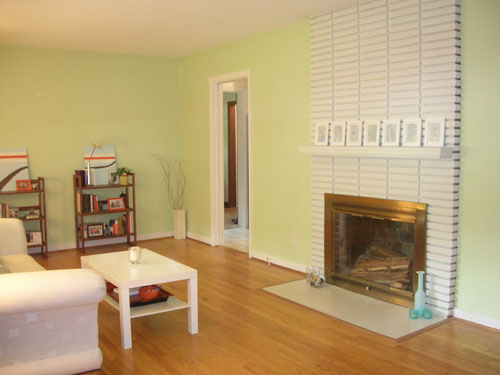
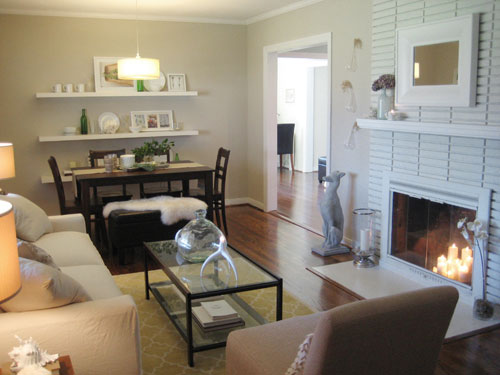
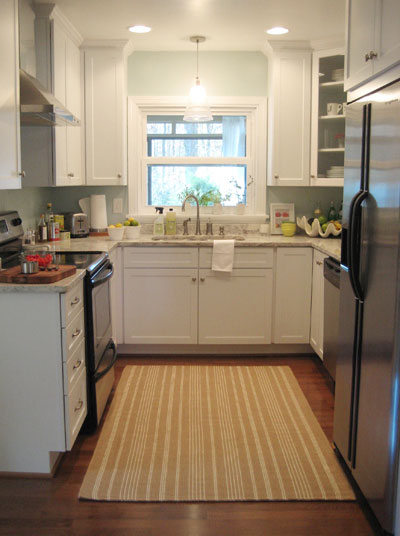
1. Widening the two doorways between the living room, the kitchen and the den (we paid a mason around $100 to help us with the den wall since it’s load bearing and had an electrician help us widen the living room wall since there were some wires in the way- also to the tune of around $100). The difference is night and day. Going from two standard 33″ doorways to over 5′ wide thresholds between all three spaces opened up our entire floor plan and allows so much light to bounce around all three rooms. Totally worth $200 (heck, we would’ve paid $500!).
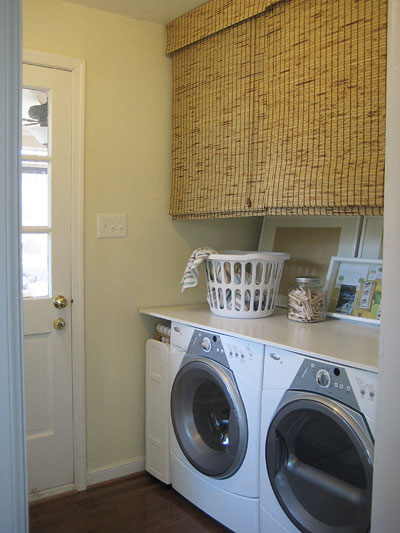
2. Adding plywood, blinds and oversized frames to our laundry nook. For under $100 we created a clean-lined plywood countertop for folding and sorting, added concealed storage with the use of two cheap Walmart blinds, and obscured ugly wires and pipes on the back wall by leaning two oversized picture frames in front of them (showcasing $1 Target wallpaper as art). It was all easy & cheap- and the result is surprisingly polished looking (you can find more details on the subject right here).
3. Getting an outlet added to our bathroom. Yup, it came without a single outlet in there. I used to blow dry my hair in the sunroom (which was pretty darn cold in the winter). But for $65 we got an electrician to add a clean little white bathroom outlet that still thrills us to no end. It’s such an improvement in the function department! No more sending guests to the sunroom to blow-dry…
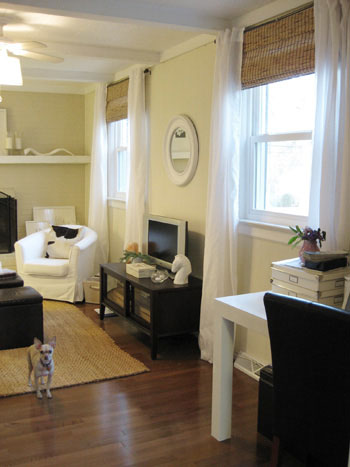
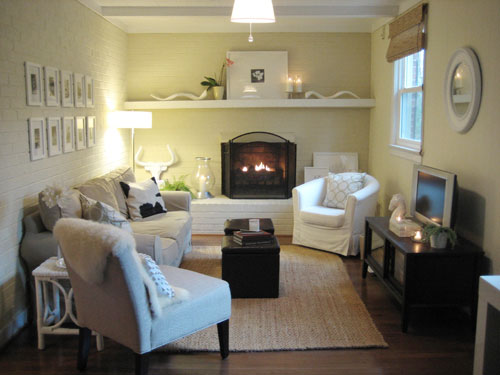
4. Curtains. End of story. Beyond painting a room, we think hanging floor length curtain panels high and wide above your windows is the quickest way to add height and airy softness to any room. Plus we only spent about $45 for the six breezy extra-long Vivan curtain panels from Ikea in our den and our living room. Can’t beat that deal with a stick.
5. Tossing a jute rug down in the kitchen. After the renovation dust cleared our white kitchen was shiny and lovely, but it was missing a bit of warmth and texture. Enter a cheap little jute rug from The Company Store to the tune of $34 on clearance. Now we’re cooking.
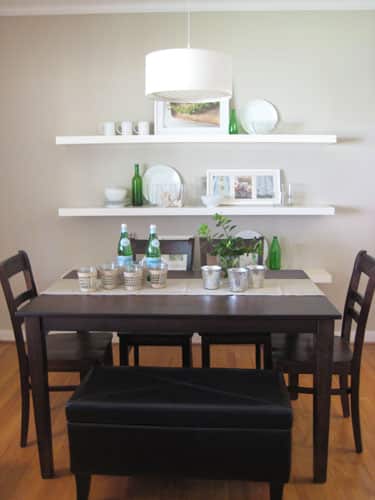
6. Popping a pendant light over the dining table for an instant “zone” that previously never existed. Again, to the tune of around $100 we had an electrician drop a fixture box above the dining table that we dragged into the corner of our living room right off of the kitchen and bam- instant dining area. It adds ambiance, even more light (which always makes a space feel open and airy) and eons of polish that couldn’t have been achieved by swagging a plug in light over the table.
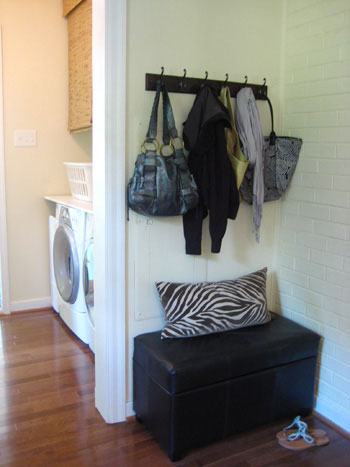
7. Storage ottomans. We can’t get enough of them. We have two leather cube ottomans in the den, a longer bench ottoman in the mudroom area, another bench ottoman at the dining table, two more leather cube ottomans under the console table in the living room and even a jute ottoman in the third bedroom. Between all of that concealed storage there’s more than enough room to hide every single file, bill, receipt, board game, printing supply, and every other unsightly item in the entire house without the purchase of a big industrial filing cabinet. And they even double as extra seating in a pinch (read more about where we stash and store everything right here).
8. Trolling those thrift stores. From our living room’s $35 glass coffee table (that looks like a dead ringer for this $400 Pottery Barn version) to our $20 secondhand Ikea armchair in the den, we’ve saved hundreds if not thousands of dollars by giving thrift store finds a second life in our home. We even snagged the base for our sunroom’s pedestal table that we rebuilt (read more about that here) at a local thrift shop (check out two of our favorite local haunts here and here).
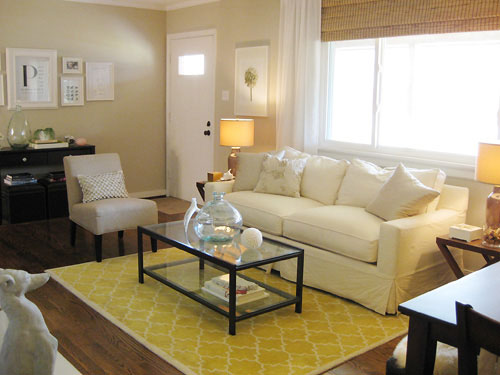
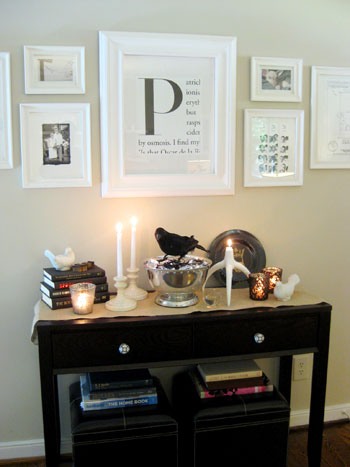
9. Adding built-in details on a dime. One of our favorite afternoon projects that seriously changed the entire feeling of our home was installing the three long Ikea lack shelves on the wall behind our dining table. They instantly added architecture and clean-lined style to a formerly blank wall (and at $29 each they’re even cheaper than DIYing them with thick lumber that you’d then have to finish to get the same look!). Plus we never have to hang anything on that wall again, leaning frames and displaying favorite items is now as easy as pie.
10. Whipping up cheap art. You’ll find at least a few framed pieces in each room of our house that are completely DIYed (and each one set us back less than $5 a pop). Sure, they’re not museum worthy, but they’re customized and meaningful so they still feel special. And did we mention they were cheap cheap cheap? From framed keys in a shadow box and a vintage map with pins that highlights our adventures to black and white photos we printed at CVS and framed in a grid above our sofa, we’re no strangers to stashing something behind glass and calling it art. And you know we love a customized monogram (or two) as demonstrated by the big P in our living room and the sweet little first initial monograms above our bed…

So that’s our little roundup of the ten things that seemed to make a world of difference around Casa Petersik… all without breaking the bank. Here’s hoping they spark a few ideas for you guys! And while we’re on the subject of getting more bang for your buck, we’d love to know what projects or purchases have changed your house for the better without emptying your wallets. A simple coat of paint on the walls? A jaw-dropping accessory you snagged on the cheap? A DIY project that you whipped up with your own two hands? Do tell.
Update- We finally created this Shop Our House page to help you hunt down any furniture/accessories that you see in our house, along with all of our paint colors.

Stacy says
Speaking of cheap artwork, last night I ran across a DIY silhouette article. Within a couple hours I had silhouettes of my husband, myself, and our puppy to hang in our bedroom:) Here is the link with three ways of getting silhouettes! We chose option 2- but didn’t have photoshop so I used a simple photo editing program.
http://prudentbaby.blogspot.com/2009/10/diy-cameo-silhouettes-three-ways.html
Enjoy!
YoungHouseLove says
Those look great Stacy! Thanks so much for sharing.
xo,
s
julie says
Hi John and Sherry and congratulations on your recent news! I’ve been wanting to share with you our fireplace makeover. I have the pix, but not posted on a blog so just let me know how to send them. Thanks!
YoungHouseLove says
Hey Julie,
Here’s a page with info about submitting Reader Redesigns among other email inquiries (which you can always access through the “click here to contact the youngsters” button on our sidebar). Hope it helps!
xo,
s
Amanda says
We knocked out a bank of hideously dated old cabinets that completely covered our breakfast bar and put in 3 pendant lights – not only did it make for a much better work surface, but it made the breakfast bar usable without whacking our heads, AND it made our kitchen size and layout truly the awesome selling point it was. You can see the mark on the wall on the left from where they were. They ran the WHOLE length of that counter:
http://www.flickr.com/photos/theotheramanda/2416021591/in/set-72157604551809186/
The lights were $20 a piece, and my two favorite handymen (Dad & husband) wired them all up. It was actually really easy since there was a light switch box on the left anyway. (I spackled and painted)
The next project in there is bigger – new cabinets, floors, and counters. I can’t wait!
Remodelaholic says
It is fun to see what makes the biggest difference to our homes. My husband and I are remodeling our third home, and I always laugh at what makes the biggest differences! I think it is an addiction, or we just REALLY love remodeling. One of my favorite things that we did in our first home was getting rid of a huge cast iron pipe, putting it in the wall and adding space back to our tiny bathroom, you can see the whole project here:
http://www.remodelaholic.com/2009/11/bathroom-retro-remodel.html
Also, more recently, when we moved into this house we needed a sofa but had no money, so we made one. We used our trundle bed’s mattress and some random fabric, 2×4’s and some plywood we had from the move.
http://www.remodelaholic.com/2009/03/couch-potatoes.html
Love your blog!
Carla says
Thank you so much for this. We’re on such a tight budget since moving into our first home this past spring. I’ve been dying to make it “ours” but that mortgage payment is really getting in the way of decorating! Little things like this can make a huge difference. =)
christine says
where are all your ottomans from? Target?
YoungHouseLove says
Hey Christine,
Most of our ottomans are from Target with the exception of one from Bed Bath & Beyond (the long bench one at the dining room table is from there, because we needed something taller for the table and the Target ones weren’t the right height). Oh and the woven ottoman in the third bedroom is actually from Michael’s of all places.
The bamboo blinds are from Walmart actually (we got them in store so there was no shipping and they came in a number of sizes). Hope it helps!
xo,
s
christine says
also your wood blinds in the living room, are they from Ikea? Do you think the blinds under the curtains make the room or window feel bigger? Thats how i feel. I am calling these wood blinds but are they? or are they bamboo?
christine says
Thanks Sherry! I also wanted to ask you …. what finish are your wood floors? Are all the floors the same finish? I love the color. We are doing our kitchen now and are thinking of doing white kitchen with dark wood floors. Any thoughts?
YoungHouseLove says
Hey Christine,
They’re all a deep mocha color throughout the house (so of course we love them and recommend it all the time- especially with a white kitchen like ours). We actually had the original yellowed floors refinished in the deep mocha color to match the new hardwoods we put down in the den, kitchen, laundry nook and half-bathroom so the entire house would have a nice seamless look and an open and easy flow. Here’s an old post all about that: https://www.younghouselove.com/floor-refinishing-101/
Unfortunately our floor guy just mixed a few colors (walnut and something else a bit more golden) to settle on the color to match our new hardwoods so we don’t know the exact color to pass along. But anything deep mocha or walnut is amazingly rich and lovely. Hope it helps!
xo,
s
christine says
i was just looking at the target site… 60 dollars for the ottoman! sounds good to me!
KOS! (Keep On S'myelin!) says
I love these posts. You’ve done a wonderful job! They give me inspiration!
We are in desperate need of lighting in our family room. We really want to get pot lights installed. We don’t have any overhead lighting in the room at all so there is no electrical source in the ceiling to attach the pot lights too. Electricians seem to be puzzled as to how to hook up the pot lights without causing major damage to our ceiling.
Was it a messy task to get the light in your dining room done? Did you already have overhead lighting in that room to attach the light too?
Thanks!
YoungHouseLove says
Hey KOS and NancyV908,
Perhaps it’s the fact that we’re in a ranch, so electricians can easily extend wires in the attic and drop them into any room quickly from above (whereas if there were a second floor to deal with it would be significantly more complicated). There was previously no overhead light anywhere in the living room (it’s the only room in our house that has a few lamps on a wall switch and had nothing overhead until we had the pendant light added above the table). But it definitely wasn’t messy or complicated- took him about 30 minutes or so from start to finish and there was minimal dust and nothing to clean up after he left. Oh and here’s a post on negotiating, just so you can hopefully snag the best deal when it comes to your house. Hope it helps!
xo,
s
NancyV908 says
Great post–so inspiring. But I wish you could send your electrician up here to my part of NJ. The kind of work you describe would cost *significantly* more here–if you can even get an electrician to return your call.
christine says
Sherry, is your ranch 1 level?
YoungHouseLove says
Yup, no upstairs. Just basement, first floor, attic. Hope it helps!
xo,
s
Bridget B. says
Congratulations again on your great news! Quick question: are your storage ottomans from target genuine or faux leather? I need a couple, but can’t seem to find genuine leather storage ottomans for under $100.
YoungHouseLove says
Oh they’re all faux. Love them because they’re super wipe-able and believable but affordable too!
xo,
s
Katrina says
I love all the changes you’ve made to improve your home! My husband and I were just talking about buying storage ottomans for extra seating in our living room – like you both we love that they can look good and be useful. I’ll have to show him this post tonight…
priscilla says
Speaking of minor moolah, check out jcpenney’s and other websites for the Cyber Monday sales! =)
YoungHouseLove says
You know we love a sale! Thanks for the heads up Priscilla!
xo,
s
Ashley M. [at] (never home)maker says
Great post — I’m especially impressed with the doorway project for only $200! It’s amazing how something like that can dramatically change the whole feel of a house.
Like you, we also pick up some great stuff at thrift stores. My favorite acquisition? A vintage console (in perfect condition!) for only $75 — and that actually included a bedroom set, but we had no need for it — so we donated it right back to the Salvo!
I blogged about it a few weeks ago here: http://neverhomemaker.blogspot.com/2009/11/furniture-hunting-success-stories.html
<3
Natalie says
Totally random question. I was browsing your home tour and came across a picture where you hung your Christmas stockings. I have the same stockings and I am looking for more. Just curious I you were getting new stockings since you have a little on on the way. Or if you would ever consider selling them down the road?
YoungHouseLove says
Hey Natalie,
We love those stockings! We’ll probably just mix and match some white ones or other neutral ones for a layered look down the line (so we won’t be selling them or getting rid of them any time soon). Hopefully that idea helps you with your stocking shortage! We love a textured layered look and it’ll look so festive and sweet on any mantel.
xo,
s
Kelley says
Hi Sherry!
Would you mind passing along the information for your electrician? I am a fellow Richmonder that needs an outlet relocated in our master bath. We just moved into a house in the near west end and our only bathroom outlet is located IN an outdated light fixture. It sounds like you got a really great rate!
Thanks for any help you can provide!
YoungHouseLove says
Hey Kelley,
After getting a few estimates we decided to go with Capital Electrical Contractors (an electrician named Adam helped us). Here’s the number: 804.763.6550. Good luck!
xo,
s
Rebecca Foxworth says
Hang on to those fabulous storage ottomans! I have four from Target in my oversized living room (they fit together in a large rectangle and double as a coffee table with the addition of a cheap Ikea tray or two). They will come in so handy when Baby Petersik arrives! For awhile, we stashed a few crib blankets, some wipes, diapers, and a few baby toys in there so we weren’t always running to the nursery to help a bored, cold, or wet baby feel better. A few years later, they housed Megablocks, Little People, and a large blanket (trust me, always build the Megablocks and Little People on a blanket with which you two can just pick up together and POUR all the toys back into the ottoman). Currently our girls find their Barbies and My Little Ponies in there. But after realizing that board games are the current fave toy of our kiddos, we’re about to relocate Barbie and the Ponies in favor or Monopoly Jr., Twister, and puzzles. Those ottomans are like God’s little gift to parents…use them wisely! (Oh, and get a few canvas covered ones from Target for your little one’s nursery. Nothing better than being able to scoop stuff quickly out of sight!)
YoungHouseLove says
Thanks so much for the ottoman tip Rebecca! We definitely hoped they’d come in handy for baby stuff when our house explodes with it so it’s great to hear that they’ll be just the thing!
xo,
s
Dreda Young says
Great post and a great reminder that little things can revitalize your outlook on your home.
On the topic of M.M.M.M. (Major makeover, minor moolah), I started painting a wall in my kitchen this weekend. My kitchen could use a makeover, but until that time arrives, hopefully some fresh color will keep me encouraged and draw my eye towards the new instead of the old.
christine says
Sherry your brown floor length mirror in your bedroom.. do u happen to know the size? meaning the height/width?
YoungHouseLove says
Hey Christine,
It’s 30″ x 72″ – hope it helps!
xo,
s
Rebecca Foxworth says
Oh, and a note on those “faux” leather ottomans from Target…they’ve lasted just over five years (so far) and through two kids jumping and spilling (and a labrador who climbs up on them to peek out the windows), with only one small, minor tear in those five years! Wipeable and sturdy…love to hear you recommending them!
Amanda says
I love the idea of “zones”- one big room doesn’t just have to be one big room- it can be a series of pleasant, functional little rooms with just a few shelves and lighting. Love all your ideas.
Erin says
Refinishing our wood floors from pickled pink to bleached oak and tiling our kitchen are the biggest—and best—changes we’ve made to our home, but hardly budget savvy. ( http://theimpatientgardener.blogspot.com/2009/11/past-project-refinishing-floors.html )
However, these days I’m tackling some smaller projects that are adding way more bang for the buck than I expected, including this Freecycle buffet-to-bookcase DIY project:
http://theimpatientgardener.blogspot.com/2009/11/from-buffet-to-bookcase.html
Lauren B says
Your #10 reminded me of something…it’s probably not the most original idea, but I recently thought it would be fun to rip out some of the pages from artsy calendars and frame them for cheap wall art. Seems like a good way to repurpose them after the year ends! I have one with different antique map prints that I’m planning on using for some cheapo decor immediately after December 31st!
Christen says
Great post! I live in Richmond too, and my husband and I also wanted to open up a wall. Could you let me know the name of the mason you used? Thanks SO much!
YoungHouseLove says
Hey Christen,
Here’s our mason’s info: Richard Southworth, 804.437.9810. Hope it helps!
xo,
s
Emily says
Our cheapest re-do was adding white trim to our builder mirror. The project cost maybe 15 bucks and looks great!
After pictures here:
http://emilyjonathan.blogspot.com/2009/11/happenings.html
Danielle@Newlyweds Paradise says
This is just a tip I started learning. At my local Home Depot, on their paint counter, they will have “oops” cans of paint marked down to $5! They are usually full gallons. Most of the time, they are pretty neutral colors and if you don’t mind the color on the can, it saves you a ton! So far, it has saved me about $60 finding these cans!
YoungHouseLove says
Great tip Danielle! Five dollar paint = a huuuuuge makeover for just five beans.
xo,
s
Jennifer S. says
This summer we painted the cement slab in our mudroom a nice shade of blue. It has really made this unfinished room nice.
Sugar Cookie says
The floating shelves in your dining area are probably my single most favorite thing about your place! Glad to see that they made the list – and that they are one of your favorite things as well!
Jill Stigs says
All of the changes you made are fabulous…….and how smart are you two to think to widen the doorways like that? MAJOR improvement.
Jen @ homeinthecountry says
Love your tips! :)
I think our biggest bang-for-our-buck project would be our kitchen. With a new coat of paint on the walls/cabinets, $30 worth of new drawer pulls, and a $50 Ikea light fixture, we gave our kitchen a whole new (and better) look:
http://homeinthecountry.wordpress.com/2009/09/24/knobs-make-all-the-difference/
Maha says
I loved this post. You guys have a good feel for what low-budget homemakers like me love to read. Thanks!
jbhat says
I don’t think I have come up with anything clever on my own (sad), but am happy to use your clever ideas (glad!). My laundry room needs a treatment similar to yours. And I need to get an electrician in to put a light over our kitchen sink. I can’t believe we didn’t put one in when we built. And if that can be accomplished for around $100 bucks, that’s even better.
Mattie says
I love your house! It has really inspired me to get creative, I can no longer sit around the house doing my daily tasks like cleaning and so no. :) I have to rearrange, fix, or buy new things! My house has come such a long way due to this website! thank you! I was wondering where you may have found the zebra print pillows in your den?
YoungHouseLove says
Hey Mattie,
Good question! We actually found it at TJ Maxx but have since seen it at Marshall’s too. Here’s hoping you can hunt one down!
xo,
s
Christen says
Thanks, Sherry! You are so amazing at responding to everyone’s questions. I really appreciate it :)
Kara says
so impressive :) I especially love the wider doorways… I never in a million years would have thought to do that, and it looks so amazing! as far as minor makeovers that make a big difference… I am scouring craigslist for a coffee table so I can try this project! our current coffee table is U.G.L.Y.
http://littlegreennotebook.blogspot.com/2009/03/make-ottoman-from-coffee-table.html
Ursula Graham says
Doing everything on the cheap is the way to go! I spent about $100 on filler + paint to cover up our wood paneling in the fireplace room. It took tons of work to fill in all of the grooves, but it’s been well worth it. You’d never know it’s paneling! (Unless you knock on it.) :) The best money spent on the house so far.
Oh and the wider doorways are AWESOME, I wish we had a place in our house where we could do that. No such luck!
Blair says
The biggest cheap makeover we’ve ever done just had to be the furniture swap my mother and I did! She and I both got new furniture and wanted new coffee tables to go with our new furniture. I needed a wrought-iron base with a glass top. She needed a honey-toned wood table. We each had what the other needed, so we swapped tables and haven’t looked back! A makeover for FREE – zip, zero, zilch, nada! Woohoo!
Megan says
*sigh*……..i have no words. I just love your place. I wish we had Craig’s list.
micaela @ hishouse;herhelp. says
i snagged two mother of pearl vases from target a couple years ago that are gorgeous! i dont remember exactly but i think the price tags were around $3 each. done and done. that target clearance decor section gets me everytime.
Cecelia says
I continue to congratulate you on your accomplishments here. I’m just in love with your style and can’t get enough pictures of your home.
I wouldn’t mind seeing it from varying views/angles, if you ever become so inclined.
Whether old or new, keep the pictures coming. I will continue sending links to fellow home decor fanatics in emails with titles such as “Can you believe what these kids have done” and “Isn’t this utterly delightful!”.
YoungHouseLove says
Aw thanks Cecelia! We definitely plan to snap a few new photos of the whole house all decked out for the holidays in the next few weeks so stay tuned for those! And we just found an old video of the house before we undertook a lot of the changes so we’d love to create a before and after video of sorts sometime soon…
xo,
s
Jenny @ DIY Newlyweds says
What great tips! I’m especially surprised how relatively inexpensive it was to widen your doorways. It’s such a great way to update the space and create an entirely new feel. Thanks for sharing!
Wendy D. says
I have a quick question about the Lack shelves from Ikea. I’m considering using one under upper cabinets to hold dishes and glasses. Would you say these are fairly sturdy and can hold up pretty well? Their website says 18-44 pounds. Would you say that what you have on them is very heavy? I know you are very busy, so any feedback is much appreciated! Thanks!
YoungHouseLove says
Hey Wendy,
Good question! We hung our Ikea shelves with metal anchors (fixed metal anchors, not the ones that butterfly out) which are a lot more substantial than the plastic ones. We’re not sure if it’s the anchors or our plaster walls or just the shelves themselves but we would guess that they can easily hold more than 50lbs each. Short of sitting on them or hanging on them they’re extremely strong (we’ve stacked tons of plates and ceramic mugs and even vases full and bottles full of water and beverages on them without any issue over the past three years). Hope it helps!
xo,
s
Jacci says
This post is **exactly** why I took note of you guys almost a year ago when I first started checking out house blogs. You have consistently made BIG impact with low-cost ideas. The proof is in the puddin’, guys, and you’ve worked hard for YHL’s success :) It’s a gift to be able to envision changes like these in your mind’s eye and run with it. I’m glad you’ve chosen to share some of that with us :)
By the way, definitely NOT on the cheap, but worth every penny – we had our replacement windows installed today. Talk about a big difference in a day! I’m soooooooo thankful!!! :)
XO,
Jacci
Amanda says
I spent about $70 on wallpaper for my dining room. We still have to buy paint and trim, but the whole room will be under $150 to change from the ghetto cafe it was previously attempting to be. http://geekdetails.com/blog/?p=1893
Bonus? Left over wallpaper will be used on the fireplace surround in another room to make it less ugly. Other bits of left over wallpaper are being used to line drawers. It’s the project that keeps on giving…
Annie, bossy color says
This is SO helpful, guys! Most people have no idea how INexpensive it can be to do structural things like widening a doorway, or electrical things like adding a light fixture. Putting real prices on things is just so helpful. And the impact – far beyond what you spent! Thanks for a great post!
Connie says
You guys are such an inspiring couple! This blog helps me to break down what could be an overwhelming task. You would be so proud of me, I painted my dining room (One project under $100) Now the next step is accessories. So my next challenge is not to spend over 100 beans. Any suggestions?
The room is a caramel color, the dining room table has a cream resin base w/ a glass top. Cream slip cover chairs, 2 gold frame pictures w/ fruit, 1 gold mirror with a fruit motif at the top, 2 faux floor plants, faux fruit motif center piece w/ 3 green candles.I have sliding glass doors which leads out to the deck.
YoungHouseLove says
Hey Connie,
We would definitely suggest visiting places like Target, TJ Maxx, Ikea, HomeGoods, etc. They all have great little accessories (you could grab a neutral runner for the table, a large glass hurricane with a candle in it for the centerpiece, some art that works with your colors and even some window treatments like Ikea floor length curtains for under $100). Good luck!
xo,
s
sarah says
loving the use of “can’t beat that deal with a stick” not once but TWICE (maybe more?) in the last couple of days! beautiful home AND funny!
Kerry says
Great post! I’m a big fan of major transformations for minor cash… and thrift stores… and creative storage… :)
Hands down, the most functional change for the least amount of money in my house so far (I’ve been here less than a year) has been transforming the smallest bedroom in my house into my dressing room. The house is old and has teeny tiny closets, so this has made a huge difference storage-wise, for not much more than $100 (Canadian).
The before and after pics are here:
http://just-you-wait.blogspot.com/2009/09/all-dressed-up.html