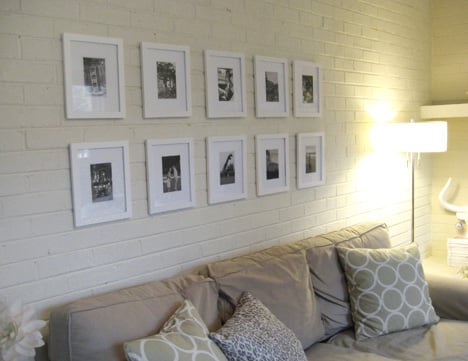
Here’s a quick project for all you DIY peeps with blank space on your walls. It’s as easy as pie, so in honor of that delicious after dinner delight, I’ve decided to write the steps recipe style. Mmmm…

INGREDIENTS
- An even number of identical frames (I used ten white 8×10 Target ones)
- The same amount of black & white photos (we got regular 4×6 inch prints)
- White paper to create a “mat” behind each framed photo
- Plain ol’ scotch tape
DIRECTIONS
1. Take your favorite photos and make them black and white. Feel free to up the contrast as well so they really pop.
2. Burn them to a disk and get them printed at any photo processing center (we like CVS for its close proximity and for the white borders you can add to each pic for a nice finishing touch).
3. Use a loop of tape to secure them in the center of the white paper (cut to fit each frame).
4. Hang ’em in a grid and help yourself to a big ol’ heaping slice of pie. You deserve it.

Tam says
I needed this idea!
katie says
How did you hang them all straight like that? Also, how did you get the pictures in the frame straight? When I tried it they looked crookedish.
YoungHouseLove says
We just eyed them in the frame (and then stood back and re-adjusted anything that looked off behind the glass before hanging them on the wall). As for how we hung them straight, we were lucky that our painted brick wall had perfectly level mortar lines between the rows of bricks, so we just nailed into one of the mortar lines at the same distance apart and everything looked even and grid-like. If you don’t have brick walls with mortar lines to follow just use a long level (they sell them up to 3 or even 5 feet long) to draw a light horizontal line in pencil on the wall. Then just mark every 15 inches or so (whatever distance you’d like) along that horizontal line and nail into those marks. You should end up with a nice even grid for hanging. Hope it helps!
xo,
s
Liz says
What are your photos of?
YoungHouseLove says
They’re just a bunch of photos we love- from a few honeymoon pics to cute shots of Burger and our closest friends and family. Hope it helps!
xo,
s
Sheetal says
I have a guest room with a dark rust colored sort of walls. What kind of pictures would you suggest for a darker wall color?
YoungHouseLove says
Dark wood ones or even oil-rubbed bronze metal ones would look awesome!
xo,
s
Alex says
Me and my new hubby recently moved into an apartment in an old house (probably around 100 years old or so). While we love the charm of it, we’re skeptical about hanging things on the walls, since behind the drywall its really just brick (most likely), and I’ve heard that drilling/nailing things into old brick will just make it dissolve like dust.
Any tips? We really want to be able to hang things on the wall (especially since the apartment is so..cozy…but with the high ceilings there are so many possible small-space solutions…
YoungHouseLove says
Our tips are to go into the mortar (not the face of the bricks) and use a masonry bit to drill a nice long pilot hole so things hold! Good luck!
xo,
s
reeba says
hi – was your opinion – would sepia look good instead of b&w with the white frames?
reeba says
that was “wanted ur opinion” -tnx:)
YoungHouseLove says
Sure, that works too!
xo
s
Chad says
I love what you did with your pictures. Such a simple project can make such an impact!
Jamie says
That is good idea, right? It must took you a lot of time to make it, thank you for sharing
Adam says
What a great idea! Love the way you made that. I found your post really interesting
Kevin says
That is good idea. I love it, thank you, I will visit your blog often.
Struan says
Your idea makes my room nicer, thank a lot,
James says
I love to decorate my room like you did. Everything is small but nice