When we last left off in our deck saga, our hero (that’s me in this case) was avoiding battling the heat as he tediously valiantly drilled in screws across the middle of our deck. Since that chapter of this drawn out harrowing tale, John The Weary Daring continued this mind-numbing history-making task.
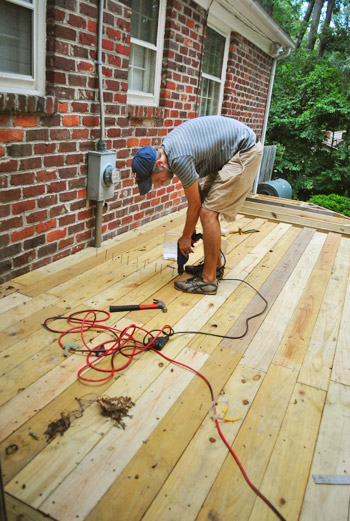
Since that’s about as exciting as I can fake my latest day of deck work, I’m just going to skip to this part where you can see the middle of the deck all laid down and screwed into place. Let’s just say I was glad the deck was finally more solid surface than it was holes for me to fall into.
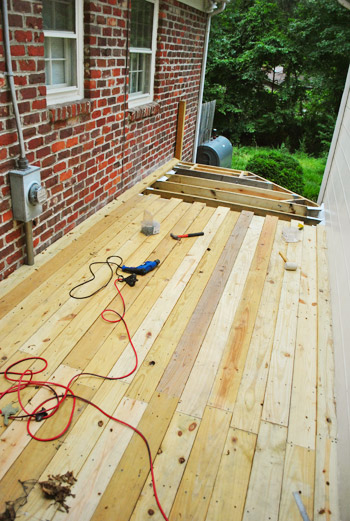
I could just fast-forward through this next part since it was, in essence, just more board screwing. Er, ahem – board attaching. But of course, since I was at the end of the deck there was some special planning / measuring / calculating I had to do. So let’s dive into those details for a second…
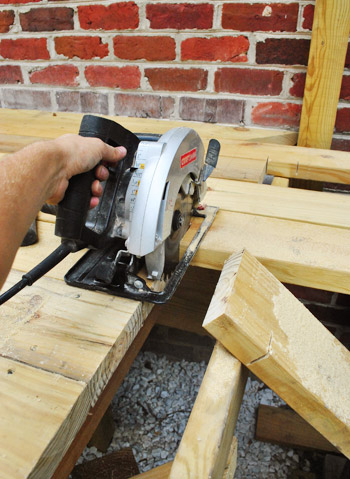
Luckily I didn’t have to worry about cutting the boards right away. I learned from several tutorials that when you get to an open edge – especially when you’re doing the “picture frame” border, you’ll want to cut all of your boards with a circular saw once they’ve been placed. That way you get a cleaner and more even edge than if you were trying to measure and cut each board independently and then placing them all.
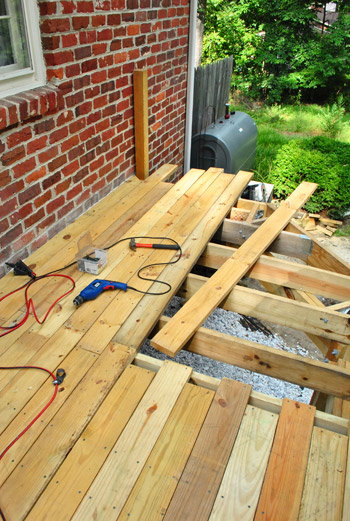
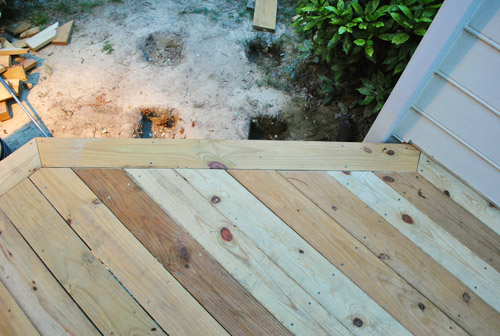
So once my jagged little edge was all screwed into place, I brought out my miter-cut frame piece and used it to mark where the edge of my boards needed to be sliced with a nice clear pen line. Like so:

Before cutting, I was sure to set the depth of my circular saw to 1 and 3/4″ so that I’d only cut through my deck boards and not into the girders below.

Then I revved up the saw, started cutting – momentarily stopped to fake a photo op (I’m no good at keeping a straight cut line with my left hand, but my right was occupied pressing the shutter – another task my left aint’ so great at) – and then finished down the line, stopping before I got to my last board (which is part of the “picture frame” design, so it was already pre-mitered before I screwed it in).
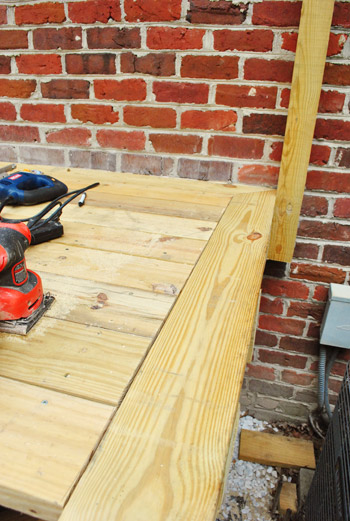
Here’s my end piece dropped into place (after sanding my cut edges to smooth them out). Not too shabby, right?
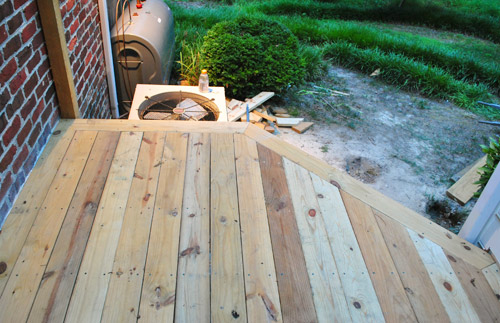
Cutting that half of the end was pretty easy, actually. It was cutting the next part that took me some time because it was on an angle. My geometry is pretty rusty so it took me a few test attempts on scrap wood to figure out what angle the two picture frame boards should meet at.

But once I got it right, I repeated my process of marking my cut with a nice obvious pen line, and then broke out the saw again.
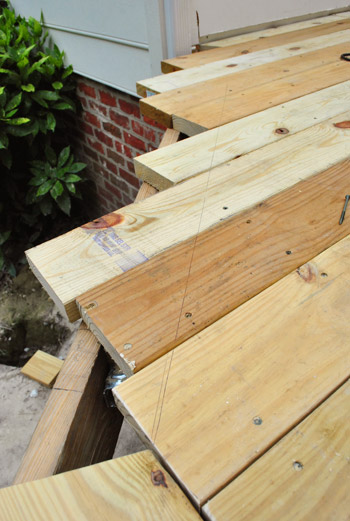
Here’s the clean, cut edge looking all pretty… and sawdusty too, I guess.
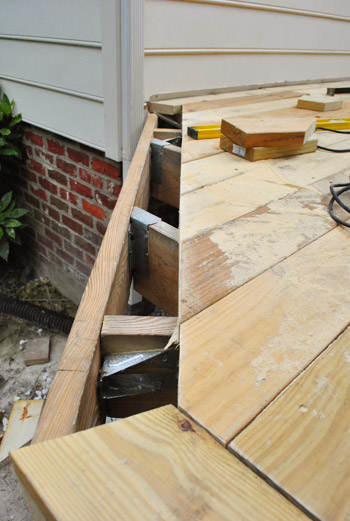
Here’s the final frame once I got everything screwed into place. I have to say I’m pretty darn proud of myself for figuring this out and not ruining any boards in the process (minus the test scrap pieces that volunteered as tribute).
And here’s that end all finished up. Looking at this makes us REALLY glad we opted to do the picture frame. Just that little touch seems to make it look a lot more “pro.”
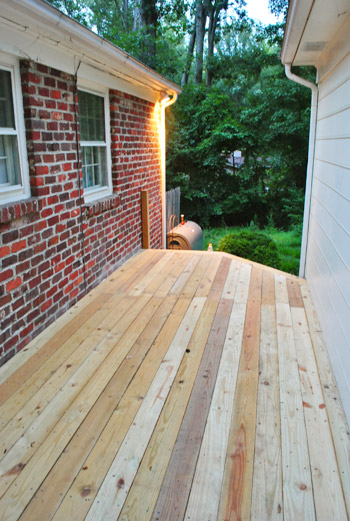
So with that, my friends, all of the deck boards are officially down. Can I get a woo to the friggin hoo? Because there were moments in this process where I never thought I’d get to something that actually looked and felt like a deck. In this picture you can also see that we ended up with two zippered seam details, and we’ll be centering the dining table between them like Sherry did in the rendering here. We’ll share more close-up seam photos soon (we think it’ll really pop when we seal the boards and furnish things so that they’re sort of a built-in detail around the table once everything’s in place).
The only bummer is that now I have to deal with the things that I’ve been back-burnering in my brain this whole time: the railing and the stairs. Something tells me they’re not only going to require a lot of math, but that they’re also elements of the deck that the inspectors will be especially mindful of. Could this spell disaster for our hero? To be continued…
Anyone else perform some DIY project heroics lately? Even if they’re just heroic in your own mind?
Psst- Wanna catch up on all of the deck action? Here’s where we shared our vision for the space, then we removed the plantings and the old balcony, followed by selecting our materials and documenting our first day of building progress. Then we dug our post holes, learned that we failed our first inspection, revised our plan and dug more holes (which got approved) and proceeded to set posts. Next it was time to install our joists, do a bunch of last minute prep for deck boards, get started laying decking boards, whip up a mood board with our design plan and continue laying deck boards. Whew, all caught up.

Stephanie Marchese says
So impressive, guys!! Can’t wait to see it all styled :)
Melanie @ MJ says
Looking good!
& I just wanna thank you guys for inspiring me to start my blog. Wednesday is my first blogiversary! :)
YoungHouseLove says
Wahoo, go Melanie! That’s so exciting! Happy blogiversary!
xo,
s
Erin {Home Everyday} says
First off, this looks great! I cannot believe how persistent you guys have been with this whole process. I cannot wait to see it all styled up. Also, good luck with the stairs and railing.
Jill says
The deck looks amazing!! Great job!!
Barb says
Splendid job, John. Dinner on the deck this week?
YoungHouseLove says
Sounds like a plan!
-John
Kristen | Popcorn on the Stove says
The deck looks great! I like how you finished the edge off – it definitely looks more professional!
Jordan@the2seasons says
Cheers to you on this huge project. I am so impressed I am glad we stuck with a patio and do not have room for a deck. I am sure you will love having it. Congrats again on the major part being finished.
Julia @ Chris Loves Julia says
Long live our hero, crowned victor. It looks awesome.
Heather says
I love the “minus the test scrap pieces that volunteered as tribute” you added in there. Nice ‘Hunger Games’ reference.
The deck looks really great, and I can’t wait to see what else is in store for it!
Michelle says
I was just coming to say the same thing! How funny!
Jayme says
I loved that line too :)
Ginny @ goofymonkeys says
Looks great!!! Instead of stairs, how about a slide and ladder? Joking, of course. The thought of figuring out the math for stair stringers is a bit intimidating.
YoungHouseLove says
Haha, I think Clara would love that!
xo
s
Michele says
We actually did this! We have a slide straight off of our deck and our girls love it :) We have stairs too of course, but the slide has been a great addition since we don’t have a full out jungle gym area
YoungHouseLove says
So cute!
xo,
s
Crystal @ 29 Rue House says
I love the idea of a slide! If we build a deck next year, I’d love to do that (with stairs too!).
Michelle says
The deck looks Ah-Maz-ing!!! Great Job, John :-) And I love the detail of the border frame.
Brian says
Looks awesome! Can’t wait to see how you tackle the stairs and railing!
Any interesting plans for the railing? Maybe a 1×4 horizontal slat wall?
YoungHouseLove says
We thought about a lot of different designs (horizontal being one of our favorite ideas) but since you can see the wood railing out of the sliding door in the nearby living room while standing on the deck, we wanted to keep things consistent, so we’ll be adding the same traditional vertical slat railing, just because it appears on the upper deck of the patio, so we wanted them to relate.
xo,
s
Erica F says
Wow, looks great John…look forward to seeing the finished rails.
Hope you are able to finish everything in time to enjoy that sweet deck for Labor Day – you’ve certainly “labored” in bringing it to fruition. :)
Maureen @ The Parkland Project says
“I offer these boards as tribute!” -HGs
Excited for the DVD release? This girl is!
YoungHouseLove says
Me too! When John worked that in I was like “see, we have to see it at least one more time on DVD” – haha.
xo,
s
Katy says
Wow, it looks amazing so far though! I am studying for the GRE currently, and the other day I had to find the circumference of a circle. I KNEW it involved pi and something with the diameter but for the life of me, I could not figure it out for the life of me! So be glad you at least don’t have to deal with pi for this project!
~Katy
P.S. Unless it was pie pie, pie is always a good idea.
YoungHouseLove says
Hhahaha, pie is always a good idea. I think we need to eat some pie on the deck when it’s done.
xo,
s
Jenny B says
It looks amazing! I’m always blown away by how quickly you guys get things done and the deck is no exception :) Must be nice to have something solid to break out a happy dance on too!
Susan says
Wow John! Pat yourself on the back, it’s looking awesome.
Kristin says
It looks FANTASTIC, John! Nice job.
Excellent story-telling skills as well. You’re my hero!
Zuzanna says
Great job, John!
Cady says
I cleaned out our hall closet this weekend – would that fall into heroic?! One question I have is do you all set a timeframe or goal for your projects? I’m fairly new to your website so I haven’t see that yet but was curious. You all seem to start and complete projects very regularly so I was wondering if you have a timeframe in which to do some of the big ones and if that’s what helps keep you on track.
YoungHouseLove says
Haha- yes that’s totally heroic! As for our time frame, we generally set a goal time of when we’d be thrilled to complete something (in the case of the deck, it’s Labor Day) but we try not to put a ton of pressure on that date since we know that sometimes timelines go off track (and personal things can pop up like a sick kid, an unexpected book deadline, etc). By not being too rigid about the deadline, it can help keep morale up so everyone isn’t grumpy and disappointed if you don’t hit it on the nose every time. We just generally subscribe to the one-day-at-a-time method, which also keeps us from getting overwhelmed. We just slowly inch towards a goal and eventually we usually get there! Haha.
xo,
s
jessica says
Nice job, Hero John!
We installed recessed lighting this weekend. My heroic boyfriend crammed his 6’3″ frame into the (old insulation filled) attic for hours on end to do the wiring, since electric + my brain = fail (and insulation + my lungs = epic fail). We now have beautiful (working!) recessed lights in the living room. Woot!
YoungHouseLove says
That’s awesome! Congrats!
xo,
s
tae says
yay! congrats!!!! this project is such a major undertaking. so impressive. i feel like you need to have some kind of deck party when it’s done to celebrate.
Brooke says
Beautiful! I saw something on Tom Silva on This Old House did that was brilliant – some way of figuring out the railing so you didn’t have to do a lot of math. It included some elastic from a fabric store. Too complicated to explain, but if you found the video online, it may help speed up your process. Good luck!
YoungHouseLove says
Thanks for the tip Brooke!
-John
Ashley@AttemptsAtDomestication says
Way to go! All hail the hero!
It looks AMAZING! Definitely love the framed look!
Stacy says
Looks great! I love the attention to detail with the seams and the frame-amazing work!
Jess @ Little House. Big Heart. says
I can’t wait to see it stained and styled! It’s looking great.
Sherry… have you started collecting stuff to decorate the deck yet? I’d love a sneak peak into what you’ve found!
YoungHouseLove says
I have the table we got from World Market for a screaming deal, some chairs from Joss and Main (both were in the mood board) and am currently hunting down a few other things. Also still have big bulb string lights from our wedding we’d love to use if we can!
xo,
s
Gabriella @ Our Life In Action says
The deck looks awesome! I bet you can’t wait to enjoy it and we can’t wait to see how you set it up.
I wasn’t as productive as you guys this weekend – went to a Brad Paisley concert….got to love Brad. :-P
Sophie says
HAPPY DECK COMPLETION, John!! I bet you’re glad it’s over so you can enjoy it now! Looks awesome!
Rebbecca says
Wow, looks great! I also liked the “boards as tribute” line.
Crystal @ 29 Rue House says
I love it! We’re doing some mini-renovations in the kitchen. I’m trying to be patient and just let things happen as they happen rather than stick to a rigid schedule. For me, practicing patience is heroic in my book! hahaha
Candice Sandusky says
If you’re board screwing, honey, you’re doing it wrong. ;) Congrats on the big finish! The deck looks fab!
Paige says
Yes…you are a hero! Looks awesome! You will conquer the stairs too, I just know it!
Kelly {the Centsible Life} says
Love it! I’m so glad you walked us through the entire process because I really, really want to build a deck, but now I know how much work it is-so I can plan ahead for next spring. :)
jeannette says
that little space was really quite strangely grotty and please-get-me-out-of-here. you’ve turned it around completely, making it clean cosy intimate convenient. i think this may be your most awesome makeover, and the zipper detail is just over the top.
i’m thrilled. i love all the tedious detail. can’t wait for the tedious detail on the armature of the stairs.
so proud of both of you.
Rachel says
OMG it’s so pretty!!!!!!!!!!!
Maya says
Looks beautiful! Fun post, too.
Paige says
Awesome job guys!
If you like horizontal…go horizontal on the railing. You can always redo the other side to match. Thus giving the “old” patio a bit of a facelift as well. Win, win!
YoungHouseLove says
Yes, we love that idea but have another railing on the patio side of the house that’s vertical. Since you can see both railings from the hall (the new deck one and the old patio one) we’re thinking we might go classic/vertical just so they’re cohesive and it doesn’t feel mismatched. More on that soon!
xo,
s
Devon @ Green House, Good Life says
The other thing to keep in mind is that vertical is safer. Horizontal railings are basically an invitation for kids to climb. As great as it would look, with kids around, I’d choose vertical every time.
YoungHouseLove says
Oh never thought of that! Smart!
xo,
s
Beth says
It looks great! Do you have any plan for putting anything under the deck to prevent little kids or dogs from going exploring in there, or will the stairs pretty much close it off? Our dog Sherlock *loves* to go under our deck for some reason, even though he knows he’s not allowed. ;)
YoungHouseLove says
The stairs will pretty much close it off, but we might add something like that trellis wood stuff just to further close it off.
xo,
s
Monica says
When we were little my parents added a door underneath the screened porch and that’s where the lawnmower and various lawn tools were stored. They basically walled the underneath in with flat boards, and turned some of the flat boards into a door that latched and locked, so it looked seamless. No idea if that makes sense?
Your deck may be too “crouchy” for that, but you could still add a little door and use it for storage. (Hobbit storage?)
YoungHouseLove says
That’s so smart! After we add the stairs ours will be mostly blocked off (thanks to that weirdly placed AC unit) but it’s a really cool idea for someone with more access!
xo,
s
Jenne says
I love it! Just curious – are you planning to stain or colorwash the deck, or leave it au naturel? ;)
YoungHouseLove says
We’re definitely planning to seal it and probably will stain it as well, but here you have to let boards acclimate for a few months before doing that. Will keep you posted!
xo,
s
robin @ our semi organic life says
Looks great! Give yourself a pat on the back (or a beer… or soda, or ice cream… give yourself anything) You desserve it!
Allyn says
Yay! SO seriously impressive. I agree that the picture frame completely rounds it out to look like a pro.
Maybe you should just attach a slide at the end. Don’t worry about the stairs at all.
YoungHouseLove says
Haha, Clara wishes!
xo,
s
Reenie says
Fantastic job ~ love it =)
Thais Bessa says
It is beautiful! I wish our deck had the frame, it looks a thousand times better!
Thank God, our deck adventure here is in its epilogue already: throwing nice barbecues (including indulgent desserts) to thank my husband’s mum and stepdad for helping us with the hard manual labour stages + baby-sitting.
I guess after rail+stair, staining, furnishing and decorating, you also have thank-you barbecues for John’s dad planned, right? :)
YoungHouseLove says
Oh yes, we will be feeding that man and bringing him iced beverages until the end of time!
xo,
s
Dee says
Woo hoo John !!! You,ve done a splendid job !!!
Gina says
Yay! It looks amazing! I’ve have been on pins and needles waiting for these posts. We’ve been re-doing our deck too so it’s nice to see someone elses vision and progress. What kind of wood did you use? Are you going to stain it?
YoungHouseLove says
We used pressure treated lumber from a local vendor (called 84 Lumber). We will eventually seal it (and probably stain it, still not sure) but here you have to wait for things to acclimate a few months before you can do that. Will keep you guys posted though!
xo,
s
sarahbclark! says
i appreciate the Hunger Games reference with the test scraps. :)
Liz says
Your deck looks great! I loved the Hunger Games shout out you added in there :) Only 5 days until the DVD comes out!
Kate says
Woo to the friggin hoo! The deck looks awesome John!!
When my husband and I re-do our deck next summer, I’ll be showing him your posts and the lovely picture frame design you guys picked out.
You guys are truly an inspiration for us newbie Do-It-Yourselfers.
Keep up the amazing work!
Jodi says
Whoo hoo! Looks like your sweat equity is paying off!
Michele Daggar says
Wow, It looks fantastic John. What a summer to have built a deck. I don’t envy all that time spent in the humidity!
I guess now it’s time to celebrate with a new soda shirt (or two!)
Hope you get some relaxation time on that deck soon!