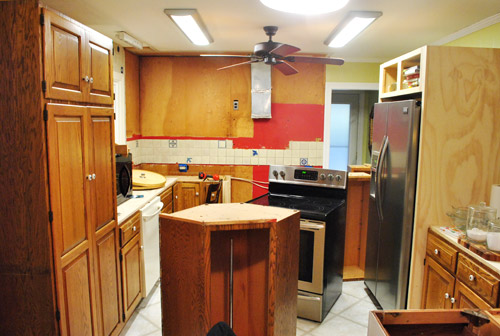
I promised more Bower visit deets on Wednesday when we dorkily spilled the beans that Katie B and I had been together in a series of photos that can only be described as awkwaaaard (get to the root of that joke here). You know we love a good Bower Visit Breakdown (like this one, this one, this one, and this one of yore). But before we get to all the stuff we did together, we’ll share the little video that we made for ya. Because KB and I always get the same few questions: how did you guys meet? are you real friends or just blog friends? how long have you been friends? what were
How To Compare Counter Options And Pick One
We’re inching right along in the kitchen (wish we could share kitchen updates every day but we’re doing this thing real-time). Which brings us to our latest decision: the new counters that we’ll be going with. We’ve been debating possibilities for weeks (there are a junkload of options out there with pros and cons to each one). And ten people would probably make ten different decisions, so it can feel especially hard to hone in on the “right” thing since there are so many variables. So here’s how we landed on the choice that we like best for our kitchen/family/life. But first the thing we’re sad about: although we had high hopes of DIYing concrete
Hanging A Gallery Wall Of Frames In The Home Office
This art wall makes us so happy – and we didn’t overthink it (to the point of what-should-we-frame paralysis – which can happen if we’re not careful). Although we did talk about a few other options and eliminate them based on certain factors, such as: one giant piece of art on each side of the window = too symmetrical for our taste, and too repetitive with the big rectangular window in the middle (so it would look like three big boxes) open shelving = too much shelving since there are two walls of it thanks to the dining room built-ins (it would be shelving with more shelving beyond it) mirrors = too much, since we
It’s baaaack…
Yup, Katie B (and Will & Jeremy) drove up to VA to pay us a visit this past weekend. Sneaky little Bowers. And among other things, we posed in the yard holding big white signs. You know, the usual. We’ll share more what-we-did details a little later in the week, but for now we’re here to issue the second ever Pinterest Challenge (it’s not actually sponsored or endorsed by Pinterest – we’re just obsessed fans). My Pinterest addiction runs deep (as you know from this heartfelt post of yore), so a few months back when Katie called me to say that she thought we should challenge ourselves to make one thing each season that’s inspired
Digging Up A Dated Row Of Bushes
We did it! Over the course of two nice long Clara naps (and with a little help from a friend) we managed to open up our front yard in what we like to call “Phase Two Of Ten Million” when it comes to slowly transforming our front yard. Why so many phases? Well it started out looking like this: Much like our first house’s yard, we figure it’ll take a few years of tweaks to get it where we want it, so this phase was just about clearing things out for a you-can-actually-see-the-house-now effect (Phase One was limbing up the magnolia). In short: we dug up/transplanted/removed a ton of bushes (with the help of a
Our Kitchen Renovation To Do List
We’re back with a quick kitchen update since we promised to share every step of the process, just like we did 4+ years ago with our first kitchen makeover (which ended up taking 113 days from start to finish). So the latest news is that the electricians came by as we mentioned last week. We’re definitely DIYers who aren’t afraid to paint or demo or drywall or build furniture (we’ve even dabbled in a little bit of plumbing) but we’re happy to call in the pros when it comes to risky things like electrical work in an older home that could lead to something major (aka: a house fire). So we hired a two-man electrician
Why We Chose Penny Tile For Our Kitchen Backsplash
We did it. Since this morning’s post we made one more trip out to the tile store and finally made a tile decision (we ordered over 50 square feet of it to do the entire wall above the stove where we’ll add open shelves and a vent hood as mentioned here). Our process was visiting a bunch of small local shops and big box stores just to see what was out there. And we had the most luck finding stuff that we loved at a local tile store (The Tile Shop). The only problem was that many of their gorgeous offerings were nearly $20 a square foot, which can work if you’re doing a standard
Planning A Kitchen Wall Full Of Tile And Open Shelves
We’ve mentioned having a backsplash + open shelving + range hood idea a few times without much elaboration, so here’s the full monty explanation: we basically want to create a counter to ceiling accent wall of backsplash tile with open shelves and a range hood going on. This Sarah Richardson kitchen is especially appealing to us when it comes to the tile choice (we love white subway tile, but we’re thinking we might do something a little less white since our cabinets will be going white and we don’t want to completely whitewash the whole room). Now I will read your mind in a move I like to call “David Blaine-ing” you. You are thinking
Fab Freebie: Oooh, Shiny
***This giveaway is no longer accepting entries – see who won below!*** Random.org had a tough job of sifting through nearly 7,000 jewelry hungry ladies (and gentlemen!) but has selected two random winners as… Lisa S. (who, like many, always wears her wedding ring but never gets sick of it because her husband did a great job) and SJ (who also wears her wedding and engagement rings out everyday). Congrats! Sherry here. I don’t usually write the giveaway posts, but we’re making an exception since I was the one who twisted John’s arm into this week’s giveaway. Instead of our usual DIY & decor-related prizes, this week we’re giving away some body decor that was
Painting The Wall Under Our Chair Rail Gray Horse By Benjamin Moore
We finally got around to painting the area under the chair rail in the office a shade darker than the stenciled wall above it so it feels more balanced (as mentioned here). It was a little top heavy with the stencil going on above the chair rail and nada happening underneath, so I slid one square down on the Benjamin Moore paint swatch with the wall color on it (which is Moonshine by the way) and landed on Gray Horse (which we also had color matched to Olympic No-VOC paint in satin). Total spent: $10 for the quart of paint. Das it. Doesn’t it look more grounded now? Hence the title. You might notice that
DIY Halloween Decor With Spiders And Snakes
Clara likes little creatures (seriously, the girl thinks snakes and spiders are cute), and is currently in the midst of an apple/pumpkin obsession (which is very fall-appropriate). So we decided this year’s loose Halloween theme could be “nature” (said a la Will Ferrell as Robert Goulet on SNL). That way it encompasses things like pumpkins, gourds, and apples along with creepy things like spiders and black crows and snakes. But let’s go back to the beginning. I had some fun with Halloween stuff. First, I grabbed some $1.99 spiders and $2-3 snakes at Michael’s (the snakes were in the wood toy aisle and definitely not meant for Halloween but you know I’m weird…). When it
A Beautiful Outdoor Makeover
Remember when we house crashed Jaime’s colorful and cozy home last June (more on that here)? Well, she redid her back deck and sweetly sent the eye candy our way. And we were instantly in love. It’s so welcoming and full of awesome DIY inspiration. What do I mean by DIY inspiration? Let’s look a little closer at the daybed under that sweet breezy canopy (that Jaime made here). When you get even closer you’ll notice that the daybed… … is actually made from pallets! Check out a full tutorial on how Jaime built it (all by herself) here. And just look at this cozy eating area. I love the mix of smooth and natural
- « Previous Page
- 1
- …
- 52
- 53
- 54
- 55
- 56
- …
- 123
- Next Page »