Archive for March, 2012
Rain On Our Parade
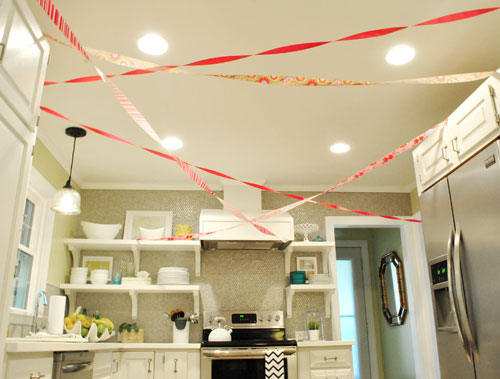
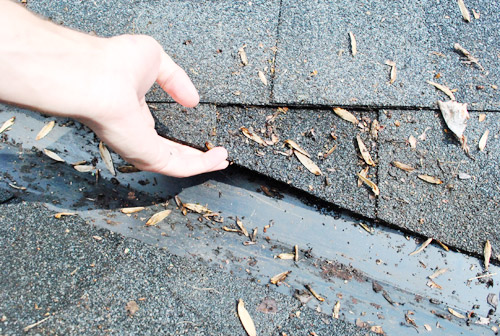
Last week was shaping up to be pretty good week. Sherry celebrated turning 30. We declared the kitchen done(-ish). Spring was in such full bloom it was practically summer. In fact, we even got a pretty awesome thunderstorm one night. Seriously it rained buckets. Faster and harder than we had ever seen since moving into our new house. And then around midnight, it happened…

We were watching some TV when we heard a sudden, loud rushing sound. Like someone dumped a gallon of milk on the floor in the kitchen. Our first instinct was that the new-ish-ly installed dishwasher was leaking, so we both dashed towards the kitchen – only to stop in our tracks when a stream of water hit us from above before even entering the kitchen. It was coming from one of the beams in the living room. And then we noticed a pretty steady stream coming out of a nearby wall too. Crap.

Neither of us had dealt with a leaky roof before. And I can tell you it was far less charming and danceable than Andre 3000 and Big Boi make it look in the Ms. Jackson video:
It all happened so fast. We scrambled to grab a bucket to catch the water streaming out of the beam and stuffed a big ol’ towel at the base of the wall that was dripping. Since it was still pouring outside (with a fair amount of thunder and lightning), our only plan of attack was to go into the attic to see what was up (since going outside with a big metal flashlight or ladder sounded like a really bad idea). So I crawled up into the attic with a flashlight and my iPhone (so I could document the damage for Sherry by snapping a picture) while Sherry stood in the living room and tapped on the beam so I could orient myself in the attic and follow the sound. Sure enough, I found a general area where water seemed to be seeping into the house. Did I say “crap” already? If so, here it is again. Crap. It was so bad that Sherry came up into the attic with me and we both just sort of crouched there staring at it.

The area was too narrow for me or Sherry to get into (there’s no flooring in that area) and since things were starting to dry up outside (thank goodness!), we decided to call it a night. At this point it was around 1:30 in the morning, and we figured that in the am the roof would hopefully be dry enough for us to get up there and see what was going on (you know, without getting hit by lightning). The stream from the wall had stopped and we left a bucket out to catch anything else that decided to drip from the beam – but that had pretty much stopped too since the storm had finally passed.

As if this weren’t bad enough on its own, it had now gotten too late to finish our DVR-ed episode of Dancing With The Stars. Tragic, we know. Watching Urkel strut his stuff would just have to wait.

The next day was sunny and hot, so we figured the roof would have dried by the time Clara was down for her nap that afternoon, which was the first moment of the day that we both could tackle the roof thing together. First we headed back into the attic to see if the spot had dried up. Yup, it mostly had.

Next I went up on top of the house to try to identify whatever was causing our leak while Sherry “Afraid Of Heights” Petersik watched from the ladder. I sort of half hoped for / half feared finding a big gaping hole. At least then I would know what needed fixing. Oh and it bears mentioning that this roof (a 30-year asphalt shingle one) was installed the spring before the previous owners sold us this house, so it’s only a few years old.

And yes, we do have quite the smorgasbord of rooflines. In case you’re totally disoriented, here’s roughly how this lines up with the floor plan below (note the chimney, which connects to our fireplace which is between the kitchen and living room – that’s usually what I use to orient myself).

When I headed to the area above the leak, it was pretty obvious that I was looking at the culprit. Not a big hole, just a big ol’ pile of leaves.

I try to keep the roof pretty clear of sticks and leaves, but I guess this pile had collected since I was last on the roof in the fall. And since it’s completely invisible from the ground, I had no clue this troublemaker was lurking up here. So after a few sweeps of the rake, the leaf collection was no more.

How does a pile of leaves cause a leak? It wasn’t so obvious to me at first, but having googled “find source of leaky roof” a bit the night before, I had a better idea. Shingles are overlapped in a way to allow rain to flow down over them. But when water flows up them, or rather builds up around them (like if there’s a leaf dam preventing water from moving off the roof quickly enough), it can seep under them and find its way into nail holes or other less waterproof surfaces. And you can see from the wet mark above just how high the water had built up. It must have finally found a way in, and swoosh, down it came, into the attic and the living room below.

I couldn’t be 100% sure that clearing the leaves would solve our problem, but I was pretty darn hopeful. Hopeful enough that I was even able to enjoy being on a roof a bit. Why yes I did tell Sherry to go into the sunroom and look up at one point. Skylights = a rip roaring good time.

We got to test our repair theory when we got a lot of rain over the course of a few storms that came through Richmond in the last week since the leak. It rained for hours on more than one occasion. And we were actually happy about it for once since it meant that we could test Operation Leaf Removal to make sure we had truly solved the issue.

After we survived about 5 hours of rain in the first of two storms, we decided it was time to check the attic to see if perhaps the water just hadn’t made its way into our living room yet (but was stealthily building up in the attic or something). Thankfully the attic looked totally dry. Victory!

And we had the same luck with the second big rainstorm (once again we checked the attic, and it was nice and dry). So for the time being, we’re considering the problem officially solved – and thanking our lucky stars that the leak didn’t ruin anything in our house, and didn’t cost anything to fix. And now we’ve learned our lesson about letting so many months go buy without checking the roof for leaf build up since there are some spots that we can’t see from the ground – and apparently leaves can be sneaky little buggers. We’re mainly just beyond grateful that the leak didn’t happen while we were in Hawaii. We can’t imagine coming home to a living room full of water.
Who else has a leaky roof story to tell? Was yours easy fix? Did it do more damage? Did you catch it just in time? Did you think your dishwasher was leaking at first? Any tips to pass around to the group about preventing, finding, or fixing leaks would be much appreciated – especially since we felt so inexperienced and unprepared this time around!
Reader Redesign: A Kitchen From Scratch
Just as we finished our big kitchen adventure, Amanda and her handy husband were finishing theirs. Except she and her husband Ben completely gutted theirs and have literally rebuilt it by hand (yup, they even DIYed new cabinets). And although we’ve been sharing quite a run of kitchen-related Reader Redesigns lately, we couldn’t resist sharing this one too. So here’s her letter:
I wanted to send you a link to our recently finished kitchen. The room started out as a 90′s oak and almond appliance box:


We tore everything out to start from scratch:

My hubby and I did all of the work, no contractors involved. He tore down a wall, built custom cabinets, laid new hardwood floors, installed our wood counter tops, backsplash, and much more.

It feels so much more open now, and things like the glass cabinets and our marble backsplash really finish things off nicely.


I just thought you could appreciate all of our hard work seeing as you’re at the end of your kitchen remodel too! -Amanda

Quite the transformation, no? And if you wanna see more, check out Amanda’s blog and be sure to hit up this post for a complete budget breakdown of the project. Congrats on a job well done guys! Now let’s play the what’s-your-favorite-part game. I’m loving those rich wood counters and Sherry wants to rub her face on that marble backsplash.
Psst- We announced this week’s giveaway winner. Click here to see if it’s you.
Hi, chair. How are ya?
Remember this old highchair that I got from my mom almost a year ago, which she ate out of when she was a bambina? Well dude, I finally got on that.

I had been waiting patiently to give it a little upgrade (it was covered in old paint splatters and smelled musty and smoky from a ton of years in storage) and now that Clara is big enough to sit in it without a lap belt, it was finally time to get ‘er done (after, you guessed it, sticking it in our playroom for at least eight months).
I debated a ton of “refinishing” options:
- sanding and staining it
- spraying it white or black for a classic look
- going bright turquoise, navy, lime, yellow, or even a fun orange-red color
But in the end, I thought about the three places it would probably get used the most:
- the dining room table
- the kitchen peninsula
- the living room table (the round pedestal one by the window where we sometimes eat)
So John and I had a little pow-wow and decided the finish that worked the best for those three rooms was…. bright happy yellow! How did we come to that conclusion? Well…
- our front door is bright yellow and the dining room looks awesome when that door is open so you can see that pop of color (it’s also in our curtains)
- we have a few happy yellow accessories in the kitchen and they look great against the grellow, gray, brown, and white backdrop
- I carried these yellow horse heads into the living room and they looked so fun in the space
And so it was settled. I did my little pre-spray painting jig (oh spray paint, how do I love thee – let me count the ways) and brought the chair outside:

First came the spray priming step. I intentionally didn’t sand the chair at all because there were old paint splatters on it that I worried could be lead paint, since this chair is very very very old (haha, sorry for all the verys mom- you don’t look a day over 29!). So per the recommendation for lead paint, I let it lie and just opted to paint right over it. I applied three super thin and even coats of spray primer (more of a mist than a coat actually, and I always kept my hand moving and my nozzle around 8-12″ away from the chair – see more spray painting tips here).

As for what I used, I actually went with my favorite spray paint with primer built in. It’s called Rustoleum Universal in the satin white color. I had a can on hand and have already used it as a primer under brightly colored spray paint with success (just because it has paint and primer doesn’t mean you can’t layer another color of spray paint on top of it and have that first few coats of primer/paint grab it and hold it for the long haul). So here’s how it looked after the white primer + paint was fully applied:

Then on went a few thin and even top coats of Sun Yellow, also by Rustoleum (from Home Depot) which I actually used on these horse heads and this box (I’m convinced it’s the perfect yellow color, which is harder to track down in spray paint form than you’d think).

After a few thin and even coats of that when I had nice solid coverage, I had this:

I left it outside for two consecutive nice and sunny days so it could cure (bringing it into the sunroom overnight in case there was an unexpected storm or morning dew to contend with). After two days outside it was pretty much cured up, but I let it sit for another 48 hours in the sunroom with the windows open, just to be sure that it was nice and dry (and no longer smelled like spray paint) before bringing it inside.
By then the paint was hard and glossy – and fully ready for serious kid abuse (jumping the gun and using something that you’ve painted too soon is probably the number one way to end up with scrapes and dents in your paint job – especially when a toddler is in charge of quality control). So it was finally time for Clara to give it a try. I brought it into the corner of the living room before grabbing her after her nap so I could document her “discovery” when she came padding in and noticed it.

The good news is as soon as she saw it and I told her it was her new big girl chair she got crazy excited about it and tried to climb right up:

She needed a little mommy help to get up there, but she was definitely comfortable sitting in it. Here she is beaming like the proud big-girl-chair-owner that she is.

The kid was all smiles (and apparently still figuring out how to sit up straight in it, but she got the hang of that soon enough):

Then there was some happy singing (at a very high volume, but it was for a good cause):

It was at this point in The Presentation Of The Yellow Chair process that I wished I had something this exciting to give to her every day – or at least every month. She really was loving her big girl chair as much as any toy we’d ever given her. This is her face when daddy walked into the room to see her trying out her new chair.

Here are some detail shots because I can’t step. away. from. the. camera. See those shiny gleaming spots on the chair in the pic below? This is the beauty of gloss paint. It’s also super durable and wipeable since it has extra flex and shine in the formula. The only thing with gloss paint is that it shows imperfections more (they’ll gleam right along with the rest of it) so you’ll want to be extra careful about applying thin and even coats of primer and paint (you can even sand a drip down between coats if you get one).

Really, what’s a hand shot without a foot shot?

And how about a shot from above?

Oh yeah, and then this happened. A few rousing rounds of “Where’s Clara?”….

…. “there she is!” ensued.

So… victory! The girl loves her big girl chair and yellow just happens to be her current favorite color. At least today it is, but if you ask her tomorrow it might be pink. Although now that she has her new yellow chair, it might stick. And I showed my mom and she beamed, so apparently she’s in love with her old chair’s new life. She said yellow was the perfect color for Clara while still being friendly for a future kiddo of either sex and I didn’t even think about that so I’m glad it worked out. Haha. So a big thank you goes out to my mom for handing down such a charming little seat for the bean and encouraging us to make it our own with some happy color. It’s kind of amazing to think that three generations of our family have snacked on things while sitting in it (I also used it for a stint when I was younger). And you gotta love free hand-me-downs!
That’s what I got on this week for my Dude Get On That Already challenge. And it was a nice big item to remove from the playroom. Huzzah! I wish I could take photos of the playroom as my embarrassingly giant mess o’ things is reduced each week, but since we have secret book projects in the mix we’re not allowed to reveal those. Boo. Anyway, what highly overdue task have you guys tackled recently? Any chair makeovers or spray painting sprees going on? I think along with Ceramic Animals Anonymous I might need Spray Painters Anonymous…


