Archive for January, 2012

A Giant Rooster? Who Does That?

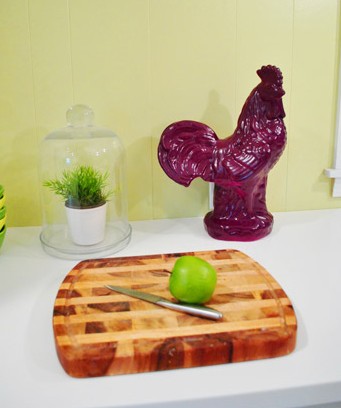
Me.

I’ve actually been hiding this $12 HomeGoods find in our playroom for… oh… five months? So it was about time I attended to him. Yup, this guy’s part of the self-imposed initiative I like to call the “Dude Get On That Already” challenge, since I’ve solemnly vowed to use it or lose it (aka: use it or craigslist/donate it) when it comes to all the things we’ve been hoarding in our full-to-the-brim playroom.

At first glance you might think “he’s a fine looking roughly weathered white & tan rooster” (or “you need ceramic animal rehab” which could also be true) but I thought his distressed white finish was a little more country than my usual crisp & modern ceramic animal tastes, so I decided that giving him a coat of new color would be just the thing. And I wanted to pick a pretty daring color, just because… well, he’s a giant rooster. Don’t want him to take himself too seriously now do I? So after standing in the spray paint aisle for at least ten minutes weighing all the bold and bright options (and singing Jingle Bells to keep the bean entertained), I grabbed Rustoleum’s Painter’s Touch in Aubergine (satin). And I was plum excited to use it. Groan. Sorry, the puns just happen. It’s a gift and a curse.

If I really wanted to be an overachiever, I would have used some spray primer (that always helps paint “grab on” when you’re spraying slippery things like ceramic) – but because the can said “two times the coverage” I figured I’d try my luck without it and just go back and add a layer of primer if things went haywire. Luckily they didn’t. I just did my usual thin misted coats routine (read more on that here). Check out how crazy things were looking at first. If you’re spray painting lightly and thinly, there’s not good coverage until the third or fourth coat, so the first one had him looking a little… hot pink:

But after two more thin and even coats, coverage was good. And Jarvis was aubergine. Oh that’s his name. Everything with a face deserves a name, don’t you think?

He looks pretty fun in front of the light avocado walls in the kitchen.

Oh and in case the scale wasn’t clear until this photo, he’s giant. Like a foot and a half tall. Who doesn’t want a giant aubergine rooster named Jarvis waiting in the kitchen to greet you in the morning? Cock-a-doodle-do to you too, Jarvis.

Although if I’m being honest, I’m not 100% sold on the color. It’s fun, but I’m not sure as the kitchen comes together if he won’t get a few more coats of another bright color someday. Say yellow… or slate blue. So I’ll keep you posted. Plum is fun, so who knows – it could totally stay.

What do you guys collect and stash in a spare corner/room/closet only to look at it months later and feel crappy for just leaving it there? These “Dude Get On That Already” projects are small, but they’re making me feel pretty good for some reason. Maybe it’s the whole “every little bit helps” thing? Or the fact that we’re inching towards clearing out the playroom which means it’ll be a blank canvas for paint and curtains and a rug and furniture and accessories. Wheee. It’s almost like that dream when you find an extra room in your house. Except we’ve always known it was there and have been filling it with weird stuff instead of discovering a secret wall or staircase that leads to it. Am I the only one who has that dream?

Psst- Jarvis is second to none when it comes to giant roosters… except for Beyoncé. If you haven’t read the funniest post on the internet about her yet (salty language warning) check that out here.

  Leave a comment

The Latest On The Book

We’ve dropped a few mentions of working on the book lately, so we figured it was about time for another post about the process. Our post two months ago mostly covered the journey to getting the book deal and the beginning stages of writing, but now we’re really in the weeds of things so there’s definitely more to share… and we don’t have to use pics of Burger to illustrate it this time! Sorry Burger.

At the time of our last book post two months back, we had turned in our 160-ish page completed outline and were beginning to coordinate the design process with our publisher. If you recall, the book is a compilation of 250-some ideas for “how to show your home some love” (everything from small art projects, little tweaks, and quick ideas to bigger makeovers involving paint & furniture). Things were trotting along nicely and our publisher, Artisan, was trying to figure out whether to keep our Fall 2012 release date or hold off until Spring of 2013. Sherry and I begged for the earlier date and they agreed – but it meant putting the pedal to the metal. So we buckled our seat belts…

But the manuscript is only half of the book process adventure right now. It’s probably less than half, actually. Maybe a third? Because what’s really keeping us busy is prepping for the photo shoots that began yesterday morning. So here’s what’s been going down on that end of things:

Update: Lots of folks are asking what we’ll be doing with all those secret projects/items once the book is shot. We’re actually hoping to do a giveaway with some of them (not sure how shipping will work though) and some items have to be returned, etc. Maybe one or two especially sentimental ones will stay at our house, but they’re all “bonus” projects (we didn’t “design” any of them to fit into our house, which is actually really freeing since we can have fun with lots of color/fabric/textures, etc) so it should be fun to see where they end up!

So our apologies to anyone who left a comment yesterday and took a little longer than normal to see it pop up or get a response! We’re definitely juggling things over here when it comes to keeping the blog and the book (and the bean) attended to. And as nuts as the next month is going to be for us, we’re so grateful for the opportunity and so excited to share the whole crazy journey with you guys as we go. Anyone else dealing with someone visiting them for weeks on end? Or keeping 100+ secrets that are slowly burning a hole through their brains? Tell us about it. Or just tell us how crazy our house looks. Go.

Psst- Thank goodness our bean sleeps the night away so we can get stuff done (check out her technique over on Young House Life).

  Leave a comment

Fab Freebie: Your Publisher

***This giveaway is no longer accepting entries – see who won below!***

Okay folks, random.org has selected the two lucky winners of a $50 gift code. Although anyone can take advantage of the free extra pages code – GIFT3570 – through Feb 6th. That’s how I saved nearly $80 on ours! But I digress. Our winners are… Christine (whose favorite pic of 2011 is her and  her husband beside the wild boar statue that stands outside the a building at her university) and Bethany (who caught her son shirtless, wearing a cowboy hat, boots, belt & buckle, Wrangler’s while iding his John Deere tractor around their yard this summer). Congrats!

Remember the Petersik Family Yearbook that we mentioned last week? Well now the folks at MyPublisher are gonna hook up two of you with $50 to spend on your own family yearbook (or any photo book really). And as we’ve found, $50 can really go a long way over there (we caught a free extra page promotion that meant our 100-page book was only $45 – including shipping). So get ready to get get your publisher on!

Note: We aren’t paid or perked for hosting these giveaways, we just do ‘em to thank you awesome folks for stopping in. See our Giveaway FAQ page for more info. Pic courtesy of MyPublisher.

  Leave a comment

How’s It Hanging?

That was the big question last week. Not in the “Hey, how ya doing?” sense of things, but more in the “Um, how are we gonna hang this $60 hood we found on Craigslist” kind of way.

Sherry talked last week about how we planned to encase it in a DIY’d wood cover (see inspiration pics back on last week’s post). Both of us were so excited about (1) the price tag and (2) the final look that we didn’t really think through the middle part: actually installing the darn thing. So yeah… #planningfail?

Here was our challenge (beyond just not having any of the installation materials or instruction): this is an under-cabinet hood and, well, we don’t have any cabinets to install it under. I figured that there were dozens of sites online detailing how to convert an under-cabinet hood to a wall-mounted one, so I wasn’t worried… until my Google searches started coming up empty. That’s when I started to second guess our plan. Was this just something that couldn’t be done?

Then I discovered these.

We didn’t buy these (our hood is Jenn-Air brand). But the fact that Kenmore sold bracket specifically “for mounting range hoods to wall when overhead cabinet is not used” meant it was not a completely crazy idea to retrofit ours to hang on the wall as well. So Sherry and I concocted a plan, did some shopping, and readied ourselves for some hood hanging (and possible hood hanging failure, as is always a possibility when we attempt to figure this stuff out as we go). This picture will make more sense soon, but just know it involved some wood pieces as a makeshift mounting panel and some heavy duty metal brackets as a stand-in for a cabinet.

But before we could put our plan in motion, some details needed to be taken care of. You know, little things like oh-yeah-we-didn’t-tile-high-enough-under-the-vent-pipe. Another lapse in planning. Oh well, it took about 20 minutes to whip up a small batch of thinset and fill it in with some spare tiles. Yes, it was slightly maddening to have to go back to the tiling phase (especially for eight measly rows) but by this point we’ve learned just to laugh. Wince a little. Laugh some more. And get it done.

Then we mapped out all the important stuff on the wall to ensure that things would hang where they were supposed to hang. Looks pretty crazy, right? But I promise it makes lots of sense…

All of this painters tape is marking important reference points, such as:

In case you’re wondering how I located the studs, it was actually thanks to some forethought on Sherry’s part. Back when that wall was open she begged me to somehow mark where they were before we tiled and covered everything up, so I opted to make small marks on the ceiling to keep track of where each stud was. Then I taped a piece of thread to that mark, tied a paper clip to the other end (to weigh it down) and voila – a perfectly marked stud all the way down the wall. And once we hang our crown molding around the ceiling those little stud-marking dots will be hidden once and for all.

With all of our guides marked, it was time to screw in our first piece of wood. Here’s the deal with the wood. The hood by itself was technically wide enough to hang from two studs, except the studs didn’t line up with the two notched holes in the back of the hood (which were at either end) and I didn’t trust that it would hold that way even if they were lined up perfectly.

So we figured we’d screw a slightly wider-than-the-hood piece of wood into two studs (and use a heavy duty anchor to secure it in a third location) and then hang the hood onto additional screws that lined up with the hood’s notched holes. We actually got a contractor’s blessing (just didn’t feel right drilling into our pretty wall o’ tile without double checking our plan with an expert first. So after that phone call we took a few deep breaths and moved on to the next (very scary) part of our plan: drilling into our tile. GASP.

I bought a special bit that’s meant for glass and tile. It took a bit of pressure, but eventually I got all of my holes drilled. Though I think we both silently freaked out the entire time drilling was in progress.

Once we got over having riddled our tile with holes (okay, there were just six) I used some 2.5″ screws to secure the chunky plank of wood to the wall. I have to tell you, feeling those screws grab the stud so tightly was one of the most confidence inspiring parts of this process. I felt like I could’ve hung my whole body weight from this thing – that is, if I was able to grip the tiny ledge with my lanky girl fingers.

With one board in (to hang the hood from) I then had to attach a second one (to hang the brackets from) also with long screws into two studs and a third set of screws into heavy duty anchors to further enforce things. Then it looked a little something like this. Note: the vent pipe is slightly off-center, not the boards (so once we build the frame for the hood that will be solved and it’ll all look centered). Oh, and the blue arrows are pointing to the two screws that the hood will hang from.

We felt pretty good when we realized that most upper cabinets are just held to studs with screws and then loaded up with dishes and plates and other items (and then a hood might be added on top of all that weight) and the whole shebang stays up.

Speaking of which, it was time to put the hood up (since the brackets would need to go up after the hood). Okay, so maybe this part was scarier than drilling into tile. We half pictured the whole wall of tile pulling off of the studs. But lucky for us, it didn’t budge. It was up there solid as a rock. Which is good news, because clearly I could use less time worrying about hanging hoods and more time spent shaving…

Anyways. Sherry supported the hood just in case (she’s the perfect height to rest it on her head from underneath it while standing on a small stepladder) and I attached the brackets to the wood panel and then into the hood using the same slots where it would’ve attached to a wall cabinet.

It was feeling plenty secure by this point, so I relieved Sherry’s head from hood-holding duties while I secured the second bracket and she took some more photos.

Once it was tightly held to the wall, I took care of some of the finishing touches – like attaching the vent pipe to the hood and plugging it in (btw, how lucky were we that the existing plug hole in the range hood was pretty much perfectly placed for our outlet???) – and we were in business. Phew! Update: We’ve since learned that metal foil tape (sold at hardware stores) is better for taping that duct together than duct tape (regardless of the more fitting name of the latter – haha) so we’ll be retaping that vent with foil tape to keep the seal nice and strong for the long term. Thanks for the tip guys!

Okay, so admittedly it looks kinda ugly right now. The exposed pipe / wood / giant hole in ceiling aren’t really a good look, are they?

But it was a good start. Not only did we have a hood for the first time in over two months, but we had a hood that wasn’t crazy close to the stove like our old microwave was (we hung it 34″ from the top of the counter which is right between the hood manufacturer’s recommended 30″ – 36″ distance from the stovetop). And this hood has two fancy light settings. Oooooh. Ahhhhh.

And I know the exposed wood looks kinda crazy – especially because it sticks out about an inch on the sides. But I promise this is all part of a plan (hint: they’ll make for a good spot to attach my homemade wood hood cover), so just bear with me for a couple of days.

Oh and don’t mind this POV, we didn’t have the filters snapped in yet (they’re basically big stainless steel rectangles, so it looks a lot better from below once those are in). We’ll have to share more photos soon.

Now in case you’re still worried about this thing coming crumbling down overnight (we were – we actually pulled the stove out before we went to bed the first night just in case!), know that it has survived a few full days now with nary a creak or shake. So without jinxing ourselves, Sherry and I are calling this hanging project a success. All is good in the hood, as they say. Between the long screws going firmly into those studs and the heavy duty brackets also adding extra from-the-top support, this guy is pretty darn secure. So after a few days of breath-holding, Captain Careful can officially exhale.

Now for the fun (?) part – building a pretty wood cover for it. Somebody crank up my jams! We’ll be back with all those details in a few days, but in the meantime, what did you guys do this weekend? Any heavy-object hanging? Tile drilling? Using your head to support something? Oh and something crazy crazy crazy is going on in our house today (well, it starts today and lasts for the next three weeks!!!) so we’ll fill you in on all that tomorrow (once we have lived through one day of it and have some photos to share).

  Leave a comment