“How’s it hanging?” That was the big question last week. Not in the “Hey, how ya doing?” sense of things, but more in the “Um, how are we gonna hang this $60 hood we found on Craigslist” kind of way.
Sherry talked last week about how we planned to encase it in a DIY’d wood cover (see inspiration pics back on last week’s post). Both of us were so excited about (1) the price tag and (2) the final look that we didn’t really think through the middle part: actually installing the darn thing. So yeah… #planningfail?
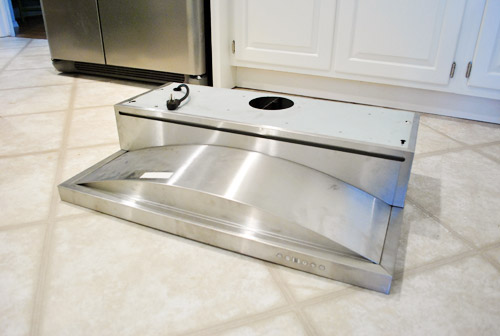
Here was our challenge (beyond just not having any of the installation materials or instruction): this is an under-cabinet hood and, well, we don’t have any cabinets to install it under. I figured that there were dozens of sites online detailing how to convert an under-cabinet hood to a wall-mounted one, so I wasn’t worried… until my Google searches started coming up empty. That’s when I started to second guess our plan. Was this just something that couldn’t be done?
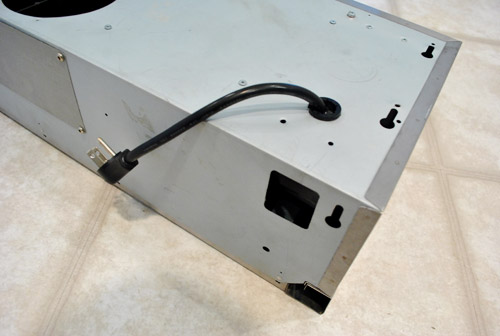
Then I discovered these.
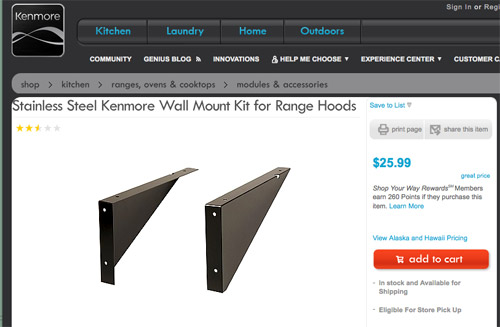
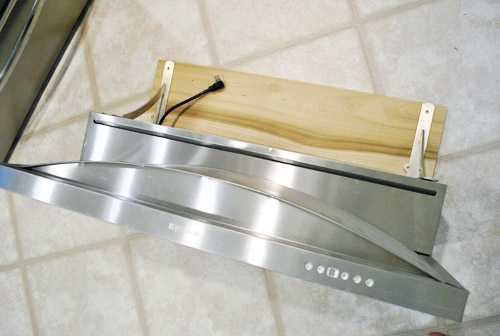
We didn’t buy these (our hood is Jenn-Air brand). But the fact that Kenmore sold bracket specifically “for mounting range hoods to wall when overhead cabinet is not used” meant it was not a completely crazy idea to retrofit ours to hang on the wall as well. So Sherry and I concocted a plan, did some shopping, and readied ourselves for some hood hanging (and possible hood hanging failure, as is always a possibility when we attempt to figure this stuff out as we go). This picture will make more sense soon, but just know it involved some wood pieces as a makeshift mounting panel and some heavy duty metal brackets as a stand-in for a cabinet.
But before we could put our plan in motion, some details needed to be taken care of. You know, little things like oh-yeah-we-didn’t-tile-high-enough-under-the-vent-pipe. Another lapse in planning. Oh well, it took about 20 minutes to whip up a small batch of thinset and fill it in with some spare tiles. Yes, it was slightly maddening to have to go back to the tiling phase (especially for eight measly rows) but by this point we’ve learned just to laugh. Wince a little. Laugh some more. And get it done.
Then we mapped out all the important stuff on the wall to ensure that things would hang where they were supposed to hang. Looks pretty crazy, right? But I promise it makes lots of sense…
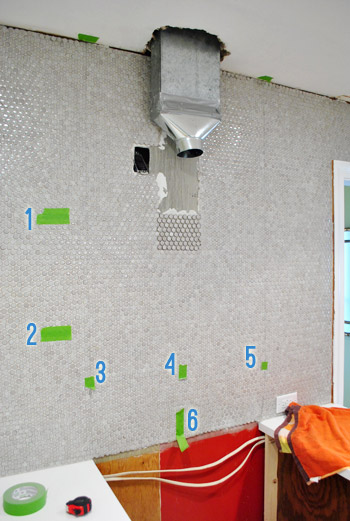
All of this painters tape is marking important reference points, such as:
- 1 & 2: Where our floating shelves would go – important because we wanted the bottom of the hood and the top shelf to be lined up (which was about 34″ from the top of the counter which is right between the hood manufacturer’s recommended 30″ – 36″ distance from the stovetop)
- 3, 4, & 5: Where our studs are – important so we could attach the hood securely to the wall
- 6: The center point of our stove – important so the hood would hang squarely over the stove
In case you’re wondering how I located the studs, it was actually thanks to some forethought on Sherry’s part. Back when that wall was open she begged me to somehow mark where they were before we tiled and covered everything up, so I opted to make small marks on the ceiling to keep track of where each stud was. Then I taped a piece of thread to that mark, tied a paper clip to the other end (to weigh it down) and voila – a perfectly marked stud all the way down the wall. And once we hang our crown molding around the ceiling those little stud-marking dots will be hidden once and for all.

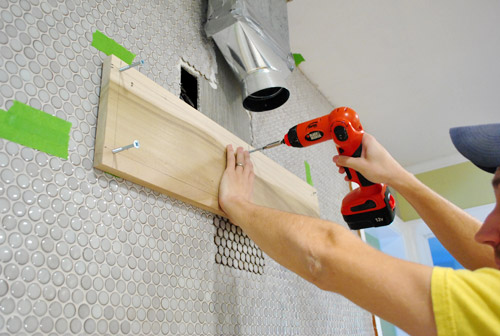
With all of our guides marked, it was time to screw in our first piece of wood. Here’s the deal with the wood. The hood by itself was technically wide enough to hang from two studs, except the studs didn’t line up with the two notched holes in the back of the hood (which were at either end) and I didn’t trust that it would hold that way even if they were lined up perfectly.
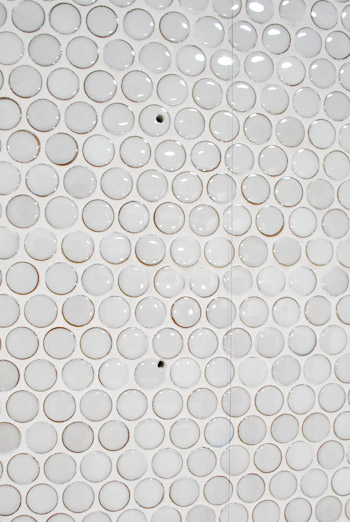
So we figured we’d screw a slightly wider-than-the-hood piece of wood into two studs (and use a heavy duty anchor to secure it in a third location) and then hang the hood onto additional screws that lined up with the hood’s notched holes. We actually got a contractor’s blessing (just didn’t feel right drilling into our pretty wall o’ tile without double checking our plan with an expert first. So after that phone call we took a few deep breaths and moved on to the next (very scary) part of our plan: drilling into our tile. GASP.

I bought a special bit that’s meant for glass and tile. It took a bit of pressure, but eventually I got all of my holes drilled. Though I think we both silently freaked out the entire time drilling was in progress.
Once we got over having riddled our tile with holes (okay, there were just six) I used some 2.5″ screws to secure the chunky plank of wood to the wall. I have to tell you, feeling those screws grab the stud so tightly was one of the most confidence inspiring parts of this process. I felt like I could’ve hung my whole body weight from this thing – that is, if I was able to grip the tiny ledge with my lanky girl fingers.
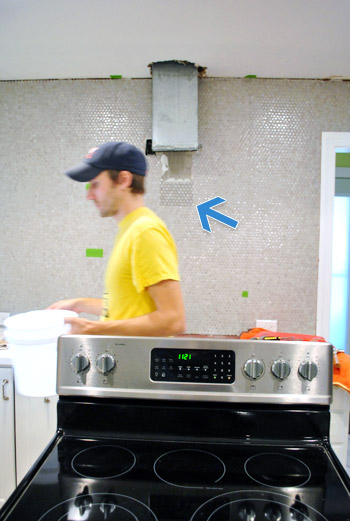
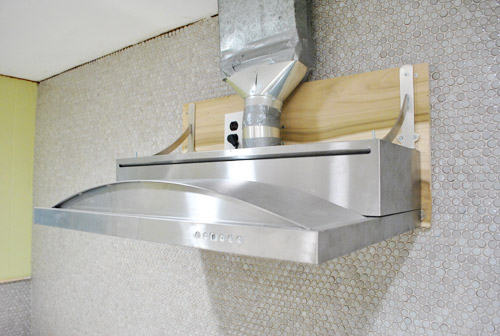
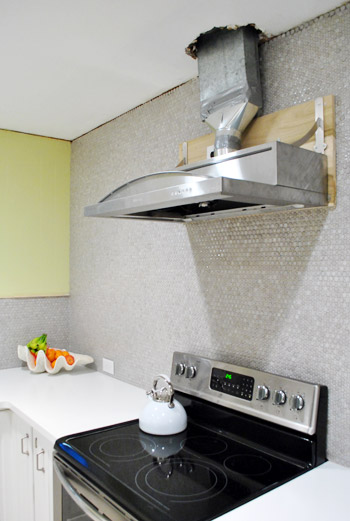
With one board in (to hang the hood from) I then had to attach a second one (to hang the brackets from) also with long screws into two studs and a third set of screws into heavy duty anchors to further enforce things. Then it looked a little something like this. Note: the vent pipe is slightly off-center, not the boards (so once we build the frame for the hood that will be solved and it’ll all look centered). Oh, and the blue arrows are pointing to the two screws that the hood will hang from.
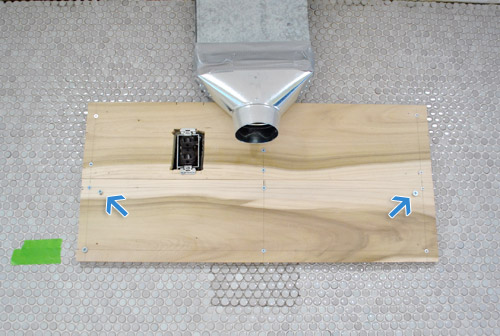
We felt pretty good when we realized that most upper cabinets are just held to studs with screws and then loaded up with dishes and plates and other items (and then a hood might be added on top of all that weight) and the whole shebang stays up.
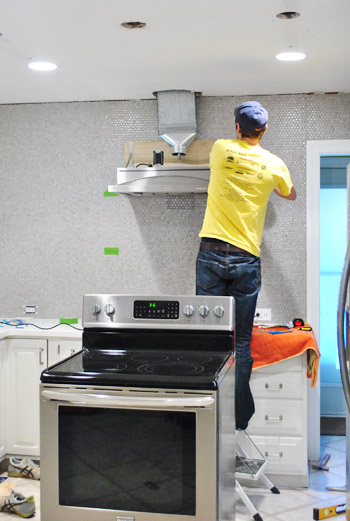
Speaking of which, it was time to put the hood up (since the brackets would need to go up after the hood). Okay, so maybe this part was scarier than drilling into tile. We half pictured the whole wall of tile pulling off of the studs. But lucky for us, it didn’t budge. It was up there solid as a rock. Which is good news, because clearly I could use less time worrying about hanging hoods and more time spent shaving…
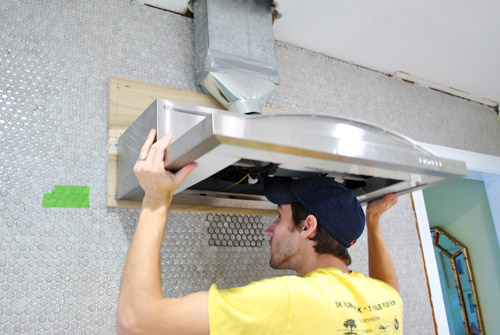
Anyways. Sherry supported the hood just in case (she’s the perfect height to rest it on her head from underneath it while standing on a small stepladder) and I attached the brackets to the wood panel and then into the hood using the same slots where it would’ve attached to a wall cabinet.
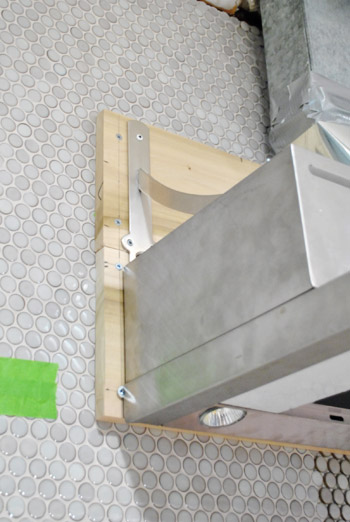
It was feeling plenty secure by this point, so I relieved Sherry’s head from hood-holding duties while I secured the second bracket and she took some more photos.
Once it was tightly held to the wall, I took care of some of the finishing touches – like attaching the vent pipe to the hood and plugging it in (btw, how lucky were we that the existing plug hole in the range hood was pretty much perfectly placed for our outlet???) – and we were in business. Phew! Update: We’ve since learned that metal foil tape (sold at hardware stores) is better for taping that duct together than duct tape (regardless of the more fitting name of the latter – haha) so we’ll be retaping that vent with foil tape to keep the seal nice and strong for the long term. Thanks for the tip guys!
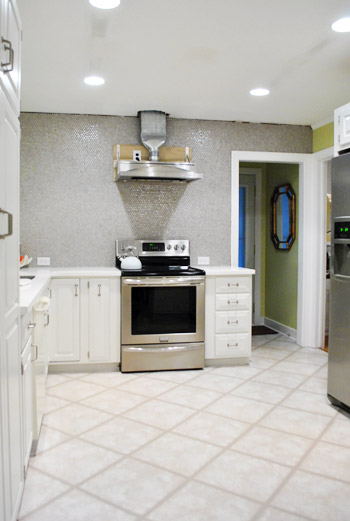
Okay, so admittedly it looks kinda ugly right now. The exposed pipe / wood / giant hole in ceiling aren’t really a good look, are they?
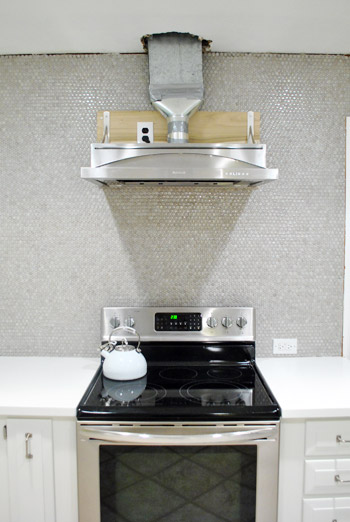
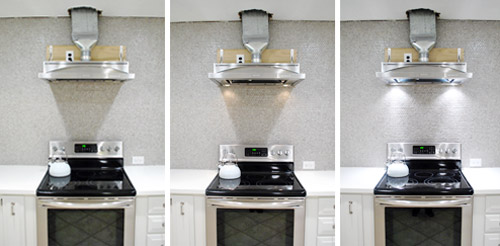
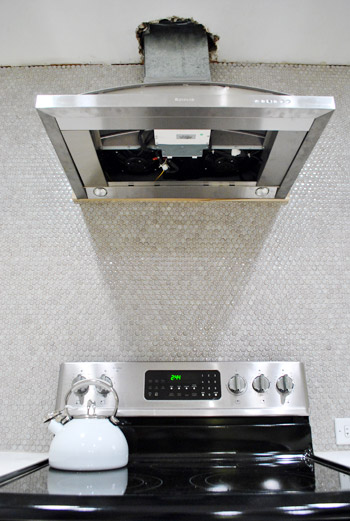
But it was a good start. Not only did we have a hood for the first time in over two months, but we had a hood that wasn’t crazy close to the stove like our old microwave was (we hung it 34″ from the top of the counter which is right between the hood manufacturer’s recommended 30″ – 36″ distance from the stovetop). And this hood has two fancy light settings. Oooooh. Ahhhhh.
And I know the exposed wood looks kinda crazy – especially because it sticks out about an inch on the sides. But I promise this is all part of a plan (hint: they’ll make for a good spot to attach my homemade wood hood cover), so just bear with me for a couple of days.
Oh and don’t mind this POV, we didn’t have the filters snapped in yet (they’re basically big stainless steel rectangles, so it looks a lot better from below once those are in). We’ll have to share more photos soon.
Now in case you’re still worried about this thing coming crumbling down overnight (we were – we actually pulled the stove out before we went to bed the first night just in case!), know that it has survived a few full days now with nary a creak or shake. So without jinxing ourselves, Sherry and I are calling this hanging project a success. All is good in the hood, as they say. Between the long screws going firmly into those studs and the heavy duty brackets also adding extra from-the-top support, this guy is pretty darn secure. So after a few days of breath-holding, Captain Careful can officially exhale.
Now for the fun (?) part – building a pretty wood cover for it. Somebody crank up my jams! We’ll be back with all those details in a few days, but in the meantime, what did you guys do this weekend? Any heavy-object hanging? Tile drilling? Using your head to support something? Oh and something crazy crazy crazy is going on in our house today (well, it starts today and lasts for the next three weeks!!!) so we’ll fill you in on all that tomorrow (once we have lived through one day of it and have some photos to share).

Kristen @ Popcorn on the Stove says
The hood looks great! I can’t believe you were able to install it yourselves… and I can’t wait to hear about this news you’re planning on telling us. I would say photoshoot for the book but that couldn’t take three weeks (or could it??).
Amanda @ Our Humble A{Bowe}d says
Glad it’s up and running! Can I ask how you determined the height of the hood? Can’t wait to see how you box it in. I love seeing finished details.
And, this weekend, my hubby built out upper cabinet doors and I started painting. We’re both getting so close to the end of a long kitchen remodel! High five!
YoungHouseLove says
We just followed the manufacturer’s recommendation (we found the manual online) so they gave us a range and we went right in the middle of that range. Hope it helps!
xo,
s
Kristie says
I think I would have had to hold my breath during the whole “tile drilling” phase. As a matter of fact, I did. And I was only reading about it.
Looks great, kids! Well done!
Marianne says
I did in real life as well as reading about it here! We’ve reno’d two bathrooms and a kitchen and every time we have to drill into tile my palms get sweaty!!! Glad it went well!
YoungHouseLove says
Haha, me too!
xo,
s
Amanda says
When I saw the photo of the drill IN THE TILE I gasped. Haha I almost yelled “JOHN WHAT ARE YOU DOING?!” then realized he already did it
… awkward? OH WELL. That is me. Haha.
Robin @ Our Semi Organic Life says
How handy of you both! It’s starting to look so put together and oh so amazing! Can’t wait to hear what’s going on!
Chelsea says
So excited to see the finished product! I hope by the time I own my own home I will have all this stuff down thanks to y’all ;) *Sigh* One day… *Sigh*
So impressed! Love your taste!
Stephanie Phillips says
You’re refinishing all of your floors?? It doesn’t seem like a project you’d take on in the midst of all the rest of this craziness, but maybe you got a good deal from your contractor and couldn’t pass it up?
You’re working on the book pictures?? Yes, you are. But you can’t share picture of that…
Um… Er… I’m at a loss. That’s quite the teaser!
That hood is looking good! I’m impressed that you were able to get it hung. I’d be soooo nervous drilling into that beautiful tile. I never doubted you, though.
Kim@superchyc says
Ha! When I mounted my tv on the wall, I swear, every creak or knock, I just knew it was pulling out of the wall. Even after I had my kiddo do a pull test on the bracket. But its been weeks and all is good.
Can’t wait to see the hood!
YoungHouseLove says
Aw congrats! Isn’t it scary to hold your breath and just say “here goes nothing!”
xo,
s
Kristen says
You two never cease to amaze me! The way you tackle a challenge shows how determined and hard-working you are. I wouldn’t have even known where to begin in a situation like that. Great work! You should give yourselves a pat on the back. It looks stunning!
Sarah @ OneCraftyHome says
That’s looking so great! I can’t wait to see it when you get the wood hood made!
Thais Bessa says
I have been hanging a rather heavy mirror this weekend. I got in a car boot sale (garage sale in the US?) for £5 and wanted to paint it. Inspired by Sherry I decided to paint it ORB only to discover that ORB spray-paint is not stocked in the UK that easily. But I didn’t give up, ordered it, waited for 6 weeks and finally was able to paint it this weekend! YAY!
Chrissie says
Yay! I couldn’t find ORB anywhere in Western Australia, I got a lot of blank looks haha. I can’t even ship it from Amazon, so I found a metallic charcoal for a project I worked on. Not the same, but it did the job.
I’m still on the hunt for ORB though. Come on shops, get with the YHL program!
YoungHouseLove says
Aw man, I hope it gets there soon! I can’t believe it can’t ship through Amazon. Bummer!
xo,
s
Rebecca @ the lil house that could says
Ahh I was on vacation last week, I’m so behind! Hood? Wood surround? Globe lights? ::runs off to read:: :)
Jordan@the2seasons says
I am sure you will love having a fan back for cooking! I was busy finishing up installing our new painted white cabinets. I love them and I gave you all a shout out for your excellent how to! Thanks again.
Katy says
The tile drilling part had my breath held too, I had to quickly scroll down to make sure it was okay before going back to reading. I hung somethings too but I wasn’t really worried about them falling down, just about the leveling http://thefirstapartment.blogspot.com/2012/01/canvas-art-recycling-trees.html
~Katy
YoungHouseLove says
Wow! What a cool project Katy!
-John
Whitney Dupuis says
That is so cool, Katy!
Dina says
I love this project, Katy! I think I might also have to buy some cauliflower today to make your cauliflower pancake recipe… looks delicious!
By the way John, are you taking bets today on what Bob has to say about your stud-marking methodology? If yes, I’d like to place a $50 on “You’re killing me, Captain!” :) For the record, I think it’s pretty ingenious, and kudos to Sherry for the foresight… I hate trying to find studs through drywall, let alone tile!
andrea H. says
Was their a specific height you had to keep in mind when installing the hood to make sure the exhaust vent worked correctly?
I’m so excited to see your progress – our kitchen reno is about a year away or so…
YoungHouseLove says
Yes! Always follow the recommended hanging height according to the manual (we looked the manual up online and hung it right in the middle of their suggested range).
xo,
s
Katy @ The Non-Consumer Advocate says
How exciting to get to the finishing touches! What a treat it will be when it’s all finished.
Katy
Melanie @ Mailbox Journey says
It took me a little while to load this post, but it was so worth the wait! Can’t wait to see what you have in store for the wood cover. :)
Sarah @ OneCraftyHome says
That’s looking great! I can’t wait to see it with the wood hood built around it.
Thais Bessa says
I have been hanging a rather heavy mirror this weekend. I got it at a car boot sale (garage sale in the US?) for £5 and wanted to paint it. Inspired by Sherry I decided to paint it ORB only to discover that ORB spray-paint is not stocked in the UK that easily. But I didn’t give up, ordered it, waited for 6 weeks and finally was able to paint it and hang it this weekend! By the way, ORB so worth the wait, I also used it in my fireplace frame. YAY!
YoungHouseLove says
Wahoo! It sounds gorgeous!
xo,
s
Alyssa says
You both never cease to amaze me with the things you come up with when faced with an issue that doesn’t start 100% on your side. I bet having a hood is so exciting, just as exciting (maybe a bit less exciting) than getting your sink back? Anyway, way to make it work and awesome score on the inexpensive hood in the first place!!
Heather says
It already looks amazing, even in it’s unfinished state. Good job! We are in the middle of a bathroom tear-apart and redo. It’s crazy fun and crazy hard work, both at the same time.
michelle says
I love that you always “just make it work” I would give up after not finding help on the internets! can’t wait to see the wood cover! I am as excited as if this is my kitchen! silly me.
WSquared says
Oh, this is exciting! :D
Julia @ Chris loves Julia says
That is innovation right there! I can’t wait to see the cover hood you come up with. I am so curious about this 3 week project! Floors?
Captain Micah says
We finished building our new desk! From old kitchen cabinets…where on earth could I have gotten THAT idea?!
http://captainmicah.blogspot.com/2012/01/mother-of-all-desks.html
Your kitchen is looking great!
YoungHouseLove says
Niiiiiiiiice Micah!
-John
Gwenalyn says
Very cool! Nice job!
Lindsay says
Looks great so far – it’s really coming together nicely!! Keep up the great work!
Jordan says
hmmmm, are those hardwood floors getting an update?
YoungHouseLove says
Hmmm, not sure which hardwood’s you’re talking about. But we are replacing the vinyl tile floors with cork soon!
-John
Deidre says
O.My.Goodness!! It looks amazing even in the current not-quite-finished state. You guys just ROCK!!!
Kim S says
Looks great! The ceiling is looking better too, I notice some holes gone in the final picture. Could be Photoshopped but figure with you two, it was just a busy weekend.
At our house, I bought a mirror for $29 for my daughter’s room. Only problem it was black and we needed white. Spray paint to the rescue. It is pretty big and heavy so we used wall anchors and it’s holding. Now she can look in the mirror while putting on those lovely rubber bands on her braces!
YoungHouseLove says
It was a busy weekend – we’re gonna loop back with details on patching those holes later this week!
-John
Rachel says
What kind of anchor did you guys use for the third (not-hanging-on-a-stud) screw? We’re hanging a vanity in the bathroom and it’s difficult to find studs in the wall, which has been tiled floor to ceiling, but I’m a little confused about all the different anchors!
Thanks!
YoungHouseLove says
In this case I tried out a special screw that meant to work without an anchor (unfortunately I forget the name and have since thrown out the packaging). I was worried about having to drill a hole in the tile large enough for a plastic anchor, but in the end my hole ended up being just about that big for the screw – so I’m not sure I would recommend anything than a good plastic anchor anyways.
-John
heather says
Rachel, look into a hollow wall anchor that is rated for the weight your hanging. They expand behind the sheet rock and are meant for hanging where it’s hollow – i.e. no stud (they will not work if you hit a stud). Besides weight, you’ll want one that matches your drywall thickness.
Rachel says
Thanks Heather!
Kristen says
I would have been terrified to drill into that tile!! I feel weird but I think the hood looks great! Obviously it still needs some beautifying but I can visualize the rest of the wall better now that it’s up. Can’t wait to see what you come up with for a hood cover!
Lindsey @ arkadian belle woods says
YAY! So exciting! Hope you guys are seeing the light at the end of the tunnel! I’m so stoked about the kitchen but I’m really excited about this ‘crazy’ thing that is happening in your house! I can’t wait to find out about it :-)
Erin @ One Project at a Time says
Nice work! Figuring out how to retro fit something on your own, and having it actually work is my favorite part of Home Improvement! It’s like problem solving and carpentry at the same time… wait, I just said that out loud. I’m a dork.
We spent the weekend working in our gutted bathroom and trying to put it back together. Every part of my body hurts. I seriously can’t even make a full fist because my fingers and had hurt so bad. It will be worth it in the end though! http://oneprojectatatime.blogspot.com/2012/01/its-demo-time.html
Erin says
We totally had the same issue with our over-the-stove microwave… we had to take down the upper cabinet to fit it in, but then had nothing to attach it to. We actually used the exact same brackets you did, and just made a shelf above the microwave, since it would end up being visible. You can see how it turned out here: http://creekbedthreads.com/2012/01/04/the-kitchen-finale-finally/
YoungHouseLove says
Wow- it looks awesome!
xo,
s
Karen F says
Nice job! You’re very brave!
Hmm…3 weeks….book photoshoot? :)
Megan says
Looks great – such inspiration – we spent the weekend stripping wallpaper at our new 1960 ranch. Can’t wait to get my tile on soon!
DebInNYC says
Hmm let’s see..
Just when I thought it would be fun to have a home improvement TV show, I have sheet rock land on my head, Spackle dust in my eye, I whacked my head on the truck door which made me choke on a jelly bean while in the Home Depot parking lot and that was just Sunday afternoon. When I got home the drill fell down the stairs and hit me in the shin.
Maybe they should follow me with a camera, at least it would be funny!
YoungHouseLove says
Oh my! Hope you’re recovering quickly!
-John
John@Our Home From Scratch says
That’s a beautiful hood. I know it’s not meant to be seen, but it’s functional beauty!!
Using the wood to mount the hood was a clever idea. Plus, you’ll be able to fasten your hood box to it.
I’ve actually seen cabinet installers rip out a section of drywall and install a strip of plywood (similar to what you’ve done here) so when they hang the cabinets, they don’t have to struggle to find the studs.
Kate says
Love it! And now you have yet another light source! I bet (hope) this was one of those projects that really made you feel like you’re making good progress.
This weekend I painted stripes in my coat closet. Sounds kinda lame, but it makes me unbelievably happy. It’s like a burst of happiness. In the coat closet. Ha.
my honest answer says
Oh wow, you did a great job! Love the lights on it as well. Thought I’d let you know that the website is loading funny for me today though… it could just be my computer but the hearts background is behind all the text (I’m sure it’s not usually) and all the links in the page tabs are blue. As I said, it’s probably just me, but thought I’d mention it in case it’s affecting a few people.
YoungHouseLove says
Thanks for the heads up. We are having a bit of tech issue (slow loading for some) so maybe that’s a symptom of that. We’re trying to get it resolved. Sorry!
-John
Kellie says
I second that, I’ve had to refresh a few extra times. But it’s worth it :-)
YoungHouseLove says
We’re on it! SO sorry for the issues guys.
xo,
s
liz says
Wow – I love that stud trick with the thread and paperclip. Good thinking!
Jarrod says
Aah!! Crazy, crazy, crazy? I want to know right now! I love surprises…
Kate Battle says
Looks great guys! It is scary drilling into tile, isn’t it! I had the same panic attack when I was putting up a shower rod in my bathroom a few months back and had to drill into tile!
This weekend I got farther on my kitchen! I installed my new cook top (over the range hood I put in last weekend) and it just barely fit! I had to jig saw the counter top. That was scary!
I was also scared to reinstall some of the cabinet doors I had painted (using the same method you guys did)-I was worried they would chip right away…but guess what, so far, so good! Now to finish the other 21! Ahhh!
http://retroranchrevamp.com/2012/01/29/stove-top-stuff-inn/
Molly says
Amazing job! It looks very sturdy and professional. Way to improvise.
This weekend I FINALLY (after 2 years) took down the paper shades in our master bedroom and installed roller shades with a little pink pom pom trim glued to the bottom. They make me smile.
http://thenestinggame.com/2012/01/30/pom-pom-roller-shades/
Blythe says
I am SWEATING just thinking about that kind of a project. I am so glad that wasn’t a fail for you! That was a B.I.G. risk in my book. GRRRRRRRRRREAT JOB :)
Lisa Riley says
Wow, I’m impressed (as usual)! I can’t wait to see the wooden covering!!
KiTx says
That stud trick is amazing, and the hood looks great! What a steal!
We woke up on Sunday with the intention of having our install guy come and lay our new laminate (we had a flood, home insurance is covering everything, so we’re letting them do it instead of us.) Instead, we halted the install because we hated the laminate (and the install guy told us he did, too!) and opted for tile. So now we’re living on a bare concrete floor. Here’s hoping our decision works out as well as your hood-hanging!
YoungHouseLove says
Aw, I bet it’ll look awesome! Good luck!
xo,
s
A says
Im sure you got that good of a deal because it was a foreclosure. My parents foreclosed and made me sell all of their jennair stuff for them for next to nothing on Craigslist. So just know that your deal probably came at the expense of another family who was screwed over by the bank.
Also the hood seems far from the stove top. Is it going to have enough suction that far away?
YoungHouseLove says
Oh yes, we followed the manufacturers recommendation and hung it right in the middle of their recommended hanging range!
xo,
s
Alex - Old Town Home says
Hey hey, lookin good. That’s one mighty fine looking range hood you’ve got there.
I can’t totally tell from the photo, but it looks like you might have used duct tape on the hood duct. Please forgive me if I’m wrong. If I’m correct, duct tape is actually the last thing you want to use on ducts. I know, how lame of a name? Instead, you should use the foil backed tape that you can pretty much get in the HVAC section of any store. It has paper on one side and metal with adhesive on the other. You just cut the right sized strip, pull the paper off, and apply.
If you use duct tape it’ll end up drying out in a year or two and then won’t hold the joint tight. Worst case, it will let grease and anything else flying up the hood escape into the cavity around it, making for something more dangerous over time.
So if it’s not too late, pull that duct tape off of just pop on the foil tape.
YoungHouseLove says
Thanks so much for the tip, we’ll upgrade it tonight!
xo,
s
Meg@ Green Motherhood says
Ha! I just read your update and can I say that I LOVE the fact that y’all used duct tape on this project! I mean, I’m glad someone caught the potential snafu, but it is totally awesome to see y’all being real, making the best of things( I mean, yall working this whole hood hanging thing out is amazing to me), but still being two people trying to figure it out and throwing some duct tape up there to make it work.
Me? I would have duct taped the whole house by now.
Taylor says
Very interesting to see John is responding to all the comments!
SherriEakin says
Haha, I was thinking the same thing! I wonder if it has to do with this ‘crazy, crazy, crazy’ surprise we were told about…? It’s not that we don’t love hearing from you, John. It’s just weird… ;)
Carly says
This looks GREAT! So impressed (as always) by you guys. Totally excited to see the hood you guys create — maybe I missed this before, but are you planning to go white-painted-wood to match the rest of your kitchen or will you be changing it up a bit and going with a wood stain? Just wondering!
-Carly @ Createlive
YoungHouseLove says
I think we’ll be going with the same color as the cabinets but we’ll have to decide once it’s in place!
xo,
s