Archive for October, 2011

Fab Freebie: Trick Or Sweet!

***This giveaway is no longer accepting entries – see who won!***

Hope everyone had a happy Halloween! The two folks getting an extra candy fix (thanks to random.org’s choosing) are… Johanna (who loves Rolos) and Clare @ Fitting It All In (who’s an M&M addict). And the winner of a pair of tickets to our local R.Home For the Holidays event on Nov 16th, featuring a presentation by Grace Bonney, is… Randa! Congrats everyone!

Since we can’t giveaway goblins or ghosts, we’re celebrating Halloween with a candy-tastic giveaway instead. No costume wearing or door knocking required. The prize comes from our favorite local candy shop, Sweet Spot. Their store is not only designed in a super fun way, but it’s stocked with tons of goodies – including those classic childhood candies you just can’t seem to find anymore. Along with (my personal favorite) over 50 flavors of soda.

So the Sweet Spot folks put together three themed baskets for our winners to choose from. Below’s just a sampling of the type of candies that you’ll find in each basket, which are all stocked with $50 worth of yummy stuff.

*************************

But wait, there’s more! We’ve got an extra prize available to anyone in the Richmond area. Local shelter mag R.Home is again hosting their annual R.Home For the Holidays event in two weeks (Nov 16)  and we’ve got one pair of tickets to give away. This daytime event includes design seminars, lunch, and a talk by Design*Sponge founder (and Virginia native!) Grace Bonney. We’re excited to finally meet her – and any of you that join us at the event!

Please only enter this bonus contest if you are available to attend from 10am to 1:30pm on Wednesday, November 16th here in VA at Plant Zero (you win two tickets so you can bring a friend if you’d like). To enter, just include the phrase “TICKET ME” in your comment (yes, you can enter both contests in one comment). One winner will be selected from all of the entries containing “Ticket Me” along with two winners from any entries that say “Trick Or Treat” and all three lucky ladies or lads will be announced on Thursday.

Note: We aren’t paid or perked for hosting these giveaways, we just do ‘em to thank you awesome folks for stopping in. See our Giveaway FAQ page for more info. Pics courtesy of Sweet Spot, R Home Magazine and Design*Sponge.

  Leave a comment

Cabinets & Costumes…

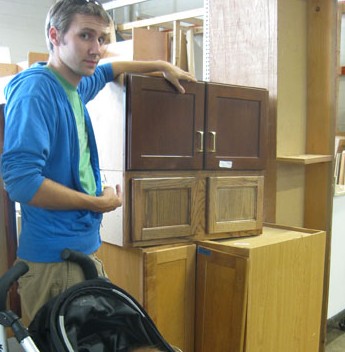
We knew we weren’t likely to find $1 cabinets again (like we did for the office built-ins) but we couldn’t resist checking out the Habitat For Humanity ReStore for the four cabinets that we need to create the peninsula and build in the microwave/fridge (we’re able to reuse the 36″ cabinet that used to live where the stove now sits, so that saved us some major money). The good news is that we found three out of the four we needed! And only spent $90 total.

Yup, we got a corner base cabinet for the peninsula for $50 and two upper cabinets (one for over the fridge and one slightly taller one for over the microwave) for $19 each. And just for reference, to buy those cabinets new from Home Depot or Lowe’s (in the stock, off-the-shelf department) they would have been $219, $96, and $89 respectively (for a grand total of $404). So we saved $314 by going secondhand. Which made complete sense since we’d be scrapping the doors anyway.

The issue with the doors? They don’t match our existing ones (nothing that we hunted down both new or secondhand did since our doors are 30 years old). But to get the solid oak cabinet frames for that price is a steal and once they’re all painted white with new or retrofitted matching doors (from other existing cabinets that we’re not using), no one would ever guess they hailed from the ReStore.

We could only fit two of the three into our trunk. But thankfully they’ll hold items for seven days at our ReStore, so we just came back for the giant corner cabinet with a bigger car borrowed from John’s sister a few days later.

Now they’re all at home, but not in their places yet (the carport and our sunroom are the holding area for lots of old cabinets and doors that we have removed and new ones that we’ll be switching in).

And yes, the sunroom looks especially crazy and smells like wood. Could be worse (wood isn’t that bad of a smell, actually). Hopefully in the next few days we’ll be back to share our freshly built-in fridge.

But wait- it’s Halloween. Did you really think we’d let you go without sharing the kiddos in costume? Meet Mrs. Monkey & Mr. Banana:

Clara liked doing her best monkey impression (saying “ooh ooh ah ah” and waving her arms) while Burger slinked around looking beyond embarrassed. The second we popped on the “hat” part of his banana, he just slumped down and half-closed his eyes as if to say “this is not ok.” We freed the poor guy from his yellow prison within a few minutes of this photoshoot though. And gave the boy a bone. Actually his monkey friend handed one over. She’s a very generous chimp indeed.

And Clara’s cousin Emanuel (seen here turning two) even got in on the fun. He was a ferocious lion who requested candy corn throughout the photoshoot. Hilarious.

Of course the banana + monkey thing might not be as cute as one especially cute combo from last year…

Hope you all have a very happy halloween! Oh and what were you guys up to this weekend? Any cabinet hunting or candy corn binging goin’ on?

Psst- Check out our pumpkin patch adventures (including a family moon bounce and corn bin adventure) here.

  Leave a comment

Bowers In Da House

I promised more Bower visit deets on Wednesday when we dorkily spilled the beans that Katie B and I had been together in a series of photos that can only be described as awkwaaaard (get to the root of that joke here). You know we love a good Bower Visit Breakdown (like this one, this one, this one, and this one of yore). But before we get to all the stuff we did together, we’ll share the little video that we made for ya. Because KB and I always get the same few questions:

So we thought we’d answer them all on film for ya. Warning: you’re about to lose 12 minutes of your life to two giggly girls who incessantly say the word “like” and perform incredibly terrible impersonations of each other).

When it came to the stuff that we did together this time, here we go:

In summary: good times. Katie even used her photog skillz to take some sweet pics:

So thankful for good friends, good weather, and sweet babies. Er, I guess they’re technically toddlers now. Sniffle. Did any of you guys hang with friends this weekend? Or have a weird feeling that KB and I were together? One commenter totally guessed that we were visiting each other while it was happening and we had no idea how they knew about it (maybe they’re psychic? or they saw us around town together?).

Psst- Check out Katie’s sweet post about everything. She even dug up our first email exchange. Love that lady.

  Leave a comment

Counter Conclusions

We’re inching right along in the kitchen (wish we could share kitchen updates every day but we’re doing this thing real-time). Which brings us to our latest decision: the new counters that we’ll be going with.

We’ve been debating possibilities for weeks (there are a junkload of options out there with pros and cons to each one). And ten people would probably make ten different decisions, so it can feel especially hard to hone in on the “right” thing since there are so many variables. So here’s how we landed on the choice that we like best for our kitchen/family/life. But first the thing we’re sad about: although we had high hopes of DIYing concrete counters (I pinned about a million tutorials) they’re not a good choice for our kitchen. After talking to a few concrete experts (who actually make ‘em for a living) we learned that in order to accommodate the double 12″ overhang (on two of the four sides of the giant 3 x 5′ peninsula that we’ll be adding) we would need to pour the slab extra thick, which is an issue because:

Cue the sad trombone sound effect. We debated doing some sort of concrete “slipcover” (for lack of a better word- some folks just coat another countertop material with a thin layer of concrete) but it ended up having more cons than solid concrete, so we decided to explore a few other options in hopes of finding The One. But we’re diabolically determined (picture me stroking my chin like an evil genius) to mess around with concrete one way or another. Maybe we’ll make a long concrete dining table for an outdoor deck area that we have yet to tell you about/build (it’s on the to-do list, so we’ll hopefully get there eventually). But back to the kitchen…

Once concrete was off the table (or the counters, har-har) we decided that hitting up a bunch of local kitchen shops as well as the usual home improvement guys (like Lowe’s and Home Depot) would be a good way to see what other counter materials were out there… and what they were going to do to our budget. Back when we did our first home’s kitchen we really splurged when it came to the counters (to the tune of $3,700 after a $300-off promotion), but they kind of made our kitchen and we had saved up the money to pay them off right away, so we didn’t regret that choice.

But we definitely went into this kitchen makeover vowing to come in substantially under that number. Which is funny given that we have about twice as much square footage (since we’re adding a big peninsula and this kitchen is a lot larger than our last one). For example, to use the same “pashmina” granite from Home Depot that we used for our last kitchen would cost us over $7,000! Which is just not in the budget. At all.

At first we thought about butcher block (Ikea sells it so affordably and it can be stained to get a richer chocolate look). But with the dark wood counters in the adjoined office (just five steps from the stove and three from the fridge) we decided that would be too much wood. Plus we loved the slick and easy-to-wipe-down surface that granite offered us in our first kitchen. Call us spoiled. But this time we wanted to go with something different (and had heard good things about quartz, solid surface options like Corian, and even cool eco options like recycled glass). So after hitting up a bunch of places, here are all of the samples that we brought home to mull over:

  1. Top left: LG Viatera quartz in “Geneva” found at Lowe’s (note: any of these options are probably available at a number of places)
  2. Bottom left: Caesarstone quartz in “Pebble” found at a local spot called Kitchen & Bath Solutions
  3. Right: Silestone quartz in “River Blanco” found at Kitchen & Bath Solutions

  1. Top left: Cambria quartz in “Torquay” found at Kitchen & Bath Solutions
  2. Bottom left: Cambria quartz in “Sussex” found at Kitchen & Bath Solutions
  3. Top right: Allen & Roth quartz in “Alloy” found at Lowe’s
  4. Bottom right: Cambria quartz in “New Quay” found at Kitchen & Bath Solutions

Oh and here’s a pile of white solid surface options from Lowe’s, Home Depot, and Kitchen & Bath Solutions (the one on top is Glacier White by Corian, and there are other options by LG Hi-Macs and Allen & Roth under it).

We also admired a few awesome eco options like recycled glass but they sadly weren’t in the budget (at least we got cork floors and can reuse almost all of our cabinetry to keep things green).

The one we loved most? This Silestone guy (River Blanco):

But after we learned that it would be over 5K for those counters alone (!!!), we knew it wasn’t meant to be. But don’t cry for me Argentina. It all worked out in the end and we found something that’ll be a great choice for our kitchen/family. The winner? Glacier White Corian:

We’re in love and have all but forgotten the 5K option that we once called a favorite. That’s actually not a white Corian square pictured above, but that bigger white tile was the same color so it represents the new counter better than a tiny Chicklet-sized square sample. Oh and the stainless steel bottle represents our new stainless appliances and the paint swatch is the current wall color so you can see how those things layer in with other things like our backsplash tile and the mocha cork.

Why did it win? So many reasons:

I know it might sound really bland to do white cabinets with white counters, but many of our inspiration photos from this post have the white on white look. And given our recent backsplash choice it’ll all hopefully make sense (the gray-green penny tiles will stand out along with colorful items on our open shelves while the counters and cabinets are classic & clean).

Those photos were found here and here by the way. We’re also toying with the idea of some sort of subtle color on the cabinets (maybe a soft taupe-gray like this kitchen that we crashed a while back). Not sure where we’ll end up, but we’ll definitely keep ya posted! What about you guys? Has anyone else decided to go with Corian? Or concrete? Or quartz? Or granite? Or butcher block? We’d love to hear which counter you picked for your kitchen! There are so many delicious options out there…

Psst- We announced this week’s giveaway winner. Click here to see if it’s you.

  Leave a comment

Some Slap Happy Office Art

You know… slap happy. As in it makes us happy and we slapped it up on the walls without over-thinking it (to the point of what-should-we-frame paralysis – which can happen if we’re not careful). Although we did talk about a few other options and eliminate them based on certain factors, such as:

So we decided to use frames that we already had in a balanced-but-not-completely-symmetrical arrangement. And as is the usual agenda, we tried to go with things that have meaning, feel personal, and make us smile. Are they perfect? Nah. But perfect is overrated. They just make us happy like our chipper green office chairs. So in a way, the fact that it’s not perfect is kind of perfect for us.

We liked that we had a “John’s side” (the right) and a “Sherry’s side” (the left) so since John loves maps, typography/handwriting, travel, and high-contrast geometric shapes, he ended up with this little medley:

Not only does it represent a bunch of things he loves (type, maps, travel, geometric shapes, etc), it’s also personal because:

On my side I knew I wanted Clara to paint me something (everything she makes is my favorite thing ever, what can I say?) and I liked the idea of framing a textile that I loved (some fabric leftover from Clara’s weekly project, which I also used a few years ago to reupholster a bench that now sits in her nursery).

It doesn’t hurt that the lattice shape of the fabric ties in with the lattice detail on the chairs… and also seems to relate to the high-contrast geometric print on John’s side. Gotta love happy accidents like that. To us that just screams: meant to be.

As for how we approached the whole office art thing, here’s the order of this whole project (although we’ve done this multiple ways so there’s definitely not one “right” formula):

  1. Went through our existing frames to see what we had to possibly work with (and found the five that we used for a grand total of $0 spent)
  2. Laid the frames out on the floor in groups until we hit on a balanced but not symmetrical arrangement that we liked
  3. Hung the frames without anything in them, just to get a sense of how they’d look on the wall instead of the floor
  4. Began the art hunt (we figured we could trim/blow things up to work with the frames we had – although sometimes art comes before frames for us – it varies)
  5. Pulled our typographic Richmond map out of the playroom since we knew it was one of the things we wanted to hang (and painted the mat for that frame with leftover wall paint from under the chair rail)
  6. Went through our “memory box” full of movie stubs and love notes (it’s just a shoebox-sized container full of keepsakes), which is where we found the comment card from our honeymoon (which we blew up 420% at a copy shop to fit the frame)
  7. Dug up some sentimental fabric that I loved (which was also used here and here)
  8. Found a high-contrast print in my little file o’ art from years past that worked nicely on John’s side (it balanced out the handwritten comment card and the detailed type-map)
  9. Stripped Clara down to a diaper with some water-based Crayola paint and had her go to town on a large sheet of paper that would fit the frame I wanted to use with it
  10. Ran to Michael’s to grab some large colorful sheets of paper to create “mats” for some of the art (to better fill the frames and tie in some happy color since the office is our cheerful little bubble of unicorns, rainbows, and puppy dogs)

It definitely feels mixed & matched yet balanced enough for us – and it’s bold & happy without giving us a headache. We like that the color palette is diverse (Clara’s painting is full of color and there’s a black & white print, so it’s pretty varied). Even with all those colors/styles, the dominant tones (like teal and grellow) relate to the chairs and the dining room curtains – and the white frames help unify things. We definitely plan to play around with room accessories in other colors though (some pops of orange or coral on the desk might be fun) so we’ll have to see where things go…

Oh and here’s the view from the dining room. I love that the office is so light-washed and the dining room built-ins are so dark. It really helps keep the spaces from blending into one big rectangle-fest. Oh and I’m on the hunt for a new runner that’s not so matchy (plum could be fun – or even textured burlap).

As for how much this entire update cost us, since we already owned all the frames we just spent around $9 at Michael’s on the large colored paper “mats” and $4 at the copy shop (FedEx Office) blowing things up. So that’s a total of 13 bucks for five pretty big pieces that we get to stare at whenever we’re not gazing at our laptop screens.

We still have other office things on the agenda, like: getting a permanent rug (most likely longer, not as wide, and darker), adding more permanent art to the other side of the room…

… hanging some window treatments (probably homemade roman shades), and adding a proper lamp and side table for the leather chair corner, etc. But for now we’re just grateful to have something on those have-been-blank-for-the-last-ten-months walls. Can’t believe we have stared at blank walls for almost a year. The shame! Especially since the frames were just sitting around in our playroom and it was only $13 to fill them with some happy-go-lucky stuff.

But enough about us. Have you guys ever blown things up at a copy shop like a comment card from a memorable meal? How about stripping down your toddler and “commissioning” some custom art? I thought I was going to be really Type A about colors and design but I just gave her every color of the rainbow and watched her go to town. My little artist…

Psst- Here’s another post about a ton of sentimental things we’ve framed around the house.

  Leave a comment