You guys have patiently waited for the big nursery reveal while we’ve spent weeks tackling everything from paint, mirrors, and art to lighting, storage, and a custom crib skirt. Now we’re back to share the whole room all put together (and not a moment too soon since John’s sister Emily’s son is due in two weeks!). But first let’s look back on the blank slate of a before that we started with:
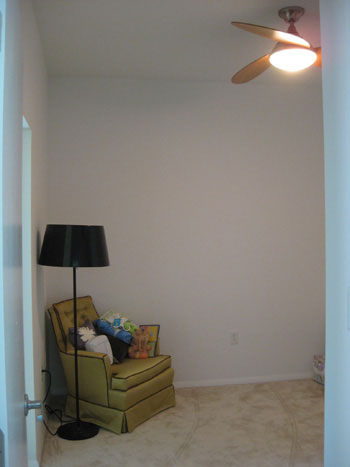
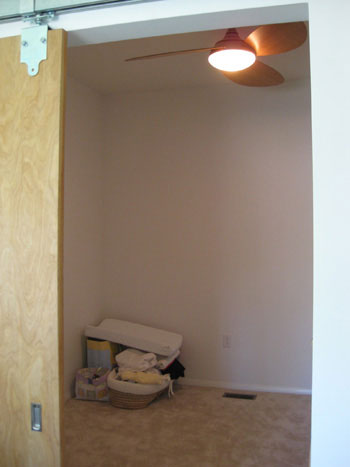
We hardly even remember that bare and boring guest room. Here’s the clean-lined yet oh so cheerful nursery we whipped up for Emily’s wee one on the way:
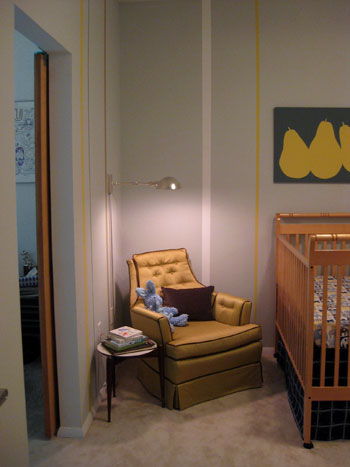
The playful and modern vertical stripes in yellow, caramel, white and slate blue really added charm and interest, especially when paired with soft blue-gray walls for a room that will really grow with our new nephew-to-be. And hanging that clearance swing arm lamp on the wall (with a nice little dimmer switch so it’s not too bright for baby) freed up some space in a tight corner for a small table full of reading material next to the thrift store chair Emily hunted down a while back (gotta love how the color and the piping fit right into our room’s palette).
I also got to get back to my art school roots by painting three pears on a canvas Emily already had with our leftover wall paint for totally free pop art in the room (and the three pears actually represent Emily’s three children- once the last one comes along, that is). We also loved that the $7 clearance crib sheet that we found at Target helped us further establish our color scheme, and instead of repeating the elephants from the bedding all over the room (which felt too theme-y for a modern family like Emily’s) we loved that we could work in other simple shapes and forms like the pears (which actually remind us of Emily because she has a huge iconic pear sculpture on the middle of her dining table).

When it comes to function, Emily wanted a storage piece that could work as a changing table and be converted to a normal cabinet once her son gets a bit bigger, so we snagged this affordable and oh so functional shelving unit with doors to conceal all the clutter (it’s full of diapers, wipes and all that good stuff)…
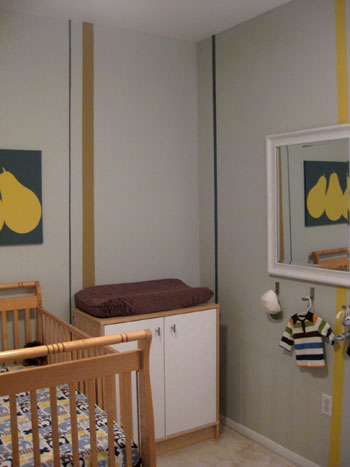
… and even added sleek silver knobs for easier access and more of that modern feel that Emily loves.

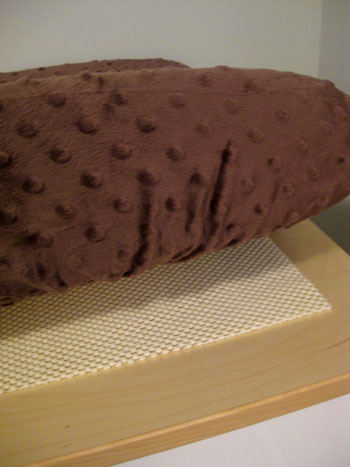
Emily also didn’t want to permanently attach the changing pad with screws or even velcro since she wanted to use the cabinet without the pad in the future, so we hunted down a super grippy rug pad which really holds the pad in place (but can be easily removed when the time comes). For those who aren’t sure about a rug pad’s strength, we actually use one to keep our wood countertop in place above our washer and dryer and it works like a charm- that sucker never so much as scoots one eighth of an inch in either direction). Of course it bears mentioning that Emily has already had two children (this lucky guy is her third) and she strongly believes in always supervising any child who’s getting changed, so even though the pad isn’t going anywhere, neither is your child if you’re right there in front of him. Safety first!
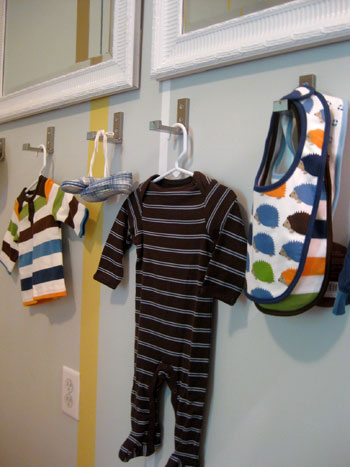
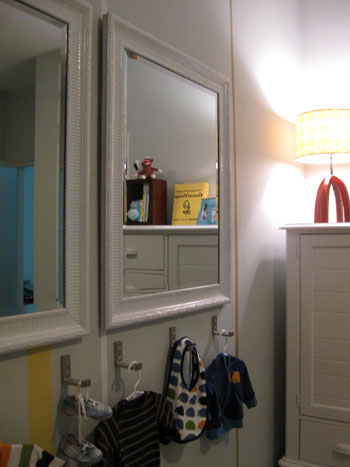
And then we have those great fold-away hooks from Ikea for more function and fun in the room (remember they fold up and away so whenever Emily wants to make a few of them disappear she can snap them up and they become flush with the wall and non-pokey (that’s a technical term by the way). So from bibs to outfits (hats, shoes, onesies) to diaper bags and backpacks- even cloth bags or hanging baskets that can house toys or dirty laundry- this wall is super diverse and functional.
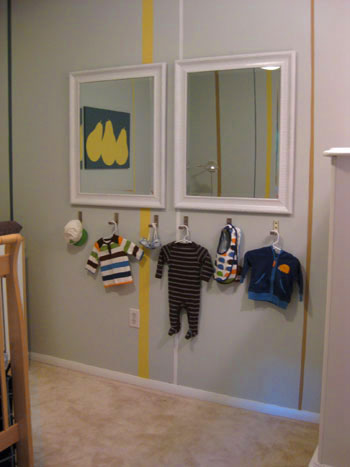
Of course the obligatory warning here is if you have kids who are toddling around, be sure there aren’t any straps or cords hanging from the hooks that they can get stuck in. Safety first! And it certainly helps to hang them a good distance from the floor so your little ones can’t hit their heads on them (Emily’s are around three and a half feet from the ground and her other two children- aged 9 and 12- are certainly old enough to know not to get rough near them).
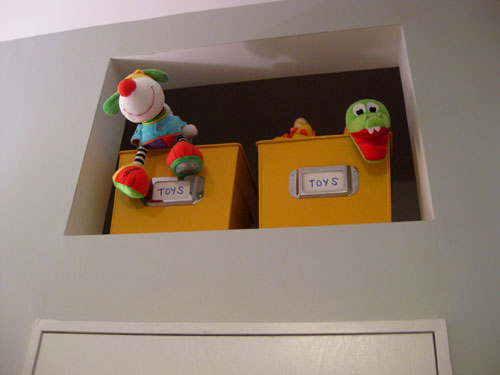
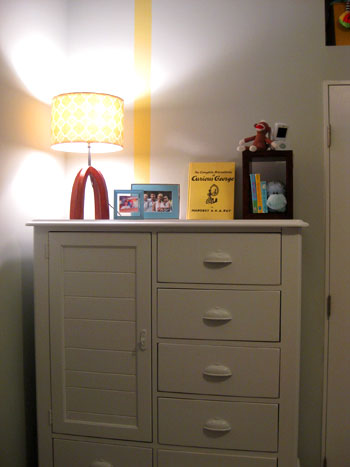
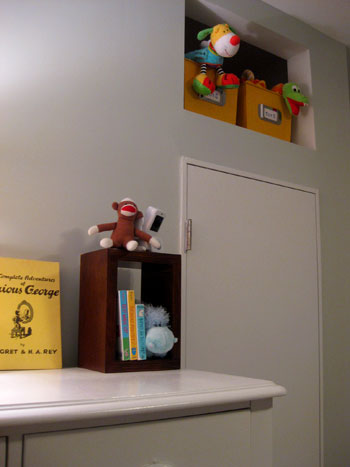
Then there’s the amazing armoire that Emily already had from her daughter’s room back in the day. We gave it a fresh coat of white paint (using this tutorial and white paint that Emily already had) and just loved how it fit perfectly into the corner next to the closet (which provides even more clothing and toy storage to keep the room feeling organized and clutter free). And do you see that cool built-in nook above the closet…
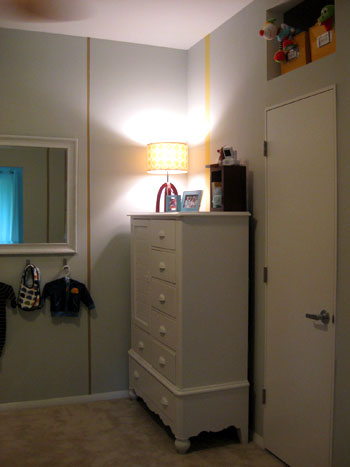
… that was the perfect place to tuck two yellow bins full of toys for a fun pop of color and even more functional storage to boot.
Atop the armoire is our punchy yellow fabric covered lamp shade that we whipped up a few weeks ago for an old lamp base that Emily already had laying around (here’s that tutorial for you). And because we realized Emily’s baby monitor needed a bit of a lift to see down into the crib at the right angle, we snagged that wooden box on the right for $1.99 at TJ Maxx and used it to store a few books and stuffed animals as well as her baby monitor for a less utilitarian look. A few existing blue frames of the family along with a cheerful yellow book starring Curious George (generously donated by Emily’s daughter Olivia after we found it in her room) fill out the top of the armoire without breaking the bank.
And of course our big previously-bronze mirrors (just $19 a pop) really help keep the room feeling open while bouncing around a ton of light, which is always a good thing in a small guest room that’s about to get a whole lot busier in two weeks…
So there’s the big nursery reveal. We had so much fun plotting and painting and planning and project-ing with Emily. And we hope you guys enjoyed the little weekly updates as we went. Oh and because we know you love when we show you the money, here’s the whole budget breakdown:
- Wall & stripe paint: $39 (click here for actual color names and a striping tutorial)
- Crib sheet: $7 on sale at Target
- Crib: free from a friend
- Armoire: already owned
- Crib skirt fabric & supplies: $29
- Mirrors & spray paint: $44 from TJ Maxx (click here for a quick how-to)
- Canvas art: free (we reused our stripe paint and painted over an existing canvas)
- Hooks under mirrors: $20 from Ikea
- Lighting: $39 for the swing arm lamp and $8 for the DIY lamp shade fabric
- Wooden box shelf for baby monitor: $2
- Yellow toy bins: $12 from World Market
- Changing table: $155 from Ikea (with $3 pulls)
- Changing table pad: gift
- Chair: already owned (snagged at a thrift store a while back)
- Grand Total: $358
Not bad for a room that we pretty much cobbled together from scratch, right? It’s especially amazing to us when we look back at the before photos because the room really had nothing in it except for that thrift store chair. And you could easily spend $358 on a changing table alone, so the fact that it includes every last knob, bin and hook makes us grin from ear to ear. We loved using paint, on-sale accessories and discounted fabrics along with items of furniture that Emily already had (or gratefully inherited) to create such a sweet little place for our future nephew to lay his little head. So that’s the story of an almost-empty room going from bare to baby-ready without depleting Emily’s diaper fund. And of course she, her husband, her 12 year old son and her 9 year old daughter can’t wait to see the room when it’s truly complete. As in, with a little baby boy in it. And we have to say that we can’t wait for that day either!
But what about you guys? Any babies on the way? Any nursery projects you’ll be taking on this fall? Any older kids’ rooms that you’ll be gussying up on a serious budget? We actually have a kid’s bathroom redo in the hopper for next week and it’s super cheap and simple so stay tuned for that…
Wanna see the room come together from the beginning? Here’s the first post, the second post, the third post, the fourth post, the fifth post and the sixth post that all led up to this big reveal.

Chelsea says
Love the nursery guys! My best friend is expecting…and do you know I have to wait 4 to 6 more weeks before we know the sex of the baby!! We are taking alot of ideas from you guys when it comes to designing the baby’s room, cant wait to know what the colors will be!
Beverley Weinberger says
Wow! Great work as always, guys!! Thanks for some really inspirational ideas! That hanging lamp was truly a stroke of genius and makes sooo much sense in a nursery where little ones like to grab and play with everything in sight! Brilliant job!
Jennifer says
Very cute! Just wondering if you’re putting bumpers in the crib?
YoungHouseLove says
Hey Jennifer,
Good question! Emily actually opted not to use bumpers as her daughter got tangled in one when she was younger and gave her quite a scare. Since the rails of the crib are close enough together that nothing can get caught between them (and the Journal of Pediatrics has actually deemed bumpers as unsafe) she feels good about her choice. Hope it helps!
xo,
s
Kate says
That’s a great makeover on such a small budget. Baby stuff can pricey quickly if not kept in check – very impressive!
Rebekah says
Very well done you guys!
I do think that chair is kinda ugly though… ;)
Audrey says
Nooo…I love the chair! Sort of an antique, “Anthropologie-esque” look.
Jenifer B says
The new nursery looks awesome. My husband and I decided a couple months ago to start planning for baby #1. No luck so far on the baby, but we’re definitely looking for ideas to transform a smallish empty bedroom (in our new-to-us home) into the charming nursery of our future baby’s dreams. Thanks for the inspiration!
Jen Z. says
Great makeover. And what a great budget. {clapping}. You guys did a great job.
Alexis says
Those wall stripes are great. this is particularly timely for me. Our first is due in January and I am pulling together a gender-neutral nursery on a serious budget. Wish I had the luck of “free” furniture, though! IKEA and Target are fast becoming my modern nursery friends.
Christa says
It’s a shame some are so critical of you youngsters that you have to defend the safety of your designs or methods of video making. I guess that’s life in the public eye.
It is parents responsibility to put in place safe practices and watch their children or teach them not to drive and use cameras simultaneously, not that of bloggers.
I am always pleased at how consistently classy and considerate you two are.
Good work as always! Can’t wait to hear an update of the new arrival in 2 weeks.
Lauren says
Love this nursery. It looks like something you’d see on apartment therapy. Great job!
Christin says
Well done. Very well done. I hope Emily and her family are pleased with the end product. It’s a fantastic room, really. And it looks like it will easily convert to an older child’s room without having to repaint and take lots of baby stuff down. Well done!
CarMaj says
Looks Great!! Sooo inexpensive too – you make it look so easy!
Mikaela says
Great nursery!! We’re expecting baby #2 in March, and are actually converting a spare bedroom upstairs for our 2 1/2 year old. I’m stealing the hook idea from you for him and I’m going to gussy up the nursery with the swinging lamp idea. How fun!
Sara @ Queen of the House says
I love it! Love the mirrors with the hooks underneath…so smart and unexpected. :)
Rebecca says
Very cute and functional! I’m wondering about the decision to put the crib in the center of the room instead of against the wall. Any thoughts?
YoungHouseLove says
Hey Rebecca,
Good question! We played around with a lot of different floor plans and the arrangement that best accommodated the chair, changing table, crib and armoire was the one that you see above (when the crib was flat against the wall it took up more wall space and everything else felt a bit more cramped). Hope it helps!
xo,
s
Danielle says
WOW! Looks great! I just love the little nook above the door. Super cute. Like I have been saying, this is totally a room her child can grow into instead of having to redecorate in a few years. Good Job guys!
carrie says
Hey guys. Love the new remodel. Is there any way you can post a more overall pic of the room? I love the section shots but would love to get the whole room too. Keep up the awesome work!
YoungHouseLove says
Hey Carrie,
These photos are actually as much of the room that we can capture in one fell swoop. It’s a modestly sized space so we did our best to get as much as possible in each photo (and toss in some detail shots for fun as well). Hope it helps!
xo,
s
Lauryn says
Love it! I was wondering what the actual wall color is though? I looked at the link you provided but didnt see the wall color. Did I miss it? or could you provide it? :-)
YoungHouseLove says
Hey Lauryn,
Here’s a link to the post all about the colors we used for those stripes: https://www.younghouselove.com/the-nursery-makeover-begins-on-video/
Hope it helps!
xo,
s
Heather says
Wow!! I’ve been dying to see the full room reveal – it looks fantastic! LOVE the color scheme, the stripes and the pear painting! Hard to believe the “before” shot and the mirrors really mask the lack of windows! Bravo!
LizzieBeth says
Looks great guys!!
My sister in law is expecting their second childing in less than a month! I’m so excited for a little girl named Skylar! They didn’t really need much more for the nursery, so as a gift I made some art with her name that you can see here and you can see how they displayed it here
Noelle says
As always…great job Youngsters!! I LOVE that chair!! It is very retro looking and ties in perfectly with the room. I think it definitely brings the whole design together. Question – did you actually base the design of the room off of the chair? Fabulous and affordable…what more could one want! :)
YoungHouseLove says
Hey Noelle,
Good question! Between the existing chair and that clearance crib sheet we found at Target for $7, those two items really set the stage for the room’s color scheme (and we knew we’d go modern with the space because Emily’s house is clean-lined and crisp). Hope it helps!
xo,
s
Jen says
Another AMAZING transformation! I heart it, it is fabulous! You guys rock!
Laura says
Love this room! I really like the wall sripes and the little hooks. When I show my husband this room he’ll think I’m baby hungry again. We had our 5th child a year ago so we’re done, but who doesn’t love to look at a great nursery?
Thanks guys for your makeover magic!
Ali says
Love it! You guys are so creative and thrifty. The stripes are still my favorite part of the room. I also love the built in nook above the closet.
travis says
Great job guys! I love it!
We are in the middle of planning our nursery for the 2nd round! We like surprises so it will be neutral, but not traditional neutral. Wish us luck!
Mary says
Love the nursery! It’s sweet and child-friendly, without being too “Babys-r-us.”
I was wondering what IKEA cabinet you guys used, and where you got the drawer pulls. Is it a Billy bookcase? I have a couple of the waist-high Billy bookcases, but they don’t seem wide enough for a changing table.
YoungHouseLove says
Hey Mary,
Thanks for the kind words! As for the changing table, here’s a link: http://www.ikea.com/us/en/catalog/categories/departments/workspaces/11689/
It’s actually meant as an office storage piece, but it works like a charm for diapers and wipes too!
xo,
s
Kim@NewlyWoodwards says
This looks great. I love the stripes and the colors you chose.
Did I miss something? In my Google Reader, your blog “title” is listed as SUSPENDED? Just wanted to let you know. I was getting a little confused.
YoungHouseLove says
Weird, Kim! Can’t say why it’s showing up that way, but if it isn’t correcting itself you can always try updating your link to http://feeds.feedburner.com/younghouselove.
Hope that solves it!
-John
Krysta says
I love that this room doesn’t look too “baby”. The colors & art you added would work for someone of any age. Great work as always, youngsters!
mayra says
I’m a fan of YHL, I think you are quite the savvy DIYers. However, I must be candid,I’m not a fan of this nursery. It seems cold and too sterile for a baby’s room. It is lacking the softness and a bit more color imo.
tamstyles says
great job…i am sure she loves it..good job uncle and auntie…question? have yall ever painted the billy booksheleves from ikea?
YoungHouseLove says
Hey Tamstyles,
Good question! We actually haven’t painted a billy bookshelf… yet. But we would imagine that oil-based primer followed by a few coats of latex paint would do the trick.
xo,
s
Kristin says
Thanks for the inspiration! I love that it’s a baby’s room but it’s not swarming with lambs and rainbows or tractors :-) I would like to have some nooks in our future home – you don’t see them too often around here.
micah says
Can’t believe you guys did all that for so cheap. Looks great!
Katie says
LOVE THE ROOM GUYS! The canvas that you used, was there something prevously on it? Also- any particular type of fabric that you would suggest using on lamps- I am wanting to redo a couple of lamps in our home..
YoungHouseLove says
Hey Katie,
Good questions! Here’s a link to a post all about the canvas (where you can see what was previously on it) and a link to the lamp reupholstering tutorial (where we mention why we chose the fabric we did). Hope it helps!
xo,
s
Becka @ColorMeInspired says
Hope you don’t mind but I just had to feature this on our blog today. :) Love you guys. You’re an inspiration!
YoungHouseLove says
Aw thanks Becka!
xo,
s
Amy @ Renovation Innovation says
I like that you went a differnt route and didn’t make the room “baby-themed” – that way, the room wont have to be redecorated as soon and the child can grow with the room. I have a question about the lighting in the room – what did you do with the overhead light? The pictures seem a bit dark, so I was wondering if you removed the overhead light, replaced the existing ceiling fan light, or just took your photos with the lamps on? I remember there being a discussion before about the lack of windows in this room. With no windows, I would want to make sure the room didn’t feel too cave-like, especially during times when the baby is not sleeping.
YoungHouseLove says
Hey Amy,
Good question! The overhead ceiling fan/light combo stayed (it came new with the house, which was just built last year) but we did take some photos with the overhead light dimmed for a bit of soft ambiance. No worries though, with the ceiling light on full blast along with the swing-arm lamp and the lamp on the armoire there’s plenty of light to play by!
xo,
s
Jennifer says
I love that it is cute without being overly precious. Perfect balance of modern style and playfulness.
Shifra says
Wow- looks great! Love love love the stripes!
Isn’t that the same cabinet that Nicole from Making it Lovely used in her nursery for a changing table? Now I have double inspiration to use it in mine :)
YoungHouseLove says
Hey Shifra,
You know what, it is! Emily actually selected it herself without seeing it in Nicole’s nursery and it wasn’t until I was helping her assemble it that I realized I was having a bit of deja vu! It turns out that Nicole used two of them in a row and selected the darker finish, but sure enough it’s the very same one. Isn’t it a small world? It must be because the height is perfect for changing and the width is deep enough to accommodate a cushion- plus that price just can’t be beat!
xo,
s
kelly says
i’m glad that you mentioned your shelf in your laundry nook; i was wondering how that was attached. makes so much more sense to have the option of removing it, but it’s nice to have the flat, clean surface instead of using the tops of your appliances (which inevitably scratches them)! i’d only considered shelving in the past, but a ‘countertop’ works a lot better. i don’t have a space small enough to make it look built-in right now (large laundry rooms, and it would look sort of clumsy), but i will eventually try this (with the non slip cushion)… GREAT, easy idea!
okay, back to nursery talk…
kelly
http://tearinguphouses.blogspot.com
Kelly says
You guys did a great job!! Congrats on the soon to be new addition in your family!! Auntie and Uncles are the greatest!! :O)
Teeni says
Love the nursery. I think it is fresh and fabulous, perfectly in keeping with the rest of Emily’s house, but sweet and cozy enough for a new baby.
I would also like to second Christa’s comments above; I love your style, ideas and creativity, but it is absolutely your thoughtful, considerate and supremely classy way of handling this blog that keeps me coming back for more. Please keep up the good work.
Pat B. says
Wow I love this room! Having done my babies’ rooms in the era of matchy-match this is a breath of fresh air. I just have to say Sherry, I love your organizational skills! You are amazing … leaving a link for all the posts at the end of the reveal post is so helpful. You guys are always thinking of us!!
Carolyn says
I loved watching the nursery progress on the YHL. We’re in the middle of redesigning our guest bedroom as a nursery so I have been waiting for the big reveal with much anticipation. Great ideas and tips. In fact, I had wanted to do a stripe pattern on the wall so the how to video was super helpful!
I’m keeping my fingers crossed for another nursery in the near future – maybe a gender neutral one next time around…Keep up the good work!
Amanda says
You guys did an awesome job with such a small space, it looks fantastic!
Jill Stigs says
Nursery looks fabulous…………love it all! I think cutesy theme nurseries are (hopefully) a thing of the past.
Great job Youngsters!
Jennifer S. says
Well done. I really like the stripes. I am thinking about adding stripes to my daughters’ room. We are in the middle of a major renovation to their room which added a window, skylight, closet, 100 square feet, built-ins and new bamboo flooring. It’s going to be a whole new room! I’m planning on sprucing up their old furniture with new duvet covers and new throw rugs. It’s a huge room (around 500 sq ft) but it fills up fast with three girls in it. They are ages 14, 13, and 11, so I’m trying to make it suitable for their teenage years and beyond. (They are using the den as their bedroom until their room is done, I hope in a couple of weeks!)
Lacey says
Well- the room is absolutely fabulous! We just had a baby in May and now are moving in to a new home… and the idea on those ikea hooks is coming with me! Additionally, this is a little off topic, but do you know much about the sliding door that Emily has used outside the nursery? I can see it in a few of the photos and am thinking a similar contraption would be perfect for between my bedroom/bathroom in the basement.
YoungHouseLove says
Hey Lacey,
Good question! The sliding door was a look Emily found in a magazine and requested from her builder (who was happy to oblige). We believe he just purchased a “barn door track” and hung a regular old solid core door from it, so it can be slid open and closed. You can probably find everything you’d need at a home improvement store or even online. Hope it helps!
xo,
s
Nicole says
Thanks for sharing this – it looks fantastic! We are moving in three weeks and I have two blank bedrooms to do, one for my toddler son and one for my infant son. I feel quite overwhelmed with the possibilities so am keeping my eyes on your site for some direction:) Don’t you want to just come over and do it for me??
Looking forward to the kid’s room post!
Meredith says
Love the nursery–what a great idea for the changing table. I have been looking for something that isn’t a huge and obvious changing table!
I especially love that cover for the changer.
And you know what I REALLY love? That you guys used pieces of furniture that are important to the homeowners. I know you got some flack for the chair, but if it’s something that Emily loves, it’s great that you found a way to incorporate it. Decorating shouldn’t be just about buying the “trendy” products that you’ll see in everyone’s home that year, but about finding those unique pieces that each individual truly LOVES, and incorporating them into spaces that will be spaces that the homeowner will love.
YoungHouseLove says
Aw thanks Meredith! The polka dot brown cover for the changer was a gift but it was actually on Emily’s registry so we know it’s from Babies R Us and comes in a number of other colors. Just in case you’re in the market for one…
xo,
s
MrsLimestone says
Love how you picked up on the colors in the pear painting with the stripes and the chair. Nice.