You guys have patiently waited for the big nursery reveal while we’ve spent weeks tackling everything from paint, mirrors, and art to lighting, storage, and a custom crib skirt. Now we’re back to share the whole room all put together (and not a moment too soon since John’s sister Emily’s son is due in two weeks!). But first let’s look back on the blank slate of a before that we started with:
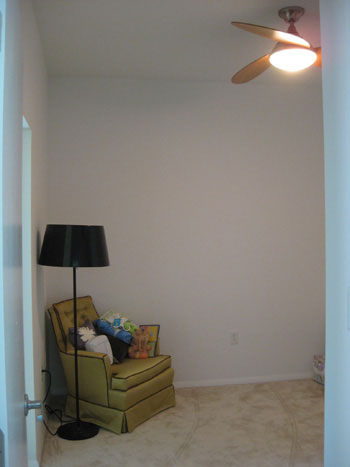
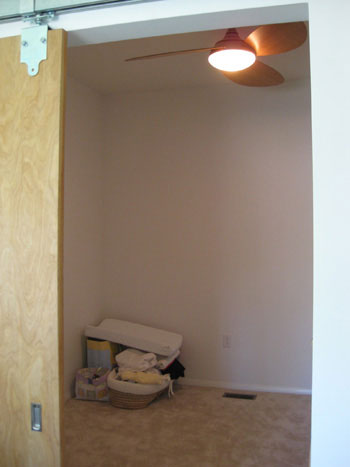
We hardly even remember that bare and boring guest room. Here’s the clean-lined yet oh so cheerful nursery we whipped up for Emily’s wee one on the way:
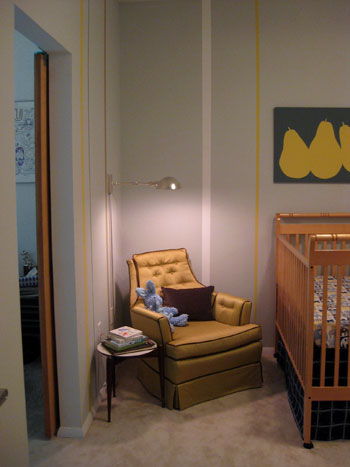
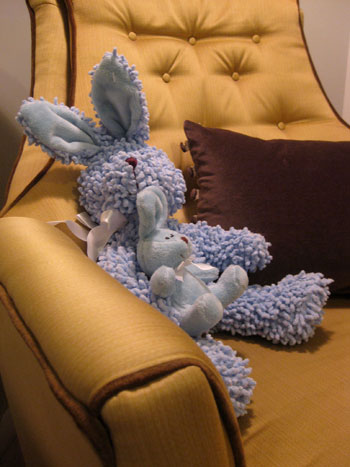
The playful and modern vertical stripes in yellow, caramel, white and slate blue really added charm and interest, especially when paired with soft blue-gray walls for a room that will really grow with our new nephew-to-be. And hanging that clearance swing arm lamp on the wall (with a nice little dimmer switch so it’s not too bright for baby) freed up some space in a tight corner for a small table full of reading material next to the thrift store chair Emily hunted down a while back (gotta love how the color and the piping fit right into our room’s palette).
I also got to get back to my art school roots by painting three pears on a canvas Emily already had with our leftover wall paint for totally free pop art in the room (and the three pears actually represent Emily’s three children- once the last one comes along, that is). We also loved that the $7 clearance crib sheet that we found at Target helped us further establish our color scheme, and instead of repeating the elephants from the bedding all over the room (which felt too theme-y for a modern family like Emily’s) we loved that we could work in other simple shapes and forms like the pears (which actually remind us of Emily because she has a huge iconic pear sculpture on the middle of her dining table).

When it comes to function, Emily wanted a storage piece that could work as a changing table and be converted to a normal cabinet once her son gets a bit bigger, so we snagged this affordable and oh so functional shelving unit with doors to conceal all the clutter (it’s full of diapers, wipes and all that good stuff)…
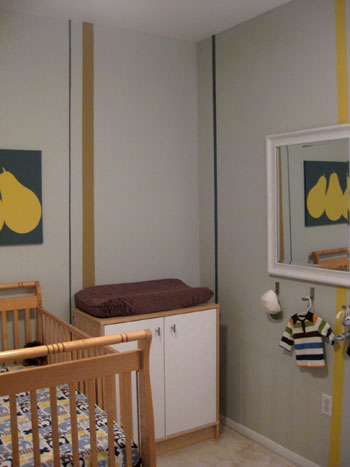
… and even added sleek silver knobs for easier access and more of that modern feel that Emily loves.

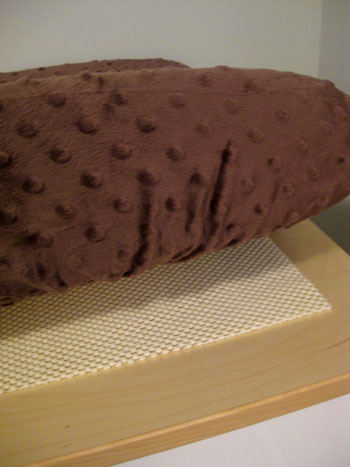
Emily also didn’t want to permanently attach the changing pad with screws or even velcro since she wanted to use the cabinet without the pad in the future, so we hunted down a super grippy rug pad which really holds the pad in place (but can be easily removed when the time comes). For those who aren’t sure about a rug pad’s strength, we actually use one to keep our wood countertop in place above our washer and dryer and it works like a charm- that sucker never so much as scoots one eighth of an inch in either direction). Of course it bears mentioning that Emily has already had two children (this lucky guy is her third) and she strongly believes in always supervising any child who’s getting changed, so even though the pad isn’t going anywhere, neither is your child if you’re right there in front of him. Safety first!
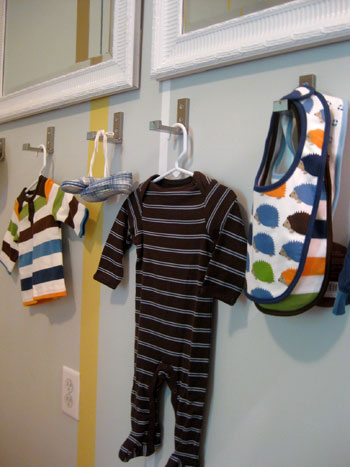
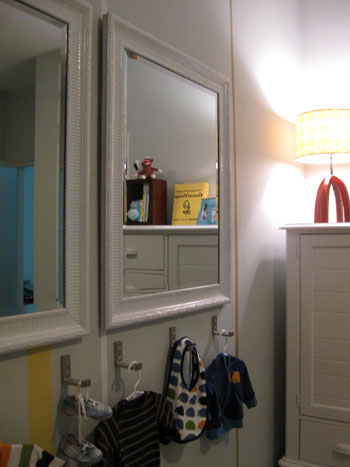
And then we have those great fold-away hooks from Ikea for more function and fun in the room (remember they fold up and away so whenever Emily wants to make a few of them disappear she can snap them up and they become flush with the wall and non-pokey (that’s a technical term by the way). So from bibs to outfits (hats, shoes, onesies) to diaper bags and backpacks- even cloth bags or hanging baskets that can house toys or dirty laundry- this wall is super diverse and functional.
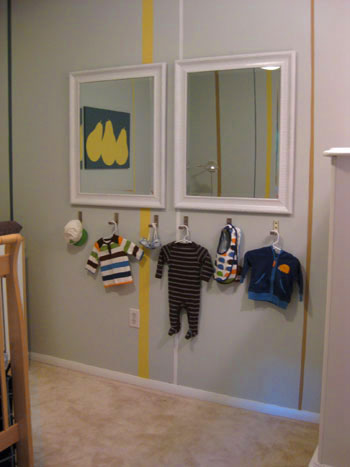
Of course the obligatory warning here is if you have kids who are toddling around, be sure there aren’t any straps or cords hanging from the hooks that they can get stuck in. Safety first! And it certainly helps to hang them a good distance from the floor so your little ones can’t hit their heads on them (Emily’s are around three and a half feet from the ground and her other two children- aged 9 and 12- are certainly old enough to know not to get rough near them).
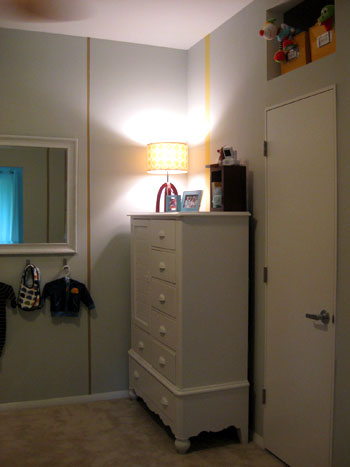
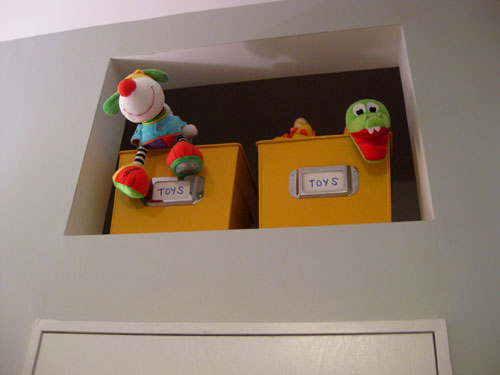
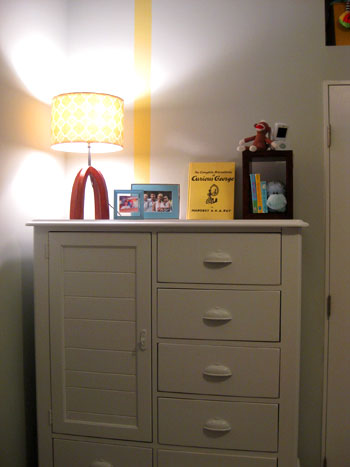
Then there’s the amazing armoire that Emily already had from her daughter’s room back in the day. We gave it a fresh coat of white paint (using this tutorial and white paint that Emily already had) and just loved how it fit perfectly into the corner next to the closet (which provides even more clothing and toy storage to keep the room feeling organized and clutter free). And do you see that cool built-in nook above the closet…
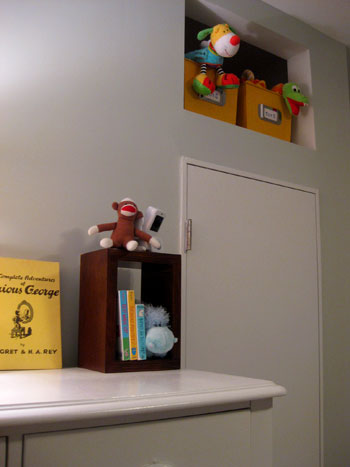
… that was the perfect place to tuck two yellow bins full of toys for a fun pop of color and even more functional storage to boot.
Atop the armoire is our punchy yellow fabric covered lamp shade that we whipped up a few weeks ago for an old lamp base that Emily already had laying around (here’s that tutorial for you). And because we realized Emily’s baby monitor needed a bit of a lift to see down into the crib at the right angle, we snagged that wooden box on the right for $1.99 at TJ Maxx and used it to store a few books and stuffed animals as well as her baby monitor for a less utilitarian look. A few existing blue frames of the family along with a cheerful yellow book starring Curious George (generously donated by Emily’s daughter Olivia after we found it in her room) fill out the top of the armoire without breaking the bank.
And of course our big previously-bronze mirrors (just $19 a pop) really help keep the room feeling open while bouncing around a ton of light, which is always a good thing in a small guest room that’s about to get a whole lot busier in two weeks…
So there’s the big nursery reveal. We had so much fun plotting and painting and planning and project-ing with Emily. And we hope you guys enjoyed the little weekly updates as we went. Oh and because we know you love when we show you the money, here’s the whole budget breakdown:
- Wall & stripe paint: $39 (click here for actual color names and a striping tutorial)
- Crib sheet: $7 on sale at Target
- Crib: free from a friend
- Armoire: already owned
- Crib skirt fabric & supplies: $29
- Mirrors & spray paint: $44 from TJ Maxx (click here for a quick how-to)
- Canvas art: free (we reused our stripe paint and painted over an existing canvas)
- Hooks under mirrors: $20 from Ikea
- Lighting: $39 for the swing arm lamp and $8 for the DIY lamp shade fabric
- Wooden box shelf for baby monitor: $2
- Yellow toy bins: $12 from World Market
- Changing table: $155 from Ikea (with $3 pulls)
- Changing table pad: gift
- Chair: already owned (snagged at a thrift store a while back)
- Grand Total: $358
Not bad for a room that we pretty much cobbled together from scratch, right? It’s especially amazing to us when we look back at the before photos because the room really had nothing in it except for that thrift store chair. And you could easily spend $358 on a changing table alone, so the fact that it includes every last knob, bin and hook makes us grin from ear to ear. We loved using paint, on-sale accessories and discounted fabrics along with items of furniture that Emily already had (or gratefully inherited) to create such a sweet little place for our future nephew to lay his little head. So that’s the story of an almost-empty room going from bare to baby-ready without depleting Emily’s diaper fund. And of course she, her husband, her 12 year old son and her 9 year old daughter can’t wait to see the room when it’s truly complete. As in, with a little baby boy in it. And we have to say that we can’t wait for that day either!
But what about you guys? Any babies on the way? Any nursery projects you’ll be taking on this fall? Any older kids’ rooms that you’ll be gussying up on a serious budget? We actually have a kid’s bathroom redo in the hopper for next week and it’s super cheap and simple so stay tuned for that…
Wanna see the room come together from the beginning? Here’s the first post, the second post, the third post, the fourth post, the fifth post and the sixth post that all led up to this big reveal.

Crystal says
I love this nursery. It turned out great, as does everything that you two do. My sister is expecting a little girl in Feb., and I’m looking forward to seeing her nursery come together.
One question: where did she find the bib with the hedgehogs? I love it!
YoungHouseLove says
Hey Crystal,
That super cute bib is from Target (she got it as a gift, but we know it’s from their Dwell line). Isn’t it adorable? Hope it helps!
xo,
s
Nicole B. says
This looks great! I love the colors, everything! The hooks are a great idea that I may do in my boys room so they can help dress themselves a bit easier.
You may just want to watch out for climbing babies… I know for my kids, having the two longer sides of the crib away from the wall invited a lot of climbing out at a terribly early age. Put the changer next to it, and it may become an engraved invitation. Just a thought.
Or maybe my kids are just extra climb-y???
Molly says
Wow – what a challenge- a windowless nursery! The finished room looks sooooo great! My favorite part: the nook above the closet. Once again, YHL strikes….you two came up with some awesome design solutions!
Making it Lovely says
You went with the same “changing table” that I did! I love it.
YoungHouseLove says
Hey Nicole (aka Making It Lovely),
Isn’t that funny? Emily actually selected it on a trip to Ikea without us and it wasn’t until I was helping her assemble it that I realized I was having some serious deja vu… and then I figured out it was the same piece that you used for little Eleanor in a darker finish. It must be because the height is perfect for changing and the width is deep enough to accommodate a cushion- plus the price just can’t be beat. So glad you love it, that bodes well for Emily!
xo,
s
Nikki says
Great Nursery! We have a baby on the way and are working on the nursery. We are still in the get all of the office stuff out phase, but have big plans for the actual nursery. http://nikkisnacs.blogspot.com/2009/09/office-before.html
MaryB says
Guys! This is great!! I’m way done with bringing babies home, but there’s tons of great stuff here anybody can use.
THANK YOU!
Jessica at Lavender and Lilies says
Adorable. Love it.
becca e. says
Looks awesome! I’m so glad you showed how to get that changing pad to stay in place without screwing it in! We bought a cube shelf from IKEA for $50 – and some cute turqouise bins for a few bucks a pop for storage – and put a changing pad on top, but we also want to be able to use it for other things later and didn’t want to ruin it with a screw. I had some of that grippy shelf liner left over from our kitchen cabinets – VOILA! It works beautifully to keep that pad in place! Thanks for the great tip!!
YoungHouseLove says
Hey Becca E,
So glad it worked for you!
xo,
s
Dina says
Looks amazing…great space planning, and can’t beat that budget! The only thing I’d question is where the diapering supplies will be kept? As a new mom myself, I can’t imagine pulling the diapering supplies out from under the cabinet 8-12 times a day and trying to reach for diaper cream and wipes one-handed if they weren’t in easy reach. But Emily is probably more experienced than I am in that department!
JacRan says
I am expecting my second in February but my 14 month old girl’s room still never got organised! Looks like I have two rooms now to get on with. But thanks for the inspiration as I like the idea of decorating the room that will grow with them and am not a fan of too much cutesy baby gah gah. The two little ones will eventually share a room so making it neither too girlie or boyish is great!
It’s awesome that you do things on a budget and reuse furniture because some of us don’t have a ton of money to spend on doing up a room from scratch, not to mention the cost of raising kids!
Keep it up, thanks guys.
Jennae @ Green Your Decor says
Considering what you started with, I can’t BELIEVE you made this nursery so fabulous for so little money! You two constantly inspire me, and now I’m off to plan a low-budget makeover of my daughter’s room :)
nina says
The nursery looks beautiful – congratulations! I know it’s a long shot, but I wonder if you know anything about the ceiling fan in the room. We’ve just purchased an old home with horrible ceiling fans that hang way down and are looking for something closer to the ceiling that looks updated without completely out-moderning our 1939 house. Can you help? Thanks much!
YoungHouseLove says
Hey Nina,
I’m afraid they were a sample provided by the builder so Emily doesn’t know exactly where they came from. I would try googling “modern fan” and seeing if you can hunt anything down. Hope it helps!
xo,
s
Bromeliad says
Nice. It’s not too baby-ish. The baby can grow into it.
kate says
I love the stripes on the wall and those doors are great, too! Well done!
onegrandhome says
Beautiful –I always love the combination of grey and yellow– and such an inspired result on a slim budget.
Alexis
Modern, Gender Neutral Nursery for under $1K: http://onegrandhome.wordpress.com/2009/09/02/modern-nursery-for-under-1k/
Michele says
Love the thrifty design and color scheme! We just finished our nursery project. It was so much fun.
http://mingshan2.blogspot.com/2009/10/nursery.html
Lori says
I love love love the stripes in this room.
I have a question…we are getting ready to paint our baby’s nursery….with some horizontal stripes. We are going to do a green from the floor to pretty high up, then a thin white (like 2-3 inches) then a pink (like 4-5 inches) then white and white right into the ceiling….any advice on what the order of our steps should be?
THANKS!
YoungHouseLove says
Hey Lori,
Hmm, good question. I would just go with whatever sounds nice to you. It’s a random enough pattern and all the colors will look great together so you really can’t go wrong!
xo,
s
Bridget B. says
Sherry,
Do you have any pointers for placing the door pulls on the changing table/cabinet in the right spot? I’m nervous about breaking out the drill and adding knobs to ours in case they end up looking misaligned.
Thanks!
YoungHouseLove says
Measure three times just to be sure you’re in the right spot. We like to place blue painter’s tape on the front of each door and then measure a few times before making one clear “drill here” x on the tape. Then you can use that as your guide without any fear that you’ll have misaligned knobs in the end. Something like going down three inches and going over three inches might be a good example of how to start. Hope it helps!
xo,
s