I never pictured myself painting a wall in our house black, let alone doing it at 5am. But that’s what I found myself doing two weeks ago. Allow me to explain.
When our postcard wall moved into place last week, it meant our much loved wallflowers above the desk had to be relocated…
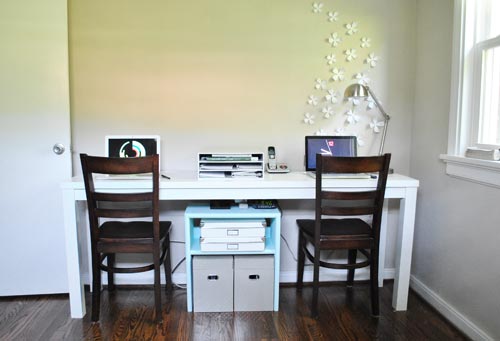
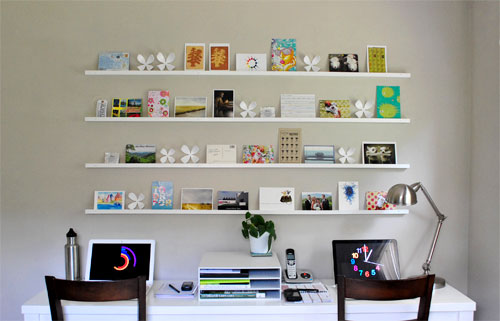
… well, some stayed in place when we decided we liked leaning a few on the shelves of our postcard wall– but the rest needed a new home.
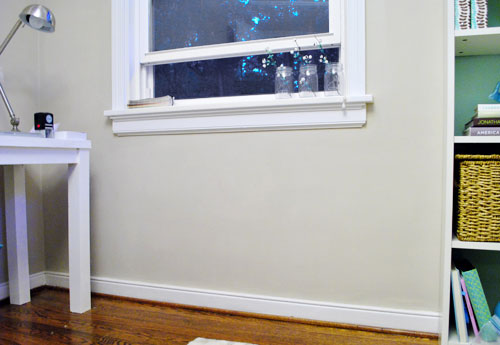
Well, they didn’t go far. We decided to move them just one wall over to the small space under the office/guest room/playroom’s one and only big window.
Why? That’s probably best explained by answering the “how” first. Instead of relying on the special nails that came with our magnetic wallflower kit- which firmly affix the arrangement in one spot thanks to the magnet-backed flowers which stick to the magnetized nail heads- we decided to try something new: magnetic paint (note: some of the new wallflower kits snap instead of being magnetized). We thought magnetic paint would be just the thing for this project since we’d been dying to try it for years and were just waiting for the right project. We often wondered if the rumors were true- did it really work? We were about to find out.
See, by creating a large magnetic canvas we could design a spot where the wallflowers could be displayed, but instead of being limited to the fixed spots where we placed the magnetic pins in the wall, this time the wallflowers (along with any other magnets) could easily be moved around into an infinite number of fun formations, adding a nice element of “play” to our office/guest room/playroom- especially once Clara becomes mobile enough to move them around. And they’re definitely at a kid-friendly height!
Luckily the magnetic paint rumors were true. Well, mostly – it’s actually magnetic primer. We found this $21 quart of Rust-oleum Magnetic Latex Primer at Home Depot (next to things like chalkboard paint, dry erase paint, and glow-in-the-dark paint). Update: Here’s an affiliate link to it over on Amazon if you can’t find it in stores.

Oh and before heading home we noticed the instructions actually suggested having it shaken by the store’s paint department to help keep the iron particles from settling on the bottom – so don’t forget to shake yours like crazy! The instructions also suggested two or three thin coats to achieve the best results as opposed to one or two thick and gloppy ones. Good to know.
Well… we did seven.
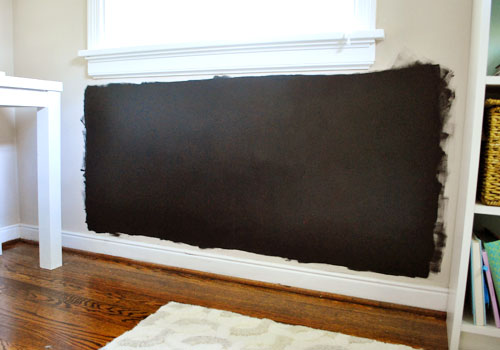
And we made sure they were all extremely thin so there wasn’t any bump or delineation where the magnetic paint started or ended. Maybe four extra applications were overkill, but we were determined to make this stuff work. Plus I realized only after coat number two or three that I was supposed to be vigorously stirring between each application. Oops. But since the coats dried really fast it only took me an evening, a morning, and one random 5am painting session to apply all seven (Clara had woken us up for a surprise feeding- she usually sleeps from around 10pm to 9am!- so I figured I’d be productive while Sherry sleepily nursed her). And ultimately… drumroll please… it worked. Woo hoo!
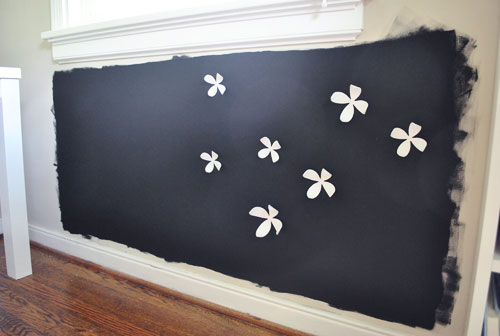
Well, it mostly worked. After each coat I tested variously sized wallflowers to see if they would stay up. The smallest sizes stuck almost immediately but despite my persistence I never could get the larger ones to stay in one spot (they’d just slide down the wall, hit the baseboard, and fall off). So we’d say that magnetic primer works, but not with anything terribly heavy. Now you know why some ended up on the postcard shelves. Oh well – happy accident.
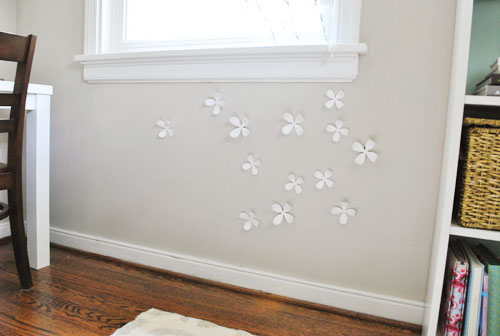
But in the good news category, despite the fact that we had just painted a huge black spot on our wall – it barely took two coats to cover it up completely with the original wall color (Glidden’s Sand White). Phew. Heart attack averted. And it didn’t seem to lose any of the magnetic attraction when covered with other non-magnetic paint. It’s also 100% non-toxic and kid-safe when dry (obviously it’s not safe for a kid to drink it in liquid form). We did keep Clara out of the room with the windows open and a fan on for the full drying period (and about three days after that since we happened to be out of town for the weekend anyway) just to be safe.
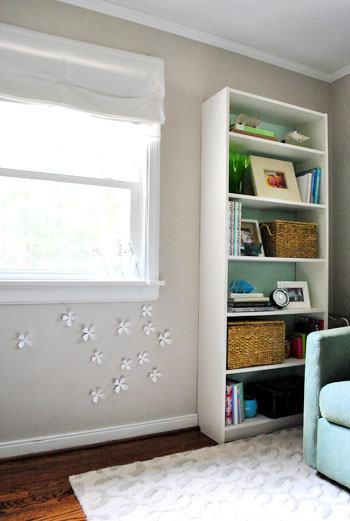
Even though we couldn’t get all of the wallflowers to stick, we’re actually really happy with how it turned out. And we can’t wait to find some other fun magnets to put up there so Clara can play with them when she’s a bit older. Speaking of which – does anyone know where we could find an all-white set of those alphabet magnets? We googled around for a while with no luck- and we think they would be a fun and educational addition to the little slices of “playroom” that we’re trying to squeeze into this small space for our favorite little girl.
Has anyone else tried magnetic primer? Or any of those other wacky chalkboard/dry erase/glow-in-the-dark paints? We’d love to know what you guys thought about using those newfangled products. Did they work? Were they messy or hard to apply? Spill the beans.
Psst- Wanna follow the entire office/guest bedroom/playroom makeover? Click here for the intro post, here to read about the big sleeper sofa hunt, here for the DIY desk play-by-play, here for the homemade light fixture project, here for our hacked Ikea bookcase, here for the file storage we built, here for how we squeezed in some toy storage, here for how we picked out some DIY art that we could agree on, here for how we wrangled our wires, and here for the play-by-play of creating our postcard art wall.

Cate says
Love this idea!
However…all-white alphabet letters?! I’d just go with the primary colors. They’re much more stimulating for children.
YoungHouseLove says
Hey Cate,
Thanks for the tip! We’ve actually thought about that but we plan to teach her colors in another way by bringing in flash cards and colorful childrens blocks. Stay tuned for those details sometime soon!
xo,
s
Jordan says
What a great, fun addition!! I was thinking maybe you two could DIY some white, alphabet magnets. Maybe even different fonts and sizes would be a neat look. Craft stores have all different fonts and letters. White spray paint and magnets would be so fun!! Just an idea….
Lauren E. says
Looks great guys! That room is looking awesome! I can’t wait for the big reveal. I just recently got some wallflowers for my craft area and office nook in the basement and was trying really hard to figure out why they weren’t magnetic! I kept telling my fiance (who was thinking I had lost it) John and Sherry’s are magnetic! :)
georgia says
That looks good!!
Couldnt you buy coloured magnets then spray them white with kid safe paint? Just a thought if you cant get hold of them easy enough, (i googled, and also didnt find anything)
Also there is a postcard on its way from us here…
C says
How about using those craft foam sheets in white and cutting out the letters of the alphabet with a craft knife and sticking magnetic paper or tape to the back?
ESBlondie says
Maybe you could DIY an all white alphabet magnet set? Just a thought.
Rachel says
That turned out so well! I love it! You guys have some of the cutest ideas. I’m sure Clara will love playing there too.
I have never tried any of these funky paints, but I would love to do chalkboard paint one day in a kitchen or office and frame it out with painted white wood trim.
YoungHouseLove says
Thanks for all the DIY-ideas for white magnetic letters! We figured we could make something ourselves if we couldn’t find ’em, we’d just have to be sure to use kid-safe things (no toxic spray paint, etc). We do love a challenge though!
xo,
s
Sarah Young says
I have never seen white letters but I did find a DYI project for you guys.
http://www.amazon.com/Avery%C2%AE-Magnet-Sheets-inches-White/dp/B00006HN5Q
You can make your own letters!! This way you can personalize them with different fonts,etc!! I am thinking about doing this for my little ones!!
primpeony says
I thought zombies had taken over your bodies when I saw that black wall. How were you going to make that work? Of course you guys are way smarter than me. Paint over it of course. Thank God. Order is restored.
primpeony says
p.s. can’t believe I’m the first to comment!
Mindi says
Darling! Would these letters work? http://magnetletters.com/index.htm
YoungHouseLove says
They definitely would, we were just looking for an all-white set Mindi!
xo,
s
primpeony says
Oops! Where did all those comments come from? Not the first at all.
YoungHouseLove says
Hey Primpeony,
We actually hold our comments in moderation so you’re not crazy! We just approved them all so they popped up!
xo,
s
C says
Or paint some wooden ones like this: http://www.geniusbabies.com/-magnetic-wooden-alphabet—melissa—doug.html with non toxic childrens paint?
marianne says
http://www.etsy.com/listing/49683475/magnetic-alphabet-custom?ref=sr_gallery_6&ga_search_query=letter+magnets&ga_search_type=handmade&ga_page=7&order=&includes%5B%5D=tags&includes%5B%5D=title
I bet this seller or another seller could make an all white set.
Christina Marie says
It’s so funny that you just highlighted these paints! I have the same magnetic primer as well as chalkboard paint sitting on my kitchen table just waiting to be used!
I wish I’d known about having them mix it for you… I guess I should read the package next time!!
Marsha says
Have you thought about spray painting alphabet magnets white?
keri says
magnet letters are an obsession at our lake house…don’t ask me why, but “kids” 18-25 get more excited about them than the 2-5 year olds that come to visit.
Target’s $1 spot had the (of course, primary colored) letters and numbers – I picked them up about 2 weeks ago. Nothing a little paint can’t cure?
Noa says
Love how it turned out! I used magnetic chalkboard paint on my kitchen door and the “magnetic” part didn’t quite turn out, (maybe because we only did two coats) but the chalkboard works great to write down the grocery shopping list!
Also, I googled around and found this: http://www.thefind.com/crafts/info-white-wood-magnetic-alphabet-letter they are sold individually, but they are wood, not plastic, and I like the font!
liz @ bontempsbeignet says
I’d never heard of magnetic primer. This is such a good idea!
Do you think y’all would ever do a chalk board wall in a light color? I’ve seen a recipie on Martha’s site for a DIY chalk board paint.
I just got this chalkboard wall sticker from One Kings Lane
http://bontempsbeignet.blogspot.com/2010/07/wall-candy.html
Sheena says
http://moodygirlprojects.blogspot.com/2010/02/alphabet-magnets-made-over.html
Voila! Perfect project for you DIY superstars! And if you shopped around I’m sure you could find some kind of zero-VOC organic spray paint out there.
Shaunda Harris says
It looks great but I’m still stuck on how you got Clara to sleep through the night!?! What’s the secret? I just found out I’m pregnant with my second and I’d love to know how to get a breast fed baby to sleep through the night.
YoungHouseLove says
Hey Shaunda,
We really think that every baby is different! All throughout my pregnancy Clara was super active during the day and virtually undetectable at night (she slept when I slept- no 3am kicks like my friends mentioned) so I think she’s always just been a sleep-at-night baby. Even in the nursery at the hospital the nurses had to wake her up at feeding time and they’d bring her to me all groggy (she often tried to sleep through those feedings and I struggled to tickle her and keep her awake). Our only advice, other than just seeing what kind of baby you end up with and embracing that, would be differentiating night sleep and daytime naps (ex: make sure the room is extremely dark overnight, play a sound machine for the baby, create a bedtime routine to wind the baby down the same way every day). Doing these things quickly had Clara going longer and longer stretches even though she’s breastfed (she does feed extremely frequently at night before we put her to bed – like nearly every hour from 7-10). Hope it helps!
xo,
s
Meredith Leigh says
Funny story; my sister has TERRIBLE vision (she’s had glasses since age 2) and remembers “learning” the letters but not being able to actually distinguish them, only the blobs of color (e.g. “A” is red, “B” is orange, etc.). To this day she can tell you which letters are which colors in the standard alphabet magnets. Not that Clara won’t be able to learn from the white ones. :)
Kari says
As cool as all white alphabet magnets would look (they’d be awesome), you might think about colored ones not just because they are more stimulating, but because colored ones may help your daughter learn them better–distinguishing one from the other, organizing them by colors, creating patterns (red, blue, green, etc.). I’m really not one to jump on your parenting style (after having 3 of my own, I’m totally understanding that different families, and even different kids in each family, need different things), but from an educator point of view, it’s something to consider.
Nevertheless, love, love, love the idea of a magnet board right at kid-height in a regular room!
YoungHouseLove says
Thanks for the tip, Kari. We’ve actually thought about that but we plan to teach her colors in another way by bringing in flash cards and colorful childrens blocks. Stay tuned for those details sometime soon!
xo,
s
Lauren says
You could definitely make letters yourself! Maybe you could paint them to coordinate with some of the other colors you’re using in the room? That way it go with the room and still provides some stimulation for little Clara. You could also make a magnet in the shape of Burger!! :-)
Bryanna S says
I think blue and green and white letters would be a LOT more fun for a little one than just white :D Of course, right now is the time to play with stark contrast of black and white. My kiddo was absolutely enthralled with bathroom door signs bahah
YoungHouseLove says
Thanks for all the DIY-ideas for white magnetic letters! We figured we could make something ourselves if we couldn’t find ‘em, we’d just have to be sure to use kid-safe things (no toxic spray paint, etc). We do love a challenge though!
xo,
s
Jamie says
Why not get some chipboard letters from the scrapbook section and glue a magnet to the back? That way you can have pretty and colorful letters to match your room?
Cheers!
Jamie
Emily says
These are really cute. Actually, they aren’t all white, but the colors match your room. Then, it would be really easy to make the wood white. Or make your own… I know you’ve already thought of that :-)
http://mikaela.bigcartel.com/product/single-alphabet-magnets
YoungHouseLove says
Thanks for all the DIY-ideas for white magnetic letters! We figured we could make something ourselves if we couldn’t find ‘em, we’d just have to be sure to use kid-safe things (no toxic spray paint, etc). We do love a challenge though!
xo,
s
Tiffini S. says
Along the same line: I have an awesome ceiling o’ stars trick, from my teenage years, no less.
I bought some of those large, plastic, glow-in-the-dark stars as a way to personalize my room. My Mom said “NO WAY” when I asked to paint the ceiling black, so I had to improvise. Plus the stars kept falling off the ceiling when I’d tacked them up there with the sticky stuff that came with them.
I bought a huge amount of black tulle. I hot glued the stars to the tulle (process: Lay out the stars upside down on your driveway (or other large, clear surface), lay the tulle over the stars, put a dab of hot glue on the tulle over the star then smoosh it around, when the glue cools, it should be pretty solid). Then I used cup hooks in my ceiling to hang the ‘sky’ in a billowy mass over my bed.
That was, erm, a while back, and I recently found my ‘sky’ in a box and hung it in my sons room. Only a few stars had gone missing over the, erm, while since my high school days (oh, OK, my 20 year reunion is next month) so I just replaced them with a little more hot glue. The stars even still glow for about 20 minutes after you shut off the lights. He even has a ceiling fan in his room, so we just hung the sky off to one side and down a wall.
Last week, my sons daycare had a camp out with s’mores and all, so I took the whole ‘sky’ down and let them use it for the day. It was a huge hit and several of the Moms asked me how to make it.
YoungHouseLove says
That sounds like so much fun Tiffani!
xo,
s
Alyssa says
This is such a fabulous idea. I am definitely going to try it at some point in my house days. My roommate is the student body president at our college and she is planning on using chalkboard paint in her office! She figured it would allow for easy communication among her staff. I want her to bring some home!
LauraC says
Oh wow! I was trying to imagine a big black wall, before I scrolled down! Duh! Looks great, as always!
Danielle says
I just did this to a wall in my dining room about a month ago! We did four coats and then used a chalkboard paint (also purchased at Home Depot in a nice latte color) on top. We now have a message center up top for my husband and I and a magnetic play area, away from the fridge, on the bottom of the wall for our 11 month old.
Check it out! Sorry though, the picture is a little blurry.
http://www.facebook.com/photo.php?pid=31363336&l=d7434023fa&id=1481568408
Jean says
This is a fantastic idea and it turned out great. However, my head is still spinning at the idea that Clara sleeps from 10 pm to 9 am. Do you know how lucky you are?!!
YoungHouseLove says
Hey Jean,
We know! My mom says she’s spoiling us and the next baby is going to be a doozy. We’re like slow down mom! Haha. As for all that night sleeping, she’s pretty much up and alert for most of the day, but we’ll take it! She’s so much fun to play with anyway!
xo,
s
Tiffini S. says
(Forgot to say that the beauty of it is that it creates a pretty 3D looking night sky when you hang it like that. As the room gets dark, it looks like the stars are floating. Neato!)
Jessica @ How Sweet says
I love this idea! I think it adds such character to a room.
YoungHouseLove says
Thanks for all the DIY-ideas for white magnetic letters! We figured we could make something ourselves if we couldn’t find ‘em, we’d just have to be sure to use kid-safe things (no toxic spray paint, etc). We do love a challenge though!
xo,
s
Kendra says
Heres’s a DIY tutorial to make magnetic letters and numbers from FABRIC! I know you guys always have a slew of pretty fabric laying around so maybe this will interest you!
http://www.prudentbaby.com/2009/10/diy-fabric-number-alphabet-magnets.html
Kelly says
I can’t believe I’ve never thought to just paint over the black with the wall color! (lightbulb moment for me haha).
We have a couple ‘fake’ door cabinets in our kitchen that actually do open up but only to reveal the side of a cabinet. I would love to use this stuff in there to hang all that stuff that used to go on the fridge until we upgraded to the stainless steel model :)
Sara Lyn says
I found these!
http://www.magnetletters.com/1.5_inch_magnets.htm
Pretty sure you just pick which size and color from the pull down menu – looks like they have white! :)
Christine says
I just bought a set of the white wallflowers at BBB – only $15 with the $5 off coupon! Like you said – they are not magnetic anymore – they are clip on. I haven’t put them up yet though – that is the hard part to decide!
Also, I’ve used the chalkboard paint – I painted the (not so lovely frosted)glass on the bifold door in my kitchen. I love it so much – the best DIY project I’ve done. I use it for my weekly menu and for writing notes/lists. The trick with the chalkboard paint is a smooth surface – walls are not so great but glass or mirrors work awesome.
Peggy says
Another DIY. These are $2.50 AUD each but look pretty simple to make. Maybe with some round magnets, wooden discs, and foam letters? http://mikaela.bigcartel.com/product/single-alphabet-magnets
Melissa says
I don’t know about all white alphabet magnets, but we have some really cute magnets made by Djeco – there is an alphabet set and some puzzle-type sets (mix-and-match animals). Check http://www.moolka.com or here: http://www.tickety-boo.co.uk/acatalog/Crazy_Animal_Magnets.html. My daughter and her cousins love the animals.
YoungHouseLove says
Thanks for all the DIY-ideas for white magnetic letters! We figured we could make something ourselves if we couldn’t find ‘em, we’d just have to be sure to use kid-safe things (no toxic spray paint, etc). We do love a challenge though!
xo,
s
Jes says
I found these on Etsy… they are fabric, and customizable so you can do any colors you want… Maybe do the C,S, and J in accent colors of the room and the rest white??? But here ya go!
http://www.etsy.com/listing/49683475/magnetic-alphabet-custom?ref=sr_gallery_6&ga_search_query=alphabet+magnets&ga_search_type=all&ga_page=5&order=&includes%5B%5D=tags
Michelle says
Hi Youngsters!
You two think of the best ideas! Having a DIY magnetic chalkboard at Clara’s level on a wall is such an amazing idea. I’ll have to hang onto that idea for my own children one day. I agree with some of your fans about having the alphabet letters be in color though. Maybe not the primary colors as I know that’s probably too much color for your space :), but at least 3 different colors. Maybe white, blue & green? Or maybe use white & another color and do stripes, plaid and polka dots? Like a previous fan said, being able to not only start to learn letters, Clara can also group them by color too. Flashcards are one way of teaching I suppose, but hands on is so much more beneficial :) Anyways, great idea and ignore my not-asked-for opinion on the letters :)
YoungHouseLove says
Hey Michelle,
We definitely could make them in a few colors if we were DIYing them, and we could choose colors that work with the room. Great suggestion!
xo,
s
Jennifer says
I always thought these were cute. I’m sure the etsy seller could make an all-white set for you!
http://www.etsy.com/listing/47075271/simple-alphabet-letters
Amanda T says
What about these:
http://www.amazon.com/Magnetic-Letter-Letters-Numbers-Symbols/dp/B00006IAT4
You could cut out most of the black.
Lisa says
Wow, I’m impressed that the magnetic paint covered so well! I love this idea for our playroom. I was thinking chalkboard paint, but this is less messy and kids seem to looooove magnets.
Anna says
Wow! I didn’t even know anything like that existed! I think my husband, the contractor, has been holding out on me!
Katie says
This is awesome! I have never seen the magnetic paint used and didn’t realize you could paint over it and it’s still magnetic! I painted a small chalkboard on the wall for my 4 year old. The only down side is the chalk dust, but I just have to clean a little more on the baseboard and carpet.
Mallory @ R. Simple Life says
This is awesome! I’m racking my brain trying to find a spot in our military base house that I can do this… And figure out what I would put on that wall… Might have to wait for a while.
Anyway, I’m not sure about the alphabet letters in white, but if you were looking for a nice decent cheap set, you could always get a colored set and spray them white?
Kendra says
Oops! I posted the wrong link before!
Here’s the link to the actual tutorial for the FABRIC letters!
http://www.purlbee.com/abc-fabric-magnets/
Ashley says
Couldn’t you just spray paint the original magnetic letters? Just make sure the magnetic pieces are VERY secure. They’re a HUGE choking hazard! Check them frequently.