Oh sweet victory, our much debated office art project is done and I’m here to spill the beans about how it all went down, er, up.

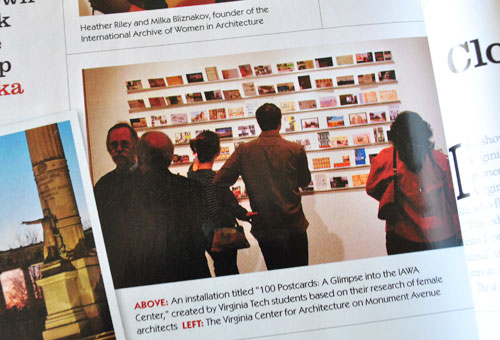
After all, we already gave you this no-detail-left-behind play by play about how Sherry and I fiiiinally agreed to base our design on this gallery of postcard ledges that we spotted in Richmond magazine:
The project was pretty darn easy and actually really fun to do, especially after some of you suggested that we collect reader-submitted postcards from across the globe to fill our wall with an ever-changing arrangement. That suggestion really made trips to our PO Box a lot more exciting than usual. So thanks to everyone who sent a postcard our way (from a bunch of exciting places like Hawaii, England, Spain, Canada and a slew of other spots in the lower 48).
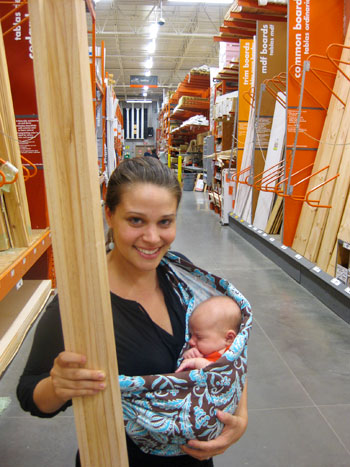
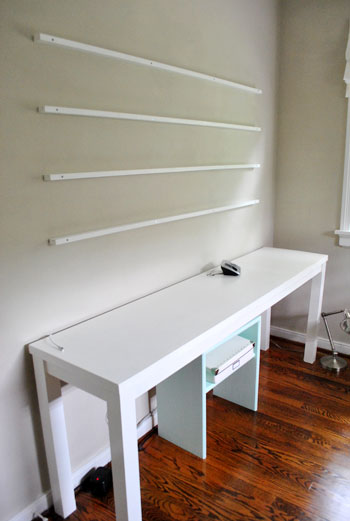
The gallery-inspired shelves started with a trip to Home Depot (Clara’s very first!) to buy supplies. And boy were some of our orange-apron-wearing friends excited to see the tiny human who lived it up in Sherry’s belly for all those months. But back to business. Based on some measurements of the wall, we determined that we wanted four rails above the desk, each measuring 64″ long (we used blue painter’s tape to mark where we wanted them and how long they should be – it’s such an easy way to try out a few zero-commitment arrangements to land on something you love).
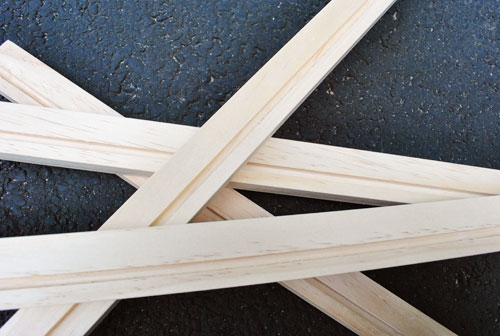
So with our trusty measurements in hand, we snagged some simple 1 x 2 pine boards for about $4 a pop, plus a bunch of screws and anchors (which I’ll talk more about later). In the end this would be the only cost for the entire art wall project, bring the grand total to under 25 bucks. Not bad for filling a giant expanse of wall, right?
And although we once had visions of taking a more complex narrow-shelf-with-a-raised-ledge approach, that all went away when we realized this was the perfect project to break out my Father’s Day present: a Dremel Trio. Sherry must’ve seen me lustily eying it every single time we entered any home improvement store (I’ll admit that I lingered a bit each time), so she surprised me with the $99 tool for daddy’s day (even though I didn’t have a specific sanding, routing, or cutting project in mind). I like to call it fate.

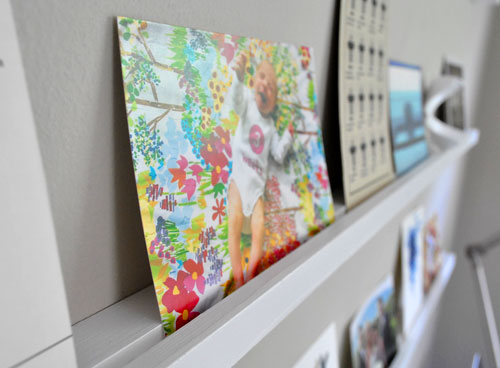
The reason the Dremel would be perfect for this project is because it would allow me to route a small straight groove along each of my four pine boards, creating a perfect spot for postcards and other small art to rest. But before breaking out my new tool, I used an old friend (the miter saw) to cut my four 1 x 2s to identical 64″ lengths. Note: you can have this done at the home improvement store if you don’t have a saw on hand.
Then, despite my enthusiasm to begin Dremel-ing, first I decided to read the directions and (more importantly) do a few test runs on a scrap piece of wood. Thank goodness I did, because I spent about five minutes trying to route with the cutting tool. D’oh. I also learned that the Dremel really likes to pull to one side, so making straight grooves posed a challenge. But thankfully it was a challenge that could easily be overcome by using the metal guide included in the set. Disaster averted.
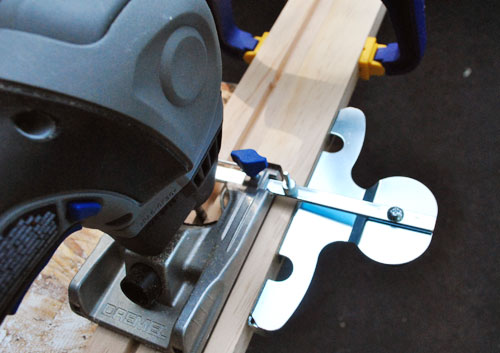
The adjustable guide let me set exactly where I wanted to make my grooves. Although I did hit one snag in that the 1 x 2 boards were thinner than the width of the Dremel. So to use the guide I had to clamp two boards together. No biggie.
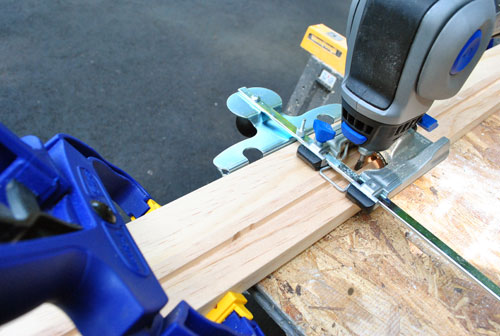
With everything clamped I set my guide so I’d make my cut about a half inch from the outer edge and I set my depth to about 1/3″ inch.
I found the Dremel really easy and fun to use, and once I had everything set and had practiced my system of moving clamps as I went (since they would eventually get in the way of my routing path), it took me about ten minutes to do the remaining three boards.
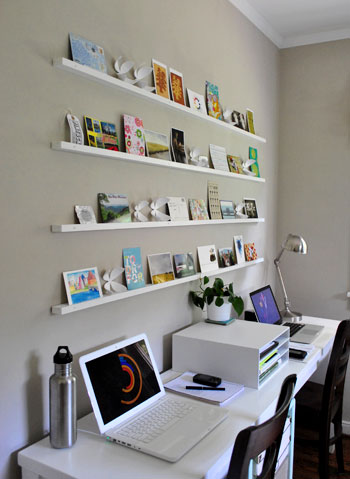
With everything cut, I did a quick sanding job to smooth everything out (by hand, not using the Dremel) and then applied one coat of primer followed by one coat of semi-gloss white paint. Sherry and I discussed staining them a dark wood tone or even painting them a color, but ultimately decided they weren’t the stars of the show so the white would help the postcards pop best while making the shelves feel architectural (like the white trim and crown molding in the room).
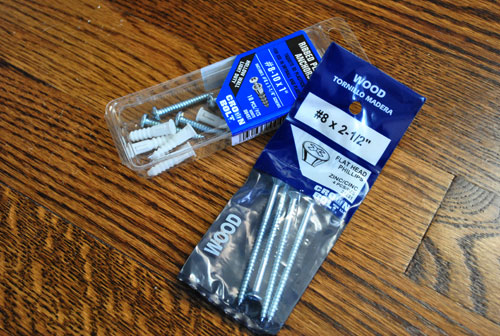
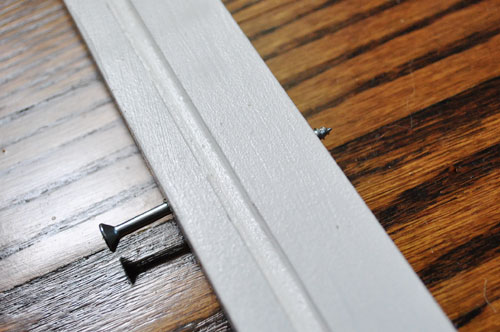
Then we could move into the installation phase of the project. Again we discarded any complex ideas about hiding the screws and decided we’d just screw straight through the boards into some anchors in the wall (and then roughly disguise the screwheads on the front of each shelf with a bit of white paint). Since the boards were pretty light, just 2″ deep, and would be holding postcards, we weren’t too concerned with them being able to bear any intense amount of weight. So our weapons of choice were some long 2.5″ screws and a pack of drywall anchors (since only about 1/2″ of screw would be sticking out the back end after it passed through the 1 x 2, we had to buy a separate pack of smaller anchors).
We opted to go the anchor route (instead of finding studs) so we could place the semi-visible screws evenly across the front of the 1 x 2s. Speaking of which, I took my first board, measured an even spacing for each of the four screws and marked spots to drill my pilot holes. Thus would begin my somewhat intricate one-person system of hanging these suckers. Sherry had already helped me mark a level line for the bottom shelf before Clara woke up (phew) so I was able to hold the shelf in place and then re-drill through my pilot hole far enough to make a small mark on the wall. After following the same process to mark the rest of my holes, I put the shelf down, drilled the rest of the holes, and placed the anchors.
Now here’s a little trick I like to use when doing these things. Trying to screw the rail in place by myself could be a nightmare in terms of lining up the holes to the anchors. So instead I put the screws through each of the four holes in the 1 x 2’s on the ground, allowing the screw tip to poke through the back of the shelf, just a bit. Then when I held the shelf back up against the wall and attempted to line it up with the anchors that I sunk into the wall, I could feel when the screw tips fell into place (plus it helped to keep the shelf from slipping while I one-handedly tightened all of the screws into the anchors in the wall).
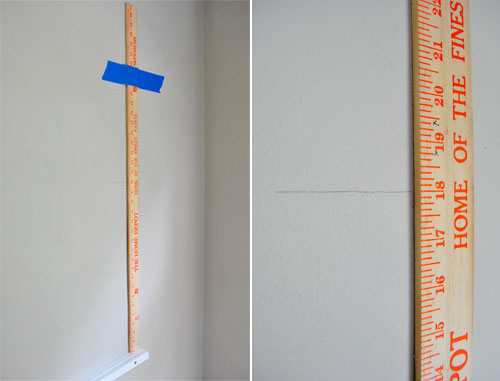
Hanging the first shelf was pretty easy (heck, it almost stayed in place with just one screw). But getting the other three to be straight and evenly spaced required a game plan. Sherry and I had decided that we wanted the four shelves to be nine inches apart to allow enough breathing room for a vertically placed 5 x 7″ piece of art on the shelves. So to measure my nine inch increments I vertically leveled a yard stick and employed some blue painters tape as my second pair of hands to hold it in place while I marked the wall. I did this for each of the four vertical spots that I’d be placing a screw to make sure all of my anchor points were lined up and evenly spaced.
I spare you the rest of the process since it took longer than I expected, especially since I double and triple checked a lot of my measurements. But in about 45 minutes I had all four of the shelves hung. And wouldn’t you know it, they were perfectly level and extremely secure. Phew!
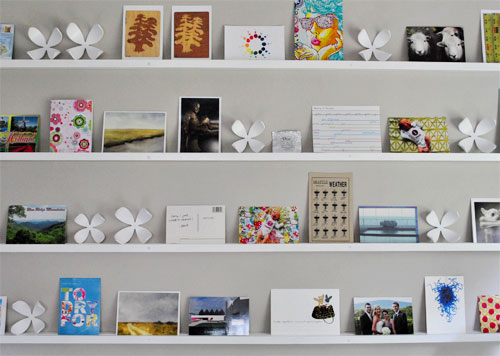
Then all that was left to do was to populate the shelves with postcards and other postcard sized artwork. And thanks to a bunch of you, we had plenty to choose from! We also peppered in a few photos, cards, and other miscellaneous items that we liked (from flattened foil chocolate wrappers with sweet quotes on them to art that we cut out of magazines and backed on cardstock to create a postcard-esque weight). Here’s a shot of what it looked like yesterday afternoon (after a trip to the PO Box- thanks again to everyone who sent cards our way!).
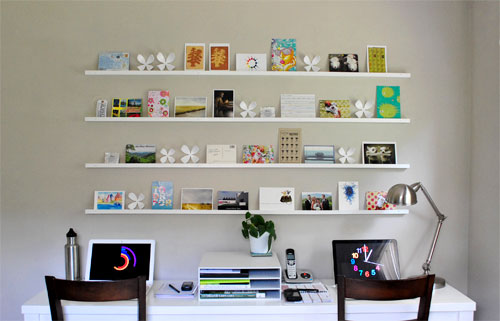
You’ll notice that a few of the displaced Wallflowers made it back up on the shelves. Oh and we found a new spot for the rest of ’em too, which we’ll share in our next office progress post. But for now we’re happy to bask in the glory of this project: the big intimidating blank wall is no more. And we finally have a rotating wall of eye candy to enjoy (and switch up whenever the mood strikes).
Heck, it’ll probably look different by the time we post our “big reveal” photos of the whole room.
We know some of you are wondering how we’re going to keep things from blowing off of the wall. We haven’t devised a system for that yet, since it’s not a problem that we’re going to encounter ’til (at earliest) the fall when we might throw open a window or two. But when the time comes we’re thinking of possibly backing things on hefty mat-board to keep them from budging in the breeze, or even using that removable blue sticky tack to keep the backs of the cards adhered to the wall (other ideas we flirted with: magnets or even velcro). Ultimately we don’t want to do anything too permanent because it defeats the ever-changing nature of such a project. We promise to keep you posted if we find that we have to implement any of those stay-in-place strategies.
Thank you again to everyone who sent us postcards. It’s been such a sweet byproduct of this art project and we’re very grateful. We plan to keep a stash of all of them so we can continually rotate them out (so if you don’t spot yours in these pictures it’ll definitely still be enjoyed!). And if you want to add to the collection our address again is: PO Box 36665, Richmond, VA 23235. We’d love to hear from you!
But enough about us, we’re wondering if you guys have implemented or otherwise come across any other interesting ways of displaying collections, whether they be 3-D or flat-ish (like our growing postcard collection). Any gallery-inspired art walls? Or shelves full of like objects (snow globes? Eiffel tower statues? garage sale oil paintings?). Spill it.
Psst- Wanna follow the entire office/guest bedroom/playroom makeover? Click here for the intro post, here to read about the big sleeper sofa hunt, here for the DIY desk play-by-play, here for the homemade light fixture project, here for our hacked Ikea bookcase, here for the file storage we built, here for how we squeezed in some toy storage, here for how we picked out some DIY art that we could agree on, and here for how we wrangled our wires.

Lindsay@Tell'er All About It says
It looks great, guys! It’ll be perfect in the future for rotating out kids’ artwork, too! They accumulate *so* much of it! I really need to send you a postcard from the great state of Oregon….hrmmm…
;-)
Lindsay
liz @ bon temps beignet says
This is A-W-E-S-O-M-E! I love that y’all kept the flowers.
Does that one card say something about weather?
YoungHouseLove says
Liz,
Yeah, that’s a cool Seattle weather postcard we got from a reader named Lisa. Love it!
xo,
s
Liz Carignan says
I LOVE it!! Everything looks great…
Erin says
I absolutely love it!! I especially love the Clara pictures:) I though the different material backgrounds were genius before and now as part of the display i think i is even more amazing. Great job!
Lauren F says
Love this!
Jessica @ How Sweet says
I love the shelves – I think they look great!
Jen Z. says
I did a similar project in our bedroom and family room. The bedroom has three smaller shelves with pictures from our wedding & honeymoon, plus letter initials for our first names & small glasses. Then in our family room we have two long Ikea white shelves that have more wedding & honeymoon pictures (we don’t have kids yet), with small vases and our last name initial, some star fish and a couple of other small things. We love how it came out.
Elizabeth says
WOW! It looks great! And kids think they’ll never use math. HA!
AnnabelVita says
I love this, it’s so simple yet elegant. I love places to display favourite images on a rolling/temporary basis and coralling items them this makes it all look so neat and cohesive (although I personally love the cluttered look of magnet or pinboard displays, I can see something orderly like this working better in a workspace).
There’s a postcard on its way to you from me in London!
YoungHouseLove says
Wahooo! Can’t wait to receive your London postcard AnnabelVita!
xo,
s
Meghan says
What a lovely project. I love projects that are cheap and fairly easy enough to pull off in a day or so. Instant gratification!
Meghan says
I LOVE THIS. I’m remodeling a house starting after Christmas and I absolutely love this idea. I have gazillions of postcards from Italy (couldn’t stop buying them!) and had no idea how to display them. This sounds perfect for me.
Jennifer Ott says
One idea to keep things from blowing…they make white poster putty now! It should be easy to find during the back-to-school sales that are going on now. Easy, removable, and a small bit should suffice at the top of each piece where it hits the wall. Our pack has lasted for over a year with similar usage.
Rebekah M says
Looks great! How are you going to keep the photos and cards from curling up? Whenever I have photos sitting out they always curl!!
YoungHouseLove says
Rebekah- The groove actually really help the cards have some structure (since they can sink into it about a third of an inch for more support as they lean) and the heft of the cardstock (since most postcards are decently thick) also seems to keep them from curling. We do realize that over time they might take on a slight curl, so if that bothers us after a while we’ll just back them all with mat board to keep them standing at attention. Hope it helps!
Jennifer- Sweet! We didn’t know they made white putty now. Even better (should we need it)!
xo,
s
Adriane says
Holy schnikeys am I first!? :-D
I love, love, love, this project. I have a large blank wall in my guest room and I think this is the perfect filler! Not too much work for the hubs and a neat way to welcome/provide eye candy for guests in from other places.
Thanks for the play-by-play and congrats on completion!
rose says
Hey DIY Youngsters!
The wall turned out great. So refreshing and fun!
It’s kind of hard to tell from the photos, but did you fill in the screw holes or are they left exposed?
PS…Ikea also sells a similiar shelf that just has a lip on it. More for leaning picture frames, I think.
YoungHouseLove says
Hey Rose,
We didn’t fill the screw heads with anything, but we applied a thin coat of white paint (so they appear to be clean-looking white screws that blend right in). It looks great!
xo,
s
Catherine says
This looks fabulous! I love it!
pam says
I love it!! Really! It turned out amazing! :)
Ginny says
Love your hotsling! Between that and the Ergo, you are set! The postcard wall looks great, too! Love how it is interchangeable!
Heather says
Looks amazing!
Janelle says
In my experience, the blue sticky stuff leave blue sticky marks on the walls. It can be tough to find, but if you decide to go that route, get white sticky stuff. The color is more neutral (especially for your walls) and it doesn’t leave as much residue. Same basic stuff, though.
YoungHouseLove says
Thanks for the heads up about the white sticky tack Janelle! So good to know if we end up needing it!
xo,
s
Kristine says
Ooooh! So pretty and beautifully arranged! The touch of the wall flowers makes it look so ethereal. Awesome job guys!
Blair R says
Oh, my gosh, guys! This looks great! I’m happy that some of the flowers made it on the shelves; it really adds interest and breaks up it a bit. GENIUS!
Laurel-Dawn says
This is such an amazing idea… having the option to change colors and styles could change the look of the entire space! I can’t wait to see what this will look like around the holiday season! I will be looking forward to seeing this wall change in style! (I also love seeing your little one at Home Depot already!)
Megan says
Looks great! I am new to reading your blog and have been really enjoying it!!
Briel K. says
That looks really great! I love how it turned out. It makes me want something similar in my bedroom.
Shannon says
I love the post card art! You guys think of the best ideas. I also love the baby sling that Clara is in at Home Depot. What kind is it…and do you like it?
Kat says
This looks great. A suggestion for keeping the postcards and pictures weighted down would be to tape a penny or two to the backsides. I had a very long wedding veil and got married on top of a mountain and to prevent my veil from blowing in the wind I sewed pennies along the train. It worked like a charm and I think the same idea would work for securing lightweight postcards.
YoungHouseLove says
Kat- Such a great idea! Thanks so much for sharing!
Shannon- That’s actually a Hotsling that I inherited from my best friend. Clara loves it (and therefore, so do I!).
xo,
s
Michelle says
I really love it. You guys are going to have fun changing things around as time goes by as well!
Cheryl says
I am , this minute, looking at the blank wall above my parson’s desk, a newly painted wall in our bedroom. This gallery display could be ‘the one’ I’m looking for instead of the usual big framed painting/poster. Lots to mull over here.
Beth @ bethcooks says
I think that looks awesome! It’ll be so great to display all different stages of Clara’s life. Great job!
Melly says
I shouldn’t be, but I’m astonished at how lovely that is.
Mandy Ford says
LOVE this – what a great way to add artwork to your wall and be able to change it out on a whim. I would definitely recommend the blue sticky poster stuff to keep things from blowing off the shelves. It works great and won’t leave any damage behind. :)
Mandy @ This Girl’s Life
CarMaj says
This is a really great idea and it looks so wodnerful on that wall! Love Love Love! Awesome job!!
Ronnie says
I love what you’ve done with the wall!! You two are so creative :) I have a question regarding your wallflowers though. I’ve seen you use them in a couple of different places in your house and I am thinking of putting some in my newly finished basement. Do you fill in the holes left by the tacks used to hang the flowers when you move the arrangementor are the tack holes small enough that it doesn’t present a problem?
Thanks!
Ronnie
YoungHouseLove says
Hey Ronnie,
You definitely have to fill the holes left by the tacks, but it only takes about five minutes to throw some caulk in them and apply one coat of paint to render them completely invisible. So we wouldn’t recommend moving them every day, but moving them once every few years isn’t a big deal. Hope it helps!
xo,
s
Jenny says
For the windy issue, if it comes up, you might try taping a penny to the back of each card — giving it just enough extra weight to stay put. Of course, there’s a bit of a cash expenditure for that solution!
YoungHouseLove says
Hey Jenny,
Thanks so much for that tip! It’s genius (and cheap- haha).
xo,
s
samantha says
wow it looks great! I wish I could bottle your DIY skills!
Melinda J says
This looks great in your space! Well done!!!
Sally says
Love it–great idea! On another note, what is the color of your floor stain? I’m sure you have it listed somewhere but I can’t find it, and love the darker color! Thanks in advance!
YoungHouseLove says
Hi Sally,
The stain on our floor doesn’t have a name as it was a custom blend our floor refinisher whipped up in a effort to match the new hardwood we laid in our kitchen. That floor was called “Mocha Oak” and was from Lumber Liquidators if that’s a help. You can read more about the project here:
https://www.younghouselove.com/drumroll-please/
Hope that helps!
-John
PS: Good idea with the pennies Alisha! We may turn to something like that, but for now we’re trying to leave the backs as-is so we can enjoy all of the kind notes everyone wrote. :)
Alisha says
How about adding a penny or two to the back of your postcards/pictures to weigh them down. I always seem to have an endless supply of pennies, so they get used all over the house for leveling tables to making my curtains hang straight.
Just an idea. :)
Beth@EverydayLifeOfBellom says
Love it, it’s so “John and Sherry!”
The sticky tack suggestions have been thick, but one more for you. Even the white leaves a horrid little greasy mark and I have found it comes through touch up paint. (Just ask my last landlord, ugh!) To prevent you from priming and painting over and over what about putting the sticky tack in the groove on the shelf. That way you won’t see it and if it leaves a mark it won’t be as noticeable!
Rachael @ The Artsy Generalist says
WOW! You guys seriously inspire me! What a fabulous way to fill wall space… love love love it! I can’t get enough of your blog! : )
Not sure if you’ve mentioned this before — but where did you get the lamp on the right side of your desk? I’ve been looking for one like that for a while now.
YoungHouseLove says
Hey Rachael,
We got that lamp for $10 at Linens N Things- sadly the store is closed but they still have a site: http://www.lnt.com- hopefully you’ll find something there!
xo,
s
YoungHouseLove says
Hey Elizabeth,
We actually don’t ever dust those Wallflowers because they never seem to need it! Maybe it’s because they’re made from such a slick plastic surface that dust can’t really collect on them without slipping off? Interesting!
xo,
s
Anne says
OMG I love this idea, my hubs just got a router … I see a little project in his future. :)
Blair says
Just to add to the great sticky tack debate…
As a teacher, I can say that they have sticky tack in plenty of colors. A teacher’s store is your best bet (Target also has a decent selection).
Also, the blue stuff (and all of them, really) can indeed leave residue, but I find that if you rub the sticky tack along the spot where you remove it, it picks up all the residue really easily.
Cynda says
Oooh! I love these shelves and the whole effect. I am all about color and personal touches.
As for things blowing away- you could stuff a strip of foam into the groove of each shelf, then tuck the postcards down in between the foam and groove. If that makes sense. You don’t have to actually do anything to the artwork!
Carmen says
LOVE IT! ABSOLUTELY LOVE IT! My husband and I love it! He is inspired and might actually do some handy work. I think your office looks great.
Amanda says
I love this idea, now if only I didn’t live in an apartment I would totally go buy the materials today (especially for under 30 dollars!) … which is ironic because it would totally help with my apartment-white-walls trouble. Haha.
Ps, I think yours looks better then the one in the magazine because yours is less cluttered and more colourful! :)
Tanis says
I love this project! I’m desperately trying to come up with a space in my house that I can do this. It must be so great to be able to gaze at such beautiful and sentimental objects and images while you’re working. And ever changing! It’s so perfect. Good job!
Audrey says
Drats – I wish I had a picture, but I did something similar in my bedroom. I rent, and didn’t want to put more holes in the wall, so I used ribbon and penny nails at the end.
I attached the artwork with those tiny clips from my office. I use it to showcase any art/photo/card that catches my eye – its easily changeable and with the clips holding them in, even with my window open/fan on they don’t move too much.
I love it, because I can change the artwork weekly if I want. I love how your mini-shelves look though. Definitely something for me to keep in mind for next time!
Lacey says
Love it! I recall a previous post about how you send a postcard to your home during every trip as a way to remember it…this would be a great way to display all the fun places one has been!
Vania says
:o great idea!! I think I am gonna do the same thing at my office! And if you don’t mind I’ll post the idea on my blog, credits all yours of course ;)