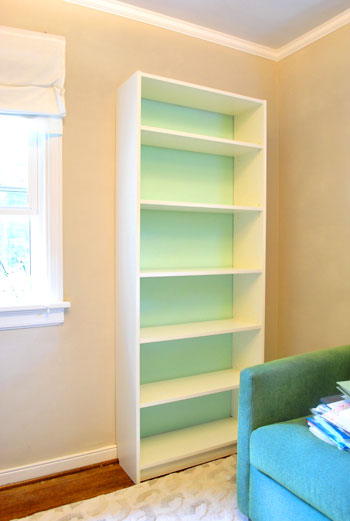
We mentioned a few times that we wanted to get a bookcase for the office/guest room/playroom since they’re so great for storing things, displaying things, and adding some architecture and height. We thought a bit about placement and quickly realized that the area to the left of the uncentered window on the far wall of the room would be the best place for a bookcase, so we headed off to Ikea with the measurements of that wall on a little scrap of paper in my purse. And in a few short hours we found ourselves assembling our $69 Billy bookcase:
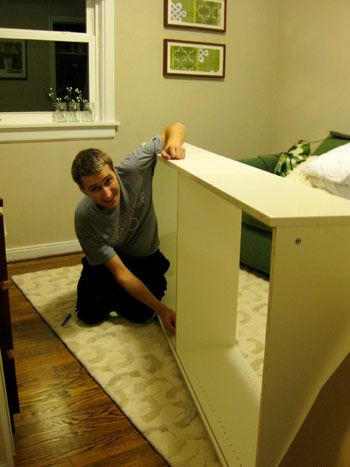
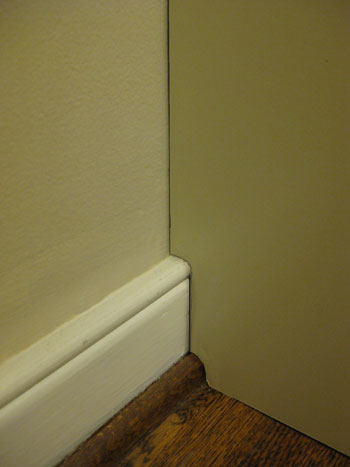
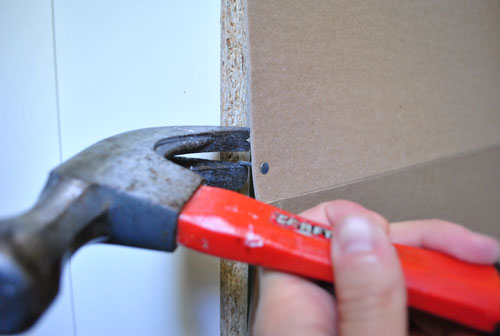
We actually checked out a few other Ikea options (like the Expedit and the Lack bookcase) but the measurements of that wall seemed perfect for the width and height of good ol’ Billy (and the $69 price tag wasn’t to shabby either). Plus whenever we snag something affordable we don’t feel too bad taking the time to tweak it a little. So when we realized that it wouldn’t sit flush against our wall thanks to the baseboard and shoe molding we grabbed a small coping saw and chiseled out the perfect shape.
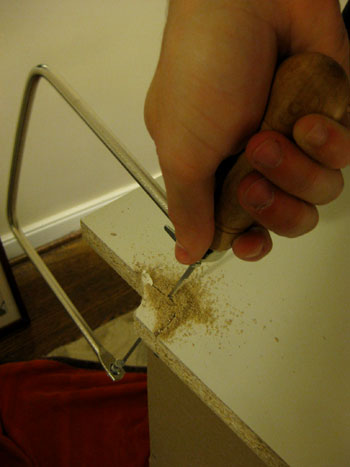
About ten minutes of sawing left us with this nicely customized setup. Flush bookcase = happy dance.
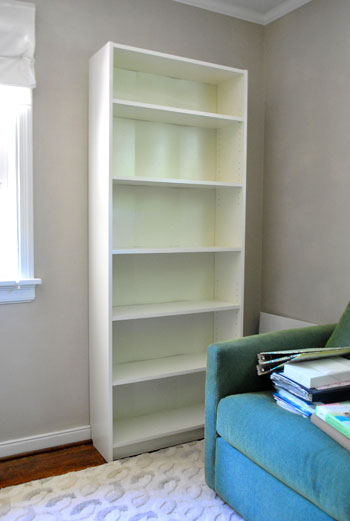
And when we stepped back and surveyed the full scene we loved how the bookcase added some much-needed balance to the entire wall. The height that it introduced on the right side of the wall really worked with the height of the window to the left. And the fact that it tucked right in next to our sleeper sofa without feeling crowded (thanks to the modest footprint of the bookcase) was the icing on the cake. But there was something that totally rubbed us the wrong way about Billy. The thin cardboard-ish back panel was folded into thirds in the flat-packed box, so when we unfolded it and secured it to the back of the bookcase with small finish nails it still had some telltale creases and looked a bit shoddy to boot. Cripes.
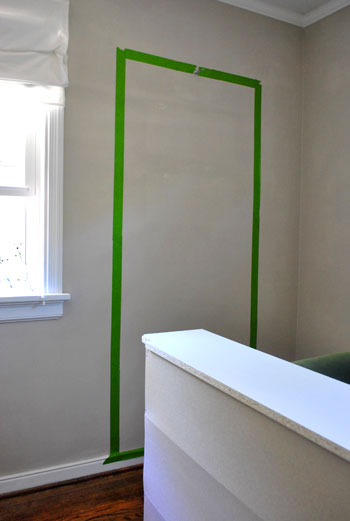
So we decided to take a moment to brainstorm a few possible solutions. We decided we could grab some foam core and cut it to the size of the six rectangular openings in the back of the bookcase and slip it back there (to obscure the view of the creased back). Heck we could even paint, wallpaper, or cover the foam core with fabric for a nice little customized look. But that seemed like a lot of foam core and a fair amount of work. Then came our second idea. What if we removed the back of the bookcase altogether and painted the wall behind it for the same effect? So off came the back:
Then we realized that we could apply a quick and dirty tape rectangle around the wall (with the bookcase still in place) so we knew where to apply our background color. After we stuck up some Frog Tape and removed the bookcase, here’s what we were left with:
We opted to go with Mythic’s Adanna Aire, which was paint that we had leftover from the nursery ceiling. Gotta love a soft aqua tone that’s 100% free. Plus it worked really well with our blue-green sleeper sofa. Then we just slid the bookcase back into place in front of the painted portion of the wall.
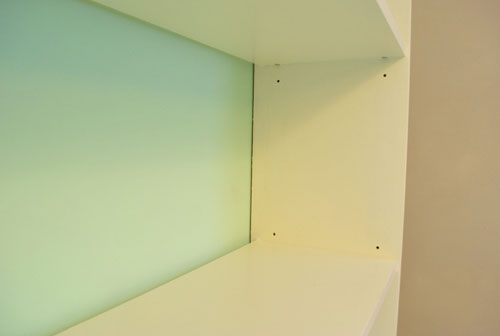
But we had a second eyesore to solve. Removing the back panel left a dark crevice in the back of the bookcase that we could definitely do without. And all the holes for moving the shelves around didn’t exactly look high end either.
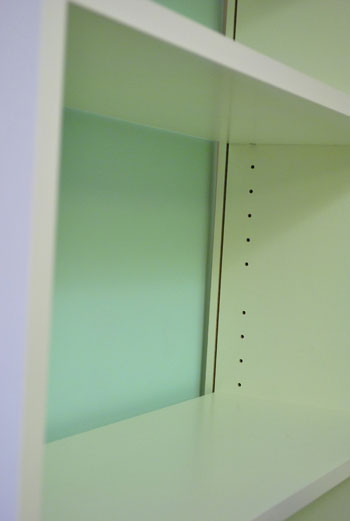
So we broke out some white caulk and filled them in. We opted to leave one hole above and below each shelf (in case we wanted to shift things slightly to accommodate something a smidge taller or shorter) but we loved the look of six unformly spaced shelves, so we knew we’d never use the other holes to create extra tall or short ones. And in an oh-happy-day moment, the white Dap window and trim caulk that we used turned out to be nearly identical in color to the bookcase, so it definitely obscured that ridge near the wall along with all those extra holes:
We did notice that deciding to lose that back did slightly compromise the bookcase’s sturdy-factor. By no means was it super rickety, but it didn’t feel quite as reinforced as it was with that panel in place – even though it was basically just a folded sheet of cardboard.
Happily, after anchoring it to the wall at the top it added back a bit more of the structural integrity, but for even more dependable sturdiness and kid-safety we would highly recommend adding some metal L-brackets for more structure (which can be painted white so they virtually disappear). We definitely plan to take that reinforcement project on soon when we do other kid-safe things like anchor the TV in the den and a few other bookcases around the house.
When it came to loading up the bookcase, we aimed for equal parts function and form. Since the room would have to work as an office and a guest room, we didn’t want it to feel like it was all business, but we also didn’t want to sacrifice practicality in the name of guest ambiance. So we actually whipped out a pad and a pen to jot down everything that we wanted to store (to be sure that we got the function in there before moving on to the form):
- office supplies like envelopes, tape, scissors, a stapler, notepads, etc
- extra printer paper and cardstock
- paint decks galore (since we refer to them while blogging, they were too far away in the den ottoman where we used to store them)
- books & binders
- a clock (I feed Clara every few hours on the sofa in here, so I knew that would come in handy)
- a few of Clara’s favorite stories and toys (since one of us plays with her while the other tends to the blog)
- treats for Burger (can’t forget about our other baby)
- a few decorative items to keep it from feeling too office-focused when we have overnight visitors
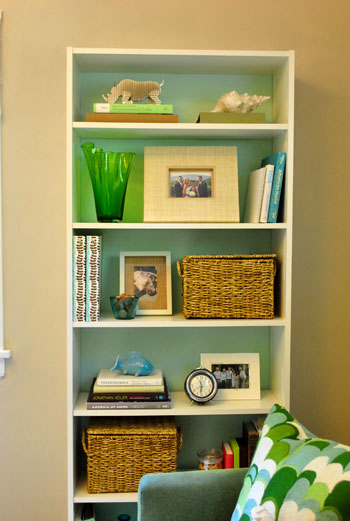
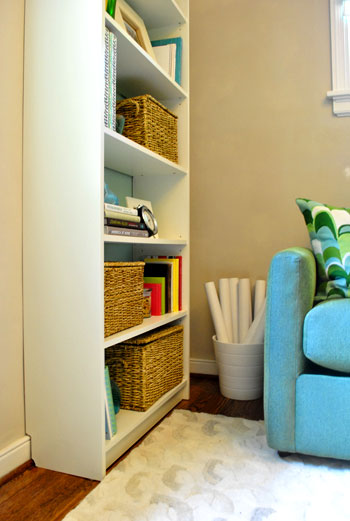
And here’s what we ended up with:
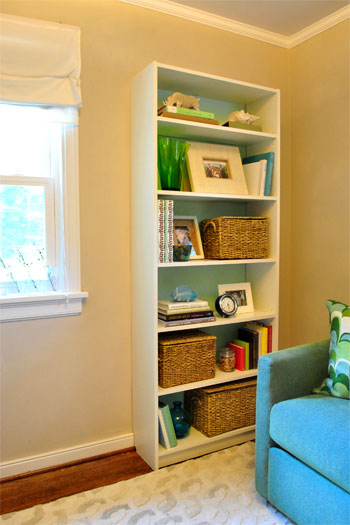
The baskets (from Michael’s for 50% off) easily housed things that we’d rather keep out of view (office supplies, extra paper for the printer, Clara’s books and toys, and a slew of paint decks) while everything from books and binders to a glass container of treats for Burger got premium placement on the shelves. We even had a small clock sitting around and a few decorative vases, frames, and other accessories on hand to keep it from feeling too industrial and office focused so our friends and family feel right at home when they spend the night.
Of course we still have a bunch of files and other paperwork that we’re planning to store over on the desk side of the room (stay tuned for those details) but we love the balance, practicality, and visual interest that a simple $69 bookcase (along with some free paint that we already had on hand) added to the space. Oh and we even had room to squeeze a white planter that we already had (from Ikea) into the corner to hold some mailing tubes (which we use to ship shop stuff). Hooray for even more storage space.
So that’s the latest office update. What have you guys been up to this week? Any bookcase makeovers going on at your house? Any basket-buying going on to add concealed storage somewhere else in your casa? Do tell.
Psst- Wanna follow the entire office/guest bedroom/playroom makeover? Click here for the intro post, here to read about the big sleeper sofa hunt, here for the DIY desk play-by-play, and here for the homemade light fixture project.

Snickrsnack Katie says
Awesome office update! :)
Lindsay says
Love the Billy! I have it in my den, which you can read about here:
http://tellerallaboutit.wordpress.com/2009/12/10/an-impossible-mission-part-3-the-gripping-conclusion/
I plan to do something decorative to the back of the bookcase because I also don’t like the tri-fold paperback. I might do something like this:
http://tellerallaboutit.wordpress.com/2009/08/17/before-after-bliss-part-1/
So many possibilities! Adding crown molding….but gotta get through a Laundry Room renovation before tackling the bookcases.
Great tip on covering those pesky holes with caulk! May have to do that!
xoxo,
Lindsay
Kate says
Triple love it. You guys are aaaammaaaaazing!!!!
Jennifer says
Hi S&J- love the bookcase, it really came out great! I’m curious, where did you get the picture frame at the top that looks like a nice linen or seagrass texture?
YoungHouseLove says
Hi Jennifer,
We snagged that frame, along the with the one on the shelf below it, from the Pottery Barn Outlet in SC back when we visited in February. At the time we didn’t know exactly where they’d go, but we’re thrilled that we found the perfect spot for them. You can see more pictures of ’em here: https://www.younghouselove.com/2010/03/window-shopping-charlotte-or-bust/
-John
Sara @ Russet Street Reno says
Wow, the aqua paint is stunning as a backdrop. I never use those cardboard back panels from Ikea, my bookcases always seem to do just fine without them. It looks great, and what a bargain!
Jarrod says
It’s amazing how just a little paint and caulk can really enhance a budget find. You guys are so creative!
Elisa says
Ab-so-lute-ly love. Makes me want a bookcase. And some baskets. And a baby. And Burger.
Shlee says
Love the back ground color of the bookcase. Looks super cute!
Heather-Anne says
We have 2 of these same billy bookcases in our tiny “master” bedroom. We couldn’t fit a dresser in it so we added some crown molding to the top to give a more custom look and added the Ikea doors that are made for the Billy bookcase to the bottom half of the 2 Billy bookcases and it acts as our dresser. Then we use the Ikea agen baskets on the top half for socks, pjs, etc. We love them! We also didn’t like the back so a little beadboard wallpaper on sheets of luon did the trick.
Erika says
What a great idea to paint behind the bookcase….made a huge difference!
Claire says
I absolutely LOVE seeing how you organize and style bookshelves. That sort of thing helped me out quite a bit for staging our house when we put it on the market. We own two of the Billy bookcases (unfortunately purchased when they were $20 more each last summer!). They are certainly a lot of bang for the buck. Great idea to paint the wall behind it. Adds a ton of interest and style to an otherwise plain bookcase! Well done Youngsters!
Nadia says
Love this! I Can never quite figure out how to decorate my bookcases to look chic without looking cluttered! I actually have a bookcase that would look way better and be far safer for my 15 month old if I were able to make those cutouts so that it would sit flush on the wall. How did you measure for the cutouts??? I’d be so afraid of doing it wrong and messing up my bookcase!
liz @ bon temps beignet says
I love Ikea hacks! That’s how I originally found your blog… way back when. I saw your master bedroom on Ikeahacker and FELL IN LOVE with it. It all comes full circle.
Krystal says
Love the bookcase and the idea of painting the backdrop!
Katie says
I love the idea of painting the wall behind the bookshelf! And I love how it wasn’t planned. I’m in the middle of painting our master bedroom’s trim white, and then painting the walls. One of our closets is set up like a bookshelf (with lots of shelves). We decided to take off the doors and now after reading your post, I think we’ll paint the inside of it our accent apple green color (the rest of the room will be brown except for a corner that we’re turning into a sitting area and now, maybe the inside of the closets). Thanks for the idea!
Dennis says
Your idea for painting behind the bookcase it great guys!
Tracie @ Gurtler + Home says
I love how you guys are able to style a bookshelf. I will be eternally jealous.
Jessica @ How Sweet says
Annnnd this is being sent to my husband right now to show him what the next project is. :)
Shunta says
I get so excited every time I see an update on this room!!!
Steph says
Brilliant! It’s amazing how you made the common Billy bookcase look so special.
Jane says
What a great idea! We’ve had five strung-together IVAR units (that we stained and laquered ourselves) for more than 5 years now, and love how airy they feel. Now that we’ll be home-owners, we’ll be able to actually paint the walls any color we want, so I imagine the IVAR system will look great with a colorful backdrop.
Mandy Ford says
Looks great! I love how you personalized it for the space. And the hues of green and blue together are so yummy!
Kristine says
So cool! You guys make anything cheap-o look like a masterpiece. I too recently just bought an IKEA bookcase this past weekend (the IKEA 5×5 expedit) and put it all together myself. I’m pretty proud of my accomplisment b/c I had to lug that thing up 3 1/2 flights of stairs and it’s taller than me (I’m 5’2″, the bookcase is 6″ tall). Now, after all that work, my goal is to get all my stuff to fit in it nice and orderly, which I hope to do next weekend. Also, I don’t know if you’ve seen this link, but it definitely got me inspired to organize (along with your blog, of course)
http://www.flickr.com/groups/ikeashelves/
Beth @ bethcooks says
I mean, y’all are brilliant! It look sooo great with a splash of color back there. Awesome job!
Katie says
How funny that I just bought a bookcase very similar this weekend – and I too wasn’t crazy about the tri-fold cardboard backing. I’ve been looking like crazy for baskets similar to yours (for a good price), I’ll check out Michaels soon. I was thinking about backing it with fabric also, so that’s an option too. Love your site, it’s given me so much inspiration to slowly make over our apartment! Thanks!
Amanda@Reno366 says
And you continue to impress. What a great idea. I have a walmart bookshelf that had the same problem. I just filled it up with baskets so you couldn’t see the back. We’ll do the same thing with the next one we buy! Great idea!
Keren says
We have a bookcase on the to-do list after getting a bunch of my husband’s childhood books from his parents. Ana’s Knockoff Wood blog has plans to build your own bookcase modeled after the IKEA ones. I think we are going to go this route so we can tweek and customize to our hearts’ content. I love the idea of coping the bottom to sit flush with the wall…we will have to do that!
Matt Peckham says
Doesn’t the backing provide a decent amount of structure to the bookcase? The backing and nails helps to provide a good amount of structure to what is basically a not very solid vertical structure, just like cross braces on a bridge do.
It’s something to think about, I’m sure you haven’t got plans to load it floor to ceiling with copies of Maxim…
YoungHouseLove says
Hey Matt,
We did notice that deciding to lose that back of the bookcase slightly compromised its sturdy-factor. By no means was it rickety or unsafe, but it didn’t feel quite as reinforced as it was with that panel in place – even though it was basically just a folded sheet of cardboard. Happily, as soon as we loaded up the bookcase, the added weight beefed it right back up and we knew it was solid and safe (otherwise we would have added some metal L-brackets for more structure, which we could have painted white so they’d virtually disappear). And anchoring it to the wall definitely added even more reinforcement to keep it nice and sturdy. Hope it helps!
xo,
s
lana @ make a house a home says
we just bought baskets for this kitchen this weekend! we have awful storage in the kitch!
Jen Z. says
I’m actually lovin the Expedit bookcase. I want it for our home office that i’m trying to put together. Love all the storage ideas you came up with so you don’t have to see all the little things and it looks great because of the storage & decor. Can’t wait to see your office finished.
Julia says
Love it! Especially the painted wall behind the bookshelf, very pretty and definitely less time consuming than adding paper to the back of the shelf would have been! We had a Billy bookshelf in our first apartment in D.C. and it did not survive the move to Kansas, the back board split and the shelf definitely became more rickety so we put it at the end of the driveway so someone could find it a new home! Our house has 2 huge built ins that about drove me insane when I was accessorizing them, and they are of course never finished. I might add some cabinet doors to the bottom shelves or paper the back, eventually. Biggest frustration is that they are not *quite* deep enough for the magazine storage I got at West Elm, and my OCD natures hates that they hang over the edge an inch, so those may have to be relocated. http://pugsnotdrugs.wordpress.com/2010/01/31/okay-one-more-time/
Kenn says
Well done! Getting bookshelves and furniture pieces to sit flush against a wall is an annoying process, but makes a world of difference. There’s a handy tool you can use to make the job a little easier: a needle gage or a contour gauge. Its a tool that you press up against a profile (like your baseboards or crown molding) to copy the shape. You can then trace it on the surface you have to cut to get a perfect match. I find them to be very andy tools with a ton of uses, and you can pick one up pretty cheap at Rockler or even Home Depot. Keep up the good work.
Christina says
It looks really good- great job! I love the paint color on the back. In a year I suspect those bottom shelves will be empty as Miss Clara begins to rearrange things – my daughter’s favorite activity was to pull everything off our lower bookcase shelves for hours on end :)
YoungHouseLove says
Christina- Good point! We actually plan to put Clara’s books and toys (in baskets and out in the open) on those bottom shelves when she’s more mobile so she can help herself!
Kenn- Thanks for the tip! We’ll have to check it out!
xo,
s
Adriane says
OK,
1) I love, LOVE that idea. It came together so nicely! I had the same problem with the base boards and molding while finding a hallway table but found the perfect solution (also at Ikea) in their Hemnes shoe cabinet. It only had the front two legs and is adorable.
2) I love following your blog and a great part is your readers (obviously the coolest are here, lol). So, I have to mention this comment that made me snort in my cube. Whoops! I don’t know you, but I like your style:
“Comment by Elisa No Gravatar on June 15, 2010 @ 10:13 am
Ab-so-lute-ly love. Makes me want a bookcase. And some baskets. And a baby. And Burger.”
Hahahahaha, great sentiment.
YoungHouseLove says
Hey Adriane,
I know right? Our readers are THE BEST! We love you guys!
xo,
s
Julie says
LOVE it! I think I’ll steal that idea for my girls room when we move into our new house!
Stefani Moore says
Love it, great job! I’m loving seeing your multi-purpose room come together, so fun!
It’s funny – I have that same bookcase, and it has been so versatile for me! I actually bought it while in college, and used it as-purchased for about 7 years, including moving it to my new apartment in a new city after graduating, and then into my new house a few years later. This past year, I was creating and decorating a bedroom for my fiance’s little boy, and was painting furniture for his room black. This cheap old bookshelf got a brand new life as a painted-shiny-black new bookshelf, and I also decided to remove the cardboard backing, like you, to let the yellow walls show through, and so it wouldn’t be too dark. It turned out great, and now it’s a happy home for his toys and books. Amazing how much use you can get for a cheap Ikea bookcase!
Jenna says
Have you considered getting the doors for the bookshelves? They look gorgeous and high-end with the doors in nicole from makingitlovely’s library – http://makingitlovely.com/photos/album/72157604302986919/photo/3266987273/library-my-library.html
YoungHouseLove says
Hey Jenna,
That’s actually a great idea for when Clara is more mobile (in case we want to keep her out of there completely). Love it!
xo,
s
Holly says
We recently just purchase 6 Billy bookcases for our basement. We were trying to great a built in look on a limited budget. We were a little disappointed that our ikea and online no longer offer the matching solid wooden doors. We were hoping to have ways to store books and other things that we necessarily didn’t want to see. So we’ll have to do some creative brainstorming to hide all our eye sores.
RD Shugart says
Great job! It’s really coming together! Any tips on where to find Mythic Paint? Do you have to order it from their website or do they have local distributors? We’ve used low VOC paint to get our house ready for the market, but I’d really like to use no-VOC in the new abode if I can get my hands on some! Thanks!
YoungHouseLove says
We were happy to find a local distributor here in Richmond (EcoLogic). Perhaps you can google around or check the Mythic website to track some down near you?
xo,
s
Jessie (Bites and Pieces) says
Once again, you guys never fail to impress me! Amazing what a little paint and creativity can do. I love how you made it flush to the wall too!
Elle Sees says
I love, love, love how you were honest with this project. Sometimes things just don’t turn out! But I was pleased with such a fabulous solution. So clever. You’d think you did this for a living or something? ;)
I made a jewelry rack and was quite proud of it. It’s horrible-looking but it’s hidden behind a door.
srabee says
yet another over-accessorized bookcase… yawn
Diane Taylor says
What a great idea, you guys! As usual, I am impressed with how you took an orindary bookcase and made it your own. I love those Billy bookcases and have several! I just bought 3 for my son to organize his new apartment.
Great job!
CarMaj says
OOOO love the bookcase! I sent the link to my hubby – we’re planning on re-doing the office in the next few weeks and the paint-on-the-wall idea is great!
JenWoodhouse.com says
Looks great! I especially love the way you guys customized the bookshelf. Kudos!
Jill Stigs says
Looks fantastic! You guys are around 10 years too late on this post to help me. I had a huge bookcase for my daughter’s room and it screamed cheap to me. Of course if I would have known to caulk all the holes, take off the back and trim to account for the base molding I would have been pleased as punch. Love that you used that gorgeous color for the back! GREAT JOB YOUNGSTERS!!
Taylor says
My husband and I bought the Expedit bookcase from Ikea last week. We decided to turn it on its side and use it as a tv stand. I’m loving all of the different compartments that hold anything from our gaming systems, to baskets and picture frames. Your bookcase looks wonderful!
Donna says
Okay, how do you guys get away with it? We have way too many office supplies to store in a few baskets. Just one example–we buy printer paper in boxes of a dozen. Do you have secondary storage areas?
YoungHouseLove says
Wow! We can definitely see how it would be hard to store a dozen boxes of printer paper! We buy things like that one at a time since they last us quite a while. And as for other storage solutions, this old post might give you some ideas: https://www.younghouselove.com/2009/04/how-ya-bin/ Hope it helps!
xo,
s
Carole says
cute idea to have treats for Burger in the bookshelf! Is he ever tempted by the breakable things on lower shelves?
Like someone else mentioned, I know my kiddos used to take great joy emptying the lower shelves (filled with their books). Now that we have a puppy (who hasn’t quite graduated to roaming the office yet!), I wonder if I need to rethink bottom shelf storage, too?
YoungHouseLove says
Hey Carole,
Burger is a pretty amazing pup! He doesn’t even chew on shoes or socks that we leave on the floor, so he definitely doesn’t touch things on shelves, even if they’re down at his level. Hope it helps!
xo,
s
Heather says
Very custom looking. You did a wonderful job. I would have never thought to fill in the holes with caulking!